


activeMQ安装
-
使用VMware的Linux系统安装activeMQ步骤
1.1 官网下载Linux安装包
http://activemq.apache.org/components/classic/download/
1.2 创建activeMQ目录mkdir myactiveMQ,上传安装文件到文件夹下,如下所示:
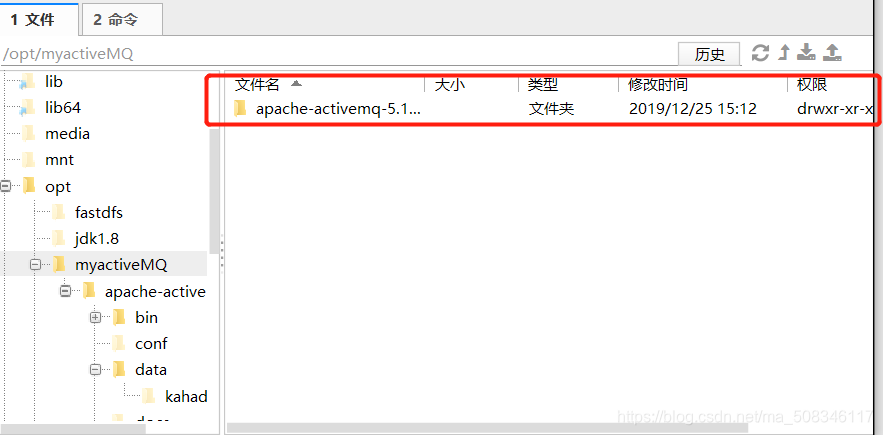
解压命令为tar -zxvf apache-activemq-5.15.11-bin.tar.gz
1.3 备注:运行ActiveMQ需要按钮java运行环境,本次安装的Java版本为:openjdk version "1.8.0_181",安装JDK步骤请自行百度 -
运行ActiveMQ
2.1cd /opt/myactiveMQ/apache-activemq-5.15.11/bin/
2.2./activemq start启动ActiveMQ
2.3 查看ActiveMQ进程
ps -ef|grep activemq |grep -v grep
显示如下:
root 21222 1 0 10:20 pts/1 00:00:17 /opt/jdk1.8/jdk1.8.0_201/bin/java -Xms64M -Xmx1G -Djava.util.logging.config.file=logging.properties -Djava.security.auth.login.config=/opt/myactiveMQ/apache-activemq-5.15.11//conf/login.config -Dcom.sun.management.jmxremote -Djava.awt.headless=true -Djava.io.tmpdir=/opt/myactiveMQ/apache-activemq-5.15.11//tmp -Dactivemq.classpath=/opt/myactiveMQ/apache-activemq-5.15.11//conf:/opt/myactiveMQ/apache-activemq-5.15.11//../lib/: -Dactivemq.home=/opt/myactiveMQ/apache-activemq-5.15.11/ -Dactivemq.base=/opt/myactiveMQ/apache-activemq-5.15.11/ -Dactivemq.conf=/opt/myactiveMQ/apache-activemq-5.15.11//conf -Dactivemq.data=/opt/myactiveMQ/apache-activemq-5.15.11//data -jar /opt/myactiveMQ/apache-activemq-5.15.11//bin/activemq.jar start
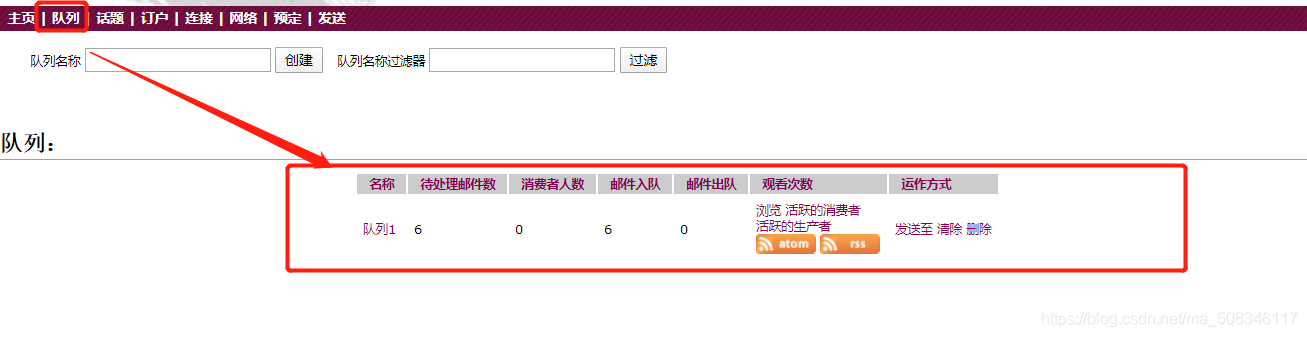
访问ActiveMQ:
备注:ActiveMQ默认运行端口为 61616,访问端口为8161,如果你想要windows浏览器访问需要开放Linux防火墙及端口,或者直接关闭防火墙【不推荐使用】
http://192.168.25.110:8161/ Ip+8161访问,之后显示登录密码
admin admin 【账号:密码】
显示如下:
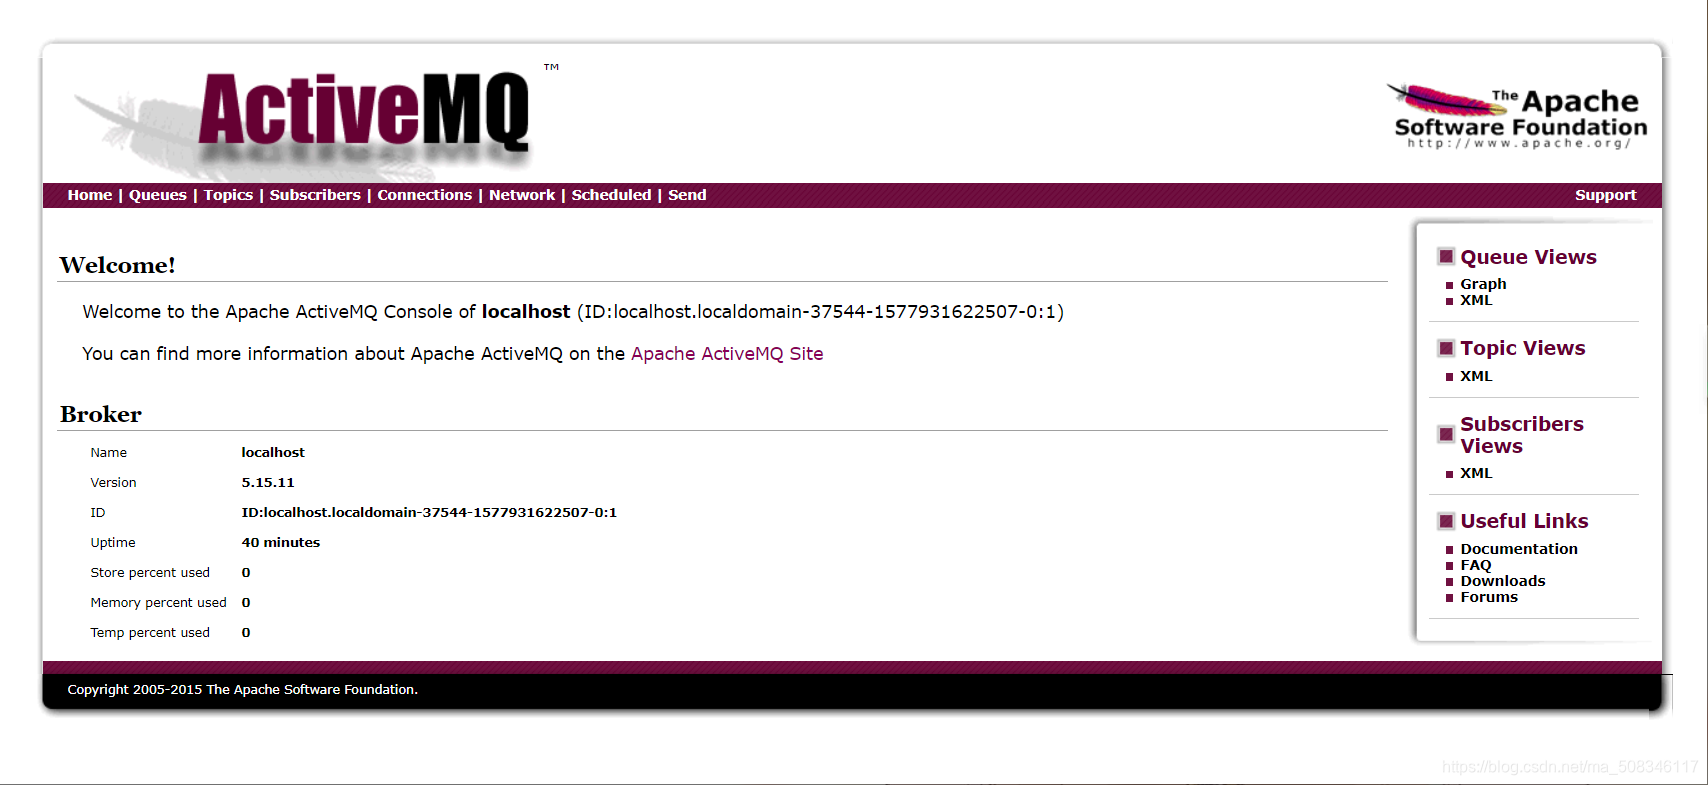
至此,AcitveMQ安装成功。
SpringBoot使用ActiveMQ API :【Queue】
- pom引入依赖
<!--        activemq-->
        <dependency>
            <groupId>org.springframework.boot</groupId>
            <artifactId>spring-boot-starter-activemq</artifactId>
            <version>2.0.4.RELEASE</version>
        </dependency>
1.2 测试发送消息
1.2.1 配置环境
//    连接地址  此ip为你安装的Linux系统的ip,请自行修改
    private final static String ACTIVE_URL = "tcp://192.168.25.110:61616";
//   目的地名称 ,你可以随意修改 Queue
    private final static String QUEUE_NAME = "queue1";
        //   目的地名称  主题
    private final static String TOPIC_NAME = "topic";
    //创建工厂
    ActiveMQConnectionFactory activeMQConnectionFactory = new ActiveMQConnectionFactory(ACTIVE_URL);
发送
 /**
     * 初始化发送
     * @throws JMSException
     */
    @Test
    public void test01() throws JMSException {
        //        连接
        Connection connection = activeMQConnectionFactory.createConnection();
        connection.start();
//        创建会话、【事务,签收】
        Session session = connection.createSession(false, Session.AUTO_ACKNOWLEDGE);
//      创建目的地
        Queue queue = session.createQueue(QUEUE_NAME);
        MessageProducer producer = session.createProducer(queue);
//        发送消息
        for (int i=1;i<=3;i++) {
            TextMessage textMessage = session.createTextMessage();
            textMessage.setText("这是一个测试:"+i);
            producer.send(textMessage);
        }
//        关闭资源
        producer.close();
        session.close();
        connection.close();
    }
方式一:接收

//   接收
    @Test
    public void accept() throws JMSException {
        Connection connection = activeMQConnectionFactory.createConnection();
        connection.start();
        Session session = connection.createSession(false, Session.AUTO_ACKNOWLEDGE);
//      创建目的地
        Queue queue = session.createQueue(QUEUE_NAME);
        MessageConsumer consumer = session.createConsumer(queue);
        while (true){
            TextMessage textMessage =(TextMessage) consumer.receive(14000L);//接收目的地值
//            String text = textMessage.getText();
            if (textMessage !=null){
                System.out.println("接收到消息:"+textMessage.getText());
            }else{
                break;
            }
        }
        consumer.close();
    }
方式二:接收

 //   监听接收
    @Test
    public void acceptListener() throws JMSException, IOException {
        Connection connection = activeMQConnectionFactory.createConnection();
        connection.start();
        Session session = connection.createSession(false, Session.AUTO_ACKNOWLEDGE);
//      创建目的地
        Queue queue = session.createQueue(QUEUE_NAME);
        MessageConsumer consumer = session.createConsumer(queue);
        consumer.setMessageListener((t)->{
            if(null !=t && t instanceof TextMessage){
                TextMessage t1 = (TextMessage) t;
                try {
                    System.out.println("监听模式:"+t1.getText());
                } catch (JMSException e) {
                    e.printStackTrace();
                }
            }
        });
        System.in.read();//等待
        consumer.close();
        connection.close();
    }
SpringBoot使用ActiveMQ API :【Topic】
- 主题:一对多的关系,订阅一个主题的消费只能消费自他订阅之后发布的消息。Topic是无状态且不保存历史消息的一种模式.
- 案例示例:
2.1 topic发送消息代码示例:
  /**
     * topic发送消息
     * @throws JMSException
     */
    @Test
    public void topicSend() throws JMSException {
        Connection connection = activeMQConnectionFactory.createConnection();
        connection.start();
        Session session = connection.createSession(false,Session.AUTO_ACKNOWLEDGE);
        Topic topic = session.createTopic(TOPIC_NAME);
        MessageProducer producer = session.createProducer(topic);
        //        发送消息
        for (int i=1;i<=6;i++) {
            TextMessage textMessage = session.createTextMessage();
            textMessage.setText("这是一个Topic测试:"+i);
            producer.send(textMessage);
        }
        producer.close();
        session.close();
        connection.close();
    }
2.2 Topic接收消息
	@Test
    public void  topicAccept() throws JMSException, IOException {
        Connection connection = activeMQConnectionFactory.createConnection();
        connection.start();
        Session session = connection.createSession(false,Session.AUTO_ACKNOWLEDGE);
        Topic topic = session.createTopic(TOPIC_NAME);
        MessageConsumer consumer = session.createConsumer(topic);
        consumer.setMessageListener((t)->{
            if(null !=t && t instanceof TextMessage){
                TextMessage t1 = (TextMessage) t;
                try {
                    System.out.println("监听模式Topic:"+t1.getText());
                } catch (JMSException e) {
                    e.printStackTrace();
                }
            }
        });
        System.in.read();//等待
        consumer.close();
        connection.close();
    }
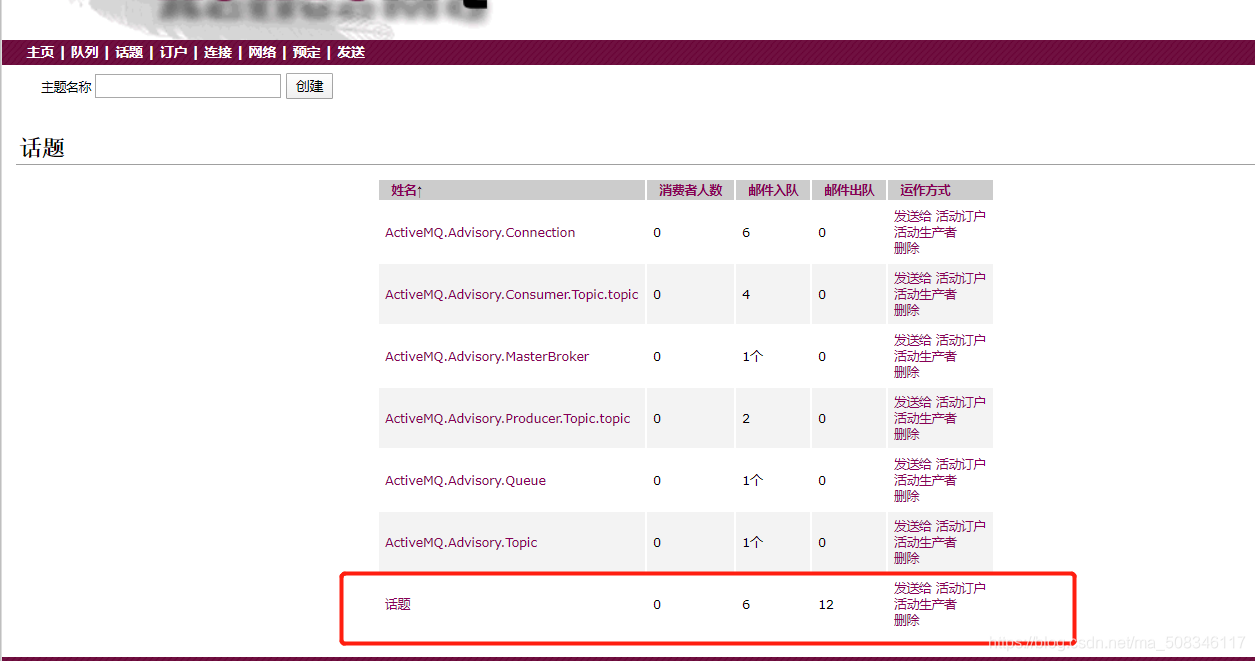
由于Topic的特性,先启动topic消费者,再启动topic生产者。可以看到,如下:
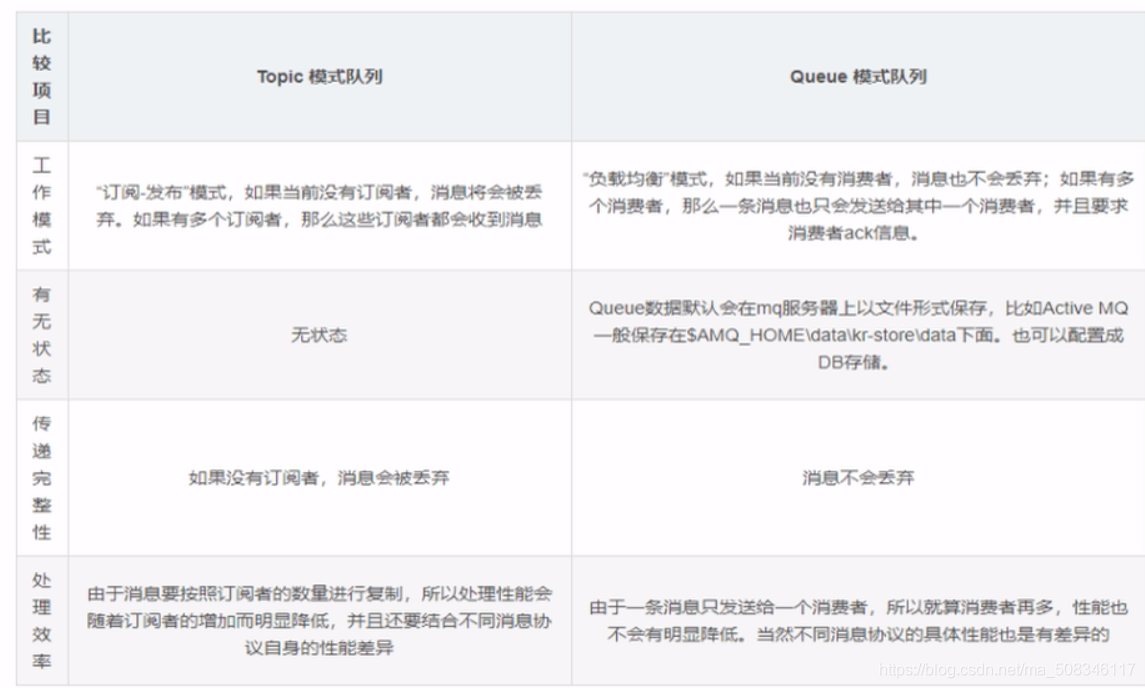
2.3 两者比较
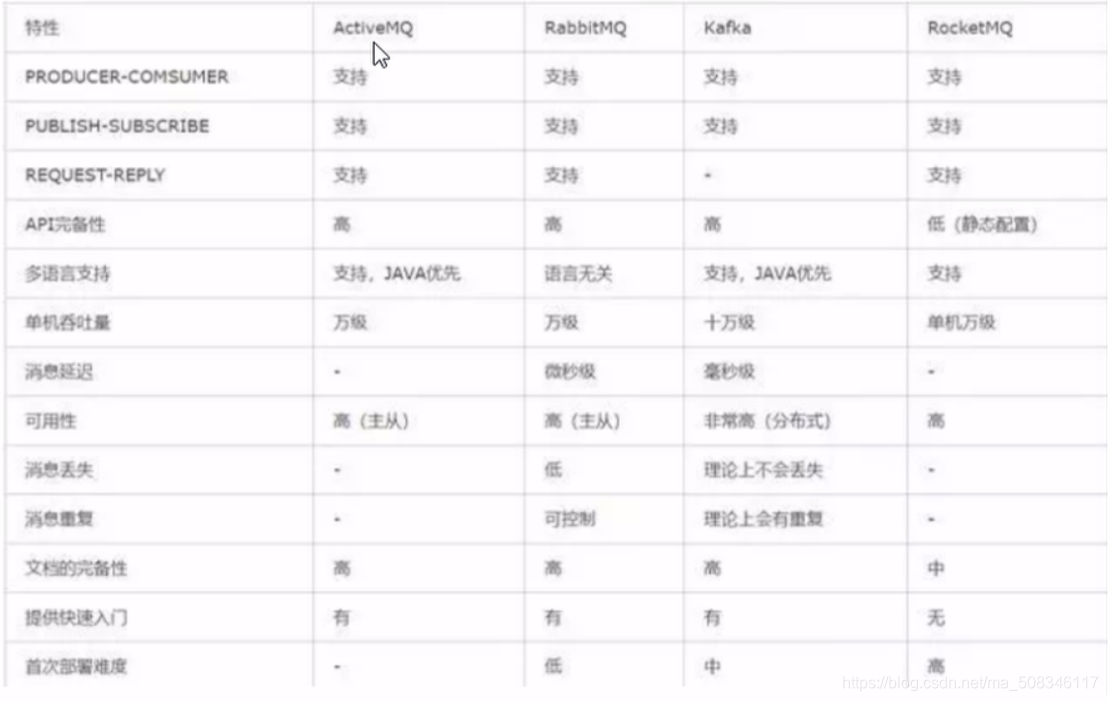
2.4 消息中间件比较
JMS的四大组成模块
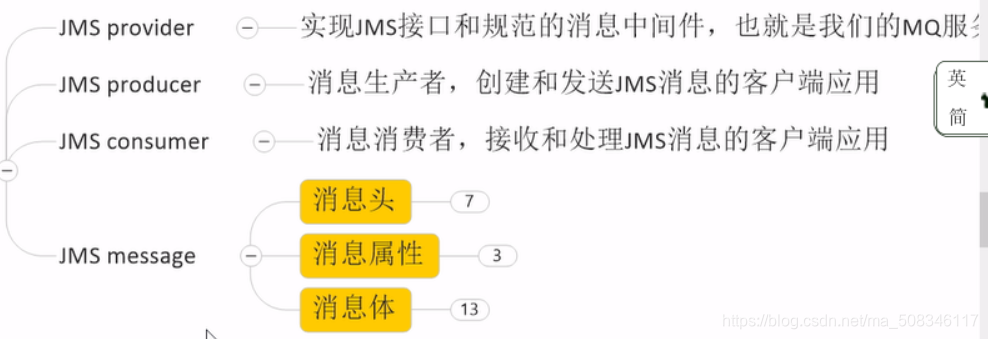
- 消息头:
1.1 JMSDestination 消息投递方式 【Queue or Topic】
1.2 JMSDeliveryMode 持久化消息方式
1.3 JMSExpiration 过期时间 默认是永不过期
1.4 JMSPriority 优先级 0-9
1.5 JMSMessageID 唯一标识id - 消息体
2.1 五种消息体格式: 前两种包含开发的百分之九十

2.2 代码示例:
省略部分重复代码
发送
//        发送消息
        for (int i=1;i<=3;i++) {
            TextMessage textMessage = session.createTextMessage();
            textMessage.setText("这是一个测试:"+i);
            producer.send(textMessage);
            MapMessage mapMessage = session.createMapMessage();
            mapMessage.setString("k1","v1");
            producer.send(mapMessage);
        }
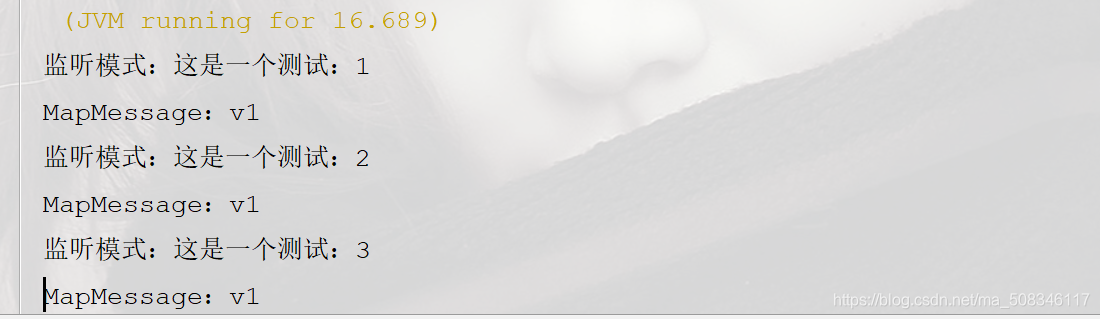
如下所示:
接收
 consumer.setMessageListener((t)->{
            if(null !=t && t instanceof TextMessage){
                TextMessage t1 = (TextMessage) t;
                try {
                    System.out.println("监听模式:"+t1.getText());
                } catch (JMSException e) {
                    e.printStackTrace();
                }
            }else if(null !=t && t instanceof MapMessage){
                MapMessage t1 = (MapMessage) t;
                try {
                    System.out.println("监听模式:"+t1.getString("k1"));
                } catch (JMSException e) {
                    e.printStackTrace();
                }
            }
        });
控制台输入如下:
3. 消息属性
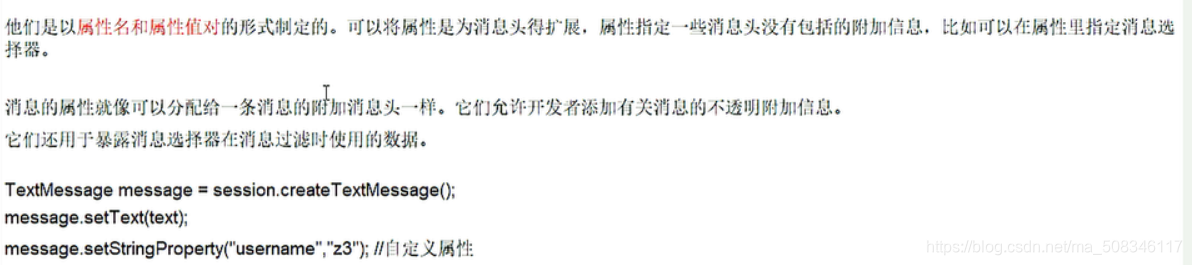

消息可靠性
- 消息持久化

1.2 非持久化
Queue 模式
        MessageProducer producer = session.createProducer(queue);
        producer.setDeliveryMode(DeliveryMode.NON_PERSISTENT);

Topic持久化就比较有些不同了:
消息生产:
 /**
     * topic 持久化发送
     * @throws JMSException
     * @throws IOException
     */
    @Test
    public void topicSendDurableSubscriber() throws JMSException, IOException {
        Connection connection = activeMQConnectionFactory.createConnection();
        Session session = connection.createSession(false, Session.AUTO_ACKNOWLEDGE);
        Topic topic = session.createTopic(TOPIC_NAME);
        MessageProducer producer = session.createProducer(topic);
        producer.setDeliveryMode(DeliveryMode.PERSISTENT);
        connection.start();
        //        发送消息
        for (int i = 1; i <= 6; i++) {
            TextMessage textMessage = session.createTextMessage();
            textMessage.setText("Topic持久化发送:" + i);
            textMessage.setJMSMessageID(UUID.randomUUID().toString());
            producer.send(textMessage);
        }
    }
消息接收:
    /**
     * topic 持久化接收
     *
     * @throws JMSException
     * @throws IOException
     */
    @Test
    public void topicDurableSubscriber() throws JMSException, IOException {
        Connection connection = activeMQConnectionFactory.createConnection();
        connection.setClientID("z4");
        Session session = connection.createSession(false, Session.AUTO_ACKNOWLEDGE);
        Topic topic = session.createTopic(TOPIC_NAME);
        TopicSubscriber topicSubscriber = session.createDurableSubscriber(topic, "备注");
        connection.start();
        topicSubscriber.setMessageListener((t) -> {
            if (null != t && t instanceof TextMessage) {
                TextMessage t1 = (TextMessage) t;
                try {
                    System.out.println("监听模式Topic持久化:" + t1.getText());
                } catch (JMSException e) {
                    e.printStackTrace();
                }
            }
        });
        System.in.read();//等待
    }
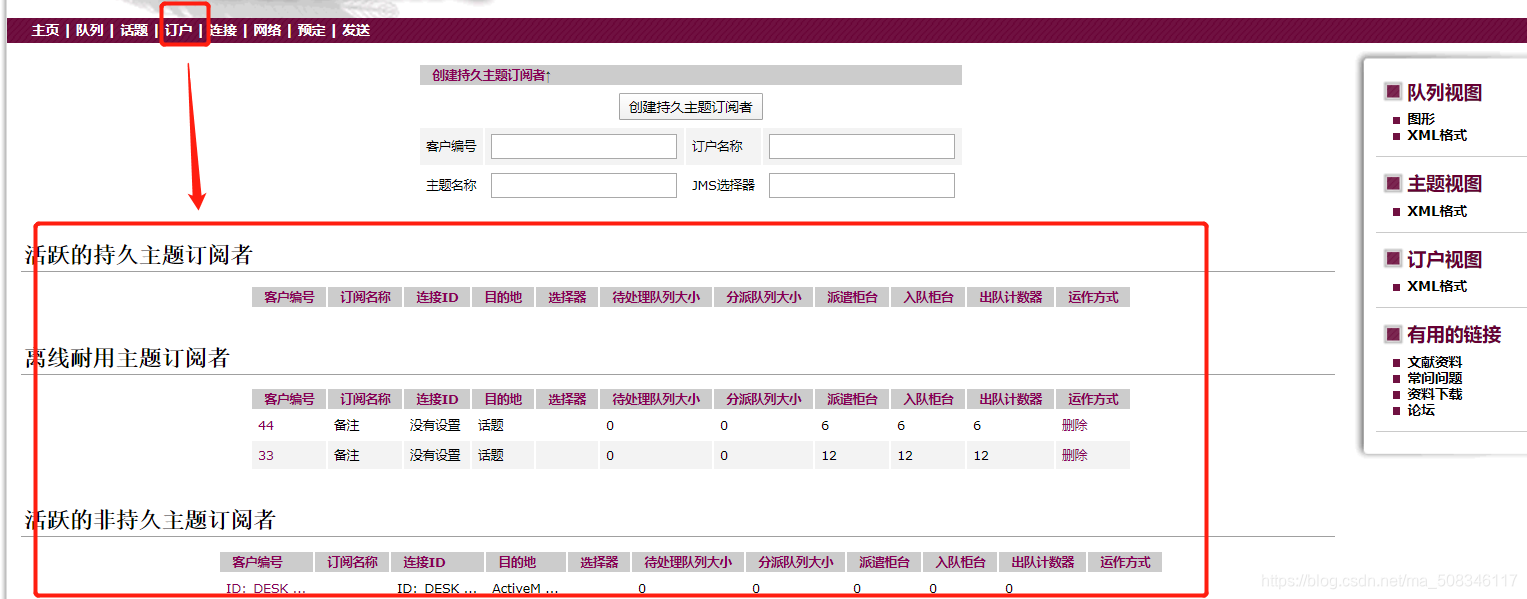
然后我们查看主页变化:

此时查看 Subscribers :
事务
偏向于生产者

创建Session 时的构造参数:【解释】

无论是消息发送或者接收,设置事务为true 时,只有:
使用Session.commit(); 提交才结束
使用Session.rollback(); 回滚
签收
偏向于消費者

1.1 connection.createSession(false, Session.AUTO_ACKNOWLEDGE); //自动签收
备注 :自动出队
1.2 connection.createSession(false, Session.CLIENT_ACKNOWLEDGE);//手动签收
备注:显式 TextMessage.acknowledge();//签收实现消息出队列
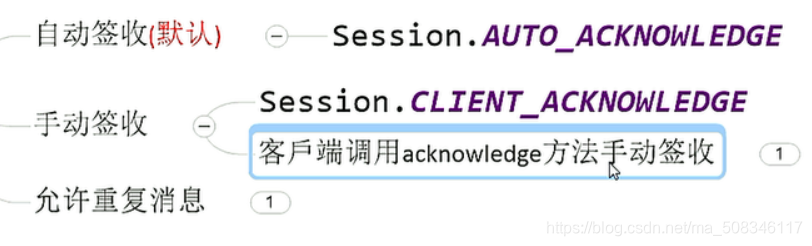
1.3 DUPS_OK_ACKNOWLEDGE 允许部分重复签收
事务情况下
- 非自动提交的情况下需要自动签收
        Connection connection = activeMQConnectionFactory.createConnection();
        connection.setClientID("z4");
        Session session = connection.createSession(true, Session.CLIENT_ACKNOWLEDGE);
        Topic topic = session.createTopic(TOPIC_NAME);
        TopicSubscriber topicSubscriber = session.createDurableSubscriber(topic, "备注");
        connection.start();
        topicSubscriber.setMessageListener((t) -> {
            if (null != t && t instanceof TextMessage) {
                TextMessage t1 = (TextMessage) t;
                try {
                    System.out.println("监听模式Topic持久化:" + t1.getText());
//                    t1.acknowledge();
                    session.commit();
                } catch (JMSException e) {
                    e.printStackTrace();
                }
            }
        });
        System.in.read();//等待
结果为:不需要手动签收t1.acknowledge();依然能够签收
1.2 无提交session.commit();但手动签收t1.acknowledge();,会产生重复消费、
通常情况下,事务大于签收

ActiveMQ的Broker
- 是什么?

- 复制安装路径下/conf/activemq.xml 文件 为 activemq01.xml
cp activemq.xml activemq01.xml
- 启动命令

如下:【使用不同的配置文件启动不同的实例】
[root@localhost conf]# cd ../bin/
[root@localhost bin]# ./activemq start xbean:file:/opt/myactiveMQ/apache-activemq-5.15.11/conf/activemq01.xml
- 嵌入式Broker


 8314
8314

 被折叠的 条评论
为什么被折叠?
被折叠的 条评论
为什么被折叠?
 到【灌水乐园】发言


