


自定义指令+插槽+路由入门
一、自定义指令
1.使用步骤
含义:自己定义的指令, 可以封装一些 dom 操作, 扩展额外功能
获取焦点案例:dom元素.focus()
//全局注册指令
Vue.directive("focus", {
  //inserted会在指令所在的元素被插入到页面时被触发
  inserted(el) {
    //el就是指令所绑定的元素
    el.focus();
  },
});
export default {
  //局部注册指令
  directives: {
    focus: {
      inserted(el) {
        el.focus();
      },
    },
  },
};
使用时:
<input v-指令名 type="text">
2.自定义指令传参
需求:实现一个 color 指令 - 传入不同的颜色, 给标签设置文字颜色
<template>
  <div>
    <!-- 在绑定指令时,可以通过“等号”的形式为指令绑定具体的参数值 -->
    <h1 v-color="color1">指令的值1测试</h1>
    <h1 v-color="color2">指令的值2测试</h1>
  </div>
</template>

<script>
export default {
  data() {
    return {
      color1: "pink",
      color2: "skyblue",
    };
  },
  directives: {
    color: {
      // 通过 binding.value 可以拿到指令值,指令值修改会触发update函数
      inserted(el, binding) {
        el.style.color = binding.value;
      },
      updated(el, binding) {
        el.style.color = binding.value;
      },
    },
  },
};
</script>
3.v-loading 指令封装
场景:实际开发过程中,发送请求需要时间,在请求的数据未回来时,页面会处于空白状态 => 用户体验不好
需求:封装一个 v-loading 指令,实现加载中的效果
分析:
- 本质 loading 效果就是一个蒙层,盖在了盒子上
- 数据请求中,开启loading状态,添加蒙层
- 数据请求完毕,关闭loading状态,移除蒙层
实现:
- 准备一个 loading 类,通过伪元素定位,设置宽高,实现蒙层
/* 伪类 - 蒙层效果 */
.loading:before {
  content: "";
  position: absolute;
  left: 0;
  top: 0;
  width: 100%;
  height: 100%;
  background: #fff url("./loading.gif") no-repeat center;
}
- 开启关闭 loading 状态(添加移除蒙层),本质只需要添加移除类即可
 directives: {
    loading: {
      inserted(el, binding) {
        binding.value
          ? el.classList.add("loading")
          : el.classList.remove("loading");
      },
      update(el, binding) {
        binding.value
          ? el.classList.add("loading")
          : el.classList.remove("loading");
      },
    },
  },
- 结合自定义指令的语法进行封装复用
    <div class="box" v-loading="isloading">
    ......
	export default {
	  data() {
	    return {
	      list: [],
	      isloading: true,
	    };
	  },
	  async created() {
	    const res = await axios.get("http://hmajax.itheima.net/api/news");

	    setTimeout(() => {
	      this.list = res.data.data;
	      this.isloading = false;
	    }, 2000);
	  },
二、插槽
1. 默认插槽
作用:让组件内部的一些 结构 支持 自定义
需求: 将需要多次显示的对话框, 封装成一个组件
问题:组件的内容部分,不希望写死,希望能使用的时候自定义。怎么办?
插槽基本语法:
- 组件内需要定制的结构部分,改用
<slot></slot>占位 - 使用组件时, 在
<MyDialog></MyDialog>标签内部, 写入你想要替换的内容
<template>
<div class="dialog">
<div class="dialog-header">
<h3>友情提示</h3>
<span class="close">✖ </span>
</div>
<div class="dialog-content">
<slot></slot>
</div>
<div class="dialog-footer">
<button>取消</button>
<button>确认</button>
</div>
</div>
</template>
<MyDialog>
这里可以输入你想自定义的的内容
</MyDialog>
2.后备内容(默认值)
通过插槽完成了内容的定制,传什么显示什么, 但是如果不传,则是空白
能否给插槽设置 默认显示内容 呢?
语法: 在 <slot> 标签内,放置内容, 作为默认显示内容
<template>
<div class="dialog">
<div class="dialog-header">
<h3>友情提示</h3>
<span class="close">✖ </span>
</div>
<div class="dialog-content">
<slot>我是后备内容</slot>
</div>
<div class="dialog-footer">
<button>取消</button>
<button>确认</button>
</div>
</div>
</template>
效果:
外部使用组件时,不传东西,则slot会显示后备内容
<MyDialog></MyDialog>
外部使用组件时,传东西了,则slot整体会被换掉
<MyDialog>我传了新东西哦!</MyDialog>
3.具名插槽
需求:一个组件内有多处结构,需要外部传入标签进行定制
默认插槽:只能定制一个位置
具名插槽语法:
- 多个slot使用name属性区分名字
<div class="dialog-header">
<slot name="head"></slot>
</div>
<div class="dialog-content">
<slot name="content"></slot>
</div>
<div class="dialog-footer">
<slot name="footer"></slot>
</div>
- template配合v-slot:名字来分发对应标签
<MyDialog>
<template v-slot:head>
大标题
</template>
<template v-slot:content>
内容文本
</template>
<template v-slot:footer>
<button>按钮</button>
</template>
</MyDialog>
具名插槽简化语法:v-slot:插槽名 可以简化成 #插槽名
4.作用域插槽
作用域插槽: 定义 slot 插槽的同时, 是可以传值的。它允许父组件向子组件传递数据,并在子组件内部进行处理和渲染
场景:封装表格组件
实现步骤:
- 父传子,动态渲染表格内容:v-for
- 利用默认插槽,定制操作列
- 删除或查看都需要用到 当前项的 id,属于 组件内部的数据
通过 作用域插槽 传值绑定,进而使用
基本使用步骤:
- 给 slot 标签, 以 添加属性的方式传值
- 所有添加的属性, 都会被收集到一个对象中
{ id: 3, msg: ‘测试文本’ } - 在template中, 通过
#插槽名= "obj"接收,默认插槽名为 default
<MyTable :list="list">
<template #default="obj">
<button @click="del(obj.id)">删除</button>
</template>
</MyTable>
表格重要代码示例:
<slot :row="item" msg="测试文本"></slot>
<template>
  <div>
    <MyTable :data="list">
      <!-- 3. 通过template #插槽名="变量名" 接收 -->
      <template #default="obj">
        <button @click="del(obj.row.id)">
          删除
        </button>
      </template>
    </MyTable>

    <MyTable :data="list2">
      <template #default="{ row }">
        <button @click="show(row)">查看</button>
      </template>
    </MyTable>
  </div>
</template>
三、路由入门
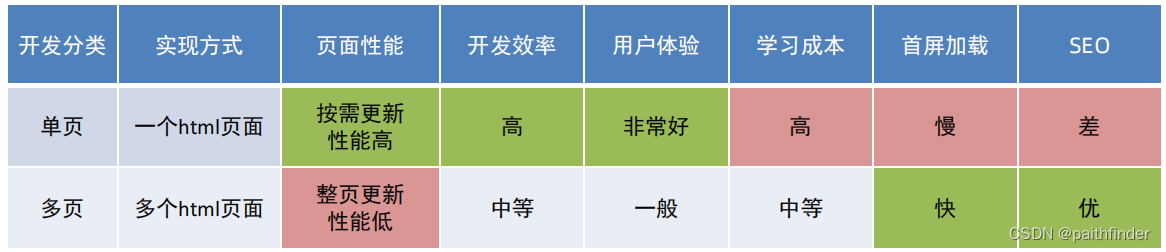
1.单页应用程序: SPA - Single Page Application
单页面应用(SPA): 所有功能在 一个html页面 上实现
具体示例: 网易云音乐 https://music.163.com/
单页面应用
系统类网站 / 内部网站 / 文档类网站 /移动端站点
多页面应用
公司官网 / 电商类网站
单页面应用程序,之所以开发效率高,性能高,用户体验好
最大的原因就是:页面按需更新
要按需更新,首先就需要明确:访问路径 和 组件的对应关系!
访问路径 和 组件的对应关系如何确定呢? 路由
2.路由的介绍
生活中的路由:设备和ip的映射关系
Vue中路由:路径 和 组件 的 映射 关系
3.VueRouter 的 介绍
目标:认识插件 VueRouter,掌握 VueRouter 的基本使用步骤
作用:修改地址栏路径时,切换显示匹配的组件
说明:Vue 官方的一个路由插件,是一个第三方包
官网:https://v3.router.vuejs.org/zh/
4.VueRouter 的 使用 (5 + 2)
5个基础步骤 (固定)
① 下载: 下载 VueRouter 模块到当前工程,版本3.6.5
yarn add vue-router@3.6.5
② 引入
import VueRouter from 'vue-router'
③ 安装注册
Vue.use(VueRouter)
④ 创建路由对象
const router = new VueRouter()
⑤ 注入,将路由对象注入到new Vue实例中,建立关联
new Vue({
render: h => h(App),
router
}).$mount('#app')
2 个核心步骤
① 创建需要的组件 (views目录),配置路由规则:Find.vue My.vue Friend.vue
import Find from './views/Find.vue'
import My from './views/My.vue'
import Friend from './views/Friend.vue'
const router = new VueRouter({
routes: [
{ path: '/find', component: Find },
{ path: '/my', component: My },
{ path: '/friend', component: Friend },
]
})
② 配置导航,配置路由出口(路径匹配的组件显示的位
置)
<div class="footer_wrap">
<a href="#/find">发现音乐</a>
<a href="#/my">我的音乐</a>
<a href="#/friend">朋友</a>
</div>
<div class="top">
//路由出口,匹配的组件所展示的位置(改变router-view的位置)
<router-view></router-view>
</div>
5.组件存放目录问题。
路由相关的组件,为什么放在 views 目录呢?组件分类
组件分类: .vue文件分2类; 页面组件 & 复用组件
注意:都是 .vue文件 (本质无区别)
分类开来 更易维护
src/views文件夹:页面组件 - 页面展示 - 配合路由用
src/components文件夹:复用组件 - 展示数据 - 常用于复用


 被折叠的 条评论
为什么被折叠?
被折叠的 条评论
为什么被折叠?
 到【灌水乐园】发言


