


个人名片:
🤡作者简介:一名正在努力地大二在校生
🐝座右铭:不浪费时间,不虚度光阴,才能让自己的生命更加充实且有意义。
🎅社区交流:如果有错误的地方,欢迎各位大佬的指导和指正
🐼学习目标:解决程序每一次出现的BUG
控制反转的概念
控制反转(Inversion of Control,IoC)是面向对象编程中的一个设计原则,用于降低程序代码之间的耦合度。控制反转是一种将控制权交给框架或者外部容器的设计思想,与传统编程模式相对立。在控制反转模式中,应用程序的代码不是直接控制组件的创建和管理,而是由外部容器负责创建组件并将其注入到应用程序中。这意味着,应用程序的类不再负责自己的实例化和依赖管理,而是将这些控制权交给了外部系统。
控制反转的实现常常依赖于依赖注入(Dependency Injection,DI)机制。依赖注入是控制反转的一个具体实现方式,它通过配置文件、注解或者容器管理来描述组件之间的依赖关系。这使得应用程序的组件能够解耦,并且更加灵活、易于维护。
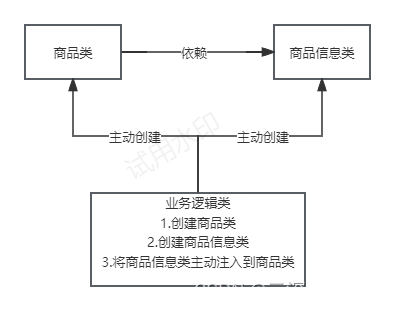
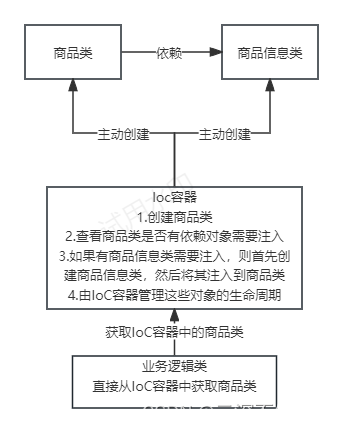
控制反转与传统的编程模式相反,传统的程序中,应用程序控制着组件的创建和管理,而在控制反转中,这一控制权被转移到了外部容器或者框架。控制反转的主要优点包括降低了组件之间的耦合度、提高了应用程序的可维护性和灵活性,并且使得单元测试和集成测试更加容易进行。那么,传统面向编程设计原则与IoC设计原则的区别由下面两张图揭晓:
依赖注入的概念
依赖注入(DI)是指IoC容器在运行期间动态地将某种依赖资源注入到对象中,用于降低模块之间的耦合度,提高代码的可测试性和可维护性。在依赖注入中,组件的依赖关系由外部容器负责注入,而不是由组件类本身负责创建或管理依赖对象。这种模式使得组件更加独立,易于重用和测试。
依赖注入的类型
依赖注入指的是使用Spring框架创建对象时,动态地将其所依赖的对象注入到Bean组件中。依赖注入通常有两种方式,一种是构造方法注入,另一种是属性setter方法注入。这两种实现方法的具体介绍如下:
1.构造方法注入
构造方法注入是指Spring容器调用构造方法注入被依赖的实例,构造方法可以是有参的或者是无参的。Spring在读取信息后,会通过反射方式调用实例的构造方法,如果是有参构造方法,可以先在构造方法中传入所需的参数值,然后创建类对象。
下面通过案例呈现构造方法的实现,具体步骤如下:
- 编写用户类
在项目Spring_Demo的com.example包下新建User1类,在User1类中定义id、name和password这三个属性,具体代码如下:
package com.example;

public class User1 {
    private int id;
    private String name;
    private String password;
    // 有参构造方法
    public User1(int id,String name,String password){
        this.id=id;
        this.name=name;
        this.password=password;
    }
    // 使用toString()方法获取通过构造方法注入的相对应值
    @Override
    public String toString() {
        return "User1{" +
                "id=" + id +
                ", name='" + name + '\'' +
                ", password='" + password + '\'' +
                '}';
    }
}
- 配置Bean信息
在Spring_Demo项目的src/main/resources目录下创建applicationContext-User.xml文件,在该文件中添加User1类的配置信息,具体代码如下:
<?xml version="1.0" encoding="UTF-8"?>
<beans xmlns="http://www.springframework.org/schema/beans"
       xmlns:xsi="http://www.w3.org/2001/XMLSchema-instance"
       xsi:schemaLocation="http://www.springframework.org/schema/beans http://www.springframework.org/schema/beans/spring-beans.xsd">
    <bean id="user1" class="com.example.User1">
        <constructor-arg name="id" value="1"></constructor-arg>
        <constructor-arg name="name" value="张三"></constructor-arg>
        <constructor-arg name="password" value="123456"></constructor-arg>
    </bean>
</beans>
在上面的代码中,<constructor-arg>元素用于给User1类构造方法的参数注入值,Spring在通过User1类的构造方法获取到 <constructor-arg>所注入的值,最终这些值被赋值给Spring创建的User1对象。
- 编写测试类
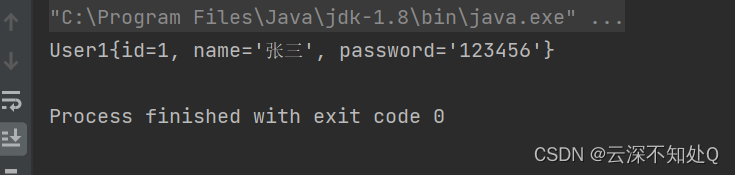
在项目Spring_Demo的src/test/java下创建测试类TestUser1,具体代码及运行结果如下:
import com.example.User1;
import org.springframework.context.ApplicationContext;
import org.springframework.context.support.ClassPathXmlApplicationContext;

public class TestUser1 {
    public static void main(String[] args) {
        // 加载applicationContext.xml配置
        ApplicationContext applicationContext = new ClassPathXmlApplicationContext("applicationContext-User.xml");
        // 获取配置中的User1实例
        User1 user1 = applicationContext.getBean("user1",User1.class);
        System.out.println(user1);
    }
}
2.属性setter方法注入
属性setter方法注入是Spring最主流的注入方法,这种方法简单、直观,它是被注入的类中声明一个setter方法,通过setter方法的参数注入对应的值。
下面通过案例呈现属性setter方法注入的实现,具体步骤如下:
- 编写用户对象类
在项目Spring_Demo的com.example包下新建User2类,在User1类中定义id、name和password这三个属性,具体代码如下:
package com.example;

public class User2 {
    private int id;
    private String name;
    private String password;

    public void setId(int id) {
        this.id = id;
    }

    public void setName(String name) {
        this.name = name;
    }

    public void setPassword(String password) {
        this.password = password;
    }

    @Override
    public String toString() {
        return "User2{" +
                "id=" + id +
                ", name='" + name + '\'' +
                ", password='" + password + '\'' +
                '}';
    }
}
- 获取Bean的配置信息
在SpringDemo项目的src/main/resources目录下创建applicationContext-User2.xml文件,在该文件中添加User1类的配置信息,具体代码如下:
<?xml version="1.0" encoding="UTF-8"?>
<beans xmlns="http://www.springframework.org/schema/beans"
       xmlns:xsi="http://www.w3.org/2001/XMLSchema-instance"
       xsi:schemaLocation="http://www.springframework.org/schema/beans http://www.springframework.org/schema/beans/spring-beans.xsd">
    <bean id="user2" class="com.example.User2">
        <property name="id" value="2"></property>
        <property name="name" value="李四"></property>
        <property name="password" value="123456"></property>
    </bean>
</beans>
在上面的代码中,<property>元素的name属性指定该类的成员变量名称,vlaue属性提供其对应的注入值。
- 编写测试类
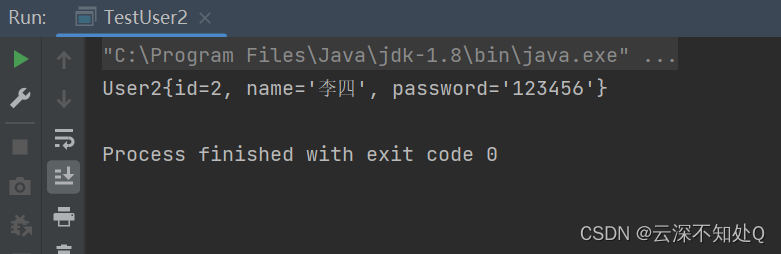
在项目Spring_Demo的src/test/java下创建测试类TestUser2,具体代码及运行结果如下:
import com.example.User2;
import org.springframework.context.ApplicationContext;
import org.springframework.context.support.ClassPathXmlApplicationContext;

public class TestUser2 {
    public static void main(String[] args) {
        // 加载applicationContext.xml配置
        ApplicationContext applicationContext = new ClassPathXmlApplicationContext("applicationContext-User2.xml");
        // 获取配置中的User1实例
        User2 user2 = applicationContext.getBean("user2",User2.class);
        System.out.println(user2);
    }
}


 被折叠的 条评论
为什么被折叠?
被折叠的 条评论
为什么被折叠?
 到【灌水乐园】发言


