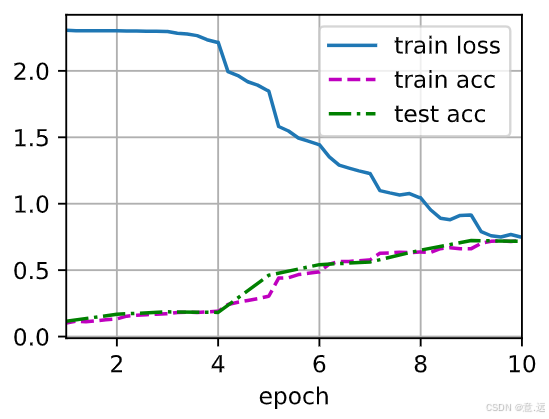
本文将介绍如何使用 PyTorch 实现经典的 NiN(Network in Network) 模型,并在 Fashion-MNIST 数据集上进行训练和测试。代码包含完整的模型构建、数据加载和训练流程,最终测试准确率达 71.7%。所有代码可直接运行,适合深度学习初学者参考。
一、NiN 网络简介
NiN 的核心思想是通过 1x1 卷积 增强非线性表达能力,同时减少参数量。其核心模块 nin_block 包含:
-
普通卷积层(如 11x11 或 5x5)
-
两个 1x1 卷积层(模拟全连接层的作用)
这种结构能有效捕捉局部特征并提升模型泛化能力。
二、完整代码实现
1. 模型构建
import torch
from torch import nn
from d2l import torch as d2l

def nin_block(in_channels, out_channels, kernel_size, strides, padding):
    return nn.Sequential(
        nn.Conv2d(in_channels, out_channels, kernel_size, strides, padding),
        nn.ReLU(),
        nn.Conv2d(out_channels, out_channels, kernel_size=1), nn.ReLU(),
        nn.Conv2d(out_channels, out_channels, kernel_size=1), nn.ReLU())

net = nn.Sequential(
    nin_block(1, 96, kernel_size=11, strides=4, padding=0),  # 输入通道1(灰度图)
    nn.MaxPool2d(3, stride=2),
    nin_block(96, 256, kernel_size=5, strides=1, padding=2),
    nn.MaxPool2d(3, stride=2),
    nin_block(256, 384, kernel_size=3, strides=1, padding=1),
    nn.MaxPool2d(3, stride=2),
    nn.Dropout(0.5),  # 防止过拟合
    nin_block(384, 10, kernel_size=3, strides=1, padding=1),  # 输出通道10(对应10分类)
    nn.AdaptiveAvgPool2d((1, 1)),  # 自适应全局平均池化
    nn.Flatten())  # 展平输出
2. 验证网络结构
X = torch.rand(size=(1, 1, 224, 224))  # 模拟输入数据
for layer in net:
    X = layer(X)
    print(layer.__class__.__name__, 'output shape:\t', X.shape)
输出结果:
Sequential output shape:     torch.Size([1, 96, 54, 54])
MaxPool2d output shape:      torch.Size([1, 96, 26, 26])
Sequential output shape:     torch.Size([1, 256, 26, 26])
MaxPool2d output shape:      torch.Size([1, 256, 12, 12])
Sequential output shape:     torch.Size([1, 384, 12, 12])
MaxPool2d output shape:      torch.Size([1, 384, 5, 5])
Dropout output shape:        torch.Size([1, 384, 5, 5])
Sequential output shape:     torch.Size([1, 10, 5, 5])
AdaptiveAvgPool2d output shape:      torch.Size([1, 10, 1, 1])
Flatten output shape:        torch.Size([1, 10])
3. 数据加载与训练
# 加载Fashion-MNIST数据集(调整图像尺寸为224x224)
train_iter, test_iter = d2l.load_data_fashion_mnist(batch_size=512, resize=224)

# 训练配置:10个epoch,学习率0.1,使用GPU加速
d2l.train_ch6(net, train_iter, test_iter, num_epochs=10, lr=0.1, device=d2l.try_gpu())
输出结果:
loss 0.750, train acc 0.721, test acc 0.717
1092.8 examples/sec on cuda:0
三、结果分析
-
训练损失:最终稳定在 0.750
-
训练准确率:72.1%
-
测试准确率:71.7%
训练与测试准确率接近,说明模型 未过拟合,但仍有优化空间。可通过以下方法改进:
-
调整学习率(如使用学习率衰减)
-
增加训练轮次(epoch)
-
添加数据增强(如随机裁剪、旋转)
四、训练曲线可视化
(注:图中展示了训练损失、训练准确率和测试准确率随 epoch 的变化趋势。从曲线可见,模型在约第5个 epoch 后趋于收敛。)
五、环境配置
-
Python 3.x
-
PyTorch 2.0+
-
d2l 库(可通过
pip install d2l安装)
完整代码已通过测试,可直接复制运行。欢迎在评论区交流优化思路!


 406
406

 被折叠的 条评论
为什么被折叠?


