


Haproxy介绍
文章目录
Haproxy简介
HAProxy是一个使用C语言编写的自由及开放源代码软件,其提供高可用性、负载均衡,以及基于TCP和HTTP的应用程序代理。
Haproxy的应用方面
-
HAProxy特别适用于那些负载特大的web站点,这些站点通常又需要会话保持或七层处理。
-
HAProxy运行在当前的硬件上,完全可以支持数以万计的并发连接。并且它的运行模式使得它可以很简单安全的整合进您当前的架构中, 同时可以保护你的web服务器不被暴露到网络上。
-
HAProxy实现了一种事件驱动, 单一进程模型,此模型支持非常大的并发连接数。多进程或多线程模型受内存限制 、系统调度器限制以及无处不在的锁限制,很少能处理数千并发连接。
-
事件驱动模型因为在有更好的资源和时间管理的用户空间(User-Space) 实现所有这些任务,所以没有这些问题。此模型的弊端是,在多核系统上,这些程序通常扩展性较差。这就是为什么他们必须进行优化以 使每个CPU时间片(Cycle)做更多的工作。
-
包括 GitHub、Bitbucket、Stack Overflow、Reddit、Tumblr、Twitter和 Tuenti在内的知名网站,及亚马逊网络服务系统都使用了HAProxy。
负载均衡
二层负载均衡(mac)
用于虚拟mac地址方式,外部对虚拟mac地址请求,负载均衡接收后分配给后端实际的mac地址响应。
三层负载均衡(ip)
一般用于虚拟ip地址的方式,外部对虚拟ip地址请求,负载均衡接收后分配给后端实际的ip地址响应。
四层负载均衡(tcp)
在三层负载均衡的基础上,用ip+port接收请求,在转发到对应的机器上。
产品大概有:
- F5
- lvs
- nginx
- haproxy
七层负载均衡(http)
根据虚拟的url或者ip,主机名接收请求,在转发到相应的处理服务器上。
产品大概有:haproxy,nginx,apache,mysql proxy…
Haproxy搭建http负载均衡
部署环境说明:
| 主机名称 | IP地址 | 相关环境 |
|---|---|---|
| Masters | 192.168.79.134 | |
| Masters_A | 192.168.79.135 | Haproxy |
| Masters_B | 192.168.79.136 | Httpd |
| Masters_C | 192.168.79.137 | Httpd |
具体步骤:
Masters(测试机)
1-在Masters_A-C主机配置完成后进行访问测试
[root@Masters ~]# curl http:/192.168.79.135
Masters_B
[root@Masters ~]# curl http:/192.168.79.136
Masters_B
[root@Masters ~]# curl http:/192.168.79.135
Masters_C
[root@Masters ~]# curl http:/192.168.79.136
Masters_B
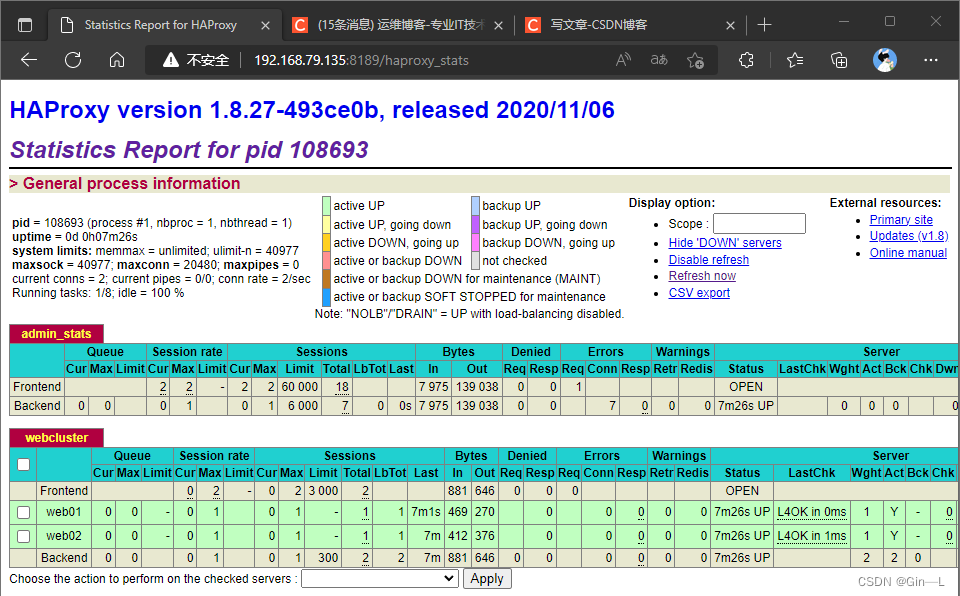
访问测试:(web)
登录账号和密码都是:admin
Masters_A
1-关闭防火墙与Selinux
[root@localhost ~]# systemctl disable firewalld.service
Removed /etc/systemd/system/multi-user.target.wants/firewalld.service.
Removed /etc/systemd/system/dbus-org.fedoraproject.FirewallD1.service.
[root@localhost ~]# systemctl stop firewalld.service
[root@localhost ~]# setenforce 0
[root@localhost ~]# hostnamectl set-hostname Masters_A
[root@localhost ~]# bash
[root@Masters_A ~]#

2-安装haproxy
[root@Masters_A ~]# yum -y install haproxy
过程......
[root@Masters_A ~]# systemctl enable haproxy.service
Created symlink /etc/systemd/system/multi-user.target.wants/haproxy.service → /usr/lib/systemd/system/haproxy.service.

4-修改内核参数
[root@Masters_A ~]# vim /etc/sysctl.conf
[root@Masters_A ~]# sysctl -p
net.ipv4.ip_nonlocal_bind = 1
net.ipv4.ip_forward = 1

5-修改haproxy配置文件(主机访问测试)
[root@Masters_A ~]# vim /etc/haproxy/haproxy.cfg
[root@Masters_A ~]# cat /etc/haproxy/haproxy.cfg
global
    daemon
    maxconn 256

defaults
    mode http
    timeout connect 5000ms
    timeout client 50000ms
    timeout server 50000ms

frontend http-in
    bind *:80
    default_backend servers

backend servers
server web01 192.168.79.136:80
server web02 192.168.79.137:80

6-开启haproxy服务
[root@Masters_A ~]# systemctl restart haproxy

7-修改haproxy配置文件(web访问测试)
[root@Masters_A ~]# vim /etc/haproxy/haproxy.cfg
[root@Masters_A ~]# cat /etc/haproxy/haproxy.cfg
global
    log 127.0.0.1 local0  info
    #log loghost local0 info
    maxconn 20480
#chroot /usr/local/haproxy
    pidfile /var/run/haproxy.pid
    #maxconn 4000
    user haproxy
    group haproxy
    daemon
#---------------------------------------------------------------------
#common defaults that all the 'listen' and 'backend' sections will
#use if not designated in their block
#---------------------------------------------------------------------
defaults
    mode http
    log global
    option dontlognull
    option httpclose
    option httplog
    #option forwardfor
    option redispatch
    balance roundrobin
    timeout connect 10s
    timeout client 10s
    timeout server 10s
    timeout check 10s
    maxconn 60000
    retries 3
#--------------统计页面配置------------------
listen admin_stats
    bind 0.0.0.0:8189
    stats enable
    mode http
    log global
    stats uri /haproxy_stats
    stats realm Haproxy\ Statistics
    stats auth admin:admin
    #stats hide-version
    stats admin if TRUE
    stats refresh 30s
#---------------web设置-----------------------
listen webcluster
    bind 0.0.0.0:80
    mode http
    #option httpchk GET /index.html
    log global
    maxconn 3000
    balance roundrobin
    cookie SESSION_COOKIE insert indirect nocache
    server web01 192.168.79.136:80 check inter 2000 fall 5
    server web02 192.168.79.137:80 check inter 2000 fall 5

8-开启haproxy服务
[root@Masters_A ~]# systemctl restart haproxy
[root@Masters_A ~]# ss -tnl
State       Recv-Q      Send-Q            Local Address:Port             Peer Address:Port      Process
LISTEN      0           128                     0.0.0.0:80                    0.0.0.0:*
LISTEN      0           128                     0.0.0.0:22                    0.0.0.0:*
LISTEN      0           128                     0.0.0.0:8189                  0.0.0.0:*
LISTEN      0           128                        [::]:22                       [::]:*
Masters_B
1-关闭防火墙与Selinux
[root@localhost ~]# hostnamectl set-hostname Masters_B
[root@localhost ~]# bash
[root@Masters_B ~]# systemctl stop firewalld.service
[root@Masters_B ~]# systemctl disable firewalld.service
Removed /etc/systemd/system/multi-user.target.wants/firewalld.service.
Removed /etc/systemd/system/dbus-org.fedoraproject.FirewallD1.service.
[root@Masters_B ~]# setenforce 0
[root@Masters_B ~]#

2-安装httpd
[root@Masters_B ~]# yum -y install httpd
过程......

3-写入web文件
[root@Masters_C ~]# echo Masters_C > /var/www/html/index.html
[root@Masters_C ~]# systemctl restart httpd
[root@Masters_C ~]# systemctl enable httpd
Created symlink /etc/systemd/system/multi-user.target.wants/httpd.service → /usr/lib/systemd/system/httpd.service.
Masters_C
1-关闭防火墙与Selinux
[root@localhost ~]# hostnamectl set-hostname Masters_C
[root@localhost ~]# bash
[root@Masters_C ~]# systemctl stop firewalld.service
[root@Masters_C ~]# systemctl disable firewalld.service
Removed /etc/systemd/system/multi-user.target.wants/firewalld.service.
Removed /etc/systemd/system/dbus-org.fedoraproject.FirewallD1.service.
[root@Masters_C ~]# setenforce

2-安装httpd
[root@Masters_C ~]# yum -y install httpd
过程......

3-写入web文件
[root@Masters_B ~]# echo Masters_B > /var/www/html/index.html
[root@Masters_B ~]# systemctl restart httpd
[root@Masters_B ~]# systemctl enable httpd
Created symlink /etc/systemd/system/multi-user.target.wants/httpd.service → /usr/lib/systemd/system/httpd.service.


 2352
2352

 被折叠的 条评论
为什么被折叠?
被折叠的 条评论
为什么被折叠?
 到【灌水乐园】发言


