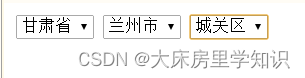
一.省市区级联菜单的实现
1.效果展示
2.代码
<!DOCTYPE html>
<html>
	<head>
		<meta charset="UTF-8">
		<title>省市区定位实现</title>
	</head>

	<body>
		<script type="text/javascript">

			//更换省份选项:调用的方法:添加城市信息
			function changePro(){
				//被选中的下拉框的索引:selectedIndex,从0开始
				var index=pro.selectedIndex;//省份的索引:1 2 3 。。。。
			    citys=data[index-1].data1;//当前所选省的所有城市

				//city.options.length=1;//删除重复
				//qu.options.length=1;//删除重复
				//先删除之前添加的所有(不包含默认的第一个)数据
				while(city.children.length>1){
					city.removeChild(city.children[1])
				}
				//清空区县的信息
				while(qu.children.length>1){
					qu.removeChild(qu.children[1])
				}
				//遍历城市 的数据,向city中添加子节点
				for(var i in citys){
					var opt=document.createElement("option");//创建子节点
					//给子节点中添加元素
					opt.innerHTML=citys[i].city;
					//在city父节点中添加子元素
					city.appendChild(opt);
				}
			}

			//更换市选项:调用的方法:添加区县信息
			function changeCity(){
				//被选中的下拉框的索引:selectedIndex,从0开始
				var index1=city.selectedIndex;//市的索引:1 2 3 。。。。
				var qus=citys[index1-1].data2;//当前所选市的所有区县

				//qu.options.length=1;//删除重复
				//删除区县的信息:先删除之前添加的所有(不包含默认的第一个)数据
				while(qu.children.length>1){
					qu.removeChild(qu.children[1])
				}
				//遍历市的数据,向qu中添加子节点
				for(var i in qus){
					var opt=document.createElement("option");//创建子节点
					//给子节点中添加元素
				   opt.innerHTML=qus[i];
					//在qu父节点中添加子元素
					qu.appendChild(opt);
				}
			}


		//页面加载事件//onload//页面加载时,获取数据存到省下
			window.onload=function(){

				data=[
							{pro:'陕西省',data1:[
									{city:'西安市',data2:['高新区1','雁塔区','未央区','灞桥区']},
									{city:'宝鸡市',data2:['高新区2','宝鸡区']},
									{city:'咸阳市',data2:['高新区3']}
								],
							},

							{pro:'山西省',data1:[
									{city:'大同市',data2:['大同区1','大同区2']},
									{city:'太原市',data2:['太原区1']}
								],
						    },

							{pro:'甘肃省',data1:[
									{city:'兰州市',data2:['城关区','安宁区','西关区']},
									{city:'天水市',data2:['秦州区','麦积区']}
								],
							}
						];

				 //获得省,市,区标签
			    pro=document.getElementById("pros");
			    city=document.getElementById("city");
			    qu=document.getElementById("qu");

				//遍历数据,添加省份信息
				for (var i = 0; i < data.length; i++) {
					//给pros创建option
					var opt=document.createElement("option");
				    //给子节点添加内容
					opt.innerHTML=data[i].pro;
					//将子节点添加到父节点里
					pro.appendChild(opt);
				}
		}

		</script>


		<select id="pros"  onchange="changePro()">
			<option>省</option>
		</select>
		<select id="city" onchange="changeCity()">
			<option>市</option>
		</select>
		<select id="qu">
			<option>区/县</option>
		</select>


	</body>
</html>
二. 多细节图切换展示-放大镜效果
1.效果图

2.代码
<!DOCTYPE html>
<html>
	<head>
		<meta charset="UTF-8">
		<title>多细节图切换展示-放大镜</title>
		<style type="text/css">
			#left{
				width: 500px;
				height: 600px;
			}
			#big img{
				width: 500px;
				height: 500px;
			}
			.small img{
				float: left;
				width: 100px;
				height: 100px;
			}
			#abslay{
	         width:500px;
	          height:500px;
	          overflow:hidden;/* 溢出属性:超过面积时如何展示 visible可见/hidden隐藏/scroll滚动 */
	          position:absolute;/* 绝对定位 */
	          /*top:8px;
	          left:508px; */
	           display: none;
             }
             #abslay img{
	          width:1000px;
	          height:1000px;
              }

		</style>
	</head>


	<body>
		<div id="left">
			<div id="big" onmouseenter="showdiv(1)" onmouseleave="showdiv(2)" onmousemove="showfd(event)">
				<img src="img/001.jpg" />
			</div>

			<div class="small" onmouseenter="changeImg(1)"><img  src="img/001.jpg"/></div>
			<div class="small" onmouseenter="changeImg(2)"><img   src="img/002.jpg"/></div>
			<div class="small" onmouseenter="changeImg(3)"><img   src="img/003.jpg"/></div>
			<div class="small" onmouseenter="changeImg(4)"><img   src="img/004.jpg"/></div>
			<div class="small" onmouseenter="changeImg(5)"><img   src="img/005.jpg"/></div>
		</div>

		<div id="abslay">
			<img src="#" />
		</div>


        <script type="text/javascript">
        	window.onload=function(){
        		big=document.getElementById("big");
        		small=document.getElementsByClassName("small");
        		abslay=document.getElementById("abslay");

        		//大图在右边进一步展示时,得到进一步展示的图片存在的位置
        		var r=big.getBoundingClientRect();
				abslay.style.top=r.top+"px";
				abslay.style.left=r.right+"px";
        	}

        	//将最小图片路径先传给大图,鼠标经过大图时又在右边进一步放大查看
        	function changeImg(x){
        		big.children[0].src=small[x-1].children[0].src;
        		abslay.children[0].src=small[x-1].children[0].src;
        	}
        	//当鼠标停在大图时,右边图片显示,离开大图时,右边图片进行隐藏
        	function showdiv(x){
				//显示/隐藏
				if(x==1){
					//显示
					abslay.style.display="block";
				}else{
					//隐藏
					abslay.style.display="none";
				}
			}

        	function showfd(x){
				//alert(x.clientX+"==="+x.clientY);
				//abslay的左滚动条scrollLeft=((小绿-小蓝)/大红)2000
				//大图   大图右边具体显示图
				var bigr=big.getBoundingClientRect();
				abslay.scrollLeft=((x.clientX-bigr.left)/500)*2000-250;
				abslay.scrollTop=((x.clientY-bigr.top)/500)*2000-250;
			}

        </script>
	</body>
</html>
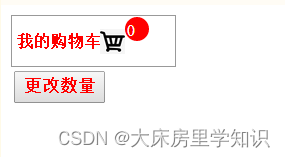
三. 单击按钮,给购物车数量加一
1.效果
2.代码
<!DOCTYPE html>
<html>
	<head>
		<meta charset="utf-8">
		<title>购物车+1操作</title>
		<style type="text/css">
			.box{
	width: 130px;
	height: 40px;
	background-color: #fff;
	border: 1px solid #999999;
	position: relative;
}
img{
	width: 20px;
	height: 20px;
	position: absolute;
	margin-top: -19px;
	margin-left: 70px;
}
#text{
	font-size: 13px;
	margin-top: 13px;
	margin-left: 4px;
	color: red;
}
#but{
	width: 16px;
	height: 16px;
	background-color: red;
	position: absolute;
	margin-top: -28px;
	margin-left: 90px;
	border: 2px solid red;
	border-radius: 10px;
}
#word{
	font-size: 13px;
	color: #fff;
	margin-top: 5px;
	text-align: center;
}
.but {
	margin-top: 15px;
	color: red;
	line-height: 20px;
	text-align: center;
}
		</style>
	</head>

	<body>

		<div class="box">
			<div id="text"><b>我的购物车</b></div>
			     <img src="https://img2.baidu.com/it/u=1329012137,1035134999&fm=253&fmt=auto&app=138&f=JPEG?w=500&h=500" />
			<div id="but">
			     <span id="word" onclick="change()">0</span>
			</div>
			<button class="but" onclick="change()"><b>更改数量</b></button>
		</div>

		<script type="text/javascript">
		    var i=0;
			function change(){
				i++;
				var w=document.getElementById("word");
				w.innerHTML=i;
			}
		</script>

	</body>
</html>
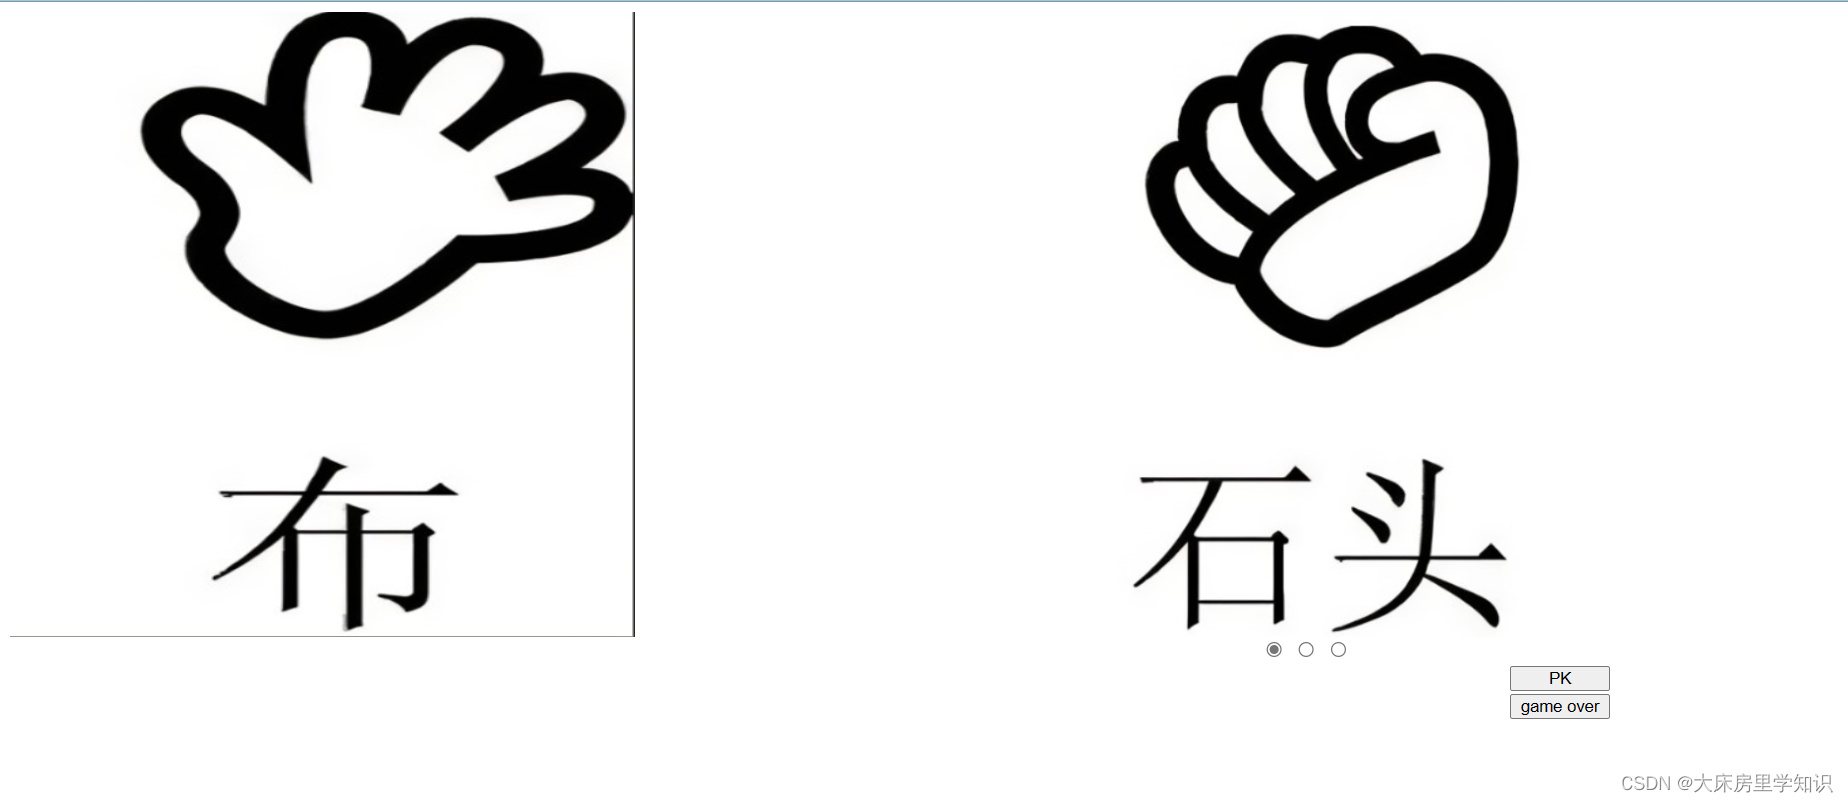
四. 石头剪刀布猜拳游戏
1.效果
2.代码
<!DOCTYPE html>
<html>
	<head>
		<meta charset="utf-8">
		<title>猜拳游戏</title>
		<style type="text/css">
			#box{
	width: 500px;
	height: 500px;
	overflow: hidden;
}
#box1{
	width: 1500px;
	height: 500px;
	background-color: aqua;
}
#box1 img{
	width: 500px;
	height: 500px;
}
#box2{
	width: 500px;
	height: 500px;
	overflow: hidden;
	margin-left: 800px;
	margin-top: -500px;
}
#box3{
	width: 1500px;
	height: 500px;
	background-color: aqua;
}
#box3 img{
	width: 500px;
	height: 500px;
}
#inp{
	margin-left: 1200px;
	width: 80px;
	height: 20px;
}
#ra{
	margin-left: 1000px;
}
		</style>
		<script type="text/javascript" >
			window.onload=function(){
	box=document.getElementById("box");
	box2=document.getElementById("box2");
	img=document.getElementsByClassName("img");
	img1=document.getElementsByClassName("img1");
	index=0;
	indexi=0;
	index1=0;
}
function show(x){
	if(x==0){
		index=0;
	}else if(x==1){
		index=500;
	}else if(x==2){
		index=1000;
	}
	box2.scrollLeft=index;
}
function showimg(){
	box.scrollLeft=indexi;
	indexi+=500;
	if(indexi==1500){
	indexi=0;
	}
}
function pk(){
	clearInterval(A);
	if(box.scrollLeft==box2.scrollLeft){
		alert("平手")
	}
	if(box.scrollLeft==0&&box2.scrollLeft==500){
		alert("玩家输")
	}
	if(box.scrollLeft==0&&box2.scrollLeft==1000||box.scrollLeft==500&&box2.scrollLeft==0||box.scrollLeft==1000&&box2.scrollLeft==500){
		alert("恭喜你,玩家赢")
	}
	if(box.scrollLeft==500&&box2.scrollLeft==1000){
		alert("玩家输")
	}
	if(box.scrollLeft==1000&&box2.scrollLeft==0){
		alert("玩家输")
	}
}


		</script>
	</head>
	<body>
		<div id="box">
			<div id="box1">
				<img class="img1" src="img/shitou.png"/><img class="img1" src="img/jiandao.png"/><img class="img1" src="img/bu.png"/>
			</div>
		</div>
		<div id="box2">
			<div id="box3">
				<img class="img" src="img/shitou.png"/><img class="img" src="img/jiandao.png"/><img class="img" src="img/bu.png"/>
			</div>
		</div>

		<div id="ra">
			<input type="radio" name="rad" onclick="show(0)"/>
			<input type="radio" name="rad" onclick="show(1)"/>
			<input type="radio" name="rad" onclick="show(2)"/>
		</div>
		<input id="inp" type="button" value="PK" onclick="A=setInterval('showimg()',100);"/>
		<input id="inp" type="button" value="game over" onclick="pk()"/>
	</body>
</html>
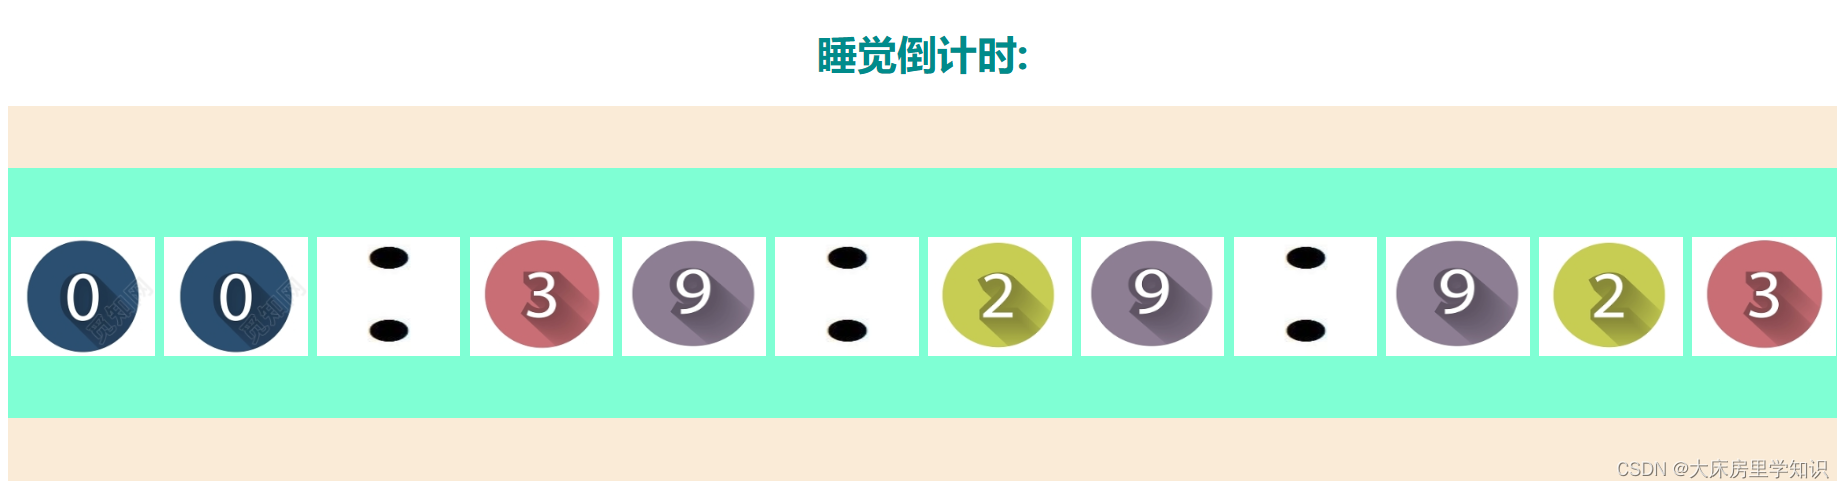
五. 活动截止倒计时效果
1.效果
2.代码
<!DOCTYPE html>
<html lang="en">
<head>
    <meta charset="UTF-8">
    <meta http-equiv="X-UA-Compatible" content="IE=edge">
    <meta name="viewport" content="width=device-width, initial-scale=1.0">
    <title>活动截止倒计时</title>
    <style>
        #content{
            width: 100%;
            height: 300px;
            background-color: antiquewhite;
        }
        #time{
            width: 100%;
            height: 200px;
            background-color: aquamarine;
            display: inline-block;
            position: relative;
            top: 50px;
        }
        #time img{
        	width: 115px;
        	height: 95px;
        	margin-left: 2.5px;
        	margin-top: 55px;
        }
    </style>
</head>
<body>
	<h1 style="color: darkcyan; text-align: center;">睡觉倒计时:</h1>
    <div id="content">
        <div id="time">
            <img src="">
            <img src="">
            <img src="">
            <img src="">
            <img src="">
            <img src="">
            <img src="">
            <img src="">
            <img src="">
            <img src="">
            <img src="">
            <img src="">
        </div>
    </div>
    <script>
        window.onload=function(){
            change();

            setInterval(change,1);
        }


        function change(){
            d = new Date();
            //获得当前毫秒时间
            time = d.getTime();
            d.setHours(23);
            d.setMinutes(59);
            d.setSeconds(59);
            d.setMilliseconds(999);
            time = d.getTime() - time;
            //获得毫秒
            ms = time%1000;
            time = parseInt(time/1000);
            //获得秒
            s = time%60;
            time = parseInt(time/60);
            //获得分
            m = time%60;
            time = parseInt(time/60);
            //获得时
            h = time%24;
            var times = document.getElementById("time");

            times.children[0].src = "img/" + parseInt(h/10) + ".png";
            times.children[1].src = "img/" + (h%10) + ".png";
            times.children[2].src = "img/maohao.png";
            times.children[3].src = "img/" + parseInt(m/10) + ".png";
            times.children[4].src = "img/" + (m%10) + ".png";
            times.children[5].src = "img/maohao.png";
            times.children[6].src = "img/" + parseInt(s/10) + ".png";
            times.children[7].src = "img/" + (s%10) + ".png";
            times.children[8].src = "img/maohao.png";
            times.children[9].src = "img/" + parseInt(ms/100) + ".png";
            times.children[10].src = "img/" + (parseInt(ms/10)%10) + ".png";
            times.children[11].src = "img/" + (ms%10) + ".png";
        };
    </script>
</body>
</html>
六. 轮播图


 被折叠的 条评论
为什么被折叠?
被折叠的 条评论
为什么被折叠?
 到【灌水乐园】发言


