


// 安装
npm i typescript -g
// 检测一下是否安装成功
tsc -v
tsc index.ts // 编译成 js 文件
tsc --init // 会生成 tsconfig.json
tsc -w // 自动编译// 生成 package.json
npm init -y// 声明文件
npm i @types/node -D每次更改后重新编译
ts-node index.ts如需单独运行 js 文件
node index.js一、基础类型
let num: number = 123;
let str: string = "小满";
let b: boolean = true;
let n: null = null;
let u: undefined = undefined;

// let v1: void = null;
let v2: void = undefined;

// 函数没有返回值
function myFn(): void {
  // 不能 return 任何值
}
二、任意类型
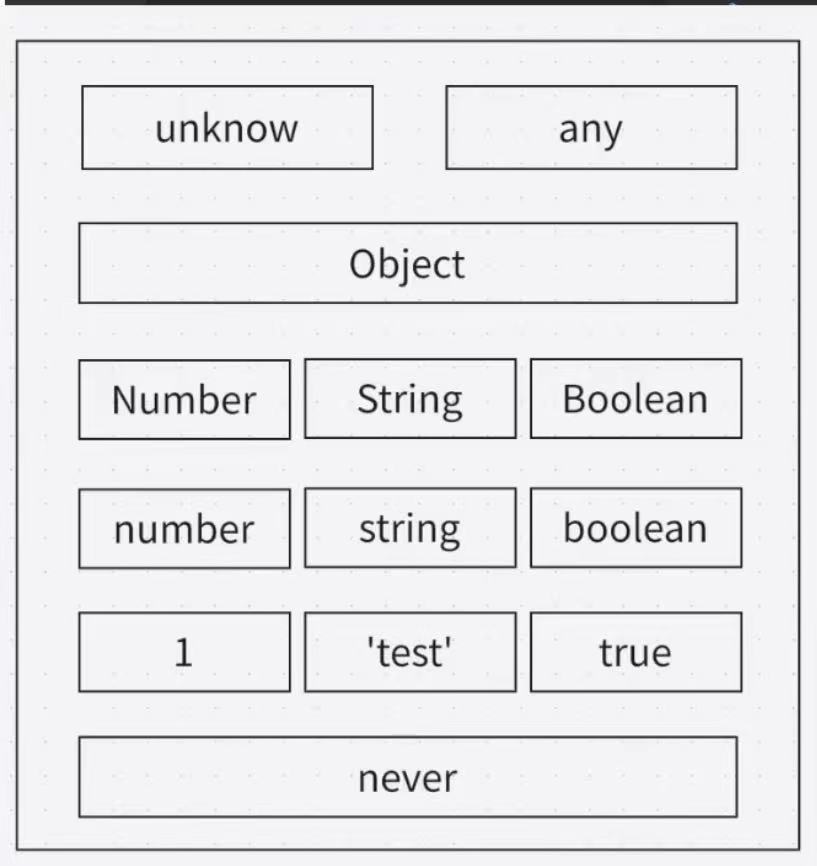
1. top type:顶级类型 any unknown,可以包含下面所以类型
2. Object
3. 自身实例:Number String Boolean
4. number string boolean
5. 1 '小满' false
6. never
any 任意类型;unknown 不知道类型
any:定义的时候不知道类型,用的时候也没人管。
unknown :定义的时候不确定,用的时候确定了才能用。
// unknown 和 any 也是有一定区别的:
let a: any = 1;
let b: number = 5;

a = b;
b = a;
unknown 类型
比 any 安全,用的时候会检查
是未知的,用之前必须保障操作合法
let a: unknown = 5;

if (typeof a == "number") {
  console.log(a * 2); // 10
}
(1)unknown 不可以赋值给别的类型的,只能赋值给自身或者 any
let a: unknown = 1;
let b: number = 5;

a = b;
b = a; // 报错
(2)unknown 没有办法读取任何属性,方法也不可以调用
let xiaoman: unknown = { shuai: true, open: () => 123 };
xiaoman.shuai; // 报错
xiaoman.open; // 报错

// any 类型则不报错
never 类型
永远不会有返回值,比如抛出异常或者死循环,那么该函数永远执行不完,不可能会有返回值
function fn(): never {
  throw new Error();
  console.log(123);
}
function fn(): never {
  while (true){
    // 永远执行不完,不可能有结果
  }
  console.log(123);
}
值类型
单个值也是一种类型
let a: "hello" = "hello";三、Object、object 以及 {}
1. Object
所有原始类型以及对象类型都指向 Object
在 ts 中,Object 表示包含所有类型
let a: Object = 123;
let a1: Object = "123";
let a2: Object = [];
let a3: Object = {};
let a4: Object = () => 123;
2. object
常用于泛型约束,代表非原始类型的一种类型,不支持 原始类型,支持所有 引用类型
let a: object = 123; // 错误 原始类型
let a1: object = "123"; // 错误 原始类型
let a2: object = false; // 错误 原始类型
let a3: object = []; // 正确
let a4: object = {}; // 正确
let a5: object = () => 123; // 正确
let a: { age: number; name: string } = { name: "张三", age: 18 };
// 先声明再赋值
let a2: { salary: number; address: string };
a2 = { salary: 8500, address: "北京" };
(1)可选属性
属性后面加问号,代表该属性可有可无
一个对象中可以有多个可选属性
let a: { age?: number; name: string } = { name: "张三" };(2)任意属性
如果我只希望一个对象必须具有 a 属性,其他属性有没有随意
一个对象中只能有一个任意属性
let a: { name: string; [propName: string]: string } = {
  // propName 代表属性名,肯定是字符串,propName 是形参,可以换成别的名字
  name: "张三",
  age: "18",
  aa: "999",
};
任意属性的类型一定是其他类型的父类
let a: { name: string; age: number; [propName: string]: any } = {
  name: "张三",
  age: 18,
  aa: "999",
};
(3)只读属性
在对象属性的前面加上 readonly,代表该属性只能访问不能修改
let obj: {
  readonly name: string;
  like: string[];
  pet: { name: string; age: number };
  [propName: string]: any;
};

obj = {
  name: "张三",
  like: ["睡觉", "唱歌", "打游戏"],
  pet: { name: "旺财", age: 2 },
  girlFriend: {
    name: "刘亦菲",
    age: 18,
  },
};

obj.name = "李四"; // 报错
(4)在对象中声明函数
let obj: {
  run: (height: number) => void;
};

obj = {
  run: function (height: number) {
    console.log("run");
  },
};
(5)关于内置对象
let b: Boolean = new Boolean(1);
let e: Error = new Error("Error occurred");
let d: Date = new Date();
let r: RegExp = /[a-z]/;
let body: HTMLElement = document.body;
let allDiv: NodeList = document.querySelectorAll("div");
3. {}
可以理解成 new Object,和第一个一样,原始类型 和 引用类型 都可以
let a: {} = 123;
let a1: {} = "123";
let a2: {} = [];
let a3: {} = {};
let a4: {} = () => 123;
虽然字面量模式可以赋值任意类型,但是赋值之后无法修改
let a: {} = { name: 1 };

// 无法对变量进行任何操作
a.age = 2; // 报错,没有办法 增加
最好少用
四、接口(经常使用)
使用 interface 来定义一种约束,让数据的结构满足约束的格式
不能多属性,也不能少属性
1. 基本使用
在 TypeScript 中,我们使用接口(interface)来定义对象的类型。
interface Person {
  name: string;
  age: number;
  salary: number;
}

let obj: Person = { name: "张三", age: 18, salary: 3500 };
可选操作符 & readonly
interface Axx {
  name: string;
  age?: number; // 可选操作符
  readonly id: number;
  readonly callback: () => boolean;
}

let a: Axx = {
  name: "小满",
  id: 1,
  callback: () => {
    return false;
  },
};

a.callback();

// 以下报错
a.callback = () => {
  return true;
};
一般函数或者 id 会写 readonly,不能随便改
定义任意 key
索引签名
interface Axx {
  name: string;
  age: number;
  [propName: string]: any;
}

let a: Axx = {
  name: "小满",
  age: 88,
  a: 1,
  b: 2,
  c: 3,
};
2. 接口继承 extends
如果你需要创建一个新的接口,而这个新的接口中的部分内容已经在存在的接口中定义过了,那么可以直接继承,无需重复定义
语法:interface 接口名 extends 另一个接口名
只要存在接口的继承,那么我们实现接口的对象必须同时实现该接口以及它所继承的接口的所有属性。
interface Person {
  name: string;
  age: number;
  address: string;
}

interface Girl extends Person {
  height: number;
  hobby: string[];
}

let xiaofang: Girl = {
  name: "小芳",
  age: 18,
  address: "北京",
  height: 170,
  hobby: ["逛街", "买买买"],
};
一个接口可以被多个接口继承,同样,一个接口也可以继承多个接口,多个接口用逗号隔开
interface Person {
  name: string;
  age: number;
  address: string;
}

interface Pro {
  phone: string;
  coat: string;
}

interface Girl extends Person, Pro {
  height: number;
  hobby: string[];
}

interface Boys extends Person {
  salary: number;
  car: string;
}

let xiaofang: Girl = {
  name: "小芳",
  age: 18,
  address: "北京",
  height: 170,
  hobby: ["逛街", "买买买"],
  phone: "华为",
  coat: "安踏",
};
interface Axx extends B {
  name: string;
  age?: number; // 可选操作符
  readonly id: number;
  readonly callback: () => boolean;
}

interface B {
  xxx: string;
}

let a: Axx = {
  xxx: "xxx",
  name: "小满",
  id: 1,
  callback: () => {
    return false;
  },
};
A 继承 B,A 与 B 合并,a 必须具备 xxx 属性
3. 接口同名会合并
名字相同的接口不会冲突,而是会合并为一个
interface Axx {
  name: string;
  age: number;
}

interface Axx {
  Ikun: string;
}
等同于
interface Axx {
  name: string;
  age: number;
  Ikun: string;
}
4. 接口中使用联合类型
interface Person {
  name: string;
  age: number;
  address: string;
  hobby: string[] | (() => void);
}
5. 接口定义数组
不推荐
6. 接口定义函数
不推荐
interface Fn {
  (name: string): number[];
}

const fn: Fn = function (name: string) {
  return [1];
};
7. 接口和类型别名的区别
定义对象,interface 是首选;其他类型用 type
(1)type 能够表示非对象类型,而 interface 只能表示对象类型(包括数组、函数等)
(2)interface 可以继承其他类型,type 不支持继承
(3)同名 interface 会自动合并,同名 type 则会报错
(4)interface 不能包含属性映射(mapping),type 可以
interface Point {
  x: number;
  y: number;
}

// 正确
type PointCopy1 = {
  [key in keyof Point]: Point[key];
};

// 报错
interface PointCopy2 = {
  [key in keyof Point]: Point[key];
};
五、数组和元组
1. 数组
ts 中规定,数组中所有成员的类型必须相同,数量可以不确定
数组的声明语法:
let arr:类型[]=[]
或者
let arr:Array<类型> =[] // 这种写法本质上属于泛型
// 声明直接复制
let arr: string[] = ["a", "b"];
// 先声明再赋值
let arr2: number[];
arr2 = [1, 2, 3];
// 后续添加的元素也必须符合数组的类型
arr.push("8");
(1) 数组普通类型
let arr2: string[] = ['a','b']
let arr: number[] = [1, 2, 3, 4, 5];
let arr1: boolean[] = [true, false];
泛型方式
let arr2: Array<boolean> = [true, false];(2) 对象数组
let arr: { name: string; age: number }[] = [
  { name: "aa", age: 18 },
  { name: "bb", age: 20 },
];
定义对象数组,使用 interface
interface X {
  name: string;
  age?: number;
}

let arr: X[] = [{ name: "小满" }, { name: "胡萝卜" }];
(3) 二维数组
let arr: number[][] = [[1], [2], [3]];泛型方式
let arr1: Array<Array<number>> = [[1], [2], [3]];(4)大杂烩数组
let arr: any = [1, "sadsad", true, {}];(5)函数数组
let arr: (() => number)[] = [
  function () {
    return 123;
  },
  function () {
    return 443;
  },
];
(6)数组在函数中的用法
// ... 是拓展运算符,可用于将函数参数收集后转为一个数组实例
function a(...args: string[]) {
  console.log(args); // ['1','2']
}

a("1", "2");
arguments 是类数组,但是没有数组上的方法
function b(...args: string[]) {
  console.log(arguments); // {'0':'1','1':'2'}
  let b: IArguments = arguments;
}

b("1", "2");

// IArguments 原理
interface A {
  callee: Function;
  length: number;
  [index: number]: any;
}
2. 元组
元组可以包含不同类型的元素,每个元素具有预定义的位置。规定了类型,顺序,数量
需要为每一个元素规定类型。
let arr:[类型1,类型2] = [数据1,数据2]let arr: [string, number, boolean] = ["A", 123, true];
// 先声明再赋值
let arr2: [boolean, string];
arr2[0] = true;
arr2[1] = "123";
// 如果后续通过任何方法向数组添加数据,也可以,后添加的数据是前面每个数据的联合类型
arr2.push("apple");
arr2.push(true);
// 但是 123 不可以,数字类型let arr: [number, boolean] = [1, false];
const arr1: [x: number, y: boolean] = [1, false];
type first = (typeof arr)[0]; // type first = number
type second = (typeof arr)["length"]; // type second = 2
let excel: [string, string, number][] = [
["小满", "女", 18],
["小满", "女", 18],
["小满", "女", 18],
];
六、函数类型
1. 函数定义类型和返回值
function add(a: number, b: number): number {
  return a + b;
}

console.log(add(1, 1)); // 2
箭头函数定义类型和返回值
const add = (a: number, b: number): number => a + b;

console.log(add(1, 1)); // 2
单独定义函数类型
// let 变量名: (参数1:类型) => 返回值
let fn: (a: number) => number;

fn = function (a: number): number {
  return 123;
};

let fn2: (a: number) => { age: number };

fn2 = function (a: number) {
  return {
    age: a,
  };
};
2. 函数的参数
(1)函数默认的参数
function add(a: number = 10, b: number = 20): number {
  return a + b;
}

console.log(add()); // 30
(2)函数可选参数
function add(a: number = 10, b?: number): number {
  return a + b;
}

console.log(add()); // NaN
(3)参数省略
函数的实际参数个数可以少于类型指定的参数个数,但是不能多于
let fn: (a: number, b: number) => number;
fn = (a: number) => a; // 正确
fn = (a: number, b: number, c: number) => a; // 错误
以上是函数类型定义的时候,定义了几个参数
函数赋值的时候可以省略,不会报错
// 函数定义,规定了几个形参,就要传几个实参
function fn2(a: string, b: number): number {
  return 123;
}
这是因为 Javascript 函数在声明时往往有多余的参数,实际使用时可以只传入一部分参数。
比如,数组的 forEach 方法的参数是一个函数,该函数默认有三个参数 (item, index, array) => void,实际上往往只有第一个参数 (item) => void。
(4)rest 参数
function fn(a, ...rest) {
  console.log(a, rest);
}

fn(1, 2, 3, 4); // 1 [ 2, 3, 4 ]
rest 参数表示函数剩余的所有参数,它可以是数组(剩余参数类型相同),也可能是元组(剩余参数类型不同)。
// rest 参数为数组
function fn(...args: number[]) {
  // ...
}

// rest 参数为元组
function fn1(...args: [boolean, number]) {
  // ...
}
3. 参数是一个对象如何定义
interface User {
  name: string;
  age: number;
}

function add(user: User): User {
  return user;
}

console.log(add({ name: "小满", age: 24 })); // { name: '小满', age: 24 }
4. 函数 this 类型
interface Obj {
  user: number[];
  add: (this: Obj, num: number) => void;
}

// ts 可以定义 this 的类型,必须是第一个参数定义 this 的类型
// js 种无法使用
let obj: Obj = {
  user: [1, 2, 3],
  add(this: Obj, num: number) {
    this.user.push(num);
  },
};

obj.add(4);
console.log(obj); // { user: [ 1, 2, 3, 4 ], add: [Function: add] }
5. 函数重载
let user: number[] = [1, 2, 3];
function findNum(add: number[]): number[]; // 如果传的是一个 number 类型的数组,那就做添加
function findNum(id: number): number[]; // 如果传入了 id, 就是单个查询
function findNum(): number[]; // 如果没有传入东西就是查询全部

function findNum(ids?: number | number[]): number[] {
  if (typeof ids == "number") {
    return user.filter((v) => v == ids);
  } else if (Array.isArray(ids)) {
    user.push(...ids);
    return user;
  } else {
    return user;
  }
}

console.log(findNum()); // [ 1, 2, 3 ]
console.log(findNum(3)); // [ 3 ]
console.log(findNum([4, 5, 6])); //[ 1, 2, 3, 4, 5, 6 ]
七、联合类型 | 类型断言 | 交叉类型
1. 联合类型 |
let a: string | number | boolean | { name: string; age: number } | number[] | (()=>void);// string,number 二选一
let arr: (string | number)[] = ["hh", 33];
// 数组里面只能单一类型
let arr1: string[] | number[] = [11, 33];只能访问共有的属性
function fn(a: string | number): void {
  a.substring(); // 报错,因为 number 上没有
  a.length; // 只有字符串length

  a.toString(); // 正确,因为 都有
}
let phone: number | string = "1391736484";

let fn = function (type: number | boolean): boolean {
  // 强转成 boolean
  return !!type;
};

let result = fn(1);
console.log(result);
2. 交叉类型 &
交叉类型用于组合多个类型,生成一个包含所有类型特性的新类型。
注意不要对基本类型使用,只能对对象类型使用
interface People {
  name: string;
  age: number;
}

interface Man {
  sex: number;
}

const xiaoman = (man: People & Man): void => {
  console.log(man);
};

xiaoman({
  name: "xiaoman",
  age: 24,
  sex: 1,
});
3. 类型断言 as
(1)基础用法
类型断言就是我明确知道这个数据肯定是字符串,告诉编译器你不用检测他了。
let fn = function (num: number | string): void {
  console.log((num as string).length);
};

fn("12345"); // 5
fn(12345); // undefined
类型断言只能欺骗 ts 编译器,无法避免运行时错误
类型断言不能滥用
interface A {
  run: string;
}

interface B {
  build: string;
}

let fn = (type: A | B): void => {
  console.log((<A>type).run);
  console.log((type as A).run);
};

fn({
  run: "123",
});
(2)将一个联合类型断言为其中一个类型
注意:类型断言只能欺骗 ts 编译器, 让他不报错,无法避免项目运行时的错误
interface Boy {
  name: string;
  make: () => number;
}

interface Girl {
  name: string;
  cost: () => void;
}

function fn(obj: Boy | Girl) {
  (obj as Boy).make();
}
let student = {} as { name: string };
student.name = "zhangsan";
(3)将任何一个类型断言为 any
let num: number = 1;
console.log((num as any).length);
(4)将 any 断言为任意类型
let a: any = 5;
console.log((a as string).length);
(5)将父类型断言为子类
class Students {
  make() {
    console.log("make");
  }
}

class Xm extends Students {
  run() {
    console.log("run");
  }
}

let a = new Students();

(a as Xm).run; // 编译通过,运行报错
(6)非空断言 !
type MyFn = () => number;
function fn(m: MyFn | undefined) {
  let num = m();
  let num2 = m!(); // 错误写法
}
(7)双重断言(不推荐)
interface Girl {
  name: string;
  cost: () => void;
}

interface Boy {
  name: string;
  make: () => void;
}

function fn(obj: Girl) {
  obj as any as Boy;
  // 有 any 做媒介,任何两个类型直接可以随便做断言
  1 as any as string;
}
八、内置对象 & 代码雨
1. ECMA
Number Date RegExp Error XMLHttprequest
let num: Number = new Number(1);
let date: Date = new Date();
let reg: RegExp = new RegExp(/\w/);
let error: Error = new Error("错了");
let xhr: XMLHttpRequest = new XMLHttpRequest();
2. DOM
querySelect MouseEvent
let div: NodeList = document.querySelectorAll("footer"); // NodeList 可以使用 forEach 遍历

let div1: NodeListOf<HTMLDivElement | HTMLElement> =
  document.querySelectorAll("div footer");
3. BOM
promise localStorage location cookie
let local: Storage = localStorage;
let lo: Location = location;

let promise: Promise<number> = new Promise((resolve) => resolve(1));

promise.then((res) => {
  // 可以提示 number 类型的方法
  res.toFixed;
});

let cookie: string = document.cookie;
4. 代码雨
先执行 tsc --init,创建 tsconfig.json 文件;然后执行 tsc -w ,自动创建 js 文件,监测文件变化
index.ts
let canvas: HTMLCanvasElement = document.querySelector("canvas");
let ctx = canvas.getContext("2d");

// 可视区域内的高度、宽度
canvas.width = screen.availWidth;
canvas.height = screen.availHeight;

let str: string[] = "XMZS010101010".split("");
let Arr = Array(Math.ceil(canvas.width / 10)).fill(0);
console.log(Arr);

const rain = () => {
  ctx.fillStyle = "rgba(0,0,0,0.05)";
  ctx.fillRect(0, 0, canvas.width, canvas.height);
  ctx.fillStyle = "#0f0";
  Arr.forEach((item, index) => {
    ctx.fillText(
      str[Math.floor(Math.random() * str.length)],
      index * 10,
      item + 10
    );
    Arr[index] =
      item > canvas.height || item > 10000 * Math.random() ? 0 : item + 10;
  });
};

setInterval(rain, 40);
index.html
<!DOCTYPE html>
<html lang="en">
  <head>
    <meta charset="UTF-8" />
    <meta name="viewport" content="width=device-width, initial-scale=1.0" />
    <title>Document</title>
    <style>
      * {
        padding: 0;
        margin: 0;
        overflow: hidden;
      }
    </style>
  </head>
  <body>
    <canvas id="canvas"></canvas>
    <script src="./index.js"></script>
  </body>
</html>
九、Class 类型
ts 中的 class 类构造函数里面用到的所有属性,必须提前定义类型
class Person {
  // 实例属性
  name: string;
  age: number;
  constructor(name, age) {
    this.name = name;
    this.age = age;
  }
  // 类属性(静态属性)只能通过类名访问和修改,对象实例访问不到
  static count: number = 100;
  // 实例属性
  readonly sex: string = "boy";

  eat() {
    console.log("我在吃饭");
  }
  static sleep() {
    console.log("我在睡觉");
  }
}

let xm = new Person("小明", 18);

// xm 拿不到 count
// Person 可以拿到
Person.count;

// 改不了
new Person("小明", 18).sex = "girl";
1. class 的基本用法:继承
通过继承可以将多个类中共有的代码写在一个父类中
这样就只需要写一次即可让所有的子类都同时拥有父类中的属性和方法
如果子类和父类名字相同,则会覆盖掉父类方法(方法重写)
class Animal {
  name: string;
  age: number;
  constructor(name, age) {
    this.name = name;
    this.age = age;
  }
  eat() {
    console.log("我在吃饭");
  }
  sleep() {
    console.log("我在睡觉");
  }
}

class Dog extends Animal {
  gender: string;
  constructor(name, age, gender) {
    super(name, age);
    this.gender = gender;
  }
  // 方法的重写
  eat() {
    console.log("我在吃饭");
  }
}

let wc = new Dog("旺财", 2, "boy");
wc.eat();
2. implements 关键类
在 TypeScript 中,implements 关键字用于检查一个类是否遵循特定的接口,接口(interface),是一个非常强大的工具,它描述了一组方法和属性的形状,但没有实现它们。
interface Person {
  id: number;
  name: string;
  play: () => void;
}

interface Person1 {
  gender: boolean;
}

class XiaoMing implements Person, Person1 {
  // 接口中有的必须有
  id: number;
  name: string;
  play: () => void;
  gender: boolean;

  // 接口中没有的,可以加类
  age: number;
  constructor(a: number, b: string, c: () => void) {
    this.id = a;
    this.name = b;
    this.play = c;
  }
}
interface Options {
  el: string | HTMLElement;
}

interface VueCls {
  options: Options;
  init(): void;
}

interface Vnode {
  tag: string; // div section header
  text?: string; // 123
  children?: Vnode[];
}

// 虚拟 dom 简单版
class Dom {
  // 创建节点的方法
  createElement(el: string) {
    return document.createElement(el);
  }
  // 填充文本的方法
  setText(el: HTMLElement, text: string | null) {
    el.textContent = text;
  }
  // 渲染函数
  render(data: Vnode) {
    let root = this.createElement(data.tag);
    if (data.children && Array.isArray(data.children)) {
      data.children.forEach((item) => {
        let child = this.render(item);
        root.appendChild(child);
      });
    } else {
      this.setText(root, data.text);
    }
    return root;
  }
}

class Vue extends Dom implements VueCls {
  options: Options;
  constructor(options: Options) {
    super();
    this.options = options;
    this.init();
  }
  init(): void {
    // 虚拟 dom 就是通过 js 去渲染我们这个真实 dom
    let data: Vnode = {
      tag: "div",
      children: [
        {
          tag: "section",
          text: "我是子节点 1",
        },
        {
          tag: "section",
          text: "我是子节点 2",
        },
      ],
    };

    let app =
      typeof this.options.el == "string"
        ? document.querySelector(this.options.el)
        : this.options.el;

    app.appendChild(this.render(data));
  }
}

new Vue({
  el: "#app",
});
3. class 的修饰符
readonly:只读,不能修改
private:只能在内部使用
protected:给子类和内部使用
public:所有方法默认都是 pubilc,公有的,任何地方都能访问到
class Animal {
  name: string; // 默认是 public 没有使用限制
  protected age: number; // 只能在当前类和子类中用
  constructor(name, age) {
    this.name = name;
    this.age = age;
  }
  private eat() { // 只能在当前类中用
    console.log("我在吃饭");
  }
  sleep() {
    console.log("我在睡觉");
  }
}

class Dog extends Animal {
  constructor() {
    super("a", 8);
    // super 用来调用 父类的方法或构造函数
    // 不能用来访问父类的实例属性(尤其是 protected 和 private)
    this.age;
  }
}
4. super 原理
相当于父类的 prototype.constructor.call
super 相当于先调父类的构造函数,先有父再有子
// 虚拟 dom 简单版
class Dom {
  constructor(name: string) {}
  ...
}

class Vue extends Dom implements VueCls {
  options: Options;
  constructor(options: Options) {
    super('小满'); // 通过 call 进行传参
    this.options = options;
    this.init();
  }
  ...
}
5. 静态方法
class Vue extends Dom implements VueCls {
  options: Options;
  constructor(options: Options) {
    super("小满");
    this.options = options;
    this.init();
  }

  static xxx() {}

  static version() {
    // 只能调用别的静态方法
    this.xxx;
    return "1.0.0";
  }
  ...
}

let vue = new Vue({
  el: "#app",
});

Vue.version(); // 只能直接通过实例调用

// 返回后的值无法调用
vue. 不可调用
6. get set
class Ref {
  _value: any;
  constructor(value: any) {
    this._value = value;
  }
  get value() {
    return this._value + "vvv";
  }
  set value(newVal) {
    this._value = newVal + "小满";
  }
}

const ref = new Ref("哈哈哈");
console.log(ref.value); // 哈哈哈vvv

ref.value = "坏人";
console.log(ref.value); // 坏人小满vvv
十、抽象类 / 基类(用得少)
抽象方法只能出现在抽象类中,包含了抽象方法的类,就一定是抽象类
抽象方法中的抽象方法必须被子类(也可以是间接子类)实现
abstract class Animal {
  abstract eat();
}

class Cat extends Animal {
  // 子类实现父类方法
  eat() {
    console.log("eat fish");
  }
}

// 间接实现
abstract class Dog extends Animal {

}

class wangcai extends Dog{
  eat() {
    console.log("eat bones");
  }
}
abstract 所定义的抽象类
abstract 所定义的方法,都只能描述,不能进行一个实现
// 抽象类
abstract class Vue {
  name: string;
  constructor(name?: string) {
    this.name = name;
  }
  getName(): string {
    return this.name;
  }
  abstract init(name: string): void;
}

// 无法创建抽象类的实例
new Vue() // 报错


// 派生类继承抽象类的应用
class React extends Vue {
  constructor() {
    super();
  }
  // 要把抽象类里的方法进行实现
  init(name: string) {}
  setName(name: string) {
    this.name = name;
  }
}

// 派生类可以被实例化
const react = new React();
react.setName("小满");

console.log(react.getName());
十一、映射类型(用得少)
映射类型只能在类型别名中使用,不能在接口中使用
作用:减少重复
in 后面跟的是联合类型,也可以是通过 keyof 生成的联合类型
1. 基本使用
type Keys = "x" | "y" | "z";

type MyType = { [key in Keys]: number };
// type MyType = { x: number; y: number; z: number };

let obj: MyType = { x: 123, y: 4, z: 22 };
2. 配合 keyof 使用
type Props = { a: number; b: string; c: boolean };

// 直接写 [key in Props] 会报错
// type Keys = keyof Props; // Keys => "a" | "b" | "c"
type MyType = { [key in keyof Props]: string }; // { a:string, b:string, c:string}

// 进一步
type MyType = { [key in keyof Props]: Props[key] }; // { a:number, b:string, c:boolean}

let obj:MyType = { a:123, b:"2", c:true }
3. 配合可选属性使用
type Keys = "x" | "y" | "z";

type MyType = { [key in Keys]?: number };
// type MyType = { x?: number; y?: number; z?: number };

let obj: MyType = {};
4. 配合只读属性使用
type Keys = "x" | "y" | "z";

type MyType = { readonly [key in Keys]: number };
// type MyType = { readonly x?: number; readonly y?: number; readonly z?: number };

let obj: MyType = { x: 123, y: 2, z: 33 };

obj.x = 888; // 报错,不能改
十二、枚举类型 enum
枚举类型用于定义一些有名字的数字常量。当一个元素有固定的几个值可选时,可以使用 Enum 来改善代码的可读性和可维护性
枚举类型解决了哪些问题
(1)如果直接用数字,无法知道含义
(2)如果直接用字符串,第一容易拼错,第二数据存起来太大
(3)使用枚举类型更方便
1. 数字枚举
// “未发货”,“已发货”,“派送中”,“未签收”,“已签收”
enum OrderStatus {
  Unfa, // 0
  Yifa, // 1
  Transport, // 2
  Unsign, // 3
  Signed, //4
}

axios({
  url: "api/?key" + OrderStatus.Unfa,
});
手动赋值的实际使用场景,适合一些对于数字有特殊要求的
enum Status {
  Success = 200,
  NotFound = 404,
  Error = 500,
}
enum Color {
  red,
  green,
  blue,
}

console.log(Color.red); // 0
console.log(Color.green); // 1
console.log(Color.blue); // 2
2. 增长枚举
未手动赋值的枚举项,会接着上一个枚举递增。
enum Days { Sun = 7, Mon = 1, Tue, Wed, Thu, Fri, Sat };

console.log(Days.Sun); // 7
console.log(Days.Mon); // 1
console.log(Days.Tue); // 2
console.log(Days.Sat); // 6
如果未手动赋值的枚举项与手动赋值的重复了,TypeScript 是不会察觉到这一点的
enum Days { Sun = 3, Mon = 1, Tue, Wed, Thu, Fri, Sat };

console.log(Days.Sun); // 7
console.log(Days.Mon); // 1
console.log(Days.Wed); // 3
console.log(Days[3] === "Sun"); // false
console.log(Days[3] === "Wed"); // true
enum Color {
red = 1,
green,
blue,
}
console.log(Color.red); // 1
console.log(Color.green); // 2
console.log(Color.blue); // 33. 字符串枚举
使用枚举类型很难出错
enum OrderStatus {
  OK = "请求成功",
  Error = "网络连接超时",
  Bad = "参数有问题",
}

enum Api {
  Detail = "/api/detail",
  List = "/api/list",
  User = "/api/info",
}

axios({
  url: Api.Detail,
});
enum Color {
  red = "red",
  green = "green",
  blue = "blue",
}

console.log(Color.red); // red
console.log(Color.green); // green
console.log(Color.blue); // blue
4. 使用计算值
数字枚举在定义值的时候,可以使用计算值和常量,但是要注意,如果某个字段使用了计算值或常量,那么该字段后面紧跟的字段必须设置初始值,这里不能使用默认的递增值了。
const getValue = () => {
  return 0;
};

enum ErrorIndex {
  a = getValue(),
  b, // error 枚举成员必须具有初始化的值
  c,
}

enum RightIndex {
  a = getValue(),
  b = 1,
  c,
}

const Start = 1;
enum Index {
  a = Start,
  b, // error 枚举成员必须具有初始化的值
  c,
}
5. 接口枚举
enum Color {
  yes = 1,
  no = "no",
}

interface A {
  red: Color.yes;
}

let obj: A = {
  red: Color.yes,
  //   red: Color.no,  报错
};
6. const 枚举
const enum Types {
  success,
  fail,
}

let code: number = 0;
if (code === Types.success) {
}
7. 反向映射
enum Types {
  success,
  // 字符串无法进行反向映射
  //   success = "456",  报错
}

let success: number = Types.success;
console.log(success); // 0

let key = Types[success];

console.log(`value -- ${success}`, `key -- ${key}`);
// value -- 0 key -- success
TypeScript 中的数字枚举会自动创建“正向 + 反向映射”
举例:
enum Types {
  success,  // = 0
  error = 1,
}
编译成 JavaScript 后大致如下(简化版):
var Types = {
  0: "success",
  1: "error",
  success: 0,
  error: 1,
};
所以你可以:
Types.success === 0      // 正向映射
Types[0] === "success"   // 反向映射
8. 异构枚举(不推荐)
enum Color {
  yes = 1,
  no = "no",
}

console.log(Color.yes); // 1
console.log(Color.no); // no
十三、类型推论 | 类型别名
1. 类型推论
let str = "小满zs";

str = 123  // 报错,之前类型推论为 string 类型
如果声明的时候没有赋值,默认推论为 any 类型
let str; // 没有赋值,默认推论为 any 类型

str = 456;

str = null;
2. 类型别名 type
类型别名是给现有类型取一个新的名字。它可以用于提高代码的可读性和可维护性,以及减少重复的类型定义。
type s = string | number;
type x = (name: string) => void;
type w = number[];

let str: s = "小满zs";
3. type 和 interface 区别
// 1. type:&;interface:extends 继承;
type s = number[] & B;

interface A extends B {}

interface B {}
// 2. type:联合类型 |;interface 必须定义一个属性
type s = number[] | string;
interface A extends B {
name: string | number;
}
interface B {}
// 3. type:不可以合并 |;interface 同名可以合并
type s = number[] | string;

interface A {
  name: string | number;
}

interface A {
  age: number;
}
4. type 高级用法
// extends 包含的意思
// 左边的值 会作为右边类型的子类型
type num = 1 extends number ? 1 : 0; // 返回 1
type num1 = 1 extends never ? 1 : 0; // 返回 0
十四、never 类型
type A = string & number; // type A = never 永远无法到达的类型
// 因为一执行就会报错,never 比 void 更合适
function xm(): never {
  throw new Error("xiaoman");
}

// 死循环也可以用 never
function xm1(): never {
  while (true) {}
}
// 因为是最底层,所以在联合类型上会出现问题
type A = void | number | never; // 只显示 number 和 void
// 如果添加新的内容,default 会报错。提示要加新的case
type A = "唱" | "跳" | "rap" | "篮球";
function kun(value: A) {
switch (value) {
case "唱":
break;
case "跳":
break;
case "rap":
break;
// 报错后加
case "篮球":
break;
default:
// 兜底逻辑
const error: never = value;
break;
}
}
十五、Symbol 类型
// 可以接受三种类型: string,number,undefined
let a1: symbol = Symbol(1);
let a2: symbol = Symbol(1);

console.log(a1); // Symbol(1)
console.log(a2); // Symbol(1)

console.log(a1 === a2); // false

// for 会在全局里找有没有注册过这个 key
// 如果有,直接拿来用,不会创建新的
console.log(Symbol.for("xiaomi") === Symbol.for("xiaomi")); // true
// 可以接受三种类型: string,number,undefined
let a1: symbol = Symbol(1);
let a2: symbol = Symbol(1);
let obj = {
name: 1,
// name: 88, // 会覆盖之前的
[a1]: 111,
[a2]: 222,
};
console.log(obj); // { name: 1, [Symbol(1)]: 111, [Symbol(1)]: 222 }
// 解决属性的 key 重复的问题,值没有覆盖掉
// for in 不能读到 Symbol
for (let key in obj) {
console.log(key); // 只能读取到 name
}
// keys 也读不到 Symbol
console.log(Object.keys(obj)); // [ 'name' ]
// getOwnPropertyNames 也读不到 Symbol
console.log(Object.getOwnPropertyNames(obj)); // [ 'name' ]
// 只能读到 Symbol,读不到 name
console.log(Object.getOwnPropertySymbols(obj)); // [ Symbol(1), Symbol(1) ]
// 两者都可以拿到
console.log(Reflect.ownKeys(obj)); // [ 'name', Symbol(1), Symbol(1) ]十六、生成器 | 迭代器
1. 生成器
// 1. 生成器 用法一样
function* gen() {
  yield Promise.resolve("小满");
  yield "大满";
  yield "超大满";
}

const man = gen();
console.log(man.next()); // { value: Promise { '小满' }, done: false }
console.log(man.next()); // { value: '大满', done: false }
console.log(man.next()); // { value: '超大满', done: false }
// done: true 表明没有东西可以迭代了
console.log(man.next()); // { value: undefined, done: true }
2. set map
(1)set
let set: Set<number> = new Set([1, 1, 2, 2, 3, 3]); // 天然去重 1 2 3
console.log(set); // { 1, 2, 3 }
(2)map
let map: Map<any, any> = new Map();
let Arr = [1, 2, 3];
map.set(Arr, "小满");
console.log(map.get(Arr)); // 小满
(3)arguments
function args() {
  console.log(arguments); // 伪数组,没有数组的方法
}

let list = document.querySelectorAll("div"); // 伪数组,没有数组的方法,但是可以 forEach
3. 迭代器
const each = (value: any) => {
  let It: any = value[Symbol.iterator]();
  let next: any = { done: false };
  while (!next.done) {
    next = It.next();
    if (!next.done) {
      console.log(next.value); // [ [ 1, 2, 3 ], '小满' ]
    }
  }
};

each(map); // [ [ 1, 2, 3 ], '小满' ]
each(set);
// 1
// 2
// 3
each(Arr);
// 1
// 2
// 3
4. 迭代器语法糖 for of
for (let value of set) {
  console.log(value);
}
// 1
// 2
// 3
5. for of 对象不可以用,因为对象身上没有 iterator
6. 解构,底层原理也是调用 iterator
let [a, b, c] = [4, 5, 6];
console.log(a, b, c); // 4 5 6
// 三个点的原理也是调用 iterator
let k = [4, 5, 6];
let copy = [...k];7. 对象支持 for of
let obj = {
  max: 5,
  current: 0,
  [Symbol.iterator]() {
    return {
      max: this.max,
      current: this.current,
      next() {
        if (this.current == this.max) {
          return {
            value: undefined,
            done: true,
          };
        } else {
          return { value: this.current++, done: false };
        }
      },
    };
  },
};

for (let value of obj) {
  console.log(value);
}
// 0
// 1
// 2
// 3
// 4

let x = [...obj];
console.log(x); // [ 0, 1, 2, 3, 4 ]


let x = { ...obj };
console.log(x);
// {
//    max: 5,
//    current: 0,
//    [Symbol(Symbol.iterator)]: [Function: [Symbol.iterator]]
//  }
十七、泛型
泛型是指在定义函数、接口或类的时候,不预先指定具体的类型,而是在使用的时候再指定类型的一种特性
简单来说,泛型就是类型参数
在定义的时候定义形参(类型变量),在使用的时候传入实参(实际的类型)
1. 在函数中使用泛型
function fn<T>(a: T) {
  return a;
}

// 传入的类型可以是:
// string number boolean undefined null symbol {name: string} ()=>void interface type 值类型

// 是对下面的简化
function fn1(a: number): number {
  return a;
}

function fn2(a: string): string {
  return a;
}
类型的推断不一定都是正确的,要谨慎使用
function fn2<T>(arr1: T[], arr2: T[]): T[] {
  return arr1.concat(arr2);
}

fn2([1, 2], ["a", "b"]); // 报错 不能将 string 分配给类型 number

fn2<number | string>([1, 2], ["a", "b"]); // 正确
// function xiaoman(a: number, b: number): Array<number> {
// return [a, b];
// }
// function xiaoman(a: string, b: string): Array<string> {
// return [a, b];
// }
function xiaoman<T>(a: T, b: T): Array<T> {
return [a, b];
}
// number
xiaoman(1, 2);
// boolean
xiaoman(true, false);2. 在类型别名中使用泛型 type
type C<T> = { value: T };

let obj: C<string> = {
  value: "hello",
};
type A<T> = string | number | T;

let a: A<boolean> = true;
let b: A<undefined> = undefined;
3. 在接口中使用泛型 interface
interface Person<T> {
  name: string;
  age: T;
}

let xm: Person<number> = { name: "小明", age: 12 };
interface Data<T> {
msg: T;
}
let data: Data<string> = {
msg: "小满",
};
let data1: Data<number> = {
msg: 1,
};
// 默认值 add<T = number, K = number>
function add<T, K>(a: T, b: K): Array<T | K> {
  return [a, b];
}

add(1, false);
4. 在类中使用泛型
class Person<T> {
  name: T;
  age: number;
  constructor(name: T, age: number) {
    this.name = name;
    this.age = age;
  }
}

const xiaoming = new Person<string>("xiaoming", 18);
泛型除了能够使用基本数据类型 string number boolean 等,同时也可以是接口,数组等
function fn<T>(a: T): T {
  return a;
}

interface Person {
  name: string;
  age: number;
}

fn<() => void>(() => {
  console.log(1);
});

fn<Person>({ name: "xiaoming", age: 18 });
泛型也可以用来声明数组
let arr: number[] = [1, 2, 3, 4];

// Array 是一个内置接口,接受一个 T 类型
let arr1: Array<number> = [1, 2, 3, 4];
5. 多个类型参数
function fn<T, U>(arr: T[], f: (arg: T) => U) {
  return arr.map(f);
}

fn<string, number>(["1", "2", "3"], (item) => parseInt(item));

// 把 map 拆分了
arr.map((item)=>{
  return
})
6. 类型参数默认值
会有推断覆盖的情况
function fn<T = string>(m: T) {
  return m;
}

fn(123); // 正确,因为类型推断覆盖掉了默认类型
类型参数默认值多用于 class 中
class Person<T = string> {
  list: T[] = [];
  add(t: T) {
    this.list.push(t);
  }
}

// 推断没有覆盖
let xm = new Person();
xm.add(4); // 报错
xm.add("4"); // 正确
7.泛型约束
在函数内部使用泛型变量的时候,由于实现不知道它是哪种类型,所以不能随意地操作它的属性和方法:
大类型 extends 更具体的类型 any extends number
// A extends B, A 包含 B
function fn<T extends string>(a: T): T {
  console.log(a.length);

  return a;
}

fn<any>("hello"); // 正确
fn<number>("hello"); // 错误
interface Person {
  name: string;
  age: number;
}

function fn<T extends Person>(person: T) {

}

fn<{ name: string; age: number; salary: number }>({
  name: "zhangsan",
  age: 18,
  salary: 5000,
});
let obj = { a: 1, b: 2, c: 3 };

function fn<T extends keyof U, U>(a: T, b: U) {

}

fn("a", obj);
8.关于泛型的嵌套
形如 <A<b>> 的嵌套写法表示在 TypeScript 中使用泛型进行多层嵌套。
在泛型中,可以使用尖括号 < 和 > 将泛型参数括起来。当出现多层嵌套时,例如 <A<b>>,它表示泛型类型 A 中的另一个参数 b 是另一个泛型类型或带有泛型参数的类型。
interface Box<T> {
  item: T;
}

let obj: Box<Box<string>> = {
  item: {
    item: "hello",
  },
};
9. 实战使用:
const axios = {
  get<T>(url: string): Promise<T> {
    return new Promise((resolve, reject) => {
      let xhr: XMLHttpRequest = new XMLHttpRequest();
      xhr.open("GET", url);
      xhr.onreadystatechange = () => {
        if (xhr.readyState == 4 && xhr.status == 200) {
          resolve(JSON.parse(xhr.responseText));
        }
      };
      xhr.send(null);
    });
  },
};

interface Data {
  message: string;
  code: number;
}

axios.get<Data>("./data.json").then((res) => {
  console.log(res);
});
十八、typeof, keyof 运算符
1. typeof
在 JavaScript 里面,typeof 运算符只可能返回八种结果,而且都是字符串
typeof undefined; // "undefined"
typeof true; // "boolean"
typeof 1337; // "number"
typeof "foo"; // "string"
typeof {}; // "object"
typeof parseInt; // "function"
typeof Symbol(); // "symbol"
TypeScript 将 typeof 运算符移植到了类型运算,它的操作数依然是一个值,但是返回的不是字符串,而是该值的 TypeScript 类型。
const a = { x: 0 };

// type 类型别名
type T0 = typeof a; // { x: number }
type T1 = typeof a.x; // number

let c: T0 = { x: 12 };
推荐先用类型别名存一下,不推荐下面这样
let a = { name: "张三", age: 18, isMarried: false };

let b: typeof a = { name: "aaa", age: 20, isMarried: true };
// 在类型后面跟一个 extends 再跟一个约束的类型
function add<T extends number>(a: T, b: T) {
return a + b;
}
add(1, 2);interface Len {
length: number;
}
function fn<T extends Len>(a: T) {
a.length;
}
fn("11111");
fn([1, 2, 3, 4, 5]);
2. keyof
keyof 运算符接受一个对象类型作为参数,返回该对象的所有键名组成的联合类型
type Person = { name: string; age: number };

type MyType = keyof Person;
// 等同于
type MyType = "name" | "age";
也就是说,MyType 是一个联合类型,只允许 "name" 或 "age" 字面量值。
let a: MyType = "xiaomi"; // ❌ 报错
let b: MyType = "name";   // ✅ 正确
因为 "xiaomi" 不是 Person 类型的属性名,所以 TypeScript 报错。
let obj = {
  name: "小满",
  sex: "女",
};

function ob<T extends object, K extends keyof T>(obj: T, key: K) {
  return obj[key];
}

ob(obj, "name");
3. keyof 高级用法
看不懂
interface Data {
  name: string;
  age: number;
  sex: string;
}

// for in  for(let key in obj)
type Options<T extends object> = {
  [Key in keyof T]: T[Key];
};

type B = Options<Data>;
十九、tsconfig.json 配置文件
生成 ts 配置文件
tsc --init{
"compilerOptions": {
/* Visit https://aka.ms/tsconfig to read more about this file */
/* Projects */
"incremental": true, // TS 编译器在第一次编译之后会生成一个储存缓存文件,第二次编译会在第一次的基础上,从而增速
"tsBuildInfoFile": "./.buildFile", // 缓存文件的存储位置
"diagnostics": true, // 打印诊断信息
/* Language and Environment */
"target": "es2016", // 编译语言版本
"lib": ["DOM", "ES2015", "ScriptHost", "ES2019.Array"], // TS 需要引用的库,即声明文件,es5 默认引用 dom、es5、ScriptHost
/* Modules */
"module": "commonjs", // 生成代码的模版标准
/* JavaScript Support */
// "allowJs": true, // 允许编译器编译 JS、JSX 文件
// "checkJs": true, // 允许在 JS 文件中报错,通常与 allowJS 一起使用
/* Emit */
"outDir": "./dist", // 指定输出目录
"rootDir": "./", // 指定输出文件目录(用于输出),用于控制输出目录结构
"declaration": true, // 生成声明文件,开启后会自动生成声明文件
"declarationDir": "", // 指定声明文件存放目录
"emitDeclarationOnly": false, // 只生成声明文件,而不会生成 js 文件
"sourceMap": false, // 是否生成源码映射文件,以便在调试时能够方便地追踪 ts 代码
"inlineSourceMap": false, // 生成目标文件的 inline sourceMap
"declarationMap": true, // 为声明文件生成 sourceMap
"typeRoots": [], // 第三方的声明文件目录,默认是 node_modules/@types
"types": [], // 加载的声明文件包
"removeComments": true, // 删除注释
"noEmit": false, // 不输出文件,即编译后不会生成任何 js 文件
"noEmitOnError": true, // 发生错误时,不输出任何文件
"downlevelIteration": true, // 降级遍历器实现,如果目标源是 es3/4,那么遍历器会有降级的实现
/* Type Checking */
"strict": false, // 开启所有严格的类型检查
"alwaysStrict": true, // 在代码中注入 'use strict'
"noImplicitAny": true, // 不允许任何隐式的 any 类型
"strictNullChecks": true, // 不允许把 null、undefined 赋值给其他类型的变量
"strictFunctionTypes": false, // 不允许函数参数双向协变
"strictBindCallApply": true, // 严格的 bind/call/apply 检查
"strictPropertyInitialization": true, // 类的实例属性必须初始化
"noImplicitThis": true, // 不允许 this 有隐式的 any 类型
"noUnusedLocals": false, // 检查只声明、未使用的局部变量(只提示不报错)
"noUnusedParameters": true, // 检查未使用的函数参数(只提示不报错)
"noFallthroughCasesInSwitch": true, // 防止 switch 语句贯穿(即如果没有 break 语句后面不会执行)
"moduleResolution": "node", // 模块解析策略,ts 默认用 node 的解析策略,即相对的方式导入
"baseUrl": "./", // 解析非相对模块的基地址,它会使用 baseurl 选项作为 url 路径,默认是当前目录
"jsxFactory": "React.createElement", // jsx 语法用什么解析器
"jsx": "preserve", // 保留原来的 jsx 文件,创建新的 js 文件
"paths": {
// 路径映射,相对于 baseurl
// 如使用 jq 时不想使用默认版本,而需要手动指定版本,可进行如下配置
"@jquery": ["node_modules/jquery/dist/jquery.min.js"],
"@/*": ["./src/*"]
}
},
// 指定一个匹配列表(属于自动指定该路径下所有 ts 相关文件)
"include": ["src/**/*", "index.ts"],
// 指定一个排除列表(include 的反向操作)
"exclude": ["demo.ts"],
// 指定哪些文件使用该配置(属于手动一个个指定文件)
"files": ["index.ts"]
}
二十、namespace 命名空间(用得少)
在 TypeScript 中,nameSpace 是一个早期的概念,用于提供命名空间功能,帮助组织代码和防止命名冲突。随着 ES6 模块的引入,namespace 的使用减少了,因为 ES6 模块提供了更好的代码组织机制。不过,namespace 在一下特定场景下(特别是在没有模块系统的全局脚本环境中)还是有它的用武之地。
官方也不再推荐使用 namespace 了。
namespace Utils {
  function fn() {
    console.log(1);
  }
  var a = 5;
  console.log(a); // 正确
}

console.log(a); // 报错
如果想在外面使用,要加上 export 关键字
namespace Utils {
  export function fn() {
    console.log(1);
  }
  export var a = 1;
}

namespace My {
  export function fn() {
    console.log(1);
  }
  export var a = 1;
}

// 写清具体的 命名空间
My.fn();
命名空间可以嵌套
namespace Utils {
  export function fn() {
    console.log(1);
  }
  export var a = 1;
}

namespace My {
  export namespace GirlFriend {
    export function angry() {
      console.log("爱生气");
    }
  }

  export interface Person {
    name: string;
  }
}

let c:My.Person{}
本质上作用和 es6 模块化一样
namespace 作用:避免全局变量造成的污染
1. 命名空间的用法:嵌套、抽离、导出、简化、合并
// namespace 所有的变量以及方法必须要导出才能访问
namespace Test {
  // 变量 方法 ...
  export let a = 1;
  export const add = (a: number, b: number) => a + b;
}

console.log(Test.a); // 1
console.log(Test.add(1, 2)); // 3
嵌套
// namespace 所有的变量以及方法必须要导出才能访问
namespace Test {
  export namespace Test2 {
    // 变量 方法 ...
    export let a = 1;
    export const add = (a: number, b: number) => a + b;
  }
}

console.log(Test.Test2.a); // 1
console.log(Test.Test2.add(1, 2)); // 3
合并,和 interface 一样
// namespace 所有的变量以及方法必须要导出才能访问
namespace Test {
  // 变量 方法 ...
  export let a = 1;
  export const add = (a: number, b: number) => a + b;
}

namespace Test {
  // 变量 方法 ...
  export let b = 2;
}

console.log(Test.b); // 2
抽离,支持导入导出
test.ts
// namespace 所有的变量以及方法必须要导出才能访问
export namespace Test {
  // 变量 方法 ...
  export let a = 1;
  export const add = (a: number, b: number) => a + b;
}
index.ts
import { Test } from "./test";

// 支持简化
import a = Test.a
console.log(a);

console.log(Test.a); // 1
2. 命名空间的案例
namespace ios {
  export const pushNotification = (msg: string, type: number) => {};
}

namespace android {
  export const pushNotification = (msg: string) => {};

  export const callPhone = (phone: string) => {};
}

namespace miniprogram {
  export const pushNotification = (msg: string) => {};
  export const callPhone = (phone: string) => {};
}
二十一、模块解析
ts 模块化是建立在 es6 模块化的基础上,与 JS 中的写法有许多不同之处
任何包含 import 或 export 语句的文件,就是一个模块(module)。相应地,如果文件不包含 export 语句,就是一个全局的脚本文件。
模块本身就是一个作用域,不属于全局作用域。模块内部的变量、函数、类只在内部可见,对于模块外部是不可见的。暴露给外部的接口,必须用 export 命令声明;如果其他文件要使用模块的接口,必须用 import 命令来输入。
如果一个文件不包含 export 语句,但是希望把它当做一个模块(即内部变量对外不可见),可以在脚本头部加一行语句。
export {}1. 基础的导入导出
a.ts
export interface Person {
  name: string;
  age: number;
}

export type obj = {
  gender: string;
  hobby: string[];
};
b.ts
import { Person, obj } from "./a";

let xm: Person = { name: "xiaoming", age: 20 };
test.ts
// 1. 默认导出 导出的东西可以任何类型
// 一个模块只能出现一个默认导出
export default {
  a: 1,
};

// 2. 分别导出
export let x = 2;
export const add = (a: any, b: any) => {
  return a + b;
};
export let arr = [1, 2, 3];

// 3. 解构导出
// export { x, add, arr };
index.ts
// 使用方式 import 如果是默认导出,名字随便起
// 可以支持别名
import obj, { add as add2, arr, x } from "./test";

console.log(obj); // { a: 1 }
console.log(add2(2, 2)); // 4
const add = () => {};

// 查看所有导出的内容
import * as api from "./test";
console.log(api); // { x: 2, add: [Function: add], arr: [ 1, 2, 3 ], default: { a: 1 } }
2.类型导出
类型导出一般是复杂的类型,不要导出基本简单的类型
类型的导出:
export { 接口名, type 名 }interface Person2 {
name: string;
age: number;
}
type obj = { gender: boolean; like: string[] };
export type { obj, Person2 }; // 方式 1
export { obj, Person2 }; // 方式 2
export { type obj, type Person2 }; // 方式 3导出或者引入的时候加入 type 关键字的好处
(1)减少编译后输出文件的大小
(2)避免不必要的运行开销
(3)明确表达意图
3. 类型引入
import type { obj, Person2, Person } from "./a"; // 方法 1
import { obj, Person2, Person } from "./a"; // 方法 2
import { type obj, type Person2, type Person } from "./a"; // 方法 3
4. 关于接口的默认导出
export default interface Person {
  name: string;
  age: number;
}

export interface Person {
  name: string;
  age: number;
}

// 以上两种写法都是对的
5. 重导出
a.ts
interface Person {
  name: string;
  age: number;
}

type obj = { gender: string; hobby: string[] };

export type { Person, obj };
b.ts(中介)
export * from "./a";index.ts
import { Person } from "./b";

let c: Person = {};
重导出作用:
当你的文件需要用到好多模块自定义的类型,那么就可以单独定义一个文件,把这些模块进行重导出。那么我们的项目文件只需要引入这一个重新导出文件就可以了。
6. 动态引入
// 动态引入
// import 只能在最上层使用
if (true) {
  //   import * as api from "./test"; // 报错
}

if (true) {
  import("./test").then((res) => {
    console.log(res); // { x: 2, add: [Function: add], arr: [ 1, 2, 3 ], default: { a: 1 } }
  });
}
二十二、声明文件 declare
实际使用场景:在开发中引入第三方插件,插件如果是用 js 写的,会出现问题。所以我们要有一个声明文件。
declare 关键字用来告诉编译器,某个类型是存在的,可以在当前文件中使用。
它的主要作用,就是让当前文件可以使用其他文件声明的类型。举例来说,自己的脚本使用外部库定义的函数,编译器会因为不知道外部函数的类型定义而报错,这时就可以在自己的脚本里面使用 declare 关键字,告诉编译器外部函数的类型。这样的话,编译单个脚本就不会因为使用了外部类型而报错。
declare 关键字的重要特点是,它只是通知编译器某个类型是存在的,不用给出具体的实现。比如,只描述函数的类型,不给出函数的实现,如果不使用 declare,这是做不到的。
declare 只能用来描述已经存在的变量和数据结构,不能用来声明新的变量和数据结构。另外,所有 declare 语句都不会出现在编译后的文件里。
common.js
function fn(x, y) {
  return x + y;
}

let xm = {
  gender: true,
  make: () => console.log("money"),
};
common.d.ts(声明)
declare function fn(x: number, y: number): number;

declare let a: number;

declare class Person {
  name: string;
}

interface Man {
  make: () => void;
  gender: boolean;
}

declare let xm: Man;
index.ts (使用)
fn(1, 2);

console.log(xm);
1. 关于 .d.ts 文件的加载机制
.d.ts 给已经存在的数据描述类型
TypeScript 中的 .d.ts 文件是类型声明文件,它们用来为 TypeScript 提供有关 JavaScript 代码结构的信息类型
在 TypeScript 中,.d.ts 文件的引入机制有以下几种情况
(1)同名引入
对于你自己写的模块,TypeScript 会默认引入与该文件同名的类型声明文件。例如,如果你有一个 foo.js 文件和一个同目录下的 foo.d.ts 文件,当你在 TypeScript 中 import 该模块时,类型信息将由 foo.d.ts 提供。
(2)自动引入
对于 npm 安装的第三方库如 lodash, 如果你安装了对应的类型声明(例如通过 npm install @types/lodash),TypeScript 会自动识别这些 node_modules/@types 的声明文件,无需显示引入它们。
可以通过配置更改
typeRoots 设置类型模块所在的目录,默认是 node_modules/@types
该目录里面的模块会自动加入编译。一旦指定了该属性,就不会再用默认值 node_modules/@type 里面的类型模块。
该属性的值是一个数组,数组的每个成员就是一个目录,它们的路径是相对于 tsconfig.json 位置。
{
  ...
  "compilerOptions": {
    "typeRoots": ["./typings", "./vender/types"], // 更改后
  }
}
(3)通过 tsconfig.json 配置自动加载
include 属性是用来指明 TypeScript 编译器应该包含哪些文件的
{
  ...
  "include": [
    "src/**/*"
  ]
}
// src/**/* 表示包含 src 目录下所有文件和子目录中的所有文件
// 无论文件的拓展名是什么,都应该纳入 ts 的编译范围
如果 tsconfig.json 不做任何特殊设置,默认会加载所有的 .d.ts 文件包括根目录下和任何文件夹内
(4)三斜线指令
你可以在文件顶部添加如下指令来显式告诉 TypeScript 引入特定的 .d.ts
文件:
/// < reference path="my-declaration-file.d.ts" />这种方式并不推荐用于模块化的代码,适用于全局脚本的场景。
2. 第三方库
让我们全都加上类型,这显然不现实
第一:很多第三方库默认都自带类型声明文件,这种就不用我们管了
第二:如果没有自带,ts 社区基本上也提供了他们的类型文件,TypeScript 社区主要使用 DefinitedlyTyped 仓库(https://github.com/DefinitelyTyped/DefinitelyTyped),各种类型声明文件都会提交到那里,已经包含了几千个第三方库。
这些声明文件都会作为一个单独的库,发布到 npm 的 @types 名称空间之下。比如,jQuery 的类型声明文件就发布成 @types/jquery 这个库,使用时安装这个库就可以了。
npm install @types/jquery --save-dev执行上面的命令, @types/jquery 这个库就安装到项目的 node_modules/@types/jquery 目录,里面的 index.d.ts 文件就是 jQuery 的类型声明文件
3. declare.module、declare.namespace
之前都是单独描述某一个变量,不常见。项目都是一个模块一个模块的。
declare module "pinia" {
  export function fn(): void;
  export let fn: string;
}
declare module:
declare module 用于声明外部模块的类型。在使用第三方模块(比如某个 npm 包)时,你可以使用这种方法来定义模块的类型声明。通常,你会在类型声明文件(.d.ts 文件)中使用 declare module。
declare namespace My {
  export let fn: string;
}
declare.namespace:
一般用es6 模块之后不会用namespace
4. declare 可以为外部模块添加属性和方法时,给出新增部分的类型描述
下面是另一个例子。一个项目有多个模块,可以在一个模块中,对另一个模块的接口进行类型拓展。
因为同名 interface 会自动合并类型声明。
index.ts
export interface A {
  x: number;
}
b.ts
import { A } from "./index";

declare module "./index" {
  interface A {
    y: number;
  }
}

// 合并
let count: A = {
  x: 1,
  y: 2,
};
5.declare module 描述的模块名可以使用通配符
declare module "my-plugin-*" {
  interface PluginOptions {
    enabled: boolean;
    priority: number;
  }
  function initialize(options: PluginOptions): void;
  export = initialize;
}
上面示例中,模块 my-plugin-* 表示适配所有以 my-plugin- 开头的模块名(比如my-plugin-logger)
6. 三斜杠命令(用的少)
专门用来引入 .d.ts 文件
因为:不是所有的第三方插件都支持模块化
三斜杠命令(///)是一个 TypeScript 编辑器命令,用来指定编译器行为。它只能用在文件的头部,如果在其他地方,会被当作普通的注释
最常见的三斜杠指令有以下两种:
(1) /// < reference path="..." /> :用来指定要引用的文件路径,告诉编译器要在编译过程中包含这个文件。
(2)/// < reference types="..." />:用来声明对某个包的类型依赖,通常用于从 @types 包中引用声明
// < reference types="node" />:

import * as fs from "fs";
该实例中,我们通过声明 node 来让 TypeScript 知道 fs 这个名字是指 Node.js 中的文件系统模块
用的少,因为 es6 开始用 import
声明文件 declare
当使用第三方库时,我们需要引用它的声明文件,才能获得对应的代码补全、接口提示等功能。
index.ts
import express from "express";

const app = express();

const router = express.Router();

app.use("/api", router);

router.get("/api", (req: any, res: any) => {
  res.json({
    code: 200,
  });
});

app.listen(9001, () => {
  console.log("9001");
});
express.d.ts
declare module "express" {
  interface Router {
    get(path: string, cb: (req: any, res: any) => void): void;
  }

  interface App {
    use(path: string, router: any): void;
    listen(port: number, cb?: () => void);
  }
  interface Express {
    (): App;
    Router(): Router;
  }
  const express: Express;
  export default express;
}

declare var a: number;

declare function xxxx(params: type) {};
declare class Vue {}
二十三、Mixins 混入
1. 对象混入
合并 A 对象,B 对象 合并到一起
interface A {
  age: number;
}

interface B {
  name: string;
}

let a: A = {
  age: 18,
};

let b: B = {
  name: "zhangsan",
};

// 1. 扩展运算符 浅拷贝 返回新的类型
let c = { ...a, ...b };
console.log(c); // { age: 18, name: 'zhangsan' }

// 2. Object.assign 浅拷贝 交叉类型
let c1 = Object.assign({}, a, b);
console.log(c1); // { age: 18, name: 'zhangsan' }

// 3. 深拷贝
console.log(structuredClone(a)); // { age: 18 }
2. 类的混入
A 类 B 类 合并到一起
// 插件类型的混入
class Logger {
  log(msg: string) {
    console.log(msg);
  }
}

class Html {
  render() {
    console.log("render");
  }
}

class App {
  run() {
    console.log("run");
  }
}

type Constructor<T> = new (...args: any[]) => T;

function pluginMinxins<T extends Constructor<App>>(Base: T) {
  return class extends Base {
    private Logger = new Logger();
    private Html = new Html();

    constructor(...args: any[]) {
      super(...args);
      this.Logger = new Logger();
      this.Html = new Html();
    }
    run() {
      this.Logger.log("run");
    }
    render() {
      this.Logger.log("render");
      this.Html.render();
    }
  };
}

const mixins = pluginMinxins(App);

const app = new mixins();

app.run();
二十四、装饰器
tsconfig.json
以下两个设置为 true
"experimentalDecorators": true ,
 "emitDecoratorMetadata": true
1. 类装饰器 ClassDecorator
参数是 target,返回的是 构造函数
const Base: ClassDecorator = (target) => {
  console.log(target);
  target.prototype.xiaoman = "小满";
  target.prototype.fn = () => {
    console.log("我是憨憨");
  };
};

@Base
class Http {
  // ...
}

const http = new Http() as any;

http.fn();

console.log(http.xiaoman);
2. 属性装饰器 PropertyDecorator
const Name: PropertyDecorator = (target, key) => {
  console.log(target, key);
};

@Base("xiao yu")
class Http {
  @Name
  xiaoman: string;
  constructor() {
    this.xiaoman = "小满";
  }
  @Get("https://api.apiopen.top/api/getHaoKanVideo?page=0&size=10")
  getList(@Result() data: any) {
    // console.log(data.result.list);
    // console.log(data);
  }
  create() {}
}
3. 参数装饰器 ParameterDecorator
简化获取数据的方法 data.result.lis => data
import axios from "axios";
import "reflect-metadata";

const Get = (url: string) => {
  const fn: MethodDecorator = (target, _, descriptor: PropertyDescriptor) => {
    // target是原型对象
    // 通过 Reflect 取
    const key = Reflect.getMetadata("key", target);
    axios.get(url).then((res) => {
      descriptor.value(key ? res.data[key] : res.data);
    });
  };
  return fn;
};

const Result = () => {
  const fn: ParameterDecorator = (target, key, index) => {
// target 是原型对象,key 是 getList 的名字,index 是参数所在的位置 第一项 0 第二项 1
    // 通过 Reflect 存 result
    Reflect.defineMetadata("key", "result", target);
    console.log(target, key, index);
  };
  return fn;
};

@Base("xiao yu")
class Http {
  @Get("https://api.apiopen.top/api/getHaoKanVideo?page=0&size=10")
  getList(@Result() data: any) {
    // console.log(data.result.list);
    console.log(data); // 简化了数据获取方式,少套一层
  }
  create() {}
}
4. 方法装饰器 MethodDecorator PropertyDescriptor
const Get = (url: string) => {
  const fn: MethodDecorator = (target, key, descriptor: PropertyDescriptor) => {
    // target是原型对象
    axios.get(url).then((res) => {
      descriptor.value(res.data);
    });
  };
  return fn;
};

@Base("xiao yu")
class Http {
  @Get("https://api.apiopen.top/api/getHaoKanVideo?page=0&size=10")
  getList(data: any) {
    console.log(data.result.list);
  }
  create() {}
}
5. 装饰器工厂
// 函数柯里化
const Base = (name: string) => {
  const fn: ClassDecorator = (target) => {
    console.log(target); // [class Http]
    target.prototype.xiaoman = name;
    target.prototype.fn = () => {
      console.log("我是憨憨");
    };
  };
  return fn;
};

@Base("xiao yu")
class Http {
  // ...
}

const http = new Http() as any;
console.log(http.xiaoman); // xiao yu
6. import 'reflect-metadata'
原数据的反射,通过 reflect 给类上面增加属性
7. axios
二十五、webpack 构建 ts
npm i -D webpack webpack-cli 下载 ts-loader 整合 webpack 和 ts
npm i -D typescript ts-loader创建文件
webpack.config.js
// 引入一个包
const path = require("path");

// webpack 中所有的配置信息都应该写在 module.exports 中
module.exports = {
  // 指定入口文件
  entry: "./src/index.ts",

  // 指定打包文件所在的目录
  output: {
    path: path.resolve(__dirname, "dist"),
  },
  // 打包后文件的名字
  filename: "bundle.js",

  // 指定 webpack 打包时要使用模块
  module: {
    // 指定要加载的规则
    rules: [
      {
        // test 指定的是规则生效的文件
        test: /\.ts$/,
        // 要使用的 loader
        use: "ts-loader",
        // 要排除的文件
        exclude: /node_modules/,
      },
    ],
  },
};
tsconif.json
{
  "compilerOptions": {
    "module":"ES2015",
    "target":"ES2015",
    "strict":false,
  }
}
自动生成 html
npm i -D html-webpack-plugin自动打开浏览器
npm i -D webpack-dev-serverpackage.json
  "scripts": {
    "test": "echo \"Error: no test specified\" && exit 1",
    "build": "webpack",
    "start": "webpack serve --open"
  },
编译前自动清空 dist 文件并重新创建
npm i -D clean-webpack-pluginwebpack.config.js
// 引入一个包
const path = require("path");
// 引入 html 插件
const HTMLWebpackPlugin = require("html-webpack-plugin");
// 引入 clean 插件
const { CleanWebpackPlugin } = require("clean-webpack-plugin");

// webpack 中所有的配置信息都应该写在 module.exports 中
module.exports = {
  // 指定入口文件
  entry: "./src/index.ts",

  // 指定打包文件所在的目录
  output: {
    path: path.resolve(__dirname, "dist"),
    // 打包后文件的名字
    filename: "bundle.js",
  },

  // 指定 webpack 打包时要使用模块
  module: {
    // 指定要加载的规则
    rules: [
      {
        // test 指定的是规则生效的文件
        test: /\.ts$/,
        // 要使用的 loader
        use: "ts-loader",
        // 要排除的文件
        exclude: /node_modules/,
      },
    ],
  },
  // 配置 webpack 插件
  plugins: [
    new CleanWebpackPlugin(),
    new HTMLWebpackPlugin({
      // title: "这是一个自定义的 title",
      template: "./src/index.html",
    }),
  ],

  // 用来设置引用模块
  resolve: {
    extensions: [".ts", ".js"],
  },

  mode: "production",
};
babel:帮助解决兼容性问题
把新语法转换成旧语法;
代码可以在不同的浏览器里面使用
npm i -D @babel/core @babel/preset-env babel-loader core-jswebpack.config.js
// 引入一个包
const path = require("path");
// 引入 html 插件
const HTMLWebpackPlugin = require("html-webpack-plugin");
// 引入 clean 插件
const { CleanWebpackPlugin } = require("clean-webpack-plugin");

// webpack 中所有的配置信息都应该写在 module.exports 中
module.exports = {
  // 指定入口文件
  entry: "./src/index.ts",

  // 指定打包文件所在的目录
  output: {
    path: path.resolve(__dirname, "dist"),
    // 打包后文件的名字
    filename: "bundle.js",
    // 告诉 webpack 不使用箭头函数,防止 无法解析 ie
    environment: {
      arrowFunction: false,
    },
  },

  // 指定 webpack 打包时要使用模块
  module: {
    // 指定要加载的规则
    rules: [
      {
        // test 指定的是规则生效的文件
        test: /\.ts$/,
        // 要使用的 loader
        use: [
          // 配置 babel
          {
            // 指定加载器
            loader: "babel-loader",
            // 设置 babel
            options: {
              // 设置预定义的环境
              presets: [
                [
                  // 指定环境插件
                  "@babel/preset-env",
                  // 配置信息
                  {
                    // 要兼容的目标浏览器
                    targets: {
                      chrome: "88",
                      ie: "11",
                    },
                    // 指定 corejs 的版本
                    corejs: "3",
                    // 使用 corejs 的方法 "usage" 表示按需加载
                    useBuiltIns: "usage",
                  },
                ],
              ],
            },
          },
          "ts-loader",
        ],
        // 要排除的文件
        exclude: /node_modules/,
      },
    ],
  },
  // 配置 webpack 插件
  plugins: [
    new CleanWebpackPlugin(),
    new HTMLWebpackPlugin({
      // title: "这是一个自定义的 title",
      template: "./src/index.html",
    }),
  ],

  // 用来设置引用模块
  resolve: {
    extensions: [".ts", ".js"],
  },

  mode: "production",
};
二十六、发布订阅模式
// 1. 什么是 发布订阅模式 他是设计模式的其中一种
// 2. 面试经常问到 其次手写这个 它的思想被人们广泛使用

// 监听器
// 实现 once on emit off 订阅中心 Map<事件的名称,[Function]订阅者的集合>
interface I {
  events: Map<string, Function[]>; // 订阅中心
  once: (event: string, callback: Function) => void; // 触发一次
  on: (event: string, callback: Function) => void; //订阅、监听
  emit: (event: string, ...args: any[]) => void; //派发
  off: (event: string, callback: Function) => void; //删除监听器
}

class Emitter implements I {
  events: Map<string, Function[]>;
  constructor() {
    this.events = new Map();
  }

  once(event: string, callback: Function) {
    // 1. 创建一个自定义函数 通过 on 触发,触发完之后立马通过 off 回收
    const cb = (...args: any[]) => {
      callback(...args);
      this.off(event, cb);
    };
    this.on(event, cb);
  }

  off(event: string, callback: Function) {
    const callbackList = this.events.get(event);
    if (callbackList) {
      callbackList.splice(callbackList.indexOf(callback, 1));
    }
  }
  on(event: string, callback: Function) {
    // 证明存过了
    if (this.events.has(event)) {
      const callbackList = this.events.get(event);
      callbackList && callbackList.push(callback);
    } else {
      // 否则就是第一次存
      this.events.set(event, [callback]);
    }
  }
  emit(event: string, ...args: any[]) {
    const callbackList = this.events.get(event);
    if (callbackList) {
      callbackList.forEach((fn) => {
        fn(...args);
      });
    }
  }
}

const bus = new Emitter();

const fn = (b: boolean, n: number) => {
  console.log(1, b, n);
};

// 监听
bus.on("message", fn);
bus.on("message", fn);

// 删除
// bus.off("message", fn);

// bus.once("message", fn);

// 触发
bus.emit("message", false, 1);
bus.emit("message", false, 1);
bus.emit("message", false, 1);
bus.emit("message", false, 1);

console.log(bus);
二十七、weekMap,weekSet,set,map
1. 基本用法
// 天然去重 引用类型除外
let set: Set<number> = new Set([1, 2, 3, 4, 5, 5, 6, 6, 6, 6, 6]);

console.log(set); // Set(6) { 1, 2, 3, 4, 5, 6 }

set.add(7);
console.log(set); // Set(7) { 1, 2, 3, 4, 5, 6, 7 }
console.log(set.has(7)); // true

set.delete(5);
console.log(set); //Set(6) { 1, 2, 3, 4, 6, 7 }

set.clear();
console.log(set); // Set(0) {}
2. 遍历方法
// map 的 key 可以是引用类型 (object,array)
let obj = { name: "小满" };
let map: Map<object, any> = new Map();

map.set(obj, "小满");
3. weakmap
弱项,弱引用。不会被计入垃圾回收策略
weakmap 与 map 的区别:weakmap 的 key 只能是引用类型
首先 obj 引用了这个对象 +1, aahph 也引用了 +1, weakmap 也引用了,但是不会 +1。因为它是弱引用,不会计入垃圾回收机制,因此 obj 和 aaphp 释放了,该引用 weakmap 也会随着消失的,但是控制台能输出,值取不到。因为 v8 回收机制需要一定时间,使用 setTimeOut 延长看看。并且为了避免这个问题不允许读取键值,也不允许遍历。同理 weakset 也一样。
let obj: any = { name: "xiaoman" }; // 1
let aahph: any = obj; // 2
let weakmap: WeakMap<object, any> = new WeakMap();
weakmap.set(obj, "sadsad"); // 2
obj = null; // -1
console.log(aahph); // { name: 'xiaoman' }
aahph = null;
console.log(aahph); // null
console.log(weakmap); // WeakMap { <items unknown> }
// 能看到但是取不出来
// v8 的垃圾回收机制需要时间
console.log(weakmap.get(obj)); // undefinedweakmap 不允许遍历,map 可以
4. weakset
也是弱引用类型,用法和 weakmap 一样
let weakset = new WeakSet([obj]);附录:tsconfig.json⽂件详细配置
exclude
{
"include": ["**/*"],
"exclude": ["**/*.spec.ts"]
}extends
{
"extends": "../tsconfig.base.json"
}{
"extends": "@tsconfig/node12/tsconfig.json"
}files
{
"files": ["a.ts", "b.ts"]
}include
{
"include": ["src/**/*", "tests/**/*"]
}references
{
"references": [
{ "path": "../pkg1" },
{ "path": "../pkg2/tsconfig.json" }
]
}{
"compilerOptions": {
"composite": true
}
}compilerOptions
allowJs
{
"compilerOptions": {
"allowJs": true
}
}alwaysStrict
allowSyntheticDefaultImports
allowUnreachableCode
allowUnusedLabels
baseUrl
{
"compilerOptions": {
"baseUrl": "./"
}
}import { helloWorld } from "hello/world";checkJs
{
"compilerOptions":{
"checkJs": true
}
}composite
declaration
{
"compilerOptions": {
"declaration": true
}
}declarationDir
{
"compilerOptions": {
"declaration": true,
"declarationDir": "./types"
}
}declarationMap
{
"compilerOptions": {
"declaration": true,
"declarationMap": true
}
}emitBOM
emitDeclarationOnly
esModuleInterop
import * as moment from 'moment'
moment(); // 报错import moment from 'moment'
moment(); // 不报错exactOptionalPropertyTypes
// 打开 exactOptionalPropertyTypes
interface MyObj {
foo?: 'A' | 'B';
}
let obj:MyObj = { foo: 'A' };
obj.foo = undefined; // 报错forceConsistentCasingInFileNames
incremental
inlineSourceMap
inlineSources
isolatedModules
jsx
{
"compilerOptions": {
"jsx": "preserve"
}
}lib
{
"compilerOptions": {
"lib": ["dom", "es2021"]
}
}listEmittedFiles
{
"compilerOptions": {
"listEmittedFiles": true
}
}listFiles
{
"compilerOptions": {
"listFiles": true
}
}mapRoot
{
"compilerOptions": {
"sourceMap": true,
"mapRoot": "https://my-website.com/debug/sourcemaps/"
}
}module
{
"compilerOptions": {
"module": "commonjs"
}
}moduleResolution
moduleSuffixes
{
"compilerOptions": {
"moduleSuffixes": [".ios", ".native", ""]
}
}newLine
noEmit
noEmitHelpers
noEmitOnError
noFallthroughCasesInSwitch
noImplicitAny
noImplicitReturns
noImplicitThis
noUnusedLocals
noUnusedParameters
outDir
outFile
paths
{
"compilerOptions": {
"baseUrl": "./",
"paths": {
"b": ["bar/b"]
}
}
}{
"compilerOptions": {
"baseUrl": "./",
"paths": {
"@bar/*": ["bar/*"]
}
}
}preserveConstEnums
{
"compilerOptions": {
"preserveConstEnums": true
}
}pretty
removeComments
resolveJsonModule
rootDir
rootDirs
{
"compilerOptions": {
"rootDirs": ["bar", "foo"]
}
}sourceMap
sourceRoot
{
"compilerOptions": {
"sourceMap": true,
"sourceRoot": "https://my-website.com/debug/source/"
}
}strict
{
"compilerOptions": {
"strict": true
}
}{
"compilerOptions": {
"strict": true,
"alwaysStrict": false
}
}strictBindCallApply
function fn(x: string) {
return parseInt(x);
}
// strictBindCallApply:false
const n = fn.call(undefined, false);
// 以上不报错strictFunctionTypes
function fn(x:string) {
console.log('Hello, ' + x.toLowerCase());
}
type StringOrNumberFunc = (ns:string|number) => void;
// 打开 strictFunctionTypes,下⾯代码会报错
let func:StringOrNumberFunc = fn;strictNullChecks
let value:string;
// strictNullChecks:false
// 下⾯语句不报错
value = null;function doSomething(x:string|null) {
if (x === null) {
// do nothing
} else {
console.log("Hello, " + x.toUpperCase());
}
}strictPropertyInitialization
// strictPropertyInitialization:true
class User {
// 报错,属性 username 没有初始化
username: string;
}// 解决⽅法⼀
class User {
username = '张三';
}
// 解决⽅法⼆
class User {
username:string|undefined;
}
// 解决⽅法三
class User {
username:string;
constructor(username:string) {
this.username = username;
}
}
// 或者
class User {
constructor(public username:string) {}
}
// 解决⽅法四:赋值断⾔
class User {
username!:string;
constructor(username:string) {
this.initialize(username);
}
private initialize(username:string) {
this.username = username;
}
}suppressExcessPropertyErrors
target
traceResolution
{
"compilerOptions": {
"traceResolution": true
}
}typeRoots
{
"compilerOptions": {
"typeRoots": ["./typings", "./vendor/types"]
}
}types
{
"compilerOptions": {
"types": ["node", "jest", "express"]
}
}useUnknownInCatchVariables
try {
someExternalFunction();
} catch (err) {
err; // 类型 any
}try {
someExternalFunction();
} catch (err) {
if (err instanceof Error) {
console.log(err.message);
}
}


 575
575

 被折叠的 条评论
为什么被折叠?
被折叠的 条评论
为什么被折叠?
 到【灌水乐园】发言


