


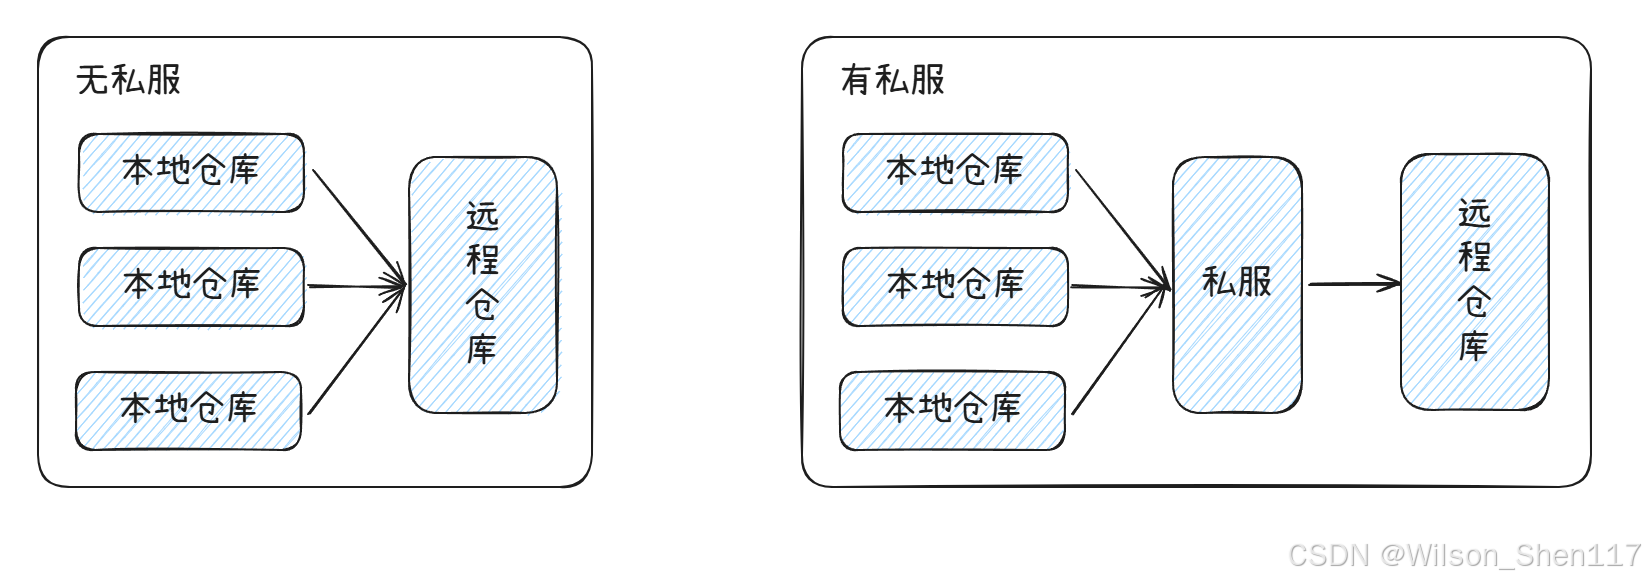
1.私服简介
私服(Private Repository)是指企业或团队内部搭建的、用于存储和管理软件构件(如 JAR 文件、WAR 文件、Docker 镜像等)的仓库。私服通常用来解决公共仓库(如 Maven Central、Nexus、JCenter 等)无法满足的需求,例如:
- 保密性和安全性要求:私有软件包和构件只能在指定的团队或组织内访问。
- 版本控制:企业可以对构件的版本进行严格管理,避免使用到不符合需求的版本。
- 构件存储:可以存储自定义构件、内部开发的第三方库等。
搭建 Maven 私服仓库可以提高项目构建和部署的效率、稳定性和安全性,同时方便管理内部开发的组件和私有库,比较适用于企业内部或者特定场景下的需求。
有了私服之后,当 Maven 需要下载构件时,直接请求私服,私服上存在则下载到本地仓库;否则,私服请求外部的远程仓库,将构件下载到私服,再提供给本地仓库下载。
2. 私服搭建
环境说明
- 服务器版本:CentOS7
- IP地址:192.168.124.128
- 私服镜像:sonatype/nexus3
2.1.下载 Nexus3 镜像
docker pull sonatype/nexus3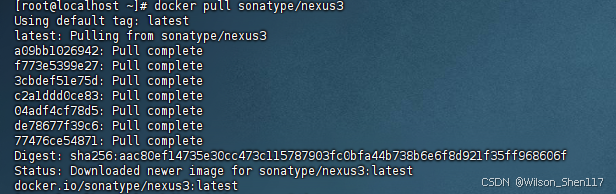
2.2.创建 Nexus3 挂载文件夹
mkdir -p /docker/nexus3/data因为接下来要挂载该目录,所以我们再给 data 文件夹执行和写入的权限,让容器正常运行。
chmod 777 /docker/nexus3/data
2.3.启动 Nexus3 容器
docker run -d -p 8081:8081 --name nexus -v /docker/nexus3/data:/nexus-data --restart=always sonatype/nexus3
在上述启动命令中,我们将 Nexus3 容器的 /nexus-data 目录映射到了宿主机的 /docker/nexus3/data 目录。这样在 Nexus3 容器运行过程中,在 /nexus-data 目录产生的文件和日志都会在宿主机的 /docker/nexus3/data 目录中查看到。
然后我们查看容器是否正常运行:
docker ps![]()
2.4.配置 Nexus3
2.4.1.登录并重新设置密码
容器启动完毕后,监听的端口和宿主机端口都是8081,所以我们在浏览器地址栏输入 http://192.168.124.128:8081 便可以打开 Nexus3 页面,然后我们点击右上角的 Sign in 进行登录。
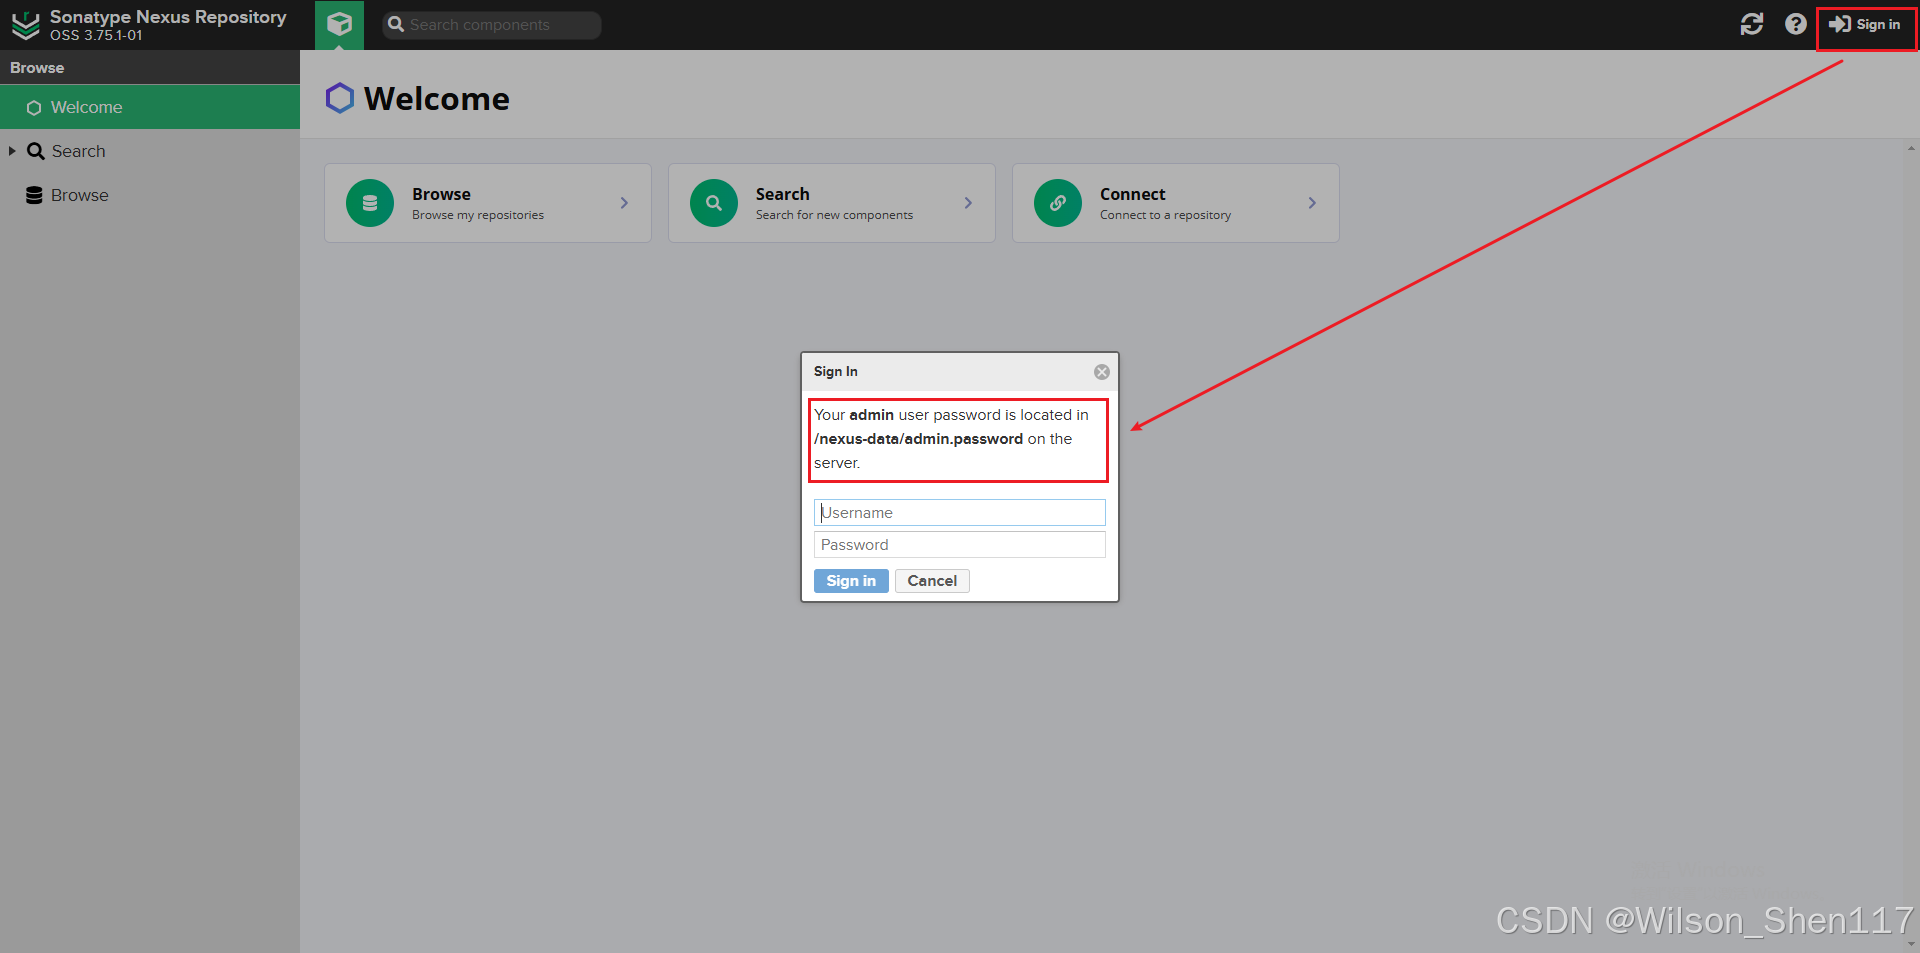
根据提示得知,初始密码的存放位置为 /nexus-data/admin.password,因为我们在启动 Nexus3 容器时,将 Nexus3 容器的 /nexus-data 目录映射到了宿主机的 /docker/nexus3/data 目录,所以,我们在宿主机的 /docker/nexus3/data 目录中也能够查询到 admin.password 文件。

然后我们查看 admin 账号的密码并输入,即可登录。
![]()
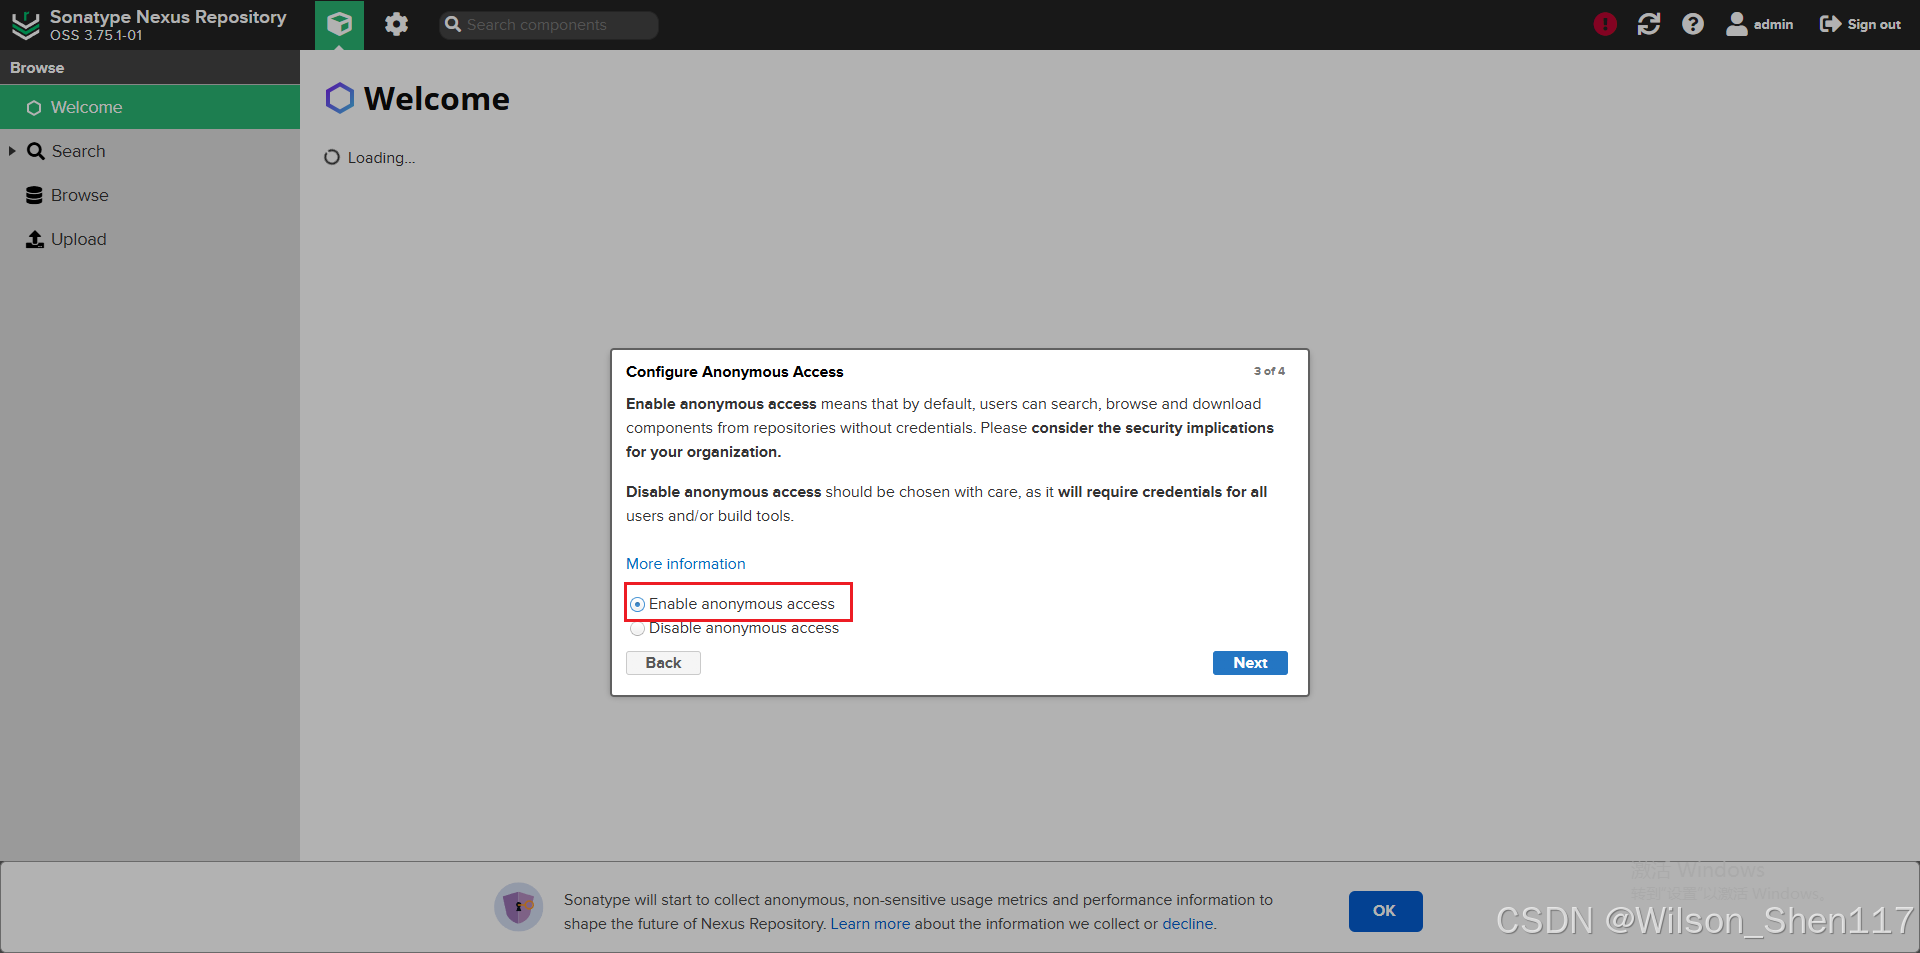
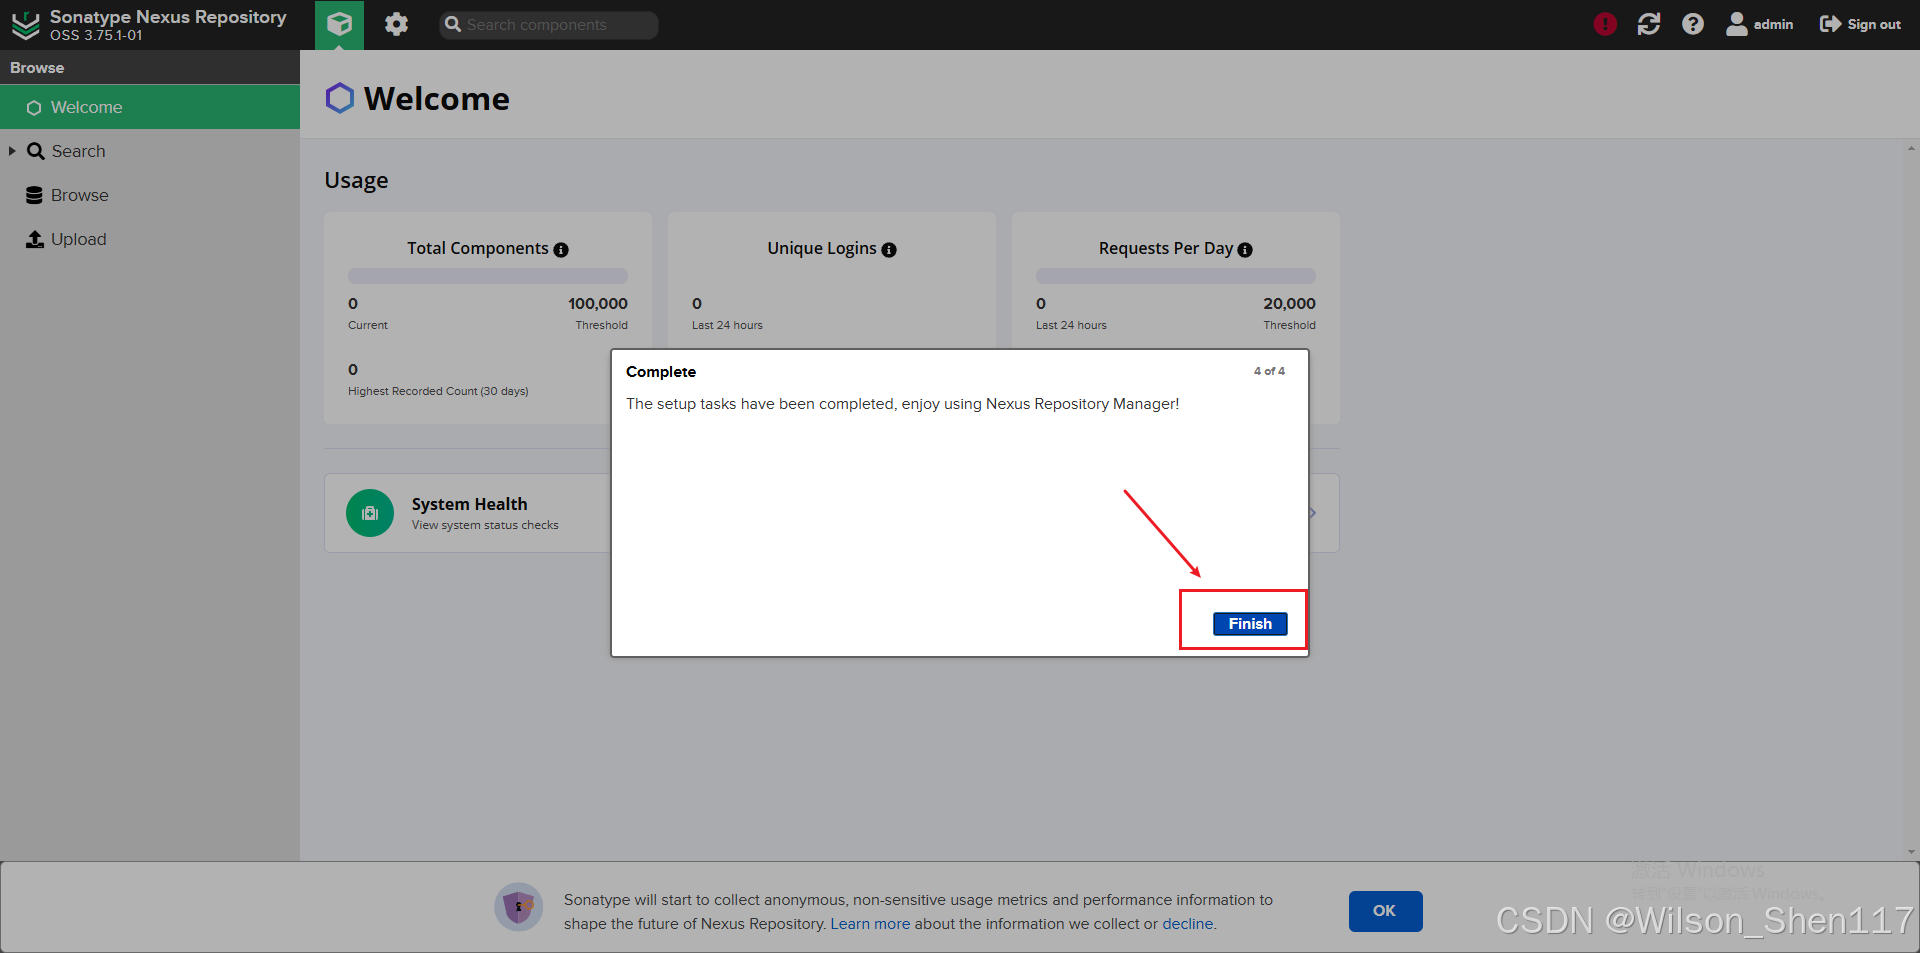
登录以后,会让我们重新设置密码,然后一直点击 Next 到 Finish 为止。
2.4.2.配置阿里云代理仓库
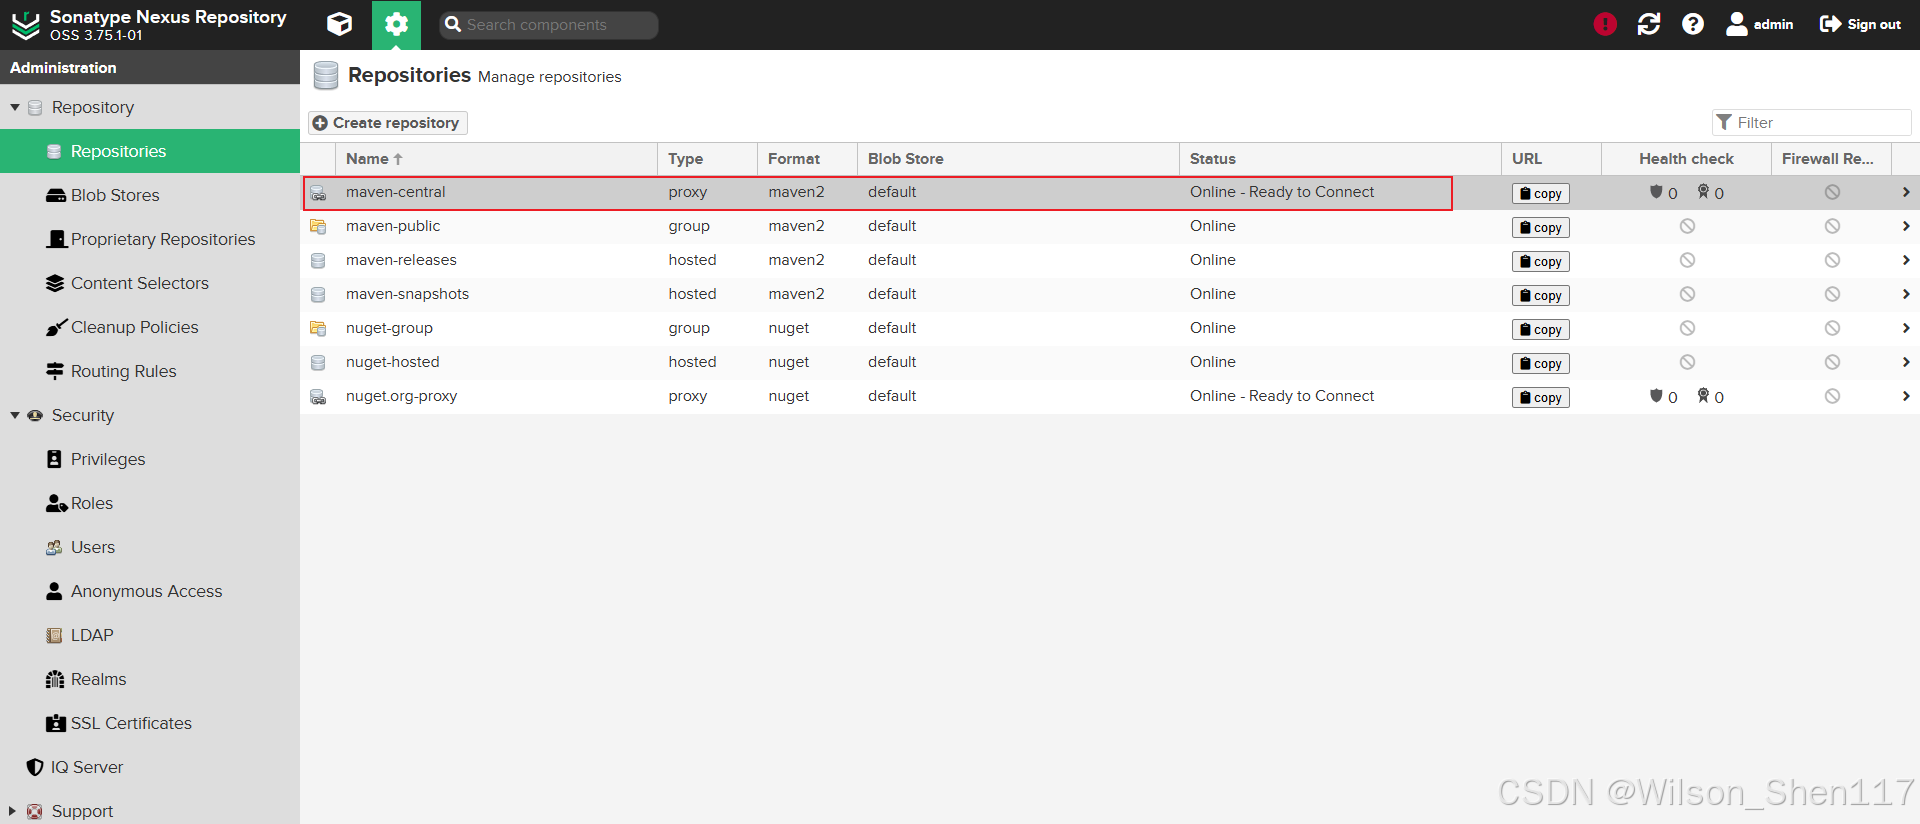
Nexus 默认使用的远程仓库是 maven-central
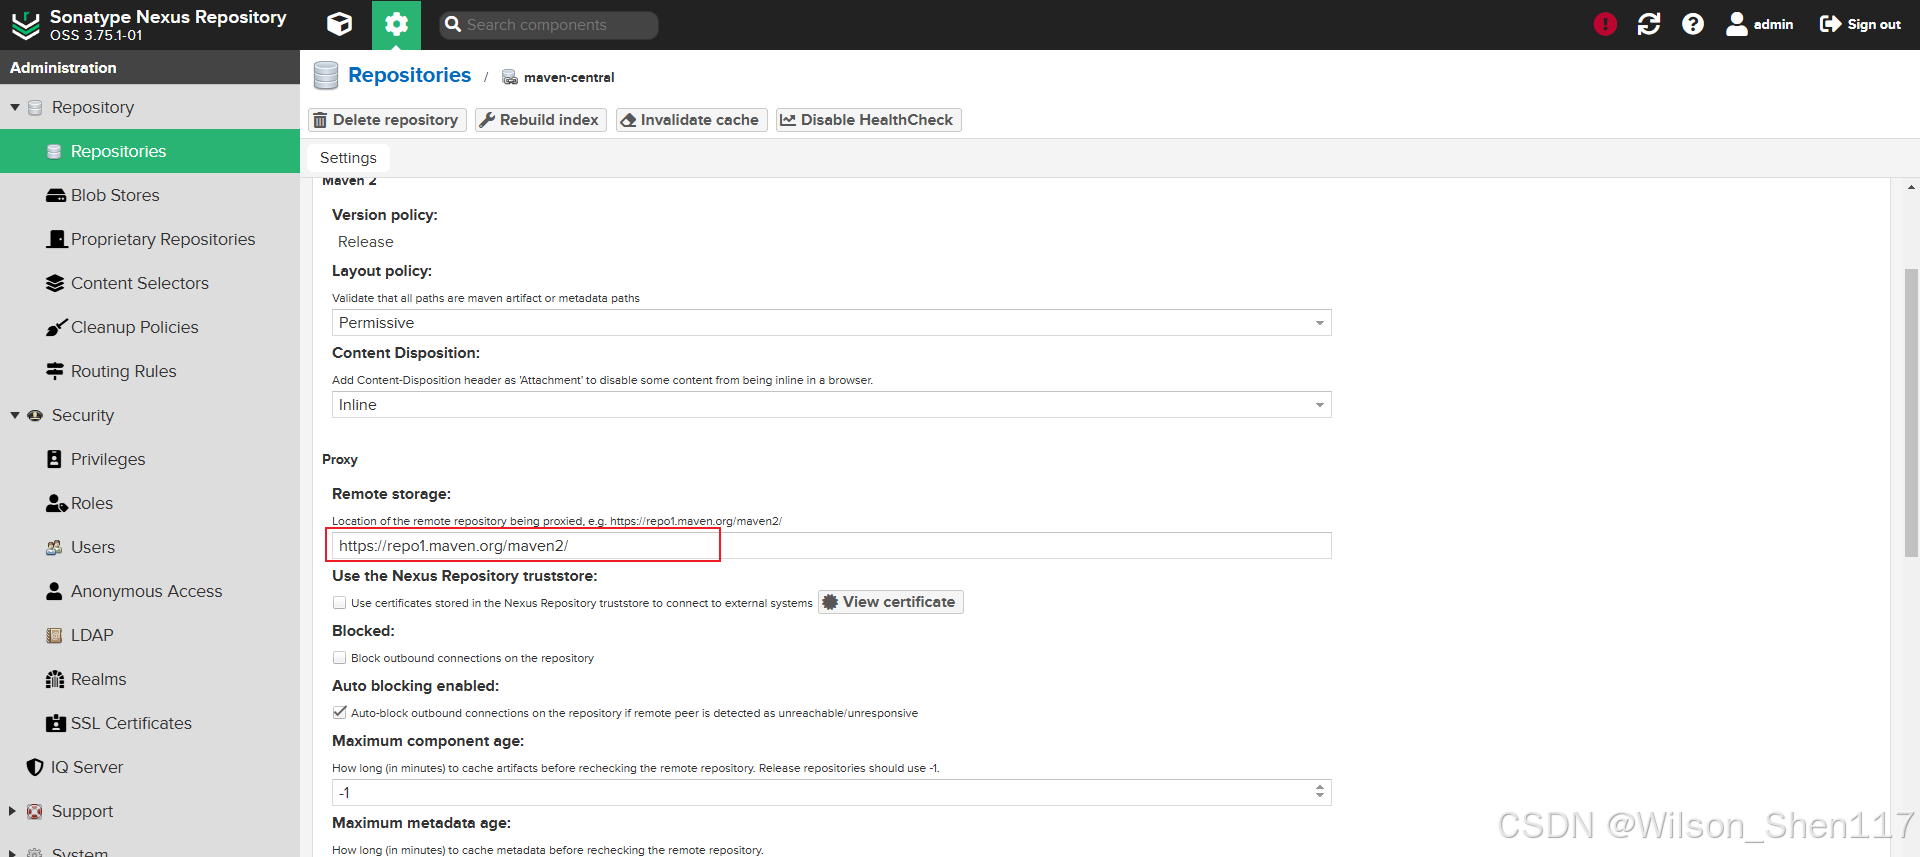
点进去,可以看到,maven-central 仓库配置的远程链接为 https://repo1.maven.org/maven2/,从这个远程仓库下载依赖很慢,经常连不上,所有我们需要配置阿里云远程代理仓库。
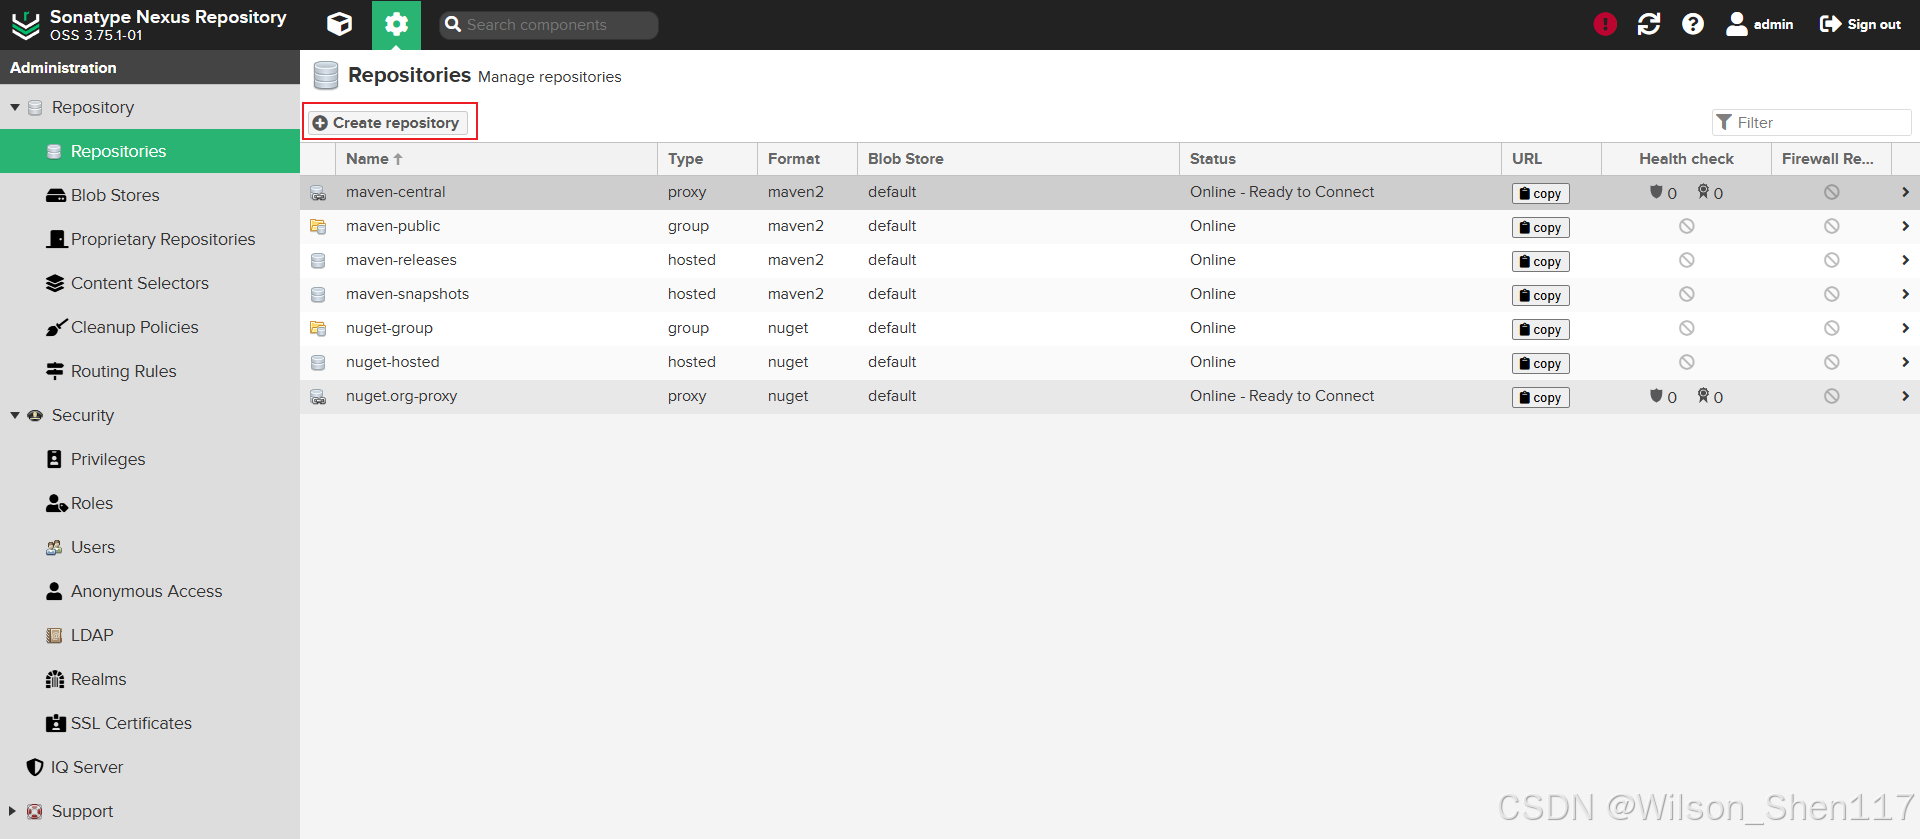
点击 Create repository 按钮:
 选择 maven2 (proxy) 类型:
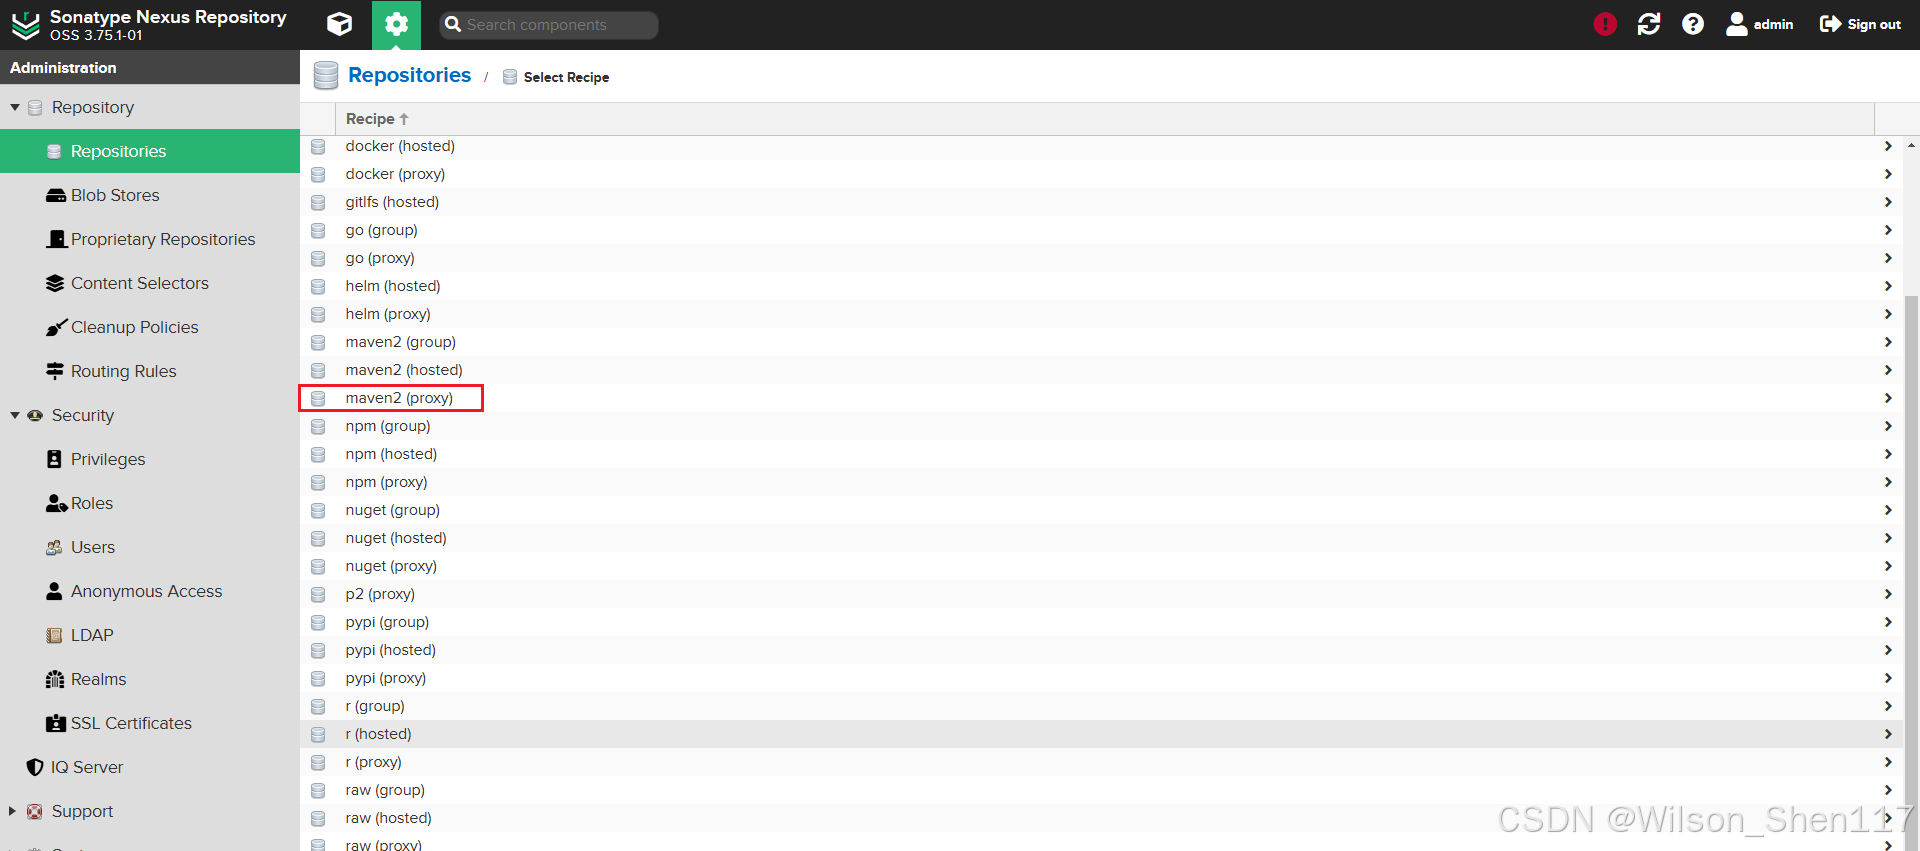
进入配置远程代理仓库的页面:
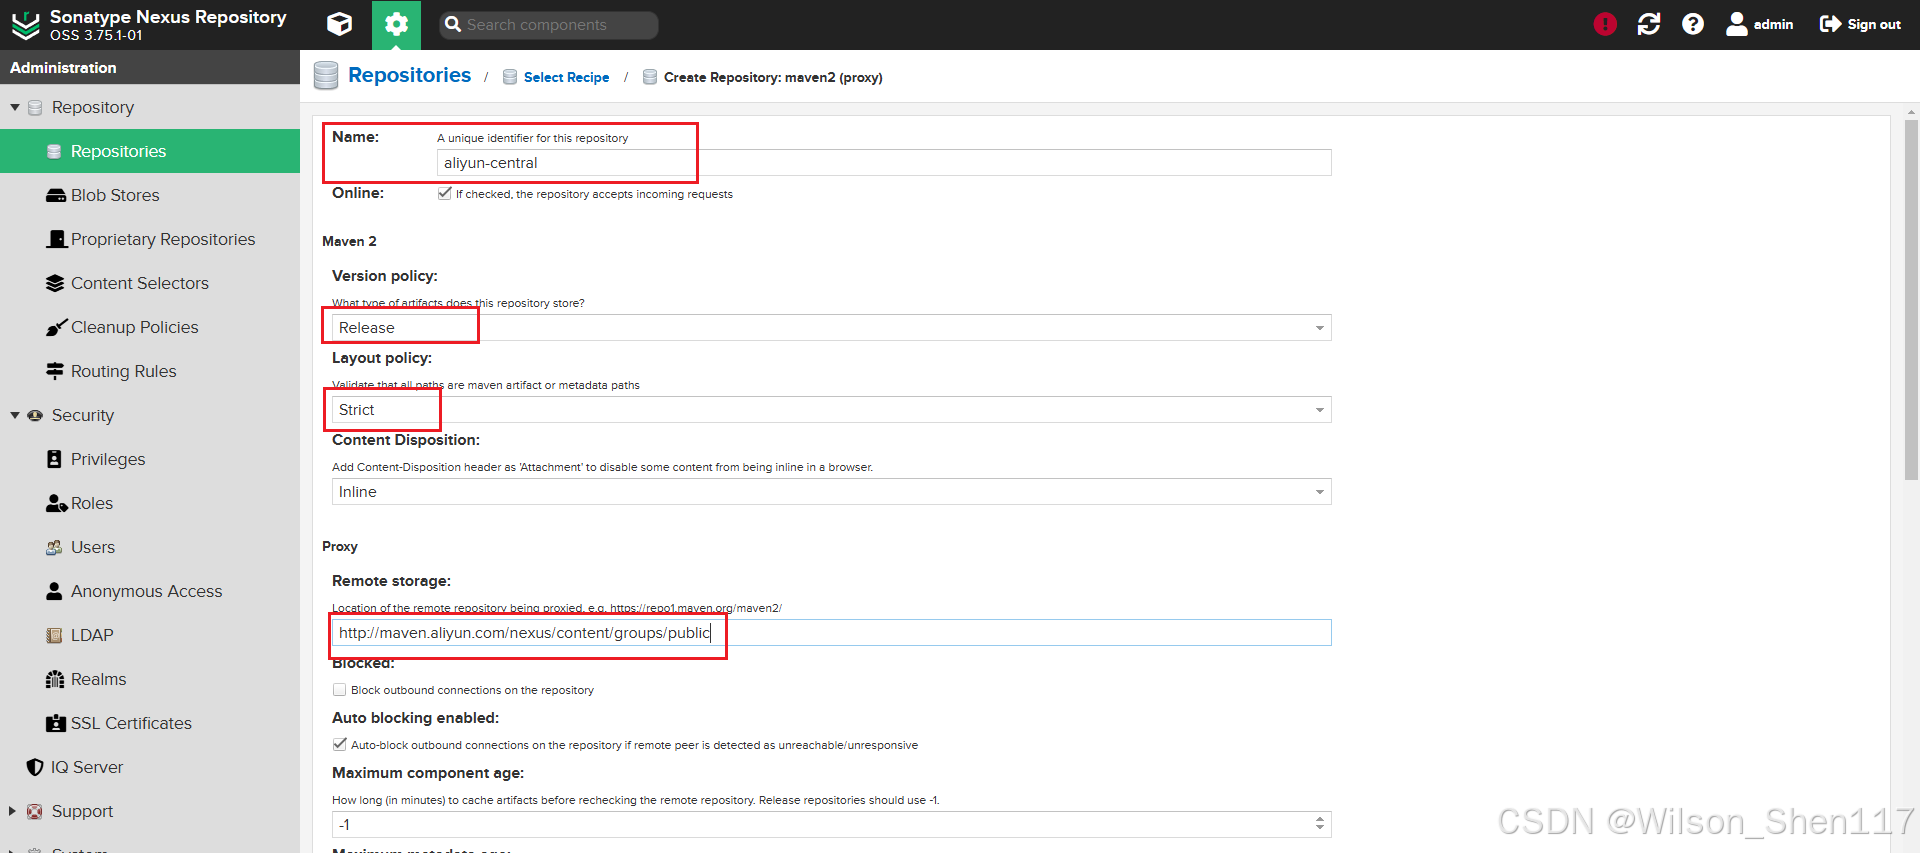
其中,每个配置项如下所示:
- Name:aliyun-central
- Version policy:Release
- Layout policy:Strict
- Remote storage:http://maven.aliyun.com/nexus/content/groups/public
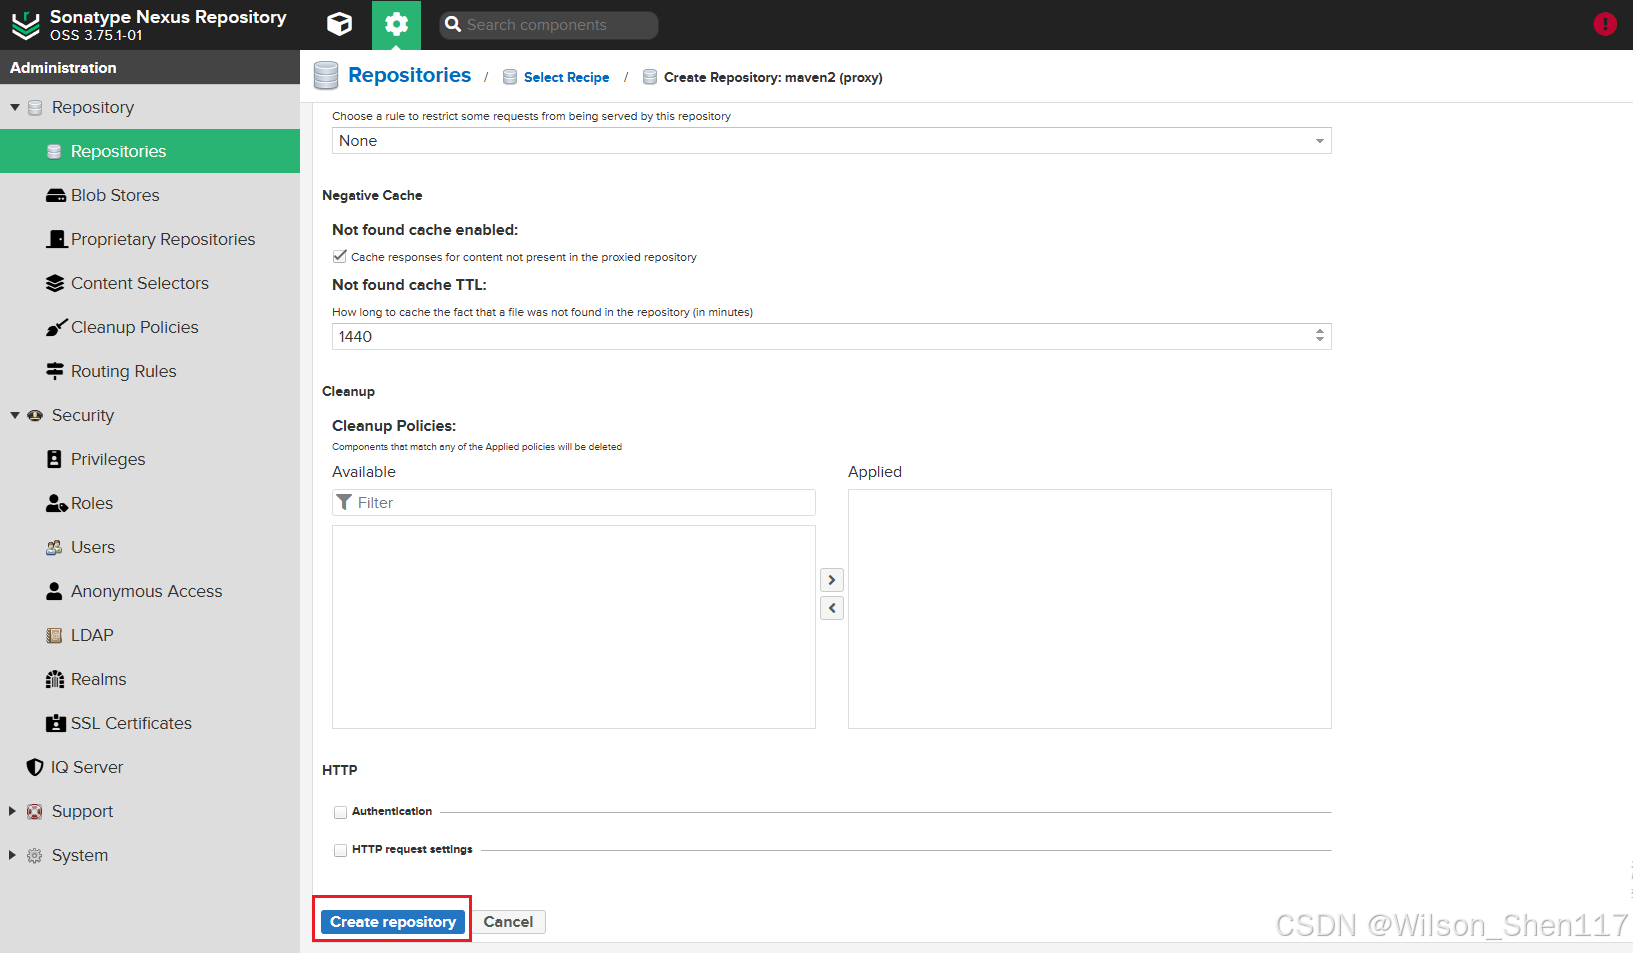
点击 Create repository 按钮完成创建:
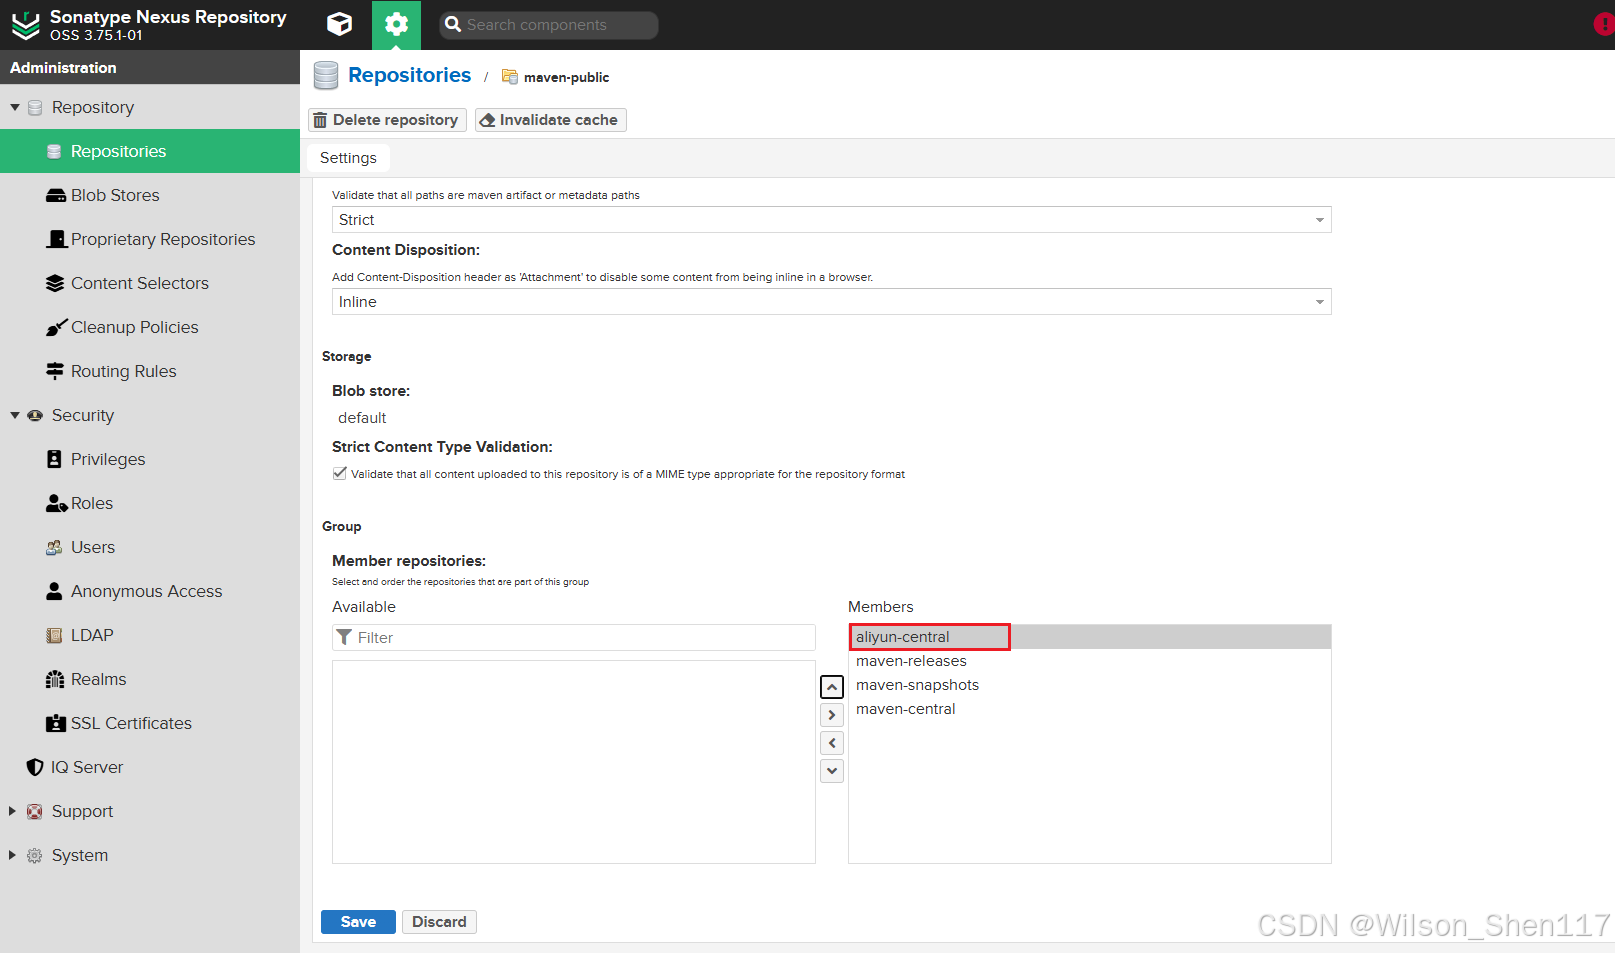
2.4.3.配置仓库组
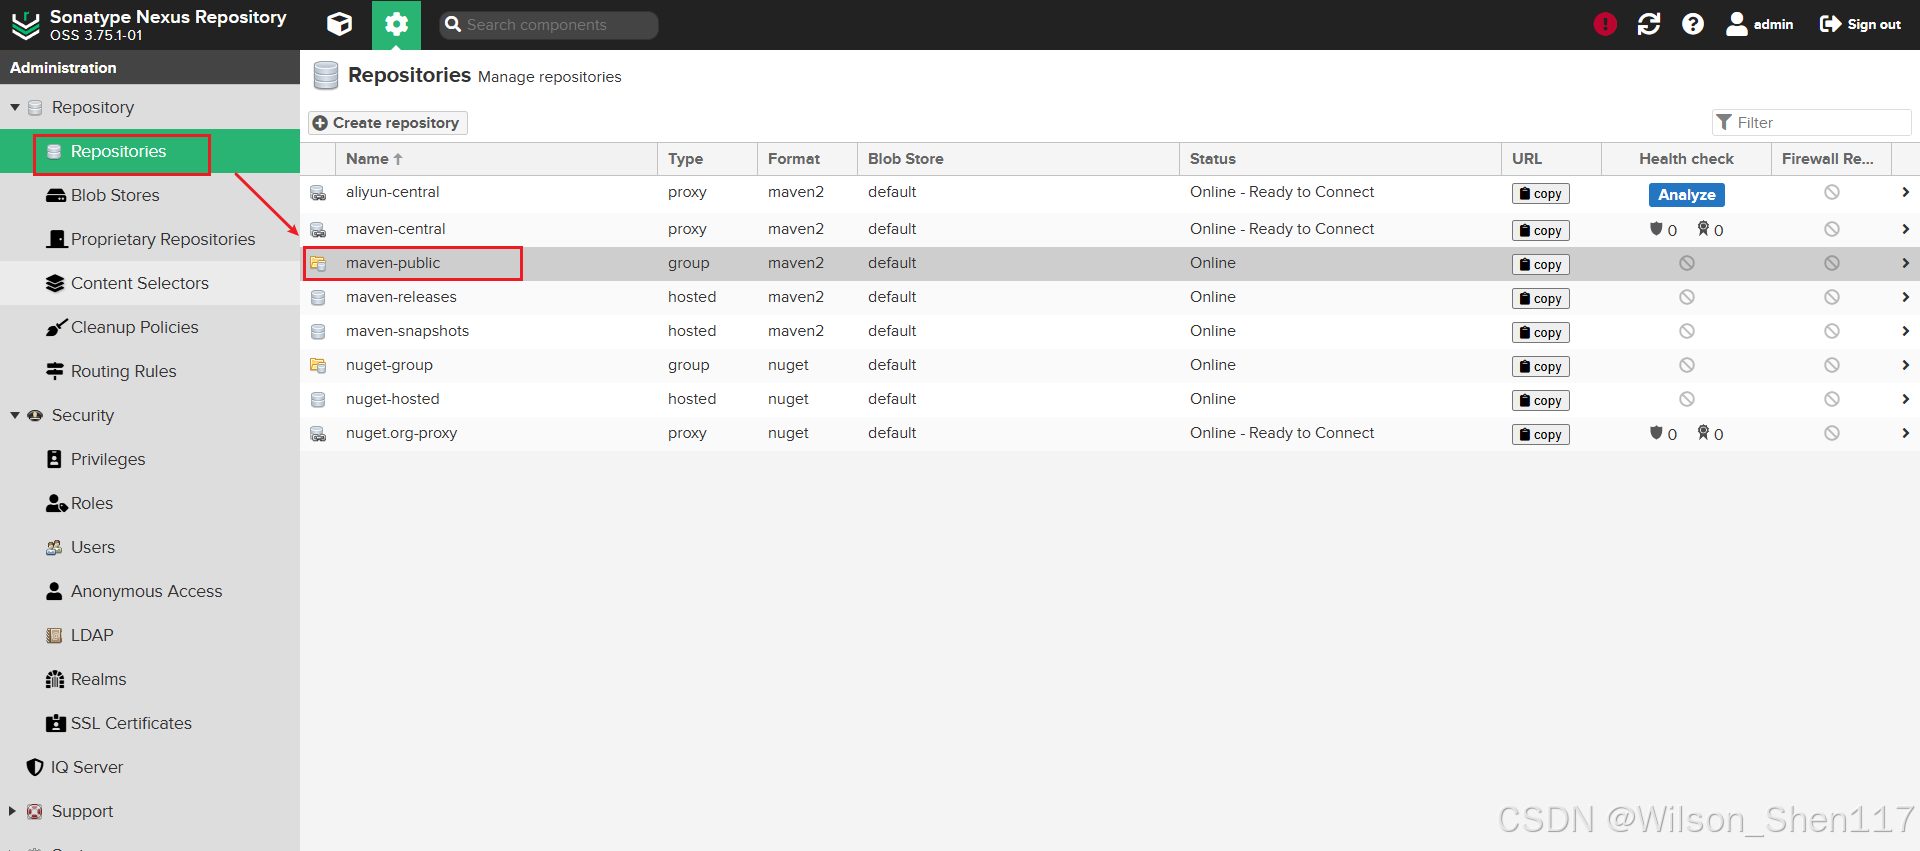
接下来,需要将 aliyun-central 配置到仓库组,并且将 aliyun-central 排在 maven-central 上面。
在Repositories 列表中,点击 maven-public:
找到 Group 配置:
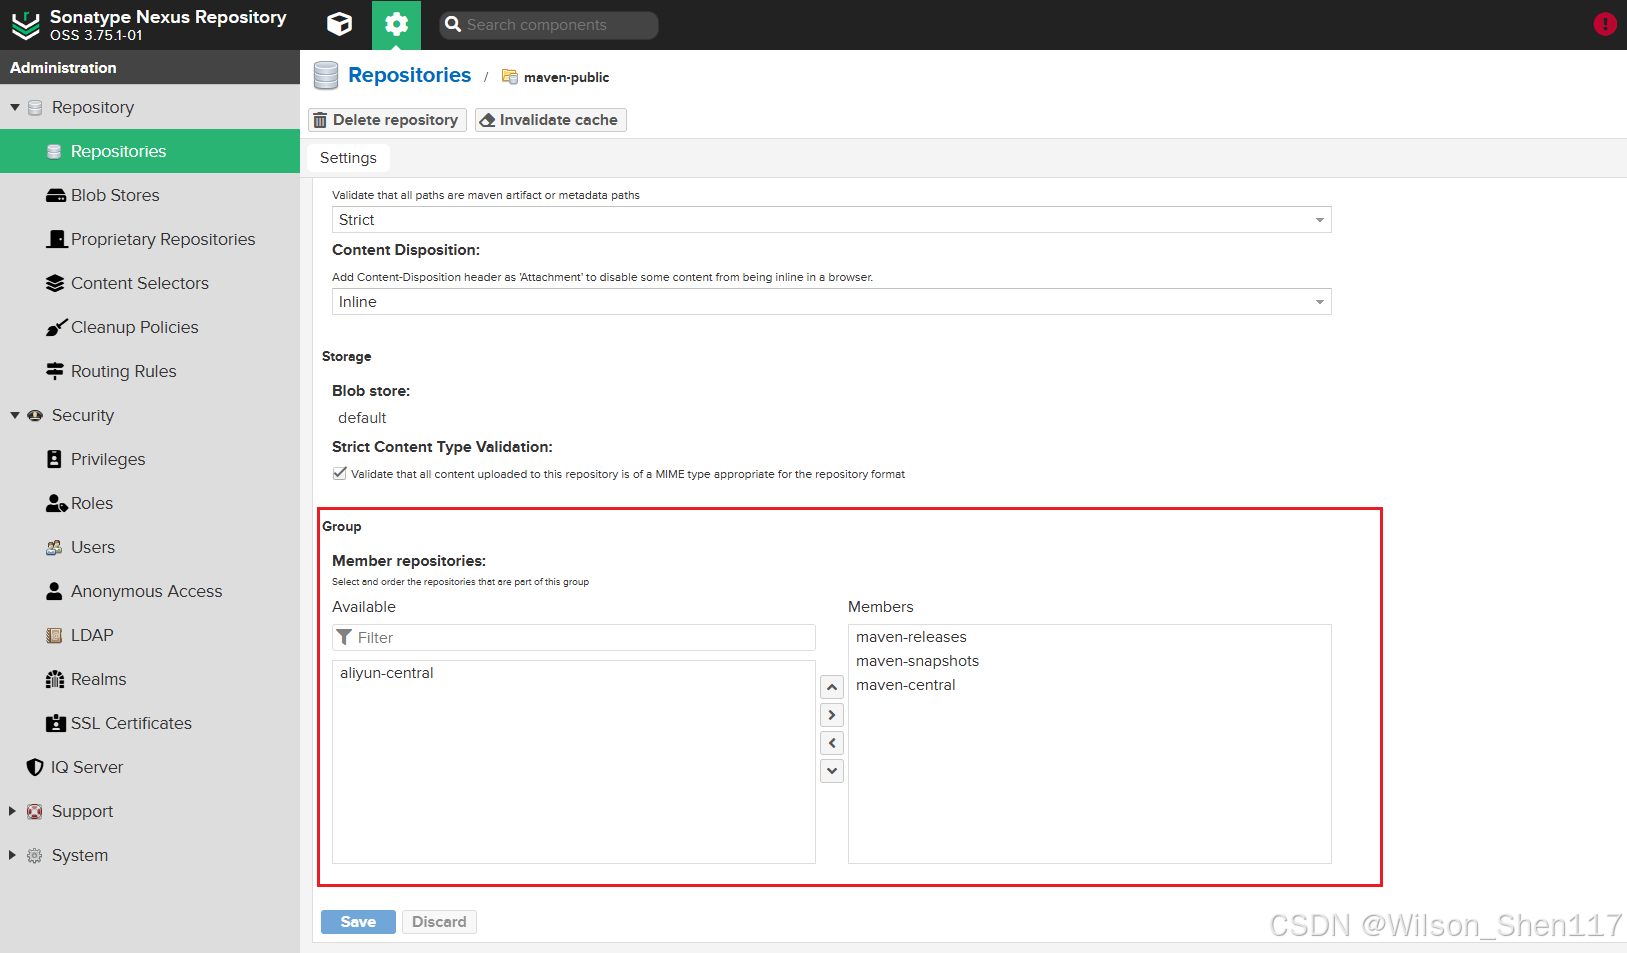
将 aliyun-central 移动到右侧,并排在最上面,然后点击 Save 按钮保存:
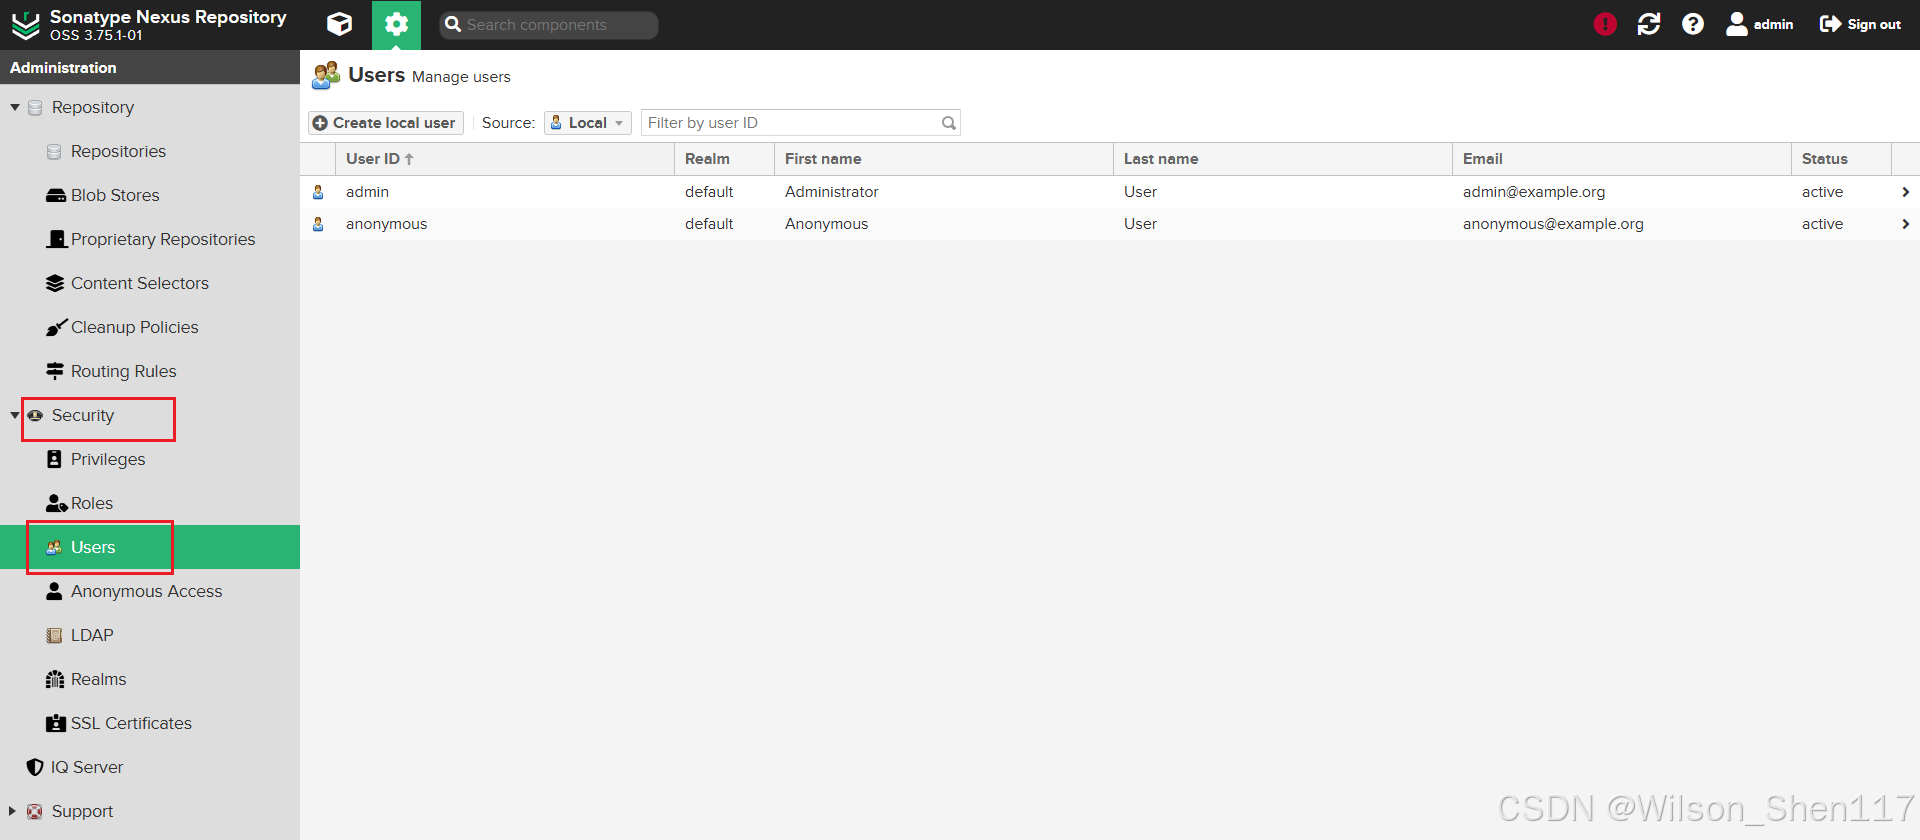
2.4.4.创建用户
接下来,创建一个用于上传 Jar 包到仓库的用户。
点击 Security 菜单下的 Users 菜单:
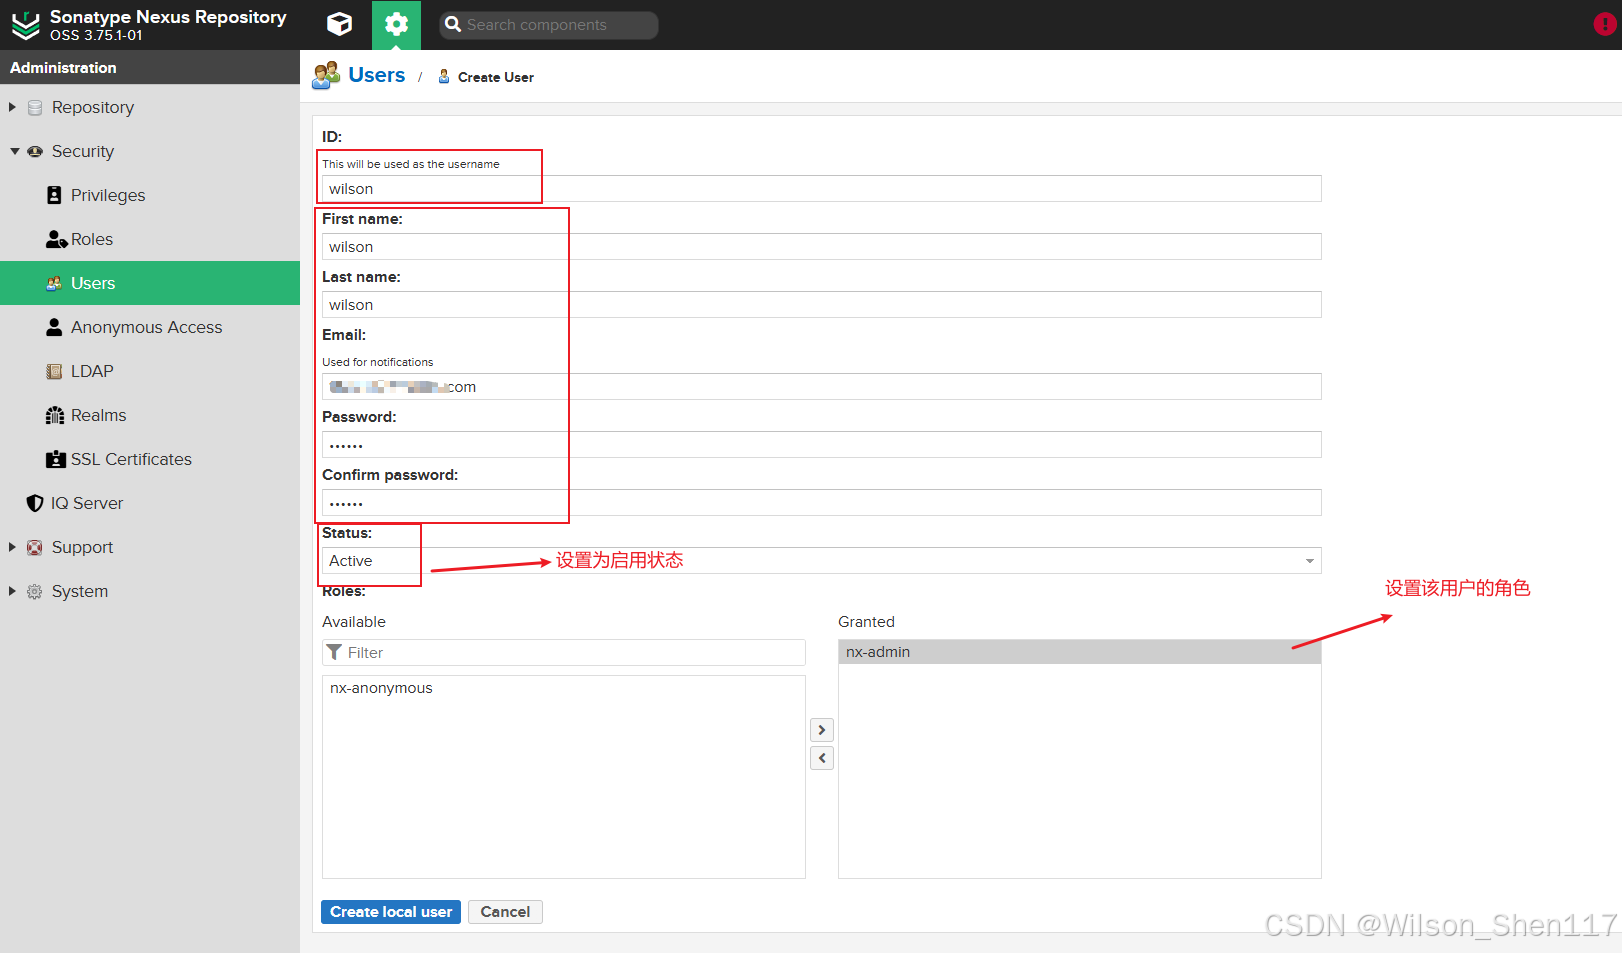
点击 Create local user 按钮,并设置用户的基本信息:
至此,Nexus 私服搭建完毕。
3.配置本地 Maven 仓库
配置完 Nexus 后,接下来,还需要对本地的 Maven 仓库进行配置,主要就是对 Maven 的 settings.xml 文件进行配置。
3.1.配置 servers 节点
在 settings.xml 文件中,找到 servers 节点,在 servers 节点中,配置之前创建的用户:
     <server>
        <id>releases</id>
        <username>wilson</username>
        <password>123456</password>
    </server>
	     <server>
        <id>snapshots</id>
        <username>wilson</username>
        <password>123456</password>
    </server>
3.2.配置 mirrors 节点
在 settings.xml 文件中,找到 mirrors 节点,在 mirrors 节点中,配置仓库地址:
<!--私服仓库地址-->
<mirror>
    <id>central</id>
    <name>Local Repository</name>
    <url>http://192.168.124.128:8081/repository/maven-public</url>
    <mirrorOf>*</mirrorOf>
</mirror>
<!--阿里云仓库地址-->
<mirror>
    <id>nexus-aliyun</id>
    <mirrorOf>*</mirrorOf>
    <name>Nexus aliyun</name>
    <url>http://maven.aliyun.com/nexus/content/groups/public</url>
</mirror>
3.3.配置 profiles 节点
在 settings.xml 文件中,找到 profiles 节点,在 profiles 节点中,配置仓库信息并激活该配置使其生效:
  <profiles>
        <profile>
            <id>nexus</id>
            <repositories>
                <repository>
                    <id>release</id>
                    <url>http://192.168.124.128:8081/repository/maven-releases/</url>
                    <releases>
                        <enabled>true</enabled>
                        <updatePolicy>always</updatePolicy>
                    </releases>
                    <snapshots>
                        <enabled>true</enabled>
                        <updatePolicy>always</updatePolicy>
                    </snapshots>
                </repository>
		<repository>
                    <id>snapshot</id>
                    <url>http://192.168.124.128:8081/repository/maven-snapshots/</url>
                    <releases>
                        <enabled>true</enabled>
                        <updatePolicy>always</updatePolicy>
                    </releases>
                    <snapshots>
                        <enabled>true</enabled>
                        <updatePolicy>always</updatePolicy>
                    </snapshots>
                </repository>
            </repositories>
            <pluginRepositories>
                <pluginRepository>
                    <id>release</id>
                    <url>http://192.168.124.128:8081/repository/maven-releases/</url>
                    <releases>
                        <enabled>true</enabled>
                        <updatePolicy>always</updatePolicy>
                    </releases>
                    <snapshots>
                        <enabled>true</enabled>
                        <updatePolicy>always</updatePolicy>
                    </snapshots>
                </pluginRepository>

                <pluginRepository>
                    <id>snapshot</id>
                    <url>http://192.168.124.128:8081/repository/maven-snapshots/</url>
                    <releases>
                        <enabled>true</enabled>
                        <updatePolicy>always</updatePolicy>
                    </releases>
                    <snapshots>
                        <enabled>true</enabled>
                        <updatePolicy>always</updatePolicy>
                    </snapshots>
                </pluginRepository>
            </pluginRepositories>
        </profile>
  </profiles>
    <activeProfiles>
        <activeProfile>nexus</activeProfile>
    </activeProfiles>
在 nexus profile 中定义了两个仓库(nexus-releases 和 nexus-snapshots)以及两个插件仓库(nexus-plugin-releases 和 nexus-plugin-snapshots)并指定了仓库的地址。
这样,我们后续在使用 Maven 构建项目时,指定使用该 settings.xml文件即可将依赖的 Jar 文件和生成的 Jar 文件上传到 Maven 私服仓库,如果使用 IDEA 编译项目,也需要在 IDEA 中,将 Maven 的配置文件指定为该 settings.xml。
4.配置项目 pom.xml
搭建完 Maven 私服仓库,配置好本地 Maven 仓库后,还需要在项目的 pom.xml 文件中进行相应的配置:
  <build>
    <plugins>
      <plugin>
        <groupId>org.apache.maven.plugins</groupId>
        <artifactId>maven-compiler-plugin</artifactId>
        <version>3.8.1</version>
        <configuration>
          <source>${java.version}</source>
          <target>${java.version}</target>
          <encoding>${project.build.sourceEncoding}</encoding>
        </configuration>
      </plugin>
      <!--发布代码Jar插件 -->
      <plugin>
        <groupId>org.apache.maven.plugins</groupId>
        <artifactId>maven-deploy-plugin</artifactId>
        <version>2.8.2</version>
      </plugin>
      <!--发布源码插件 -->
      <plugin>
        <groupId>org.apache.maven.plugins</groupId>
        <artifactId>maven-source-plugin</artifactId>
        <version>3.0.0</version>
        <executions>
          <execution>
            <phase>install</phase>
            <goals>
              <goal>jar-no-fork</goal>
            </goals>
          </execution>
        </executions>
      </plugin>
    </plugins>
  </build>

  <distributionManagement>
    <repository>
      <!--这里的id与settings.xml中的servers节点配置的用户ID一直,这样才能使用配置的用户去上传到maven私有仓库 -->
      <!--此仓库对应的为RELEASE版本的jar-->
      <id>releases</id>
      <url>http://192.168.124.128:8081/repository/maven-releases/</url>
    </repository>
    <snapshotRepository>
      <!--这里的id与settings.xml中的servers节点配置的用户ID一直,这样才能使用配置的用户去上传到maven私有仓库 -->
      <!--此仓库对应的为SNAPSHOT版本的jar-->
      <id>snapshots</id>
      <url>http://192.168.124.128:8081/repository/maven-snapshots/</url>
    </snapshotRepository>
  </distributionManagement>
5.上传 Jar 包
我们在 com.swc.util 包下,创建一个工具类 PhoneNumberUtils 用于判断输入的字符串是否符合中国大陆手机号码的规则:
public class PhoneNumberUtils {
// 中国大陆手机号码正则表达式
private static final String PHONE_REGEX = "^(1[3-9])\\d{9}$";
/**
* 判断是否为有效的中国大陆手机号码
*
* @param phoneNumber 输入的手机号
* @return true 如果是有效的手机号码,false 否则
*/
public static boolean isValidPhoneNumber(String phoneNumber) {
if (phoneNumber == null) {
return false;
}
// 使用正则表达式匹配手机号
return Pattern.matches(PHONE_REGEX, phoneNumber);
}
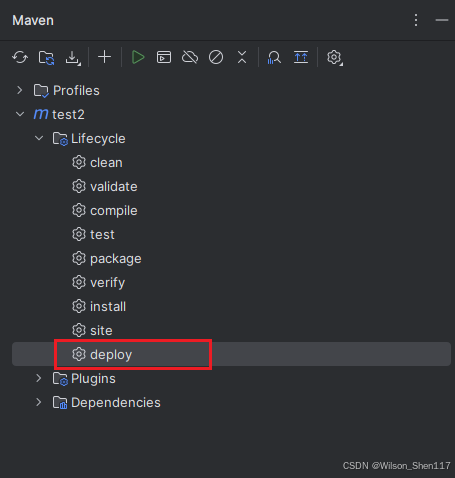
}然后我们执行 deploy 命令上传 Jar 包到私服当中:
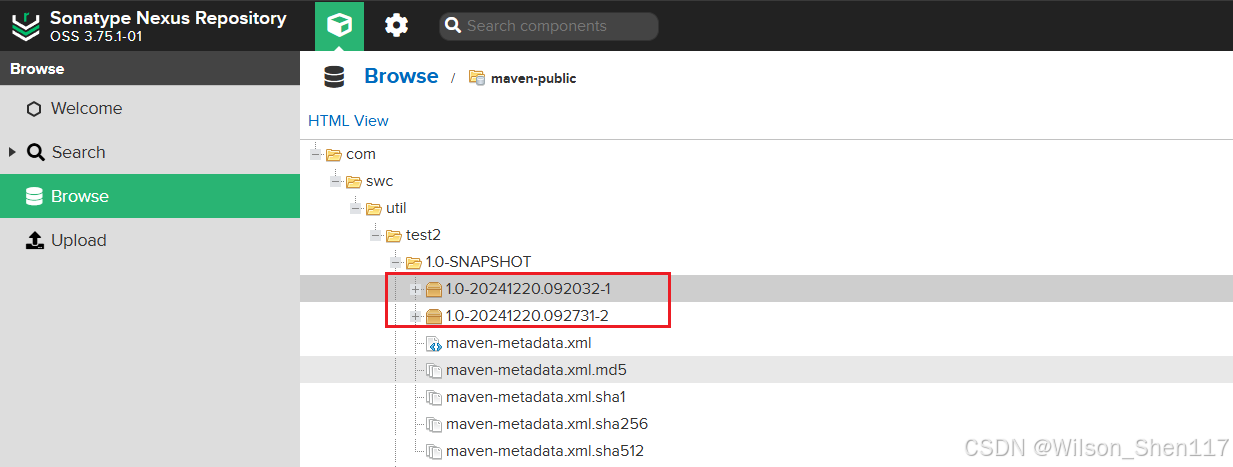
在 Nexus 页面中可以看到我们刚刚 deploy 的 Jar 包:
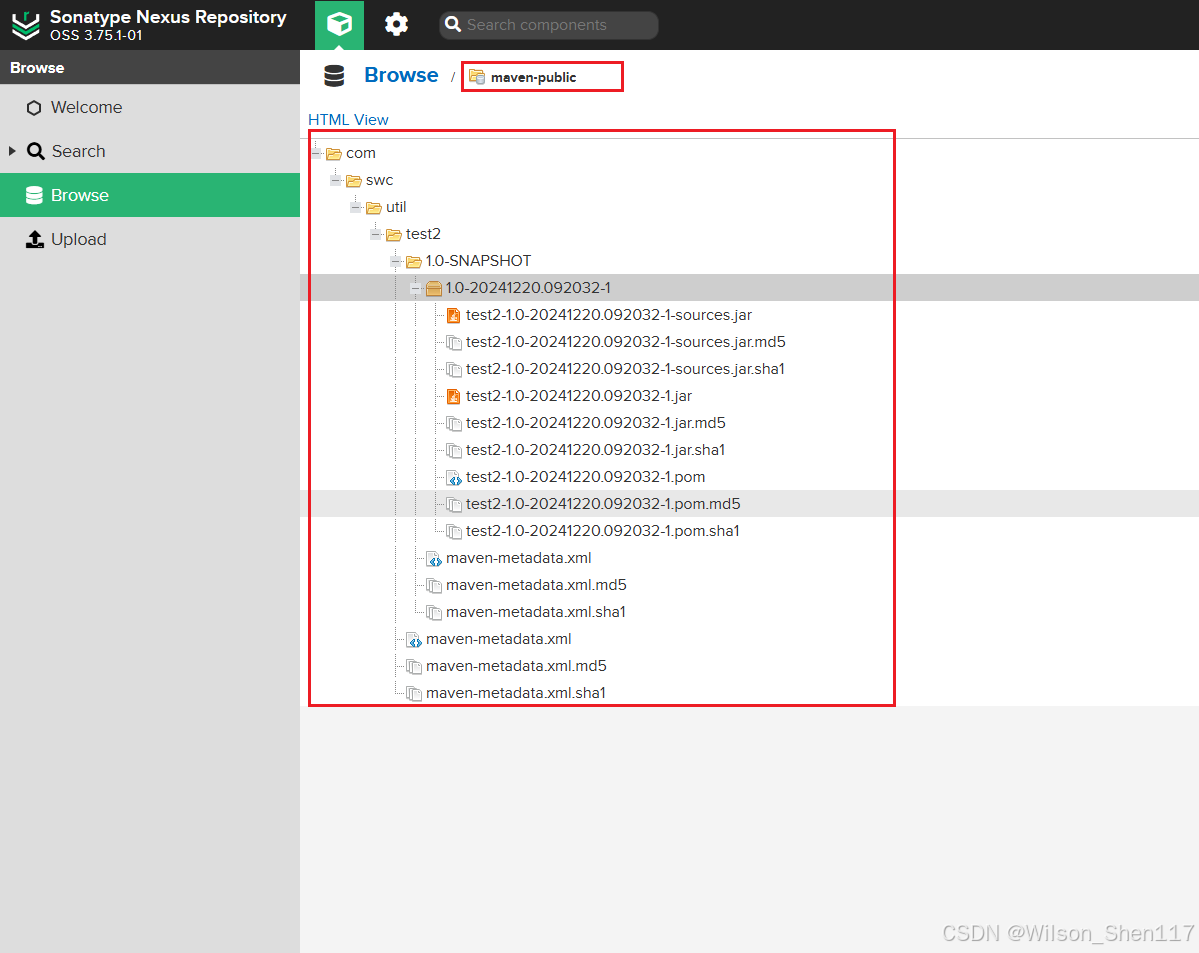
Maven 上传的 JAR 包版本号变成了类似 1.0-20241220.092032-1 的形式,这是 Maven 处理 SNAPSHOT 版本时的一种特殊行为。
当 Maven 发现项目版本是一个 SNAPSHOT 版本(例如:1.0-SNAPSHOT)时,它会在构建和上传时给版本号添加一个时间戳和唯一的构建编号,以保证每次上传的 JAR 包都具有唯一性。这是为了避免不同时间点的 SNAPSHOT 版本产生冲突。
6.下载 Jar 包
我们可以在 Nexus 页面中点击我们想要用的 Jar 包,在另一个项目的 pom.xml 文件中引入该 Jar 包的依赖即可:
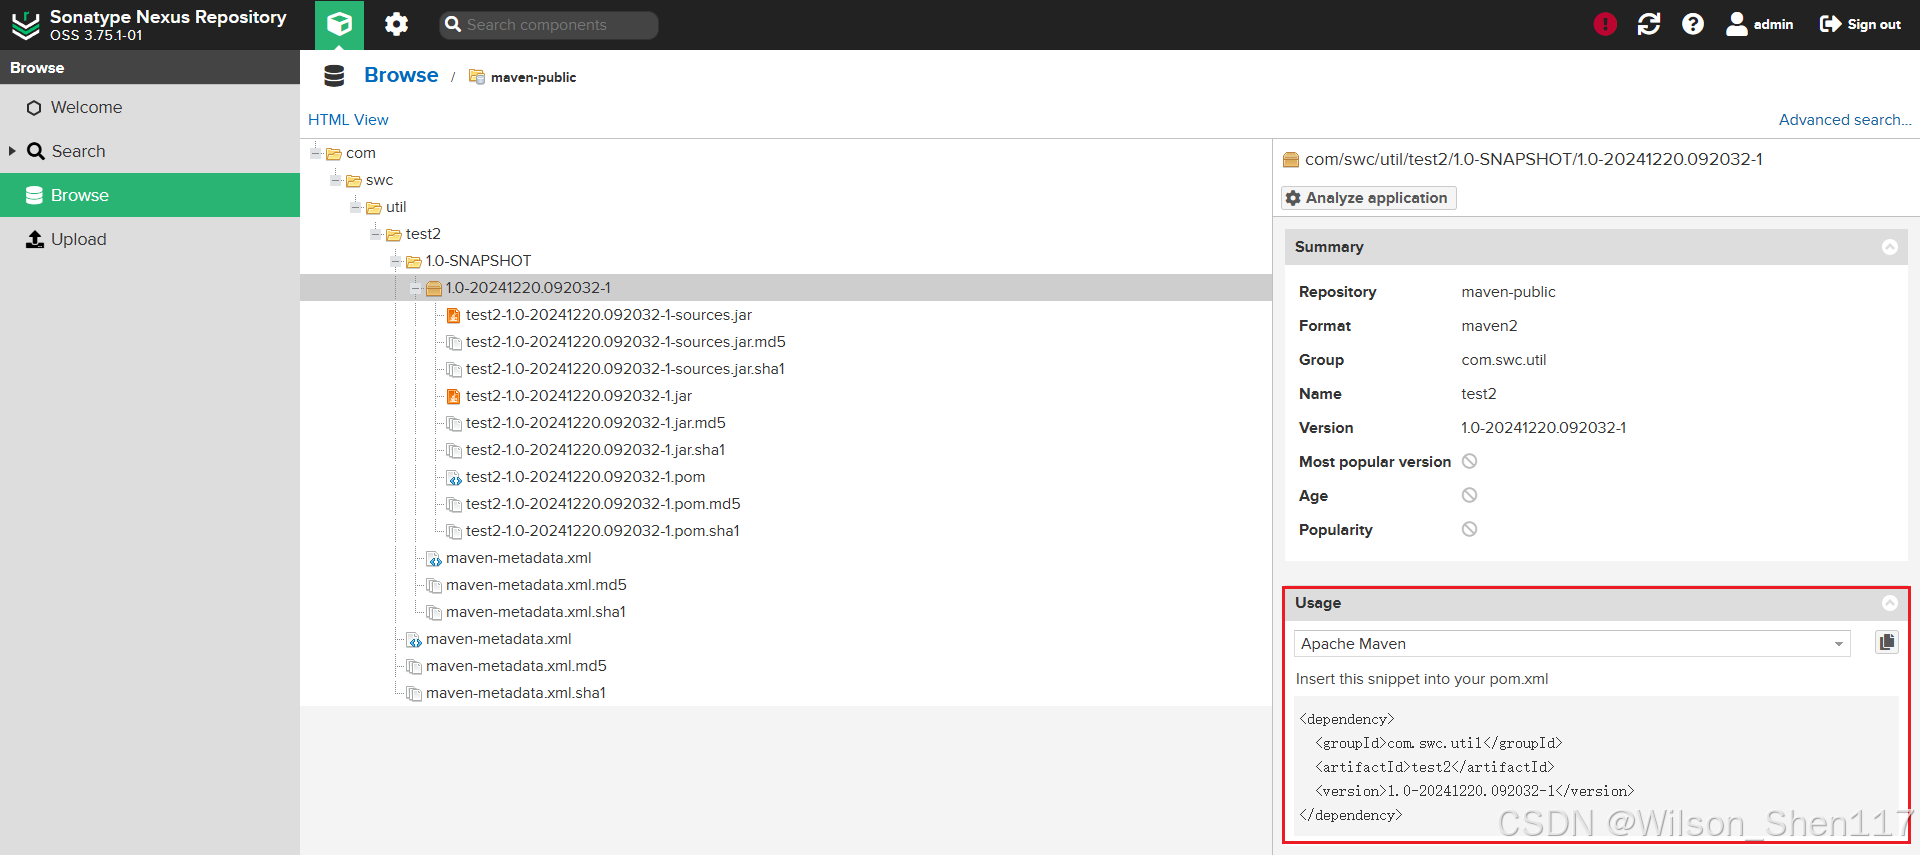
<dependency>
<groupId>com.swc.util</groupId>
<artifactId>test2</artifactId>
<version>1.0-20241220.092032-1</version>
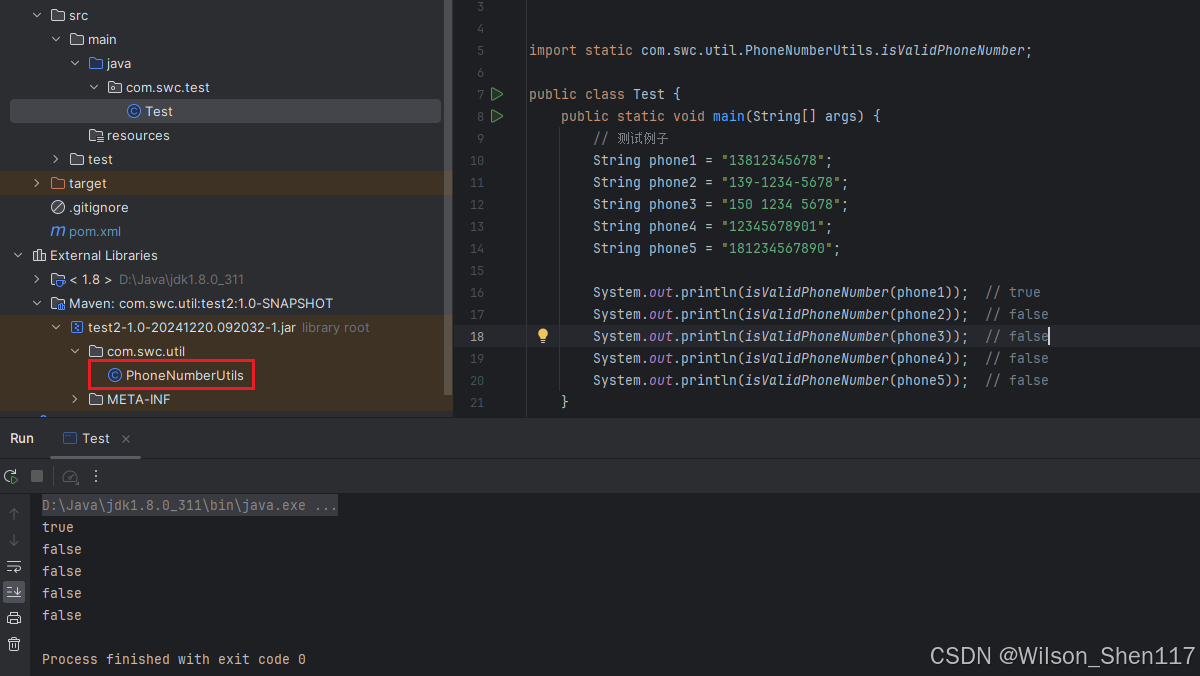
</dependency>然后我们可以在其他项目中使用 Jar 包中的工具类:
此时如果我修改了工具类中的代码,但我并没有修改 pom.xml 文件中的版本号,然后 deploy,那么在该版本下,会用时间戳和构件编号区分该版本下的两个 Jar 包,此时要在别的项目中使用该版本下的 Jar 包,会出现以下不同情况:
- 如果在 pom.xml 文件中使用 1.0-SNAPSHOT 作为 version,则默认会使用最早 deploy 的 Jar 包
- 如果要使用该版本下最后提交的 Jar 包,则需要具体指定 version 为 1.0-20241220.092731-2
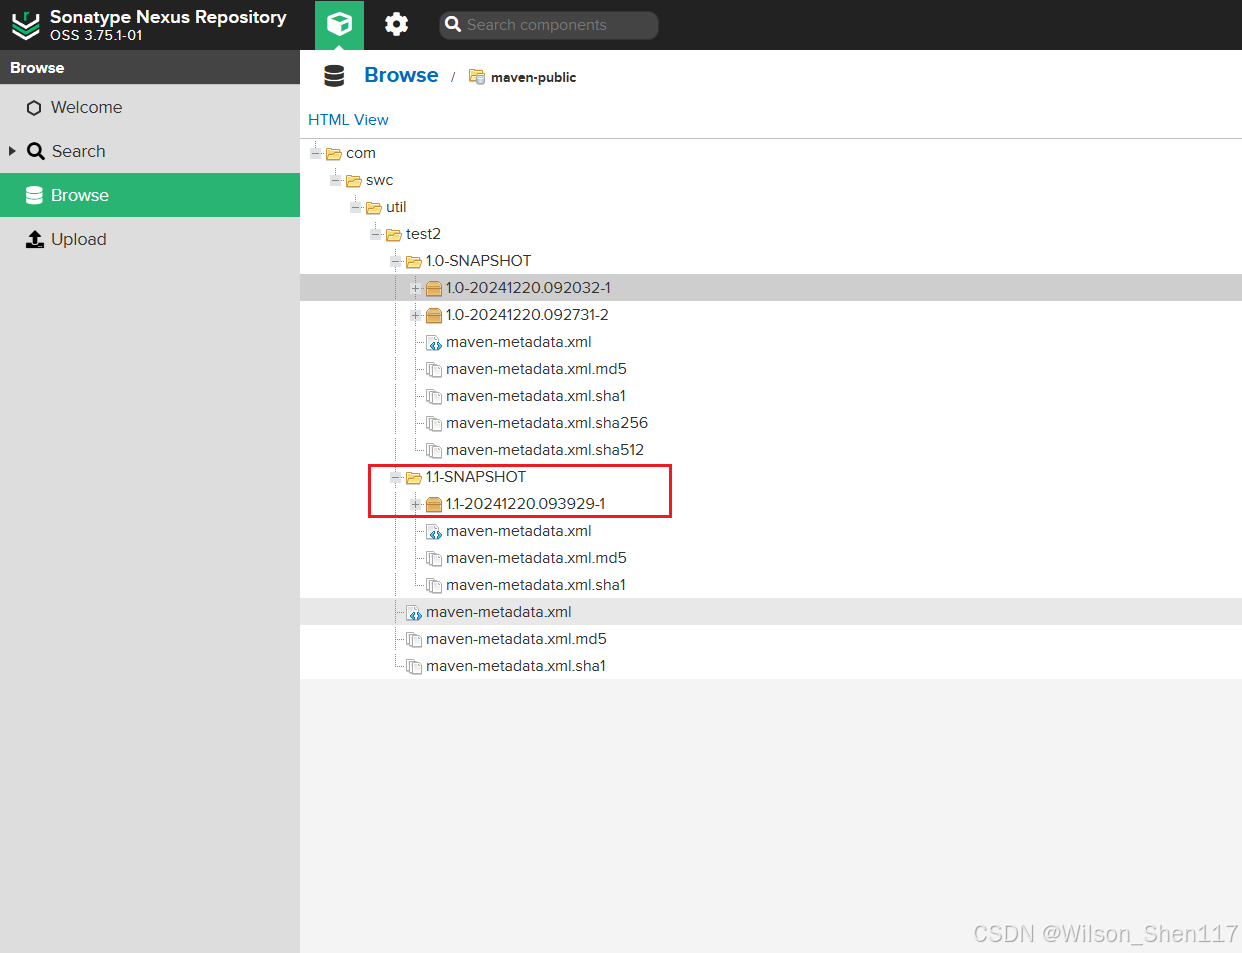
 如果我修改了版本号为1.1-SNAPSHOT,那么就会出现新的版本,此时要在别的项目中使用新修改的工具类,可以指定版本号为1.1-SNAPSHOT,因为该版本号下只有1个 Jar 包
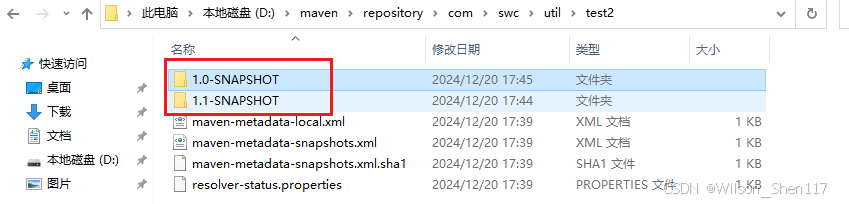
我们可以在自己电脑上的本地仓库中找到以上 Jar 包:
参考文章:


 被折叠的 条评论
为什么被折叠?
被折叠的 条评论
为什么被折叠?
 到【灌水乐园】发言


