


PyTorch学习
-
installing PyTorch and configuring the related environment
参考以上两个博客即可,注意本机的cuda驱动版本!
-
what is PyTorch?
-
an ML learning framework in python
-
2 main features:
-
N-dimensional Tensor(张量) computation(like numpy) on GPUs
-
automatic differentiation for training deep neural networks
-
-
-
training & testing neural networks in PyTorch
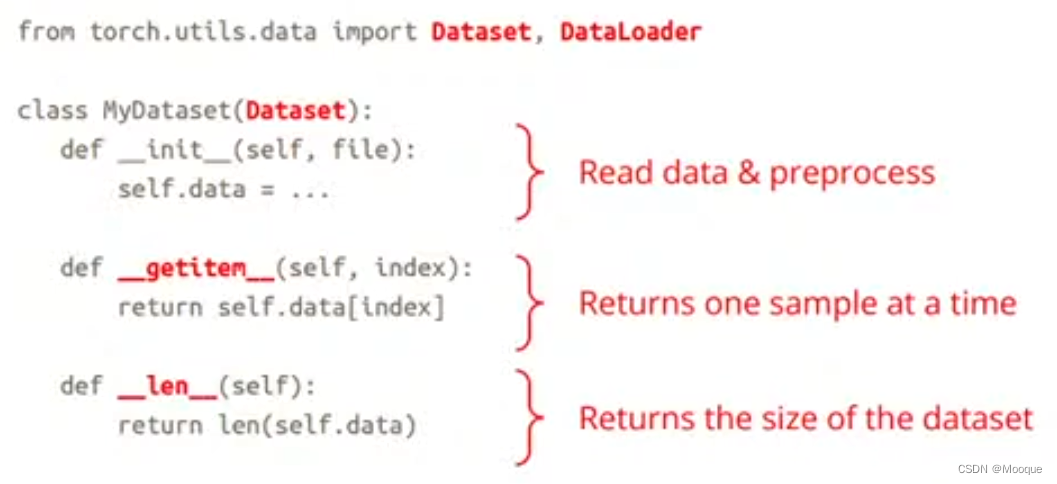
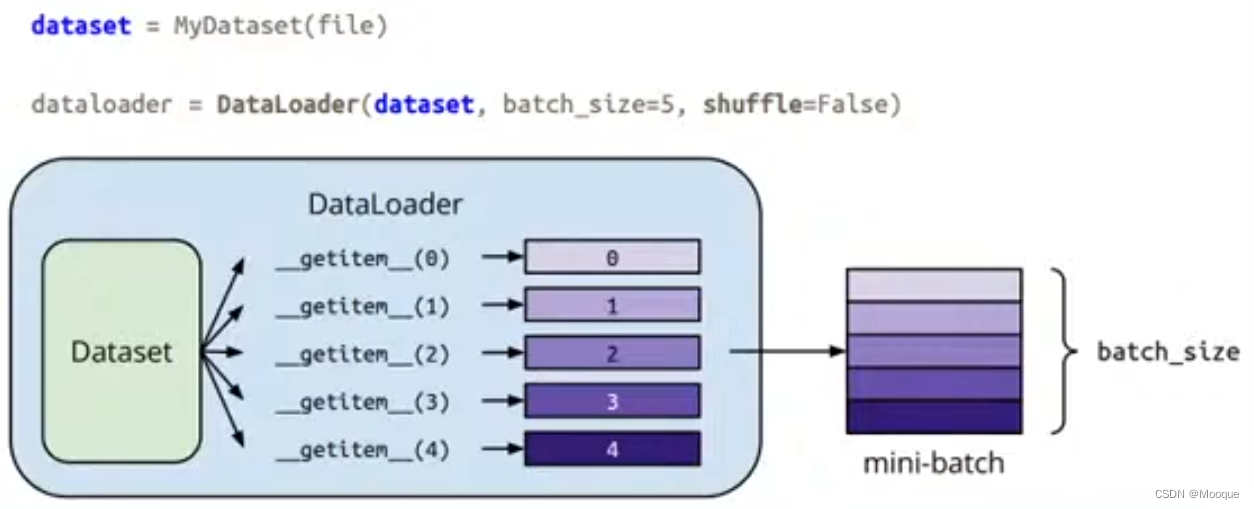
step1: data import
-
torch.utils.data.Dataset # stores data samples and expected values torch.utils.data.DataLoader # groups data in batches,enables multiprocessing dataset = MyDataset(file) # shuffle:洗牌 # traing:True;Testing:False dataloader = DataLoader(dataset,batch_size,shuffle=True)
-
custom dataset:
-
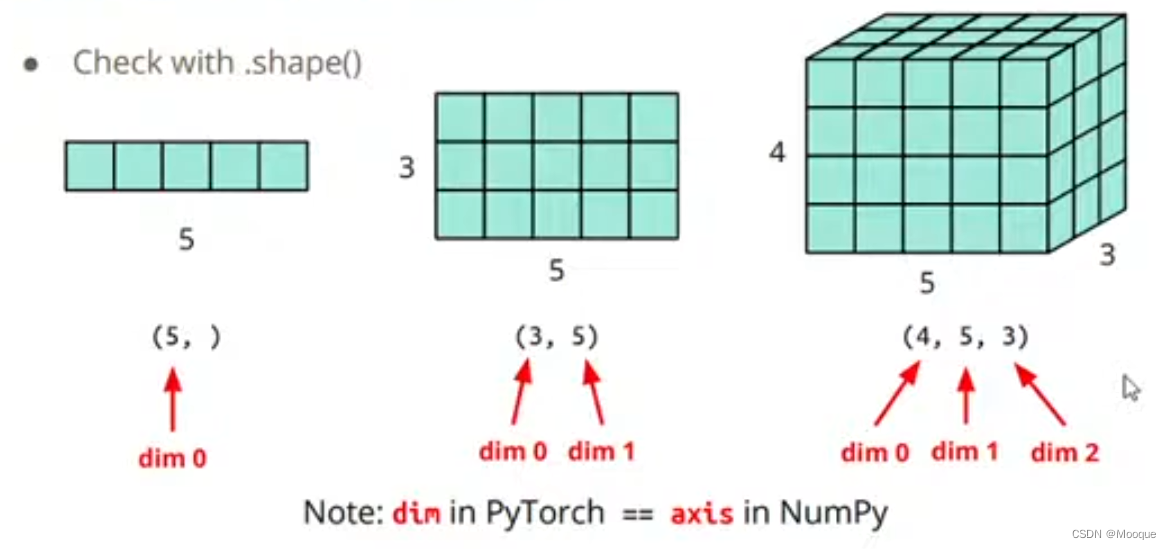
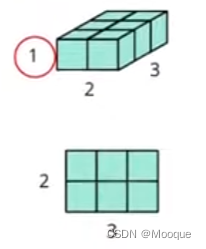
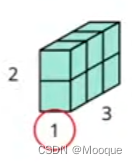
tensors(high-dimensional matrices/arrays)(一种数据结构):
1-D tensor; 2-D tensor; 3-D tensor
dim in Pytorch == axis in NumPy
-
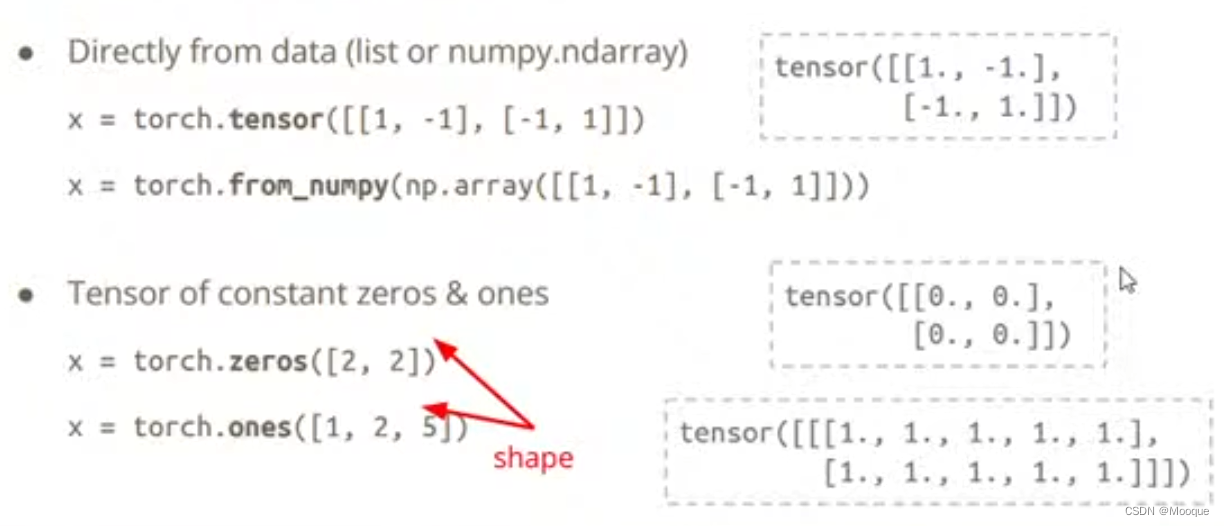
how to creating tensors:
-
common operations for tensors:
-
numerical operation:
addition summation subtraction mean power
z = x + y
y = x.sum()
z = x - y
y = x.mean()
y = x.pow(2)
-
matrix operation:
transpose squeeze(压缩维度) unsqueeze cat
x = torch.zeros([2,1,3]) x = x.transpose(0,1) x.shape # torch.Size([1, 2, 3]) x = x.squeeze(0) # remove the specified dimension with length = 1 x.shape() # torch.Size([2,3]) x = x.unsqueeze(1) x.shape() # torch.Size([2,1,3])
x = torch.zeros([2,1,3]) y = torch.zeros([2,2,3]) z = torch.zeros([2,3,3]) w = torch.cat([x,y,z],dim=1) # concatenate multiple tensors w.shape # torch.Size([2, 6, 3])
-
-
data type(using different data types for model and data will cause errors)
data type dtype tensor 32-bit floating point torch.float torch.FloatTensor 62-bit integer(signed) torch.long torch.LongTensor Errors may occur when the model and data use different data types.
-
pytorch v.s. numpy
-
similar attributes
pytorch numpy x.shape x.shape x.dtype x.dtype x.reshape()/x.view() x.reshape() x.squeeze() x.squeeze() x.unsqueeze(1) np.expend_dims(x,1)
-
-
tensors & modules will be computed with CPU by default
-
use .to() to move tensors to appropriate devices
x = x.to('cpu') x = x.to('cuda') -
check if your computer has NVIDIA GPU
torch.cuda.is_available()
-
multiple GPUs: specify 'cuda:0', 'cuda:1', 'cuda:2'
-
why use GPUs?
-
parallel computing with more cores for arithmetic calculations
-
Technical Overview | NVIDIA AI for GPU-Accelerated Deep Learning Inference
-
-
-
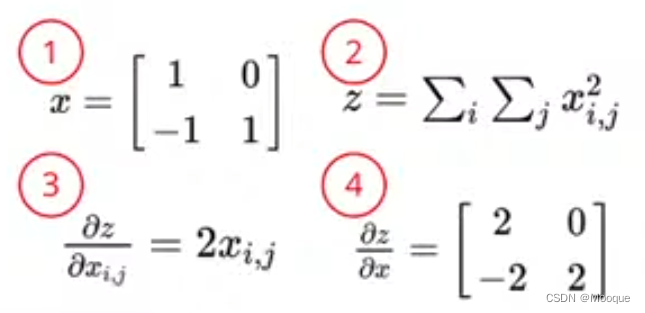
tensors - gradient calculation
x = torch.tensor(np.array([[1.,0.],[-1.,1.]]),requires_grad=True) z = x.pow(2).sum() z.backward() # 注意 z 对 x 的梯度存储在 x.grad 中 ''' tensor([[ 2., 0.], [-2., 2.]], dtype=torch.float64) ''' x.grad
step2: how to do training
torch.nn.Module
-
define neural network
-
loss function
-
optimization algorithm
network layers
-
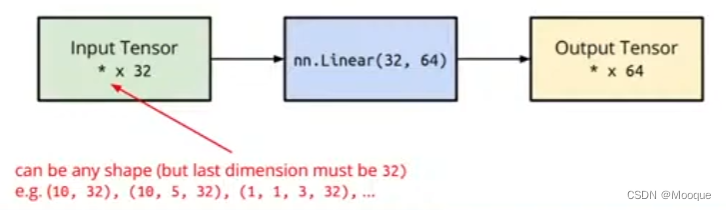
linear layer(fully-connected layer)
nn.Linear(in_features,out_features)
$$
\vec y=\vec b+W\vec x
$$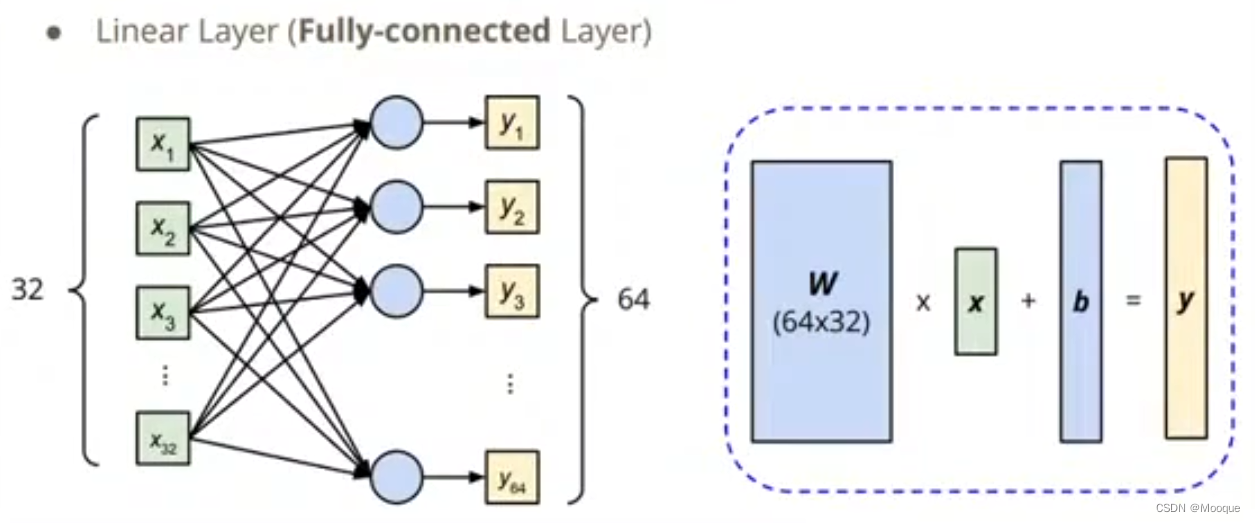
network parameters
layer = torch.nn.Linear(32,64)
layer.weight.shape  # torch.Size([64,32])
layer.bias.shape # torch.Size([64])
non-linear activation functions
-
sigmoid activation
nn.Sigmoid()
-
* ReLU activation

  ```python
  nn.ReLU()
  ```
* #### build your own neural network

  ```python
  import torch.nn as nn

  class MyModel(nn.Module):
      # initialize your model & define layers
      def __init__(self):
          super(MyModel,self).__init__()
          self.net = nn. Sequential(
              nn.Linear(10,32),  # 1st layer: 输入为 last dim = 10 的向量
              nn.Sigmoid(),  # 2ed layer
              nn.Linear(32,1)  # 3rd layer: 输出为 last dim = 1 的向量
          )

      # compute output of your NN
      # 规定模型对输入向量的运算规则并输出
      def forward(self,x):
          return self.net(x)
  ```

  等价于:

  ```python
  import torch.nn as nn

  class MyModel(nn.Module):
      def __init__(self):
          super(MyModel,self).init()
          self.layer1 = nn.Linear(10,32)
          self.layer2 = nn.sigmoid()
          self.layer3 = nn.Linear(32,1)

      def forward(self,x):
          out = layer1(x)
          out = self.layer2(out)
          out = self.layer3(out)
          return out
  ```
step3: test neural network in pytorch
torch.nn.MSELoss
torch.nn.CrossEntropyLoss
# etc.
-
Mean Squared Error(for regression tasks)
criterion = nn.MSELoss()
-
Cross Entropy(for classification tasks)
criterion = nn.CrossEntropyLoss()
-
loss = criterion(model_output,expected_value)
step4: select optimization algorithm
torch.optim
-
gradient-based optimization algorithms that adjust network parameters to reduce error
-
e.g. Stochastic Gradient Descent(SGD)
torch.optim.SGD(model.parameters(),lr,momentum=0)
for every batch of data:
-
call optimizer.zero_grad() to reset gradients of model parameters
将之前计算的梯度归零
-
call loss.backward() to back propagate(反向传播) gradients of prediction loss
根据每一层的结果计算梯度
-
call optimizer.step() to adjust model parameters
根据上一步算得的梯度来调整模型参数
-
step5: entire procedure
-
training setup
dataset = MyDataset(file)  # read data via MyDataset
tr_set = DataLoader(dataset,16,shuffle=True)  # put dataset into Dataloader
model = MyModel().to(device)  # construct model and move to device(cpu/cuda)
criterion = nn.MSELose()  # set loss function
optimizer = torch.optim.SGD(model.parameters(),0.1)  # set optimizer
-
training loop
for epoch in range(n_epochs): # iterate n_epochs model.train() # set model to train mode # 处理dataloader中每个batch的数据 # input: x; pred: y for x,y in tr_set: # iterate through the dataloader optimizer.zero_grad() # set gradient to zero x,y = x.to(device),y.to(device) # move data to device(cpu/cuda) pred = model(x) # forward pass (compute output) loss = criterion(pred,y) # compute loss loss.backward() # compute gradient(backpropagation) optimizer.step() # update model with optimizer -
validation loop
model.eval() # set model to evaluation mode ! total_loss = 0 for x,y in dv_set: # iterate through the dataloader x,y = x.to(device),y.to(device) # move data to device(cpu/cuda) with torch.no_grad(): # disable gradient calculation ! pred = model(x) # forward pass (compute output) loss = criterion(pred,y) # compute loss total_loss += loss.cpu().item()*len(x) # accumulate loss avg_loss = total_loss / len(dv_set.dataset) # compute averaged loss关于为什么要在遍历数据集的过程中取消计算梯度的功能:(got answer from chat gpt3.5)
-
减少计算开销: 计算梯度是在训练过程中需要的,因为在训练时需要反向传播误差并更新模型参数。然而,在验证模型时,我们只关心模型的预测结果和性能评估,而不需要计算梯度。取消计算梯度可以显著减少计算的开销,提高验证速度。
-
防止不必要的内存占用: 计算梯度需要存储中间结果,这可能占用大量内存,特别是在大型神经网络和大规模数据集上。在验证过程中,取消计算梯度可以避免不必要的内存占用,使内存资源得以释放。
-
模型参数保持不变: 验证模型的过程中,我们希望模型的参数保持不变,以便对其性能进行评估。如果不取消计算梯度,PyTorch或其他深度学习框架可能会默认计算梯度并更新参数,这可能导致模型参数在验证期间被错误地修改。
-
通常,在验证循环中,你可以通过在PyTorch中使用
torch.no_grad()上下文管理器或将模型的requires_grad属性设置为False来取消计算梯度。这样可以确保在验证期间不会计算梯度,同时仍然可以使用模型进行前向传播和性能评估。
总之,在验证模型准确性时取消计算梯度可以提高效率并确保模型参数的稳定性。这对于评估模型在新数据上的性能非常重要。
-
-
testing loop
model.eval() # set model to evaluation mode preds = [] for x in tt_set: # iterate through the dataloader x = x.to(device) # moce data to device (cpu/cude) with torch.no_grad(): # disable gradient calculation pred = model(x) # forward pass (compute output) preds.append(pred.cpu()) # collect prediction -
notice: model.eval(), torch.no_grad()
-
model.eval()
changes behaviour of some model layers, such as dropout and batch normalization
模型中可能有些 layers 在训练和测试的过程中所做的事情是不一样的!
-
with torch.no_grad():
-
prevents calculations from being added into gradient computation graph
-
usually used to prevent accidental training on validation/testing data
-
-
-
save/load trained models
-
save:
torch.save(model.state_dict(),path)
-
load:
ckpt = torch.load(path)
model.load_state_dict(ckpt)
-
-
PyTorch深度学习快速入门教程(绝对通俗易懂!)【小土堆】哔哩哔哩bilibili
最后安利一个我本人认为不错的教学视频~


 被折叠的 条评论
为什么被折叠?
被折叠的 条评论
为什么被折叠?
 到【灌水乐园】发言


