


WebSocket
简介
WebSocket
协议是基于
TCP
的一种新的
网络协议
。它实现了浏览器与服务器全双工
(full-duplex)
通信
——
允许服务器主动发送信息给客户端。
为什么需要
WebSocket
HTTP
是基于请求响应式的,即通信只能由客户端发起,服务端做出响应,无状态,无连接。
无状态:每次连接只处理一个请求,请求结束后断开连接。
无连接:对于事务处理没有记忆能力,服务器不知道客户端是什么状态。
通过
HTTP
实现即时通讯,只能是页面轮询向服务器发出请求,服务器返回查询结果。轮询的效率低,
非常浪费资源,因为必须不停连接,或者
HTTP
连接始终打开
WebSocket
的最大特点就是,服务器可以主动向客户端推送信息,客户端也可以主动向服务器发
送信息,是真正的双向平等对话。
*
WebSocket
特点:
(
1
)建立在
TCP
协议之上,服务器端的实现比较容易。
(
2
)与
HTTP
协议有着良好的兼容性。默认端口也是
80
和
443
,并且握手阶段采用
HTTP
协议,因此
握手时不容易屏蔽,能通过各种
HTTP
代理服务器。
(
3
)数据格式比较轻量,性能开销小,通信高效。
(
4
)可以发送文本,也可以发送二进制数据。
(
5
)没有同源限制,客户端可以与任意服务器通信。
(
6
)协议标识符是
ws
(如果加密,则为
wss
),服务器网址就是
URL
。
SpringBoot
整合
WebSocket
创建
SpringBoot
项目,引入
WebSocket
依赖
<!-- websocket dependency -->
<dependency>
<groupId>org.springframework.boot</groupId>
<artifactId>spring-boot-starter-websocket</artifactId>
<version>2.7.12</version>
</dependency>
<dependency>
<groupId>org.springframework.boot</groupId>
<artifactId>spring-boot-starter-thymeleaf</artifactId>
<version>2.7.12</version>
</dependency>
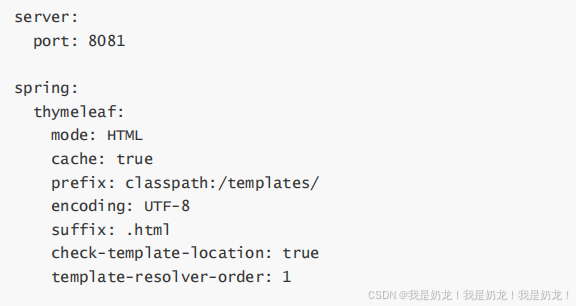
application.yml
:
WebSocketConfig
/**
* WebSocket配置类。开启WebSocket的支持
*/
@Configuration
public class WebSocketConfig {
/**
* bean注册:会自动扫描带有@ServerEndpoint注解声明的Websocket Endpoint(端点),注册
成为Websocket bean。
* 要注意,如果项目使用外置的servlet容器,而不是直接使用springboot内置容器的话,就不要注
入ServerEndpointExporter,因为它将由容器自己提供和管理。
*/
@Bean
public ServerEndpointExporter serverEndpointExporter() {
return new ServerEndpointExporter();
}
}
WebSocketServer
因为
WebSocket
是类似客户端服务端的形式
(
采用
ws
协议
)
,那么这里的
WebSocketServer
其实就相当于
一个
ws
协议的
Controller
直接
@ServerEndpoint("/imserver/{userId}")
、
@Component
启用即可,然后在里面实现
@OnOpen
开启连接,
@onClose
关闭连接,
@onMessage
接收消息等方法。
新建一个
ConcurrentHashMap
用于接收当前
userId
的
WebSocket
或者
Session
信息,方便
IM
之间对
userId
进行推送消息。单机版实现到这里就可以。
/**
* WebSocket的操作类
*/
@Component
@Slf4j
/**
* html页面与之关联的接口
* var reqUrl = "http://localhost:8081/websocket/" + cid;
* socket = new WebSocket(reqUrl.replace("http", "ws"));
*/
@ServerEndpoint("/websocket/{sid}")
public class WebSocketServer {
/**
* 静态变量,用来记录当前在线连接数,线程安全的类。
*/
private static AtomicInteger onlineSessionClientCount = new
AtomicInteger(0);
/**
* 存放所有在线的客户端
*/
private static Map<String, Session> onlineSessionClientMap = new
ConcurrentHashMap<>();
/**
* 连接sid和连接会话
*/
private String sid;
private Session session;
/**
* 连接建立成功调用的方法。由前端<code>new WebSocket</code>触发
*
* @param sid 每次页面建立连接时传入到服务端的id,比如用户id等。可以自定义。
* @param session 与某个客户端的连接会话,需要通过它来给客户端发送消息
*/
@OnOpen
public void onOpen(@PathParam("sid") String sid, Session session) {
/**
* session.getId():当前session会话会自动生成一个id,从0开始累加的。
*/
log.info("连接建立中 ==> session_id = {}, sid = {}", session.getId(),
sid);
//加入 Map中。将页面的sid和session绑定或者session.getId()与session
//onlineSessionIdClientMap.put(session.getId(), session);
onlineSessionClientMap.put(sid, session);
//在线数加1
onlineSessionClientCount.incrementAndGet();
this.sid = sid;
this.session = session;
sendToOne(sid, "连接成功");
log.info("连接建立成功,当前在线数为:{} ==> 开始监听新连接:session_id = {},
sid = {},。", onlineSessionClientCount, session.getId(), sid);
}
/**
* 连接关闭调用的方法。由前端<code>socket.close()</code>触发
*
* @param sid
* @param session
*/
@OnClose
public void onClose(@PathParam("sid") String sid, Session session) {
//onlineSessionIdClientMap.remove(session.getId());
// 从 Map中移除
onlineSessionClientMap.remove(sid);
//在线数减1
onlineSessionClientCount.decrementAndGet();
log.info("连接关闭成功,当前在线数为:{} ==> 关闭该连接信息:session_id = {},
sid = {},。", onlineSessionClientCount, session.getId(), sid);
}
/**
* 收到客户端消息后调用的方法。由前端<code>socket.send</code>触发
* * 当服务端执行toSession.getAsyncRemote().sendText(xxx)后,前端的
socket.onmessage得到监听。
*
* @param message
* @param session
*/
@OnMessage
public void onMessage(String message, Session session) {
/**
* html界面传递来得数据格式,可以自定义.
* {"sid":"user-1","message":"hello websocket"}
*/
JSONObject jsonObject = JSON.parseObject(message);
String toSid = jsonObject.getString("sid");
String msg = jsonObject.getString("message");
log.info("服务端收到客户端消息 ==> fromSid = {}, toSid = {}, message = {}",
sid, toSid, message);
/**
* 模拟约定:如果未指定sid信息,则群发,否则就单独发送
*/
if (toSid == null || toSid == "" || "".equalsIgnoreCase(toSid)) {
sendToAll(msg);
} else {
sendToOne(toSid, msg);
}
}
/**
* 发生错误调用的方法
*
* @param session
* @param error
*/
@OnError
public void onError(Session session, Throwable error) {
log.error("WebSocket发生错误,错误信息为:" + error.getMessage());
error.printStackTrace();
}
/**
* 群发消息
*
* @param message 消息
*/
private void sendToAll(String message) {
// 遍历在线map集合
onlineSessionClientMap.forEach((onlineSid, toSession) -> {
// 排除掉自己
if (!sid.equalsIgnoreCase(onlineSid)) {
log.info("服务端给客户端群发消息 ==> sid = {}, toSid = {}, message =
{}", sid, onlineSid, message);
toSession.getAsyncRemote().sendText(message);
}
});
}
/**
* 指定发送消息
*
* @param toSid
* @param message
*/
private void sendToOne(String toSid, String message) {
// 通过sid查询map中是否存在
Session toSession = onlineSessionClientMap.get(toSid);
if (toSession == null) {
log.error("服务端给客户端发送消息 ==> toSid = {} 不存在, message = {}",
toSid, message);
return;
}
// 异步发送
log.info("服务端给客户端发送消息 ==> toSid = {}, message = {}", toSid,
message);
toSession.getAsyncRemote().sendText(message);
/*
// 同步发送
try {
toSession.getBasicRemote().sendText(message);
} catch (IOException e) {
log.error("发送消息失败,WebSocket IO异常");
e.printStackTrace();
}*/
}
}
controller
@Controller
@RequestMapping("/demo")
public class DemoController {
/**
* 跳转到websocketDemo.html页面,携带自定义的cid信息。
* http://localhost:8081/demo/toWebSocketDemo/user-1
*
* @param cid
* @param model
* @return
*/
@GetMapping("/toWebSocketDemo/{cid}")
public String toWebSocketDemo(@PathVariable String cid, Model model) {
model.addAttribute("cid", cid);
return "websocketDemo";
}
}
websocketDemo.htm
<!DOCTYPE html>
<html xmlns:th="http://www.thymeleaf.org">
<head>
<meta charset="UTF-8">
<title>666666</title>
</head>
<body>
传递来的数据值cid:
<input type="text" th:value="${cid}" id="cid"/>
<p>【toUserId】:
<div><input id="toUserId" name="toUserId" type="text" value="user-1"></div>
<p>【toUserId】:
<div><input id="contentText" name="contentText" type="text" value="hello
websocket"></div>
<p>【操作】:
<div>
<button type="button" onclick="sendMessage()">发送消息</button>
</div>
</body>
<script type="text/javascript">
var socket;
if (typeof (WebSocket) == "undefined") {
console.log("您的浏览器不支持WebSocket");
} else {
console.log("您的浏览器支持WebSocket");
//实现化WebSocket对象,指定要连接的服务器地址与端口 建立连接
var cid = document.getElementById("cid").value;
console.log("cid-->" + cid);
var reqUrl = "http://localhost:8081/websocket/" + cid;
socket = new WebSocket(reqUrl.replace("http", "ws"));
//打开事件
socket.onopen = function () {
console.log("Socket 已打开");
//socket.send("这是来自客户端的消息" + location.href + new Date());
};
//获得消息事件
socket.onmessage = function (msg) {
console.log("onmessage--" + msg.data);
//发现消息进入 开始处理前端触发逻辑
};
//关闭事件
socket.onclose = function () {
console.log("Socket已关闭");
};
//发生了错误事件
socket.onerror = function () {
alert("Socket发生了错误");
//此时可以尝试刷新页面
}
//离开页面时,关闭socket
//jquery1.8中已经被废弃,3.0中已经移除
// $(window).unload(function(){
// socket.close();
//});
}
function sendMessage() {
if (typeof (WebSocket) == "undefined") {
console.log("您的浏览器不支持WebSocket");
} else {
// console.log("您的浏览器支持WebSocket");
var toUserId = document.getElementById('toUserId').value;
var contentText = document.getElementById('contentText').value;
var msg = '{"sid":"' + toUserId + '","message":"' + contentText +
'"}';
console.log(msg);
socket.send(msg);
}
}
</script>
</html>
测试运行效果
开启三个浏览器的窗口:
http://localhost:8081/demo/toWebSocketDemo/user-1http://localhost:8081/demo/toWebSocketDemo/user-2http://localhost:8081/demo/toWebSocketDemo/user-3
出现下图说明连接成功

打开页面的
toUserid
为发送消息给谁,例
:user-1
,
user-2
,
user-3......
群发送消息
当不指定
toUserid
时,则为群发。


 537
537

 被折叠的 条评论
为什么被折叠?
被折叠的 条评论
为什么被折叠?
 到【灌水乐园】发言


