


Android天气应用
🎇开发前瞻
🎆应该包含的功能
大致
- 可以查看全国的所有省,市,县
- 查看每个城市的天气信息(天气预报,空气质量)
细节
- 在主界面显示城市,温度,最高温,最低温,天气类型等重要信息(使用ScrollView)
- 写一个滑动菜单,里面添加城市搜索界面
🎆技术可行性分析
- 得到全国省市县的天气数据(√)
- 使用天气预报接口(使用彩云天气提供的API接口)获得城市数据和城市具体天气信息(√)
- 完成代码托管到github(√)
- Retrofit的使用(√)
- MVVM框架的搭建(√)
- jetpack知识的使用(仓库层,ViewModel)(√)
- 封装从接口读取出来的数据(√)
🎇架构分析
- UI控制层:平时写的Activity,Fragment,布局文件等与界面相关的东西
- ViewModel层:用于持有和UI元素相关的数据,以保证这些数据在屏幕旋转时不会丢失,并且还要提供接口给UI控制层调用以及仓库层进行通信
- 仓库层:判断调用方请求的数据应该是从本地数据源中获取还是从网络数据源中获取,并将获取到的数据返回给调用方
- 本地数据源:使用数据库或者SharedPreferences等持久化技术来实现
- 网络数据源:通常使用Retrofit访问服务器提供的Webservice来实现
🎇步骤一:搭建MVVM项目架构
- 我们学过的Jetpack的架构组件很多都是专门为了MVVM架构而量身打造的。
- MVVM架构是一个高级项目架构模式,主要可以将架构分成三个部分,Model是数据模型部分,View是界面展示部分,ViewModel可以理解成一个连接数据模式和界面展示的桥梁(实现业务逻辑和界面展示分离的程序结构设计)
- 除了MVVM架构上面的三部分以外,一个优秀的项目架构除了这三个部分以外,还应该包含仓库和数据源

对于上面的架构图来说,图中所有的箭头都是单向的,UI控制层指向了ViewModel层,表示UI控制层会持有ViewModel层的引用,但是反过来ViewModel层却不能持有UI层的引用。引用也不能跨层持有 。
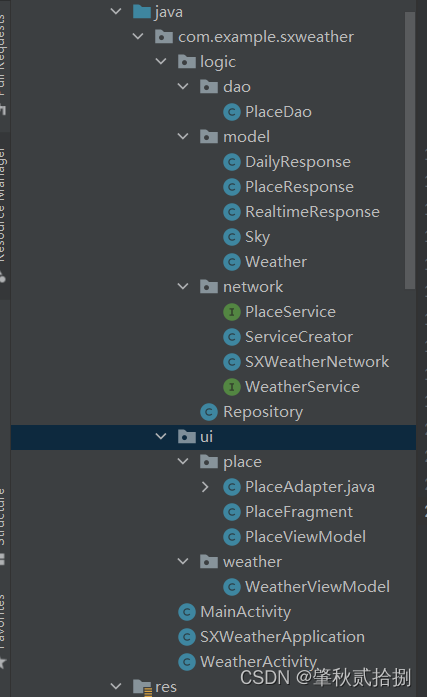
- logic:用于存放业务逻辑相关的代码(数据和数据之间的关系封装起来的包)
- logic/dao:用于存放数据访问对象(当前项目中存放的是相关本地数据源的一系列方法,操作的对象是城市信息)
- logic/model:对象模型(封装从接口读取出来的json数据成为一个类,包含城市信息返回,实时天气信息返回,未来天气信息返回,包装两种天气信息返回的Weather类,包装所有天气情况的Sky类)
Sky类存放的是多云,晴天这类信息,在里面也同时加载了相关的背景图片)
- logic/network:网络相关的代码(Retrofit的访问接口,Retrofit的构建器,已经包装网络请求操作的类)
- ui:用于存放和界面展示相关的数据
- ui/place:对应的天气APP中搜索城市的页面
- ui/weather:对应的是天气APP中返回天气的页面
- Repository:仓库层(运用LiveData,是数据获取与缓存的中间层)
🎆添加的依赖
- 可能有一两个依赖是因为出现bug上网找资料加上去的,不一定会在程序中发挥作用。
    implementation 'androidx.recyclerview:recyclerview:1.2.1'
    implementation 'androidx.lifecycle:lifecycle-extensions:2.2.0'
    implementation 'androidx.lifecycle:lifecycle-livedata-ktx:2.5.1'
    implementation 'androidx.swiperefreshlayout:swiperefreshlayout:1.1.0'
    implementation 'com.squareup.okhttp3:okhttp:3.14.+'
    implementation 'com.google.code.gson:gson:2.7'
    implementation 'com.squareup.retrofit2:retrofit:2.7.0'
    implementation 'com.squareup.retrofit2:converter-gson:2.7.0'
🎇步骤二:搜索全球城市数据
· 对于接口的申请,我们使用了彩云APP的接口,只要到彩云天气提供这些APP的网站https://dashboard.caiyunapp.com/,注册账号,申请我们的令牌值就行,令牌值会用在我们后面想API发出网络请求时使用。
·彩云天气的API接口每天提供10000次免费访问,非常适合我们开发使用
- 接口地址(查询全球绝大多数城市的数据信息):https://api.caiyunapp.com/v2/place?query=北京&token={token}&lang=zh_CN
- 想要实现查看天气信息的功能,首先要能搜索到具体的城市数据,并获取该地区的经纬度坐标。因此我们要先实现搜索全球城市的数据信息。我们分为逻辑层和UI层实现两部分
🎆全局获取Context
- ViewModel层开始不再持有Activity的引用,为了放置却Context的情况
package com.example.sxweather;

import android.app.Application;
import android.content.Context;

public class SXWeatherApplication extends Application {
    private static Context context;
    private static final String TOKEN="xxxxxxxxxxxxxx";//你注册账号申请到的令牌值
    @Override
    public void onCreate() {
        super.onCreate();
        context=getApplicationContext();
    }
    public static Context getContext(){
        return context;
    }
}
-记得在AndroidManifest.xml文件的< application >标签下指定名称android:name
 <application
        android:name=".SXWeatherApplication"
        android:allowBackup="true"
        android:icon="@mipmap/ic_launcher"
        android:label="@string/app_name"
        android:roundIcon="@mipmap/ic_launcher_round"
        android:supportsRtl="true"
        android:theme="@style/Theme.SXWeather" >
        <activity
            android:name=".WeatherActivity">
        </activity>
        <activity
            android:name=".MainActivity"
            android:exported="true" >
            <intent-filter>
                <action android:name="android.intent.action.MAIN" />

                <category android:name="android.intent.category.LAUNCHER" />
            </intent-filter>
        </activity>
    </application>
🎆用Retrofit来访问API
- 网络请求的工作本质上是 OkHttp 完成,而 Retrofit 仅负责 网络请求接口的封装。Retrofit是一款基于注解把http api转成接口,使用起来更加简单。
第一步:先定义数据模型,在logic/model包下新建一个PlaceResponse.kt文件(读取API返回来的城市数据,我们进行一个封装)
package com.example.sxweather.logic.model;

import android.location.Location;

import com.google.gson.annotations.SerializedName;

import java.util.ArrayList;
import java.util.List;
import java.util.Objects;
//这里三个类对应的是从JSON上的数据
//在Kotlin中用data class就会自动帮我们封装好需要的方法
public  class PlaceResponse {
    private  String status=new String();
    private  List<Place> places=new ArrayList<>();

    public void setPlaces(List<Place> places) {
        this.places = places;
    }

    public void setStatus(String status) {
        this.status = status;
    }

    public List<Place> getPlaces() {
        return places;
    }

    public String getStatus() {
        return status;
    }


    //这里是内部的Place
    public class Place{
        private String name;
        @SerializedName("formatted_address")
        private  String address;
        private Location location;

        public void setName(String name) {
            this.name = name;
        }

        public void setAddress(String address) {
            this.address = address;
        }

        public void setLocation(Location location) {
            this.location = location;
        }

        public String getName() {
            return name;
        }

        public Location getLocation() {
            return location;
        }

        public String getAddress() {
            return address;
        }

    }
    public static class Location{
        private String lng;
        private String lat;

        public Location(String lng, String lat) {
            this.lat = lat;
            this.lng = lng;
        }

        public String getLat() {
            return lat;
        }

        public String getLng() {
            return lng;
        }

        public void setLat(String lat) {
            this.lat = lat;
        }

        public void setLng(String lng) {
            this.lng = lng;
        }

    }
}
因为JSON中一些字段与Java的命名规范不太一致,我们使用了@SerializedName注解的方式,来让两个字段建立映射关系)
- 定义好数据模型后,编写网络层代码,首先定义一个用于访问彩云天气城市搜索API的Retrofit接口。在logic/network包下新建PlaceService接口
package com.example.sxweather.logic.network;

import com.example.sxweather.logic.model.PlaceResponse;

import retrofit2.Call;
import retrofit2.http.GET;
import retrofit2.http.Query;
//1.定义一个用于访问API的Retrofit接口
//用get来传参一般注解就用query,用post一般就用FieId
//我们在searchPlaces方法上声明了一个@GET注解,调用方法时会自动发起一条GET请求
//搜索城市数据的API只有query这个参数需要动态指定,所以另外两个参数直接放在注解当中就行了
public interface PlaceService {
    //OTI46zZoNo984B5Q
    @GET("v2/place?token={token}&lang=zh_CN") //{token}代替为令牌值,不需要左右大括号
    Call<PlaceResponse> searchPlaces(@Query("query")String query);
}
关于Retrofit注解的学习可以查看其他博客,整个天气APP中的Retrofit的使用,将部分步骤已经进行了封装
- 增加Retrofit依赖库
- 创建接收服务器返回数据的类
- 创建用于描述网络请求的接口
- 创建Retrofit实例
- 创建网络请求接口实例
- 发送网络请求
- 处理返回的数据
上面的PlaceResponse就是接收服务器返回数据的类
PlaceService就是描述网络请求的接口
- 在logic/network下,新建一个ServiceCreator,封装了四五两个步骤
package com.example.sxweather.logic.network;

import com.example.sxweather.logic.model.PlaceResponse;

import retrofit2.Call;
import retrofit2.Retrofit;
import retrofit2.converter.gson.GsonConverterFactory;
//2.创建一个Retrofit构建器
public class ServiceCreator {
    private static Retrofit retrofit=new Retrofit.Builder()
            .baseUrl("https://api.caiyunapp.com/")
            .addConverterFactory(GsonConverterFactory.create())
            .build();
    public static PlaceService PlaceCreate(Class<PlaceService> placeServiceClass){
        PlaceService placeService=retrofit.create(placeServiceClass);
        return placeService;
    }
    //private PlaceService placeService=retrofit.create(PlaceService.class);
    //Call<PlaceResponse> responseBody=placeService.searchPlaces("");
    //创建天气接口
    public static WeatherService WeatherCreate(Class<WeatherService> weatherServiceClass){
        WeatherService weatherService=retrofit.create(weatherServiceClass);
        return weatherService;
    }
}
- 接下来我们定义一个统一的网络数据源访问入口,对所有的网络请求的API进行封装。同样在logic/network包下新建一个WeatherNetwork单例类
package com.example.sxweather.logic.network;

import android.util.Log;

import com.example.sxweather.logic.model.DailyResponse;
import com.example.sxweather.logic.model.PlaceResponse;
import com.example.sxweather.logic.model.RealtimeResponse;
import com.example.sxweather.logic.model.Weather;

import java.io.IOException;

import okhttp3.ResponseBody;
import retrofit2.Call;
import retrofit2.Callback;
import retrofit2.Response;
//网络工作,这个类的工作对所有网络请求API进行封装
//包括请求城市数据和请求天气数据
public class SXWeatherNetwork {
    private static PlaceService placeService = ServiceCreator.PlaceCreate(PlaceService.class);
    //最后读取回来的信息通过PlaceResult返回
    private static PlaceResponse PlaceResult = new PlaceResponse();

    //获取城市信息
    public PlaceResponse searchPlaces(String query) {
        try {
            Response<PlaceResponse> response = placeService.searchPlaces(query).execute();
            //body是我们读取到的信息
            PlaceResponse body = response.body();
            if (body != null) {
                PlaceResult = body;
            } else {
                //kotlin中的奇怪异常在java中可以用日志输出
                Log.d("SXWeatherNetwork", "response body is null");
            }
        } catch (IOException e) {
            e.printStackTrace();
            Log.d("SXWeather", "resumeWithException");
        } finally {
            return PlaceResult;
        }
    }
}
🎆仓库层的创建
- 写完网络层的相关代码,就可以继续写仓库层的带啊吗了,仓库层的主要工作就是判断调用方请求的数据是从本地数据源中获取还是从网络数据源中获取,并将获取到的数据还给调用方。
- 仓库层像是数据获取与缓存的中间层,在本地没有缓存数据的情况下就去网络层获取,如果本地已经有了,就直接将缓存数据返回。
- 在logic包下新建一个Repository单例类,作为仓库层的统一封装入口。
package com.example.sxweather.logic;

import android.media.Session2Command;
import android.os.Parcelable;
import android.util.Log;
import android.widget.Toast;

import androidx.lifecycle.LiveData;
import androidx.lifecycle.MutableLiveData;

import com.example.sxweather.SXWeatherApplication;
import com.example.sxweather.logic.dao.PlaceDao;
import com.example.sxweather.logic.model.DailyResponse;
import com.example.sxweather.logic.model.PlaceResponse;
import com.example.sxweather.logic.model.RealtimeResponse;
import com.example.sxweather.logic.model.Weather;
import com.example.sxweather.logic.network.SXWeatherNetwork;

import java.util.List;

import kotlinx.coroutines.Dispatchers;
import okhttp3.Dispatcher;
//仓库类,主要工作就是判断调用方请求的数据应该是从本地数据源中获取还是从网络数据源中获取,并将获得的数据返回给调用方
//仓库类像是一个数据获取与缓存的中间层
//这里用一个类来作为仓库层的统一封装入口
public class Repository {
    //一个集合,用来存放读取下来的城市信息,具体可以查看PlaceResponse的内部类Place
    private static List<PlaceResponse.Place> places;
    //我们使用LiveData将异步获取的数据以响应式编程的方式通知给上一层
    private static MutableLiveData<List<PlaceResponse.Place>> PlacesData = new MutableLiveData<>();
    //创建一个网络请求API封装的实例
    static SXWeatherNetwork sxWeatherNetwork = new SXWeatherNetwork();
    //------------------------------------------------------------------------------
    //调用SXWeatherNetwork的searchPlaces()函数来搜索城市数据,如果服务器响应ok,那么就获取包含地区信息的集合
    //LiveData整合对象并返回
    public MutableLiveData<List<PlaceResponse.Place>> searchPlaces(String query) {
        //重要概念:Android不允许在主线程中进行网络请求
        //诸如读写数据库之类的本地数据操作也是不建议在主线程中进行,因此非常有必要在仓库层进行一次线程转换
        new Thread(new Runnable() {
            @Override
            public void run() {
                try {
                    //将我们的query具体城市信息作为参数从外界读取进来
                    //会返回一个带有城市信息的PlaceResponse,也就是最底层的body
                    PlaceResponse placeResponse = sxWeatherNetwork.searchPlaces(query);
                    if (placeResponse.getStatus().equals("ok")) {
                        //包含地区信息的集合
                        places = placeResponse.getPlaces();
                        //我们再将集合放入到LiveData当中
                        PlacesData.postValue(places);
                    } else {
                        Log.d("Repository", "status is not ok");
                        Log.d("Repository", "status is " + placeResponse.getStatus());
                    }
                } catch (Exception e) {
                    e.printStackTrace();
                } finally {
                    Log.d("Repository", "success");
                }
            }
        }).start();
        return PlacesData;
    }
我们在Repository中创建了一个PlacesData用来将返回来的城市数据进行包装,变成一个可以被观察的数据
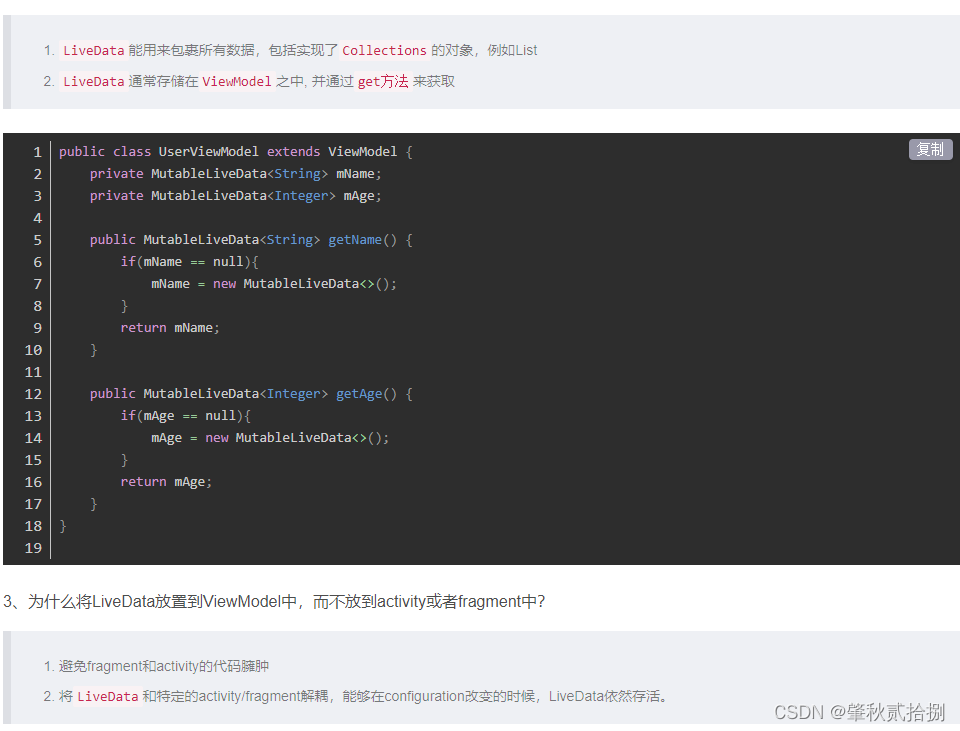
🎆更多关于LiveData的知识
1.LiveData是一种类,持有可被观察的数据(给原数据包装了一层)
2.原数据使用LiveData包装后,可以被Observer观察,数据又更新时,observer可以感知。
3.LiveData是一种可以感知生命周期的组件,意味着该组件重视其他app组件的生命周期。observer的感知,只发生在(Activity/Fragment)活跃生命周期状态(STARTED,RESUMED)
- 一般用在OnCreate中,用在OnResume中会一直被调用
| 使用LiveData的优点 |
|---|
| 1.确保界面符合数据状态,当生命周期状态变化时,LiveData通知Observer,可以在Observer中更新界面。观察者可以在生命周期状态更改的时候刷新界面,而不是在每次数据变化的时刷新界面。 |
| 2.不会发生内存泄露,observer会在LifecycleOwner状态变为DESTROYED后自动remove |
| 3.不回应Activity停止而导致崩溃,如果LifecycleOwner生命周期处于非活跃状态,则他不会接受任何LiveData事件 |
| 4.不需要手动解除观察,开发者在不需要onPause或onDestroy方法中解除对LiveData的观察,因为LiveData能感知生命周期状态变化,所以会自动管理所有这些操作 |
| 5.数据始终保持最新状态,数据更新时,若LifecycleOwner为非活跃状态,那么会在变为活跃时接收最新数据。(曾在后台的Activity在返回前台后,observer会立刻接受最新的数据。 |
- LiveData是一个抽象类,不能直接使用,通常我们使用它的直接子类MutableLiveData
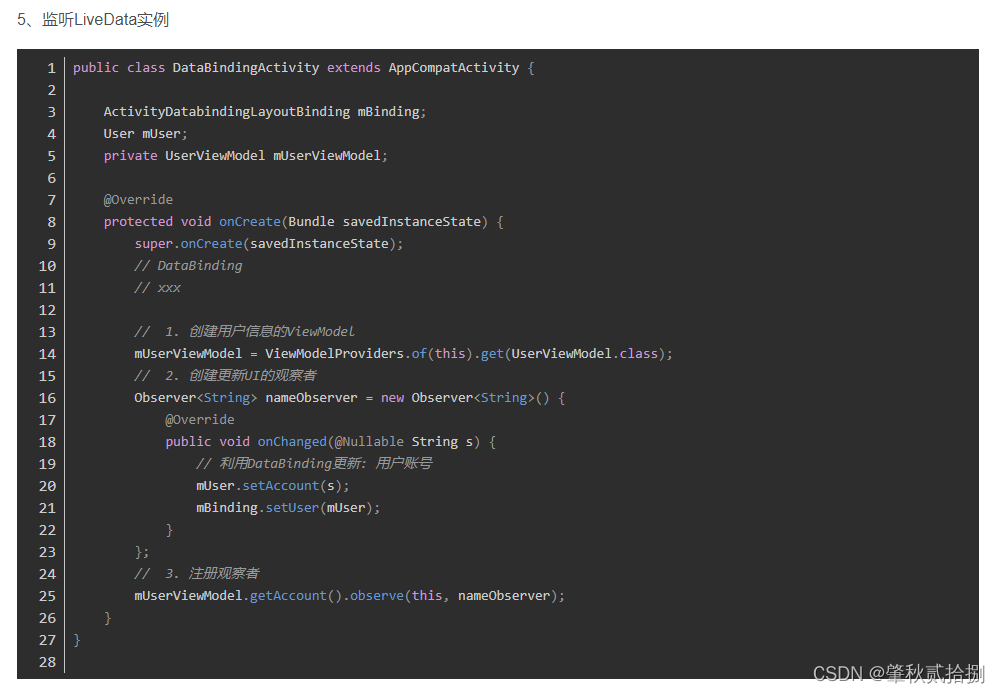
✨1.创建LiveData实例
部分内容转载自LiveData基本教程
✨2.创建Observer对象
- 通过Transformations.switchMap进行对LiveData的监听
//获取LiveData数据
    public LiveData<List<PlaceResponse.Place>> mutableLiveData=Transformations.switchMap(searchLiveData, query -> repository.searchPlaces(query));
每次的MutableLiveData的值发生变化,repository.searchPlaces(query)就会被调用。但Repository.searchPlaces(query)返回的LiveData。所以每次当返回的值发生变化时,MutableLiveData的值也会改变。
✨3.更新LiveData对象

 //定义了一个searchPlaces()方法,并没有直接调用仓库层中的searchPlaces方法,而是将传入的搜索参数query赋值给了一个searchLivaData对象
    //并且使用Transformations的switchMap()方法来观察这个对象
    //我们在发送网络请求的同时,进行了外包装,让我们的LiveDate对象转换成了一个可供Activity观察的liveData对象
    public void searchPlaces(String query){
        searchLiveData.postValue(query);
    }
PS:每一层都写了searchPlaces方法,这里是在ViewModel层将query数据更新到仓库层的LiveData,仓库层将query发送到网络请求层,网络请求层将数据发送到Retrofit通过注解发送网络请求的接口当中。
🎆ViewModel层的创建
- ViewModel层相当与逻辑层和UI层之间的一个桥梁,虽然它更偏向于逻辑层的部分,但是由于ViewModel通常和Activity或Fragment是一一对应的,因此我们还是习惯将它放在一起。在ui/places包下新建一个PlaceViewModel
package com.example.sxweather.ui.place;

import androidx.lifecycle.LiveData;
import androidx.lifecycle.MutableLiveData;
import androidx.lifecycle.Transformations;
import androidx.lifecycle.ViewModel;

import com.example.sxweather.logic.Repository;
import com.example.sxweather.logic.model.PlaceResponse;

import java.util.ArrayList;
import java.util.List;

import okhttp3.ResponseBody;

//持有和UI元素相关的数据,并保证这些数据在旋转式不会消失
public class PlaceViewModel extends ViewModel {
    //1.获得仓库层实例
    Repository repository=new Repository();
    //2.创建一个LiveDate来存放String
    private static MutableLiveData<String> searchLiveData=new MutableLiveData<String>();
    //3.城市信息集合 @List<Place> 同时我们在这定义了一个存放城市信息的集合,用于对界面上显示的城市数据进行缓存,因为原则上与界面相关的数据都应该放到ViewModel中
    //这样可以保证他们在手机旋转的时候不会丢失
    private  static List<PlaceResponse.Place> placeList=new ArrayList<>();

    //获取LiveData数据
    public LiveData<List<PlaceResponse.Place>> mutableLiveData=Transformations.switchMap(searchLiveData, query -> repository.searchPlaces(query));
    //定义了一个searchPlaces()方法,并没有直接调用仓库层中的searchPlaces方法,而是将传入的搜索参数query赋值给了一个searchLivaData对象
    //并且使用Transformations的switchMap()方法来观察这个对象
    //我们在发送网络请求的同时,进行了外包装,让我们的LiveDate对象转换成了一个可供Activity观察的liveData对象
    public void searchPlaces(String query){
        searchLiveData.postValue(query);
    }
}
🎆实现搜索城市UI层的代码
✨fragment_place.xml
<?xml version="1.0" encoding="utf-8"?>
<RelativeLayout xmlns:android="http://schemas.android.com/apk/res/android"
    android:layout_width="match_parent"
    android:layout_height="match_parent"
    android:background="?android:windowBackground">
    //ImageView用来显示背景图,为了美观
    <ImageView
        android:id="@+id/bgImageView"
        android:layout_width="match_parent"
        android:layout_height="wrap_content"
        android:layout_alignParentBottom="true"
        android:src="@drawable/bg_place"/>
    //搜索城市的数据的功能我们在后面还会服用,所以就不建议写在Activity里面,可以写在Fragment
    //这样当我们复用的时候直接在布局里面引入该Fragment即可
    <LinearLayout
        android:id="@+id/actionBarLayour"
        android:layout_width="match_parent"
        android:layout_height="60dp"
        android:orientation="horizontal"
        android:background="@color/colorPrimary">
        <EditText
            android:id="@+id/searchPlaceEdit"
            android:layout_width="match_parent"
            android:layout_height="40dp"
            android:layout_weight="2"
            android:layout_gravity="center_vertical"
            android:layout_marginStart="10dp"
            android:layout_marginEnd="10dp"
            android:paddingStart="10dp"
            android:paddingEnd="10dp"
            android:hint="@string/Edit_City_Which"
            android:maxLines="1"
            android:background="@drawable/search_bg" />

        <Button
            android:id="@+id/searchButton"
            android:layout_width="match_parent"
            android:layout_height="40dp"
            android:layout_gravity="center_vertical"
            android:layout_marginEnd="10dp"
            android:layout_weight="16"
            android:background="@drawable/enter_change"
            android:paddingStart="10dp"
            android:paddingEnd="10dp"
            />
    </LinearLayout>
    //在RecyclerView中对搜索出来的结果进行展示
    //之后在里面加载的布局我们可以用卡片式布局将
    <androidx.recyclerview.widget.RecyclerView
        android:id="@+id/recyclerView"
        android:layout_width="match_parent"
        android:layout_height="match_parent"
        android:layout_below="@+id/actionBarLayour"
        android:visibility="gone"/>

</RelativeLayout>
这个布局有两部分内容,EditText用于给用户提供一个搜索框,这样用户就可以搜索任意城市;RecyclerView则主要用于对搜索出来的结果进行展示。另外这个布局还有一个ImageView控件,他的作用只是为了展示一张背景图,从而让界面显示的更加美观,和主体功能无关。
这里布局中显示的文字应该定于到strings.xml中,然后在布局中进行引用,尽量不要使用硬编码的写法
android:hint="@string/Edit_City_Which"
✨place_item
<?xml version="1.0" encoding="utf-8"?>
<com.google.android.material.card.MaterialCardView xmlns:android="http://schemas.android.com/apk/res/android"
    xmlns:app="http://schemas.android.com/apk/res-auto"
    android:layout_width="match_parent"
    android:layout_height="130dp"
    android:layout_margin="12dp"
    app:cardCornerRadius="4dp">
    //卡片式布局作为最外层布局,使RecyclerView中的每个元素都是在卡片当中
    //用了两个TextView,一个用于显示搜索到的地区名,一个用于显示该地区的详细地址
    <LinearLayout
        android:orientation="vertical"
        android:layout_width="match_parent"
        android:layout_height="wrap_content"
        android:layout_margin="20dp"
        android:layout_gravity="center_vertical">
        <TextView
            android:id="@+id/placeName"
            android:layout_width="wrap_content"
            android:layout_height="wrap_content"
            android:textColor="?android:attr/textColorPrimary"
            android:textSize="20sp"/>
        <TextView
            android:id="@+id/placeAddress"
            android:layout_width="wrap_content"
            android:layout_height="wrap_content"
            android:textColor="?android:attr/textColorPrimary"
            android:textSize="14sp"/>
    </LinearLayout>


</com.google.android.material.card.MaterialCardView>
这里使用了MaterialCardView来作为子项的最外层布局,从而使得RecyclerView中的每个元素都是在卡片中的。至于卡片中的元素内容非常简单,只用到了两个TextView,一个用于显示搜索到的地区名,一个用于显示该地区的详细地址
✨为RecyclerVIew准备适配器以及实现Fragment
package com.example.sxweather.ui.place;

import android.app.Activity;
import android.content.Intent;
import android.view.LayoutInflater;
import android.view.View;
import android.view.ViewGroup;
import android.widget.TextView;

import androidx.annotation.NonNull;
import androidx.drawerlayout.widget.DrawerLayout;
import androidx.recyclerview.widget.LinearLayoutManager;
import androidx.recyclerview.widget.RecyclerView;
import androidx.swiperefreshlayout.widget.SwipeRefreshLayout;

import com.example.sxweather.R;
import com.example.sxweather.SXWeatherApplication;
import com.example.sxweather.WeatherActivity;
import com.example.sxweather.logic.model.PlaceResponse;

import org.w3c.dom.Text;

import java.util.List;
//很简单的RecyclerView构建器创造
public class PlaceAdapter extends RecyclerView.Adapter<PlaceViewHolder>{
    List<PlaceResponse.Place> placeList;
    private static PlaceFragment placeFragment;
    //1.将我们的数据集合传入到RecyclerView当中
    public PlaceAdapter(PlaceFragment placeFragmentList,List<PlaceResponse.Place> placeList){
        this.placeFragment=placeFragmentList;
        this.placeList=placeList;

    }
    @NonNull
    @Override
    public PlaceViewHolder onCreateViewHolder(@NonNull ViewGroup parent, int viewType) {
        View view= LayoutInflater.from(parent.getContext()).inflate(R.layout.place_item,parent,false);
        //View view=View.inflate(SXWeatherApplication.getContext(),R.layout.place_item,null);
        PlaceViewHolder placeViewHolder=new PlaceViewHolder(view);
        return placeViewHolder;
    }

    @Override
    public void onBindViewHolder(@NonNull PlaceViewHolder holder, int position) {
        PlaceResponse.Place place=placeList.get(position);
        holder.placeName.setText(place.getName());
        holder.placeAddress.setText(place.getAddress());
    }

    @Override
    public int getItemCount() {
        return placeList.size();
    }

}
class PlaceViewHolder extends RecyclerView.ViewHolder{
    TextView placeName;
    TextView placeAddress;
    View v;
    public PlaceViewHolder(@NonNull View itemView) {
        super(itemView);
        this.v=itemView;
        this.placeName=(TextView)itemView.findViewById(R.id.placeName);
        this.placeAddress=(TextView) itemView.findViewById(R.id.placeAddress);
    }
}
这里使用的是标准的RecyclerView适配器的写法
- 接下里我们只剩下对Fragment的实现,在ui/place包下新建一个PlaceFragment,并让它继承AndroidX库中的Fragment
package com.example.sxweather.ui.place;

import android.content.Intent;
import android.os.Bundle;
import android.text.Editable;
import android.text.TextWatcher;
import android.util.Log;
import android.view.LayoutInflater;
import android.view.View;
import android.view.ViewGroup;
import android.widget.Button;
import android.widget.EditText;
import android.widget.ImageView;
import android.widget.Toast;

import androidx.annotation.NonNull;
import androidx.annotation.Nullable;
import androidx.fragment.app.Fragment;
import androidx.lifecycle.Observer;
import androidx.lifecycle.ViewModelProvider;
import androidx.recyclerview.widget.LinearLayoutManager;
import androidx.recyclerview.widget.RecyclerView;

import com.example.sxweather.MainActivity;
import com.example.sxweather.R;
import com.example.sxweather.SXWeatherApplication;
import com.example.sxweather.WeatherActivity;
import com.example.sxweather.logic.model.PlaceResponse;

import java.util.List;

public class PlaceFragment extends Fragment {
    CharSequence sequence;
    //定义一个ViewModel实例
    private  static PlaceViewModel placeViewModel;
    public PlaceViewModel getViewModel(){
        return placeViewModel;
    }
    @Nullable
    @Override
    //这里是Fragment的标准用法,记载碎片布局
    public View onCreateView(@NonNull LayoutInflater inflater, @Nullable ViewGroup container, @Nullable Bundle savedInstanceState) {
        //获取了存储数据的ViewModel
        placeViewModel=new ViewModelProvider(this).get(PlaceViewModel.class);
        View v=inflater.inflate(R.layout.fragment_place,container,false);
        return v;
    }
    //1.先给RecyclerView设置LayoutManager和适配器
    //2.使用PlaceViewModel中的placeList集合作为数据源
    //3.重点!!!!!!!!!!!!!:调用EditText的addTextChangedListener()方法来监听搜索框内容的变化情况(每当搜索框发生了变化,我们就获取新的内容,然后传递给PlaceViewModel中的searchPlaces()方法)
    //这样就可以发起搜索城市数据的网络请求了
    //4.当输入框内容为空时,我们就将RecyclerView隐藏起来,只显示背景图
    //5.借助LiveData来获取到服务器响应的数据
    //PS:接下来的数字序列就代表这五个过程
    @Override
    public void onActivityCreated(@Nullable Bundle savedInstanceState) {
        super.onActivityCreated(savedInstanceState);
        //0.(我们再PlaceAdapter构造器获取到Place的信息后,我们保存了它)完成存储功能后,我们要对存储的状态进行判断和读取
        //这里对PlaceFragment进行了判断,如果当前已有存储的城市数据,那么就获取已存储的城市数据并解析成place对象
        //然后直接使用这个place的经纬度坐标和城市名,并直接跳转到WeatherActivity,这样就不用重新选择了
        //PS:前半段判断条件是之后加上去的,原因:我们之前是如果有选中的城市,保存在sharedPreferences文件中,就直接跳转到WeatherActivity
        //但是在PlaceFragment嵌入WeatherActivity之后,如果继续只有后面一个判断,就会造成无限循环跳转的情况
        if(getActivity().getClass().equals(MainActivity.class)&&placeViewModel.isPlaceSaved()){
            //只有当PlaceFragment被嵌入MainActivity中,并且之前存在选中的城市,此时会直接跳转到WeatherActivity
            PlaceResponse.Place place=placeViewModel.getSavedPlace();
            Intent intent=new Intent(getContext(), WeatherActivity.class);
            intent.putExtra("location_lng",place.getLocation().getLng());
            intent.putExtra("location_lat",place.getLocation().getLat());
            intent.putExtra("place_name",place.getName());
            startActivity(intent);
            getActivity().finish();
            return;
        }
        //补充:读取数据,并显示在我们的cardView上面
        RecyclerView recyclerView=getActivity().findViewById(R.id.recyclerView);
        //1,2 加载RecyclerView的相关设置,并从placeViewModel中获得我们的集合
        LinearLayoutManager layoutManager=new LinearLayoutManager(getActivity());//SXWeatherApplication.getContext()
        recyclerView.setLayoutManager(layoutManager);
        PlaceAdapter placeAdapter=new PlaceAdapter(this,placeViewModel.getPlaceList());
        recyclerView.setAdapter(placeAdapter);
        //3.获取控件实例,并写EditText的监听事件,用于发送搜索城市数据的网络请求
        ImageView imageViewBG=(ImageView) getActivity().findViewById(R.id.bgImageView);
        EditText PlaceEdit =getActivity().findViewById(R.id.searchPlaceEdit);
        Button button=(Button)getActivity().findViewById(R.id.searchButton);
        //我们在搜索框内部嵌套一个按钮,通过按钮进行搜索,这样我们可以避免输入上产生问题,导致内容变化错误
        PlaceEdit.addTextChangedListener(new TextWatcher() {//搜索框内容变化监听
            @Override
            public void beforeTextChanged(CharSequence s, int start, int count, int after) {
            }
            @Override
            public void onTextChanged(CharSequence s, int start, int before, int count) {
                //改变时候
                //参数分析:CharSequence在这里就是上面的数据
                String nowText = s.toString();
                //我们用日志打印一下我们输入的城市信息
                Log.d("PlaceFragment","query is"+nowText);

                button.setOnClickListener(new View.OnClickListener() {
                    @Override
                    public void onClick(View v) {
                        //4.当输入框为空的
                        if(nowText.isEmpty()){
                            Toast.makeText(getActivity(),"你不能搜索空的内容",Toast.LENGTH_SHORT).show();
                            //我们将RecyclerView隐藏,并将我们的背景图显示出来
                            recyclerView.setVisibility(View.GONE);
                            imageViewBG.setVisibility(View.VISIBLE);
                            //同时我们要清空我们的placeViewModel里面集合存放的城市信息,为了下一个搜索城市进行准备
                            //如何清空集合内的城市信息?
                            //我们可以在我们的PlaceViewModel类里面添加方法,来清空城市信息(之后是否需要其他方法?)
                            placeViewModel.clearPlaceList();
                            //提醒我们的构建器我们的数据已经发生了修改
                            placeAdapter.notifyDataSetChanged();
                        }else{
                            //有数据的时候,开始进行搜索操作
                            placeViewModel.searchPlaces(nowText);
                            Log.d("PlaceFragment",""+placeViewModel.mutableLiveData.getValue());
                        }
                    }
                });
                /* //4.当输入框为空的
                if(nowText.isEmpty()){
                    //我们将RecyclerView隐藏,并将我们的背景图显示出来
                    recyclerView.setVisibility(View.GONE);
                    imageViewBG.setVisibility(View.VISIBLE);
                    //同时我们要清空我们的placeViewModel里面集合存放的城市信息,为了下一个搜索城市进行准备
                    //如何清空集合内的城市信息?
                    //我们可以在我们的PlaceViewModel类里面添加方法,来清空城市信息(之后是否需要其他方法?)
                    placeViewModel.clearPlaceList();
                    //提醒我们的构建器我们的数据已经发生了修改
                    placeAdapter.notifyDataSetChanged();
                }else{
                    //有数据的时候,开始进行搜索操作
                    placeViewModel.searchPlaces(nowText);
                    Log.d("PlaceFragment",""+placeViewModel.mutableLiveData.getValue());
                }*/
            }
            @Override
            public void afterTextChanged(Editable s) {
                //改变之后
            }
        });
        button.setOnClickListener(new View.OnClickListener() {
            @Override
            public void onClick(View v) {
                if(PlaceEdit.getText().toString().isEmpty()){
                    Toast.makeText(getActivity(),"你不能搜索空的内容",Toast.LENGTH_SHORT).show();
                }
            }
        });


        //5.获取服务器响应的数据通过LivaData
        //我们对PlaceViewModel中的PlaceLivaData对象进行观察,当有任何数据变化时,就会回调到传入的Observer接口中
        //如果数据不为空,我们就将数据添加到PlaceViewModel的placeList集合中
        //并通知PlaceAdapter刷新界面
        //数据为空表示发生异常,弹出一个提示
        placeViewModel.mutableLiveData.observe(getViewLifecycleOwner(), new Observer<List<PlaceResponse.Place>>() {
            @Override
            public void onChanged(List<PlaceResponse.Place> placeList) {
                //这里我们获得了placeList集合
                //placeList集合不为空
                if(placeList!=null){
                    //把我们的RecyclerView显示出来
                    //把我们的背景图隐藏起来
                    Log.d("PlaceFragment","数据已变化");
                    recyclerView.setVisibility(View.VISIBLE);
                    imageViewBG.setVisibility(View.GONE);
                    placeViewModel.clearPlaceList();
                    //将数据添加到placeList集合中
                    placeViewModel.addPlaceList(placeList);
                    placeAdapter.notifyDataSetChanged();
                }else{
                    Log.d("PlaceViewModel","earth???????????");
                    Toast.makeText(getActivity(),"地球上找不到你要找的地方",Toast.LENGTH_SHORT).show();
                }
            }
        });
    }
}
先获取PlaceViewModel实例,然后加载前面写的fragment_item布局。
最后来看onActivityCreated()方法,这个方法先给RecyclerView设置LayoutManager和适配器,并使用PlaceViewModel中的placeList集合作为数据源。接着调用EditText的addTextChangedListener()方法来监听搜索框内容的变化情况。每当搜索框中的内容发生变化,我们就获取新的内容,然后传递给PlaceViewModel的searchPlaces()方法,这样就可以发起搜索城市数据的网络请求。当输入框的内容为空的时,就将RecyclerView隐藏起来,同时将背景图显示出来。
如何获取服务器响应的数据,我们对PlaceViewModel中的placeLiveData对象进行观察,当有任何数据发生变化的时候,就会回调到传入的Observer接口实现中。然后我们会对回调的数据进行判断:如果数据不为空,那么就将这些数据加载到PlaceViewModel的placeList集合中,并通知PlaceAdapter刷新界面,如果数据为空,则表明发生异常,弹出一个Toast进行提示.
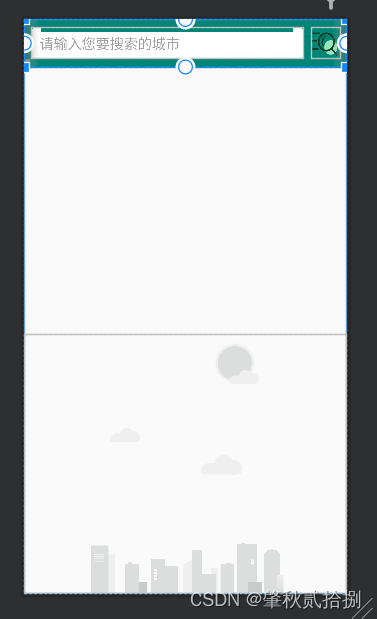
界面展示
因为已经完成,所以这里是滑动菜单形式显示

🎇步骤三:显示天气信息
- 第二阶段中,我们就要将查询到的天气信息给显示出来。同样我们也分为逻辑层实现和UI层实现两部分,那么我们仍然先从逻辑层实现开始。
🎆逻辑层代码
- 因为彩云天气返回的数据内容非常多,这里我么们不展示所有内容,只是选了一些比较重要的数据来进行解析与展示。将简化后的JSON格式来定义相应的数据模型。在logic/model包下新建一个RealtimeResponse
package com.example.sxweather.logic.model;

import com.google.gson.annotations.SerializedName;

//这是返回的实时天气预报信息的数据类型(获取实时天气信息接口所返回的JSON数据格式)
/*
 * {
 *   "status": "ok",
 *   "result": {
 *       "realtime": {
 *           "temperature": 23.16,
 *           "skycon": "WIND",
 *           "air_quality": {
 *               "aqi": { "chn": 17.0 }
 *            }
 *       }
 *   }
 * }
 * */
//data class RealtimeResponse(val status:String , val result :Result){}
public class RealtimeResponse {
    private String status;
    private Result result;
    /*
    * 可以定义一个变量,来为之后的报错进行调试(Error?)
    * */
    public void setStatus(String status) {
        this.status = status;
    }

    public String getStatus() {
        return status;
    }

    public Result getResult() {
        return result;
    }

    public void setResult(Result result) {
        this.result = result;
    }
    //----------------------------------------------------
    //内部类
    public class Result{
        private Realtime realtime;

        public Realtime getRealtime() {
            return realtime;
        }

        public void setRealtime(Realtime realtime) {
            this.realtime = realtime;
        }
    }
    public class Realtime{
        private String skycon;
        private Float temperature;
        @SerializedName("air_quality")
        private AirQuality airQuality;

        public AirQuality getAirQuality() {
            return airQuality;
        }

        public Float getTemperature() {
            return temperature;
        }

        public String getSkycon() {
            return skycon;
        }

        public void setAirQuality(AirQuality airQuality) {
            this.airQuality = airQuality;
        }

        public void setSkycon(String skycon) {
            this.skycon = skycon;
        }

        public void setTemperature(Float temperature) {
            this.temperature = temperature;
        }
    }

    public class AQI{
        private Float chn;

        public Float getChn() {
            return chn;
        }

        public void setChn(Float chn) {
            this.chn = chn;
        }
    }
    public class AirQuality{
        private AQI aqi;

        public AQI getAqi() {
            return aqi;
        }

        public void setAqi(AQI aqi) {
            this.aqi = aqi;
        }
    }
}
将所有的数据模型都定义在了RealtimeResponse的内部,这样可以防止出现和其他接口的数据模型类有同名的冲突的情况
- 接下来我们写未来几天天气信息接口所返回的JSON格式数据
package com.example.sxweather.logic.model;

import com.google.gson.annotations.SerializedName;

import java.util.ArrayList;
import java.util.Date;
import java.util.List;

//从网络接口获取到我们的未来几天的信息
/*
* {
*   "status": "ok",
*   "result": {
*       "daily": {
*           "temperature": [ {"max": 25.7 , "min": 20.3},......]
*           "skycon": [ {"value": "CLOUDY" , "date":"2019-10-20T00:00+08:00"},...]
*           "life_index":{
*               "coldRisk": [{"desc" , "易发"}, ... ]
*               "carWashing":[{"desc", "适宜"}, ... ]
*               "ultraviolet":[{"desc", "无"}, ...]
*               "dressing": [{"desc", "舒适"} , ...]
*           }
*       }
*   }
* }
* */
public class DailyResponse {
    private String status;
    private Result result;

    public Result getResult() {
        return result;
    }

    public String getStatus() {
        return status;
    }


    public class Result{
        Daily daily=new Daily();

        public Daily getDaily() {
            return daily;
        }

        public void setDaily(Daily daily) {
            this.daily = daily;
        }
    }
    public class Daily{
        private List<Temperature> temperature=new ArrayList<>();
        private List<Skycon> skycon=new ArrayList<>();
        @SerializedName("life_index")
        private LifeIndex life_index=new LifeIndex();

        public LifeIndex getLifeIndex() {
            return life_index;
        }

        public List<Skycon> getSkycon() {
            return skycon;
        }

        public List<Temperature> getTemperature() {
            return temperature;
        }
    }
    public class LifeIndex{
        //!!!!!!!!!!!!!!!!!!!!!!!第三个重大bug未出现在这
        //单词cold写成了clod导致出现json格式数据翻译上的错误,造成了空指针异常报错
        List<Life_index_num> coldRisk=new ArrayList<>();
        List<Life_index_num> carWashing =new ArrayList<>();
        List<Life_index_num> ultraviolet =new ArrayList<>();
        List<Life_index_num> dressing=new ArrayList<>();

        public List<Life_index_num> getCarWashing() {
            return carWashing;
        }

        public List<Life_index_num> getClodRisk() {
            return coldRisk;
        }

        public List<Life_index_num> getDressing() {
            return dressing;
        }

        public List<Life_index_num> getUltraviolet() {
            return ultraviolet;
        }
    }
    public class Temperature{
        Float max;
        Float min;

        public Float getMax() {
            return max;
        }

        public Float getMin() {
            return min;
        }
    }
    public class Skycon{
        String value=new String();
        Date date =new Date();

        public Date getDate() {
            return date;
        }

        public String getValue() {
            return value;
        }
    }
    public class Life_index_num{
        String desc=new String();

        public String getDesc() {
            return desc;
        }

        public void setDesc(String desc) {
            this.desc = desc;
        }
    }

}
这段JSON格式数据最大的特别之处就是,它返回的天气数据全部是数组形式的,数组中的每个元素都对应着一天的数据。在数据模型中,我们可以使用List集合来对JSON中的数组元素进行映射。
除此之外,我们还需要在logic/model包下再定义一个weather类,用于将Realtime和Daily对象封装起来
package com.example.sxweather.logic.model;
//将获取到的实时和未来天气都封装成了一个类
public class Weather {
    //Response都是Json数据格式通过Retrofit转换过来的
    private RealtimeResponse.Realtime realtime;
    private DailyResponse.Daily daily;
    public Weather(RealtimeResponse.Realtime realtime, DailyResponse.Daily daily){
        this.realtime=realtime;
        this.daily=daily;
    }

    public void setDaily(DailyResponse.Daily daily) {
        this.daily = daily;
    }

    public DailyResponse.Daily getDaily() {
        return daily;
    }

    public void setRealtime(RealtimeResponse.Realtime realtime) {
        this.realtime = realtime;
    }

    public RealtimeResponse.Realtime getRealtime() {
        return realtime;
    }
}
- 数据模型定义完成后,接下来又该开始编写网络层相关的代码。现在定义一个用于访问天气信息API的Retrofit接口,在logic/model包下新建一个WeatherService接口
package com.example.sxweather.logic.network;

import com.example.sxweather.logic.model.DailyResponse;
import com.example.sxweather.logic.model.RealtimeResponse;

import retrofit2.Call;
import retrofit2.http.GET;
import retrofit2.http.Path;

public interface WeatherService {
    //仍然使用get声明来访问API接口
    //使用@Path注解来向请求接口中动态传入经纬度的坐标
    @GET("v2.5/OTI46zZoNo984B5Q/{lng},{lat}/realtime.json")
    Call<RealtimeResponse> getRealtimeWeather(@Path("lng")String lng,@Path("lat")String lat);

    @GET("v2.5/OTI46zZoNo984B5Q/{lng},{lat}/daily.json")
    Call<DailyResponse> getDailyWeather(@Path("lng")String lng,@Path("lat")String lat);
}
这里定义了两个方法,getRealtimeWeather()方法用于获取实时的天气信息,getDailyWeather()方法用于获取未来的天气信息·。每个方法上面还是用@GET注解来声明访问的API接口,并且使用@Path注解来向请求接口中动态传入经纬度的坐标。
- 和上面搜索城市信息同样的,完成了网络层的代码编写,接下来很容易去仓库层进行相关的代码实现。修改Repository中的代码。
 //---------------------------------------------------------------------
    //
    //----------------------------------------------------------------------
    //存储我们读取到的天气信息
    //在仓库层我们并没有提供两个分别用于获取实时天气信息和未来天气信息的方法,而是提供了一个refreshWeather()方法用来刷新天气信息
    //对于调用方而言,需要调用两次请求才能获得其想要的所有天气数据明显是比较烦琐的行为,因此最好的做法就是在仓库层在进行一次统一的封装
    //以livedate的形式保存数据
    public MutableLiveData<Weather> refreshWeather(String lng,String lat){
        MutableLiveData<Weather> weatherMutableLiveData=new MutableLiveData<>();
        new Thread(new Runnable() {
            @Override
            public void run() {
               try{
                   RealtimeResponse realtimeResponse;
                   DailyResponse dailyResponse;
                   realtimeResponse=sxWeatherNetwork.getRealtimeWeather(lng,lat);
                   dailyResponse=sxWeatherNetwork.getDailyResponse(lng,lat);
                   //从网络获取到的数据可以使用
                   if(realtimeResponse.getStatus().equals("ok") && dailyResponse.getStatus().equals("ok")){
                       //将两个获取到的数据整合成一个我们之前封装的Weather对象
                       Weather weather=new Weather(realtimeResponse.getResult().getRealtime(), dailyResponse.getResult().getDaily());
                       weatherMutableLiveData.postValue(weather);
                   }else{
                       Log.d("Repository","Realtime response error! it is "+dailyResponse.getStatus());
                       Log.d("Repository","Daily response error! it is"+dailyResponse.getStatus());
                   }
               }catch (Exception e){
                   e.printStackTrace();
                   Log.d("Repository","WeatherNetwork Error");
               }finally {
                   Log.d("Repository","success");
               }
            }
        }).start();
        return weatherMutableLiveData;
    }
    //这里两个天气的获取采用了并发执行,不过在同时得到他们的响应之后,才会进行下一步只想程序
    //逻辑分析:如果他们的相应状态都是ok的,那么就将Realtime和Daily对象取出并封装到一个Weather对象中
    //(翻阅第一行代码)优化:关于使用Kotlin代码的优化可能性
    //我们使用了协程来简化网络回调的写法,导致NetWork中的每一个网络请求都可能会抛出异常,所以我们对仓库层的每一个网络请求都进行了try catch处理
    //这增加了代码的复杂度,我们可以使用某个统一的入口函数进行封装,使得只要进行一次try catch处理就行
    /*
    *private fun <T> fire(context: CoroutineContext, block: suspend() -> Result<T>)=liveData<Result<T>>(context) {
    *    val result =try{
    *        block()
    *    }catch(e: Exception){
    *       Result.failure<T>(e)
    *    }
    *    emit(result)
    *    }
    * }
    * */
    //在仓库层对我们的代码进行实现
    //仓库层是我们本机数据源的上面一层,里面存储的LiveDate对外提供了数据
    //在这里仓库层只是做了一层接口封装,这里的实现方式并不标准,因为即使是对SharedPreferences文件进行读写操作,也不太建议在主线程中进行
    //最佳的实现方式还是开启一个线程来执行这些比较耗时的任务,然后通过LiveData对象进行数据返回
    public static PlaceResponse.Place getSavedPlace(){
        return PlaceDao.getSavedPlace();
    }
    public static void savePlace(PlaceResponse.Place place){
        PlaceDao.savePlace(place);
    }
    public static boolean isPlaceSaved(){
        return PlaceDao.isPlaceSaved();
    }
- 最后一步定义WeatherViewModel层就行
package com.example.sxweather.ui.weather;

import android.util.Log;

import androidx.lifecycle.LiveData;
import androidx.lifecycle.MutableLiveData;
import androidx.lifecycle.Transformations;
import androidx.lifecycle.ViewModel;

import com.example.sxweather.logic.Repository;
import com.example.sxweather.logic.model.PlaceResponse;
import com.example.sxweather.logic.model.Weather;

public class WeatherViewModel extends ViewModel {
    //在place中我们获得了经纬度并且存放到了livedata当中,我们现在将他获取到
    //并作为参数传进去,作为搜索天气信息的必须条件
    private static MutableLiveData<PlaceResponse.Location> locationMutableLiveData=new MutableLiveData<>();
    public String location_lng="";
    public String location_lat="";
    public String place="";
    final static Repository repository=new Repository();
    //lamda表达式,location是PlaceResponse当中的一个内部类
    //从location中获取经纬度信息,通过刷新天气方法获取到天气信息,并将它放到livedata当中
    public static  final LiveData<Weather> weatherLiveDate= Transformations.switchMap(locationMutableLiveData, location->repository.refreshWeather(location.getLng(),location.getLat()));

    public void refreshWeather(String lng,String lat){
        Log.d("WeatherViewModel","lng is"+lng);
        Log.d("WeatherViewModel","lat is"+lat);
        locationMutableLiveData.postValue(new PlaceResponse.Location(lng,lat));
    }
    public MutableLiveData<PlaceResponse.Location> getLocationMutableLiveData(){
        return locationMutableLiveData;
    }
}
这里定义了一个refreshWeather()方法来刷新天气信息,并将传入的经纬度参数封装成一个Location对象后赋值给LocationLiveData对象,然后用Transformations的switchMap方法来观察对象。
这里还在ViewModel层定义了locationLng,locationLat和placeName这3个变量,它们都是和界面相关的数据,放到ViewModel中可以保证他们在手机屏幕发生旋转的时候不会丢失。
🎆实现UI层代码
- 首先创建一个用于显示天气信息的Activity,创建WeatherActivity,并将布局命名为activity_weather.xml 。我们在这里使用了引入布局的技巧来将代码进行封装到不同的布局文件里面,不至于让代码混乱不堪
- 显示当前天气信息的布局,now.xml
<?xml version="1.0" encoding="utf-8"?>
<RelativeLayout xmlns:android="http://schemas.android.com/apk/res/android"
    android:id="@+id/nowLayout"
    android:layout_width="match_parent"
    android:layout_height="530dp"
    android:orientation="vertical"
    >
    //分为上下两布局
    //上半部分是头布局,里面只放了一个TextView,用于显示城市名
    <FrameLayout
        android:id="@+id/titleLayout"
        android:layout_width="match_parent"
        android:layout_height="70dp"
        android:fitsSystemWindows="true">
        //这里的Button提醒我们右边有滑动菜单可以通过它搜索
        <Button
            android:id="@+id/navBtn"
            android:layout_width="30dp"
            android:layout_height="30dp"
            android:layout_marginStart="15dp"
            android:layout_gravity="center_vertical"
            android:background="@drawable/ic_home"/>
        <TextView
            android:id="@+id/placeName"
            android:layout_width="wrap_content"
            android:layout_height="wrap_content"
            android:layout_marginStart="60dp"
            android:layout_marginEnd="60dp"
            android:layout_gravity="center"
            android:singleLine="true"
            android:ellipsize="middle"
            android:textColor="#fff"
            android:textSize="22sp" />
    </FrameLayout>
    //下半部分是当前天气信息的布局,里面放置了几个TextView,分别用于显示当前气温,当前天气情况以及当前空气质量
    <LinearLayout
        android:id="@+id/bodyLayout"
        android:layout_width="match_parent"
        android:layout_height="wrap_content"
        android:layout_centerInParent="true"
        android:orientation="vertical">
        <TextView
            android:id="@+id/currentTemp"
            android:layout_width="wrap_content"
            android:layout_height="wrap_content"
            android:layout_gravity="center_horizontal"
            android:textColor="#fff"
            android:textSize="70sp"/>
        <LinearLayout
            android:layout_width="wrap_content"
            android:layout_height="wrap_content"
            android:layout_gravity="center_horizontal"
            android:layout_marginTop="20dp"
            >
            <TextView
                android:id="@+id/currentSky"
                android:layout_width="wrap_content"
                android:layout_height="wrap_content"
                android:textColor="#fff"
                android:textSize="18sp"/>
            <TextView
                android:layout_width="wrap_content"
                android:layout_height="wrap_content"
                android:layout_marginStart="13dp"
                android:text="|"
                android:textColor="#fff"
                android:textSize="18sp"/>
            <TextView
                android:id="@+id/currentAQI"
                android:layout_width="wrap_content"
                android:layout_height="wrap_content"
                android:layout_marginStart="13dp"
                android:textColor="#fff"
                android:textSize="18sp"/>

        </LinearLayout>
    </LinearLayout>

</RelativeLayout>
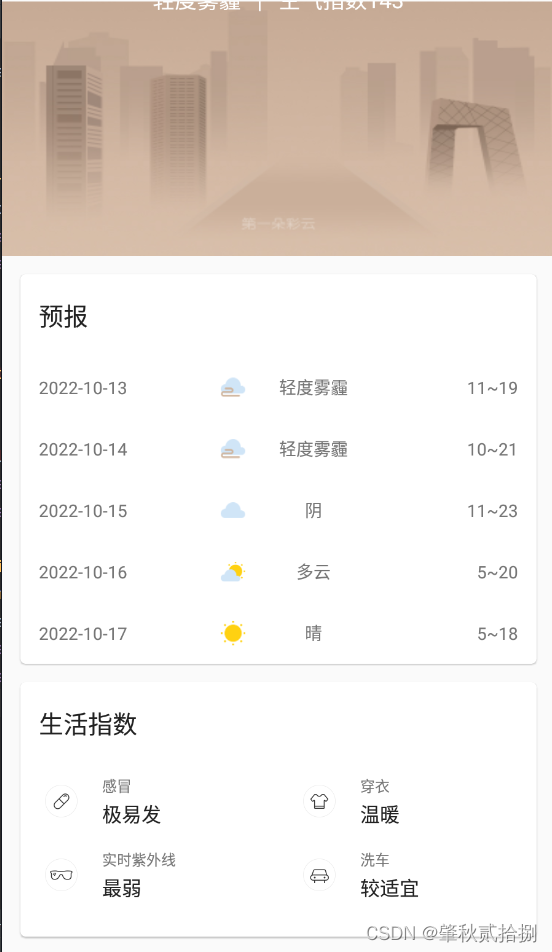
分为上下两个布局,上半部分是头布局,里面放置一个TextView用来显示城市名;下半部分是当前天气信息的布局,里面放置几个TextView,分别用于显示当前气温,当前天气情况以及当前空气质量。
- 新建forecast.xml作为未来几天天气信息的布局
<?xml version="1.0" encoding="utf-8"?>
<com.google.android.material.card.MaterialCardView xmlns:android="http://schemas.android.com/apk/res/android"
    xmlns:app="http://schemas.android.com/apk/res-auto"
    android:layout_width="match_parent"
    android:layout_height="wrap_content"
    android:layout_marginLeft="15dp"
    android:layout_marginRight="15dp"
    android:layout_marginTop="15dp"
    app:cardCornerRadius="4dp">
    //最外层使用了卡片式布局的背景效果,然后使用TextView定义一个标题
    //接着又使用一个LinearLayout定义一个用于显示未来几天天气信息的子项布局
    //不过这个布局中并没有放入任何内容,因为这是要根据服务器返回的数据在代码中动态添加
    <LinearLayout
        android:orientation="vertical"
        android:layout_width="match_parent"
        android:layout_height="wrap_content">
        <TextView
            android:layout_width="wrap_content"
            android:layout_height="wrap_content"
            android:layout_marginStart="15dp"
            android:layout_marginTop="20dp"
            android:layout_marginBottom="20dp"
            android:text="预报"
            android:textColor="?android:attr/textColorPrimary"
            android:textSize="20sp"/>
        <LinearLayout
            android:id="@+id/forecastLayout"
            android:layout_width="match_parent"
            android:layout_height="wrap_content"
            android:orientation="vertical"/>
    </LinearLayout>


</com.google.android.material.card.MaterialCardView>
最外层使用MaterialCardView来实现卡片式布局的背景效果,然后使用TextView定义一个标题,接着又使用LinearLayout定义一个用于显示未来几天天气信息的布局。这里的布局内没有放入任何内容,因为这是要根据服务器返回的数据在代码中动态添加。
- 接下里定义一个未来天气信息的子项布局,创建forecast_item.xml文件,代码如下:
<?xml version="1.0" encoding="utf-8"?>
<LinearLayout xmlns:android="http://schemas.android.com/apk/res/android"
    android:layout_width="match_parent"
    android:layout_height="wrap_content"
    android:layout_margin="15dp">
    //这个子项布局包含了3个TextView和1个ImageView,分别用于显示天气预报的日期,天气的图标,天气的情况
    //以及当天的最低温度和最高温度
    <TextView
        android:id="@+id/dateInfo"
        android:layout_weight="4"
        android:layout_width="0dp"
        android:layout_height="wrap_content"
        android:layout_gravity="center_vertical"/>
    <ImageView
        android:id="@+id/skyIcon"
        android:layout_width="20dp"
        android:layout_height="20dp"/>
    <TextView
        android:id="@+id/skyInfo"
        android:layout_width="0dp"
        android:layout_height="wrap_content"
        android:layout_weight="3"
        android:layout_gravity="center_vertical"
        android:gravity="center"/>
    <TextView
        android:id="@+id/temperatureInfo"
        android:layout_width="0dp"
        android:layout_height="wrap_content"
        android:layout_weight="3"
        android:layout_gravity="center_vertical"
        android:gravity="end"/>

</LinearLayout>
用来显示天气预报的日期,天气的图标,天气的情况以及当天的最低温度和最高温度。
- 然后新建life_index.xml作为生活指数的布局
<?xml version="1.0" encoding="utf-8"?>
<com.google.android.material.card.MaterialCardView xmlns:android="http://schemas.android.com/apk/res/android"
    xmlns:app="http://schemas.android.com/apk/res-auto"
    android:layout_margin="15dp"
    android:layout_width="match_parent"
    android:layout_height="wrap_content"
    app:cardCornerRadius="4dp">
    //定义了一个四方格布局,四个布局的内容是一样的
    //分别用于显示感冒,穿衣,实时紫外线,以及洗车的指数
    //每个方格中都有一个ImageView来显示图标,一个TextView来显示标题,一个显示指数
    <LinearLayout
        android:layout_width="match_parent"
        android:layout_height="wrap_content"
        android:orientation="vertical">
        <TextView
            android:layout_width="wrap_content"
            android:layout_height="wrap_content"
            android:layout_marginStart="15dp"
            android:layout_marginTop="20dp"
            android:text="生活指数"
            android:textColor="?android:attr/textColorPrimary"
            android:textSize="20sp"/>
        <LinearLayout
            android:layout_width="match_parent"
            android:layout_height="wrap_content"
            android:layout_marginTop="20dp">
            <RelativeLayout
                android:layout_width="0dp"
                android:layout_height="60dp"
                android:layout_weight="1">
                <ImageView
                    android:id="@+id/coldRiskImg"
                    android:layout_width="wrap_content"
                    android:layout_height="wrap_content"
                    android:layout_centerVertical="true"
                    android:layout_marginStart="20dp"
                    android:src="@drawable/ic_coldrisk"/>
                <LinearLayout
                    android:layout_width="wrap_content"
                    android:layout_height="wrap_content"
                    android:layout_centerVertical="true"
                    android:layout_toEndOf="@id/coldRiskImg"
                    android:layout_marginStart="20dp"
                    android:orientation="vertical">
                    <TextView
                        android:layout_width="wrap_content"
                        android:layout_height="wrap_content"
                        android:textSize="12sp"
                        android:text="感冒"/>
                    <TextView
                        android:id="@+id/coldRiskText"
                        android:layout_width="wrap_content"
                        android:layout_height="wrap_content"
                        android:layout_marginTop="4dp"
                        android:textSize="16sp"
                        android:textColor="?android:attr/textColorPrimary"/>
                </LinearLayout>
            </RelativeLayout>
            <RelativeLayout
                android:layout_width="0dp"
                android:layout_height="60dp"
                android:layout_weight="1">
                <ImageView
                    android:id="@+id/dressingImg"
                    android:layout_width="wrap_content"
                    android:layout_height="wrap_content"
                    android:layout_centerVertical="true"
                    android:layout_marginStart="20dp"
                    android:src="@drawable/ic_dressing"/>
                <LinearLayout
                    android:layout_width="wrap_content"
                    android:layout_height="wrap_content"
                    android:layout_centerVertical="true"
                    android:layout_toEndOf="@id/dressingImg"
                    android:layout_marginStart="20dp"
                    android:orientation="vertical">
                    <TextView
                        android:layout_width="wrap_content"
                        android:layout_height="wrap_content"
                        android:textSize="12sp"
                        android:text="穿衣"/>
                    <TextView
                        android:id="@+id/dressingText"
                        android:layout_width="wrap_content"
                        android:layout_height="wrap_content"
                        android:layout_marginTop="4dp"
                        android:textSize="16sp"
                        android:textColor="?android:attr/textColorPrimary"/>
                </LinearLayout>
            </RelativeLayout>
        </LinearLayout>
        <LinearLayout
            android:layout_width="match_parent"
            android:layout_height="wrap_content"
            android:layout_marginBottom="20dp">
            <RelativeLayout
                android:layout_width="0dp"
                android:layout_height="60dp"
                android:layout_weight="1">
                <ImageView
                    android:id="@+id/ultravioletImg"
                    android:layout_width="wrap_content"
                    android:layout_height="wrap_content"
                    android:layout_centerVertical="true"
                    android:layout_marginStart="20dp"
                    android:src="@drawable/ic_ultraviolet"/>
                <LinearLayout
                    android:layout_width="wrap_content"
                    android:layout_height="wrap_content"
                    android:layout_centerVertical="true"
                    android:layout_toEndOf="@id/ultravioletImg"
                    android:layout_marginStart="20dp"
                    android:orientation="vertical">
                    <TextView
                        android:layout_width="wrap_content"
                        android:layout_height="wrap_content"
                        android:textSize="12sp"
                        android:text="实时紫外线"/>
                    <TextView
                        android:id="@+id/ultravioletText"
                        android:layout_width="wrap_content"
                        android:layout_height="wrap_content"
                        android:layout_marginTop="4dp"
                        android:textSize="16sp"
                        android:textColor="?android:attr/textColorPrimary"/>
                </LinearLayout>
            </RelativeLayout>
            <RelativeLayout
                android:layout_width="0dp"
                android:layout_height="60dp"
                android:layout_weight="1">
                <ImageView
                    android:id="@+id/carWashingImg"
                    android:layout_width="wrap_content"
                    android:layout_height="wrap_content"
                    android:layout_centerVertical="true"
                    android:layout_marginStart="20dp"
                    android:src="@drawable/ic_carwashing"/>
                <LinearLayout
                    android:layout_width="wrap_content"
                    android:layout_height="wrap_content"
                    android:layout_centerVertical="true"
                    android:layout_toEndOf="@id/carWashingImg"
                    android:layout_marginStart="20dp"
                    android:orientation="vertical">
                    <TextView
                        android:layout_width="wrap_content"
                        android:layout_height="wrap_content"
                        android:textSize="12sp"
                        android:text="洗车"/>
                    <TextView
                        android:id="@+id/carWashingText"
                        android:layout_width="wrap_content"
                        android:layout_height="wrap_content"
                        android:layout_marginTop="4dp"
                        android:textSize="16sp"
                        android:textColor="?android:attr/textColorPrimary"/>
                </LinearLayout>
            </RelativeLayout>

        </LinearLayout>

    </LinearLayout>

</com.google.android.material.card.MaterialCardView>
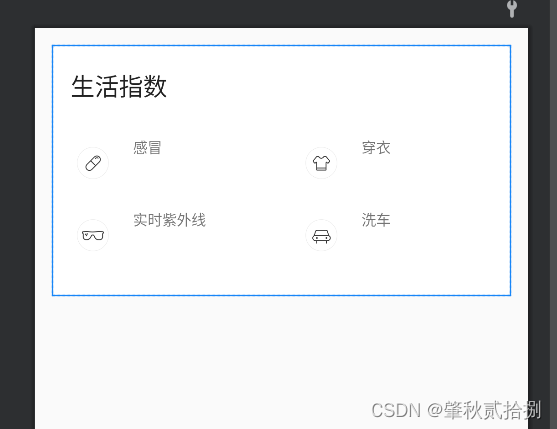
定义了一个四方格布局,分别用于显示感冒、穿衣、实时紫外线以及洗车的指数。所以只要看懂其中一个方格中的布局,其它方格中的布局自然就明白了。每个方法都有一个ImageView用来显示图标,一个TextView用来显示标题,还有一个TextView用来显示指数。
- 接下里我们将它们全部引入到天气界面的主布局就行了。
<?xml version="1.0" encoding="utf-8"?>
<androidx.drawerlayout.widget.DrawerLayout xmlns:android="http://schemas.android.com/apk/res/android"
    xmlns:app="http://schemas.android.com/apk/res-auto"
    xmlns:tools="http://schemas.android.com/tools"
    android:layout_width="match_parent"
    android:layout_height="match_parent"
    android:id="@+id/drawerLayout">
    //我们在SwipeRefreshLayout外面又嵌套了一层DrawerLayout
    //第一个子控件显示我们主界面的内容(关于天气的相关信息)
    //第二个子控件的位置添加了用于搜索全球城市的数据Fragment
    <androidx.swiperefreshlayout.widget.SwipeRefreshLayout
        android:layout_width="match_parent"
        android:layout_height="match_parent"
        android:id="@+id/swipeRefresh">
        //第三板块我们再ScrollView先嵌套了一个SwipeRefreshLayout
        //这样ScrollView就具有下拉刷新功能了
        <ScrollView
            android:id="@+id/weatherLayout"
            android:layout_width="match_parent"
            android:layout_height="match_parent"
            android:scrollbars="none"
            android:overScrollMode="never"
            android:visibility="invisible">
            //我们将我们刚才写的now_weather  forecast  life_index引入这个天气界面的布局当中
            //最外层布局使用了一个ScrollView,因为天气界面的内容需要显示的东西比较多,所以ScrollView就可以通过滚动方式查看屏幕以外的内容,由于ScrollView内部只允许存在一个子布局,所以我们写了一个LinearLayout
            //我们在这里将我们的ScrollView隐藏了起来,不然空数据的界面看上去会很奇怪,等到天气数据请求成功之后,会通过代码的方式将我们的ScrollView显示出来
            <LinearLayout
                android:orientation="vertical"
                android:layout_width="match_parent"
                android:layout_height="wrap_content">
                <include layout="@layout/now_weather"/>
                <include layout="@layout/forecast"/>
                <include layout="@layout/life_index"/>
            </LinearLayout>
        </ScrollView>
    </androidx.swiperefreshlayout.widget.SwipeRefreshLayout>
    <FrameLayout
        android:layout_width="match_parent"
        android:layout_height="match_parent"
        android:layout_gravity="start"
        android:clickable="true"
        android:focusable="true"
        android:background="@color/colorPrimary">
        <fragment
            android:id="@+id/placeFragment"
            android:name="com.example.sxweather.ui.place.PlaceFragment"
            android:layout_width="match_parent"
            android:layout_height="match_parent"
            android:layout_marginTop="25dp"/>

    </FrameLayout>
</androidx.drawerlayout.widget.DrawerLayout>
这里已经的代码已经包括了之后的滑动菜单,以及刷新界面的布局。
先将目光放到ScrollView之中,因为天气界面中的内容比较多,使用ScrollView就可以通过滚动的方式查看屏幕以外的内容。由于ScrollView的内部只允许存在一个直接子布局,因此这里又嵌套了一个垂直方向的LinearLayout,然后再LinearLayout中将刚才定义的所有布局逐个引入。
一开始我们会将ScrollView隐藏起来,不然空数据的界面看上去会很奇怪。等到天气数据请求成功,会通过代码的方式将ScrollView显示出来。
- 我们还编写了一个额外的转换函数。因为彩云天气返回的数据之中,天气情况一般都是一些诸如CLOUDY、WIND之类的天气代码。我们用一个转换函数将这些天气代码转化成一个Sky对象。
package com.example.sxweather.logic.model;

import android.util.Log;

import com.example.sxweather.R;

//额外编写一个转换的函数
//彩云天气返回的数据,都是一些诸如CLOUDY,WIND之类的天气代码,我们需要编写一个转换函数将这些天气代码转换成一个sky对象
public class Sky {
    //首先定义了一个Sky类作为数据模型,它包含了info,icon和bg这3个字段
    //分别表示该天气情况对应的文字,图标和背景
    private String info;
    private int  icon;
    private int bg;
    public Sky(String info,int icon,int bg){
        this.info=info;
        this.bg=bg;
        this.icon=icon;
    }
    //图片资料来自第一行代码
    private static final Sky CLEAR_DAY = new Sky("晴", R.drawable.ic_clear_day,R.drawable.bg_clear_day);
    private static final Sky CLEAR_NIGHT = new  Sky("晴", R.drawable.ic_clear_night, R.drawable.bg_clear_night);
    private static final Sky PARTLY_CLOUDY_DAY = new  Sky("多云", R.drawable.ic_partly_cloud_day, R.drawable.bg_partly_cloudy_day);
    private static final Sky PARTLY_CLOUDY_NIGHT = new  Sky("多云", R.drawable.ic_partly_cloud_night, R.drawable.bg_partly_cloudy_night);
    private static final Sky CLOUDY = new  Sky("阴", R.drawable.ic_cloudy, R.drawable.bg_cloudy);
    private static final Sky WIND = new  Sky("大风", R.drawable.ic_cloudy, R.drawable.bg_wind);
    private static final Sky LIGHT_RAIN = new  Sky("小雨", R.drawable.ic_light_rain, R.drawable.bg_rain);
    private static final Sky MODERATE_RAIN = new  Sky("中雨", R.drawable.ic_moderate_rain, R.drawable.bg_rain);
    private static final Sky HEAVY_RAIN = new  Sky("大雨", R.drawable.ic_heavy_rain, R.drawable.bg_rain);
    private static final Sky STORM_RAIN = new  Sky("暴雨", R.drawable.ic_storm_rain, R.drawable.bg_rain);
    private static final Sky THUNDER_SHOWER = new Sky("雷阵雨", R.drawable.ic_thunder_shower, R.drawable.bg_rain);
    private static final Sky SLEET = new  Sky("雨夹雪", R.drawable.ic_sleet, R.drawable.bg_rain);
    private static final Sky LIGHT_SNOW = new  Sky("小雪", R.drawable.ic_light_snow, R.drawable.bg_snow);
    private static final Sky MODERATE_SNOW = new  Sky("中雪", R.drawable.ic_moderate_snow, R.drawable.bg_snow);
    private static final Sky HEAVY_SNOW = new  Sky("大雪", R.drawable.ic_heavy_snow, R.drawable.bg_snow);
    private static final Sky STORM_SNOW = new Sky("暴雪", R.drawable.ic_heavy_snow, R.drawable.bg_snow);
    private static final Sky HAIL = new Sky("冰雹", R.drawable.ic_hail, R.drawable.bg_snow);
    private static final Sky LIGHT_HAZE = new  Sky("轻度雾霾", R.drawable.ic_light_haze, R.drawable.bg_fog);
    private static final Sky MODERATE_HAZE = new Sky("中度雾霾", R.drawable.ic_moderate_haze, R.drawable.bg_fog);
    private static final Sky HEAVY_HAZE = new  Sky("重度雾霾", R.drawable.ic_heavy_haze, R.drawable.bg_fog);
    private static final Sky FOG = new  Sky("雾", R.drawable.ic_fog, R.drawable.bg_fog);
    private static final Sky DUST = new Sky("浮尘", R.drawable.ic_fog, R.drawable.bg_fog);
    //定义了一个getSky方法来获得对应的Sky对象
    public static Sky getSky(String sky){
        switch (sky){
            case "CLEAR_DAY":
                return CLEAR_DAY;
            case "CLEAR_NIGHT":
                return CLEAR_NIGHT;
            case  "PARTLY_CLOUDY_DAY":
                return PARTLY_CLOUDY_DAY;
            case "PARTLY_CLOUDY_NIGHT":
                return PARTLY_CLOUDY_NIGHT;
            case "CLOUDY":
                return CLOUDY;
            case "WIND":
                return WIND;
            case "LIGHT_RAIN":
                return LIGHT_RAIN;
            case "MODERATE_RAIN":
                return MODERATE_RAIN;
            case "HEAVY_RAIN":
                return HEAVY_RAIN;
            case "STORM_RAIN":
                return STORM_RAIN;
            case "THUNDER_SHOWER":
                return THUNDER_SHOWER;
            case "SLEET":
                return SLEET;
            case "LIGHT_SNOW":
                return LIGHT_SNOW;
            case "MODERATE_SNOW":
                return MODERATE_SNOW;
            case "HEAVY_SNOW":
                return HEAVY_SNOW;
            case "STORM_SNOW":
                return STORM_SNOW;
            case "HAIL":
                return HAIL;
            case "LIGHT_HAZE":
                return LIGHT_HAZE;
            case "MODERATE_HAZE":
                return MODERATE_HAZE;
            case "HEAVY_HAZE":
                return HEAVY_HAZE;
            case "FOG":
                return FOG;
            case "DUST":
                return DUST;
            default:
                Log.d("Sky","Error!");
        }
        return null;
    }

    public int getBg() {
        return bg;
    }

    public int getIcon() {
        return icon;
    }

    public String getInfo() {
        return info;
    }
}
里面的所有UI图片都来自Android第一行代码第三版,如有需要可以去文末GitHub链接内的资源文件中去下载。
- 接下来就可以在WeatherActivity中去请求天气数据,并将数据展示到界面上。修改WeatherActivity中的代码。
package com.example.sxweather;

import androidx.annotation.NonNull;
import androidx.appcompat.app.ActionBarDrawerToggle;
import androidx.appcompat.app.AppCompatActivity;
import androidx.core.view.GravityCompat;
import androidx.drawerlayout.widget.DrawerLayout;
import androidx.lifecycle.Observer;
import androidx.lifecycle.ViewModelProvider;
import androidx.swiperefreshlayout.widget.SwipeRefreshLayout;

import android.content.Context;
import android.graphics.Color;
import android.os.Build;
import android.os.Bundle;
import android.util.Log;
import android.view.LayoutInflater;
import android.view.View;
import android.view.inputmethod.InputMethodManager;
import android.widget.Button;
import android.widget.ImageView;
import android.widget.LinearLayout;
import android.widget.RelativeLayout;
import android.widget.ScrollView;
import android.widget.TextClock;
import android.widget.TextView;
import android.widget.Toast;

import com.example.sxweather.logic.model.DailyResponse;
import com.example.sxweather.logic.model.RealtimeResponse;
import com.example.sxweather.logic.model.Sky;
import com.example.sxweather.logic.model.Weather;
import com.example.sxweather.ui.weather.WeatherViewModel;

import java.text.SimpleDateFormat;
import java.util.Locale;

//在这里我们请求太难起数据,并将数据展示到界面上
public class WeatherActivity extends AppCompatActivity {
    //创建一个WeatherViewModel实例
    private static WeatherViewModel weatherViewModel;
    public WeatherViewModel getWeatherViewModel(){
        return weatherViewModel;
    }
    //下拉刷新
    private SwipeRefreshLayout swipeRefreshLayout;
    //滑动菜单
    private DrawerLayout drawerLayout;
    public DrawerLayout getDrawerLayout(){return drawerLayout;}
    @Override
    protected void onCreate(Bundle savedInstanceState) {
        super.onCreate(savedInstanceState);
        setContentView(R.layout.activity_weather);
        //这时滑动菜单的输出部分,通过按钮点击-------------------------------------
        Button navButton =(Button)findViewById(R.id.navBtn);
        navButton.setOnClickListener(new View.OnClickListener() {
            @Override
            public void onClick(View v) {
                drawerLayout.openDrawer(GravityCompat.START);
            }
        });
        //我们监听DrawerLayout的状态,当滑动菜单隐藏的时候,同时也要隐藏输入法
        drawerLayout=(DrawerLayout)findViewById(R.id.drawerLayout);
        drawerLayout.addDrawerListener(new DrawerLayout.DrawerListener() {
            @Override
            public void onDrawerSlide(@NonNull View drawerView, float slideOffset) {

            }

            @Override
            public void onDrawerOpened(@NonNull View drawerView) {

            }

            @Override
            public void onDrawerClosed(@NonNull View drawerView) {
                InputMethodManager manager = (InputMethodManager)getSystemService(Context.INPUT_METHOD_SERVICE);
                manager.hideSoftInputFromWindow(drawerView.getWindowToken(), InputMethodManager.HIDE_NOT_ALWAYS);
            }

            @Override
            public void onDrawerStateChanged(int newState) {

            }
        });


        //优化部分:我们发现背景图和状态栏没有融合在一起,这样的视觉体验没有达到最佳的效果。------------------------------------------
        //现在学一种更简单的方式将我们的背景图和状态栏结合在一起
            //(1).调用getWindow().getDecorView()方法拿到当前的Activity的DecorView
        View decorView=getWindow().getDecorView();
            //(2).调用setSystemUiVisibility()方法来改变系统UI的展示
        decorView.setSystemUiVisibility(View.SYSTEM_UI_FLAG_FULLSCREEN | View.SYSTEM_UI_FLAG_LAYOUT_STABLE);
            //(3).最后调用setStatusBarColor方法将状态栏设置为透明色
        getWindow().setStatusBarColor(Color.TRANSPARENT);
        //后续还要修改下布局,由于系统状态栏已经成为我们布局的一部分,因此会导致天气界面的布局整体向上偏移了一些,这样头部布局就显得有些靠上了
        //可以借助android:firstSystemWindows属性
        //获取ViewModel实例
        weatherViewModel=new ViewModelProvider(this).get(WeatherViewModel.class);
        //获取下拉刷新实例
        swipeRefreshLayout = (SwipeRefreshLayout)findViewById(R.id.swipeRefresh);
        if(weatherViewModel.location_lng.isEmpty()){
            if(getIntent().getStringExtra("location_lng")==null){
                weatherViewModel.location_lng="";
            }else{
                weatherViewModel.location_lng=getIntent().getStringExtra("location_lng");
            }
        }
        if(weatherViewModel.location_lat.isEmpty()){
            if(getIntent().getStringExtra("location_lat")==null){
                weatherViewModel.location_lat="";
            }else{
                weatherViewModel.location_lat=getIntent().getStringExtra("location_lat");
            }
        }
        if(weatherViewModel.place.isEmpty()){
            if(getIntent().getStringExtra("place_name")==null){
                weatherViewModel.place="";
            }else{
                weatherViewModel.place=getIntent().getStringExtra("place_name");
            }
        }
        //观察LiveData的变化
       weatherViewModel.weatherLiveDate.observe(this, new Observer<Weather>() {
           //存储天气数据的仓库层发生了变化
           @Override
           public void onChanged(Weather weather) {
               //如果里面的天气信息不为空
               if(weather!=null){
                   Log.d("WeatherActivity","输出天气信息");
                   //就将这些天气数据显示在UI上
                   showWeatherInfo(weather);
               }else{
                   Toast.makeText(getApplicationContext(),"获取不到天气信息", Toast.LENGTH_SHORT).show();
               }
               swipeRefreshLayout.setRefreshing(false);
           }
       });
        //更新我们的天气数据保存到livedata集合当中

        weatherViewModel.refreshWeather(weatherViewModel.location_lng, weatherViewModel.location_lat);
        swipeRefreshLayout.setColorSchemeResources(R.color.colorPrimary);
        swipeRefreshLayout.setRefreshing(true);//可以让下拉刷新进度条显示出来
        //在另外写一个手动下拉刷新信息实现逻辑
        //通过事件当发现我们手动下拉刷新时,就更新我们的天气信息
        swipeRefreshLayout.setOnRefreshListener(new SwipeRefreshLayout.OnRefreshListener() {
            @Override
            public void onRefresh() {
                weatherViewModel.refreshWeather(weatherViewModel.location_lng, weatherViewModel.location_lat);
                swipeRefreshLayout.setRefreshing(true);
            }
        });
    }
    //封装一下拉刷新天气信息(后面发现封装会稍微方便点调用)
    public void refreshWeather(){
        weatherViewModel.refreshWeather(weatherViewModel.location_lng,weatherViewModel.location_lat);
        swipeRefreshLayout.setRefreshing(true);
    }
    //从weather对象中获取数据,然后将对象中获取到的数据显示到相应的控件上
    //在未来几天的天气预报中,我们添加了for-in(kotlin)循环来处理每天的天气信息,在循环中动态加载forecast_item.xml设置相应的数据
    //生活指数方面虽然服务器会返回很多天的数据,但是界面上只需要当天的数据就可以了,因此我们所有的数据都取了下标为零的那个元素的数据
    //最后记得让ScrollView变成可见状态
    private void showWeatherInfo(Weather weather){
        //展示天气信息在UI界面,我们分成了两部分,未来和实时
        //先将我们的地点信息加载到TextView上面
        TextView placeName=findViewById(R.id.placeName);
        placeName.setText(weatherViewModel.place);
        //1.先获取我们存放未来和实时信息的天气数据
        RealtimeResponse.Realtime realtime=weather.getRealtime();
        DailyResponse.Daily daily=weather.getDaily();
        //Log.d("WeatherActivity","daily"+daily.getTemperatures().get(0).toString());
        //------------------------------------------------------------------>
        //2.先填充实时天气预报,即now.xml控件上的信息
            //(1).获取实例
        TextView  currentTempText =findViewById(R.id.currentTemp);
        TextView currentASky=findViewById(R.id.currentSky);
        TextView currentAQIText=findViewById(R.id.currentAQI);
        RelativeLayout nowLayout=findViewById(R.id.nowLayout);
            //(2).修改控件->Skycon是Response内的一个关于天气数据的内部类(实时和未来里面都有这个类,getXXX就是他的获取方法)
        currentTempText.setText((int)realtime.getTemperature().floatValue()+"℃");
        Log.d("WeatherActivity","Temperature is " + realtime.getTemperature());
        currentASky.setText(Sky.getSky(realtime.getSkycon()).getInfo());//获取天气的名字信息
        currentAQIText.setText("空气指数"+(int)realtime.getAirQuality().getAqi().getChn().floatValue());
        nowLayout.setBackgroundResource(Sky.getSky(realtime.getSkycon()).getBg());//获取天气的背景信息
        //--------------------------------------------------------
        //3.填充life_index.xml生活指数布局中的数据
        //(1).获取网络请求到的生活指数信息
        DailyResponse.LifeIndex lifeIndex=daily.getLifeIndex();
        //(2).获取控件
        TextView coldRiskText=findViewById(R.id.coldRiskText);
        TextView dressingText=findViewById(R.id.dressingText);
        TextView ultravioletText=findViewById(R.id.ultravioletText);
        TextView carWashingText =findViewById(R.id.carWashingText);
        ScrollView scrollView=findViewById(R.id.weatherLayout);
        //(3).修改UI
        //PS:生活指数会返回很多天的数据,但是界面上只需要当天的数据就可以了,因此这里我们对所有的生活指数都取了下标为零的那个元素的数据
        //记得前面说的把ScrollView设为可见
        coldRiskText.setText(lifeIndex.getClodRisk().get(0).getDesc());
        dressingText.setText(lifeIndex.getDressing().get(0).getDesc());
        ultravioletText.setText(lifeIndex.getUltraviolet().get(0).getDesc());
        carWashingText.setText(lifeIndex.getCarWashing().get(0).getDesc());
        Log.d("WeatherActivity",lifeIndex.getClodRisk().get(0).getDesc().toString());
        scrollView.setVisibility(View.VISIBLE);

        //-------------------------------------------------------------------->
        //4.接下来填充未来几天天气预报,即forecast.xml控件上的信息
            //(1).因为要循环处理获取到的数据,我们用for循环来解决问题,那么首先我们需要得到天数信息作为循环的终止次数
            //因为我们DailyResponse内有存放天气信息skyCon的一个集合,所以我们可以通过集合的size来获得总共的预测天数
            //-----??第三个大bug,为什么会出现size导致的空指针异常报错
        int day=daily.getSkycon().size();
        Log.d("WeatherActivityDaily",""+daily.getSkycon().size());
        Log.d("WeatherActivity",""+daily.getSkycon().get(0));
            //(2).在forecast中我们设定了一个linearLayout用于后面加载子布局
        LinearLayout forecastLayout=findViewById(R.id.forecastLayout);
        forecastLayout.removeAllViews();//清空所有布局
            //(3).开始通过循环加载布局
        for(int i=0;i<day;i++){//这里是kotlin中的for in循环
            //先获得skyCon数据
            DailyResponse.Skycon skycon=daily.getSkycon().get(i);
            DailyResponse.Temperature temperature=daily.getTemperature().get(i);
            //加载布局
            View view= LayoutInflater.from(this).inflate(R.layout.forecast_item,forecastLayout,false);
            //获取控件
            ImageView skyIcon= view.findViewById(R.id.skyIcon);
            TextView skyInfo=view.findViewById(R.id.skyInfo);
            TextView dataInfo=view.findViewById(R.id.dateInfo);//dataInfo里面存放的是skycon内的第二个信息,时间
            TextView temperatureInfo =view.findViewById(R.id.temperatureInfo);
            //获取天气(skycon内部的value属性,放的是天气的类型——多云,晴天...)
            //获取日期(这两个数据都是skycon类里面的,也就是我们json格式数据读取出来的)
            Sky sky=Sky.getSky(skycon.getValue());
            SimpleDateFormat simpleDateFormat=new SimpleDateFormat("yyyy-MM-dd", Locale.getDefault());
            //修改控件
            skyIcon.setImageResource(sky.getIcon());
            skyInfo.setText(sky.getInfo());
            dataInfo.setText(simpleDateFormat.format(skycon.getDate()));
            temperatureInfo.setText((int)temperature.getMin().floatValue()+"~"+(int)temperature.getMax().floatValue());
            //添加view到我们的父布局当中
            forecastLayout.addView(view);
        }

    }
}
在onCreate方法中,先获得Intent,然后从Intent中取出经纬度坐标和地区名称。并将这些数据赋值给WeatherViewModel的相应变量中;然后对WeatherLiveData对象进行观察,当获取服务器返回的天气数据后,就调用showWeatherInfo()方法进行解析与展示;最后调用WeatherViewModel的refreshWeather()方法来执行一次刷新天气的请求。
showWeatherInfo()方法的逻辑比较简单。将获取到的数据显示到相应的控件上就行了。
- 编写玩WeatherActivity中的代码,接下来我们要能从搜索城市界面跳转到天气界面,修改PlaceAdapter,在里面设置点击事件
 //点击我们的小卡片布局,要做到的操作就是跳转到天气输出界面
        placeViewHolder.itemView.setOnClickListener(new View.OnClickListener() {
            //通过日志我们可以知道搜索后,出现的内容会被我们封装到livedata当中,然后送到构建器中
            @Override
            public void onClick(View v) {
                //val position =holder.adapterPosition  点击的序列号
                int position=placeViewHolder.getAdapterPosition();
                //val place = placeList(position)  点击的当前地方
                PlaceResponse.Place place=placeList.get(position);
                //获得Activity
                Activity activity=placeFragment.getActivity();

                if(activity.getClass().equals(WeatherActivity.class)){
                    //如果实在WeatherActivity中,那么关闭滑动菜单,给WeatherViewModel赋值新的经纬度坐标和地区名称
                    SwipeRefreshLayout swipeRefreshLayout = view.findViewById(R.id.swipeRefresh);
                    DrawerLayout drawerLayout = (DrawerLayout) view.findViewById(R.id.drawerLayout);

                    ((WeatherActivity) activity).getDrawerLayout().closeDrawers();
                    ((WeatherActivity) activity).getWeatherViewModel().location_lng= place.getLocation().getLng();
                    ((WeatherActivity) activity).getWeatherViewModel().location_lat = place.getLocation().getLat();
                    ((WeatherActivity) activity).getWeatherViewModel().place = place.getName();
                    ((WeatherActivity) activity).refreshWeather();
                }else {
                    //将数据上传
                    Intent intent = new Intent(parent.getContext(), WeatherActivity.class);
                    intent.putExtra("location_lng", place.getLocation().getLng());
                    intent.putExtra("location_lat", place.getLocation().getLat());
                    intent.putExtra("place_name", place.getName());
                    //通过intent进行通信
                    //调用Fragment的方法启动我们的WeatherActivity
                    placeFragment.startActivity(intent);
                    activity.finish();
                }
                placeFragment.getViewModel().savePlace(place);
            }
        });
我们给place_item.xml的最外层布局注册了一个点击事件监听器,然后在点击事件中获取当前点击项的经纬度坐标和地区名称,并将他们传入Intent中,最后调用Fragment的startActivity()方法启动WeatherActivity。
接下来我们简单看一下天气信息

🎆记录选中的城市
- 虽然我们已经实现了显示天气信息的功能,但我没有对选中的城市进行记录。在这里我们使用了SharedPreferences存储
package com.example.sxweather.logic.dao;

import android.content.Context;
import android.content.SharedPreferences;

import com.example.sxweather.SXWeatherApplication;
import com.example.sxweather.logic.model.PlaceResponse;
import com.google.gson.Gson;

//为什么需要存放本地数据源
//因为我们的目前完全没有对选中的城市进行记录。也就是说,每当你退出并重新进入程序之后,就需要再重新搜索并选择一次城市,这显然是不能接受的
//我们接下来要实现记录选中城市的功能
//我们需要运用到持久化技术,因为存储的数据并不属于关系型数据,因此也使用不着数据库存储技术
//直接使用SharedPreferences存储
//JSON数据是我们前面所有数据的总和,我们将他们分类,写成不同的类,但为了存储的方便,在持久化存储时我们一般再把他们整合回去

public class PlaceDao {

    //在PlaceDao中封装几个必要的存储和读取的数据接口
    //savePlace()方法用于将对象存储到SharedPreferences文件中
    public static void savePlace(PlaceResponse.Place place){
        SharedPreferences.Editor editor=sharedPreferences.edit();
        //这里使用了一个技巧,我们先将JSON字符串从SharedPreferences文件中读取出来,然后再通过GSON将JSON字符串解析成Place对象返回
        Gson gson=new Gson();
        editor.putString("place",gson.toJson(place)) ;
        editor.apply();
    }
    //读取是相反的过程,我们先将JSON字符从SharedPreferences中读取出来
    //再通过GSON将JSON字符串解析成Place对象并返回
    public static PlaceResponse.Place getSavedPlace(){
        Gson gson=new Gson();
        PlaceResponse.Place Savedplace=gson.fromJson(sharedPreferences.getString("place",""),PlaceResponse.Place.class);
        return Savedplace;
    }
    public static boolean isPlaceSaved(){
        return sharedPreferences.contains("place");
    }
    private static SharedPreferences sharedPreferences= SXWeatherApplication.getContext().getSharedPreferences("placeData", Context.MODE_PRIVATE);

}
- 将PlaceDao封装好之后,接下来我们在仓库层进行实现
 //在仓库层对我们的代码进行实现
    //仓库层是我们本机数据源的上面一层,里面存储的LiveDate对外提供了数据
    //在这里仓库层只是做了一层接口封装,这里的实现方式并不标准,因为即使是对SharedPreferences文件进行读写操作,也不太建议在主线程中进行
    //最佳的实现方式还是开启一个线程来执行这些比较耗时的任务,然后通过LiveData对象进行数据返回
    public static PlaceResponse.Place getSavedPlace(){
        return PlaceDao.getSavedPlace();
    }
    public static void savePlace(PlaceResponse.Place place){
        PlaceDao.savePlace(place);
    }
    public static boolean isPlaceSaved(){
        return PlaceDao.isPlaceSaved();
    }
这里只在仓库层做了一层接口的封装而已。几个接口的业务逻辑和PlaceViewModel相关,我们也要在PlaceViewModel中在进行一层封装。
 //给外面(Fragment)一个方法用于得到我们保存数据的集合
    public List<PlaceResponse.Place> getPlaceList() {
        return placeList;
    }
    //在搜索城市时,因为是实时的,我们希望在输入框为空时,将整个ViewModel内存放的城市信息给进行清空
    public void clearPlaceList(){
        placeList.clear();
    }
    //在搜索框改变时,并且有值的时候,将我们的城市信息输入到集合当中
    public void addPlaceList(List<PlaceResponse.Place> places){
        placeList.addAll(places);
    }
    //保存地点到本地数据源中
    public static void savePlace(PlaceResponse.Place place){
        Repository.savePlace(place);
    }
    //获取保存的地点
    public static PlaceResponse.Place getSavedPlace(){
        return Repository.getSavedPlace();
    }
    //判断是否有保存的地点
    public static Boolean isPlaceSaved(){
        return Repository.isPlaceSaved();
    }
- 最后修改PlaceAdapter中的代码,在onCreateViewHolder()方法中,当点击了任何子项布局时,在跳转到WeatherActivity之前,先调用PlaceViewModel的savePlace()方法来存储选中的城市。
- 这里在PlaceFragment中进行判断,如果当前已有存储的城市数据,那么就获取已存储的数据并解析成Place对象,然后使用他的经纬度坐标和城市名直接跳转并传递给WeatherActivity,这样用户就不用每次重新选择城市了。
- 不过因为是已经优化过的代码,改成了会判断你在哪个界面。如果是在WeatherActivity中,那么就关闭滑动菜单,给WeatherViewModel赋值新的经纬度坐标和地区名称,然后刷新城市的天气信息。如果是在MainActivity中,那么就保持之前的处理逻辑不变即可。
if(activity.getClass().equals(WeatherActivity.class)){
                    //如果实在WeatherActivity中,那么关闭滑动菜单,给WeatherViewModel赋值新的经纬度坐标和地区名称
                    SwipeRefreshLayout swipeRefreshLayout = view.findViewById(R.id.swipeRefresh);
                    DrawerLayout drawerLayout = (DrawerLayout) view.findViewById(R.id.drawerLayout);

                    ((WeatherActivity) activity).getDrawerLayout().closeDrawers();
                    ((WeatherActivity) activity).getWeatherViewModel().location_lng= place.getLocation().getLng();
                    ((WeatherActivity) activity).getWeatherViewModel().location_lat = place.getLocation().getLat();
                    ((WeatherActivity) activity).getWeatherViewModel().place = place.getName();
                    ((WeatherActivity) activity).refreshWeather();
                }else {
                    //将数据上传
                    Intent intent = new Intent(parent.getContext(), WeatherActivity.class);
                    intent.putExtra("location_lng", place.getLocation().getLng());
                    intent.putExtra("location_lat", place.getLocation().getLat());
                    intent.putExtra("place_name", place.getName());
                    //通过intent进行通信
                    //调用Fragment的方法启动我们的WeatherActivity
                    placeFragment.startActivity(intent);
                    activity.finish();
                }
                placeFragment.getViewModel().savePlace(place);
            }
        });
🎆手动刷新天气和切换城市
关于手动刷新天气用到的swiperefreshlayout和drawerlayout的布局文件写法,上文已经提前展示了。
- 我们在ScrollView的外面嵌套了一层SwipeRefreshLayout,这样ScrollView就会自动拥有下拉刷新功能
     //更新我们的天气数据保存到livedata集合当中

        weatherViewModel.refreshWeather(weatherViewModel.location_lng, weatherViewModel.location_lat);
        swipeRefreshLayout.setColorSchemeResources(R.color.colorPrimary);
        swipeRefreshLayout.setRefreshing(true);//可以让下拉刷新进度条显示出来
        //在另外写一个手动下拉刷新信息实现逻辑
        //通过事件当发现我们手动下拉刷新时,就更新我们的天气信息
        swipeRefreshLayout.setOnRefreshListener(new SwipeRefreshLayout.OnRefreshListener() {
            @Override
            public void onRefresh() {
                weatherViewModel.refreshWeather(weatherViewModel.location_lng, weatherViewModel.location_lat);
                swipeRefreshLayout.setRefreshing(true);
            }
        });
    }
    //封装一下拉刷新天气信息(后面发现封装会稍微方便点调用)
    public void refreshWeather(){
        weatherViewModel.refreshWeather(weatherViewModel.location_lng,weatherViewModel.location_lat);
        swipeRefreshLayout.setRefreshing(true);
    }
这里我们调用refreshWeather()方法,并将SwipeRefreshLayout的isRefreshIng属性设置成true,从而让下拉刷新进度条显示出来。接着调用setOnRefreshListener()方法给SwipeRefreshLayout设置了一个下拉刷新的监听器,当触发了下拉刷新操作的时候,就在监听器的回调中调用refreshWeather()方法来刷新天气信息。
最后别忘了隐藏刷新进度条
- 接下来在WeatherActivity中加入滑动菜单的逻辑处理
  //这时滑动菜单的输出部分,通过按钮点击-------------------------------------
        Button navButton =(Button)findViewById(R.id.navBtn);
        navButton.setOnClickListener(new View.OnClickListener() {
            @Override
            public void onClick(View v) {
                drawerLayout.openDrawer(GravityCompat.START);
            }
        });
        //我们监听DrawerLayout的状态,当滑动菜单隐藏的时候,同时也要隐藏输入法
        drawerLayout=(DrawerLayout)findViewById(R.id.drawerLayout);
        drawerLayout.addDrawerListener(new DrawerLayout.DrawerListener() {
            @Override
            public void onDrawerSlide(@NonNull View drawerView, float slideOffset) {

            }

            @Override
            public void onDrawerOpened(@NonNull View drawerView) {

            }

            @Override
            public void onDrawerClosed(@NonNull View drawerView) {
                InputMethodManager manager = (InputMethodManager)getSystemService(Context.INPUT_METHOD_SERVICE);
                manager.hideSoftInputFromWindow(drawerView.getWindowToken(), InputMethodManager.HIDE_NOT_ALWAYS);
            }

            @Override
            public void onDrawerStateChanged(int newState) {

            }
        });
主要做了两件事,第一在切换城市按钮的点击事件中调用Drawerlayout的openDrawer()方法来打开滑动菜单;第二,监听滑动菜单的状态,当滑动菜单被隐藏的时候,同时也要隐藏输入法。
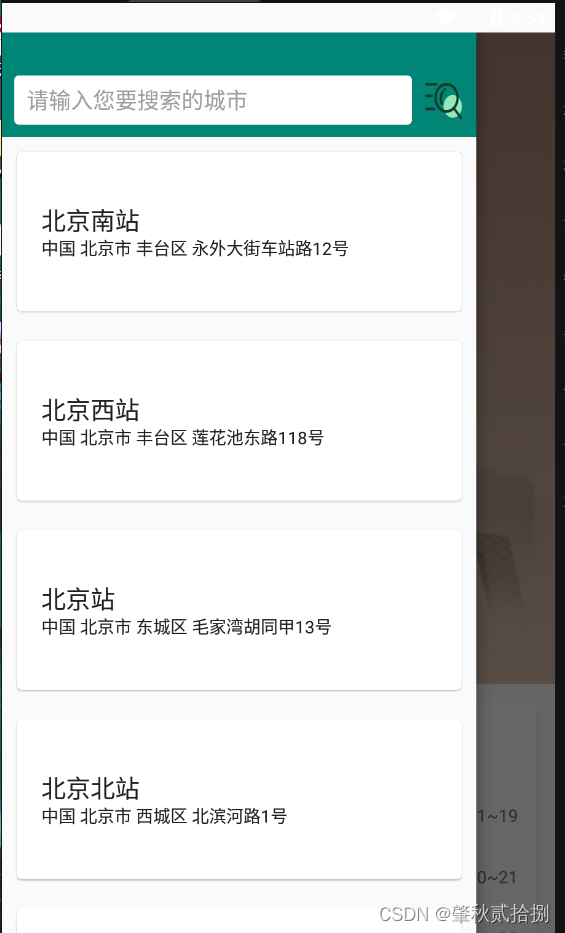
🎇总结可以改进
后续可以使用ViewPager对我们需要看的几个城市的天气信息进行保存,然后将搜索到的城市的天气信息展示变成上拉菜单形式,并在右上角增加“添加”按钮
- 通过天气预报的简单的开发,增强了对网络请求的应用,更加了解了接收网络数据,并进行分析的一整个过程。特别是架构的设计建立对应用整体的框架,为未来开发打好基础。


 989
989

 被折叠的 条评论
为什么被折叠?
被折叠的 条评论
为什么被折叠?
 到【灌水乐园】发言


