


一、保存训练模型
上篇文章实现mnist手写数字识别详细介绍了使用简单的CNN模型来完成mnist手写数字识别,本篇文章将使用简单的CNN模型完成mnist手写数字识别应用,使用Django框架搭建网络服务的代码示例,其中包括上传图片按钮、图片展示和开始识别按钮的功能。通过上传数字图片完成数字识别。
保存TensorFlow训练好的模型,可以使用save()方法将模型保存到磁盘上。HDF5是一种常用的文件格式,可以存储模型的结构、权重和训练配置等信息。保存模型后,可以将该文件移动到其他地方或在需要时重新加载它。加载模型的方法是使用tf.keras.models.load_model()函数。
import tensorflow as tf
from tensorflow.keras.datasets import mnist
from tensorflow.keras.models import Sequential
from tensorflow.keras.layers import Conv2D, MaxPooling2D, Flatten, Dense
from tensorflow.keras.preprocessing.image import load_img, img_to_array
from tensorflow.keras.utils import to_categorical
import numpy as np

# 准备数据集
(x_train, y_train), (x_test, y_test) = mnist.load_data()

# 数据预处理
x_train = x_train.reshape((60000, 28, 28, 1))
x_test = x_test.reshape((10000, 28, 28, 1))
x_train = x_train.astype('float32') / 255
x_test = x_test.astype('float32') / 255
y_train = to_categorical(y_train)
y_test = to_categorical(y_test)

# 构建模型
model = Sequential()
model.add(Conv2D(32, (3, 3), activation='relu', input_shape=(28, 28, 1)))
model.add(MaxPooling2D((2, 2)))
model.add(Conv2D(64, (3, 3), activation='relu'))
model.add(MaxPooling2D((2, 2)))
model.add(Conv2D(64, (3, 3), activation='relu'))
model.add(Flatten())
model.add(Dense(64, activation='relu'))
model.add(Dense(10, activation='softmax'))

# 模型训练
model.compile(optimizer='adam', loss='categorical_crossentropy', metrics=['accuracy'])
model.fit(x_train, y_train, epochs=10, batch_size=64, validation_data=(x_test, y_test))
model.save('model_good.h5')
二、创建Django项目
安装Django、TensorFlow
pip install django==3.2 -i https://mirrors.aliyun.com/pypi/simple/
pip install tensorflow==2.13.0 -i https://mirrors.aliyun.com/pypi/simple/
创建Django项目和应用:在命令行中进入你想要创建项目的目录,并运行以下命令来创建Django项目:django-admin startproject model_mnist
然后,进入项目目录并创建一个应用:python manage.py startapp model_mnist
三、应用实现
设置前端界面:在Django中,你可以使用模板来创建前端界面。在你的应用目录下创建一个名为templates的文件夹,并在其中创建一个HTML模板文件。在模板中,你可以添加一个上传图片按钮和一个开始识别按钮。处理上传图片:在Django中,你可以使用FileField字段来处理上传的文件。在你的应用的models.py文件中定义一个模型,包含一个FileField字段用于接收上传的图片。加载模型和进行数字识别:在你的应用中创建一个视图函数,用于处理上传的图片并进行数字识别。在视图函数中,你可以使用predict_digit函数加载模型并对上传的图片进行预测。将预测结果展示在前端界面:在视图函数中,将预测结果传递给模板,并在模板中展示出来。
settings.py 配置
import os

BASE_DIR = os.path.dirname(os.path.dirname(os.path.abspath(__file__)))
SECRET_KEY = 'your key'
DEBUG = True
ALLOWED_HOSTS = ['*']
INSTALLED_APPS = [
    'django.contrib.admin',
    'django.contrib.auth',
    'django.contrib.contenttypes',
    'django.contrib.sessions',
    'django.contrib.messages',
    'django.contrib.staticfiles',
    'model_mnist',  # 替换为你的应用程序名称
]

MIDDLEWARE = [
    'django.middleware.security.SecurityMiddleware',
    'django.contrib.sessions.middleware.SessionMiddleware',
    'django.middleware.common.CommonMiddleware',
    'django.middleware.csrf.CsrfViewMiddleware',
    'django.contrib.auth.middleware.AuthenticationMiddleware',
    'django.contrib.messages.middleware.MessageMiddleware',
    'django.middleware.clickjacking.XFrameOptionsMiddleware',
]

ROOT_URLCONF = 'model_mnist.urls'  # 替换为你的项目名称
TEMPLATES = [
    {
        'BACKEND': 'django.template.backends.django.DjangoTemplates',
        'DIRS': [os.path.join(BASE_DIR, 'templates')],
        'APP_DIRS': True,
        'OPTIONS': {
            'context_processors': [
                'django.template.context_processors.debug',
                'django.template.context_processors.request',
                'django.contrib.auth.context_processors.auth',
                'django.contrib.messages.context_processors.messages',
                # 处理静态问题件
                'django.template.context_processors.media'
            ],
        },
    },
]

WSGI_APPLICATION = 'model_mnist.wsgi.application'  # 替换为你的项目名称

DATABASES = {
    'default': {
        'ENGINE': 'django.db.backends.sqlite3',
        'NAME': os.path.join(BASE_DIR, 'db.sqlite3'),
    }
}

STATIC_URL = '/static/'
STATIC_ROOT = os.path.join(BASE_DIR, 'static')
MEDIA_URL = '/media/'
MEDIA_ROOT = os.path.join(BASE_DIR, 'media')
LANGUAGE_CODE = 'en-us'
TIME_ZONE = 'UTC'
urls.py 路由设置
# 在项目的urls.py文件中添加以下代码

from django.urls import path
from . import views
from django.contrib import admin
from django.conf import settings
from django.conf.urls.static import static

urlpatterns = [
    path('', views.home, name='home'),
    path('upload/', views.upload_image, name='upload'),
    path('predict/', views.predict_digit, name='predict'),
    path('admin/', admin.site.urls),
] + static(settings.MEDIA_URL, document_root=settings.MEDIA_ROOT)
views.py 应用配置
from django.shortcuts import render
from django.core.files.storage import FileSystemStorage
import tensorflow as tf
import numpy as np

# 加载模型
model = tf.keras.models.load_model('model/model_good.h5')

def home(request):
    return render(request, 'home.html')

def upload_image(request):
    if request.method == 'POST' and request.FILES['image']:
        image = request.FILES['image']
        fs = FileSystemStorage()
        filename = fs.save(image.name, image)
        uploaded_file_url = fs.url(filename)
        return render(request, 'upload.html', {
            'uploaded_file_url': uploaded_file_url
        })
    return render(request, 'upload.html')

def predict_digit(request):
    if request.method == 'POST':
        image_path = request.POST['image_path']
        image_path = image_path.replace("/", "",1)
        image = tf.keras.preprocessing.image.load_img(image_path, color_mode='grayscale', target_size=(28, 28))
        image_array = tf.keras.preprocessing.image.img_to_array(image)
        image_array = np.expand_dims(image_array, axis=0)
        image_array = image_array / 255.0
        prediction = model.predict(image_array)
        predicted_digit = np.argmax(prediction[0])
        return render(request, 'predict.html', {
            'predicted_digit': predicted_digit
        })
    return render(request, 'predict.html')
创建 template文件夹并新建home.html、upload.html、predict.html文件
home.html
<!DOCTYPE html>
<html>
<head>
    <title>Django Digit Recognition</title>
</head>
<body>
    <h1>Welcome to Django Digit Recognition</h1>
    <a href="/upload/">Upload Image</a>
</body>
</html>
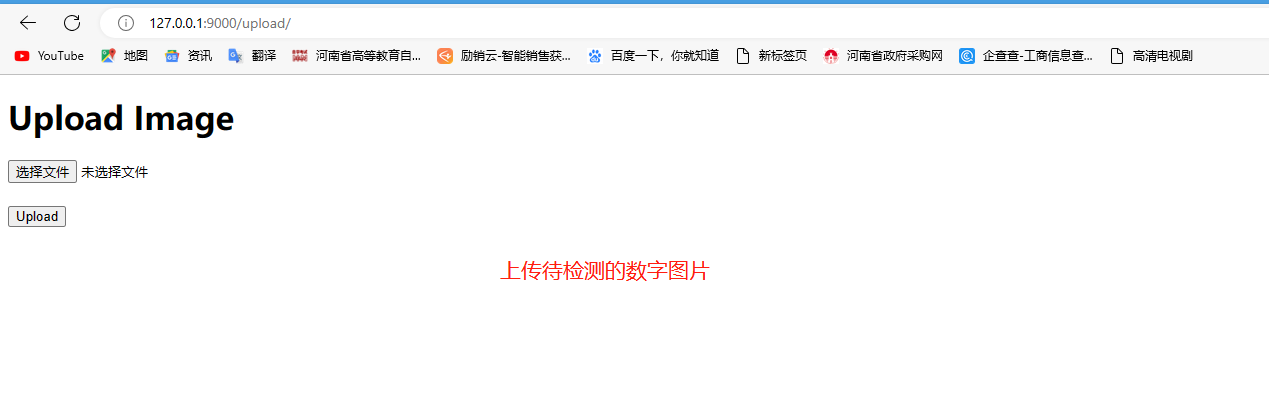
upload.html
<!DOCTYPE html>
<html>
<head>
<title>Django Digit Recognition</title>
</head>
<body>
<h1>Upload Image</h1>
<form method="post" enctype="multipart/form-data" action="/upload/">
{% csrf_token %}
<input type="file" name="image" accept="image/*">
<br><br>
<input type="submit" value="Upload">
</form>
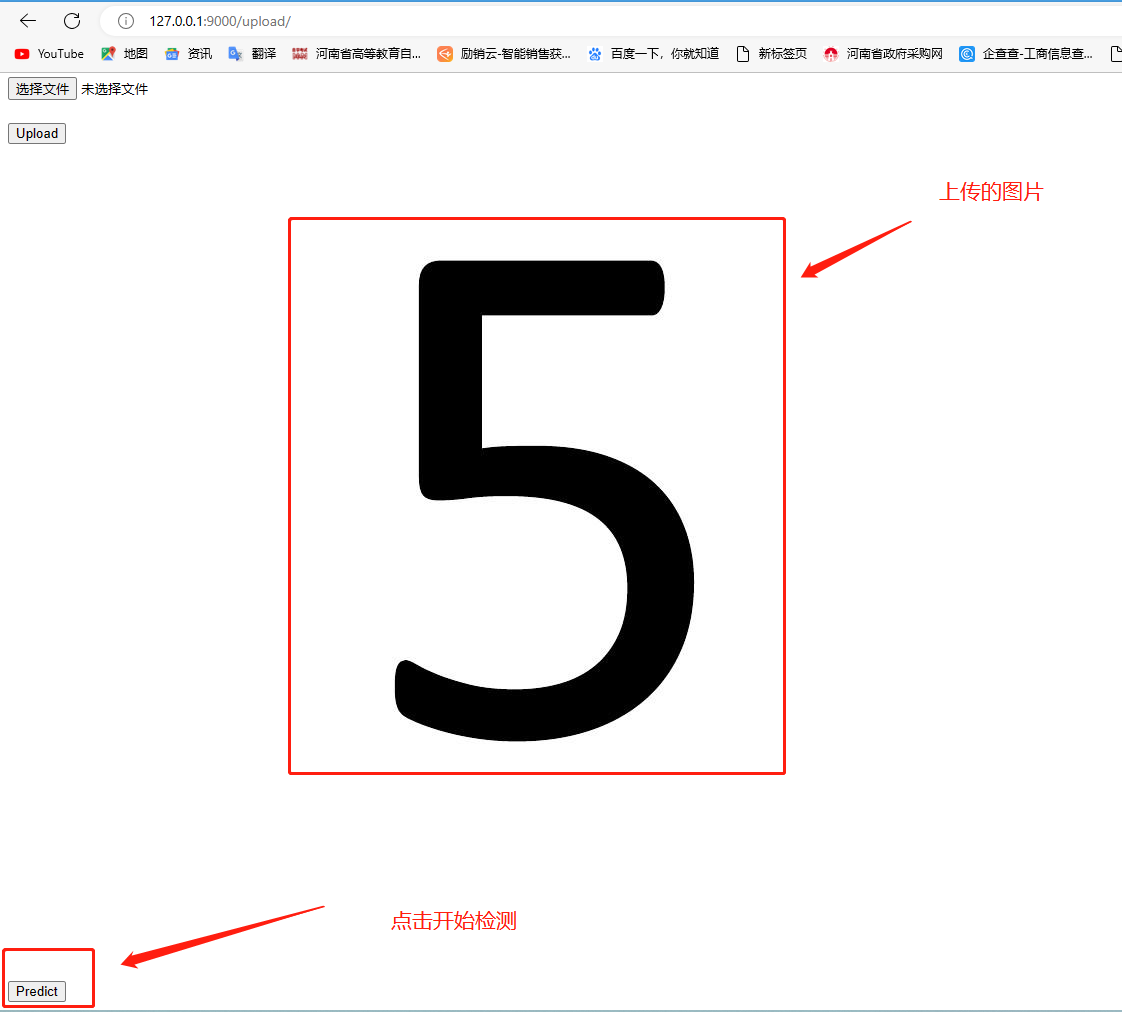
{% if uploaded_file_url %}
<img src="{{ uploaded_file_url }}" alt="uploaded image">
<br><br>
<form method="post" action="/predict/">
{% csrf_token %}
<input type="hidden" name="image_path" value="{{ uploaded_file_url }}">
<input type="submit" value="Predict">
</form>
{% endif %}
</body>
</html>
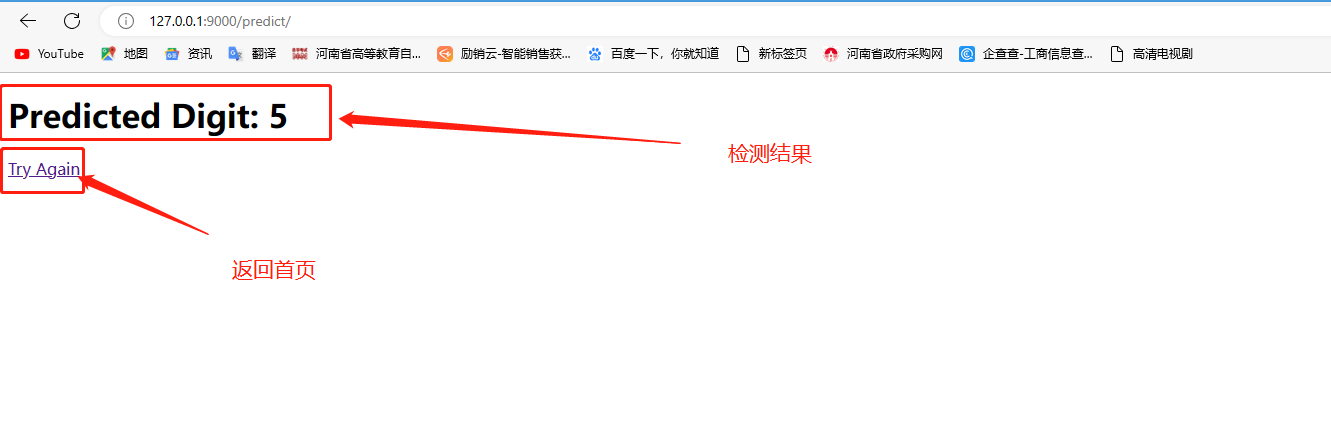
predict.html
<!DOCTYPE html>
<html>
<head>
    <title>Django Digit Recognition</title>
</head>
<body>
    <h1>Predicted Digit: {{ predicted_digit }}</h1>
    <a href="/upload/">Try Again</a>
</body>
</html>
最后,运行Django开发服务器:python manage.py runserver
可以通过访问http://localhost:8000/ 来访问你的应用,上传图片并进行数字识别。


 被折叠的 条评论
为什么被折叠?
被折叠的 条评论
为什么被折叠?
 到【灌水乐园】发言


