


 本文介绍了Spring Boot的核心功能,包括起步依赖和自动配置。起步依赖简化了Maven配置,自动配置则在启动时自动配置Spring。通过创建Maven工程,引入Spring Boot相关依赖,并配置启动项,我们可以快速搭建一个Spring Boot应用。同时,文章还探讨了Spring Boot的热部署设置,以及如何使用IDEA快速搭建项目。最后,分析了起步依赖和自动配置的原理,展示了Spring Boot如何根据引入的依赖自动配置应用。
人们把Spring Boot称为搭建程序的脚手架。它能帮我们快速的构建庞大的spring项目,并且尽可能的减少一切xml配置,这样我们在开发时关注点集中在了业务问题上,而不再是配置问题上,可以非常轻松的开始应用程序。
SpringBoot的核心功能
-
起步依赖: 起步依赖本质上是一个Maven项目对象模型(Project Object Model,POM),定义了对其他库的传递依赖,这些东西加在一起即支持某项功能。 简单的说,起步依赖就是将具备某种功能的坐标打包到一起,并提供一些默认的功能。
-
自动配置: Spring Boot的自动配置是一个运行时(更准确地说,是应用程序启动时)的过程,考虑了众多因素,才决定Spring配置应该用哪个,不该用哪个。该过程是Spring自动完成的。
[](
)SpringBoot 快速入门
项目结构:

1. 创建一个Maven工程,在pom.xml中导入Spring Boot相关的依赖:
创建工程:
首先File->new Project,选择Maven工程,这里不需要勾选Create from archetype,

点击next之后,配置自己的工程名称,点击finish

引入依赖:
找到项目目录中的pom.xml配置文件,所有的springboot的工程都以spring父工程为父工程,我们必须进行配置,父工程:spring-boot-starter-parent,如果我们要进行web开发还要配置web功能的起步依赖spring-boot-starter-web。
<?xml version="1.0" encoding="UTF-8"?>

<project xmlns="http://maven.apache.org/POM/4.0.0"

         xmlns:xsi="http://www.w3.org/2001/XMLSchema-instance"

         xsi:schemaLocation="http://maven.apache.org/POM/4.0.0 http://maven.apache.org/xsd/maven-4.0.0.xsd">

    <modelVersion>4.0.0</modelVersion>


    <!--配置父工程,导入下面的配置就表示这是一个springboot的项目-->

    <!--这个父工程的目的就是依赖般的锁定-->

    <!--所有的springboot的工程都以spring父工程为父工程,必须继承spring-boot-starter-parent -->

    <parent>

        <artifactId>spring-boot-starter-parent</artifactId>

        <groupId>org.springframework.boot</groupId>

        <version>2.0.1.RELEASE</version>

    </parent>


    <groupId>org.example</groupId>

    <artifactId>SpringBoot_quick</artifactId>

    <version>1.0-SNAPSHOT</version>


    <dependencies>

        <!--web功能的起步依赖-->

        <dependency>

            <groupId>org.springframework.boot</groupId>

            <artifactId>spring-boot-starter-web</artifactId>

        </dependency>


        <dependency>

            <groupId>org.springframework.boot</groupId>

            <artifactId>spring-boot-devtools</artifactId>

        </dependency>


        <!--@ConfiguaritionProperties的执行器配置:根据配置文件时,给出对应提示-->

        <dependency>

            <groupId>org.springframework.boot</groupId>

            <artifactId>spring-boot-configuration-processor</artifactId>

            <optional>true</optional>

        </dependency>


    </dependencies>


</project>
在SpringBoot的父工程(spring-boot-starter-parent)中已经对大部分常用依赖的版本进行了管理,我们不需要操心依赖的版本问题了,需要什么依赖,直接引入坐标即可!
2. 配置启动项
创建SpringbootTestApplication类,作为我们的启动项 ,需要添加@SpringBootApplication注解
//声明类是一个SpringBoot引导类

@SpringBootApplication

public class MySpringBootApplication {


    //main是Java程序的入口

    public static void main(String[] args){

        //run方法 表示运行springboot的引导   run参数就是SpringBoot引导类的字节码对象

        SpringApplication.run(MySpringBootApplication.class,args);

    }


}
启动测试:

创建Controller测试在web浏览器中打开
@Controller

public class TestController {


    @RequestMapping("/test")

    @ResponseBody

    public String quick(){

        return "Hello SpringBoot";

    }

}


@RestController  // 使用该注解后不需要再使用@ResponseBody注解

public class TestController {


    @RequestMapping("/test")

    public String quick(){

        return "Hello SpringBoot";

    }

}
在页面访问 http://localhost:8080/test ,访问成功!

SpringBoot工程的热部署:
在我们开发过程中会频繁修改类或页面中的信息,而每次修改过后都要重新启动才能生效,非常麻烦,通过热部署的方式,可以让我们在修改过代码之后不需要重启就能生效,相关配置如下:
<!--@ConfiguaritionProperties的执行器配置:根据配置文件时,给出对应提示-->

<dependency>

    <groupId>org.springframework.boot</groupId>

    <artifactId>spring-boot-configuration-processor</artifactId>

    <optional>true</optional>

</dependency>
在配置过后,还需要对IDEA进行自动编译设置:Settings->Build->Compiler,勾选Build project automatically

使用快捷键Shift+Ctrl+Alt+/,选择Registry...

勾选compiler.automake.allow.when.app.running

使用IDEA快速搭建SpringBoot工程:
1. 新建工程,选择Spring Initializr,这里可以选择默认的URL: https://start.spring.io,如果构建过程中出现问题可以选择阿里云的URL:https://start.aliyun.com/

2.创建项目,注意这里Artifact名称只能是全大写或全小写

3. 添加相关模板引擎

4. 搭建完成,测试运行

[](
)SpringBoot原理分析
1. 起步依赖原理分析

分析spring-boot-starter-parent:
按住Ctrl点击pom.xml中的spring-boot-starter-parent,跳转到了spring-boot-starter-parent的pom.xml,xml配置如下:

按住Ctrl点击pom.xml中的spring-boot-starter-dependencies,跳转到了spring-boot-starter-dependencies的pom.xml,xml配置如下:


从上图中我们可以看到,一部分坐标的版本、依赖管理、插件管理已经定义好,所以我们的SpringBoot工程继承spring-boot-starter-parent后已经具备版本锁定等配置了,所以起步依赖的作用就是进行依赖的传递。
2. 分析spring-boot-starter-web
启动器:为了让SpringBoot帮我们完成各种自动配置,我们必须引入SpringBoot提供的自动配置依赖,我们称为启动器。spring-boot-starter-parent工程将依赖关系声明为一个或者多个启动器,我们可以根据项目需求引入相应的启动器,因为我们是web项目,这里我们引入web启动器:
<dependencies>

    <dependency>

        <groupId>org.springframework.boot</groupId>

        <artifactId>spring-boot-starter-web</artifactId>

    </dependency>

</dependencies>
在上方代码中,并没有在这里指定版本信息,因为SpringBoot的父工程已经对版本进行了管理了。SpringBoot会根据spring-boot-starter-web这个依赖自动引入的,而且所有的版本都已经管理好,不会出现冲突。接下来我们可以查看以下代码:按住Ctrl点击pom.xml中的spring-boot-starter-web,跳转到了spring-boot-starter-web的pom.xml,观察xml中的配置(只摘抄了部分重点配置):
<?xml version="1.0" encoding="UTF-8"?>

<project xsi:schemaLocation="http://maven.apache.org/POM/4.0.0 http://maven.apache.org/xsd/maven-4.0.0.xsd" xmlns="http://maven.apache.org/POM/4.0.0"

    xmlns:xsi="http://www.w3.org/2001/XMLSchema-instance">


  、、、、、、、、、


  <dependencies>


    、、、、、、、、、、


    <dependency>

      <groupId>org.springframework</groupId>

      <artifactId>spring-web</artifactId>

      <version>5.0.5.RELEASE</version>

      <scope>compile</scope>

    </dependency>

    <dependency>

      <groupId>org.springframework</groupId>

      <artifactId>spring-webmvc</artifactId>

      <version>5.0.5.RELEASE</version>

      <scope>compile</scope>

    </dependency>

  </dependencies>

</project>
从上面的spring-boot-starter-web的pom.xml中我们可以发现,spring-boot-starter-web就是将web开发要使用的spring-web、spring-webmvc等坐标进行了“打包”,这样我们的工程只要引入spring-boot-starter-web起步依赖的坐标就可以进行web开发了,同样体现了依赖传递的作用。
2. 自动配置原理分析
使用Ctrl点击查看启动类上的注解@SpringBootApplication
//声明类是一个SpringBoot引导类

@SpringBootApplication

public class MySpringBootApplication {


    //main是Java程序的入口

    public static void main(String[] args){

        //run方法 表示运行springboot的引导   run参数就是SpringBoot引导类的字节码对象

        SpringApplication.run(MySpringBootApplication.class);

    }


}
发现@SpringBootApplication其实是一个组合注解,这里重点的注解有3个:
-
@SpringBootConfiguration:声明配置类
-
@EnableAutoConfiguration:开启自动配置
-
@ComponentScan:开启注解扫描(扫描与其同级)
@Target({ElementType.TYPE})

@Retention(RetentionPolicy.RUNTIME)

@Documented

@Inherited

@SpringBootConfiguration

@EnableAutoConfiguration

@ComponentScan(

    excludeFilters = {@Filter(

    type = FilterType.CUSTOM,

    classes = {TypeExcludeFilter.class}

), @Filter(

    type = FilterType.CUSTOM,

    classes = {AutoConfigurationExcludeFilter.class}

)}

)

public @interface SpringBootApplication {

    @AliasFor(

        annotation = EnableAutoConfiguration.class

    )

    Class<?>[] exclude() default {};


    @AliasFor(

        annotation = EnableAutoConfiguration.class

    )

    String[] excludeName() default {};


    @AliasFor(

        annotation = ComponentScan.class,

        attribute = "basePackages"

    )

    String[] scanBasePackages() default {};


    @AliasFor(

        annotation = ComponentScan.class,

        attribute = "basePackageClasses"

    )

    Class<?>[] scanBasePackageClasses() default {};

}
@SpringBootConfiguration中的代码:
@Target({ElementType.TYPE})

@Retention(RetentionPolicy.RUNTIME)

@Documented

@Configuration

public @interface SpringBootConfiguration {

}
通过这段代码中我们可以看出,该注解中还是应用了@Configuration这个注解。其作用就是声明当前类是一个配置类,然后Spring会自动扫描到添加了@Configuration的类,并且读取其中的配置信息。而@SpringBootConfiguration是来声明当前类是SpringBoot应用的配置类,项目中只能有一个。所以一般我们无需自己添加。
@EnableAutoConfiguration中的代码:
@Target({ElementType.TYPE})

@Retention(RetentionPolicy.RUNTIME)

@Documented

@Inherited

@AutoConfigurationPackage

@Import({AutoConfigurationImportSelector.class})

public @interface EnableAutoConfiguration {

    String ENABLED_OVERRIDE_PROPERTY = "spring.boot.enableautoconfiguration";


    Class<?>[] exclude() default {};


    String[] excludeName() default {};

}
在@EnableAutoConfiguration注解中我们可以看到一个@Import注解,其作用是当前配置文件中引入其他配置类。这里引入了AutoConfigurationImportSelector类,在这个类中有相应的方法用来加载文件中的配置,之后@EnableAutoConfiguration可以帮助SpringBoot应用将所有符合条件的@Configuration配置都加载到当前SpringBoot创建并使用的IOC容器中,进而实现@EnableAutoConfiguration自动配置的功能。
加载的文件:(spring-boot-autoconfigure.jar/META-INF/*)

SpringBoot内部对大量的第三方库或Spring内部库进行了默认配置,这些配置是否生效,取决于我们是否引入了对应库所需的依赖,如果有那么默认配置就会生效。我们在使用SpringBoot构建项目时,只需要引入所需依赖,配置部分交给了SpringBoot处理。
@ComponentScan中的代码:
@Retention(RetentionPolicy.RUNTIME)
@Target({ElementType.TYPE})
@Documented
@Repeatable(ComponentScans.class)
public @interface ComponentScan {
@AliasFor("basePackages")
String[] value() default {};
@AliasFor("value")
String[] basePackages() default {};
Class<?>[] basePackageClasses() default {};
Class<? extends BeanNameGenerator> nameGenerator() default BeanNameGenerator.class;
Class<? extends ScopeMetadataResolver> scopeResolver() default AnnotationScopeMetadataResolver.class;
ScopedProxyMode scopedProxy() default ScopedProxyMode.DEFAULT;
String resourcePattern() default "**/*.class";
boolean useDefaultFilters() default true;
ComponentScan.Filter[] includeFilters() default {};
ComponentScan.Filter[] excludeFilters() default {};
boolean lazyInit() default false;
@Retention(RetentionPolicy.RUNTIME)
@Target({})
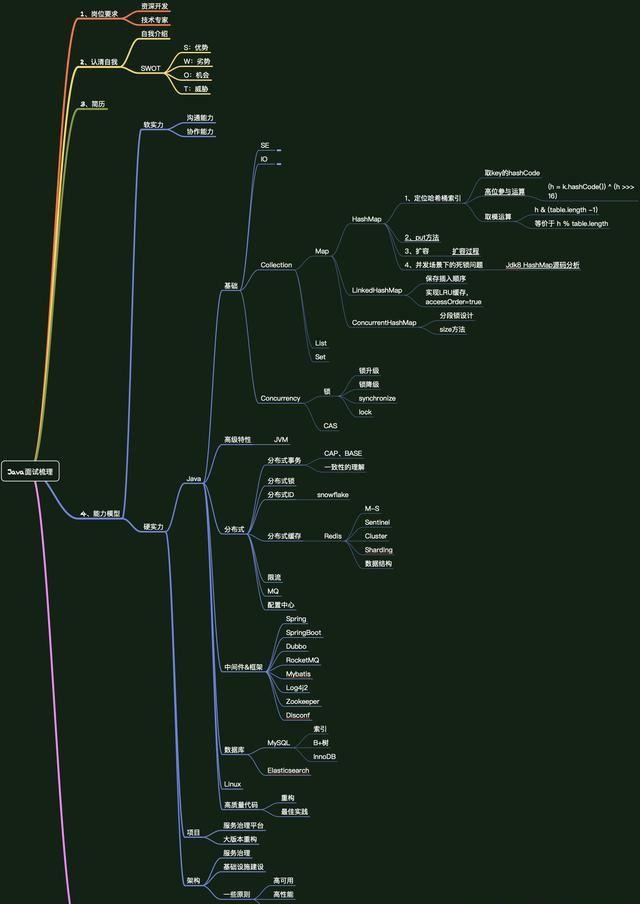
**最后,附一张自己面试前准备的脑图:**
**面试前一定少不了刷题,为了方便大家复习,我分享一波个人整理的面试大全宝典**
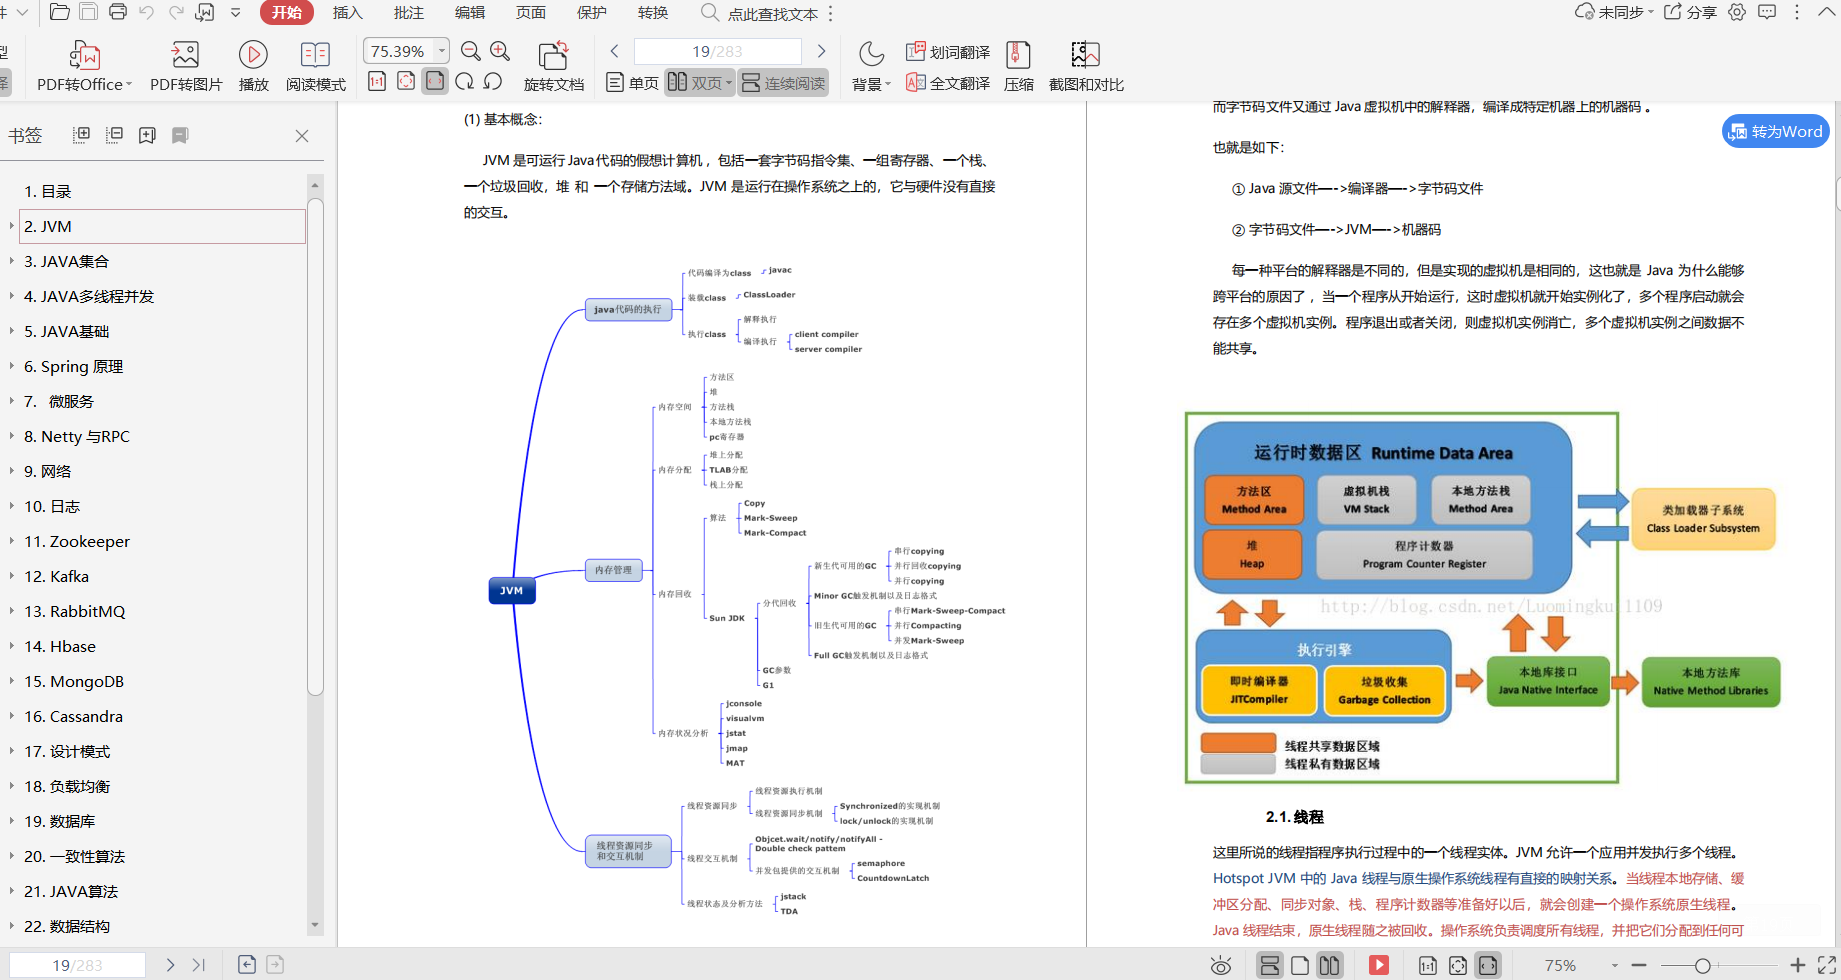
* Java核心知识整理
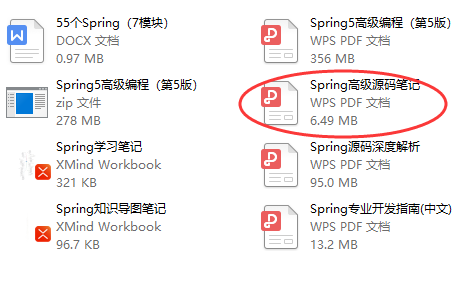
* Spring全家桶(实战系列)
**Step3:刷题**
既然是要面试,那么就少不了刷题,实际上春节回家后,哪儿也去不了,我自己是刷了不少面试题的,所以在面试过程中才能够做到心中有数,基本上会清楚面试过程中会问到哪些知识点,高频题又有哪些,所以刷题是面试前期准备过程中非常重要的一点。
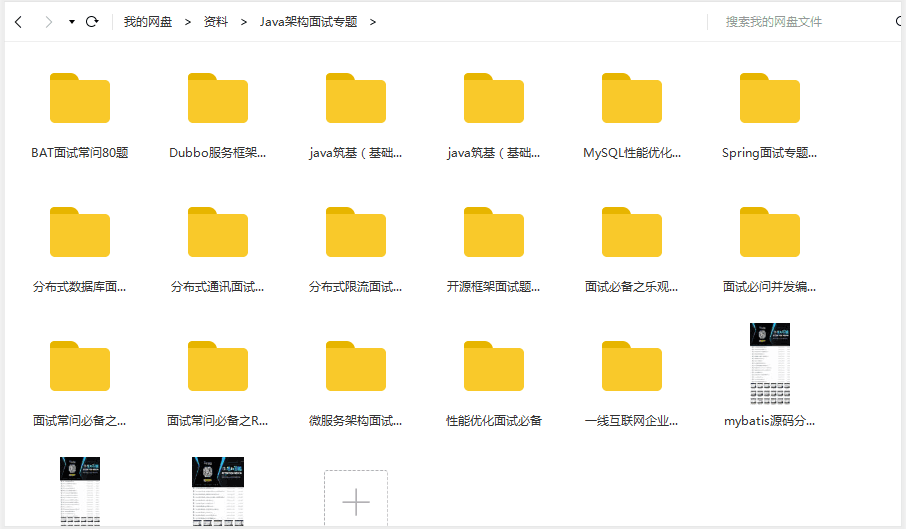
**以下是我私藏的面试题库:**
很多人感叹“学习无用”,实际上之所以产生无用论,是因为自己想要的与自己所学的匹配不上,这也就意味着自己学得远远不够。无论是学习还是工作,都应该有主动性,所以如果拥有大厂梦,那么就要自己努力去实现它。
**[CodeChina开源项目:【一线大厂Java面试题解析+核心总结学习笔记+最新讲解视频】](
)**
fault {};
boolean lazyInit() default false;
@Retention(RetentionPolicy.RUNTIME)
@Target({})
**最后,附一张自己面试前准备的脑图:**
[外链图片转存中...(img-AiRszaWX-1631180959985)]
**面试前一定少不了刷题,为了方便大家复习,我分享一波个人整理的面试大全宝典**
* Java核心知识整理
[外链图片转存中...(img-Y4LdeS4P-1631180959986)]
* Spring全家桶(实战系列)
[外链图片转存中...(img-EQcfWS1r-1631180959987)]
**Step3:刷题**
既然是要面试,那么就少不了刷题,实际上春节回家后,哪儿也去不了,我自己是刷了不少面试题的,所以在面试过程中才能够做到心中有数,基本上会清楚面试过程中会问到哪些知识点,高频题又有哪些,所以刷题是面试前期准备过程中非常重要的一点。
**以下是我私藏的面试题库:**
[外链图片转存中...(img-DE9f1erw-1631180959989)]
很多人感叹“学习无用”,实际上之所以产生无用论,是因为自己想要的与自己所学的匹配不上,这也就意味着自己学得远远不够。无论是学习还是工作,都应该有主动性,所以如果拥有大厂梦,那么就要自己努力去实现它。
**[CodeChina开源项目:【一线大厂Java面试题解析+核心总结学习笔记+最新讲解视频】](
)**
最后祝愿各位身体健康,顺利拿到心仪的offer!


 1003
1003

 被折叠的 条评论
为什么被折叠?
被折叠的 条评论
为什么被折叠?
 到【灌水乐园】发言


