


"搭积木"的开发体验
-
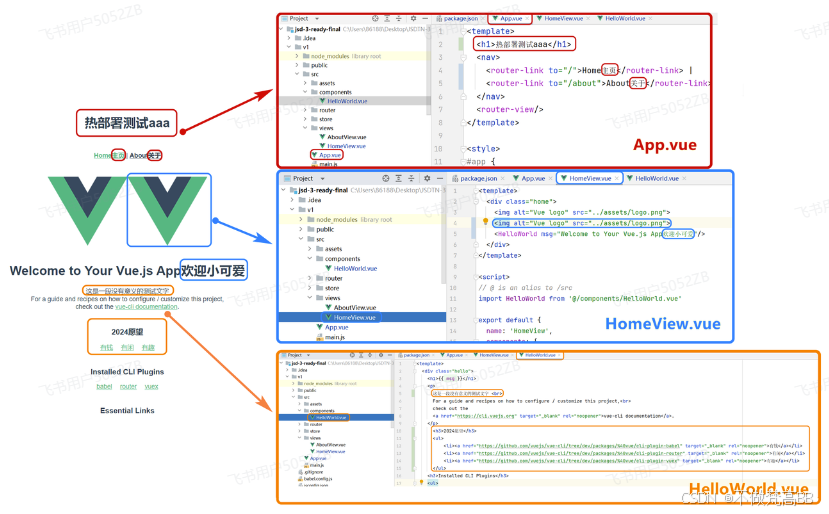
默认的主页是由以下3个文件完成显示的:
-
/App.vue
-
/views/HomeView.vue
-
/components/HelloWorld.vue
-
试试看:
分别修改以上3个文件中的显示文本,看看浏览器的哪些区域发生了变化?
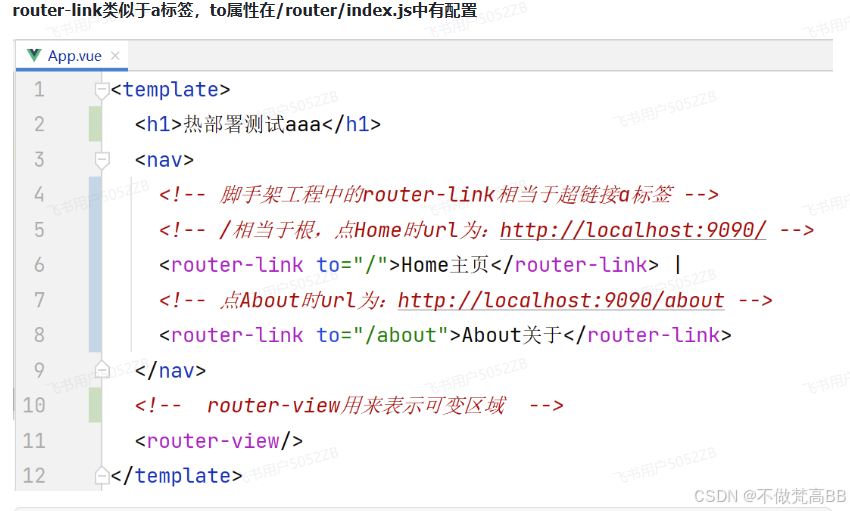
App.vue代码讲解
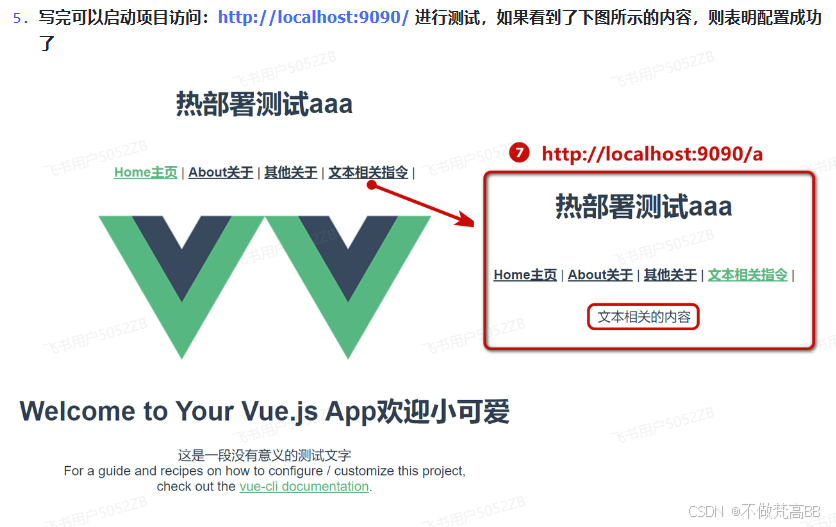
router-link类似于a标签,to属性在/router/index.js中有配置
<!--HTML写在template标签中-->
<template>
  <h1>热部署测试aaa</h1>
  <nav>
    <!-- 脚手架工程中的router-link相当于超链接a标签 -->
    <!-- 区别:超链接a跳转时页面整体刷新 router-link跳转时页面不会整体刷新,局部刷新     -->
    <!-- /相当于根,点Home时url为:http://localhost:9090/ -->
    <router-link to="/">Home主页</router-link> |
    <!-- 点About时url为:http://localhost:9090/about -->
    <router-link to="/about">About关于</router-link> |
    <router-link to="/other">其他关于</router-link>
  </nav>
  <!--  router-view用来表示可变区域  -->
  <router-view/>
</template>
<!--CSS写在style标签中-->
<style>
/*public下的index.html中的内容设置样式*/
#app {
  font-family: Avenir, Helvetica, Arial, sans-serif;
  /*让文字不要有锯齿,更平滑*/
  -webkit-font-smoothing: antialiased;
  -moz-osx-font-smoothing: grayscale;
  text-align: center;
  color: #2c3e50;
}
/* 设置上面导航栏的内间距 */
nav {
  padding: 30px;
}
/* 设置上面导航栏链接的文字颜色与字重 */
nav a {
  font-weight: bold;
  color: #2c3e50;
}
/* 设置激活的超链接文字用不同的字体颜色 */
nav a.router-link-exact-active {
  color: #42b983;
}
</style>\
HomeView.vue代码讲解
<!--HTML内容写在template标签中-->
<template>
  <div class="home">
    <!-- logo图片 -->
    <img alt="Vue logo" src="../assets/logo.png">
    <img alt="Vue logo" src="../assets/logo.png">
    <!--  vue自带的自定义的组件HelloWorld 具体:/components/HelloWorld.vue -->
    <HelloWorld msg="Welcome to Your Vue.js App欢迎小可爱"/>
  </div>
</template>
<!--JavaScript内容写在script标签中-->
<script>
// @ is an alias to /src
// 导入自定义组件HelloWorld后才能使用
import HelloWorld from '@/components/HelloWorld.vue'

export default {
  name: 'HomeView',
  components: {
    HelloWorld
  }
}
</script>
index.js代码讲解
-
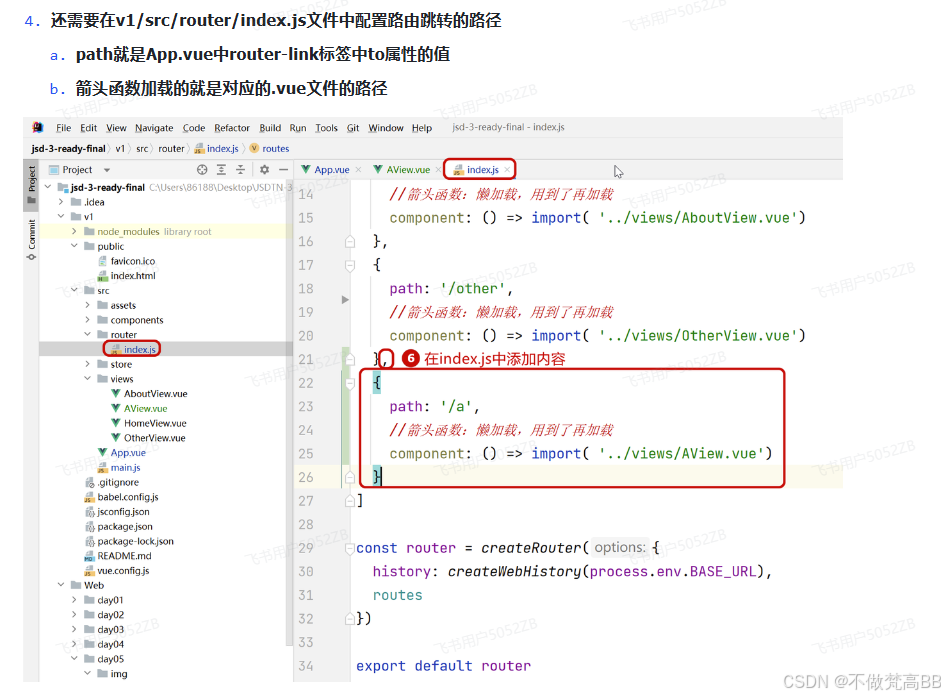
假如to里写的path是"/",那么就会显示对应component的HomeView.vue中的内容
-
假如to里写的path是"/about",那么就会显示对应component的AboutView.vue中的内容
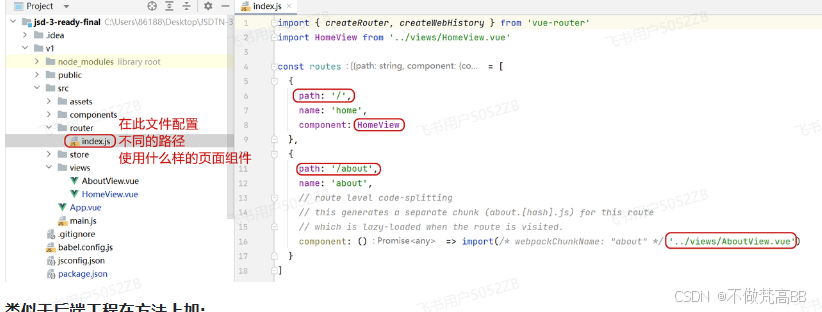 类似于后端工程在方法上加: @RequestMapping("/v1/users/reg") localhost:8080/v1/users/reg就会找此方法提供服务
import { createRouter, createWebHistory } from 'vue-router'
//预加载:提前加载(只有这个是预加载)
import HomeView from '../views/HomeView.vue'

const routes = [
  {
    path: '/',
    name: 'home',
    component: HomeView
  },
  {
    path: '/about',
    name: 'about',
    //箭头函数:懒加载,用到了再加载
    component: () => import( '../views/AboutView.vue')
  },
  {
    path: '/other',
    name: 'other',
    //箭头函数:懒加载,用到了再加载
    component: () => import( '../views/OtherView.vue')
  }
]

const router = createRouter({
  history: createWebHistory(process.env.BASE_URL),
  routes
})

export default router
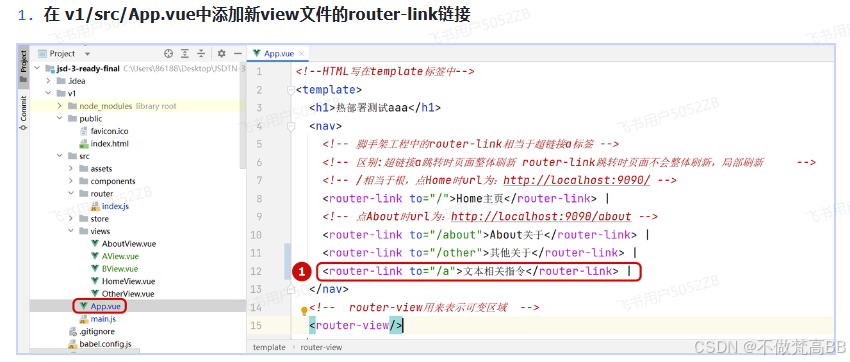
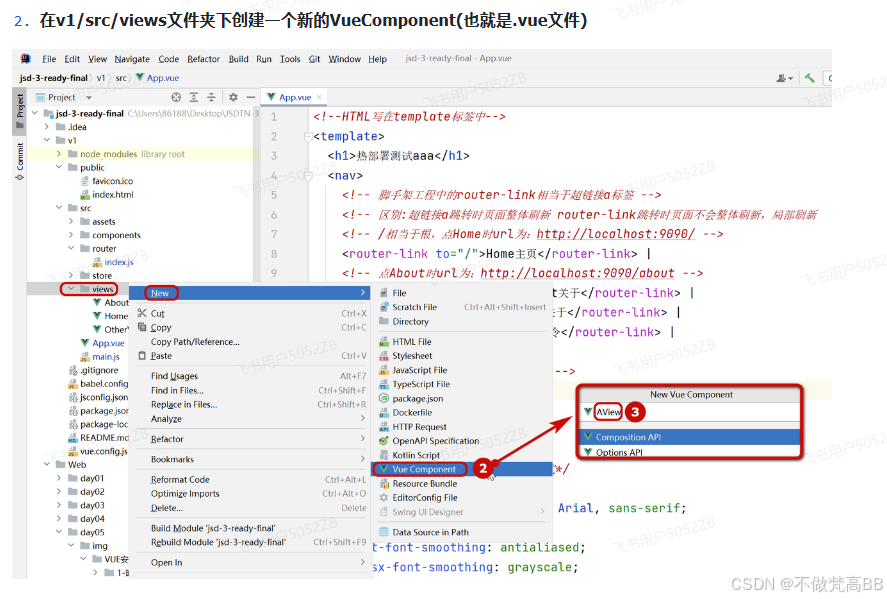
新view.vue 的创建方式
-
在 v1/src/App.vue中添加新view文件的router-link链接
-
VUE指令练习
-
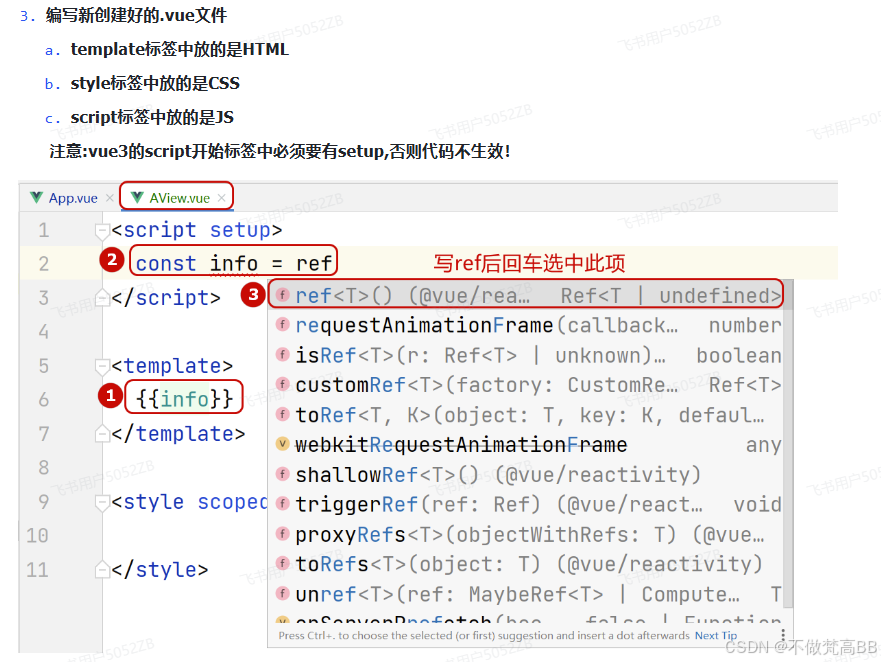
文本相关指令练习 AView.vue
-
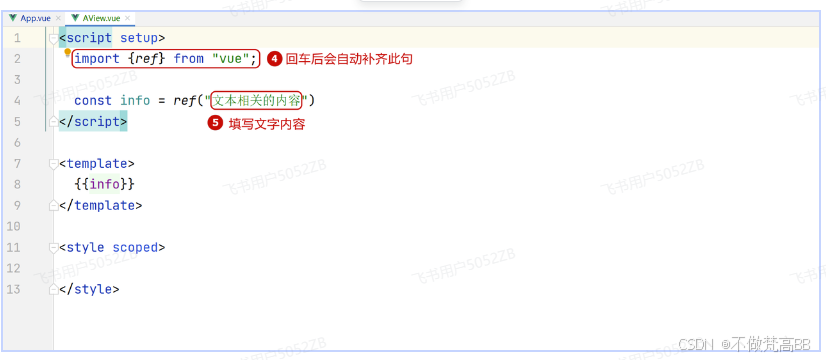
const info = ref("文本相关的内容"); 定义响应式变量,注意需要导入!
-
{{变量}} 插值,让此处的文本内容与变量进行绑定
-
v-text="响应式变量名":将文本内容与变量进行绑定
-
v-html="响应式变量名":将标签内容与变量进行绑定
-
关于写法:
-
响应式变量的导入语句: import {ref} from "vue";
-
在JS代码中使用响应式变量: console.log(info.value);
-
箭头函数: const f = (参数列表)=>{方法体}
-
<template>
  <h1>我是第一个页面</h1>
  <!-- 插值指令:将页面显示的文本与响应式变量的值进行绑定
  如果修改变量的值,页面显示的文本也会随之改变-->
  <span>{{info}}</span>
  <p>{{info}}</p>
  <h1>{{info}}</h1>
  <!-- 响应式变量的值还可以拼接 -->
  {{info+'大家好呀!'}}
  <hr>
  <p v-text="info"></p> <!-- v-text渲染文本内容-->
  <p v-html="info"></p> <!-- v-html若有html元素,会按照元素效果进行渲染-->
  <button @click="f">点我</button> <!-- 点击事件@click -->
</template>

<script setup>
import {ref} from "vue";
//1.定义响应式变量,注意:必须导入!
const info = ref('我是info666');
//2.箭头函数
const f = ()=>{
  info.value = '我是<mark>info2</mark>';//在JS中使用响应式变量的值,必须.value!!!
}

</script>

<style scoped>

</style>-
属性绑定练习 BView.vue
v-else: 和最近的未关闭的 v-if 状态取反
v-show="变量":控制元素是否显示
应用场景:当需要获取用户输入内容时使用
(当变量的值改变时,控件的值会随之改变;当控件中用户输入的值改变时,变量的值也会随之改变)
-
v-bind:属性名="变量名"
-
让HTML元素的 xxx 属性的值与变量值进行绑定
-
可以简写成 :属性名="变量名"
<template> <h1>属性绑定练习</h1> <input type="text" value="kk"> <input type="text" value="info"> <hr> <!-- 将input元素的value属性与响应式变量info进行绑定,由info来控制输入框显示的默认值 --> <input type="text" v-bind:value="info"> <!-- v-bind:value="" 可以简写成 :value="" --> <input type="text" :value="info"> <hr> <a href="url">超链接1</a> <!--此处的url只是一个字符串--> <a :href="url">超链接2</a> <!--属性绑定,将超链接的跳转路径交给url变量来控制--> </template> <script setup> import {ref} from "vue"; const info = ref('属性绑定666'); const url = ref('https://www.baidu.com'); url.value = 'https://www.jd.com'; //JS中操作响应式变量的值,必须.value!!! </script> <style scoped> </style> -
双向绑定练习 CView.vue
-
双向绑定:页面中的内容发生改变,变量的值也会随之改变
-
v-model="变量名" 除了这个其他都是单向绑定
-
当需要获取用户输入的内容时使用(输入框/单选/多选/下拉选框等)
-
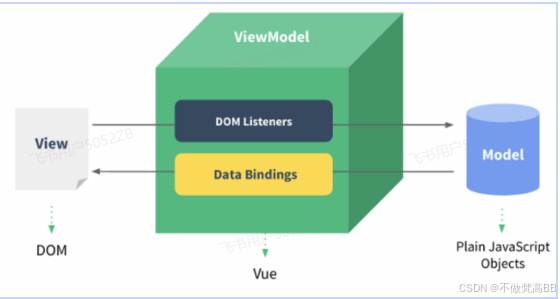
之前 DOM 操作需要先获取 html 元素,再获取 html 元素的值,效率较低
-
现在使用 MVVM 的方式:当页面的值发生改变,变量保存的值也会立即随之改变,可以直接使用
-
双向绑定的数据会实时更新,但注意用户输入也会影响绑定的数据
<template> <h1>双向绑定指令</h1> <!-- 双向绑定:将info变量的值与页面上的元素进行绑定,效果: 1)info变量的数据发生变化,页面html的显示会随之变化(Data Binding数据绑定) 2)页面上元素的值发生变化,info变量的值也会随之改变(DOM Listener事件监听)--> <input type="text" v-model="info"> <button @click="console.log(info)">点击</button> <h3>用户登录</h3> <input type="text" placeholder="请输入用户名" v-model="user.name"> <input type="password" placeholder="请输入密码" v-model="user.password"> <br> 性别: <input type="radio" name="gender" value="1" v-model="user.gender">男 <input type="radio" name="gender" value="0" v-model="user.gender">女 <button @click="login">登录</button> </template> <script setup> import {ref} from "vue"; const info = ref('双向绑定'); //定义一个用户对象用来保存用户输入的数据 const user = ref({name:'皮卡丘',password:'123',gender:'1'}); const login = ()=>{ console.log(user.value);//打印完整的对象 console.log(user.value.name);//打印对象的属性值 console.log(user.value.password); console.log(user.value.gender); } </script> <style scoped> </style> -
事件绑定练习 DView.vue
-
@click="f()" 与 v-on:click="f()" 都是绑定点击事件
-
@keydown.enter="ent()" 表示绑定敲回车事件
-
<template> <h1>事件绑定指令</h1> <!-- 下面这两种写法是等价的,我们一般使用第2种 --> <button v-on:click="f">按钮1</button> <button @click="f">按钮2</button> <h3>敲回车事件</h3> <!-- v-model="search"双向绑定可以将页面输入的值存入search变量中 @keydown.enter="ent"敲回车调用ent函数 --> <input type="text" placeholder="请输入您想搜索的关键词" v-model="search" @keydown.enter="ent"> </template> <script setup> import {ref} from "vue"; const f = ()=>{ alert('点击了!'); } const search = ref(''); const ent = ()=>{ alert('您输入了:'+search.value); } </script> <style scoped> </style> -
循环指令练习 EView.vue
-
v-for="元素 in 数组" 遍历数组 遍历时会生成当前遍历到的元素
-
v-for="元素 in 数字n" 遍历数组 从1到数字n,步长为1,数字n可以自定义
-
v-for="(元素,下标) in 数组" 第2个参数是当前遍历到的元素下标,从0开始
<template> <h1>循环指令</h1> <ul> <!-- 循环遍历arr数组,uname就是本轮循环遍历到的元素 --> <li v-for="uname in arr">{{uname}}</li> </ul> <ol> <!-- 从1开始遍历,一直到数字5,固定每次++,结束数字5可以自定义 --> <li v-for="item in 5">{{item}}</li> </ol> <table border="1px"> <caption>商品列表</caption> <tr> <th>序号</th> <th>商品名称</th> <th>商品价格</th> <th>商品库存</th> <th>操作</th> </tr> <tr v-for="(item,index) in productArr"> <td>{{index+1}}</td> <td>{{item.title}}</td> <td>{{item.price}}</td> <td>{{item.num}}</td> <td><button @click="del(index)">删除</button></td> </tr> </table> </template> <script setup> import {ref} from "vue"; const arr = ref(["张三","李四","王五","赵六","钱七"]); const productArr = ref([ {title:'小米手机',price:5000,num:800}, {title:'华为手机',price:6000,num:900}, {title:'苹果手机',price:7000,num:100}, {title:'OPPO手机',price:8000,num:200}, ]); const del = (index)=>{ if(confirm('您确认要删除此条数据吗?')){ //删除数组中的元素,从当前index开始,删1个元素 productArr.value.splice(index,1); } } </script> <style scoped> </style> -
隐藏显示指令练习 FView.vue
v-if="变量":控制元素是否显示
-
true 显示,false 不显示
-
直接在DOM中跳过该元素渲染,HTML代码中没有该元素
-
元素首次渲染需要复杂计算或初始化,v-if初次加载的速度快,推荐使用
-
true 显示,false 不显示(隐藏元素)
-
通过设置CSS display:none;让元素消失
-
当元素需要频繁修改显示状态时推荐使用,不用多次新建删除元素,开销较小
<template> <h1>隐藏显示指令</h1> <!-- v-if="布尔值" true元素显示 false元素消失 false表示该元素不会被渲染到DOM中,会直接跳过这部分内容的渲染 --> <p v-if="true">张三</p> <p v-if="false">李四</p> <p>王五</p> <hr> <p v-if="isShow">月亮</p> <p v-if="isShow">星星</p> <!-- v-else是v-if取反 它会找离自己最近的v-if进行取反 --> <p v-else>太阳</p> <hr> <!-- v-if是直接在DOM中跳过该元素渲染,HTML代码中没有该元素 --> <p v-if="false">小绿</p> <!-- v-show是修改元素的CSS属性display:none;在频繁切换是否显示时才推荐,性能更好 --> <p v-show="false">小红</p> </template> <script setup> import {ref} from "vue"; const isShow = ref(false); </script> <style scoped> </style> -
计算器练习 GView.vue
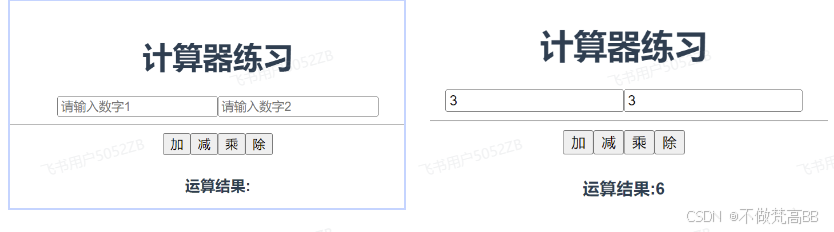
<template> <h1>计算器练习</h1> <input type="text" placeholder="请输入数字1" v-model="a"/> <input type="text" placeholder="请输入数字2" v-model="b"/> <hr> <button @click="calc('+')">加</button> <button @click="calc('-')">减</button> <button @click="calc('*')">乘</button> <button @click="calc('/')">除</button> <h4>运算结果:{{result}}</h4> </template> <script setup> import {ref} from "vue"; //定义响应式变量 const a = ref(''); const b = ref(''); const result = ref(''); //定义箭头函数 const calc = (o)=>{ //响应式变量在JS中使用必须.value! //eval("5*2") 结果为10 将字符串形式的算式转为JS进行运算 result.value = eval(a.value+o+b.value); } </script> <style scoped> </style> -
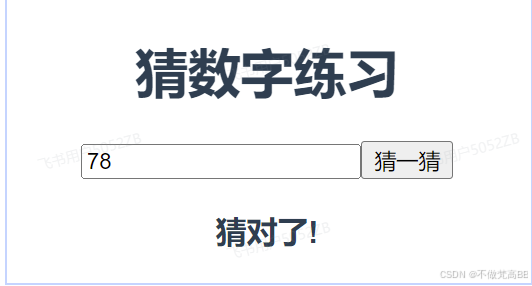
猜数字练习 HView.vue
-
<template> <h1>猜数字练习</h1> <input type="text" placeholder="请输入1~100之间的整数" v-model="num"> <button @click="guess()">猜一猜</button> <h3>{{result}}</h3> </template> <script setup> import { ref } from 'vue'; const num = ref(''); const result = ref(''); //生成一个随机数 let x = parseInt(Math.random()*100)+1; console.log(x); const guess = ()=>{ if(num.value>x){ result.value='猜大了'; }else if(num.value<x){ result.value='猜小了'; }else{ result.value='猜对了'; } } </script> <style scoped> </style> -
员工列表练习 IView.vue
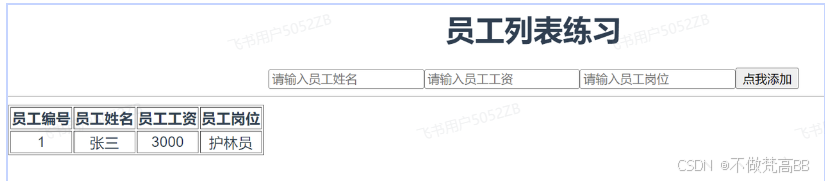
<template> <h1>员工列表练习</h1> <input type="text" placeholder="请输入员工姓名" v-model="e.name"> <input type="text" placeholder="请输入员工工资" v-model="e.salary"> <input type="text" placeholder="请输入员工岗位" v-model="e.job"> <button @click="add()">点我添加</button> <hr> <table border="1px"> <tr> <th>员工编号</th> <th>员工姓名</th> <th>员工工资</th> <th>员工岗位</th> </tr> <tr v-for="(emp,i) in arr"> <td>{{i+1}}</td> <td>{{emp.name}}</td> <td>{{emp.salary}}</td> <td>{{emp.job}}</td> </tr> </table> </template> <script setup> import {ref} from "vue"; const e = ref({name:'',salary:'',job:''}); const arr = ref([]); const add = ()=>{ //如果输入框有空值,不允许新增! if(e.value.name.trim()=='' || e.value.salary.trim()=='' || e.value.job.trim()==''){ alert('请输入完整信息'); return; } //每准备好一个员工数据,就存入arr数组中 arr.value.push(e.value); //新增成功后,清空所有输入框 e.value = {name:'',salary:'',job:''}; //e.value = {}; } </script> <style scoped> </style> -
VUE指令总结
-
{{变量}}:插值,让此处的文本内容和变量进行绑定
-
v-text="变量":让元素的文本内容和变量进行绑定
-
v-html="变量":让元素的 html 标签内容和变量进行绑定
-
v-on:事件名="方法":事件绑定,简写@事件名
-
v-for="(变量,下标) in 数组":循环遍历指令,遍历的过程中生成遍历到的当前元素
-
v-if="变量":控制元素是否显示,true 显示,false 不显示(直接不渲染该元素)
-
v-else 和 v-if 的状态取反
-
v-show="变量":控制元素是否显示,true 显示,false 不显示(隐藏元素)
-
v-bind:属性名="变量":让 xxx 属性的值和变量进行绑定,简写是把 v-bind 去掉
-
v-model="变量":让控件的值和变量进行双向绑定
-


 被折叠的 条评论
为什么被折叠?
被折叠的 条评论
为什么被折叠?
 到【灌水乐园】发言


