


 本文介绍了Spring中Bean的装配方式,包括基于XML的设值注入和构造注入。首先展示了Dao层接口和实现,然后是配置文件的编写,以及测试类的实现。接着详细解释了Bean实例化的两种方式,有参和无参构造函数,并列举了<beans>元素的常用属性。最后,通过一个User类的例子,演示了如何通过XML配置进行设值注入和构造注入,并给出了测试结果。
回忆总结:
1、之前是Dao层,创建接口:
public void say();
2、DaoImpl层,实现类,实现接口:
public void say(){
System.out.println("");
}
3、创建配置文件xml:
<bean id=" " class=" "/>
4、创建测试类main,实现say()方法:
ApplicationContext applicationContext=new ClassPathXMLApplicationContext(" ");
依赖注入:
1、定义Dao层,定义接口
2、创建Impl实现类,实现接口
3、创建XML配置文件
4、创建测试类main,只不过ClassPathXMLApplicationContext(" ");
括号中的地址变为了定义的字符串变量
Bean的实例化:
相当于省略了创建接口这一步:
有参实例化:
public class ConstructorInstance {
    private String name;
    public ConstructorInstance(String name) {
        System.out.println("ConstructorInstance with args");
        this.name = name;
    }

    public String getName() {
        return name;
    }

    public void setName(String name) {
        this.name = name;
    }

}
<?xml version="1.0" encoding="UTF-8"?><beans xmlns="http://www.springframework.org/schema/beans" xmlns:xsi="http://www.w3.org/2001/XMLSchema-instance" xsi:schemaLocation="http://www.springframework.org/schema/beans http://www.springframework.org/schema/beans/spring-beans.xsd http://www.springframework.org/schema/context http://www.springframework.org/schema/context/spring-context.xsd"> <bean id="constructorInstance" class="spring.service.instance.ConstructorInstance"> <constructor-arg index="0" name="name" value="test constructor with args"/> <!-- 说明 constructor-arg:通过构造函数注入。 --> </bean> </beans>无参构造函数实例化:
public class ConstructorInstance {
    public ConstructorInstance() {
        System.out.println("ConstructorInstance none args");
    }
}
<?xml version="1.0" encoding="UTF-8"?><beans xmlns="http://www.springframework.org/schema/beans" xmlns:xsi="http://www.w3.org/2001/XMLSchema-instance" xsi:schemaLocation="http://www.springframework.org/schema/beans http://www.springframework.org/schema/beans/spring-beans.xsd http://www.springframework.org/schema/context http://www.springframework.org/schema/context/spring-context.xsd"> <bean id="constructorInstance" class="spring.service.instance.ConstructorInstance"/> </beans>关于<beans>元素的常用属性如下表所示:
属性或子元素名称 描述 id Bean的唯一标识符,Spring容器对Bean的配置、管理都通过该属性完成。 name Spring容器同样可以通过此属性对容器中的Bean进行配置和管理,name属性可以为Bean指定多个名称,逗号隔开。 class 指定Bean的实现类,使用类的全限定名。 scope 用来设定Bean实例作用域,属性值有:singleton(单例)、prototype(原型)、request、session、global Session、applicaion和websocket。
默认值为singleton。
property <bean>元素的子元素,调用Bean实例中的setter方法完成属性赋值,从而完成依赖注入。
该元素name属性,指定Bean实例的相应属性名,ref或value用于指定参数值。
ref <property>、<constructor-arg>等元素的属性或子元素,指定Bean工厂里面某个实例的引用 value <property>、<constructor-arg>等元素的属性或子元素 list 用于封装List或数组类型的依赖注入 set 用于封装Set类型属性的依赖注入 map 用于封装Map类型属性的依赖注入 entry <map>元素的子元素,用于设置键值。key属性指定字符串类型的键值,ref或value子元素指定其值,也可通过value-ref或value属性指定其值 constructor-arg <bean>元素的子元素,传入构造参数进行实例化。
该元素index属性制定构造参数的序号(从0开始),type属性指定构造参数类型,参数值可以通过ref属性或者value属性直接指定,或其子元素指定.
正文:
Bean的装配可以理解为依赖关系注入,Bean的装配方式就是Bean依赖注入的方式。
Spring容器支持多种Bean的装配方式,如:
1、基于XML的装配、
2、基于注解(Annotation)(常用)的装配
3、自动装配
1、基于XML的装配分为:设值注入、构造注入
第一步:
package com.itheima.assemble;

import java.util.List;

public class User {
	private String username;
	private Integer password;
	private List<String> list;
//本节运用两种注入方式,进行测试


	/*
	 * 构造注入
	 */

	// 需要生成带参数的构造函数
	public User(String username, Integer password, List<String> list) {
		super();
		this.username = username;
		this.password = password;
		this.list = list;
	}

	/*
	 * 使用设值注入
	 */
	// 需要生成默认空参构造方法
	// 为所有属性提供setter方法
	public User() {
		super();
		// TODO Auto-generated constructor stub
	}


	public String getUsername() {
		return username;
	}

	public void setUsername(String username) {
		this.username = username;
	}

	public Integer getPassword() {
		return password;
	}

	public void setPassword(Integer password) {
		this.password = password;
	}

	public List<String> getList() {
		return list;
	}

	public void setList(List<String> list) {
		this.list = list;
	}


	/*
	 * toString,这个方法的目的,主要就是将对象按字符串的方式输出出来,
	 * 例如,在main测试类中:
	 *
	 * 		People p = new Perple();
	 *		System.out.println(p.toString());
	 * 如果没有定义,则main在输出时,只会输出内存地址,定义后则会输出p中的所有对象及参数
	 */
	@Override
	public String toString() {
		return "User [username=" + username + ", password=" + password + ", list=" + list + "]";
	}

}
第二步:
<?xml version="1.0" encoding="UTF-8"?>
<beans xmlns="http://www.springframework.org/schema/beans"
xmlns:xsi="http://www.w3.org/2001/XMLSchema-instance"
xsi:schemaLocation="http://www.springframework.org/schema/beans
http://www.springframework.org/schema/beans/spring-beans-4.3.xsd">
<!-- 使用构造注入方式装配User实例 -->
<bean id="user1" class="com.itheima.assemble.User">
<!-- 使用构造器注入,会装配User的全部实例,必须按下标顺序全部实现,否则会出错
<constructor-arg>元素用于定义构造方法的参数,index表示索引,value表示注入的值
-->
<constructor-arg index="0" value="tom"></constructor-arg>
<constructor-arg index="1" value="123456"></constructor-arg>
<constructor-arg index="2">
<list>
<value>"constructor-arg value1"</value>
<value>"constructor-arg value2"</value>
</list>
</constructor-arg>
</bean>
<!-- 使用设值注入方式装配User实例 -->
<bean id="user2" class="com.itheima.assemble.User">
<!-- 使用设值注入装配User时,name属性指定实例类,value设置想对应的值,不需全部配置就可运行
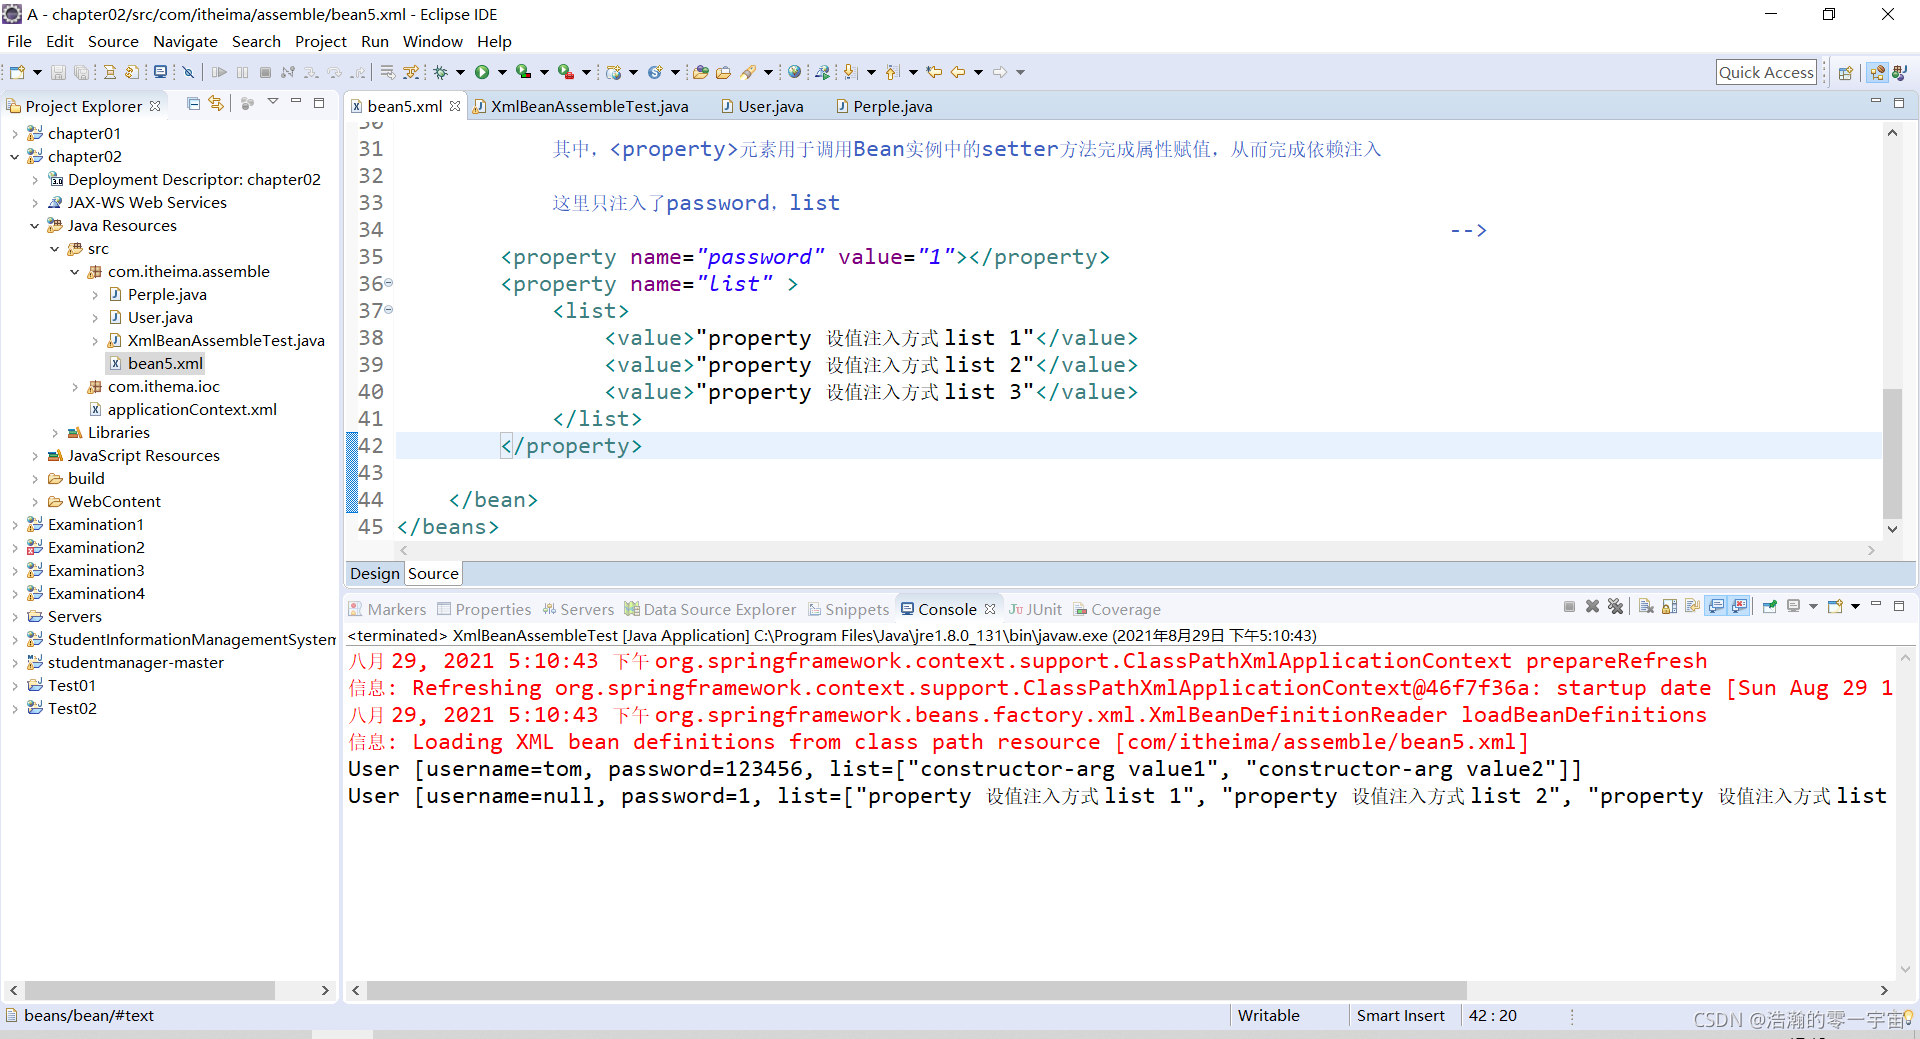
其中,<property>元素用于调用Bean实例中的setter方法完成属性赋值,从而完成依赖注入
这里只注入了password,list
-->
<property name="password" value="1"></property>
<property name="list" >
<list>
<value>"property 设值注入方式 list 1"</value>
<value>"property 设值注入方式 list 2"</value>
<value>"property 设值注入方式 list 3"</value>
</list>
</property>
</bean>
</beans>
第三步:创建测试类:XmlBeanAssembleTest
package com.itheima.assemble;

import org.springframework.context.ApplicationContext;
import org.springframework.context.support.ClassPathXmlApplicationContext;

public class XmlBeanAssembleTest {

	public static void main(String[] args) {
		// TODO Auto-generated method stub
		/*
		 * 测试:
		 * Perple p = new Perple(); System.out.println(p.toString());
		 * System.out.println(p.name); System.out.println(p.age);
		 */

		// 定义配置文件路径
		String xmlPath = "com/itheima/assemble/bean5.xml";

		// 加载配置文件
		ApplicationContext applicationContext = new ClassPathXmlApplicationContext(xmlPath);

		// 构造方式输出结果
		System.out.println(applicationContext.getBean("user1"));

		// 设值方式输出结果
		System.out.println(applicationContext.getBean("user2"));

	}

}
运行结果截图:


 1428
1428

 被折叠的 条评论
为什么被折叠?
被折叠的 条评论
为什么被折叠?
 到【灌水乐园】发言


