


 本文介绍了组件在前端开发中的重要性,详细讲解了组件的概念,区分了组件与模块的区别,并通过实例演示了非单文件组件和单文件组件的创建与使用,包括组件命名规范和嵌套。最后,强调了学习组件对于提升开发效率的价值。
在学习前先问几个问题:

什么是组件?
为什么要学组件?
如何使用组件?
目录
组件的概念
组件的定义:实现应用中局部功能代码和资源的集合。
(代码是指css、html、js这类文件;资源是指mp3、mp4、ttf、zip格式的内容)
组件的分类:非单文件组件(一个文件中包含有n个组件)和单文件组件(一个文件中只包含有1个组件)。
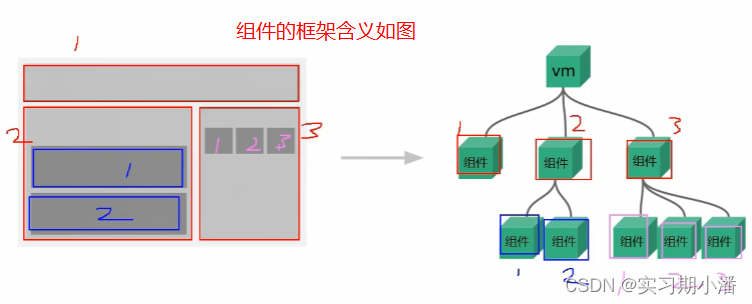
组件如图理解
组件的好处:复用编码,简化项目编码,提高运行效率。(不要有固化思维,组件不是一定给谁服务,而是“组件就是一块砖哪里需要往哪搬”)
模块与组件差异对比
模块的定义:向外提供特定功能的js程序,一般就是一个js文件。
使用模块的原因:js文件很多很复杂
模块的作用:复用js,简化js的编写,提高js运行效率。
组件的基本使用
非单文件组件
特点:一个基本的组件需要有HTML、CSS、js组合。
缺点:样式不能跟着组件,需要重新引入。
<!-- 准备好一个容器-->
		<div id="root">
			<hello></hello>
			<hr>
			<h1>{{msg}}</h1>
			<hr>
			<!-- 第三步:编写组件标签 -->
			<school></school>
			<hr>
			<!-- 第三步:编写组件标签 -->
			<student></student>
		</div>

		<div id="root2">
			<hello></hello>
		</div>
	</body>

	<script type="text/javascript">
		Vue.config.productionTip = false

		//第一步:创建school组件
		const school = Vue.extend({
			template:`
				<div class="demo">
					<h2>学校名称:{{schoolName}}</h2>
					<h2>学校地址:{{address}}</h2>
					<button @click="showName">点我提示学校名</button>
				</div>
			`,
	   // el:'#root',
//组件定义时,一定不要写el配置项,因为最终所有的组件都要被一个vm管理,由vm决定服务于哪个容器。
			data(){
				return {
					schoolName:'尚硅谷',
					address:'北京昌平'
				}
			},
			methods: {
				showName(){
					alert(this.schoolName)
				}
			},
		})

		//第一步:创建student组件
		const student = Vue.extend({
			template:`
				<div>
					<h2>学生姓名:{{studentName}}</h2>
					<h2>学生年龄:{{age}}</h2>
				</div>
			`,
			data(){
				return {
					studentName:'张三',
					age:18
				}
			}
		})

		//第一步:创建hello组件
		const hello = Vue.extend({
			template:`
				<div>
					<h2>你好啊!{{name}}</h2>
				</div>
			`,
			data(){
				return {
					name:'Tom'
				}
			}
		})

		//第二步:全局注册组件
		Vue.component('hello',hello)

		//创建vm
		new Vue({
			el:'#root',
			data:{
				msg:'你好啊!'
			},
			//第二步:注册组件(局部注册)
			components:{
				school,
				student
        //components:{school:a}在components中是真正确定组件的名字
			}
		})

		new Vue({
			el:'#root2',
		})
	</script>
创建组件时注意!!!
组件定义时,一定不要写el配置项,因为最终所有的组件都要被一个vm管理,由vm决定服务于哪个容器。 举例如下理解:
const school = Vue.extend({
			template:`
				<div class="demo">
					<h2>学校名称:{{schoolName}}</h2>
					<h2>学校地址:{{address}}</h2>
					<button @click="showName">点我提示学校名</button>
				</div>
			`,
// el:'#root',
//组件定义时,一定不要写el配置项,因为最终所有的组件都要被一个vm管理,由vm决定服务于哪个容器。
			data(){
				return {
					schoolName:'尚硅谷',
					address:'北京昌平'
				}
			},
			methods: {
				showName(){
					alert(this.schoolName)
				}
			},
		})
使用组件的一些注意点
- 关于组件名
一个单词组成:
- 首字母小写:school
- 首字母大写:School
多个单词组成:
- kebab-case式命名:my-school
- CamelCase式命名:Myschool(需要Vue脚手架支持)
备注:
- 组件名尽可能回避HTML中已有的元素名称,例如:h2、H2都不行;
- 可以使用name配置项指定组件再开发工具中呈现的名字。
- 关于组件标签
- <school></school>或者<School></School>
- <school/>
备注:不用使用脚手架,<school/>会导致后续组件不能渲染。
- 一个简写方式
const school=Vue.extend(options) 可简写为:const school=options
组件的嵌套
当要使用组件的嵌套时,我们需要把子组件写在父组件中,如下图理解:
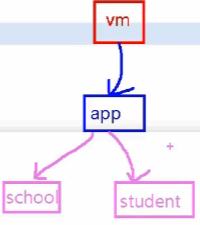
代码中结构层次,如下图:
代码如下:
<body>
<!-- 准备好一个容器-->
<div id="root">
<!-- <app></app>如果容器里面如果不写内容,那就在下面的new Vue中添加写一个template:'<app></app>' -->
</div>
</body>
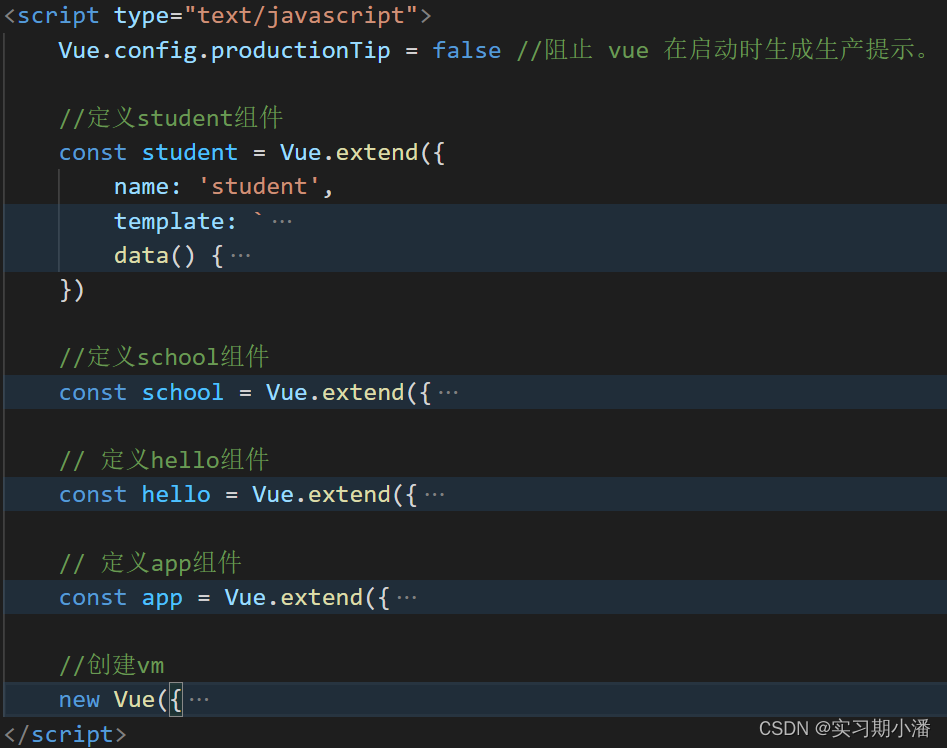
<script type="text/javascript">
Vue.config.productionTip = false //阻止 vue 在启动时生成生产提示。
//定义student组件
const student = Vue.extend({
name: 'student',
template: `
<div>
<h2>学生姓名:{{name}}</h2>
<h2>学生年龄:{{age}}</h2>
</div>
`,
data() {
return {
name: '尚硅谷',
age: 18
}
}
})
//定义school组件
const school = Vue.extend({
name: 'school',
template: `
<div>
<h2>学校名称:{{name}}</h2>
<h2>学校地址:{{address}}</h2>
<student></student>
</div>
`,
data() {
return {
name: '尚硅谷',
address: '北京'
}
},
//注册子组件(局部)
components: {
student
//这里注册了子组件那就在template里面添加<student></student>
}
})
// 定义hello组件
const hello = Vue.extend({
templat: `<h1>{{msg}}</h1>`,
data() {
return {
msg: '欢迎来到尚硅谷学习!'
}
}
})
// 定义app组件
const app = Vue.extend({
template: `
<div>
<hello></hello>
<school></school>
</div>
`,
components: {
school,
hello
}
})
//创建vm
new Vue({
template: `<app></app>`,
el: '#root',
//注册组件(局部)
components: {
app
}
})
</script>
单文件组件的使用
特点:组件的组成应该是由HTML+CSS+Js
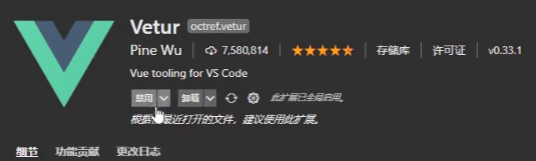
在VScode中是无法直接识别vue文件的所以需要在里面安装一个插件:Vetur (作者:Pine Wu)
在写单文件组件时需要如下几个文件夹里的内容,不然无法产生效果:
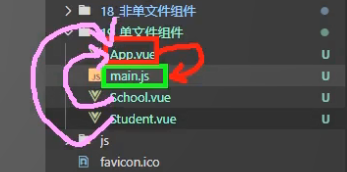
✨注意:App.vue中的内容只会和main.js中产生效果,否则School.vue、Student.vue无法与App.vue产生效果。
main.js是入口文件;
School.vue和Student.vue里面有模板就遍历一遍后进行渲染到页面;
App.vue就是用来存放School.vue和Student.vue里面的东西。
命名时的注意点:
代码如下(以下代码需要放在脚手架中才能实现但是框架就是这样的):
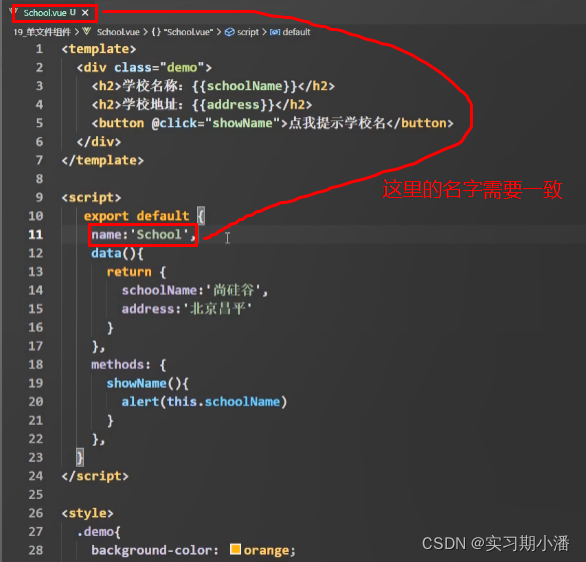
School.vue中的代码:
<template>
	<div class="demo">
		<h2>学校名称:{{name}}</h2>
		<h2>学校地址:{{address}}</h2>
		<button @click="showName">点我提示学校名</button>
	</div>
</template>

<script>
	 export default {
		name:'School',
		data(){
			return {
				name:'尚硅谷',
				address:'北京昌平'
			}
		},
		methods: {
			showName(){
				alert(this.name)
			}
		},
	}
</script>

<style>
	.demo{
		background-color: orange;
	}
</style>Student.vue中的代码:
<template>
	<div>
		<h2>学生姓名:{{name}}</h2>
		<h2>学生年龄:{{age}}</h2>
	</div>
</template>

<script>
	 export default {
		name:'Student',
		data(){
			return {
				name:'张三',
				age:18
			}
		}
	}
</script>
App.vue中的代码:
<template>
	<div>
		<School></School>
		<Student></Student>
	</div>
</template>

<script>
	//引入组件
	import School from 'School.vue'
	import Student from 'Student.vue'

	export default {
		name:'App',
		components:{
			School,
			Student
		}
	}
</script>
index.html中的代码:
<!DOCTYPE html>
<html>

<head>
    <meta charset="UTF-8" />
    <title>练习一下单文件组件的语法</title>
</head>

<body>
    <!-- 准备一个容器 -->
    <div id="root">

    </div>
    <!-- <script type="text/javascript" src="vue.js"></script> -->
    <!-- <script type="text/javascript" src="main.js"></script> -->
</body>

</html>main.js中的代码:
<!DOCTYPE html>
<html>

<head>
    <meta charset="UTF-8" />
    <title>练习一下单文件组件的语法</title>
</head>

<body>
    <!-- 准备一个容器 -->
    <div id="root">

    </div>
    <!-- <script type="text/javascript" src="vue.js"></script> -->
    <!-- <script type="text/javascript" src="main.js"></script> -->
</body>

</html>
总结
组件的基础学习就是以上内容,大家可以先利用上面提供的代码进行练习。由于还没用上脚手架所以是不能执行的,到时候学了脚手架就能运行起来咯!可以小小期待一下后面的学习内容!


 2万+
2万+

 被折叠的 条评论
为什么被折叠?
被折叠的 条评论
为什么被折叠?
 到【灌水乐园】发言


