


鸿蒙5.0版本,实现Mqtt通信
一、实现Mqtt服务器
1.1 进入官网注册账号
免费试用 EMQX Cloud 或 EMQX Enterprise | 下载 EMQX
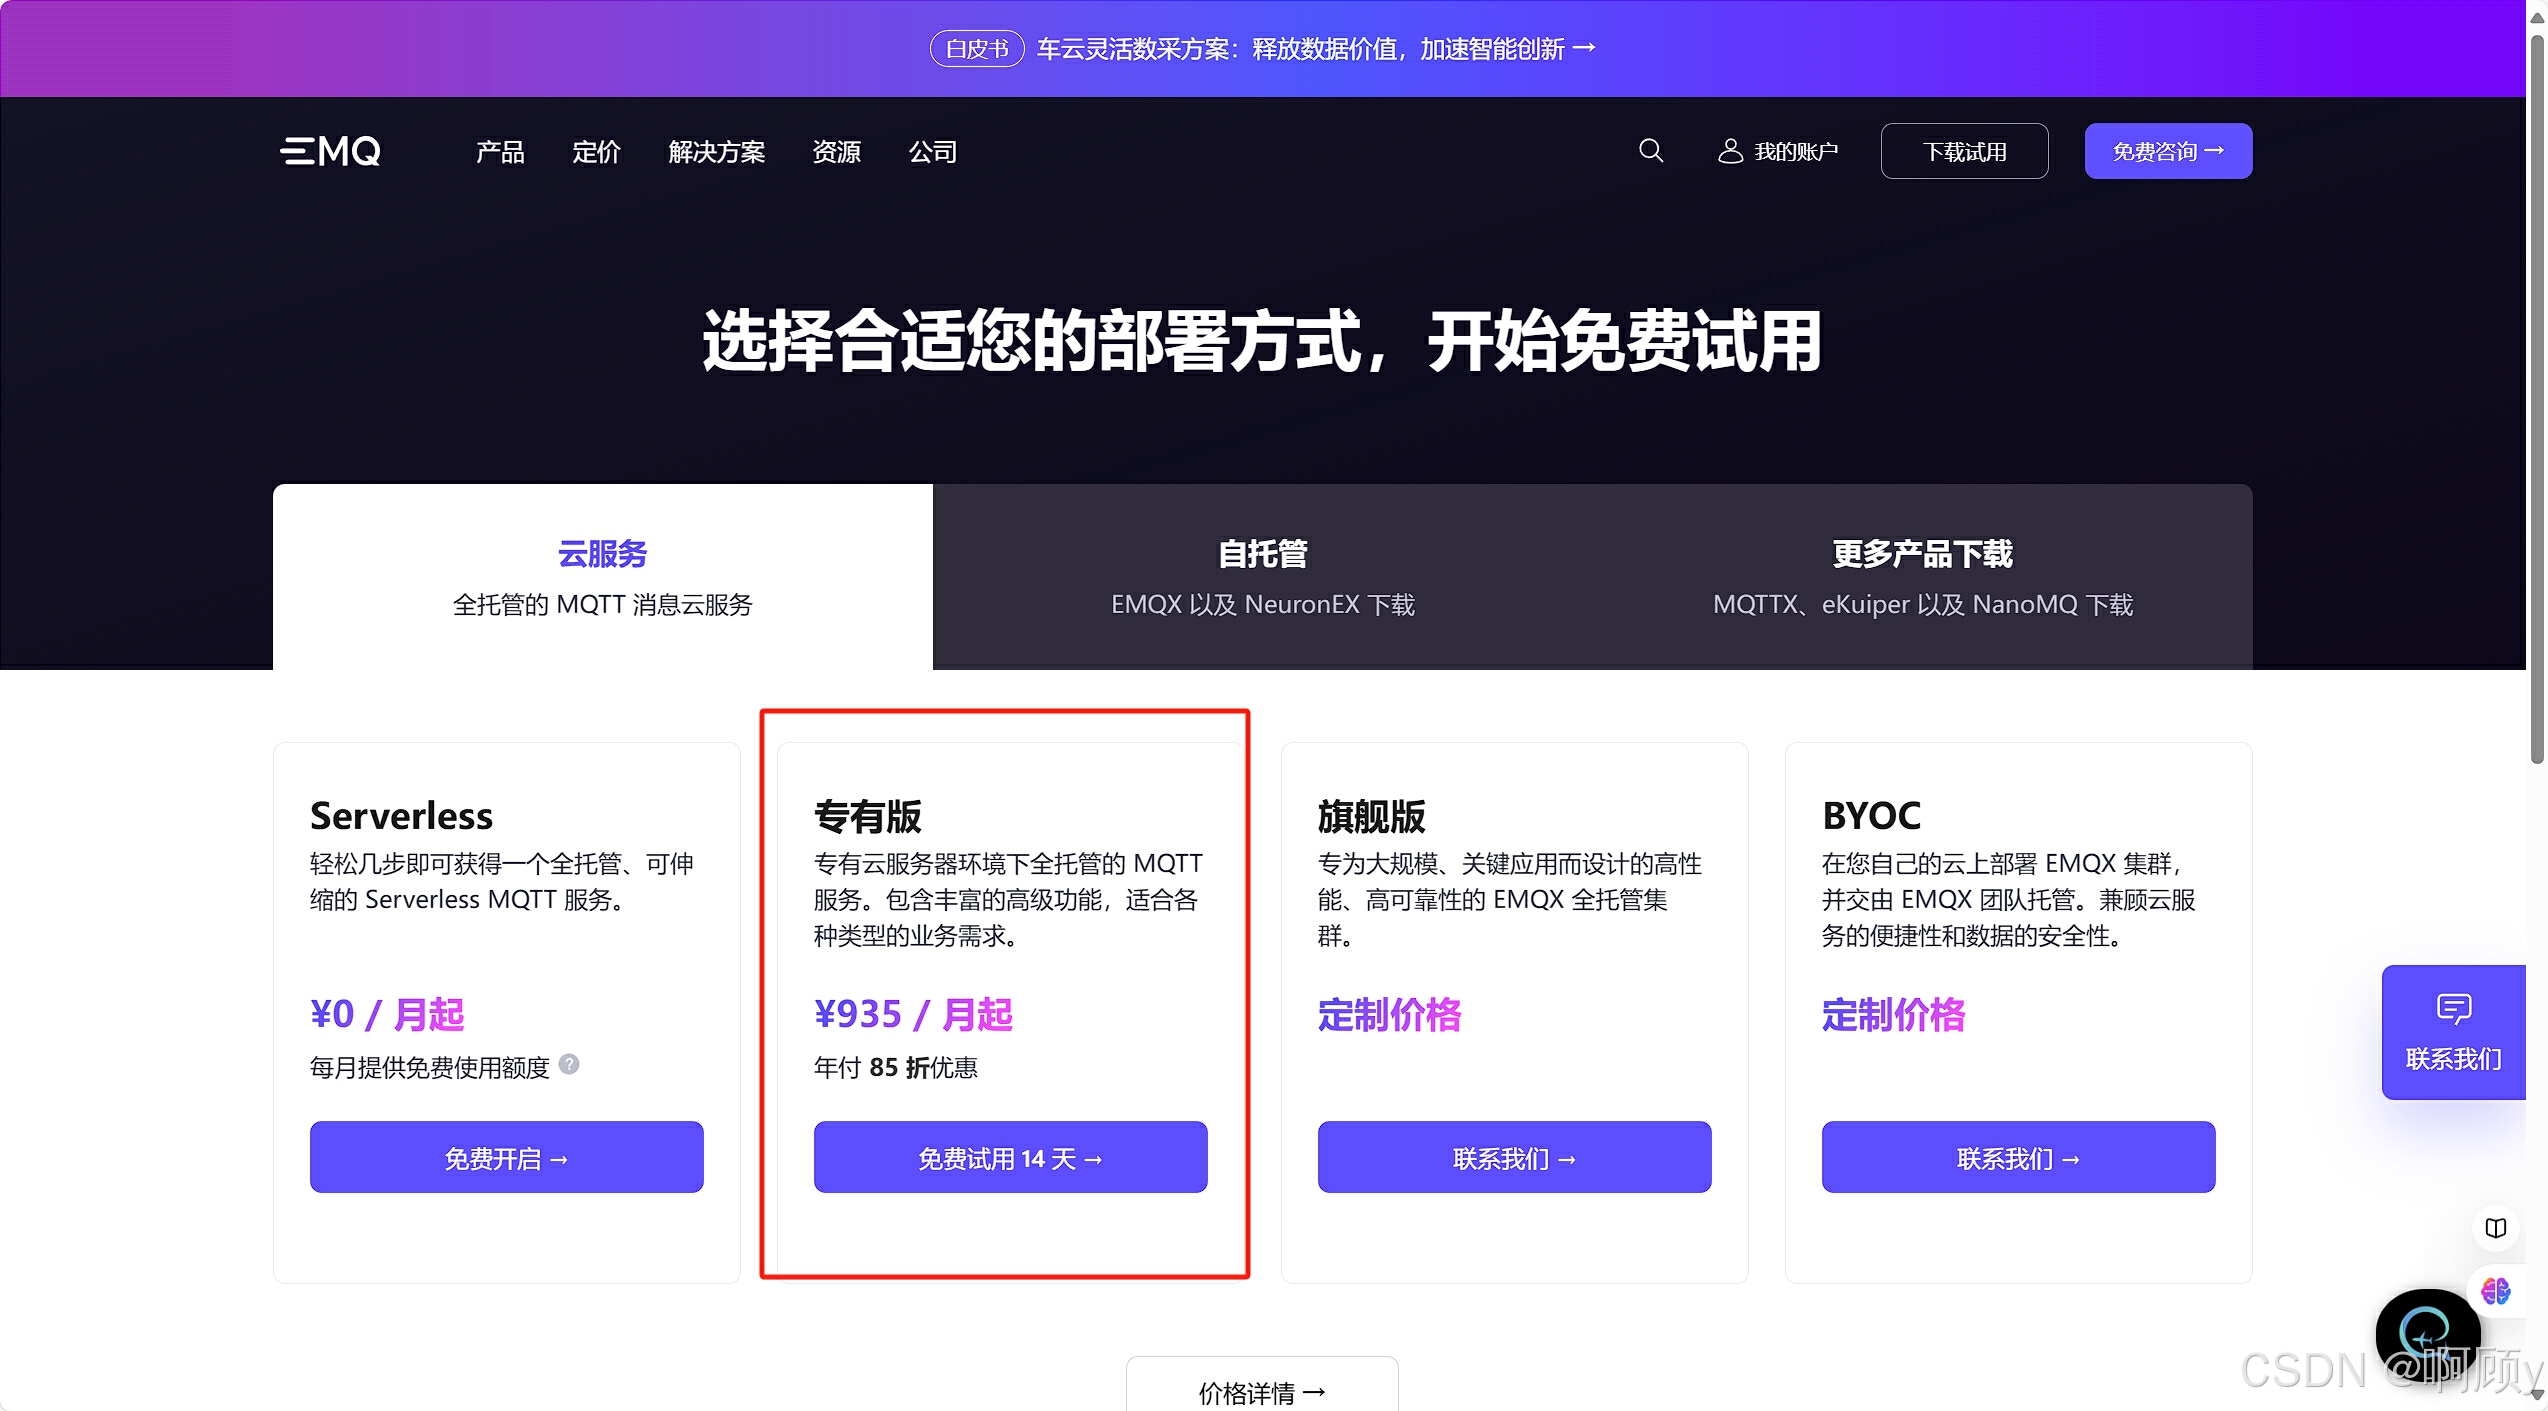
1.2 选择专有版试用
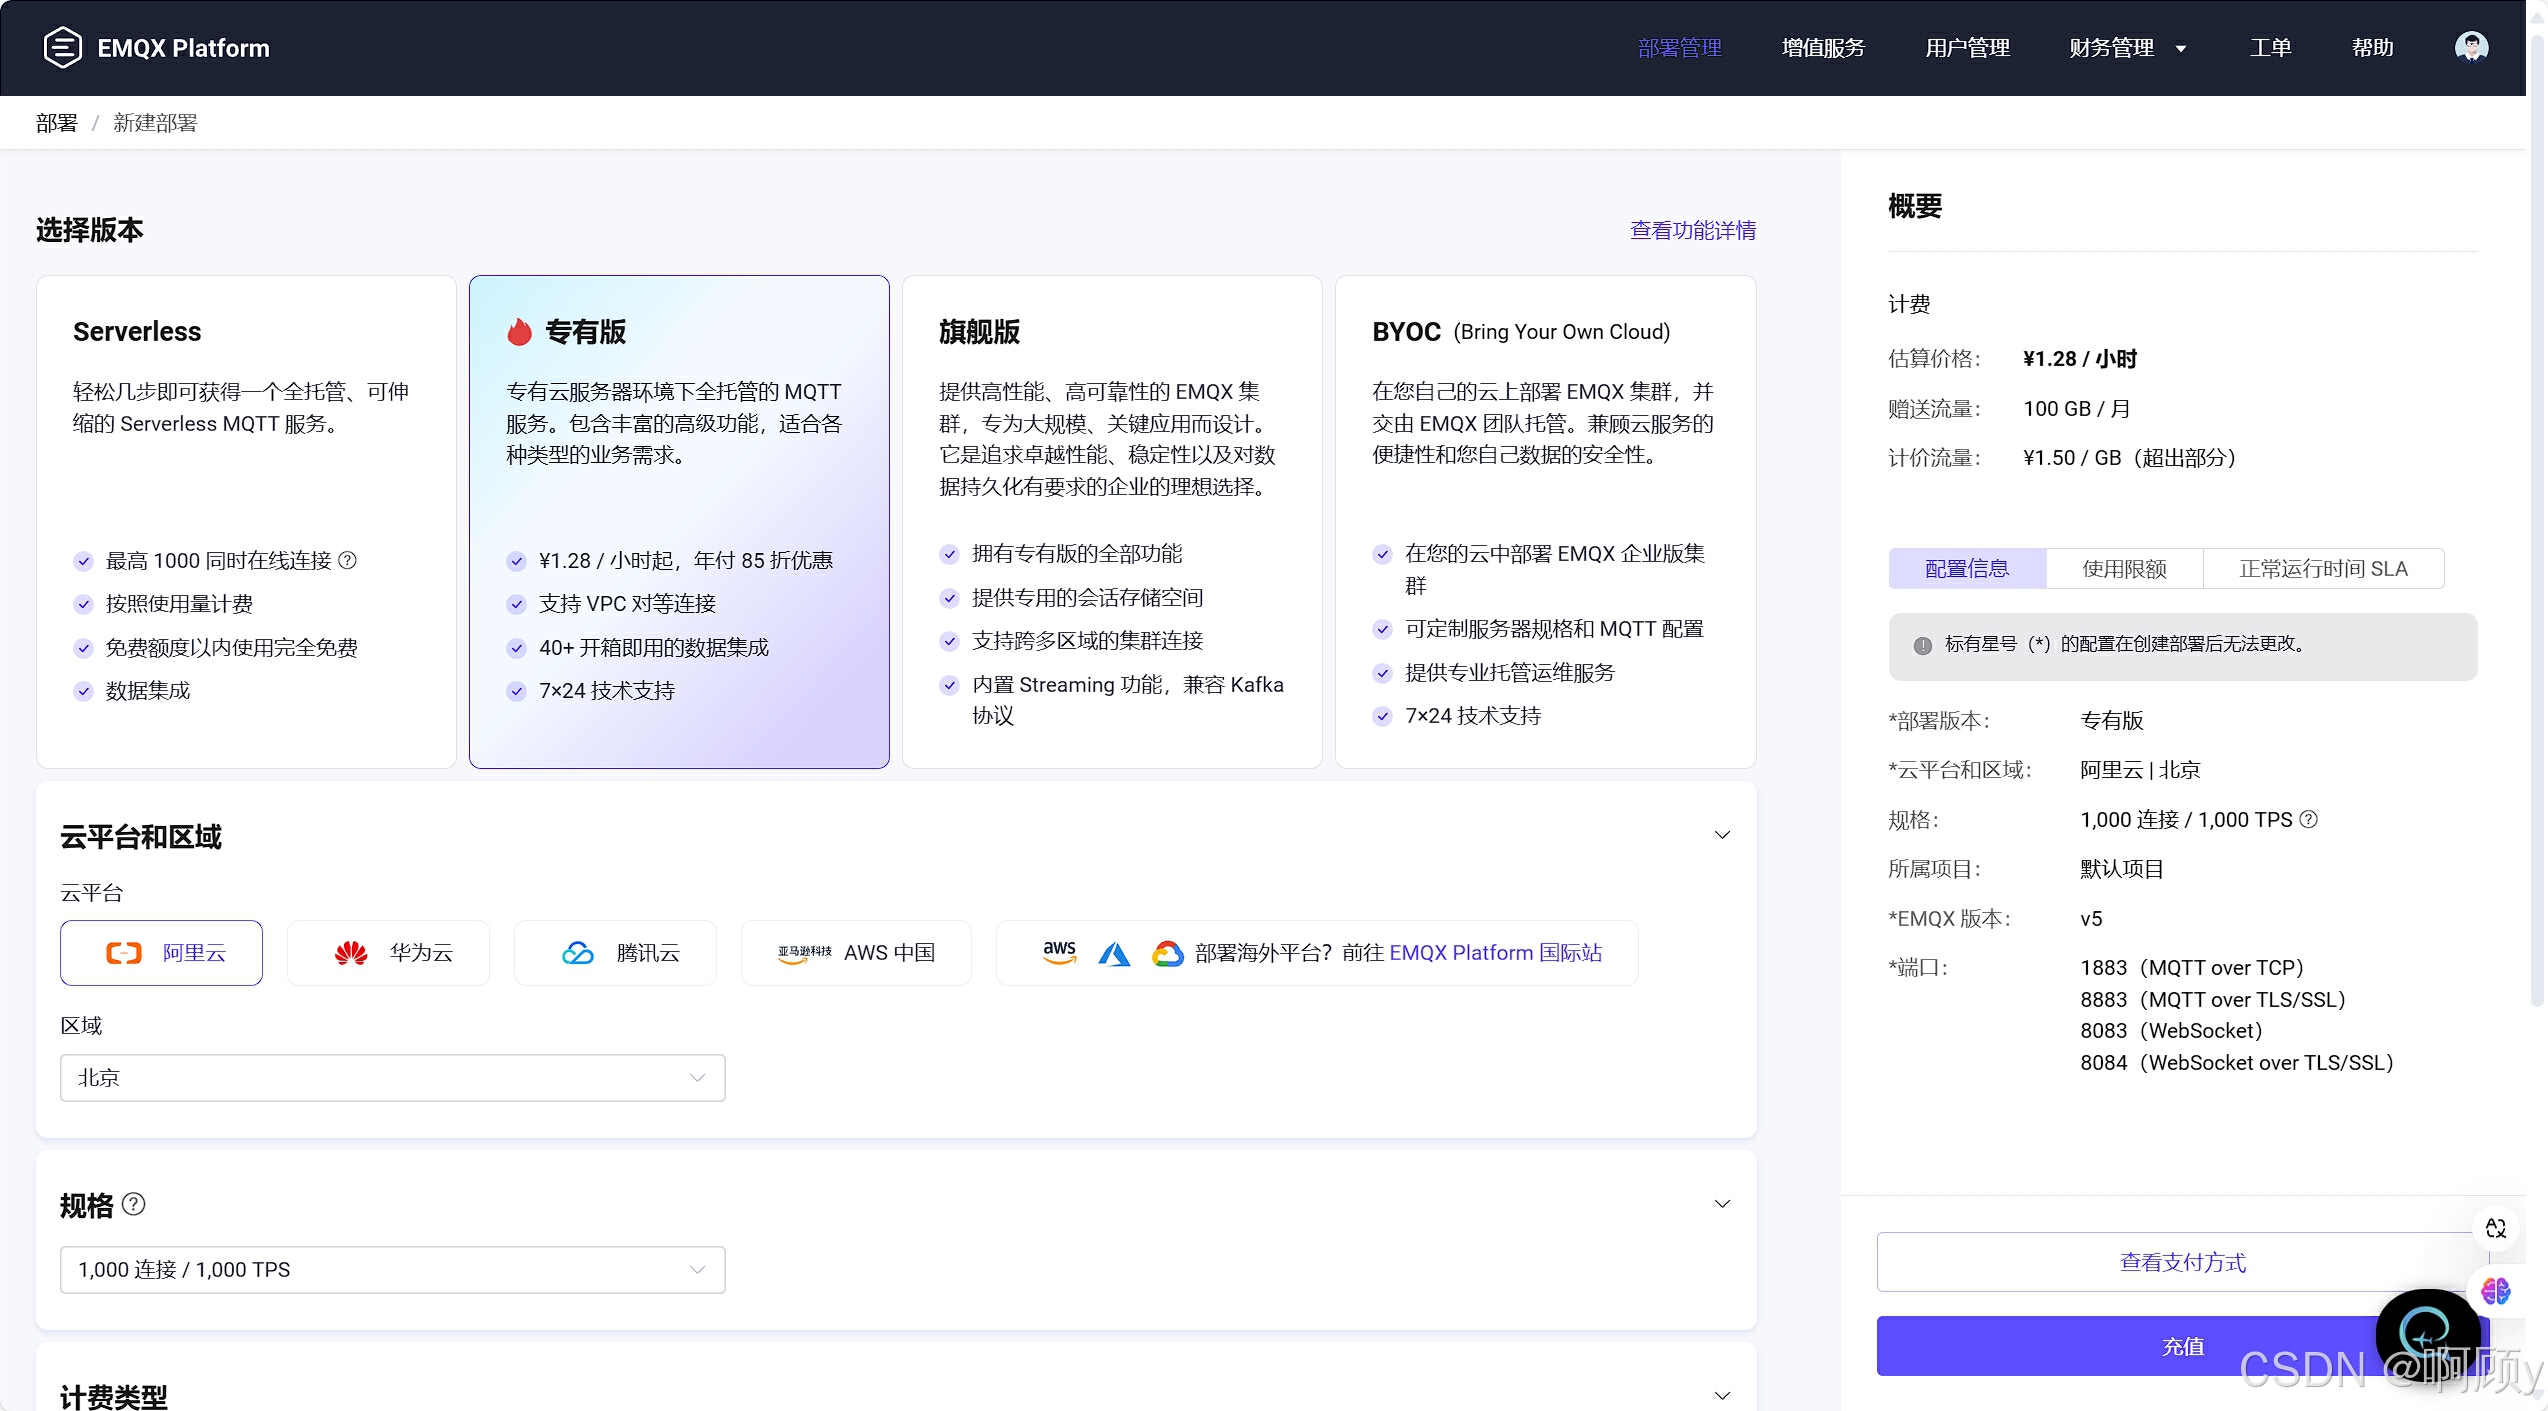
1.3 部署
默认即可
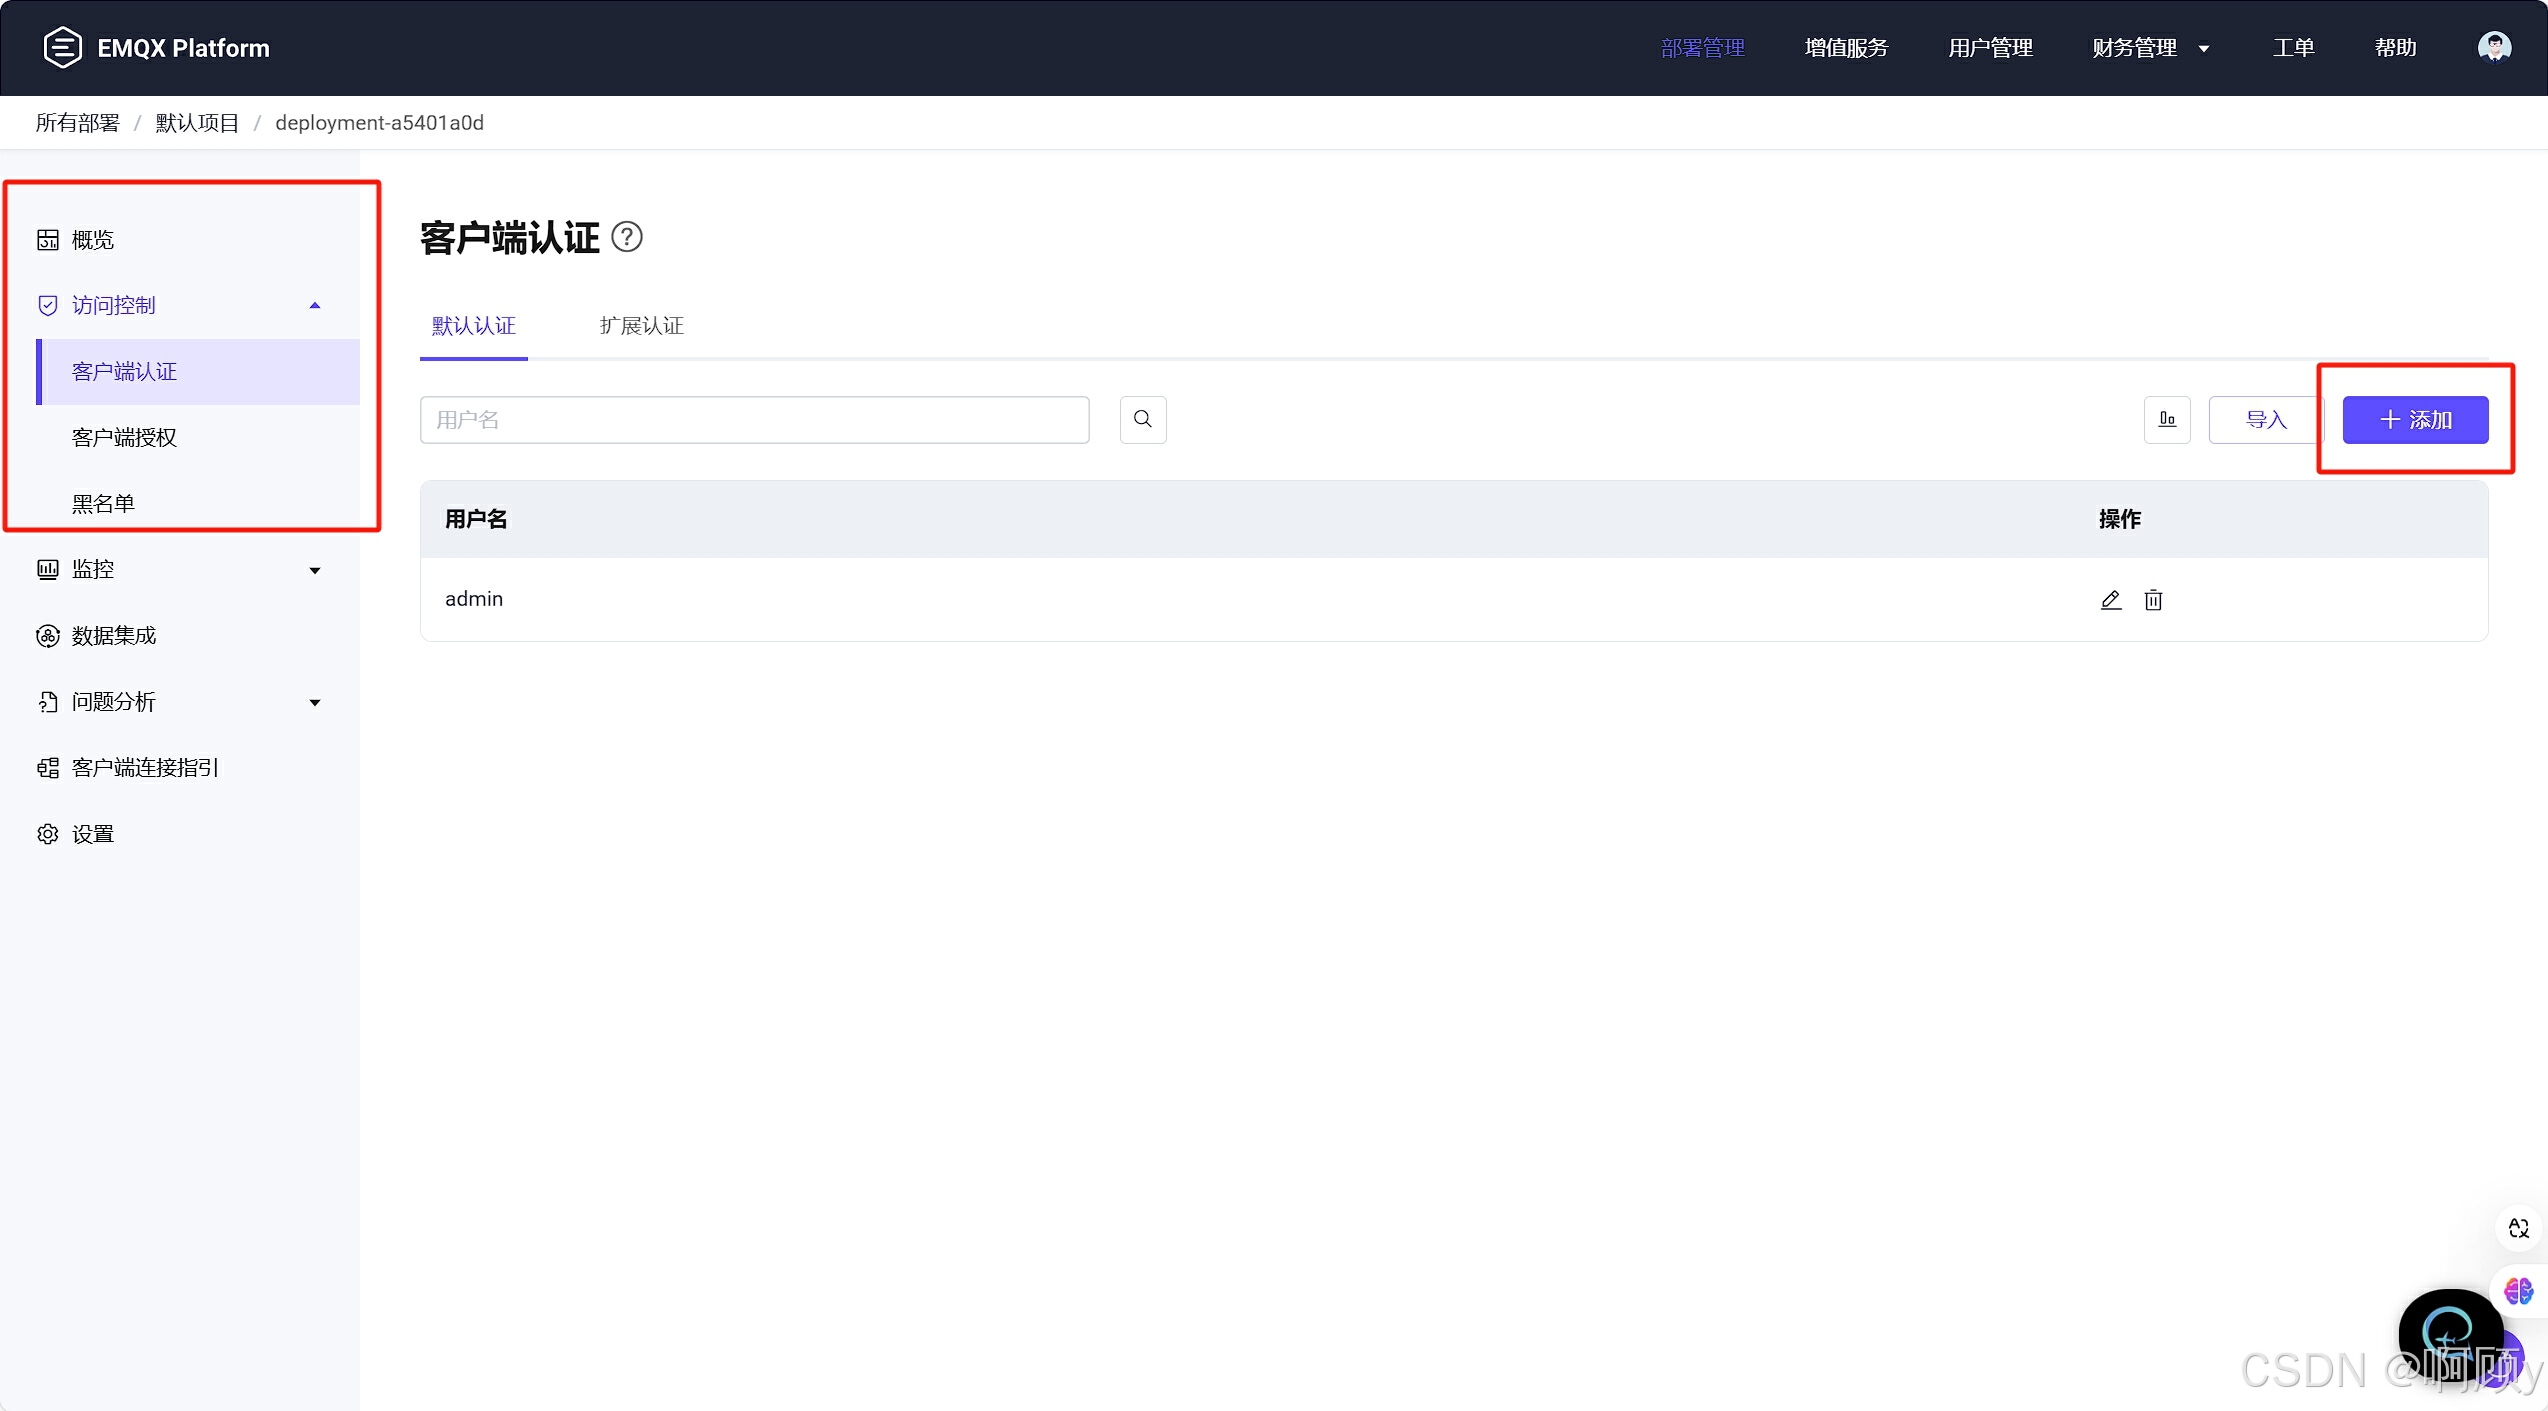
1.4 添加用户名和密码
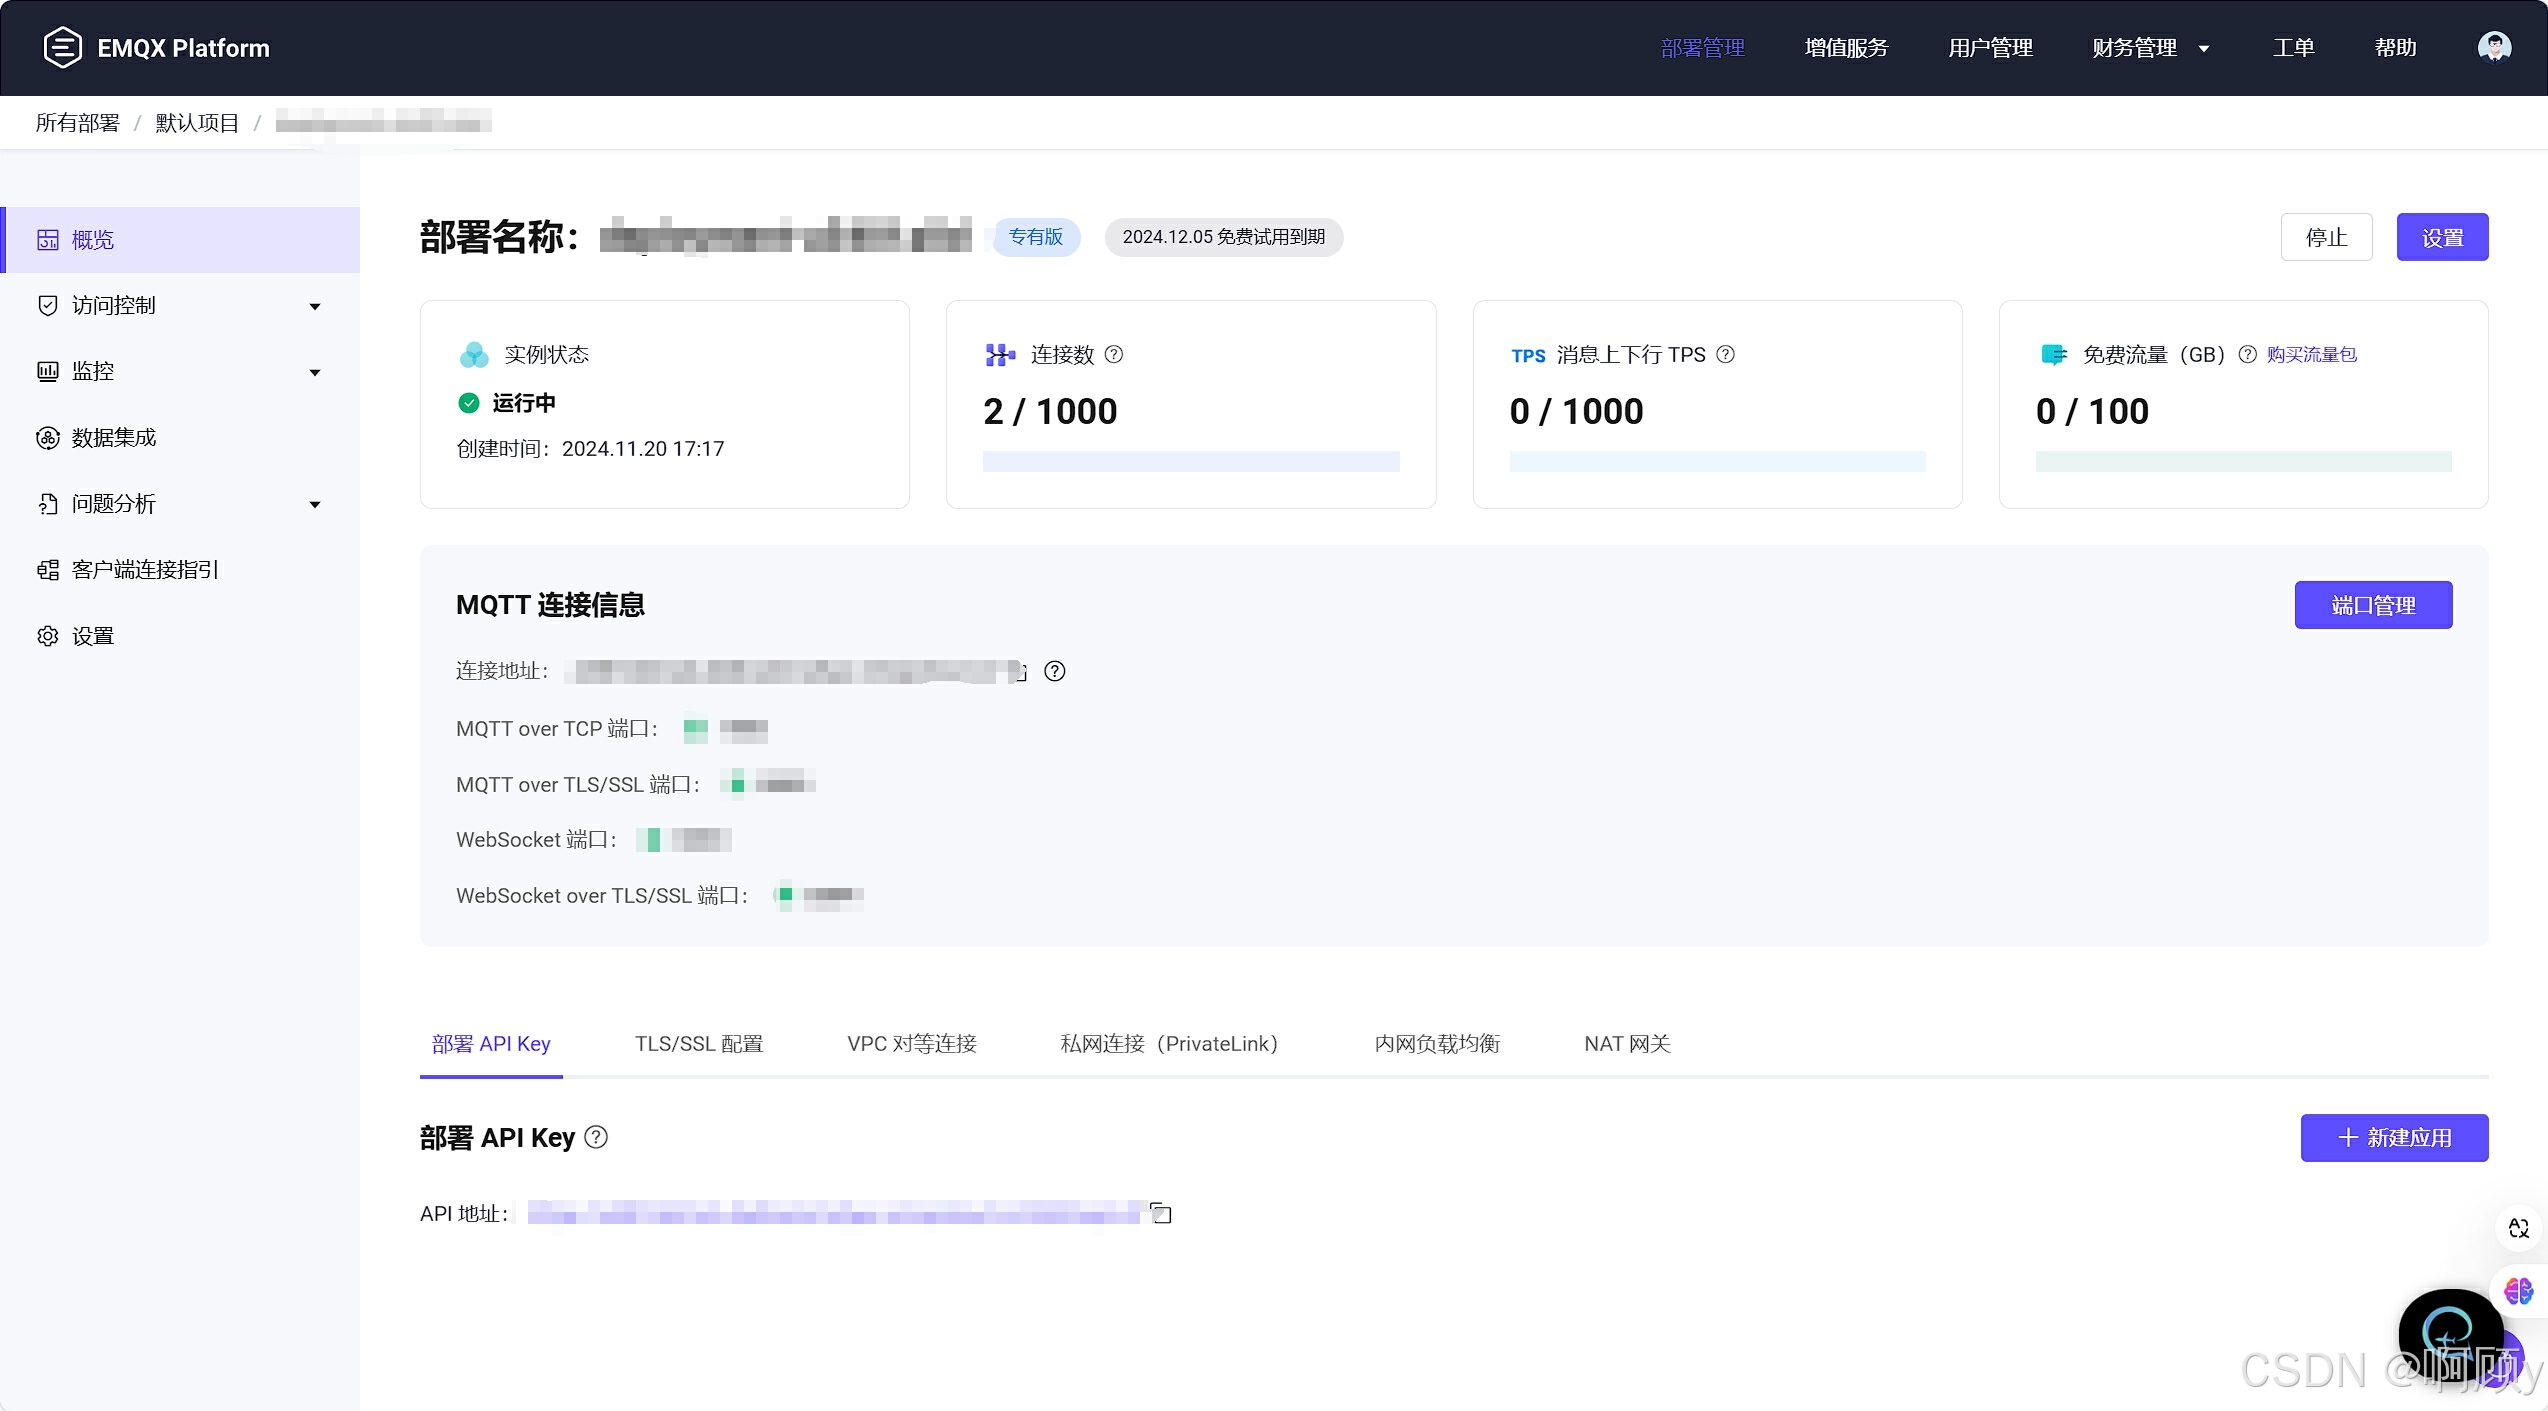
1.5 开启服务成功
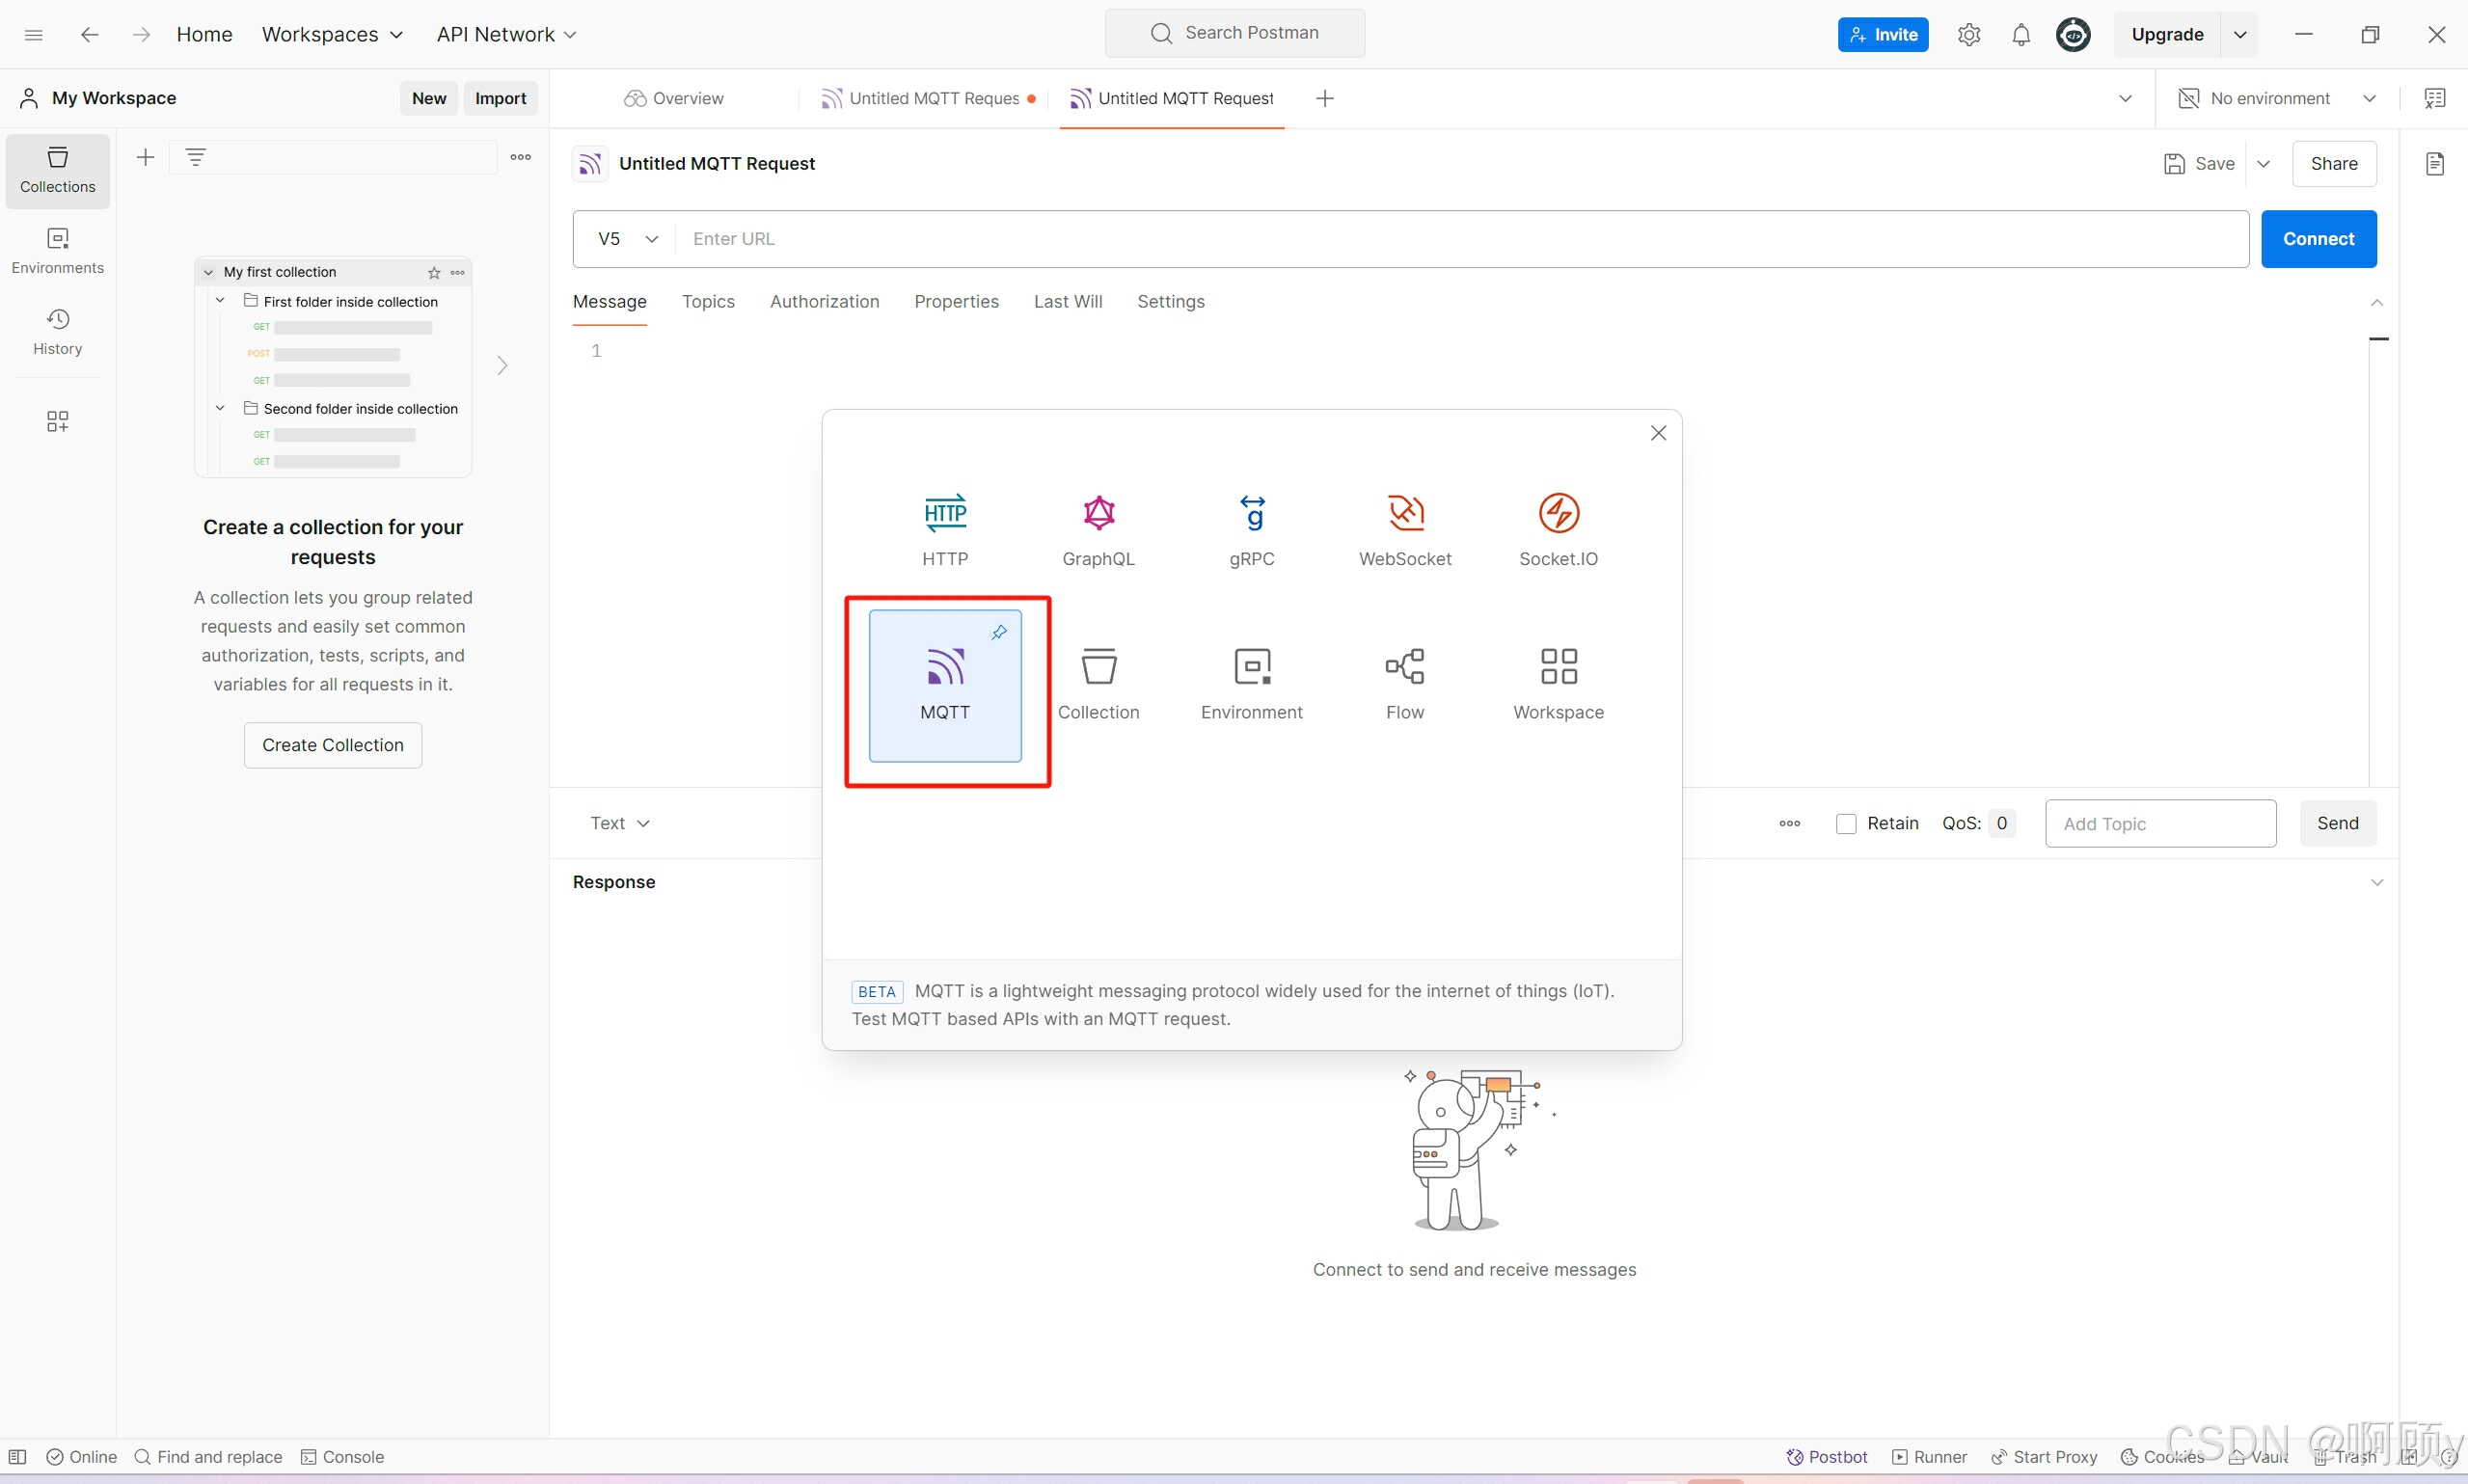
二、测试连接服务器
2.1 使用postman连接
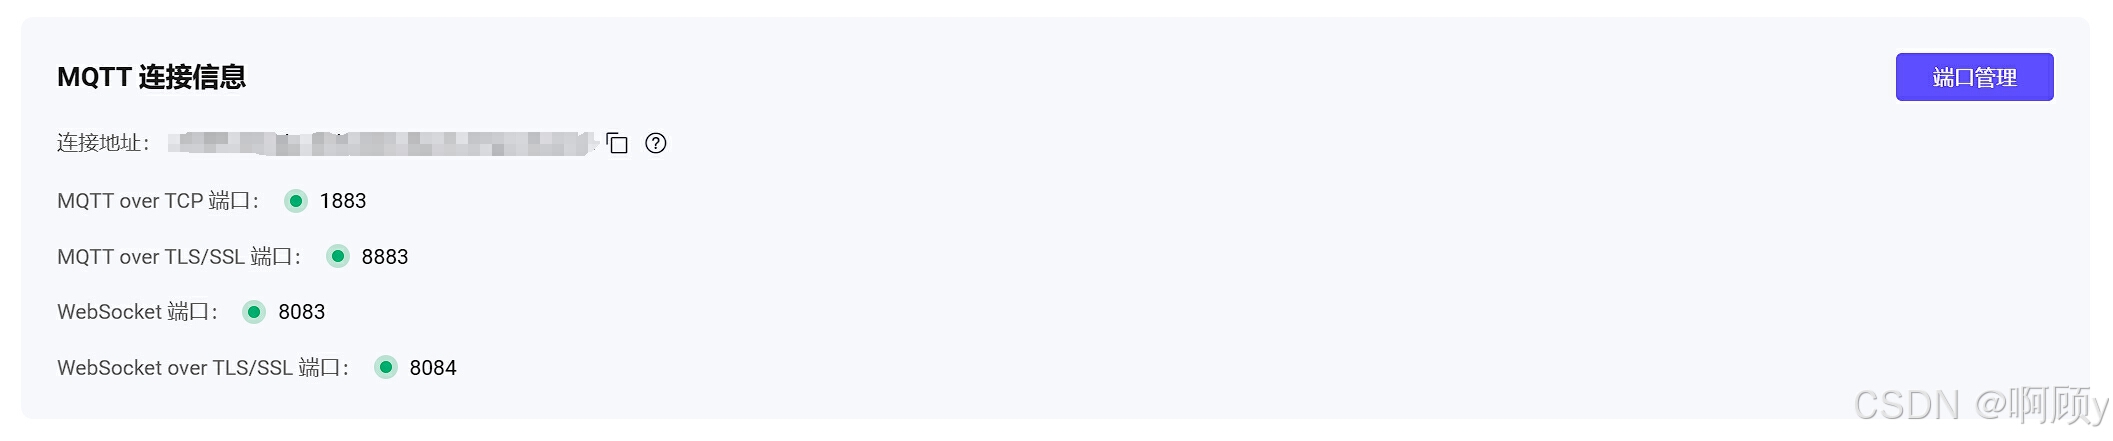
2.2 填写服务器地址
到EMQX中,找到MQTT连接信息,复制连接地址和端口号,填写到postman中
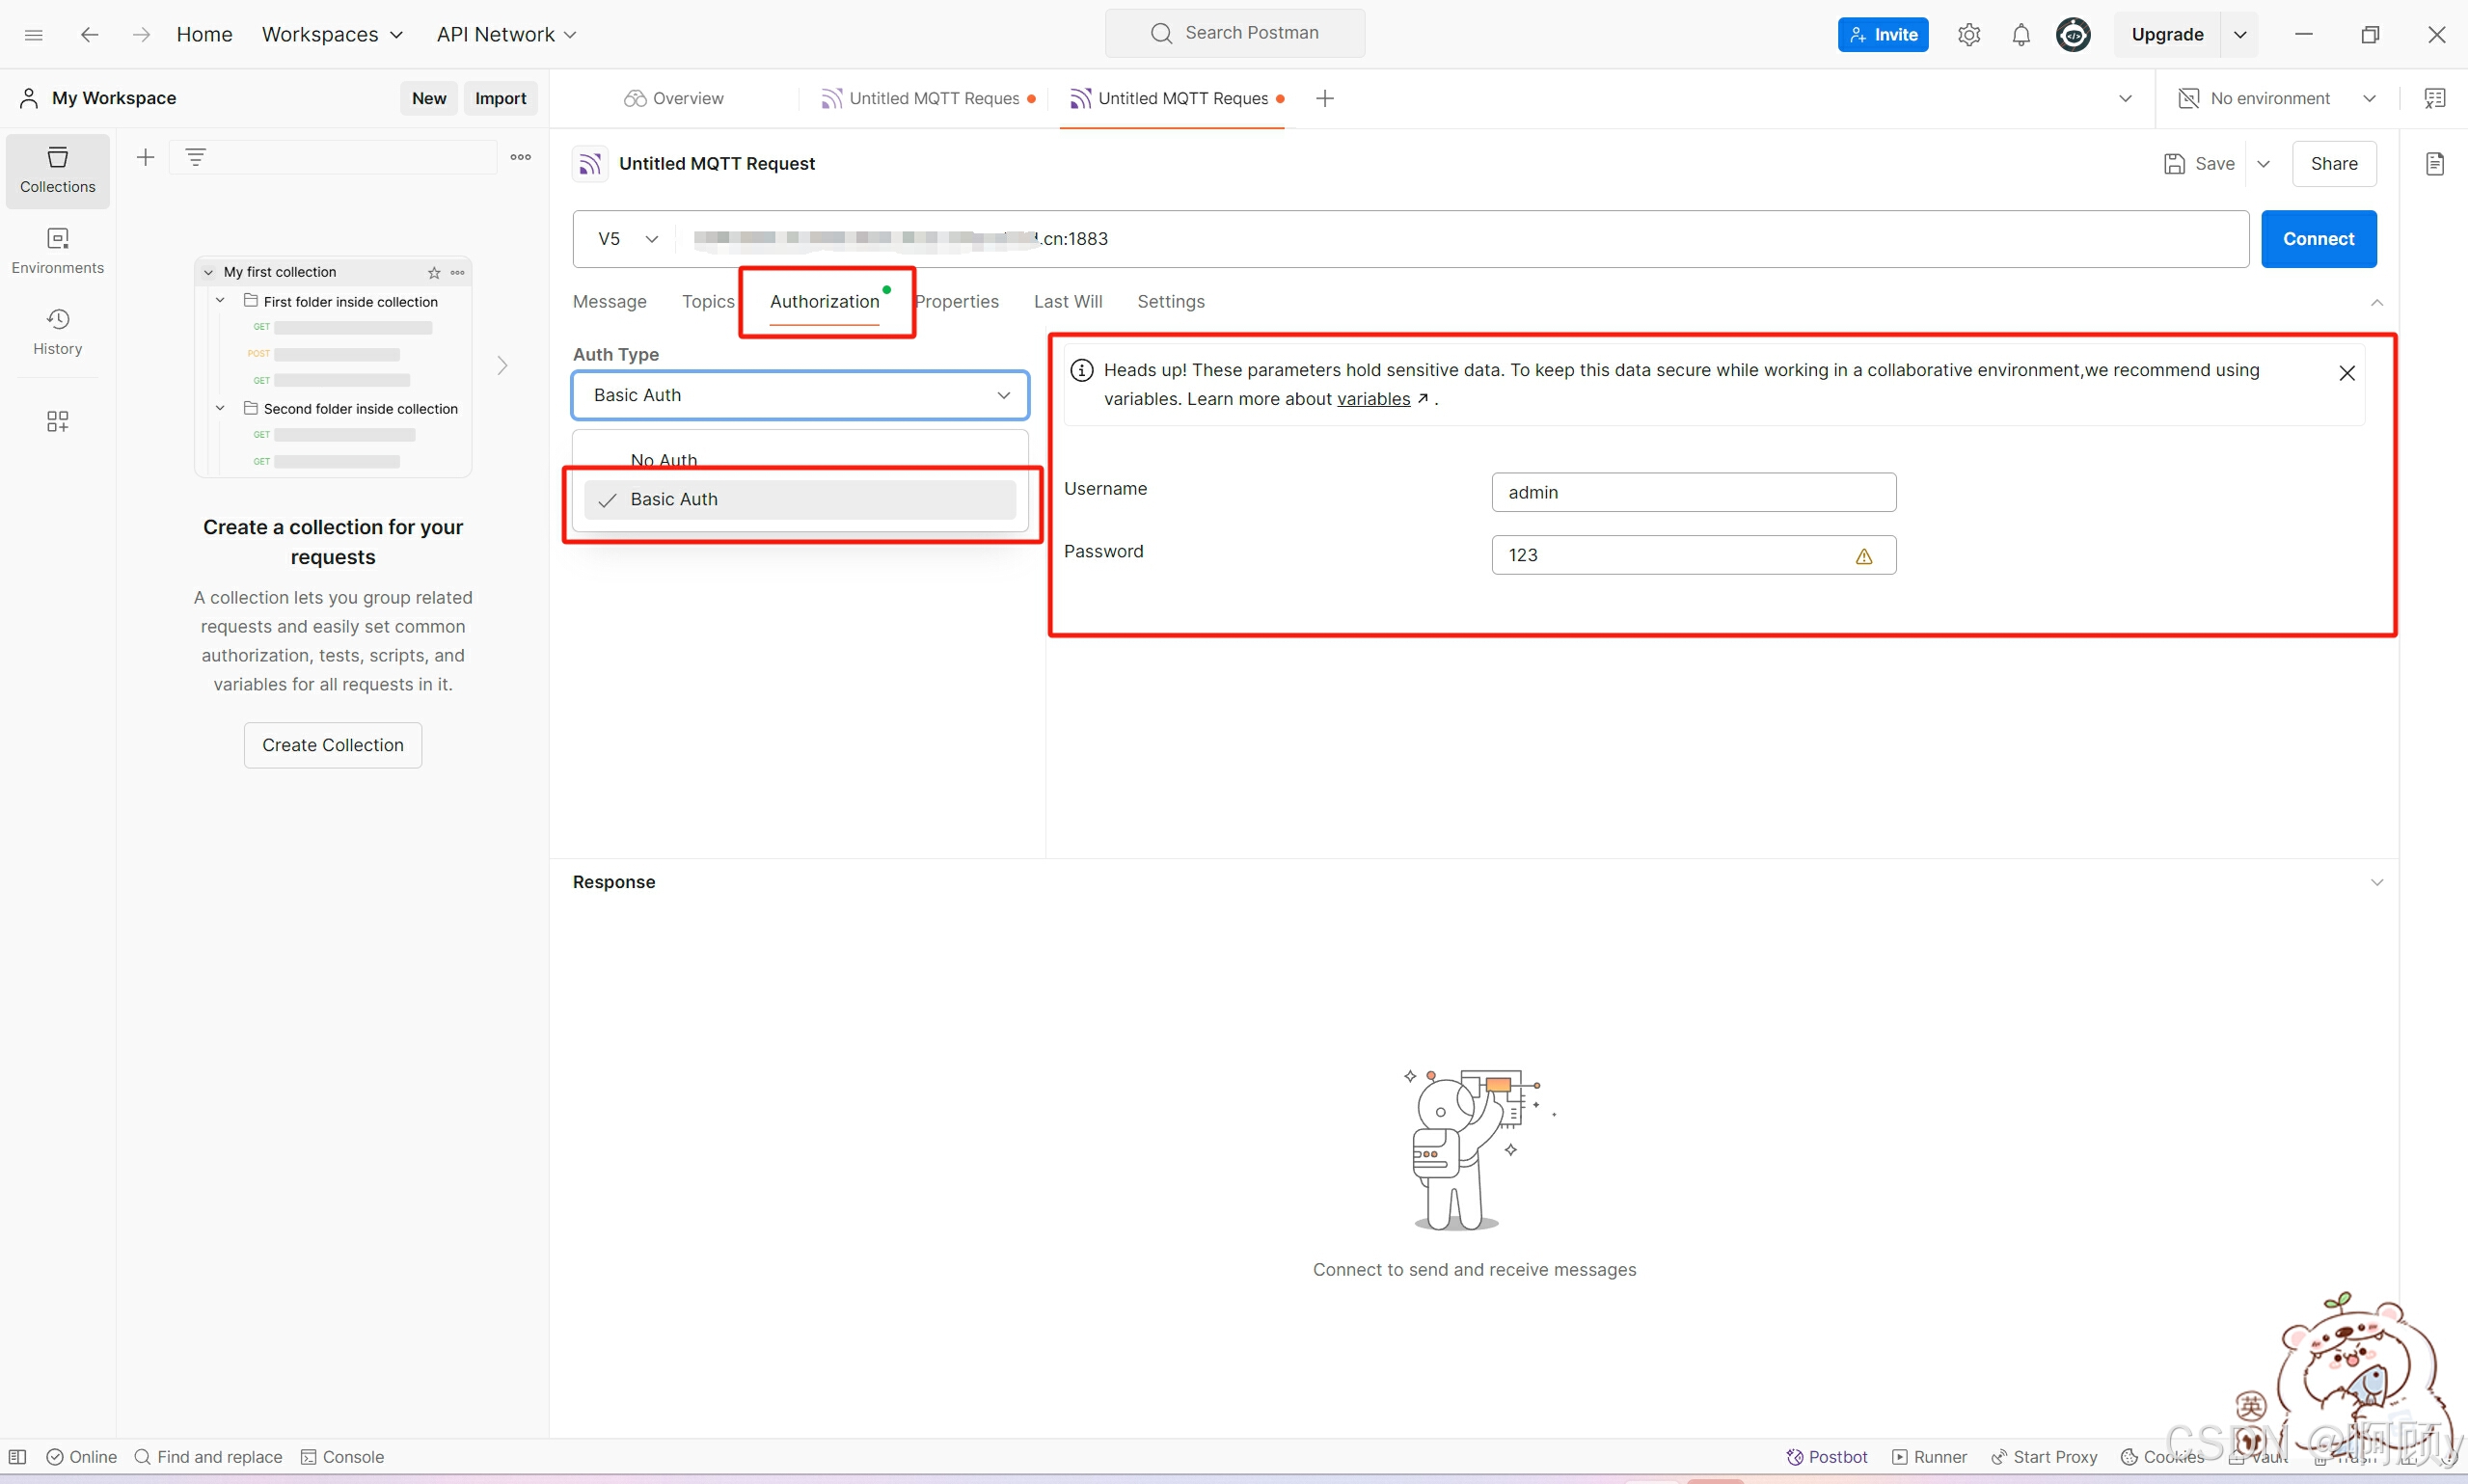
2.3 配置用户名和密码
这里的用户名和密码填1.4步骤中的用户名和密码
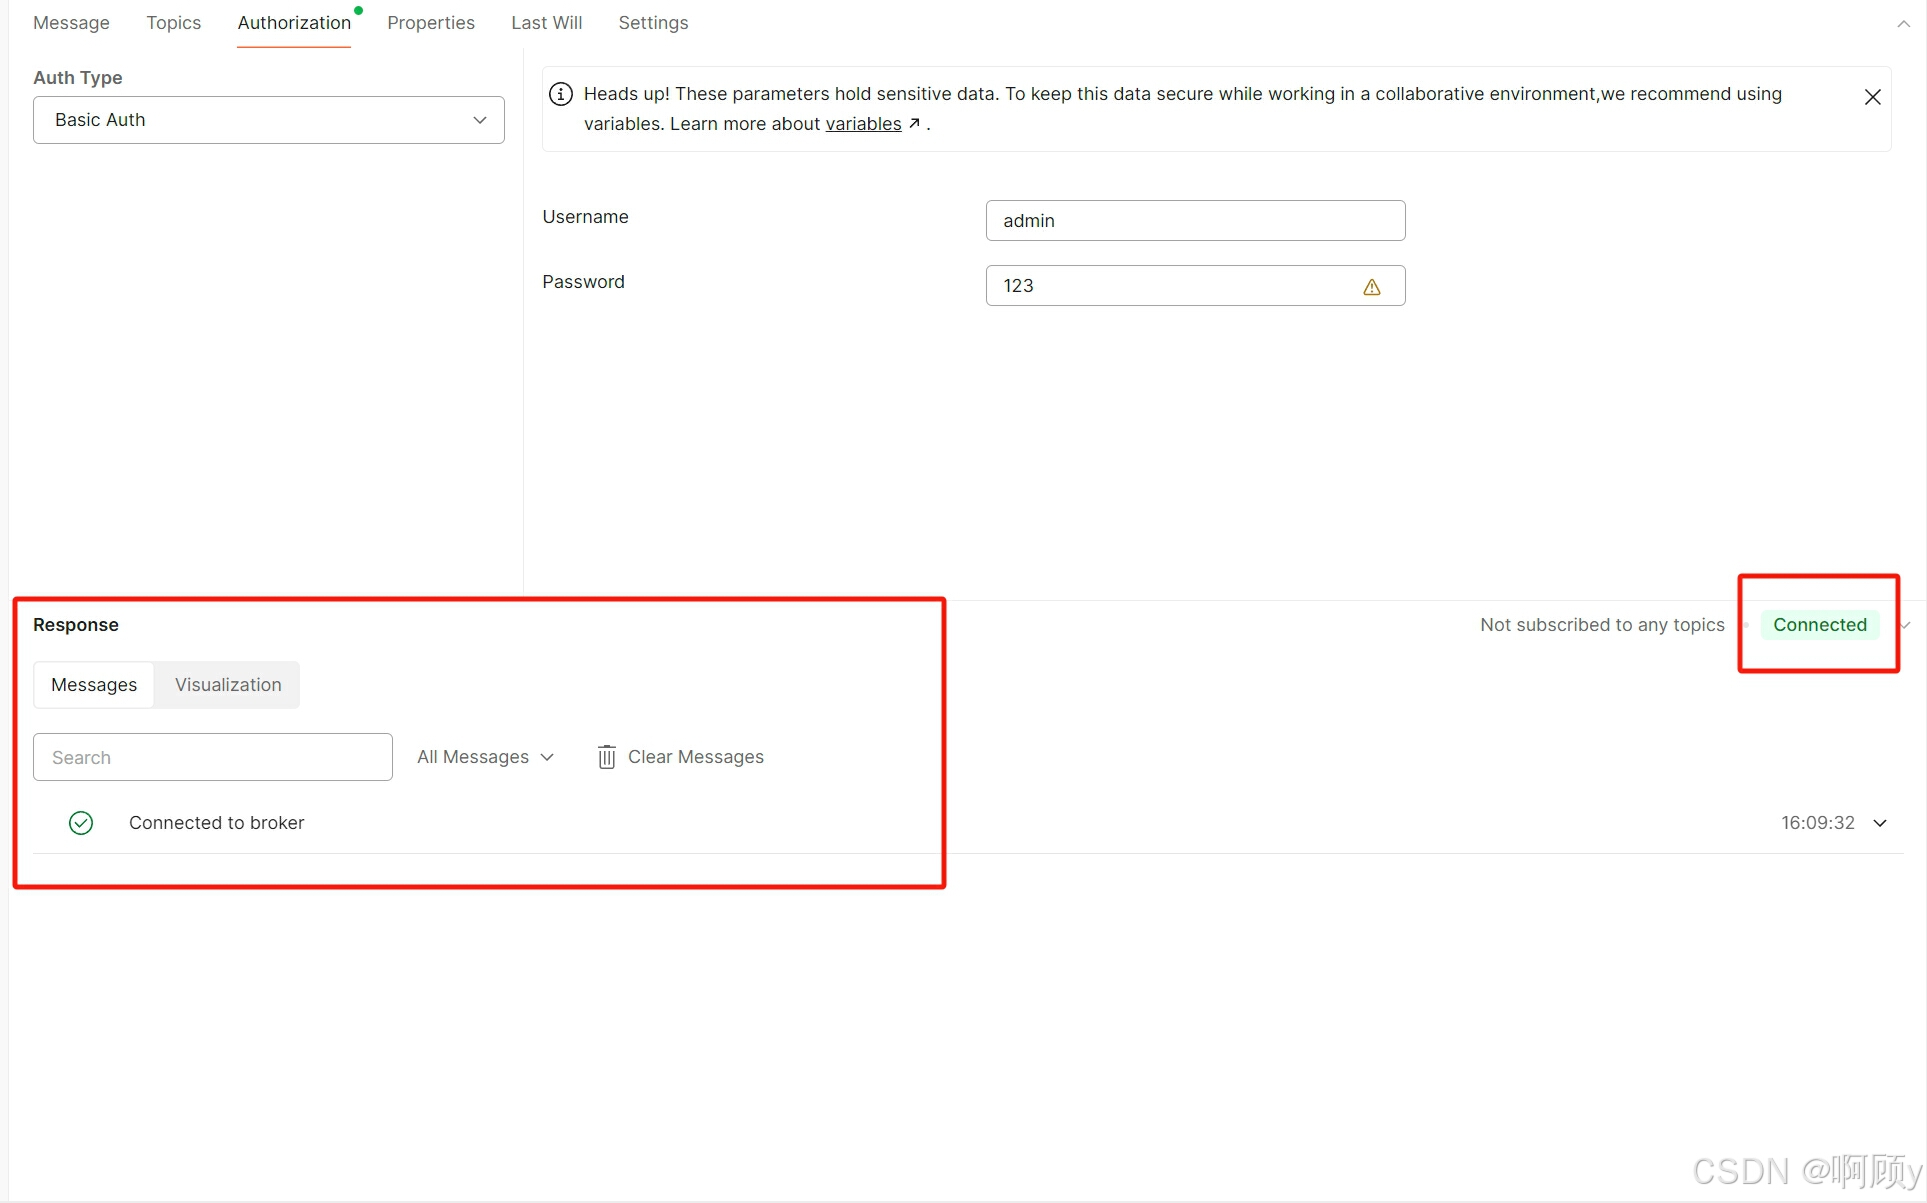
2.4 连接服务器成功
三、鸿蒙代码编写
3.1 下载mqtt依赖
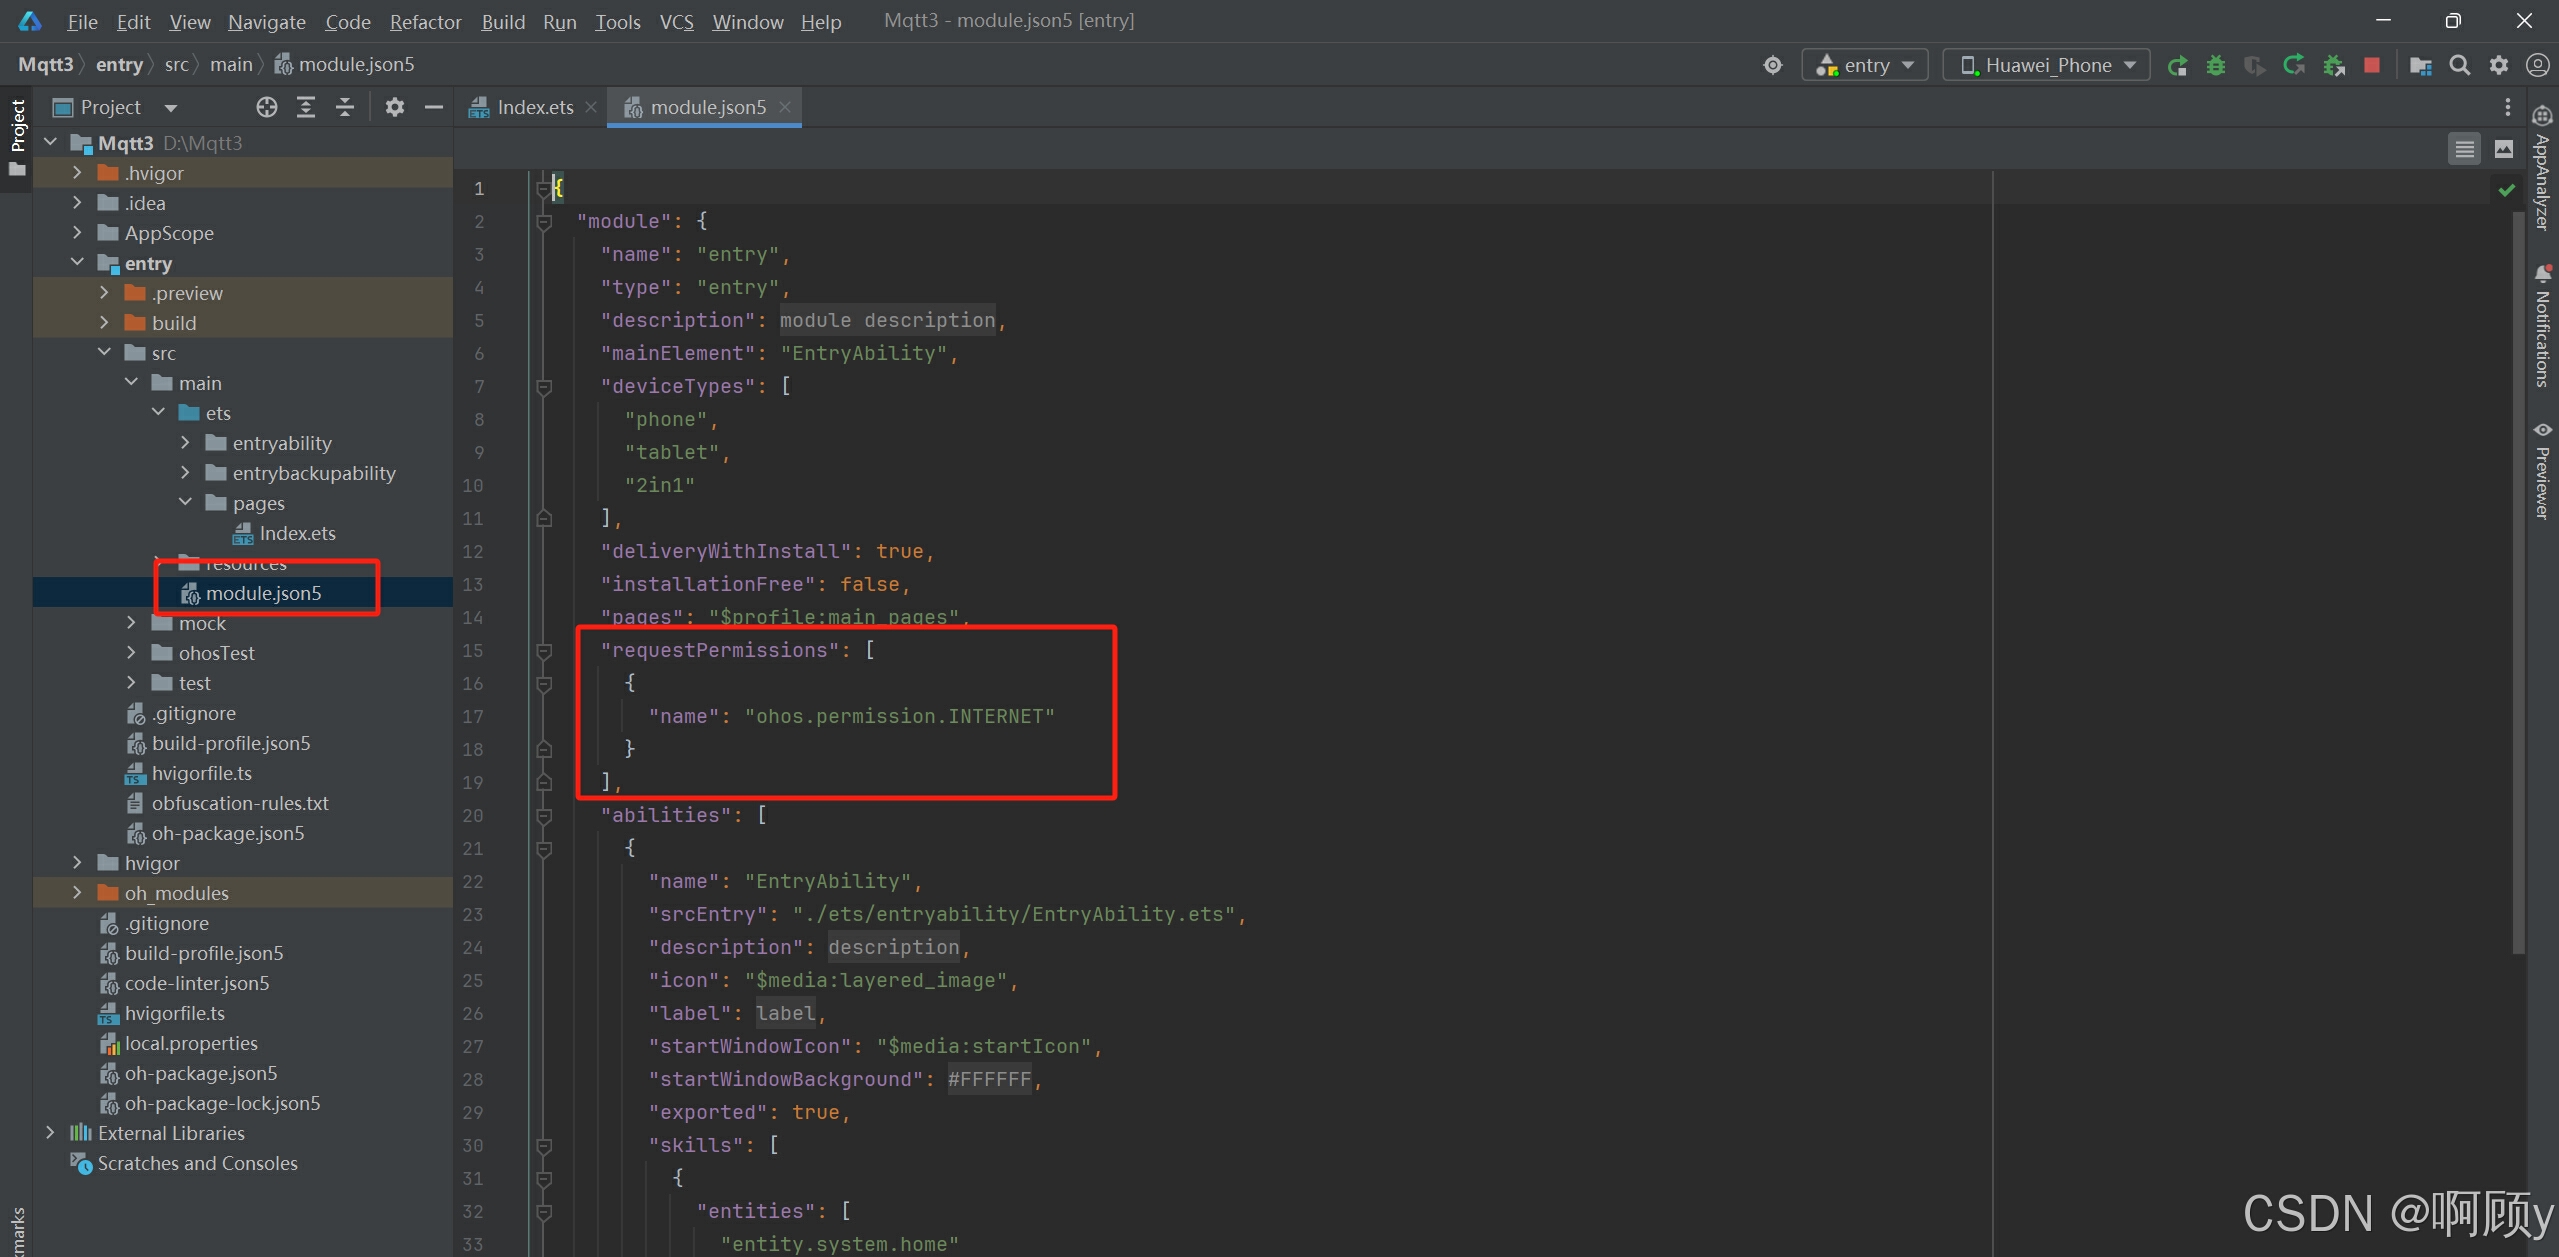
ohpm install @ohos/mqtt3.2 配置联网权限
3.3 鸿蒙mqtt代码
//mqtt客户端
  private mqtt:MqttClient = MqttAsync.createMqtt({
    url:this.ip, //填写服务器地址 `mqtt://${地址}:1883`
    clientId:'1q1q11q' //唯一即可
    persistenceType:1 //需要配置为1,0为默认值会导致初始化失败
  })

//连接mqtt服务器
  async mqttConnect(): Promise<void>{
    try {
      //连接代码
      await this.mqtt.connect({
        userName:'admin', //用户名
        password:'123'    //密码
      }).then((res:MqttResponse)=>{
        console.log('--->连接成功'+JSON.stringify(res))
      }).catch((err:Error)=>{
        console.log('--->连接失败'+JSON.stringify(err))
      })
    }catch (err){
      console.log('--->捕捉异常'+err)
    }
  }

//订阅主题
  async mqttSubscribe(): Promise<void>{
    try {
      //订阅主题代码
      await this.mqtt.subscribe({
        topic:'test', //订阅主题
        qos:1         //至少交付一次
      }).then((res:MqttResponse)=>{
        console.log('--->订阅成功'+JSON.stringify(res))
      }).catch((err:Error)=>{
        console.log('--->订阅失败'+JSON.stringify(err))
      })
      //接收服务器的消息代码
      this.mqttGetData()
    }catch (err){
      console.log('--->捕捉异常'+err)
    }
  }

//接收消息
  mqttGetData(): void{
    try {
      //接收消息代码
      this.mqtt.messageArrived((err:Error,data:MqttMessage)=>{
        if(err){
          console.log('--->接收消息失败'+JSON.stringify(err))
        }else {
          console.log('--->接收消息成功'+JSON.stringify(data))
          //在屏幕上展现接收到的数据
          this.message = data.payload
        }
      })
    }catch (err){
      console.log('--->捕捉异常'+err)
    }
  }
3.4 鸿蒙UI代码
build() {
Column({space:20}){
Row(){
Text('Mqtt通信').fontSize(25).fontWeight(800)
}.width('100%').height('10%').justifyContent(FlexAlign.Center)
Row(){
Text('接收到的消息:'+this.message).fontSize(22).fontWeight(900).fontColor(Color.Red)
}.width('100%').height('15%').justifyContent(FlexAlign.Center).alignItems(VerticalAlign.Center)
Row(){
TextInput({placeholder:'输入要发送的内容'}).width('80%').height(40)
.onChange((val:string)=>{
this.value = val
})
Button('发送').width('20%').height(40)
.onClick(()=>{
this.mqttSendData()
})
}.width('100%').height('15%')
}
.width('100%')
.height('100%')
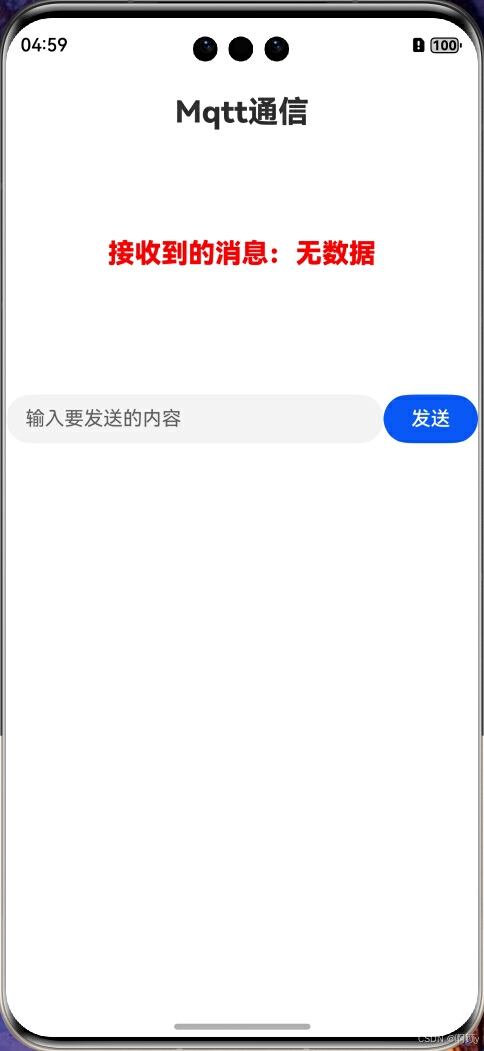
}3.5 使用模拟器运行
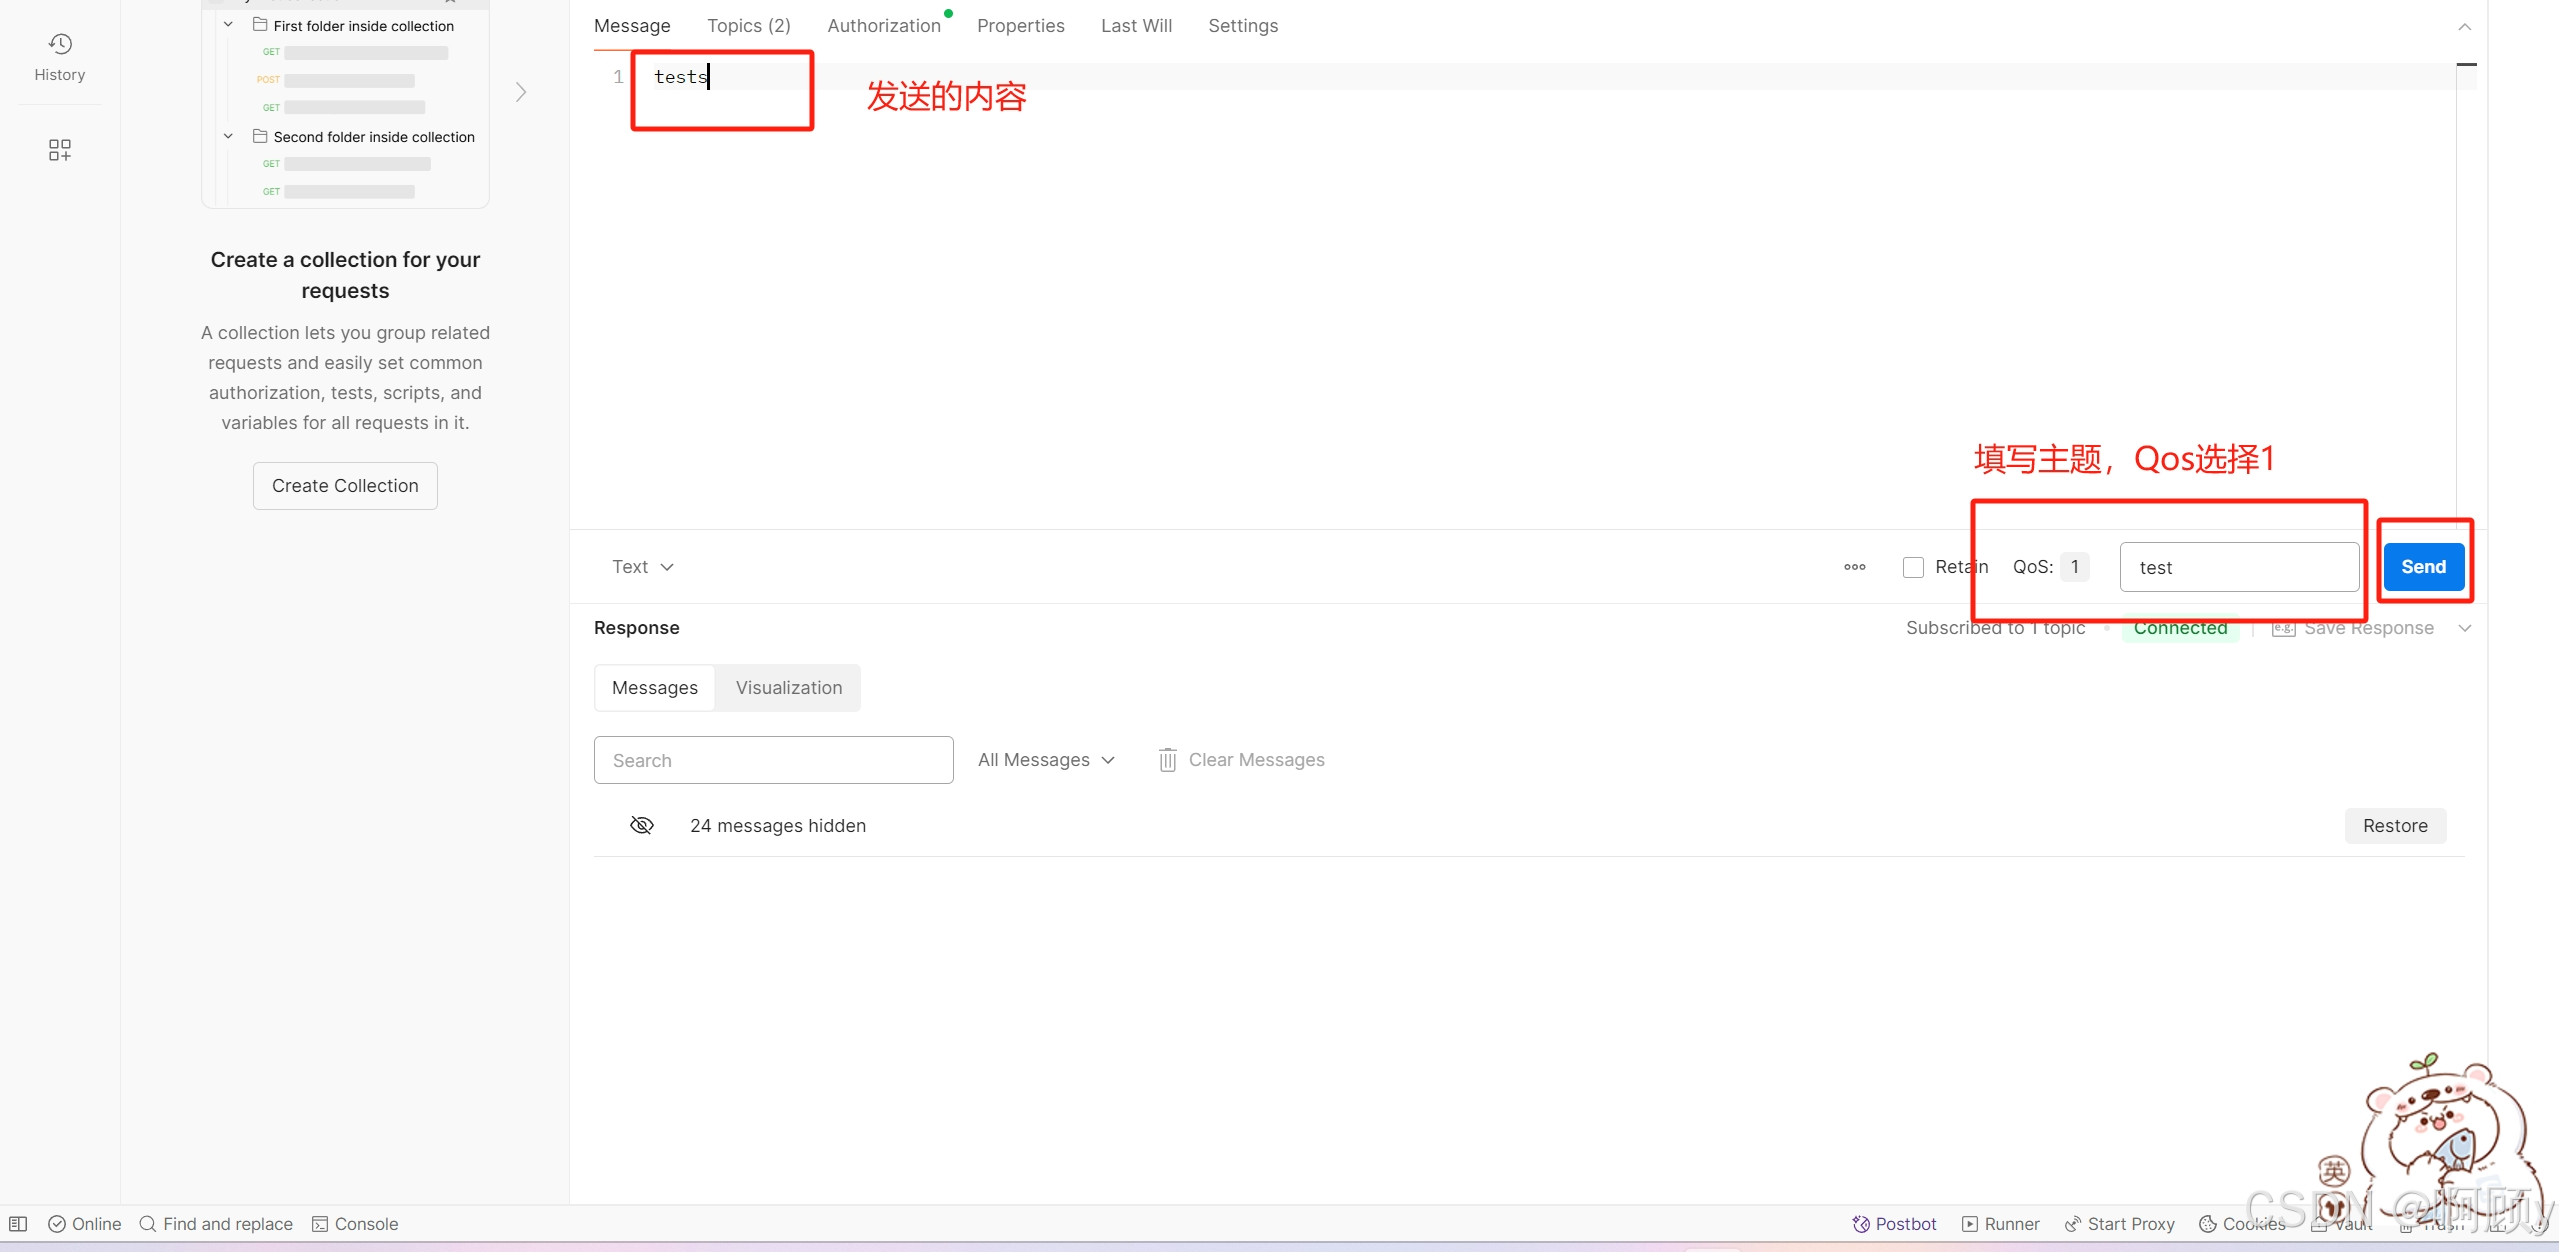
3.6 使用postman发送消息
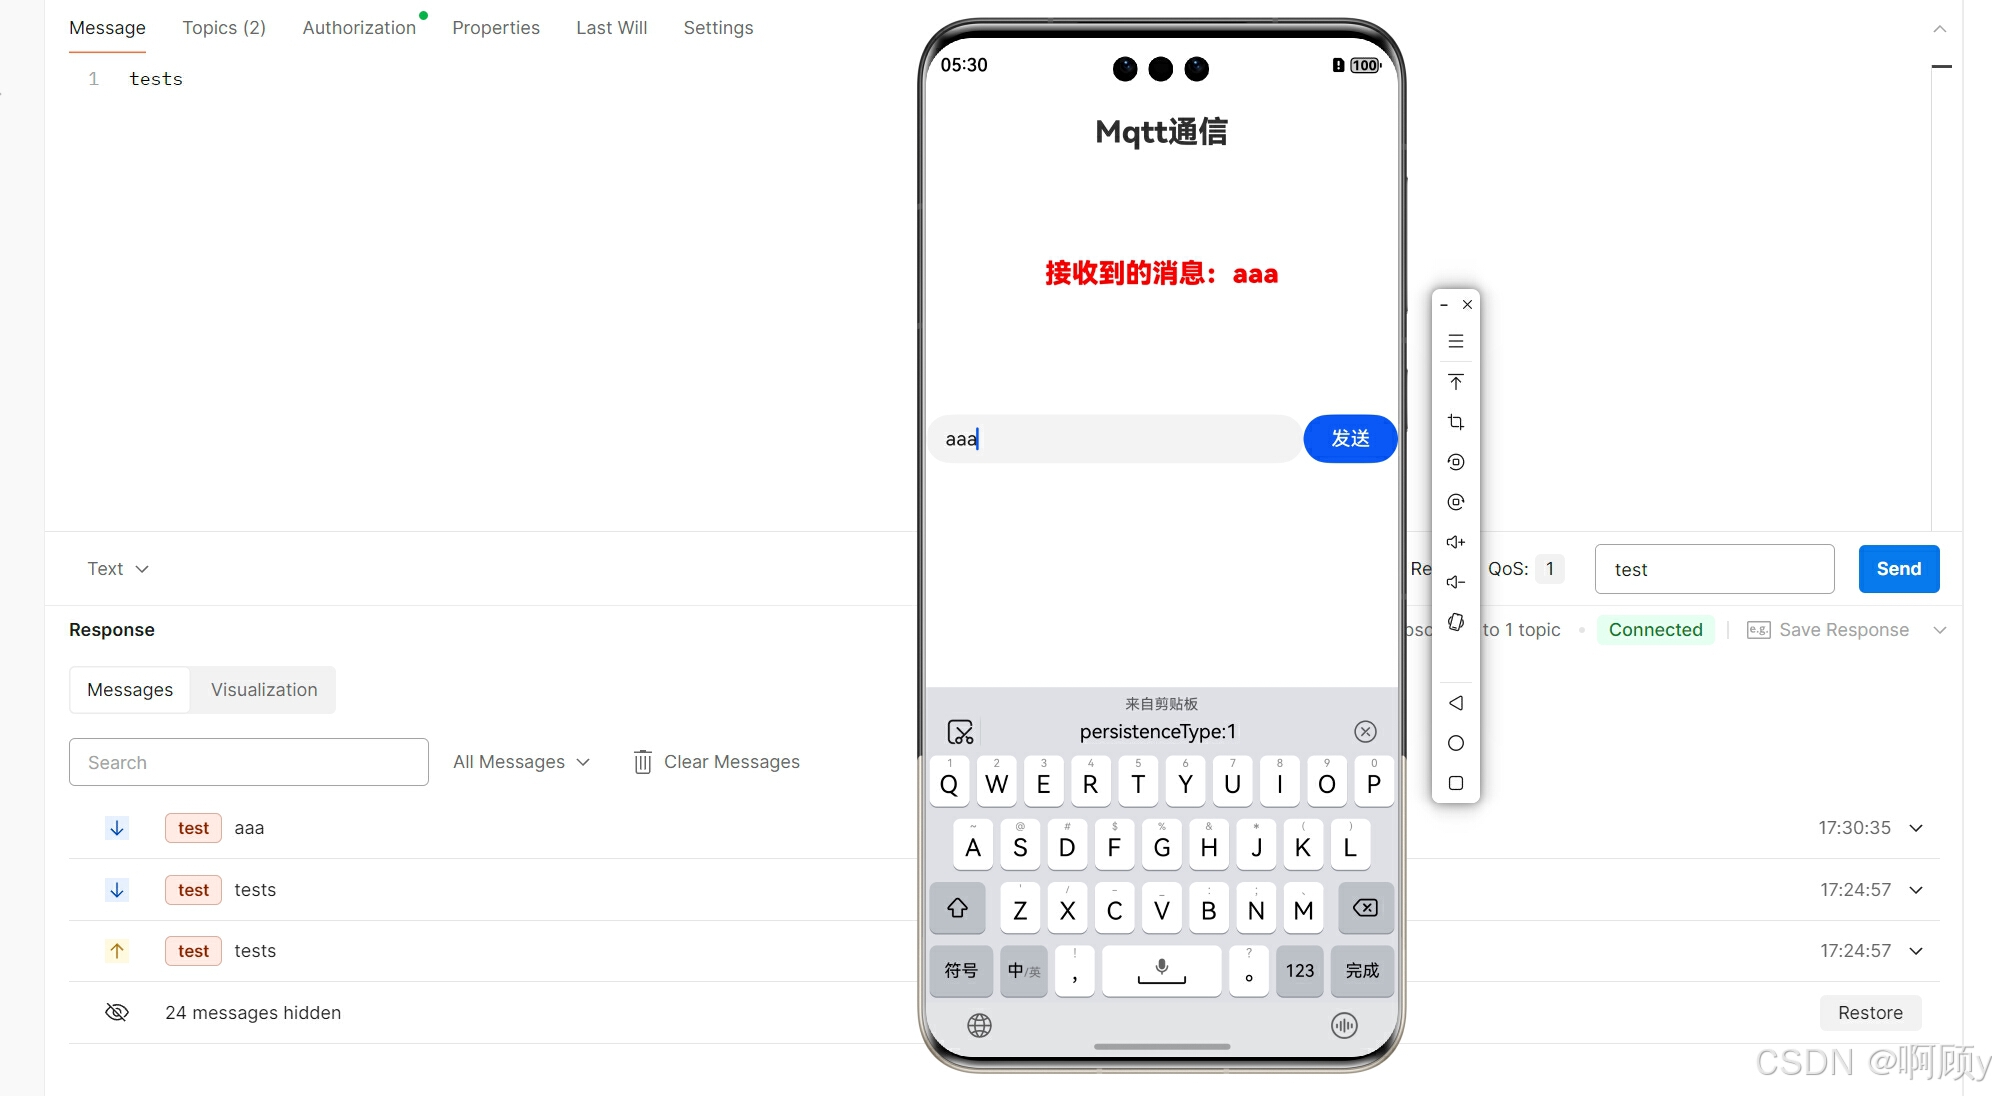
3.7 鸿蒙界面接收数据 
3.8 发送消息
总结
完整代码:
import { MqttAsync, MqttClient, MqttMessage, MqttResponse } from '@ohos/mqtt';

@Entry
@Component
struct Index {

//接收到的消息
  @State message: string = '无数据'

  //要发送的消息
  @State value: string = ''

  //服务器地址
  @State ip:string = ''

  //mqtt客户端
  mqtt:MqttClient = MqttAsync.createMqtt({
    url:this.ip, //填写服务器地址 `mqtt://${地址}:1883`
    clientId:'123', //唯一即可
    persistenceType:1
  })

async aboutToAppear(): Promise<void> {
    if(!this.mqtt){
      console.log('--->未初始化')
      return
    }
    await this.mqttConnect()
    await this.mqttSubscribe()
  }

//mqtt客户端
  private mqtt:MqttClient = MqttAsync.createMqtt({
    url:this.ip, //填写服务器地址 `mqtt://${地址}:1883`
    clientId:'1q1q11q' //唯一即可
    persistenceType:1 //需要配置为1,0为默认值会导致初始化失败
  })

//连接mqtt服务器
  async mqttConnect(): Promise<void>{
    try {
      //连接代码
      await this.mqtt.connect({
        userName:'admin', //用户名
        password:'123'    //密码
      }).then((res:MqttResponse)=>{
        console.log('--->连接成功'+JSON.stringify(res))
      }).catch((err:Error)=>{
        console.log('--->连接失败'+JSON.stringify(err))
      })
    }catch (err){
      console.log('--->捕捉异常'+err)
    }
  }

//订阅主题
  async mqttSubscribe(): Promise<void>{
    try {
      //订阅主题代码
      await this.mqtt.subscribe({
        topic:'test', //订阅主题
        qos:1         //至少交付一次
      }).then((res:MqttResponse)=>{
        console.log('--->订阅成功'+JSON.stringify(res))
      }).catch((err:Error)=>{
        console.log('--->订阅失败'+JSON.stringify(err))
      })
      //接收服务器的消息代码
      this.mqttGetData()
    }catch (err){
      console.log('--->捕捉异常'+err)
    }
  }

//接收消息
  mqttGetData(): void{
    try {
      //接收消息代码
      this.mqtt.messageArrived((err:Error,data:MqttMessage)=>{
        if(err){
          console.log('--->接收消息失败'+JSON.stringify(err))
        }else {
          console.log('--->接收消息成功'+JSON.stringify(data))
          //在屏幕上展现接收到的数据
          this.message = data.payload
        }
      })
    }catch (err){
      console.log('--->捕捉异常'+err)
    }
  }


 build() {
    Column({space:20}){
      Row(){
        Text('Mqtt通信').fontSize(25).fontWeight(800)
      }.width('100%').height('10%').justifyContent(FlexAlign.Center)
      Row(){
        Text('接收到的消息:'+this.message).fontSize(22).fontWeight(900).fontColor(Color.Red)
      }.width('100%').height('15%').justifyContent(FlexAlign.Center).alignItems(VerticalAlign.Center)
      Row(){
        TextInput({placeholder:'输入要发送的内容'}).width('80%').height(40)
          .onChange((val:string)=>{
            this.value = val
          })
        Button('发送').width('20%').height(40)
          .onClick(()=>{
            this.mqttSendData()
          })
      }.width('100%').height('15%')
    }
    .width('100%')
    .height('100%')
  }
}


 587
587

 被折叠的 条评论
为什么被折叠?
被折叠的 条评论
为什么被折叠?
 到【灌水乐园】发言


