


安装docker
cat /etc/redhat-release
#(系统要centOS7.5以上)
systemctl stop  firewalld
#关闭防火墙
setenforce 0
#强制关闭SELinux安全增强功能
vi /etc/selinux/config
#修改SELINUX=permissive


[root@localhost ~]# ping baidu.com
PING baidu.com (39.156.66.10) 56(84) bytes of data.
64 bytes from 39.156.66.10 (39.156.66.10): icmp_seq=1 ttl=128 time=81.0 ms
##配置网络实现能ping通百度


yum install -y wget
#安装wegt工具准备配置docker源
cd /etc/yum.repos.d/
#进到yum目录
wget https://download.docker.com/linux/centos/docker-ce.repo
#下cker仓库
yum makecache
#更新件包仓库缓存
yum install -y docker
安装docker

systemctl start docker
#启动docker
systemctl enable docker
#Docker容器服务设置为系统启动时自动启动
[root@localhost yum.repos.d]# docker -v
Docker version 1.13.1, build 7d71120/1.13.1
#显示出版本,表示docker安装成功
使用Docker容器运行一个web
docker pull nginx
#把nginx镜像拉到本地
[root@localhost yum.repos.d]# docker images
REPOSITORY          TAG                 IMAGE ID            CREATED             SIZE
docker.io/nginx     latest              f9c14fe76d50        2 days ago          143 MB
#查看所拉取的镜像

[root@localhost yum.repos.d]# docker run -d -p 800:80  --restart always --name nginx1  -h node1 docker.io/nginx
a3e800a3b5dc476a90377b92ea32d5518954100660508e359e6c7bd61911f029
#详细解释:docker run运行一个容器; 参数-d在后台运行; 参数-p 800:80端口映射,宿主机的800端口映射到容器的80端口; --name nginx1  容器的名字是nginx1;  -h node1 容器的主机名是node1; docker.io/nginx   所使用的镜像

[root@localhost yum.repos.d]# docker ps
CONTAINER ID        IMAGE               COMMAND                  CREATED             STATUS              PORTS                 NAMES
a3e800a3b5dc        docker.io/nginx     "/docker-entrypoin..."   2 minutes ago       Up 2 minutes        0.0.0.0:800->80/tcp   nginx1
#查看容器 -- docker ps -a 查看所有容器,包括停止运行的容器
访问本机的的地址加宿主机映射的端口进行测试:
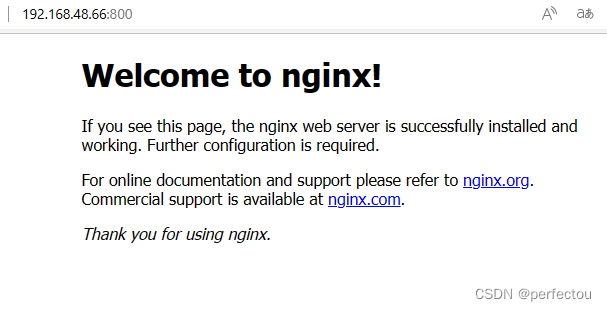
可以看见web运行成功!!
进行多开容器多个web试验:
[root@localhost yum.repos.d]# docker run -d -p 801:80  --restart always --name nginx2  -h node2 docker.io/nginx
65f825560807210e00a367da2e45420cbc79c32be0577a34ba67a19335ad8622
#在后台运行一个名为nginx2的容器;容器的主机名是node2;将宿主机的801端口映射到容器的80端口;

[root@localhost yum.repos.d]# docker run -d -p 802:80  --restart always --name nginx3  -h node3 docker.io/nginx
574cdd830b4c3e774809be949878a769317e006361f8735e250ae6625462f961
#在后台运行一个名为nginx3的容器;容器的主机名是node3;将宿主机的802端口映射到容器的80端口;

[root@localhost yum.repos.d]# docker exec -it nginx1 /bin/bash
#进入到容器nginx1
root@node1:/# cd /usr/share/nginx/html/
#进到网站的跟目录
root@node1:/usr/share/nginx/html# echo "node1:800:nginx1:I am web container number one" > index.html
#修改web页面内容
root@node1:/usr/share/nginx/html# exit
exit
#退出容器nginx1

[root@localhost yum.repos.d]# docker exec -it nginx2 /bin/bash
root@node2:/# cd /usr/share/nginx/html/
root@node2:/usr/share/nginx/html# echo "node2:801:nginx2:I am web container number two" > index.html
root@node2:/usr/share/nginx/html# exit
exit


[root@localhost yum.repos.d]# docker exec -it nginx3 /bin/bash
root@node3:/# cd /usr/share/nginx/html/
root@node3:/usr/share/nginx/html# echo "node2:802:nginx3:This is web container number three" > index.html
root@node3:/usr/share/nginx/html# exit
exit
进行验证
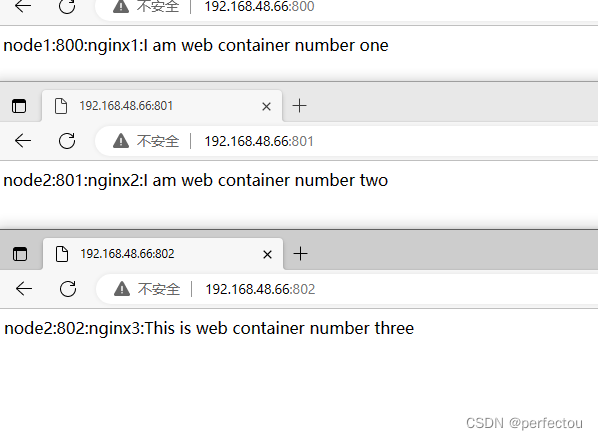
可以看见成功运行了多个web!!
使用docker容器运行数据库
docker pull mariadb
#先把mariadb镜像拉下来

[root@localhost yum.repos.d]# docker images
REPOSITORY          TAG                 IMAGE ID            CREATED             SIZE
docker.io/nginx     latest              f9c14fe76d50        2 days ago          143 MB
docker.io/mariadb   latest              4af0c16be4b1        2 weeks ago         403 MB
#查看镜像

[root@localhost yum.repos.d]# docker run -d -p 3306:3306  -e MYSQL_ROOT_PASSWORD=123456 --restart always --name mariadb   docker.io/mariadb
3b79d1d7a5344172e32208198b1bfe0d0c5f5ab221068901255b68e36bf79026
#参数-e MYSQL_ROOT_PASSWORD=123456  设置环境变量,数据库密码设置123456

root@localhost ~]# docker ps -a
CONTAINER ID   IMAGE     COMMAND                  CREATED        STATUS        PORTS                                       NAMES
11ceb612e969   mariadb   "docker-entrypoint.s…"   38 hours ago   Up 38 hours   0.0.0.0:3306->3306/tcp, :::3306->3306/tcp   mariadb

yum install -y mysql
#数据库软件包工具

[root@localhost yum.repos.d]# mysql -h 192.168.48.66 -uroot -p123456
Welcome to the MariaDB monitor.  Commands end with ; or \g.
Your MariaDB connection id is 4
Server version: 10.11.3-MariaDB-1:10.11.3+maria~ubu2204 mariadb.org binary distribution

Copyright (c) 2000, 2018, Oracle, MariaDB Corporation Ab and others.

Type 'help;' or '\h' for help. Type '\c' to clear the current input statement.

MariaDB [(none)]>

#进入数据库
配置命令
配置docker源
cd /etc/yum.repos.d/
wget https://download.docker.com/linux/centos/docker-ce.repo   下载docker 仓库
yum makecache

安装docker
yum install docker-ce docker-ce-cli containerd.io
---(`yum install docker-ce docker-ce-cli containerd.io` 命令是安装 Docker 的完整组件,包括 Docker CE、Docker CE CLI 和 Containerd.io,这些组件提供了 Docker 的核心功能和运行环境。它们与 `yum install -y docker` 安装的 Docker 包是不同的。

`yum install -y docker` 命令安装的是 Docker 的基本功能,包括 Docker 客户端和守护进程。这样安装可能会导致缺少某些 Docker 的高级功能,例如运行多个容器、构建自定义镜像等。

因此,如果您需要 Docker 的完整功能,可以使用 `yum install docker-ce docker-ce-cli containerd.io` 命令进行安装;如果只需要基本功能,可以使用 `yum install -y docker` 进行安装。)


启动docker
systemctl start docker
systemctl enable docker
能显示出版本,表示docker安装成功
docker -v

docker search nginx  搜索nginx镜像,默认搜索最新版本
docker pull nginx   拉取镜像到本地
docker images nginx   查看所拉取的镜像
docker tag docker.io/nginx:latest docker.io/nginx:3.0  给镜像添加新标签
docker rmi docker.io/nginx:3.0  删除镜像

docker pull nginx 先把nginx镜像拉下来
docker run -d -p 800:80  --restart always --name nginx1  -h node1 docker.io/nginx                                           启动nginx容器
详细解释如下:
docker run运行一个容器
参数-d在后台运行
参数-p 800:80端口映射,宿主机的800端口映射到容器的80端口
--name nginx1  容器的名字是nginx1
-h node1 容器的主机名是node1
docker.io/nginx   所使用的镜像

docker pull mariadb 先把mariadb镜像拉下来
docker run -d -p 3306:3306  -e MYSQL_ROOT_PASSWORD=123456 --restart always --name mariadb   docker.io/mariadb    启动数据库容器
详细解释如下:
docker run运行一个容器
参数-d在后台运行
参数-p 3306:3306端口映射,宿主机的3306端口映射到容器的3306端口
参数-e MYSQL_ROOT_PASSWORD=123456  设置环境变量,数据库密码设置123456
--name mariadb  容器的名字是mariadb
  docker.io/mariadb   所使用的镜像

yum安装数据库的登录方式
mysql -uroot -p密码
docker运行数据库的登录方式(前提是,虚拟机安装了数据库软件包,可以使用mysql命令)
mysql -uroot -p密码 -h虚拟机ip


docker run -it -p 800:80  --restart always --name nginx1  -h node1 docker.io/nginx     在前端启动一个容器,注意与-d后端启动容器的区别。
docker run
-i    交互式一般与-t 连用     -it
-t   开启一个终端 一般与-i连用 -it
-d  后台运行(一般不与it同时用)
/bin/bash  提供一个shell脚本


 docker exec -it nginx1 /bin/bash
进入容器
解释如下四行:
docker exec 进入容器的固定命令
-it   交互式进入
nginx1  进入容器的名字
/bin/bash 提供一个shell脚本


docker ps
查看容器
docker stop 容器名或容器id
停止容器运行
docker ps -a
查看所有容器,包括停止运行的容器
docker rm 容器名或容器id
删除容器
docker rm -f 容器名或容器id
强制删除容器(容器不关闭也可以直接删掉)
docker inspect  容器名或容器id
查看容器配置(比如查看容器ip)
docker exec -it 容器名或容器id  /bin/bash
进入容器

docker基本命令
docker exec -it nginx /bin/bash  进入容器
cd /usr/share/nginx/html/    进入nginx首页文件目录(在容器中操作)
cat index.html
echo "hello" >index.html
exit 退出容器
浏览器http://ip:所映射的端口/
可以在网页上查看到自己输入的hello
docker stop nginx
停止容器
docker rm nginx
删除容器
docker rmi docker.io/nginx:latest
删除镜像
docker logs (容器名字)
查看日志


 1万+
1万+

 被折叠的 条评论
为什么被折叠?
被折叠的 条评论
为什么被折叠?
 到【灌水乐园】发言


