


1.分页功能
参考:
C#中datatable数据切割取部分数据_c# datatable 截取-优快云博客
WPF的DataGrid用法 - Stay627 - 博客园 (cnblogs.com)
xaml:

<StackPanel Orientation="Horizontal" Grid.Row="1" HorizontalAlignment="Right">
    <TextBlock Text="共" Margin="7"/>
    <TextBox Height="18" Name="totalCount" Text="" />
    <TextBlock Text="条记录:" Margin="7"/>

    <Button Margin="5" Name="btnUp"  VerticalAlignment="Center" Width="20" Height="20" BorderThickness="0" Background="Transparent" Click="btnUp_Click">
        <Image Source="pack://application:,,,/BLIU;Component/img/2-shangyiye.png" Width="18" Height="18"></Image>
    </Button>
    <Button Margin="5" Name="btnNext" VerticalAlignment="Center" Width="20" Height="20" BorderThickness="0" Background="Transparent" Click="btnNext_Click">
        <Image Source="pack://application:,,,/BLIU;Component/img/2-xiayiye.png" Width="18" Height="18"></Image>
    </Button>
    <TextBlock Height="20">
         <TextBlock Text="【共" />
         <TextBlock Name="tbkTotal" Foreground="Red" />
         <TextBlock Text="页】" />
         <TextBlock Text="【当前" />
         <TextBlock Name="tbkCurrentsize" Foreground="Red" />
         <TextBlock Text="页】" />
    </TextBlock>
</StackPanel>

cs:
 private void btnUp_Click(object sender, RoutedEventArgs e)
 {
     int currentpage = Convert.ToInt32(tbkCurrentsize.Text);
     if (currentpage == 1)
     {
         MessageBox.Show("已是第一页!");
     }
     else
     {
         int currentH = (currentpage-1) * pageCount-pageCount;
         //利用linq语句读取dt,存进dt
         //.Skip(currentH).Take(pageCount)表示从索引currentH开始读取pageCount行数据
         //获取第一环节前18条题目,放入dt3里
         var query1 = dt2.Copy().AsEnumerable().Skip(currentH).Take(pageCount);
         DataTable dt3 = new DataTable();
         dt3 = query1.CopyToDataTable<DataRow>();
         datagrid2.ItemsSource = dt3.DefaultView;
         this.tbkCurrentsize.Text = (currentpage -1).ToString();
     }

 }

 private void btnNext_Click(object sender, RoutedEventArgs e)
 {
     int currentpage = Convert.ToInt32(tbkCurrentsize.Text);
     int tbktotal = Convert.ToInt32(tbkTotal.Text);
     if (currentpage == tbktotal)
     {
         MessageBox.Show("已是最后一页!");
     }
     else
     {
         int currentH = currentpage * pageCount;
         //获取第一环节前18条题目,放入dt3里
         if (dt2.Rows.Count - currentH < pageCount)
         {
             var query1 = dt2.Copy().AsEnumerable().Skip(currentH).Take(dt2.Rows.Count-currentH);
             DataTable dt3 = new DataTable();
             dt3 = query1.CopyToDataTable<DataRow>();
             datagrid2.ItemsSource = dt3.DefaultView;
             this.tbkCurrentsize.Text = (currentpage + 1).ToString();
         }
         else
         {
             var query1 = dt2.Copy().AsEnumerable().Skip(currentH).Take(pageCount);
             DataTable dt3 = new DataTable();
             dt3 = query1.CopyToDataTable<DataRow>();
             datagrid2.ItemsSource = dt3.DefaultView;
             this.tbkCurrentsize.Text = (currentpage + 1).ToString();
         }

     }
 }
2. 建一个dll(类库)文件,存图像并引用
添加一个新项目newProject,右击newProject项目名-属性,在应用程序里修改程序集输出类型为“类库”,保存。
右击App.XML-属性,生成操作改为Page,
可以在该项目里新建一个文件夹用来存储图片。
最后生成。
在主项目里添加引用,选择你生成的dll文件即可。
在主项目XAML里引用图片写法:
BLIU为你的类库名,img/2-xiayiye.png为你图片在类库里的路径
<Image Source="pack://application:,,,/BLIU;Component/img/2-xiayiye.png" Width="18" Height="18"></Image>
3.wpf - 如何使用 WPF 打开颜色和字体对话框?
参考:
wpf - 如何使用 WPF 打开颜色和字体对话框? - IT工具网 (coder.work)
引用 System.Windows.Forms
//字体对话框
FontDialog fd = new FontDialog();
var result = fd.ShowDialog();
if (result == System.Windows.Forms.DialogResult.OK)
{
    Debug.WriteLine(fd.Font);

    tbFonttest.FontFamily = new FontFamily(fd.Font.Name);
    tbFonttest.FontSize = fd.Font.Size * 96.0 / 72.0;
    tbFonttest.FontWeight = fd.Font.Bold ? FontWeights.Bold : FontWeights.Regular;
    tbFonttest.FontStyle = fd.Font.Italic ? FontStyles.Italic : FontStyles.Normal;

    TextDecorationCollection tdc = new TextDecorationCollection();
    if (fd.Font.Underline) tdc.Add(TextDecorations.Underline);
    if (fd.Font.Strikeout) tdc.Add(TextDecorations.Strikethrough);
    tbFonttest.TextDecorations = tdc;

    //实例
   zitititextbox.Text = fd.Font.Name.ToString();
   zititisize.Text = fd.Font.Size.ToString();
}

//颜色对话框
ColorDialog cd = new ColorDialog();
var result = cd.ShowDialog();
if (result == System.Windows.Forms.DialogResult.OK)
{
    tbFonttest.Foreground = new SolidColorBrush(Color.FromArgb(cd.Color.A, cd.Color.R,
   cd.Color.G, cd.Color.B));

   //实例
 yansetitextbox.Text = Color.FromArgb(cd.Color.A, cd.Color.R, cd.Color.G, cd.Color.B).ToString();
}
4.控件中文字自动换行
参考:
WPF控件TextBlock中文字自动换行_wpf textblock自动换行居中-优快云博客
1.使用转义字符
在XAML文件中,实现方式如下:
<TextBlock x:Name="textBlock" Text="Jack 
Tom" Height="150" HorizontalAlignment="Center" VerticalAlignment="Top" Width="250">
</TextBlock>
在.cs文件中代码实现如下:
this.textBlock.Text = Jack\nTom;
注:以下这种方式不能得到正确的结果
<TextBlock x:Name="textBlock" Height="150" HorizontalAlignment="Center" VerticalAlignment="Top" Width="250">Jack
Tom </TextBlock>
2.使用属性设置
只需简单的设置TextBlock的TextWrapping = "Wrap"即可,当文字的长度超过最大宽度后,文字自动换行,代码如下:
<TextBlock x:Name="textBlock" Height="150" HorizontalAlignment="Center" VerticalAlignment="Top" Width="250" Textwrapping = "Wrap">Jack|Tom </TextBlock>
注:我用前两种报错,用第三种是可以的
3.使用InLines属性的LineBreak来换行(不常用)
具体代码如下:
<TextBlock x:Name="textBlock" Height="150" HorizontalAlignment="Center" VerticalAlignment="Top" Width="250">
<Run>Jack</Run>
<LineBreak/>
<Run>Tom</Run>
</TextBlock>
5.阴影边框
原文:
wpf border的阴影效果_wpf border 阴影-优快云博客
//border阴影
 <Border SnapsToDevicePixels="True" CornerRadius="5"
        BorderBrush="#d24726" BorderThickness="10" Margin="20"
        HorizontalAlignment="Center" VerticalAlignment="Center">
            <Border.Effect>
                <DropShadowEffect Color="#d24726" BlurRadius="16" ShadowDepth="0" Opacity="1" />
            </Border.Effect>
            <Image Width="200" Source="d:/1.jpg" Stretch="Uniform" />
        </Border>

//文本框阴影
<TextBox Text="Enter text">
    <TextBox.Effect>
        <DropShadowEffect BlurRadius="3" ShadowDepth="1" Direction="45" Opacity="0.5" Color="Gray"/>
    </TextBox.Effect>
</TextBox>

//按钮阴影

<Button Content="Click me">
    <Button.Effect>
        <DropShadowEffect BlurRadius="5" ShadowDepth="2" Direction="270" Opacity="0.7" Color="Black"/>
    </Button.Effect>
</Button>

//图像阴影
<Image Source="image.png">
    <Image.Effect>
        <DropShadowEffect BlurRadius="8" ShadowDepth="4" Direction="135" Opacity="0.8" Color="DarkBlue"/>
    </Image.Effect>
</Image>

//窗体阴影
<Style x:Key="window_Shadow" TargetType="{x:Type Window}">
            <!--对象中心点用来定义所有RenderTransform变换中相对位置的的参考点,默认为图形的左上即(0,0),
                该属性值为相对值,介于 0 和 1 之间的值被解释为每对 x,y 轴中的当前元素的范围的因素-->
            <!--<Setter Property="RenderTransformOrigin" Value="0.5,0.5"/>-->
            <Setter Property="Template">
                <Setter.Value>
                    <ControlTemplate TargetType="{x:Type Window}">
                        <Grid Margin="10">
                            <!--x:Static 引用中定义的任何静态的值的代码实体公共语言规范 (CLS)– 合规的方式。 引用的静态属性可以用于提供在 XAML 中属性的值
                              SystemColors 定义的所需的静态成员的类型的名称。
                              WindowBrushKey 使用WindowBrushKey创建对用于绘制窗口的客户端区域背景的画笔的动态引用。 如果更改画笔,将自动更新此动态引用。 若要创建的静态引用,不会自动更新,请使用WindowBrush。-->
                            <Rectangle Name="rt" Fill="{DynamicResource {x:Static SystemColors.WindowBrushKey}}">
                                <Rectangle.Effect>
                                    <!--DropShadowEffect是WPF中一个阴影效果的类
                                        BlurRadius模糊半径属性,获取或设置阴影边缘的定义(阴影有多模糊)
                                        ShadowDepth属性设置投影距纹理下方的距离-->
                                    <DropShadowEffect BlurRadius="12" ShadowDepth="0"/>
                                </Rectangle.Effect>
                            </Rectangle>
                            <!--SnapsToDevicePixels获取或设置一个值,该值确定在呈现过程中,此元素的呈现是否应使用特定于设备的像素设置。 这是依赖项属性。-->
                            <Border Background="{TemplateBinding Background}"
                                    BorderBrush="{TemplateBinding BorderBrush}"
                                    BorderThickness="{TemplateBinding BorderThickness}"
                                    Padding="{TemplateBinding Margin}"
                                    SnapsToDevicePixels="{TemplateBinding SnapsToDevicePixels}"
                                    CornerRadius="5">
                                <ContentPresenter />
                            </Border>
                        </Grid>
                    </ControlTemplate>
                </Setter.Value>
            </Setter>
        </Style>

<Window x:Class="WPF001.Window1"
        xmlns="http://schemas.microsoft.com/winfx/2006/xaml/presentation"
        xmlns:x="http://schemas.microsoft.com/winfx/2006/xaml"
        xmlns:d="http://schemas.microsoft.com/expression/blend/2008"
        xmlns:mc="http://schemas.openxmlformats.org/markup-compatibility/2006"
        xmlns:local="clr-namespace:WPF001"
        mc:Ignorable="d"
        Title="Window1" Height="450" Width="800" WindowStyle="None" Background="Transparent" AllowsTransparency="True" Style="{StaticResource window_Shadow}">
    <Grid>

    </Grid>
</Window>
6.画线
原文:
《15天玩转WPF》—— 直线、矩形、椭圆的各种画法_wpf 在image上绘制矩形-优快云博客
//直线
<Line X1="10" Y1="20" X2="260" Y2="20" Stroke="Red" StrokeThickness="10"/>
7.DataGrid
参考:
WPF的DataGrid用法 - Stay627 - 博客园 (cnblogs.com) 很详细,很有用
xaml:

  <Border CornerRadius="8" Background="#FFFFFF" BorderThickness="2" BorderBrush="#FFEFEFEF" Width="330" Height="655" Margin="20,15,1070,20">
     <!--datagrid-->
        <DataGrid x:Name="datagrid1" HeadersVisibility="None"  RowHeight="39" IsReadOnly="True" Margin="5" Background="#FFFFFF" AutoGenerateColumns="False" BorderThickness="0" CanUserAddRows="False"  GridLinesVisibility="Horizontal" HorizontalGridLinesBrush="#FFEFEFEF">
           <DataGrid.Columns>
               <DataGridTextColumn  Binding="{Binding 环节,Mode=TwoWay}" Width="150">
                   <DataGridTextColumn.ElementStyle>
                       <Style TargetType="TextBlock">
                            <Setter Property="FontSize" Value="14"/>
                                <Setter Property="TextAlignment" Value="Left"/>
                                <Setter Property="Foreground" Value="#FF535353"/>
                                <Setter Property="Margin" Value="0,8,0,0"/>
                             </Style>
                        </DataGridTextColumn.ElementStyle>
                    </DataGridTextColumn>
               <DataGridTextColumn  Binding="{Binding 出题类型,Mode=TwoWay}" Width="105">
                    <DataGridTextColumn.ElementStyle>
                         <Style TargetType="TextBlock">
                             <Setter Property="FontSize" Value="14"/>
                             <Setter Property="TextAlignment" Value="Right"/>
                             <Setter Property="Foreground" Value="#FF535353"/>
                             <Setter Property="FontWeight" Value="Bold"/>
                             <Setter Property="Margin" Value="0,8,20,0"/>
                          </Style>
                    </DataGridTextColumn.ElementStyle>
                </DataGridTextColumn>
                    <DataGridTemplateColumn Header="操作" Width="50">
                        <DataGridTemplateColumn.CellTemplate>
                           <DataTemplate>
                             <WrapPanel>
           //此处button的IsEnabled绑定的是列是ischeck,值是true或者false,决定button是否可用
                              <Button Background="Transparent"  Width="18" Height="18" Margin="0,5,0,0" BorderThickness="1" IsEnabled="{Binding ischeck,Mode=TwoWay}" Click="HuanJieEdit">
                //此处绑定的是列是imgSource
                                 <Image Source="{Binding imgSource,Mode=TwoWay}"></Image>
                              </Button>
//此处button的IsEnabled绑定的是列是ischeck,值是true或者false,双向绑定,且UpdateSourceTrigger=PropertyChanged可以更改绑定源的值,Tag="{Binding 环节}"是让tag绑定一个可以识别该列的值,方便后台对该列操作
                              <CheckBox Click="CheckBox_Click" IsChecked="{Binding ischeck,Mode=TwoWay,UpdateSourceTrigger=PropertyChanged}" Tag="{Binding 环节}" Width="20" Height="20" BorderThickness="1" Margin="7,9,0,0"></CheckBox>
                                   </WrapPanel>
                               </DataTemplate>
                           </DataGridTemplateColumn.CellTemplate>
                       </DataGridTemplateColumn>
                   </DataGrid.Columns>
               </DataGrid>
           </Border>

cs:
初始化:
 //定义一个全局dt1,
/
 DataColumn dc2 = dt1.Columns.Add("imgSource", Type.GetType("System.String"));
 for (int i = 0; i < dt1.Rows.Count; i++)
{
     if (dt1.Rows[i]["ischeck"].ToString() == "True")
     {
         dt1.Rows[i]["imgSource"] = "图片路径1";
     }
     else
     {
         dt1.Rows[i]["imgSource"] = "图片路径2";
     }

 }
 datagrid1.ItemsSource = dt1.DefaultView;


ckeckbox点击事件:
 private void CheckBox_Click(object sender, RoutedEventArgs e)
 {
     CheckBox cb = (CheckBox)sender;
     for(int i = 0; i < dt1.Rows.Count; i++)
     {
         if (dt1.Rows[i]["某一列"].ToString()== cb.Tag.ToString())
         {
             if (cb.IsChecked == true)
             {
                 dt1.Rows[i]["imgSource"] = "图片路径1";
             }
             else
             {
                 dt1.Rows[i]["imgSource"] = "图片路径2";
             }

         }
     }
选中一行,点击按钮,在后台点击事件里获取该行
 var seleceItem = datagrid2.SelectedItem as DataRowView;
 int  a= Convert.ToInt32(seleceItem["列名"]);
 int  b =Convert.ToInt32(seleceItem["列名1"]);

//获取选择的索引
int index = pwDataGrid.SelectedIndex;
获取某一单元格的值
 private void Add(object sender, RoutedEventArgs e)
 {
     int addScore = Convert.ToInt32(this.textbox.Text);
     for (int i = 0; i < this.datagrid.Items.Count; i++)
     {
         var cntr = datagrid.ItemContainerGenerator.ContainerFromIndex(i);
         DataGridRow ObjROw = (DataGridRow)cntr;
         if (ObjROw != null)
         {
             FrameworkElement objElement = datagrid.Columns[0].GetCellContent(ObjROw);
            //获取第0个单元格的值
             DependencyObject wp = VisualTreeHelper.GetChild(objElement, 0);
             if (objElement != null)
             {
                 System.Windows.Controls.CheckBox objChk = (System.Windows.Controls.CheckBox)wp;
                 if (objChk.IsChecked == true)
                 {
                     int text = Convert.ToInt32((datagrid.Columns[1].GetCellContent(datagrid.Items[i]) as TextBlock).Text.Substring(0, 1));
                     int score = Convert.ToInt32((datagrid.Columns[2].GetCellContent(datagrid.Items[i]) as TextBlock).Text);
                     int sumScore = score + addScore;

                     (datagrid.Columns[2].GetCellContent(datagrid.Items[i]) as TextBlock).Text = sumScore.ToString();
                     objChk.IsChecked = false;
                 }
             }
         }
     }
 }
全选,反全选
private void CheckBox_Checked(object sender, RoutedEventArgs e)
{
    for (int i = 0; i < this.datagrid.Items.Count; i++)
    {
        var cntr = datagrid.ItemContainerGenerator.ContainerFromIndex(i);
        DataGridRow ObjROw = (DataGridRow)cntr;
        if (ObjROw != null)
        {
            FrameworkElement objElement = datagrid.Columns[0].GetCellContent(ObjROw);
            DependencyObject wp = VisualTreeHelper.GetChild(objElement, 0);
            if (objElement != null)
            {
                System.Windows.Controls.CheckBox objChk = (System.Windows.Controls.CheckBox)wp;
                if (objChk.IsChecked == false)
                {
                    objChk.IsChecked = true;
                }
                else
                {
                    objChk.IsChecked = false;
                }
            }
        }
    }
}
双击一行事件
参考:
wpf datagrid 行双击事件 - common\ - 博客园 (cnblogs.com)
xaml:
加入:MouseDoubleClick="datagrid_MouseDoubleClick"

<DataGrid
SelectionMode="Single"
VerticalScrollBarVisibility="Auto"
MouseDoubleClick="datagrid_MouseDoubleClick"
CanUserAddRows="True"/>

cs:
cs代码:

private void datagrid_MouseDoubleClick(object sender, MouseButtonEventArgs e)
{
  DataGrid datagrid = sender as DataGrid;
  Point aP = e.GetPosition(datagrid);
  IInputElement obj = datagrid.InputHitTest(aP);
  DependencyObject target = obj as DependencyObject;

  while (target != null)
  {
    if (target is DataGridRow)
    {
      break;
    }
    target = VisualTreeHelper.GetParent(target);
  }
//获取被点击的一行数据
 DataRowView row = datagrid.SelectedItem as DataRowView;
 EditWindow editWindow = new EditWindow(row["ID"].ToString());
 editWindow.ShowDialog();
}
DataGrid根据行号、列号获取或者某一单元格的值的几种方法。
原文链接:https://blog.youkuaiyun.com/qq_43307934/article/details/88915100
1、根据行、列得到单元格的数值:
string value=(DataGridName.Columns[M].GetCellContent(DataGridName.Items[N]) as TextBlock).Text

其中,DataGridName是前台DataGrid的名字,M,N分别代表所在的列和行号。value中是单元格中的值。

2、根据行、列设置单元格的数值:
(DataGridName.Columns[M].GetCellContent(DataGridName.Items[N]) as TextBlock).Text = "这里写值";
其中,DataGridName是前台DataGrid的名字,M,N分别代表所在的列和行号。给单元格中的值要先转为字符型。

3、以上是在知道数据所在行列号的情况下,如果要获得当前鼠标点击选中的行号:
 int rownum = this.DataGridName.SelectedIndex;
正常情况下从1开始,如果没有选中的数据,为-1;结合前面两个方法可以读取到行中的单元格值。

同时SelectedIndex也是可以设置的,也就是可以通过给其赋值来控制当前选中哪一行。

4、获得当前选中行的单元格的值,网上查询到最多的一种方法是:
DataRowView mySelectedElement = (DataRowView)dataGrid1.SelectedItem;
string result = mySelectedElement.Row[0].ToString();
这种写法,编辑没问题,但运行进会报错,无法将选中项转化为DataRowView。


5、获得当前选中行的单元格的值,正确简单的做法是将其转化为控件所绑定集合所属的类。
比如 DataGrid绑定了一个名为ClassName的list集合。

那么获取它的当前选中行值如下:

 ClassName sevalue = XAML_DataGrid.SelectedItem as ClassName;
XAML_DataGrid为控件的名字。

这里sevalue就可以像类的一个实例一样使用了,也就是通过 .(点)的形式获得字段的值。

6、如果选中的行有多行,可以通过如下方法获得选中的行号。
参考网友给出的方法 https://blog.youkuaiyun.com/weixin_41029722/article/details/90897858


7、DataGrid的变动事件会引发TabControl的SelectionChanged事件的问题。

private void TabControl_SelectionChanged(object sender, SelectionChangedEventArgs e)
{
    if (e.Source is TabControl)
    {
      //do work when tab is changed
    }
}
前面添加序列号
WPF下给DataGrid自动增加序列号_wpf datagrid显示序号-优快云博客
取消列点击排序功能
两种方法:
1.  AllowSorting=false
2.  CanUserSortColumns=“False”
8.打开文件夹
using Microsoft.Win32;

图片:
 Microsoft.Win32.OpenFileDialog openFileDialog = new Microsoft.Win32.OpenFileDialog();
 //openFileDialog.InitialDirectory = "..\\..\\resources";
 openFileDialog.Filter = "Image files (*.png;*.jpg)|*.png;*.jpg";
 if (openFileDialog.ShowDialog()==true)
 {
     grid.Background = new ImageBrush
     {
         ImageSource = new BitmapImage(new Uri(openFileDialog.FileName, UriKind.RelativeOrAbsolute)),
         Stretch = Stretch.Fill,
     };
 }

//或者
 OpenFileDialog ofd = new OpenFileDialog()
 {
     Filter = "图像文件|*.png|所有文件|*.*"
 };
或者
openFileDialog.Filter = "Image files (*.png;*.jpg)|*.png;*.jpg|所有文件(*.*)|*.*";
9.控件拖动
参考:C# wpf 实现Grid内控件拖动_利用wpf实现鼠标改变矩形位置和大小-优快云博客
xaml:
在控件(Border)里:
PreviewMouseDown="Canvas_PreviewMouseDown" PreviewMouseMove="Canvas_PreviewMouseMove" PreviewMouseUp="Canvas_PreviewMouseUp"

cs:
        //定义3个变量记录信息
        //鼠标是否按下
        bool _isMouseDown = false;
        //鼠标按下的位置
        Point _mouseDownPosition;
        //鼠标按下控件的Margin
        Thickness _mouseDownMargin;

 #region 控件移动

 //记录鼠标按下位置
 void Canvas_PreviewMouseDown(object sender,System.Windows.Input.MouseButtonEventArgs e)
 {
    //因为我要拖动的控件是Border,根据你的控件改
     var c = sender as Border;
     _isMouseDown = true;
     _mouseDownPosition = e.GetPosition(this);
     _mouseDownMargin = c.Margin;
     c.CaptureMouse();
 }

 //鼠标移动触发拖动
 void Canvas_PreviewMouseMove(object sender, System.Windows.Input.MouseEventArgs e)
 {
     if (_isMouseDown)
     {
         var c = sender as Border;
         var pos = e.GetPosition(this);
         var dp = pos - _mouseDownPosition;
         c.Margin = new Thickness(_mouseDownMargin.Left + dp.X, _mouseDownMargin.Top + dp.Y, _mouseDownMargin.Right - dp.X, _mouseDownMargin.Bottom - dp.Y);
     }
 }

 //鼠标弹起屏蔽消息
 void Canvas_PreviewMouseUp(object sender, MouseButtonEventArgs e)
 {
     var c = sender as Border;
     _isMouseDown = false;
     c.ReleaseMouseCapture();
     Border bd = (Border)sender;
     string cvname = bd.Name;
     OleDbConnection conn = MainWindow.GetDbConnection();
     try
     {
         int a = MainWindow.ExecSql("update aspect set 环节按钮位置='" + bd.Margin.ToString() + "' where 环节名称='" + cvname + "'", conn);
     }catch(Exception ex)
     {
         MessageBox.Show(ex.Message);
     }
     finally
     {
         MainWindow.CloseDbConnection(conn);
     }
 }
 #endregion
10.后台设置字体的大小,样式,颜色
参考:WPF 后台常用属性值设置_wpf fontweight-优快云博客
 if (c.GetType() == typeof(TextBlock))
 {
     var systemFontFamilies = Fonts.SystemFontFamilies;
     FontFamily filteredChineseFamily = null;
     foreach (FontFamily family in systemFontFamilies)
     {
         LanguageSpecificStringDictionary familyNames = family.FamilyNames;
         if (familyNames.ContainsKey(XmlLanguage.GetLanguage("zh-cn")))
         {
             if (familyNames.TryGetValue(XmlLanguage.GetLanguage("zh-cn"), out var chineseFontName) && chineseFontName == "" + dt2.Rows[0]["环节按钮字体"].ToString() + "")
             {
                 filteredChineseFamily = family;
                 break;
             }
         }
     }
     ((System.Windows.Controls.TextBlock)c).FontSize = Convert.ToDouble(dt2.Rows[0]["环节按钮字号"]);
     ((System.Windows.Controls.TextBlock)c).FontFamily = filteredChineseFamily;
     ((System.Windows.Controls.TextBlock)c).Foreground = new SolidColorBrush((Color)ColorConverter.ConvertFromString(dt2.Rows[0]["环节按钮字色"].ToString()));
11.查找子控件
private void Cv_StartMouseLeftButtonUp(object sender, MouseButtonEventArgs e)
{
    System.Windows.Media.Brush brushes = null;
    brushes = System.Windows.Media.Brushes.Gray;
    //cv.Background = brushes;
    DependencyObject wp = null;
    DependencyObject cv = null;
    DependencyObject cv1 = null;
    DependencyObject bd = null;
    DependencyObject label = null;

    //获取父控件canvas
    Canvas canvas = (Canvas)sender;
    string canvasName = canvas.Name;

    //获取它的子控件有几个
    int gridcount = VisualTreeHelper.GetChildrenCount(buttonstack);
    for (int gridc = 0; gridc < gridcount; gridc++)
    {
        //StackPanel的子控件为wrappanel
        //获取子控件
        wp = VisualTreeHelper.GetChild(buttonstack, gridc);
        int wpcount = VisualTreeHelper.GetChildrenCount(wp);

        for (int wpc = 0; wpc < wpcount; wpc++)
        {
            cv = VisualTreeHelper.GetChild(wp, wpc);
            if (cv.GetType() == typeof(Canvas))
            {
                int count1 = VisualTreeHelper.GetChildrenCount(cv);
                //获取名称名称
                string ParentName = ((Canvas)cv).Name;
                //获取第二个canvas
                cv1 = VisualTreeHelper.GetChild(cv, 0);
                int count2 = VisualTreeHelper.GetChildrenCount(cv1);
                //循环获取子控件
                for (int m = 0; m < count2; m++)
                {
                    //获取子控件
                    bd = VisualTreeHelper.GetChild(cv1, m);
                    //判断子控件类型
                    if (bd.GetType() == typeof(Border))
                    {
                        if (ParentName == canvasName)
                        {
                            ((Canvas)cv).MouseLeftButtonUp -= new MouseButtonEventHandler(Cv_StartMouseLeftButtonUp);
                            ((Canvas)cv).MouseLeftButtonUp += new MouseButtonEventHandler(Cv_StopMouseLeftButtonUp);
                            //获取父控件名称后缀
                            string labelName = ParentName.Substring(2);
                            //获取子控件
                            label = VisualTreeHelper.GetChild(bd, 0);
                            if (((Label)label).Name == "zuID" + labelName)
                            {
                                zuID = Convert.ToInt32(((Label)label).Content);
                            }
                            if (((Label)label).Name == "score" + labelName)
                            {
                                Score = Convert.ToInt32(((Label)label).Content);
                                ((Label)label).Content = Score;
                            }
                        }
                        else
                        {
                            //更改自控件背景色
                            ((Border)bd).Background = brushes;
                            //获取父控件名称后缀
                            string labelName = ParentName.Substring(2);
                            ((Canvas)cv).MouseLeftButtonUp -= new MouseButtonEventHandler(Cv_StartMouseLeftButtonUp);
                        }
                    }
                }
            }
        }
    }
}
12.双击事件 控件失去焦点事件
xaml:双击前不让编辑textbox
控件上加上:IsReadOnly="False" MouseDoubleClick="wenti_MouseDoubleClick"

cs:
 private void xinjiangrid_MouseDown(object sender, MouseButtonEventArgs e)
 {
     if (FocusManager.GetFocusedElement(this) is TextBox)
     {
         // 您可以选择将焦点设置到特定元素,或者简单地清除焦点
         Keyboard.ClearFocus();
         //_isMouseDown = false;
        // ((TextBox)FocusManager.GetFocusedElement(this)).Tag = "true";
         //失去焦点后可编辑
         ((TextBox)FocusManager.GetFocusedElement(this)).IsReadOnly = true;
     }
 }
13.wpf 窗口最大化,最小化,关闭,拖动,双击放大缩小窗口基本事件
参考:wpf 窗口最大化,最小化,关闭,拖动,双击放大缩小窗口基本事件_wpf最小化-优快云博客
14.button左击出现的ContextMenu
xaml:

                      <!--新建-->
                      <Button Width="120" Height="32" Margin="465,0,289,1" Foreground="White" BorderThickness="1" Grid.Column="1" Click="xinjian_Click">
                          新建
                          <Button.Resources>
                              <Style TargetType="{x:Type Border}">
                                  <Setter Property="CornerRadius" Value="3"></Setter>
                                  <Setter Property="BorderBrush" Value="#33000000"></Setter>
                                  <Setter Property="Background">
                                      <Setter.Value>
                                          <LinearGradientBrush StartPoint="1,0" EndPoint="1,1">
                                              <GradientStop Color="#FF03A795" Offset="0.0"/>
                                              <GradientStop Color="#FF03786B" Offset="0.5" />
                                          </LinearGradientBrush>
                                      </Setter.Value>
                                  </Setter>
                              </Style>
                          </Button.Resources>
                          <Button.Effect>
                              <DropShadowEffect BlurRadius="20" ShadowDepth="0" Color="#DADADA" Opacity="0.2"/>
                          </Button.Effect>
                          <Button.ContextMenu>
                              <ContextMenu>
                                  <MenuItem Name="tupianmenu" Header="图片题" Click="MenuItem_Click">
                                  </MenuItem>
                                  <MenuItem Name="shipinmenu" Header="视频题" Click="MenuItem_Click">
                                  </MenuItem>
                              </ContextMenu>
                          </Button.ContextMenu>
                      </Button>

cs:
private void xinjian_Click(object sender, RoutedEventArgs e)
{
    Button btn = (Button)sender;
    btn.ContextMenu.IsOpen = true;
    ////ContextMenu cm = new ContextMenu();
    //ContextMenu ct = this.FindResource("ContextMenu") as ContextMenu;
    //btn.ContextMenu = ct;

}
15.更改消息框的文字,样式
参考:如何显示消息框 - WPF .NET | Microsoft Learn
string messageBoxText = "Do you want to save changes?";
string caption = "Word Processor";
MessageBoxButton button = MessageBoxButton.YesNoCancel;
MessageBoxImage icon = MessageBoxImage.Warning;
MessageBoxResult result;

result = MessageBox.Show(messageBoxText, caption, button, icon, MessageBoxResult.Yes);
16.Page
点击鼠标侧键,会出现回到上一页,下一页的情况
参考:WPF之导航和Page的生命周期 - wangyafei_it - 博客园
page页切换页时会保留导航记录,在点击鼠标侧键,会出现回到上一页,下一页的情况,但有时我们不需要这种情况,所以需要清除导航记录,
若是用下图的方法清除,会出现导航记录中始终有上一个页面的记录,因为这个方法执行完之后页面才能生成,导航记录里只有上上个页面的,比如有page1,page2两个页面,现在处在page1页面,导航记录为空,在下面的代码里执行到清除导航记录时,此时的导航记录为空,因为这个方法还没走完,page2还没生成,理论上来说还是处在page1页面里。当page2生成后,点击鼠标的侧键还是会回到page1页面。
 if (i == 2)
 {
     frame.Content = new Page1(this);
 }
 else if (i == 3)
 {
     frame.Content = new Page2(this);
 }
 i--;
 if (!frame.CanGoBack && !frame.CanGoForward)
 {
     // do nothing
 }
 else
 {
     // clear frame history
     var entry = frame.RemoveBackEntry();
     while (entry != null)
     {
         entry = frame.RemoveBackEntry();
     }
 }
解决办法:在page的UnLoaded页面里清除父容器的导航记录。
xaml:
<Page x:Class="WpfApp1.Page1"
      xmlns="http://schemas.microsoft.com/winfx/2006/xaml/presentation"
      xmlns:x="http://schemas.microsoft.com/winfx/2006/xaml"
      xmlns:mc="http://schemas.openxmlformats.org/markup-compatibility/2006"
      xmlns:d="http://schemas.microsoft.com/expression/blend/2008"
      xmlns:local="clr-namespace:WpfApp1"
      mc:Ignorable="d"
      d:DesignHeight="450" d:DesignWidth="800"
      Title="Page1" Unloaded="Page_Unloaded">
    <Grid Background="Azure">
        <Label>page1</Label>
    </Grid>
</Page>

cs:
 WeakReference<MainWindow> main;  //弱引用父窗口
 public Page1(MainWindow window)
 {
     main = new WeakReference<MainWindow>(window);
     System.Console.WriteLine("------------------------------------------");
     System.Console.WriteLine("Page1 被创建出来");

     InitializeComponent();
 }
 private void Page_Unloaded(object sender, RoutedEventArgs e)
 {
     if(main.TryGetTarget(out MainWindow target))
     {
         if (target != null)
         {
             var entry = target.frame.RemoveBackEntry();  //清除父容器的导航记录
             while (entry != null)
             {
                 entry = target.frame.RemoveBackEntry();
             }
         }
     }
     System.Console.WriteLine("------------------------------------------");
     System.Console.WriteLine("Page1 UnLoaded");

 }
17.C#后台指定XAML控件背景颜色的三种方法
参考:VS编程,WPF中,C#后台指定XAML控件背景颜色的三种方法_c# backgroud rgb-优快云博客
18. 柱状图
1.LiveCharts图表
参考:WPFUI LiveCharts使用记录(一)柱状图-优快云博客
xaml:
window里引用:
 xmlns:lvc="clr-namespace:LiveCharts.Wpf;assembly=LiveCharts.Wpf"

 <Grid Margin="100">
     <lvc:CartesianChart Series="{Binding Achievement, UpdateSourceTrigger=PropertyChanged}">
         <lvc:CartesianChart.AxisX>
             <lvc:Axis Labels="{Binding ZuName}" />
         </lvc:CartesianChart.AxisX>
         <lvc:CartesianChart.AxisY>
             <lvc:Axis />
         </lvc:CartesianChart.AxisY>
     </lvc:CartesianChart>
 </Grid>


cs:
public ShuTu()
{
    InitializeComponent();
    Model model = new Model();

    this.DataContext =model;
}


新建一个类:
internal class Model
{
    public SeriesCollection colunmSeriesCollection = new SeriesCollection();
    public List<int> score = new List<int>();

    #region 属性
    private SeriesCollection achievement = new SeriesCollection();
    /// <summary>
    /// 成绩柱状图
    /// </summary>
    public SeriesCollection Achievement
    {
        get { return achievement; }
        set { achievement = value; }
    }

    private List<string> zuname;
    /// <summary>
    /// 学生名字
    /// </summary>
    public List<string> ZuName
    {
        get { return zuname; }
        set { zuname = value; }
    }

    #region 方法
    /// <summary>
    /// 成绩初始化
    /// </summary>
    public void Init()
    {
        OleDbConnection conn = MainWindow.GetDbConnection();
        DataTable dt = MainWindow.SelectSql("select 台号,分数,组名 from Score order by 分数 desc", conn);
        MainWindow.CloseDbConnection(conn);
        ZuName = dt.AsEnumerable().Select(x => x.Field<string>("组名")).ToList();
        score = dt.AsEnumerable().Select(x => x.Field<int>("分数")).ToList();

        //成绩分数集合
        ChartValues<int> achievement = new ChartValues<int>();
        Random random = new Random();
        for (int i = 0; i < score.Count; i++)
        {
            achievement.Add(score[i]);
        }
        var column = new ColumnSeries();
        column.DataLabels = true;
        column.LabelsPosition = BarLabelPosition.Perpendicular;
        column.Title = "成绩";
        column.Values = achievement;
        Achievement.Add(column);
    }
    #endregion
    #endregion
    public Model()
    {
        Init();
    }

}
2.不用LiveCharts图表 (2D)
 public void Draw2D(List<string> list, List<double> list1)
 {
     cv.Children.Clear();
     double Y = cv.Height;
     for (int i = 0; i < list.Count; i++)
     {
         double height = Y * (list1[i] / list1[0]);
         StackPanel sk = new StackPanel()
         {
             Height = height + 100
         };
         TextBlock textBlock1 = new TextBlock()
         {
             Text = list1[i].ToString(),
             Height = 30,
             FontSize = 18,
             Margin = new Thickness(30, 0, 0, 0),
             Foreground = new SolidColorBrush((Color)ColorConverter.ConvertFromString("#FFFFFFFF"))
         };
         sk.Children.Add(textBlock1);

         Rectangle rec1 = new Rectangle()
         {
             Fill = new SolidColorBrush(colorsSolution[i, 0]),
             Height = height,
             Width = 70,
             Margin = new Thickness(30, 0, 0, 0),
             VerticalAlignment = VerticalAlignment.Top
         };
         sk.Children.Add(rec1);

         TextBlock textBlock2 = new TextBlock()
         {
             TextWrapping = TextWrapping.Wrap,
             Width = 60,
             Height=100,
             FontSize = 18,
             Margin = new Thickness(30, 0, 0, 10),
             RenderTransform = new SkewTransform(-20, 0, 0, 0),
             Foreground = new SolidColorBrush((Color)ColorConverter.ConvertFromString("#FFFFFFFF"))
         };
         textBlock2.Text = list[i].ToString();
         sk.Children.Add(textBlock2);

         Canvas.SetTop(sk, cv.Height - sk.Height);
         Canvas.SetLeft(sk, 20 + 90 * i);

         cv.Children.Add(sk);
     }
 }


//颜色
 private Color[,] colorsSolution = new Color[12, 3]
 {
    {Color.FromRgb(246,188,16),Color.FromRgb(194,153,11),Color.FromRgb(158,123,3)},
    {Color.FromRgb(175,216,248),Color.FromRgb(135,173,196),Color.FromRgb(111,139,161)},
    {Color.FromRgb(215,69,70),Color.FromRgb(167,55,54),Color.FromRgb(138,44,44)},
    {Color.FromRgb(140,186,0),Color.FromRgb(112,147,1),Color.FromRgb(92,121,2)},
    {Color.FromRgb(253,143,68),Color.FromRgb(200,114,55),Color.FromRgb(165,95,76)},
    {Color.FromRgb(0,142,143),Color.FromRgb(0,113,113),Color.FromRgb(2,92,93)},
    {Color.FromRgb(142,70,143),Color.FromRgb(117,56,116),Color.FromRgb(88,46,90)},
    {Color.FromRgb(90,133,41),Color.FromRgb(70,107,30),Color.FromRgb(58,87,23)},
    {Color.FromRgb(178,170,21),Color.FromRgb(142,133,0),Color.FromRgb(115,108,2)},
    {Color.FromRgb(1,141,216),Color.FromRgb(3,112,175),Color.FromRgb(1,92,137)},
    {Color.FromRgb(158,9,13),Color.FromRgb(130,7,10),Color.FromRgb(101,5,7)},
    {Color.FromRgb(161,134,189),Color.FromRgb(127,105,151),Color.FromRgb(107,86,125)}
 };


调用:
ZuName = dt.AsEnumerable().Skip((currentPage - 2) * 12).Take(12).Select(x => x.Field<string>("组名")).ToList();
score = dt.AsEnumerable().Skip((currentPage - 2) * 12).Take(12).Select(x => Convert.ToDouble(x.Field<int>("分数"))).ToList();

if (style == "2D")
{
    Draw2D(ZuName, score);
}
3.3D柱状图
参考:WPF用SkewTransform画3D柱状图-优快云博客
//颜色
 private Color[,] colorsSolution = new Color[12, 3]
 {
    {Color.FromRgb(246,188,16),Color.FromRgb(194,153,11),Color.FromRgb(158,123,3)},
    {Color.FromRgb(175,216,248),Color.FromRgb(135,173,196),Color.FromRgb(111,139,161)},
    {Color.FromRgb(215,69,70),Color.FromRgb(167,55,54),Color.FromRgb(138,44,44)},
    {Color.FromRgb(140,186,0),Color.FromRgb(112,147,1),Color.FromRgb(92,121,2)},
    {Color.FromRgb(253,143,68),Color.FromRgb(200,114,55),Color.FromRgb(165,95,76)},
    {Color.FromRgb(0,142,143),Color.FromRgb(0,113,113),Color.FromRgb(2,92,93)},
    {Color.FromRgb(142,70,143),Color.FromRgb(117,56,116),Color.FromRgb(88,46,90)},
    {Color.FromRgb(90,133,41),Color.FromRgb(70,107,30),Color.FromRgb(58,87,23)},
    {Color.FromRgb(178,170,21),Color.FromRgb(142,133,0),Color.FromRgb(115,108,2)},
    {Color.FromRgb(1,141,216),Color.FromRgb(3,112,175),Color.FromRgb(1,92,137)},
    {Color.FromRgb(158,9,13),Color.FromRgb(130,7,10),Color.FromRgb(101,5,7)},
    {Color.FromRgb(161,134,189),Color.FromRgb(127,105,151),Color.FromRgb(107,86,125)}
 };

//画图
 public StackPanel Draw3DHitsgram(int width, Double height, int colorSolutionIndex,double score,string zuname)
 {
     StackPanel sp = new StackPanel()
     {
         Orientation = Orientation.Horizontal,
         Height = height + width / 3,
         Width = width / 3 * 4
     };

     Rectangle rect1 = new Rectangle()
     {
         Fill = new SolidColorBrush(colorsSolution[colorSolutionIndex, 0]),
         Width = width,
         Height = height,
         VerticalAlignment = VerticalAlignment.Bottom,
     };
     sp.Children.Add(rect1);
     Rectangle rect2 = new Rectangle()
     {
         Fill = new SolidColorBrush(colorsSolution[colorSolutionIndex, 1]),
         Width = width,
         Height = width / 3,
         VerticalAlignment = VerticalAlignment.Top,
         Margin = new Thickness(-width / 3 * 2, 0, 0, 0),
         RenderTransform = new SkewTransform(-45, 0, 0, 0)
     };
     sp.Children.Add(rect2);
     Rectangle rect3 = new Rectangle()
     {
         Fill = new SolidColorBrush(colorsSolution[colorSolutionIndex, 2]),
         Width = width / 3,
         Height = height,
         VerticalAlignment = VerticalAlignment.Bottom,
         Margin = new Thickness(-width / 3-2, 0, 0, 0),
         RenderTransform = new SkewTransform(0, -45, 0, 0)
     };
     sp.Children.Add(rect3);
     return sp;
 }


//在柱状图的上面和下面加上分数和名称
        public void Draw3D(List<string> list, List<double> list1)
        {
            cv.Children.Clear();
            for (int i = 0; i < list.Count; i++)
            {
                double height = cv.Height * (list1[i] / list1[0]);

                StackPanel sp = new StackPanel()
                {
                    Height = height + 130
                };
                sp.VerticalAlignment = VerticalAlignment.Bottom;
                TextBlock textBlock1 = new TextBlock()
                {
                    Margin = new Thickness(20, 0, 0, 0),
                    Foreground = new SolidColorBrush((Color)ColorConverter.ConvertFromString("#FFFFFFFF")),
                    FontSize=18
                };
                textBlock1.Text = list1[i].ToString();
                sp.Children.Add(textBlock1);

                sp.Children.Add(Draw3DHitsgram(70, height, i, list1[i], list[i]));

                TextBlock textBlock2 = new TextBlock()
                {
                    TextWrapping = TextWrapping.Wrap,
                    Width = 60,
                    FontSize = 18,
                    Height = 100,
                    Margin = new Thickness(0, 0, 0, 20),
                    RenderTransform = new SkewTransform(-15, 0, 0, 0),
                    Foreground= new SolidColorBrush((Color)ColorConverter.ConvertFromString("#FFFFFFFF"))
                };
                textBlock2.Text = list[i].ToString();
                sp.Children.Add(textBlock2);

                Canvas.SetLeft(sp, 90 * i);
                Canvas.SetTop(sp, cv.Height - sp.Height);

                this.cv.Children.Add(sp);
            }
        }

调用:
 Draw3D(ZuName, score);
19.导入导出
导入:
导出:
参考:
WPF 利用NPOI DataGrid直接导出Excel_wpf datagrid导出excel-优快云博客
/// <summary>
/// 导出
/// NuGet包: NPOI.Excel
/// </summary>
/// <param name="dt"></param>
/// <returns></returns>
public bool Export(DataTable dt)
{
SaveFileDialog saveFileDialog = new SaveFileDialog();
saveFileDialog.Filter = "Excel(2007-2016)|*.xlsx";
saveFileDialog.ShowDialog();
if (saveFileDialog.FileName == "")
{
return false;
}
var extension = System.IO.Path.GetExtension(saveFileDialog.FileName);//获取扩展名
if (extension.Equals(".xlsx"))
{
IWorkbook iw = new XSSFWorkbook();
ISheet isheet = iw.CreateSheet("Sheet1"); //建sheet
IRow irow = isheet.CreateRow(0); //添加行
for (int i = 0; i < dt.Columns.Count; i++)
{
irow.CreateCell(i, CellType.String).SetCellValue(dt.Columns[i].ColumnName.ToString());//建立表头
}
for (int i = 0; i <dt.Rows.Count; i++)
{
IRow row1 = isheet.CreateRow(i + 1); //新建行
for (int j = 0; j < dt.Columns.Count; j++)
{
if (dt.Rows[i][j].ToString() != null)
{
row1.CreateCell(j, CellType.String).SetCellValue(dt.Rows[i][j].ToString());//填入表格
}
else
{
row1.CreateCell(j, CellType.String).SetCellValue("");
}
}
}
for (int i = 0; i < dt.Columns.Count; i++)
{
isheet.AutoSizeColumn(i);//表格格式默认自动
}
using (FileStream stream = File.OpenWrite(saveFileDialog.FileName))
{
iw.Write(stream);
stream.Close();
}
System.Windows.MessageBox.Show("导出数据成功!");
GC.Collect();//废品回收站
}
return true;
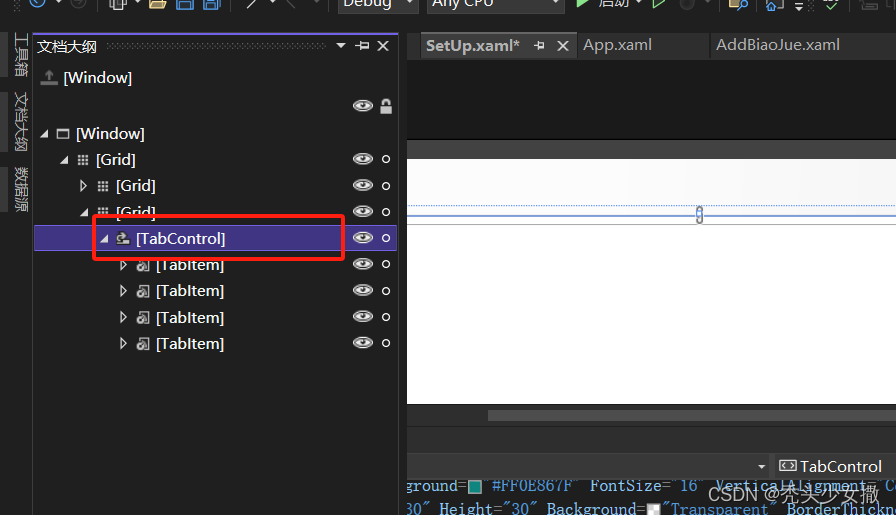
}20.TabControl(查看空间的默认样式)
参考:WPF滑块控件(Slider)的自定义样式 - kiba518 - 博客园 (cnblogs.com)
要查看TabControl的默认定义样式,可以在左侧文档大纲,右键点击TabControl-编辑模版-编辑副本
会出现如下图:
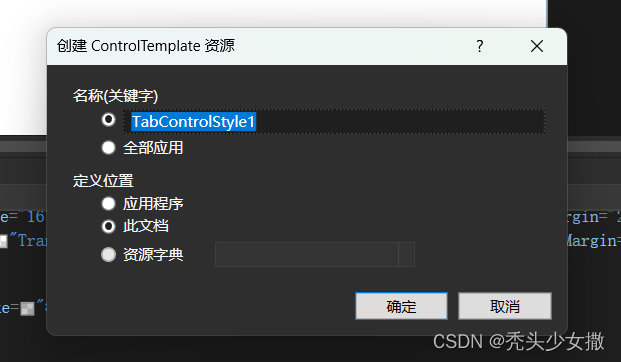
上图名称里的第一个是会有一个x:key属性,第二个就没有。
定义位置里的第一个是会把样式代码生成在app.xml中,第二个是生成在此文档的resources里,
第三个是生成资源字典。
点“确定”就会生成样式代码。
实际项目里用的是:
    <Window.Resources>
        <LinearGradientBrush x:Key="Brush1" StartPoint="0,0" EndPoint="0,1">
            <LinearGradientBrush.GradientStops>
                <GradientStop Offset="0" Color="#FF03A795" />
                <GradientStop Offset="1" Color="#FF03786B" />
            </LinearGradientBrush.GradientStops>
        </LinearGradientBrush>
        <LinearGradientBrush x:Key="backgroud" StartPoint="0,0" EndPoint="0,1">
            <LinearGradientBrush.GradientStops>
                <GradientStop Offset="0" Color="#FFFEFEFE" />
                <GradientStop Offset="1" Color="#FFF1F1F1" />
            </LinearGradientBrush.GradientStops>
        </LinearGradientBrush>
        <LinearGradientBrush x:Key="TabItem.Selected.BordernCjh" StartPoint="0,0" EndPoint="0,1">
            <GradientStop Color="#FFE8A6" Offset="0.07" />
            <GradientStop Color="#FFFAEA" Offset="0.1" />
            <GradientStop Color="#FFFAEA" Offset="0.4" />
            <GradientStop Color="#FFE8A6" Offset="0.5" />
        </LinearGradientBrush>
        <!--<SolidColorBrush x:Key="PrimaryBlueColor" Color="#348EF6"/>-->
        <SolidColorBrush x:Key="SecundaryBlueColor" Color="#EFF2EF"/>
        <!--<SolidColorBrush x:Key="PrimaryTextColor" Color="#FFFFFF"/>
        <SolidColorBrush x:Key="SecundaryTextColor" Color="#BBC1D1"/>-->

        <!--start Style-->

        <!--start tabItem Style
    Foreground="{DynamicResource SecundaryTextColor}"
-->
        <Style x:Key="TabItemStyle" TargetType="TabItem">
            <Setter Property="Background" Value="{StaticResource backgroud}"/>
            <Setter Property="Foreground" Value="#FF038576"/>
            <!--<Setter Property="FontWeight" Value="Bold"/>-->
            <Setter Property="BorderThickness" Value="0"/>
            <Setter Property="Margin" Value="0 0 0 0"/>
            <Setter Property="Width" Value="100"/>
            <Setter Property="Padding" Value="10 10"/>
            <Setter Property="VerticalAlignment" Value="Top"/>
            <Setter Property="HorizontalAlignment" Value="Left"/>
            <Setter Property="Template">
                <Setter.Value>
                    <ControlTemplate TargetType="TabItem">
                        <Grid SnapsToDevicePixels="True">
                            <Border CornerRadius="5"
                            Background="{TemplateBinding Background}"
                            BorderThickness="{TemplateBinding BorderThickness}"
                            BorderBrush="{TemplateBinding BorderBrush}"
                            Margin="{TemplateBinding Margin}"/>
                            <ContentPresenter HorizontalAlignment="Center"
                                      VerticalAlignment="{TemplateBinding VerticalAlignment}"
                                      SnapsToDevicePixels="True"
                                      RecognizesAccessKey="True"
                                      Margin="{TemplateBinding Padding}"
                                      ContentSource="Header"
                                      Focusable="True"/>
                        </Grid>
                        <ControlTemplate.Triggers>
                            <Trigger Property="IsMouseOver" Value="True">
                                <Setter Property="Background" Value="{DynamicResource SecundaryBlueColor}"/>
                                <Setter Property="Foreground" Value="#FF038576"/>
                            </Trigger>
                            <Trigger Property="IsSelected" Value="True">
                                <Setter Property="Background" Value="{StaticResource Brush1}"/>
                                <Setter Property="Foreground" Value="{DynamicResource SecundaryBlueColor}"/>
                            </Trigger>
                            <Trigger Property="IsSelected" Value="False">
                                <Setter Property="Background" Value="{StaticResource backgroud}"/>
                                <Setter Property="Foreground" Value="#FF038576"/>
                            </Trigger>
                        </ControlTemplate.Triggers>
                    </ControlTemplate>
                </Setter.Value>
            </Setter>
        </Style>
        <!--end tabItem Style-->

        <Style x:Key="TabControlStyle" TargetType="TabControl">
            <Setter Property="BorderThickness" Value="0"/>
            <Setter Property="BorderBrush" Value="Transparent"/>
            <Setter Property="Template">
                <Setter.Value>
                    <ControlTemplate TargetType="TabControl">
                        <Grid SnapsToDevicePixels="True">
                            <Grid.RowDefinitions>
                                <RowDefinition Height="50"/>
                                <RowDefinition Height="*"/>
                            </Grid.RowDefinitions>
                            <!--TabPanel 可以设置 HorizontalAlignment 属性改变选项卡的对齐方式-->
                            <TabPanel Grid.Row="0" Background="Transparent" IsItemsHost="True"/>

                            <Border Grid.Row="1" CornerRadius="5" BorderThickness="{TemplateBinding BorderThickness}" BorderBrush="{TemplateBinding BorderBrush}" Background="{TemplateBinding Background}"                                    >
                                <ContentPresenter ContentSource="SelectedContent" SnapsToDevicePixels="True" Margin="{TemplateBinding Padding}"/>
                            </Border>
                        </Grid>
                    </ControlTemplate>
                </Setter.Value>
            </Setter>
        </Style>
    </Window.Resources>

调用:

<TabControl Style="{StaticResource TabControlStyle}" >
    <TabItem Header="更换背景" Style="{StaticResource TabItemStyle}">1</TabItem>
</TabControl>
21.Datatable
删除一行数据
C#中删除DataTable中的行的方法_c#删除列表的行-优快云博客
使用DataTable.Rows.Remove(DataRow),或者DataTable.Rows.RemoveAt(index);可以直接删除行

datatable.Rows[i].Delete()。Delete()之后需要datatable.AccepteChanges()方法确认完全删除,
因为Delete()只是将相应列的状态标志为删除,还可以通过datatable.RejectChanges()回滚,使该行取消删除。
22.数组
1.将一个数组赋值给另一个数组
Array.Copy 方法 (System) | Microsoft Learn
1.for循环
2.copy
int []pins = {9,3,7,2}
int []copy3 = new int[pins.length];
Array.Copy(pins,copy3,copy.Length);

其他方法查看参考文章
2.找出两个数组相同或不同的元素
参考:C#比较二个数组并找出相同或不同元素的方法-优快云博客
string[] arr1 = new[] { "1", "2", "3", "4", "5" };
string[] arr2 = new[] { "1", "3", "5" };

//找出相同元素(即交集)
var sameArr = arr1.Intersect(arr2).ToArray();

//找出不同的元素(即交集的补集)
var diffArr = arr1.Where(c => !arr2.Contains(c)).ToArray();
21,后台指定控件的背景图片
两种方法
1.
grid.Background = new ImageBrush
{
    ImageSource = new BitmapImage(new Uri(App.path+"background/1.1.jpg"))
};

2.
ImageBrush bg = new ImageBrush();
bg.ImageSource = new BitmapImage(new Uri(path, UriKind.RelativeOrAbsolute));
hygrid1.Background = bg;


 1371
1371

 被折叠的 条评论
为什么被折叠?
被折叠的 条评论
为什么被折叠?
 到【灌水乐园】发言


