


 "本文详细介绍了RabbitMQ中的三种交换机类型:直连交换机、主题交换机和扇形交换机。通过配置示例展示了如何创建队列、交换机以及绑定,并提供了生产者发送信息和消费者接收信息的代码。直连交换机基于完全匹配的路由键将消息发送到队列;主题交换机允许使用通配符进行路由,如 "*.orange.*";扇形交换机则会将消息广播到所有绑定的队列。"
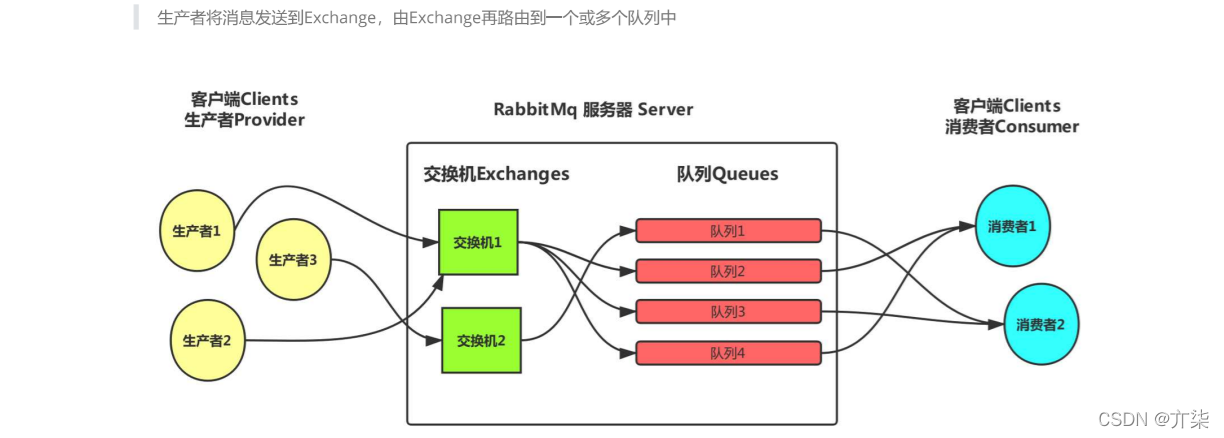
一,什么是交换机
交换机类型:


实战
1,pom 依赖在上一篇博客中
2,生产者和消费者的yml文件
server:
  port: 8081
spring:
  application:
    name: scz
  rabbitmq:
    host: 47.98.177.61
    password: 123456
    port: 5672
    username: springboot
    virtual-host: my_vhost
server: port: 8082 spring: application: name: scz rabbitmq: host: 47.98.177.61 password: 123456 port: 5672 username: springboot virtual-host: my_vhost
二,直连交换机
1,DirectConfig 生产者创建队列和交换机
package com.lgs.scz.mq;

import com.rabbitmq.client.AMQP;
import org.springframework.amqp.core.Binding;
import org.springframework.amqp.core.BindingBuilder;
import org.springframework.amqp.core.DirectExchange;
import org.springframework.amqp.core.Queue;
import org.springframework.context.annotation.Bean;
import org.springframework.context.annotation.Configuration;


@Configuration
@SuppressWarnings("all")
public class DirectConfig {

    /**
     * 创建队列
     */
    @Bean
    public Queue DirectQueueA(){
        return new Queue("DirectQueueA",true);
    }

    @Bean
    public Queue DirectQueueB(){
        return new Queue("DirectQueueB",true);
    }

    @Bean
    public Queue DirectQueueC(){
        return new Queue("DirectQueueC",true);
    }

    /**
     * 创建交换机
     */
    @Bean
    public DirectExchange directExchange(){
        return new DirectExchange("directExchange");
    }


    /**
     *进行交换机和队列的绑定  设置bindingkey
     */
    @Bean
    public Binding bindingA(){
        return BindingBuilder.bind(DirectQueueA()).to(directExchange()).with("AA");
    }

    @Bean
    public Binding bindingB(){
        return BindingBuilder.bind(DirectQueueB()).to(directExchange()).with("BB");
    }

    @Bean
    public Binding bindingC(){
        return BindingBuilder.bind(DirectQueueC()).to(directExchange()).with("CC");
    }

}
2,ProviderController 生产者发送信息
package com.lgs.scz.controller;

import org.springframework.amqp.rabbit.core.RabbitTemplate;
import org.springframework.beans.factory.annotation.Autowired;
import org.springframework.web.bind.annotation.RequestMapping;
import org.springframework.web.bind.annotation.RestController;

@RestController
@SuppressWarnings("all")
public class ProviderController {

    @Autowired
    private RabbitTemplate template;

    @RequestMapping("/DirectSend")
    public String DirectSend(String routingKey){
        template.convertAndSend("directExchange",routingKey,"你好你好!来俄罗斯打仗吗!!!");
        return "yes";
    }


}
3, DirectReceiverA 消费者接收信息
package com.lgs.xfz.mq;

import lombok.extern.slf4j.Slf4j;
import org.springframework.amqp.rabbit.annotation.RabbitHandler;
import org.springframework.amqp.rabbit.annotation.RabbitListener;
import org.springframework.stereotype.Component;

@Component
@SuppressWarnings("all")
@RabbitListener(queues = "DirectQueueA")
@Slf4j
public class DirectReceiverA {

    @RabbitHandler
    public void process(String message){
        log.info("A接到"+message);
    }

}
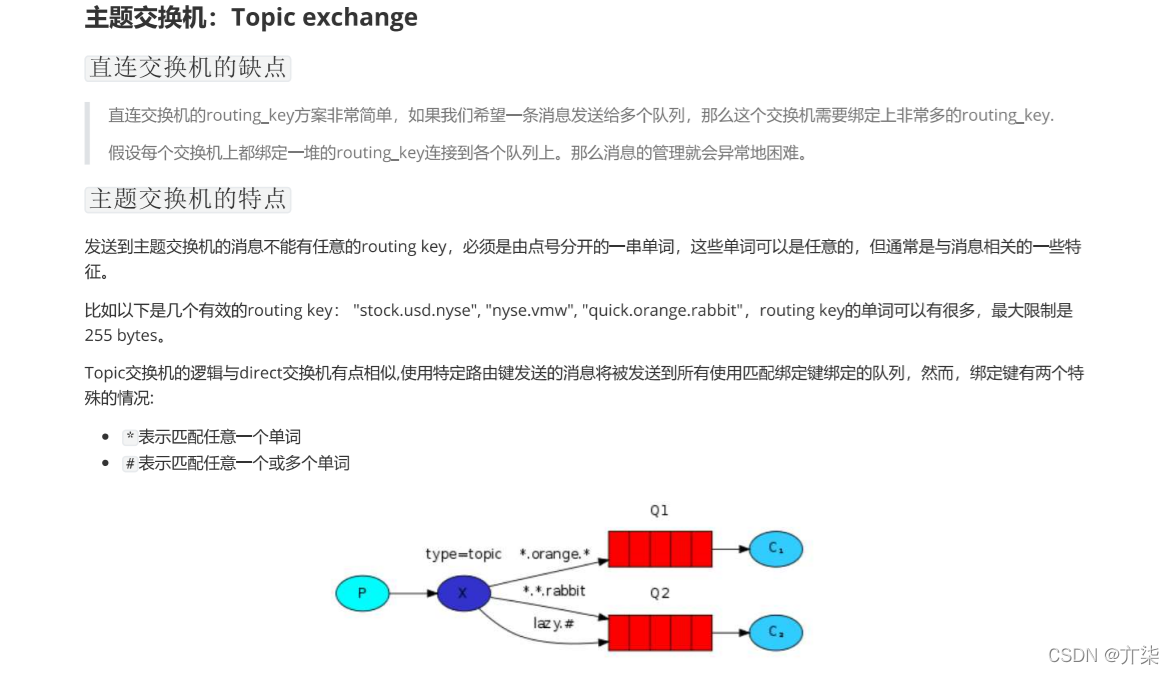
三,主题交换机
1,TopicConfig 生产者创建队列和交换机和定义路由键
package com.lgs.scz.mq;

import org.springframework.amqp.core.*;
import org.springframework.context.annotation.Bean;
import org.springframework.context.annotation.Configuration;

//主题交换机

@Configuration
@SuppressWarnings("all")
public class TopicConfig {

    /**
     * 定义路由键
     */
    public final static String KEY_A="*.orange.*";
    public final static String KEY_B="*.*.rabbit";
    public final static String KEY_C="lazy.#";

    /**
     * 创建队列
     */
    @Bean
    public Queue TopicQueueA(){
        return new Queue("TopicQueueA",true);
    }

    @Bean
    public Queue TopicQueueB(){
        return new Queue("TopicQueueB",true);
    }

    @Bean
    public Queue TopicQueueC(){
        return new Queue("TopicQueueC",true);
    }

    /**
     * 创建交换机
     */
    @Bean
    public TopicExchange topicExchange(){
        return new TopicExchange("topicExchange");
    }


    /**
     *进行交换机和队列的绑定  设置bindingkey
     */
    @Bean
    public Binding TopicbindingA(){
        return BindingBuilder.bind(TopicQueueA()).to(topicExchange()).with(KEY_A);
    }

    @Bean
    public Binding TopicbindingB(){
        return BindingBuilder.bind(TopicQueueB()).to(topicExchange()).with(KEY_B);
    }

    @Bean
    public Binding TopicbindingC(){
        return BindingBuilder.bind(TopicQueueC()).to(topicExchange()).with(KEY_C);
    }

}
2,ProviderController 生产者发送信息
package com.lgs.scz.controller;

import org.springframework.amqp.rabbit.core.RabbitTemplate;
import org.springframework.beans.factory.annotation.Autowired;
import org.springframework.web.bind.annotation.RequestMapping;
import org.springframework.web.bind.annotation.RestController;

@RestController
@SuppressWarnings("all")
public class ProviderController {

    @Autowired
    private RabbitTemplate template;


    @RequestMapping("/TopicSend")
    public String TopicSend(String routingKey){
        template.convertAndSend("topicExchange",routingKey,"你好你好!来俄罗斯打仗吗!!!");
        return "yes";
    }


}
3, TopicReceiverA 消费者接收信息
package com.lgs.xfz.mq;

import lombok.extern.slf4j.Slf4j;
import org.springframework.amqp.rabbit.annotation.RabbitHandler;
import org.springframework.amqp.rabbit.annotation.RabbitListener;
import org.springframework.stereotype.Component;

@Component
@SuppressWarnings("all")
@RabbitListener(queues = "FanoutQueueA")
@Slf4j
public class TopicReceiverA {

    @RabbitHandler
    public void process(String message){
        log.warn("A接到"+message);
    }

}
四,扇形交换机
1,FanoutConfig 生产者创建队列和交换机
package com.lgs.scz.mq;

import org.springframework.amqp.core.*;
import org.springframework.context.annotation.Bean;
import org.springframework.context.annotation.Configuration;

//扇形交换机

@Configuration
@SuppressWarnings("all")
public class FanoutConfig {

    /**
     * 创建队列
     */
    @Bean
    public Queue FanoutQueueA(){
        return new Queue("FanoutQueueA",true);
    }

    @Bean
    public Queue FanoutQueueB(){
        return new Queue("FanoutQueueB",true);
    }

    @Bean
    public Queue FanoutQueueC(){
        return new Queue("FanoutQueueC",true);
    }

    /**
     * 创建交换机
     */
    @Bean
    public FanoutExchange fanoutExchange(){
        return new FanoutExchange("fanoutExchange");
    }


    /**
     *进行交换机和队列的绑定
     */
    @Bean
    public Binding FanoutbindingA(){
        return BindingBuilder.bind(FanoutQueueA()).to(fanoutExchange());
    }

    @Bean
    public Binding FanoutbindingB(){
        return BindingBuilder.bind(FanoutQueueB()).to(fanoutExchange());
    }

    @Bean
    public Binding FanoutbindingC(){
        return BindingBuilder.bind(FanoutQueueC()).to(fanoutExchange());
    }

}
2,ProviderController 生产者发送信息
package com.lgs.scz.controller;

import org.springframework.amqp.rabbit.core.RabbitTemplate;
import org.springframework.beans.factory.annotation.Autowired;
import org.springframework.web.bind.annotation.RequestMapping;
import org.springframework.web.bind.annotation.RestController;

@RestController
@SuppressWarnings("all")
public class ProviderController {

    @Autowired
    private RabbitTemplate template;

    @RequestMapping("/FanoutSend")
    public String FanoutSend(){
        template.convertAndSend("fanoutExchange",null,"你好你好!来俄罗斯打仗吗!!!");
        return "yes";
    }

}
3,FanoutReceiverA 消费者接收信息
package com.lgs.xfz.mq;

import lombok.extern.slf4j.Slf4j;
import org.springframework.amqp.rabbit.annotation.RabbitHandler;
import org.springframework.amqp.rabbit.annotation.RabbitListener;
import org.springframework.stereotype.Component;

@Component
@SuppressWarnings("all")
@RabbitListener(queues = "TopicQueueA")
@Slf4j
public class FanoutReceiverA {

    @RabbitHandler
    public void process(String message){
        log.warn("A接到"+message);
    }

}
OK!到这就结束了,希望能帮到你!!!


 1034
1034

 被折叠的 条评论
为什么被折叠?
被折叠的 条评论
为什么被折叠?
 到【灌水乐园】发言


