


第一章 NIO基础
1.三大组件
1.1 Channel & Buffer
channel 有一点类似于 stream,它就是读写数据的双向通道,可以从 channel 将数据读入 buffer,也可以将 buffer 的数据写入 channel,而之前的 stream 要么是输入,要么是输出,channel 比 stream 更为底层

常见的 Channel 有:
FileChannel
DatagramChannel
SocketChannel
ServerSocketChannel
Buffer 则用来缓冲读写数据,常见的 Buffer 有
ByteBuffer
MappedByteBuffer
DirectByteBuffer
HeapByteBuffer
ShortBuffer
IntBuffer
LongBuffer
FloatBuffer
DoubleBuffer
CharBuffer
1.2 Selector
selector 单从字面意思不好理解,需要结合服务器的设计演化来理解它的用途
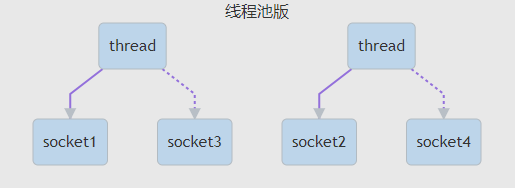
多线程版本设计
为每个连接分别开辟一个线程,分别去处理对应的socke连接
多线程版缺点:
内存占用高 - 每个线程都需要占用一定的内存,当连接较多时,会开辟大量线程,导致占用大量内存
线程上下文切换成本高
只适合连接数少的场景 - 连接数过多,会导致创建很多线程,从而出现问题

线程池版设计
使用线程池,让线程池中的线程去处理连接
线程池版缺点:
阻塞模式下,线程仅能处理一个 socket 连接
线程池中的线程获取任务(task)后,只有当其执行完任务之后(断开连接后),才会去获取并执行下一个任务
若 socke 连接一直未断开,则其对应的线程无法处理其他 socke 连接
仅适合短连接场景
短连接即建立连接发送请求并响应后就立即断开,使得线程池中的线程可以快速处理其他连接
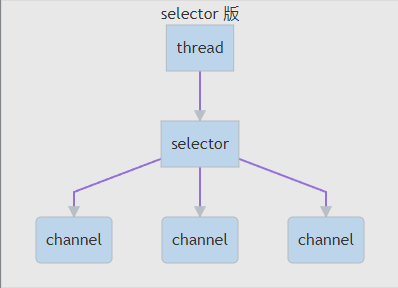
selector 版设计
selector 的作用就是配合一个线程来管理多个 channel(fileChannel因为是阻塞式的,所以无法使用selector),获取这些 channel 上发生的事件,这些 channel 工作在非阻塞模式下,当一个channel中没有执行任务时,可以去执行其他channel中的任务。适合连接数多,但流量较少的场景
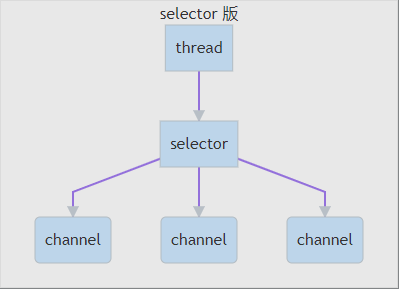
调用 selector 的 select() 会阻塞直到 channel 发生了读写就绪事件,这些事件发生,select 方法就会返回这些事件交给 thread 来处理
2.ByteBuffer
ByteBuffer提供了字节缓冲区,其可以不断的从Channel中读取接收到的数据。Buffer的优点主要在于其提供了一系列的Api,能够让用户更方便的对数据进行读取和写入
2.1 ByteBuffer 结构
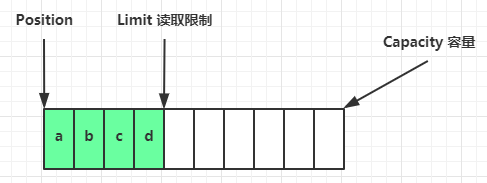
ByteBuffer 有以下重要属性:
capacity:缓冲区的容量。通过构造函数赋予,一旦设置,无法更改
position:缓冲区的界限。位于limit 后的数据不可读写。缓冲区的限制不能为负,并且不能大于其容量
limit:下一个读写位置的索引。缓冲区的位置不能为负,并且不能大于limit
mark:记录当前position的值。position被改变后,可以通过调用reset() 方法恢复到mark的位置
以上四个属性必须满足以下要求: mark <= position <= limit <= capacity
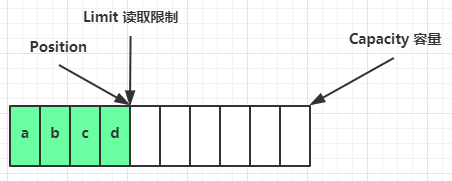
运行过程:
定义10个容量后的初始状态
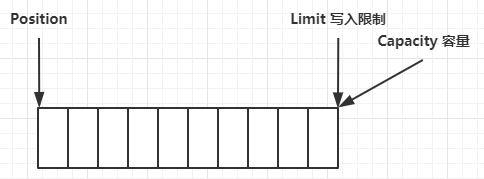
写模式下,position 是写入位置,limit 等于容量
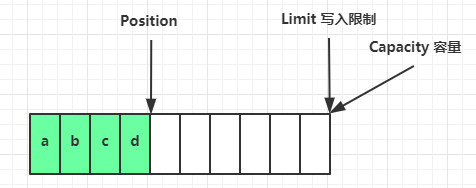
写入了 4 个字节后的状态
flip 动作发生后,position 切换为读取位置,limit 切换为读取限制
读取 4 个字节后的状态
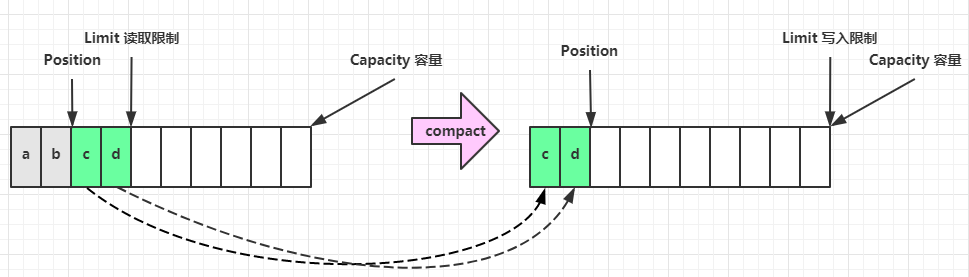
clear() 方法发生后

compact() 方法,是把未读完的部分向前压缩,然后切换至写模式
2.2 快速使用
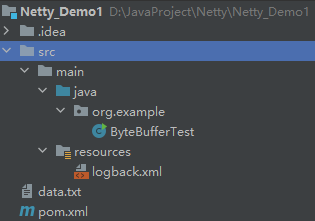
项目结构
创建文本文件 data.txt,内容为
1234567890abcd引入日志Maven依赖
<dependency>
    <groupId>org.projectlombok</groupId>
    <artifactId>lombok</artifactId>
    <version>1.16.18</version>
</dependency>
<dependency>
    <groupId>ch.qos.logback</groupId>
    <artifactId>logback-classic</artifactId>
    <version>1.2.9</version>
</dependency>
logback配置文件
<?xml version="1.0" encoding="UTF-8"?>
<!-- 从高到到低 OFF 、 FATAL > ERROR > WARN > INFO > DEBUG > TRACE > ALL
     如果设置为 WARN ,则低于 WARN的信息都不会输出
-->
<!-- 日志输出规则 根据当前ROOT级别,日志输出时,级别高于root默认的级别时 会输出 -->
<configuration
        xmlns="http://ch.qos.logback/xml/ns/logback"
        xmlns:xsi="http://www.w3.org/2001/XMLSchema-instance"
        xsi:schemaLocation="http://ch.qos.logback/xml/ns/logback logback.xsd">
    <!-- 输出控制,格式控制-->
    <appender name="STDOUT" class="ch.qos.logback.core.ConsoleAppender">
        <!--
        %date            日期
        [%-5p]           %p当前级别|-5靠左对其 最多输出5个字符
        [%thread]        当前线程
        %logger{60}      日志的消息
        [%file : %line]  哪个文件哪一行
        %msg%n           消息内容 和 换行
        -->
        <encoder>
            <pattern>%date{HH:mm:ss} [%-5level] [%thread] %logger{17} - %m%n </pattern>
        </encoder>
    </appender>

    <!-- 用来控制查看那个类的日志内容(对mybatis name 代表命名空间) -->
    <!--单独指定某个包 进行日志输出-->
    <logger name="org.example" level="DEBUG" additivity="false"> <!--additivity =【true:反馈到<root 里面打印或者写出日志,false:不反馈】-->
        <appender-ref ref="STDOUT"/>
    </logger>

    <root level="ERROR">
        <appender-ref ref="STDOUT"/>
    </root>
</configuration>
使用 FileChannel 来读取文件内容
@Slf4j
public class ByteBufferTest {
    public static void main(String[] args) {
        //输入流
        try (FileChannel channel = new FileInputStream("data.txt").getChannel()) {
            //准备buffer缓冲区
            ByteBuffer buffer = ByteBuffer.allocate(10);

            while (true) {		//当缓冲区大小小于文件大小时,需要多次读入
                //从channel读取数据,向buffer写入
                int len = channel.read(buffer);
                if (len == -1)
                    break;

                //打印buffer的内容
                buffer.flip();      //转换成读模式
                while (buffer.hasRemaining()) {
                    log.info("实际字节 {}", (char) buffer.get());
                }

                buffer.clear(); //转换成写模式
            }
        } catch (IOException e) {
            e.printStackTrace();
        }
    }
}
输出
21:25:23.051 [main] INFO org.example.ByteBufferTest - 实际字节 1
21:25:23.055 [main] INFO org.example.ByteBufferTest - 实际字节 2
21:25:23.055 [main] INFO org.example.ByteBufferTest - 实际字节 3
21:25:23.055 [main] INFO org.example.ByteBufferTest - 实际字节 4
21:25:23.055 [main] INFO org.example.ByteBufferTest - 实际字节 5
21:25:23.055 [main] INFO org.example.ByteBufferTest - 实际字节 6
21:25:23.055 [main] INFO org.example.ByteBufferTest - 实际字节 7
21:25:23.055 [main] INFO org.example.ByteBufferTest - 实际字节 8
21:25:23.055 [main] INFO org.example.ByteBufferTest - 实际字节 9
21:25:23.055 [main] INFO org.example.ByteBufferTest - 实际字节 0
21:25:23.055 [main] INFO org.example.ByteBufferTest - 实际字节 a
21:25:23.055 [main] INFO org.example.ByteBufferTest - 实际字节 b
21:25:23.055 [main] INFO org.example.ByteBufferTest - 实际字节 c
21:25:23.055 [main] INFO org.example.ByteBufferTest - 实际字节 d
2.3 常用方法
0.准备工作
为方便输出,引入工具类
import static io.netty.util.internal.MathUtil.isOutOfBounds;
import static io.netty.util.internal.StringUtil.NEWLINE;

public class ByteBufferUtil {
    private static final char[] BYTE2CHAR = new char[256];
    private static final char[] HEXDUMP_TABLE = new char[256 * 4];
    private static final String[] HEXPADDING = new String[16];
    private static final String[] HEXDUMP_ROWPREFIXES = new String[65536 >>> 4];
    private static final String[] BYTE2HEX = new String[256];
    private static final String[] BYTEPADDING = new String[16];

    static {
        final char[] DIGITS = "0123456789abcdef".toCharArray();
        for (int i = 0; i < 256; i++) {
            HEXDUMP_TABLE[i << 1] = DIGITS[i >>> 4 & 0x0F];
            HEXDUMP_TABLE[(i << 1) + 1] = DIGITS[i & 0x0F];
        }

        int i;

        // Generate the lookup table for hex dump paddings
        for (i = 0; i < HEXPADDING.length; i++) {
            int padding = HEXPADDING.length - i;
            StringBuilder buf = new StringBuilder(padding * 3);
            for (int j = 0; j < padding; j++) {
                buf.append("   ");
            }
            HEXPADDING[i] = buf.toString();
        }

        // Generate the lookup table for the start-offset header in each row (up to 64KiB).
        for (i = 0; i < HEXDUMP_ROWPREFIXES.length; i++) {
            StringBuilder buf = new StringBuilder(12);
            buf.append(NEWLINE);
            buf.append(Long.toHexString(i << 4 & 0xFFFFFFFFL | 0x100000000L));
            buf.setCharAt(buf.length() - 9, '|');
            buf.append('|');
            HEXDUMP_ROWPREFIXES[i] = buf.toString();
        }

        // Generate the lookup table for byte-to-hex-dump conversion
        for (i = 0; i < BYTE2HEX.length; i++) {
            BYTE2HEX[i] = ' ' + StringUtil.byteToHexStringPadded(i);
        }

        // Generate the lookup table for byte dump paddings
        for (i = 0; i < BYTEPADDING.length; i++) {
            int padding = BYTEPADDING.length - i;
            StringBuilder buf = new StringBuilder(padding);
            for (int j = 0; j < padding; j++) {
                buf.append(' ');
            }
            BYTEPADDING[i] = buf.toString();
        }

        // Generate the lookup table for byte-to-char conversion
        for (i = 0; i < BYTE2CHAR.length; i++) {
            if (i <= 0x1f || i >= 0x7f) {
                BYTE2CHAR[i] = '.';
            } else {
                BYTE2CHAR[i] = (char) i;
            }
        }
    }

    /**
     * 打印所有内容
     *
     * @param buffer
     */
    public static void debugAll(ByteBuffer buffer) {
        int oldlimit = buffer.limit();
        buffer.limit(buffer.capacity());
        StringBuilder origin = new StringBuilder(256);
        appendPrettyHexDump(origin, buffer, 0, buffer.capacity());
        System.out.println("+--------+-------------------- all ------------------------+----------------+");
        System.out.printf("position: [%d], limit: [%d]\n", buffer.position(), oldlimit);
        System.out.println(origin);
        buffer.limit(oldlimit);
    }

    /**
     * 打印可读取内容
     *
     * @param buffer
     */
    public static void debugRead(ByteBuffer buffer) {
        StringBuilder builder = new StringBuilder(256);
        appendPrettyHexDump(builder, buffer, buffer.position(), buffer.limit() - buffer.position());
        System.out.println("+--------+-------------------- read -----------------------+----------------+");
        System.out.printf("position: [%d], limit: [%d]\n", buffer.position(), buffer.limit());
        System.out.println(builder);
    }

    private static void appendPrettyHexDump(StringBuilder dump, ByteBuffer buf, int offset, int length) {
        if (isOutOfBounds(offset, length, buf.capacity())) {
            throw new IndexOutOfBoundsException("expected: " + "0 <= offset(" + offset + ") <= offset + length(" + length + ") <= " + "buf.capacity(" + buf.capacity() + ')');
        }
        if (length == 0) {
            return;
        }
        dump.append("         +-------------------------------------------------+" + NEWLINE + "         |  0  1  2  3  4  5  6  7  8  9  a  b  c  d  e  f |" + NEWLINE + "+--------+-------------------------------------------------+----------------+");

        final int startIndex = offset;
        final int fullRows = length >>> 4;
        final int remainder = length & 0xF;

        // Dump the rows which have 16 bytes.
        for (int row = 0; row < fullRows; row++) {
            int rowStartIndex = (row << 4) + startIndex;

            // Per-row prefix.
            appendHexDumpRowPrefix(dump, row, rowStartIndex);

            // Hex dump
            int rowEndIndex = rowStartIndex + 16;
            for (int j = rowStartIndex; j < rowEndIndex; j++) {
                dump.append(BYTE2HEX[getUnsignedByte(buf, j)]);
            }
            dump.append(" |");

            // ASCII dump
            for (int j = rowStartIndex; j < rowEndIndex; j++) {
                dump.append(BYTE2CHAR[getUnsignedByte(buf, j)]);
            }
            dump.append('|');
        }

        // Dump the last row which has less than 16 bytes.
        if (remainder != 0) {
            int rowStartIndex = (fullRows << 4) + startIndex;
            appendHexDumpRowPrefix(dump, fullRows, rowStartIndex);

            // Hex dump
            int rowEndIndex = rowStartIndex + remainder;
            for (int j = rowStartIndex; j < rowEndIndex; j++) {
                dump.append(BYTE2HEX[getUnsignedByte(buf, j)]);
            }
            dump.append(HEXPADDING[remainder]);
            dump.append(" |");

            // Ascii dump
            for (int j = rowStartIndex; j < rowEndIndex; j++) {
                dump.append(BYTE2CHAR[getUnsignedByte(buf, j)]);
            }
            dump.append(BYTEPADDING[remainder]);
            dump.append('|');
        }

        dump.append(NEWLINE + "+--------+-------------------------------------------------+----------------+");
    }

    private static void appendHexDumpRowPrefix(StringBuilder dump, int row, int rowStartIndex) {
        if (row < HEXDUMP_ROWPREFIXES.length) {
            dump.append(HEXDUMP_ROWPREFIXES[row]);
        } else {
            dump.append(NEWLINE);
            dump.append(Long.toHexString(rowStartIndex & 0xFFFFFFFFL | 0x100000000L));
            dump.setCharAt(dump.length() - 9, '|');
            dump.append('|');
        }
    }

    public static short getUnsignedByte(ByteBuffer buffer, int index) {
        return (short) (buffer.get(index) & 0xFF);
    }
}
需要用到netty的常量,引入Maven依赖
<dependency>
    <groupId>io.netty</groupId>
    <artifactId>netty-all</artifactId>
    <version>4.1.39.Final</version>
</dependency>
1.分配空间
可以使用 allocate() 方法为 ByteBuffer 分配空间,其它 buffer 类也有该方法
ByteBuffer byteBuffer = ByteBuffer.allocate(10);		//使用Java堆内存
ByteBuffer byteBuffer1 = ByteBuffer.allocateDirect(10);	//使用本地内存
Buffer 是 非线程安全的
2.向 buffer 写入数据
有两种办法
调用 channel 的 read 方法
int byteBuffer = channel.read(buf);调用 buffer 自己的 put 方法
byteBuffer.put((byte) 0x61);或者写入byte数组
byteBuffer.put(new byte[]{0x62, 0x63, 0x64});
ByteBufferUtil.debugAll(byteBuffer);
3.从 buffer 读取数据
同样有两种办法(注意要切换成读模式:byteBuffer.flip())
调用 channel 的 write 方法
int writeBytes = channel.write(byteBuffer);调用 buffer 自己的 get 方法
byte b = byteBuffer.get();注意:get 方法会让 position 读指针向后走,如果想重复读取数据
1.可以调用 rewind 方法将 position 重新置为 0
2.或者调用 get(int i) 方法获取索引 i 的内容,它不会移动读指针
4.compact()
该函数会将 position 与 limit 之间的数据复制到buffer的开始位置,复制后 position = limit -position,limit = capacity,但如果 position 与 limit 之间没有数据的话,就不会进行复制
ByteBufferUtil.debugAll(byteBuffer);
byteBuffer.get();
ByteBufferUtil.debugAll(byteBuffer);
byteBuffer.compact();
ByteBufferUtil.debugAll(byteBuffer);
输出:
+--------+-------------------- all ------------------------+----------------+
position: [0], limit: [4]		 //注意position和limit
         +-------------------------------------------------+
         |  0  1  2  3  4  5  6  7  8  9  a  b  c  d  e  f |
+--------+-------------------------------------------------+----------------+
|00000000| 61 62 63 64 00 00 00 00 00 00                   |abcd......      |
+--------+-------------------------------------------------+----------------+
+--------+-------------------- all ------------------------+----------------+
position: [1], limit: [4]
         +-------------------------------------------------+
         |  0  1  2  3  4  5  6  7  8  9  a  b  c  d  e  f |
+--------+-------------------------------------------------+----------------+
|00000000| 61 62 63 64 00 00 00 00 00 00                   |abcd......      |
+--------+-------------------------------------------------+----------------+
+--------+-------------------- all ------------------------+----------------+
position: [3], limit: [10]
         +-------------------------------------------------+
         |  0  1  2  3  4  5  6  7  8  9  a  b  c  d  e  f |
+--------+-------------------------------------------------+----------------+
|00000000| 62 63 64 64 00 00 00 00 00 00                   |bcdd......      |
+--------+-------------------------------------------------+----------------+
5.mark() 和 reset()
mark() 是在读取时做一个标记,即使 position 改变,只要调用 reset() 就能回到 mark 记录的位置
注意:rewind 和 flip 都会清除 mark 位置
ByteBufferUtil.debugAll(byteBuffer);
byteBuffer.get();
ByteBufferUtil.debugAll(byteBuffer);
byteBuffer.mark();		//position = 1
byteBuffer.get();
ByteBufferUtil.debugAll(byteBuffer);
byteBuffer.reset();
ByteBufferUtil.debugAll(byteBuffer);	//position = 1
输出:
+--------+-------------------- all ------------------------+----------------+
position: [0], limit: [4]
         +-------------------------------------------------+
         |  0  1  2  3  4  5  6  7  8  9  a  b  c  d  e  f |
+--------+-------------------------------------------------+----------------+
|00000000| 61 62 63 64 00 00 00 00 00 00                   |abcd......      |
+--------+-------------------------------------------------+----------------+
+--------+-------------------- all ------------------------+----------------+
position: [1], limit: [4]
         +-------------------------------------------------+
         |  0  1  2  3  4  5  6  7  8  9  a  b  c  d  e  f |
+--------+-------------------------------------------------+----------------+
|00000000| 61 62 63 64 00 00 00 00 00 00                   |abcd......      |
+--------+-------------------------------------------------+----------------+
+--------+-------------------- all ------------------------+----------------+
position: [2], limit: [4]
         +-------------------------------------------------+
         |  0  1  2  3  4  5  6  7  8  9  a  b  c  d  e  f |
+--------+-------------------------------------------------+----------------+
|00000000| 61 62 63 64 00 00 00 00 00 00                   |abcd......      |
+--------+-------------------------------------------------+----------------+
+--------+-------------------- all ------------------------+----------------+
position: [1], limit: [4]
         +-------------------------------------------------+
         |  0  1  2  3  4  5  6  7  8  9  a  b  c  d  e  f |
+--------+-------------------------------------------------+----------------+
|00000000| 61 62 63 64 00 00 00 00 00 00                   |abcd......      |
+--------+-------------------------------------------------+----------------+
2.4 字符串和ByteBuffer转换
字符串转ByteBuffer
方法一
byteBuffer.put("你好".getBytes());方法二
ByteBuffer byteBuffer = StandardCharsets.UTF_8.encode("你好");写入后会自动转换成读模式
方法三
ByteBuffer byteBuffer = ByteBuffer.wrap("你好".getBytes());写入后会自动转换成读模式
ByteBuffer转字符串
byteBuffer.flip();
String s = StandardCharsets.UTF_8.decode(byteBuffer).toString();
2.5 Scattering Reads & Gathering Writes
分散读和集中写可以降低数据拷贝的次数,提高效率
1.Scattering Reads
将一个文本文件分别读取到多个ByteBuffer中,前提是已知文本文件切分的长度
举例:
文本文件 3parts.txt
onetwothree使用如下方式读取,可以将数据填充至多个 buffer
try (RandomAccessFile file = new RandomAccessFile("3parts.txt", "rw")) {
    FileChannel channel = file.getChannel();
    ByteBuffer a = ByteBuffer.allocate(3);
    ByteBuffer b = ByteBuffer.allocate(3);
    ByteBuffer c = ByteBuffer.allocate(5);
    channel.read(new ByteBuffer[]{a, b, c});
    a.flip();
    b.flip();
    c.flip();
    debug(a);
    debug(b);
    debug(c);
} catch (IOException e) {
    e.printStackTrace();
}
输出
+--------+-------------------- all ------------------------+----------------+
position: [0], limit: [3]
         +-------------------------------------------------+
         |  0  1  2  3  4  5  6  7  8  9  a  b  c  d  e  f |
+--------+-------------------------------------------------+----------------+
|00000000| 6f 6e 65                                        |one             |
+--------+-------------------------------------------------+----------------+
+--------+-------------------- all ------------------------+----------------+
position: [0], limit: [3]
         +-------------------------------------------------+
         |  0  1  2  3  4  5  6  7  8  9  a  b  c  d  e  f |
+--------+-------------------------------------------------+----------------+
|00000000| 74 77 6f                                        |two             |
+--------+-------------------------------------------------+----------------+
+--------+-------------------- all ------------------------+----------------+
position: [0], limit: [5]
         +-------------------------------------------------+
         |  0  1  2  3  4  5  6  7  8  9  a  b  c  d  e  f |
+--------+-------------------------------------------------+----------------+
|00000000| 74 68 72 65 65                                  |three           |
+--------+-------------------------------------------------+----------------+
2.Gathering Writes
将多个ByteBuffer合并成一次向文件中写入
举例:
使用如下方式写入,可以将多个 buffer 的数据填充至 channel
ByteBuffer a = StandardCharsets.UTF_8.encode("one");
ByteBuffer b = StandardCharsets.UTF_8.encode("two");
ByteBuffer c = StandardCharsets.UTF_8.encode("three");
RandomAccessFile file = new RandomAccessFile("3parts.txt", "rw");
FileChannel channel = file.getChannel();
channel.write(new ByteBuffer[]{a, b, c});
file.close();
输出 3parts.txt
onetwothree2.6 黏包、半包的解决
网络上有多条数据发送给服务端,数据之间使用 \n 进行分隔但由于某种原因这些数据在接收时,被进行了重新组合,例如原始数据有3条:
Hello,world\n
I'm zhangsan\n
How are you?\n
变成了下面的两个 byteBuffer (黏包,半包):
Hello,world\nI'm zhangsan\nHo
w are you?\n
粘包:由于追求效率将多个包合并成一次发送给服务端
半包:由于服务端缓冲区大小的限制,导致无法一次缓存全部数据
现在要求将错乱的数据恢复成原始的按\n分隔的数据
public static void main(String[] args) {
    ByteBuffer source = ByteBuffer.allocate(32);
    source.put("Hello,world\nI'm zhangsan\nHo".getBytes());
    split(source);

    source.put("w are you?\nhaha!\n".getBytes());
    split(source);
}

private static void split(ByteBuffer source) {
    source.flip();
    for (int i = 0; i < source.limit(); i++) {
        //找到一条完整的消息
        if (source.get(i) == '\n') {
            int len = i - source.position();
            //把这条消息存到ByteBuffer
            ByteBuffer target = ByteBuffer.allocate(len);
            for (int j = 0; j < len; j++)
                target.put(source.get());
            ByteBufferUtil.debugAll(target);
            source.get();	//向后移动一个位置
        }
    }
    source.compact();
}
+--------+-------------------- all ------------------------+----------------+
position: [11], limit: [11]
+-------------------------------------------------+
| 0 1 2 3 4 5 6 7 8 9 a b c d e f |
+--------+-------------------------------------------------+----------------+
|00000000| 48 65 6c 6c 6f 2c 77 6f 72 6c 64 |Hello,world |
+--------+-------------------------------------------------+----------------+
+--------+-------------------- all ------------------------+----------------+
position: [12], limit: [12]
+-------------------------------------------------+
| 0 1 2 3 4 5 6 7 8 9 a b c d e f |
+--------+-------------------------------------------------+----------------+
|00000000| 49 27 6d 20 7a 68 61 6e 67 73 61 6e |I'm zhangsan |
+--------+-------------------------------------------------+----------------+
+--------+-------------------- all ------------------------+----------------+
position: [12], limit: [12]
+-------------------------------------------------+
| 0 1 2 3 4 5 6 7 8 9 a b c d e f |
+--------+-------------------------------------------------+----------------+
|00000000| 48 6f 77 20 61 72 65 20 79 6f 75 3f |How are you? |
+--------+-------------------------------------------------+----------------+
+--------+-------------------- all ------------------------+----------------+
position: [5], limit: [5]
+-------------------------------------------------+
| 0 1 2 3 4 5 6 7 8 9 a b c d e f |
+--------+-------------------------------------------------+----------------+
|00000000| 68 61 68 61 21 |haha! |
+--------+-------------------------------------------------+----------------+3.文件编程
3.1 FileChannel
FileChannel 工作模式:只能工作在阻塞模式下
1.获取
不能直接打开 FileChannel,必须通过 FileInputStream、FileOutputStream 或者 RandomAccessFile 来获取 FileChannel,它们都有getChannel()方法
通过 FileInputStream 获取的channel只能读
通过 FileOutputStream 获取的channel只能写
通过 RandomAccessFile 是否能读写根据构造RandomAccessFile时的读写模式决定
2.读取
会从channel中读取数据填充到ByteBuffer,返回值表示读到了多少字节,-1表示到达了文件的末尾
int readBytes = channel.read(buffer);3.写入
SocketChannel的容量不高,因此写入的标准顺序如下:
ByteBuffer buffer = ...;
buffer.put(...); // 存入数据
buffer.flip();   // 切换读模式

while(buffer.hasRemaining()) {
    channel.write(buffer);
}
在while循环中调用channel.write()是因为write()方法并不能保证一次将buffer中的内容全部写入channel
4.关闭
channel 必须关闭,不过调用了 FileInputStream、FileOutputStream 或者 RandomAccessFile 的close()方法会间接地调用channel的close()方法
5.位置
获取当前位置
long pos = channel.position();设置当前位置
long newPos = ...;
channel.position(newPos);
设置当前位置时,如果设置为文件的末尾,这时读取会返回 -1
这时写入,会追加内容,但要注意如果 position 超过了文件末尾,再写入时在新内容和原末尾之间会有空洞(00)
6.大小
使用size()方法获取文件的大小
7.强制写入
操作系统出于性能的考虑,会将数据缓存,不是立刻写入磁盘。可以调用force(true)方法将文件内容和元数据(文件的权限等信息)立刻写入磁盘
3.2 两个 Channel 传输数据
当文件较小时,可以直接使用transferTo()方法一次传输。相比于IO流,效率高,因为底层会利用操作系统的零拷贝进行优化
public static void main(String[] args) {
    String FROM = "from.txt";
    String TO = "to.txt";
    long start = System.nanoTime();
    try (FileChannel from = new FileInputStream(FROM).getChannel();
         FileChannel to = new FileOutputStream(TO).getChannel()
        ) {
        from.transferTo(0, from.size(), to);
    } catch (IOException e) {
        e.printStackTrace();
    }
    long end = System.nanoTime();
    System.out.println("transferTo 用时:" + (end - start) / 1000_000.0);
}
输出:
transferTo 用时:8.2011transferTo()方法最大一次传输2G大小的文件,当文件量过大时,需要使用循环多次传输
public static void main(String[] args) {
    try (
        FileChannel from = new FileInputStream("from.txt").getChannel();
        FileChannel to = new FileOutputStream("to.txt").getChannel();
    ) {
        long size = from.size();  	// left 变量代表还剩余多少字节没有传输
        for (long left = size; left > 0; ) {
            System.out.println("position:" + (size - left) + " left:" + left);
            left -= from.transferTo((size - left), left, to);
        }
    } catch (IOException e) {
        e.printStackTrace();
    }
}
3.3 Path
jdk7 引入了 Path 和 Paths 类
Path 用来表示文件路径
Paths 是工具类,用来获取 Path 实例
Path source = Paths.get("1.txt"); // 相对路径 使用 user.dir 环境变量来定位 1.txt

Path source = Paths.get("d:\\1.txt"); // 绝对路径 代表了 d:\1.txt

Path source = Paths.get("d:/1.txt"); // 绝对路径 同样代表了 d:\1.txt

Path projects = Paths.get("d:\\data", "projects"); // 代表了 d:\data\projects
Paths支持符号对于路径的查找:
. 代表了当前路径
.. 代表了上一级路径
举例:
目录结构如下
d:
	|- data
		|- projects
			|- a
			|- b
主函数
Path path = Paths.get("d:\\data\\projects\\a\\..\\b");
System.out.println(path);
System.out.println(path.normalize()); // 正常化路径
输出
d:\data\projects\a\..\b
d:\data\projects\b
3.4 Files
检查文件是否存在
Path path = Paths.get("helloword/data.txt");
System.out.println(Files.exists(path));
创建一级目录
Path path = Paths.get("helloword/d1");
Files.createDirectory(path);
如果目录已存在,会抛异常FileAlreadyExistsException
不能一次创建多级目录,否则会抛异常NoSuchFileException
创建多级目录用
Path path = Paths.get("helloword/d1/d2");
Files.createDirectories(path);
拷贝文件
Path source = Paths.get("helloword/data.txt");
Path target = Paths.get("helloword/target.txt");

Files.copy(source, target);
如果文件已存在,会抛异常FileAlreadyExistsException
如果希望用source覆盖掉target,需要用StandardCopyOption来控制
Files.copy(source, target, StandardCopyOption.REPLACE_EXISTING);
移动文件
Path source = Paths.get("helloword/data.txt");
Path target = Paths.get("helloword/data.txt");

Files.move(source, target, StandardCopyOption.ATOMIC_MOVE);
StandardCopyOption.ATOMIC_MOVE保证文件移动的原子性
删除文件
Path target = Paths.get("helloword/target.txt");

Files.delete(target);
如果文件不存在,会抛异常NoSuchFileException
删除目录
Path target = Paths.get("helloword/d1");

Files.delete(target);
如果目录还有内容,会抛异常DirectoryNotEmptyException
遍历目录文件
public static void main(String[] args) throws IOException {
    Path path = Paths.get("./src");
    AtomicInteger dirCount = new AtomicInteger();	//匿名内部类不能使用普通变量
    AtomicInteger fileCount = new AtomicInteger();
    Files.walkFileTree(path, new SimpleFileVisitor<Path>() {
        @Override
        public FileVisitResult preVisitDirectory(Path dir, BasicFileAttributes attrs)	//进入文件夹前的方法
            throws IOException {
            System.out.println(dir);
            dirCount.incrementAndGet();
            return super.preVisitDirectory(dir, attrs);
        }

        @Override
        public FileVisitResult visitFile(Path file, BasicFileAttributes attrs)
            throws IOException {
            System.out.println(file);
            fileCount.incrementAndGet();
            return super.visitFile(file, attrs);
        }

        @Override
        public FileVisitResult visitFileFailed(Path file, IOException exc) throws IOException {     //访问文件失败方法
            return super.visitFileFailed(file, exc);
        }

        @Override
        public FileVisitResult postVisitDirectory(Path dir, IOException exc) throws IOException {       //访问文件夹后的方法
            return super.postVisitDirectory(dir, exc);
        }
    });
    System.out.println(dirCount);	//包括起始文件夹
    System.out.println(fileCount);
}
访问者模式
举例:统计 jar 的数目
Path path = Paths.get("C:Java\\jdk1.8.0_91");
AtomicInteger fileCount = new AtomicInteger();
Files.walkFileTree(path, new SimpleFileVisitor<Path>(){
    @Override
    public FileVisitResult visitFile(Path file, BasicFileAttributes attrs)
        throws IOException {
        if (file.toFile().getName().endsWith(".jar")) {
            fileCount.incrementAndGet();
        }
        return super.visitFile(file, attrs);
    }
});
System.out.println(fileCount);
删除多级目录
Path path = Paths.get("d:\\a");
Files.walkFileTree(path, new SimpleFileVisitor<Path>(){
    @Override
    public FileVisitResult visitFile(Path file, BasicFileAttributes attrs)
        throws IOException {
        Files.delete(file);
        return super.visitFile(file, attrs);
    }

    @Override
    public FileVisitResult postVisitDirectory(Path dir, IOException exc)
        throws IOException {
        Files.delete(dir);
        return super.postVisitDirectory(dir, exc);
    }
});
拷贝多级目录
public static void main(String[] args) throws IOException {
    long start = System.currentTimeMillis();
    String source = "D:\\netty讲义";
    String target = "D:\\netty讲义aaa";

    Files.walk(Paths.get(source)).forEach(path -> {
        try {
            String targetName = path.toString().replace(source, target);  //注意path的形式是D:\netty讲义,替换时只能用转义字符的形式
            // 是目录
            if (Files.isDirectory(path)) {
                Files.createDirectory(Paths.get(targetName));
            }
            // 是普通文件
            else if (Files.isRegularFile(path)) {
                Files.copy(path, Paths.get(targetName));
            }
        } catch (IOException e) {
            e.printStackTrace();
        }
    });
    long end = System.currentTimeMillis();
    System.out.println(end - start);
}注意:子文件夹如果有和父文件夹同名的情况可能会有问题
4.网络编程
4.1 非阻塞 vs 阻塞
1.阻塞
阻塞模式下,相关方法都会导致线程暂停
ServerSocketChannel.accept()会在没有连接建立时让线程暂停
SocketChannel.read()会在没有数据可读时让线程暂停
阻塞的表现其实就是线程暂停了,暂停期间不会占用 cpu,但线程相当于闲置
单线程下,阻塞方法之间相互影响,几乎不能正常工作,需要多线程支持
但多线程下,有新的问题,体现在以下方面:
32 位 jvm 一个线程 320k,64 位 jvm 一个线程 1024k,如果连接数过多,必然导致 OOM,并且线程太多,反而会因为频繁上下文切换导致性能降低
可以采用线程池技术来减少线程数和线程上下文切换,但治标不治本,如果有很多连接建立,但长时间 inactive,会阻塞线程池中所有线程,因此不适合长连接,只适合短连接
举例:
服务器端
public class Server {
    public static void main(String[] args) throws Exception {
        ServerSocketChannel ssc = ServerSocketChannel.open();   //创建服务器
        ssc.bind(new InetSocketAddress(8080));      //监听端口

        List<SocketChannel> channels = new ArrayList<>();
        while (true) {
            System.out.println("服务端等待连接");
            channels.add(ssc.accept());     //建立连接,阻塞
            for (SocketChannel sc : channels) {
                ByteBuffer byteBuffer = ByteBuffer.allocate(16);

                System.out.println("服务端等待读取数据");
                sc.read(byteBuffer);        //阻塞
                byteBuffer.flip();
                ByteBufferUtil.debugAll(byteBuffer);
            }
        }
    }
}
客户端
public class Client {
    public static void main(String[] args) throws IOException, InterruptedException {
        SocketChannel sc = SocketChannel.open();    //创建客户端
        sc.connect(new InetSocketAddress("localhost",8080));    //连接端口
        while (true) {
            sc.write(ByteBuffer.wrap("hello,world".getBytes()));
            Thread.sleep(100000);
        }
    }
}
运行后发现多个问题:
除非等到下一个链接连接到服务器,否则只能接收当前客户端一条消息
连接到第二个客户端也需要第一个客户端发送消息后,才能接收到第二个客户端的消息
2.非阻塞
非阻塞模式下,相关方法都会不会让线程暂停
在 ServerSocketChannel.accept 在没有连接建立时,会返回 null,继续运行
SocketChannel.read 在没有数据可读时,会返回 0,但线程不必阻塞,可以去执行其它 SocketChannel 的 read 或是去执行 ServerSocketChannel.accept
写数据时,线程只是等待数据写入 Channel 即可,无需等 Channel 通过网络把数据发送出去
但非阻塞模式下,即使没有连接建立和可读数据,线程仍然在不断运行,导致 cpu 空转
数据复制过程中,线程实际还是阻塞的(AIO 改进的地方)
举例:
服务端
public class Server {
    public static void main(String[] args) throws Exception {
        ServerSocketChannel ssc = ServerSocketChannel.open();
        ssc.configureBlocking(false);           //设置非阻塞模式
        ssc.bind(new InetSocketAddress(8080));

        List<SocketChannel> channels = new ArrayList<>();
        while (true) {
            SocketChannel accept = ssc.accept();

            if (accept != null) {
                channels.add(accept);     //非阻塞
                System.out.println("服务端建立连接" + accept);
            }
            for (SocketChannel sc : channels) {
                ByteBuffer byteBuffer = ByteBuffer.allocate(16);

                int read = sc.read(byteBuffer);		//非阻塞
                if (read>0) {
                    System.out.println("服务端读取到数据");
                    byteBuffer.flip();
                    ByteBufferUtil.debugAll(byteBuffer);
                }
            }
        }
    }
}
客户端
public class Client {
    public static void main(String[] args) throws IOException, InterruptedException {
        SocketChannel sc = SocketChannel.open();
        sc.connect(new InetSocketAddress("localhost",8080));
        while (true) {
            sc.write(ByteBuffer.wrap("hello,world".getBytes()));
            Thread.sleep(100000);
        }
    }
}
3.多路复用
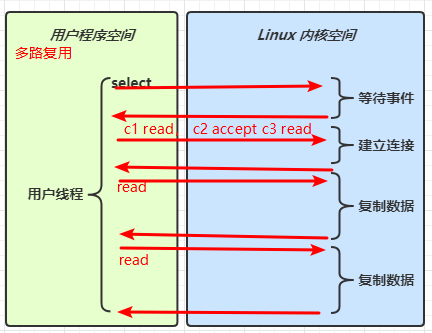
单线程可以配合Selector完成对多个Channel可读写事件的监控,这称之为多路复用
多路复用仅针对网络 IO,普通文件 IO没法利用多路复用
如果不用Selector的非阻塞模式,线程大部分时间都在做无用功,而Selector能够保证
有可连接事件时才去连接
有可读事件才去读取
有可写事件才去写入
限于网络传输能力,Channel未必时时可写,一旦Channel可写,会触发Selector的可写事件
4.2 Selector
优势:
一个线程配合 selector 就可以监控多个 channel 的事件,事件发生线程才去处理。避免非阻塞模式下所做无用功
让这个线程能够被充分利用
节约了线程的数量
减少了线程上下文切换
1.创建
创建selector,可以监听多个channel
Selector selector = Selector.open();2.绑定 Channel 事件
也称之为注册事件,selector只会处理绑定过的事件
channel.configureBlocking(false);
SelectionKey key = channel.register(selector, 绑定事件, 附件);
channel 必须工作在非阻塞模式
FileChannel 没有非阻塞模式,因此不能配合 selector 一起使用
绑定的事件类型可以有:
connect - 客户端连接成功时触发
key.interestOps(SelectionKey.OP_CONNECT); //也可不在注册时直接绑定,而是等到后续指定绑定类型accept - 服务器端成功接受连接时触发
sscKey.interestOps(SelectionKey.OP_ACCEPT);read - 数据可读入时触发,有因为接收能力弱,数据暂不能读入的情况
sscKey.interestOps(SelectionKey.OP_READ);write - 数据可写出时触发,有因为发送能力弱,数据暂不能写出的情况
sscKey.interestOps(SelectionKey.OP_WRITE);3.监听 Channel 事件
可以通过下面三种方法来监听是否有事件发生,方法的返回值代表有多少channel发生了事件(注意:Selector只会监听绑定过的类型)
方法1,阻塞直到绑定事件发生
int count = selector.select();方法2,阻塞直到绑定事件发生,或是超时(时间单位为 ms)
int count = selector.select(long timeout);方法3,不会阻塞,也就是不管有没有事件,立刻返回,自己根据返回值检查是否有事件
int count = selector.selectNow();
if(count <= 0) {
    continue;
} else {
    ...
}注意:select 何时不阻塞?
事件发生时
客户端发起连接请求,会触发accept事件
客户端发送数据过来,客户端正常、异常关闭时,都会触发read事件,另外如果发送的数据大于buffer缓冲区,会触发多次读取事件
channel可写,会触发write事件
在linux下nio bug发生时
调用selector.wakeup()方法
调用selector.close()方法
selector所在线程interrupt
有事件未处理时
4.取消事件
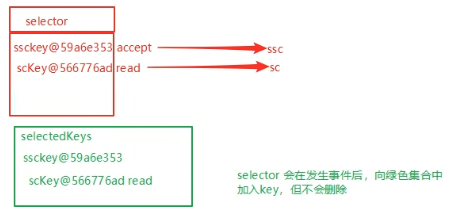
事件发生后能否不处理?事件发生后,要么处理(accept、read、write),要么取消(cancel),不能什么都不做,否则下次该事件仍会触发,这是因为 nio 底层使用的是水平触发
当接收到事件但未对事件处理时,selector.select()不会陷入阻塞,而是继续执行,回到 CPU 空转的状态。因此必须要么处理事件,要么取消未处理的事件。取消事件后,Selector就无法再对该事件类型进行接受了
Selector selector = Selector.open();    //创建selector,可以监听多个channel

ServerSocketChannel ssc = ServerSocketChannel.open();
ssc.configureBlocking(false);

SelectionKey sscKey = ssc.register(selector, 0, null);  //建立selector和channel的关系(绑定)
sscKey.interestOps(SelectionKey.OP_ACCEPT);  //指定消息类型为accept

ssc.bind(new InetSocketAddress(8080));
while (true) {
    selector.select();  //没有事件发生时会陷入阻塞
    Iterator<SelectionKey> iterator = selector.selectedKeys().iterator();
    while (iterator.hasNext()) {
        SelectionKey key = iterator.next();
        System.out.println("接收到accept事件");
        key.cancel();		//取消事件。取消后后续的客户端accept事件不会被selcetor接收
    }
}注意:cancel的作用
cancel()方法会取消注册在 selector 上的 channel,并从 keys 集合中删除 key 后续不会再监听事件
5.处理 accept 事件
客户端
public class Client {
    public static void main(String[] args) {
        try (Socket socket = new Socket("localhost", 8080)) {
            socket.getOutputStream().write("world".getBytes());
            System.in.read();
        } catch (IOException e) {
            e.printStackTrace();
        }
    }
}
服务端
@Slf4j
public class Server {
    public static void main(String[] args) {
        try (ServerSocketChannel channel = ServerSocketChannel.open()) {	//创建selector,可以监听多个channel
            channel.bind(new InetSocketAddress(8080));
            System.out.println(channel);

            Selector selector = Selector.open();
            channel.configureBlocking(false);
            channel.register(selector, SelectionKey.OP_ACCEPT);

            while (true) {
                int count = selector.select();
                log.debug("select count: {}", count);

                // 获取所有事件
                Set<SelectionKey> keys = selector.selectedKeys();

                // 遍历所有事件,逐一处理
                Iterator<SelectionKey> iter = keys.iterator();
                while (iter.hasNext()) {
                    SelectionKey key = iter.next();
                    // 判断事件类型
                    if (key.isAcceptable()) {
                        ServerSocketChannel c = (ServerSocketChannel) key.channel();
                        // 处理事件
                        SocketChannel sc = c.accept();
                        log.debug("{}", sc);
                    }
                    // 处理完毕,必须将事件移除,否则会陷入循环一直处理这个事件
                    iter.remove();
                }
            }
        } catch (IOException e) {
            e.printStackTrace();
        }
    }
}
6.处理 read 事件
客户端
public class Client {
    public static void main(String[] args) throws IOException, InterruptedException {
        SocketChannel sc = SocketChannel.open();    //创建客户端
        sc.connect(new InetSocketAddress("localhost",8080));    //连接端口
        sc.write(ByteBuffer.wrap("0123\n456789abcdef".getBytes()));
        sc.write(ByteBuffer.wrap("0123456789abcdef3333\n".getBytes()));
        sc.close();
    }
}
服务端
@Slf4j
public class ChannelDemo6 {
    public static void main(String[] args) {
        try (ServerSocketChannel channel = ServerSocketChannel.open()) {
            channel.bind(new InetSocketAddress(8080));
            System.out.println(channel);
            Selector selector = Selector.open();
            channel.configureBlocking(false);
            channel.register(selector, SelectionKey.OP_ACCEPT);

            while (true) {
                int count = selector.select();
                log.debug("select count: {}", count);

                // 获取所有事件
                Set<SelectionKey> keys = selector.selectedKeys();

                // 遍历所有事件,逐一处理
                Iterator<SelectionKey> iter = keys.iterator();
                while (iter.hasNext()) {
                    SelectionKey key = iter.next();
                    // 判断事件类型
                    if (key.isAcceptable()) {		//如果是连接的类型就再把链接的管道也绑定到Selector上,key为读取类型
                        ServerSocketChannel c = (ServerSocketChannel) key.channel();
                        SocketChannel sc = c.accept();
                        sc.configureBlocking(false);
                        sc.register(selector, SelectionKey.OP_READ);
                        log.debug("连接已建立: {}", sc);
                    } else if (key.isReadable()) {	//如果是读取类型就直接读取数据
                        SocketChannel sc = (SocketChannel) key.channel();
                        ByteBuffer buffer = ByteBuffer.allocate(128);
                        int read = sc.read(buffer);
                        if(read == -1) {
                            key.cancel();
                            sc.close();
                        } else {
                            buffer.flip();
                            debug(buffer);
                        }
                    }
                    // 处理完毕,必须将事件移除
                    iter.remove();
                }
            }
        } catch (IOException e) {
            e.printStackTrace();
        }
    }
}注意:为何要iter.remove()?
因为 select 在事件发生后,就会将相关的 key 放入 selectedKeys 集合,但不会在处理完后从 selectedKeys 集合中移除,需要我们自己remove()。
举例:处理完毕的事件是不会主动删除的,而是会在下次迭代时继续出现
if (key.isAcceptable()) {	//如果是连接的类型就再把链接的管道也绑定到Selector上,key为读取类型
 ServerSocketChannel c = (ServerSocketChannel) key.channel();
 SocketChannel sc = c.accept();
 sc.configureBlocking(false);
 sc.register(selector, SelectionKey.OP_READ);
 log.debug("连接已建立: {}", sc);
} else if (key.isReadable()) {	//如果是读取类型就直接读取数据
 SocketChannel sc = (SocketChannel) key.channel();
 ByteBuffer buffer = ByteBuffer.allocate(128);
 int read = sc.read(buffer);
 if(read == -1) {
     key.cancel();
     sc.close();
 } else {
     buffer.flip();
     ByteBufferUtil.debugAll(buffer);
 }
}
//iterator.remove();		//取消事件
当一个客户端连接到服务端后触发了 ssckey 上的 accept 事件,没有移除 ssckey
当客户端发送消息时触发了 sckey 上的 read 事件,但由于建立连接的那个事件没有被删除,也就是 selectedKeys 中还有上次的 ssckey ,会再次执行if中的代码。而此时根本获取不到c.accept()的结果,因此设置sc为非阻塞模式会报空指针异常
最终Selector内存结构如下:
开启两个客户端,修改一下发送文字,输出
sun.nio.ch.ServerSocketChannelImpl[/0:0:0:0:0:0:0:0:8080]
21:16:39 [DEBUG] [main] c.i.n.ChannelDemo6 - select count: 1
21:16:39 [DEBUG] [main] c.i.n.ChannelDemo6 - 连接已建立: java.nio.channels.SocketChannel[connected local=/127.0.0.1:8080 remote=/127.0.0.1:60367]
21:16:39 [DEBUG] [main] c.i.n.ChannelDemo6 - select count: 1
         +-------------------------------------------------+
         |  0  1  2  3  4  5  6  7  8  9  a  b  c  d  e  f |
+--------+-------------------------------------------------+----------------+
|00000000| 68 65 6c 6c 6f                                  |hello           |
+--------+-------------------------------------------------+----------------+
21:16:59 [DEBUG] [main] c.i.n.ChannelDemo6 - select count: 1
21:16:59 [DEBUG] [main] c.i.n.ChannelDemo6 - 连接已建立: java.nio.channels.SocketChannel[connected local=/127.0.0.1:8080 remote=/127.0.0.1:60378]
21:16:59 [DEBUG] [main] c.i.n.ChannelDemo6 - select count: 1
         +-------------------------------------------------+
         |  0  1  2  3  4  5  6  7  8  9  a  b  c  d  e  f |
+--------+-------------------------------------------------+----------------+
|00000000| 77 6f 72 6c 64                                  |world           |
+--------+-------------------------------------------------+----------------+
客户端关闭问题
当客户端关闭时,无论是否强制关闭都会触发read事件,因此需要在处理read事件时添加断开客户端连接的逻辑
如果read返回 >0 说明还有数据,0表示读取完成,-1表示断开
服务端
public class Server {
    public static void main(String[] args) throws Exception {
        Selector selector = Selector.open();

        ServerSocketChannel ssc = ServerSocketChannel.open();
        ssc.configureBlocking(false);

        SelectionKey sscKey = ssc.register(selector, 0, null);
        sscKey.interestOps(SelectionKey.OP_ACCEPT);

        ssc.bind(new InetSocketAddress(8080));
        while (true) {
            selector.select();
            Iterator<SelectionKey> iterator = selector.selectedKeys().iterator();
            while (iterator.hasNext()) {
                SelectionKey key = iterator.next();

                // 判断事件类型
                if (key.isAcceptable()) {
                    ServerSocketChannel c = (ServerSocketChannel) key.channel();
                    SocketChannel sc = c.accept();
                    sc.configureBlocking(false);
                    sc.register(selector, SelectionKey.OP_READ);
                    log.debug("连接已建立: {}", sc);
                } else if (key.isReadable()) {
                    try {
                        SocketChannel sc = (SocketChannel) key.channel();
                        ByteBuffer buffer = ByteBuffer.allocate(16);
                        int read = sc.read(buffer);
                        if(read == -1) {
                            key.cancel();		//客户端正常close()时,read会返回-1
                            sc.close();
                        } else {
                            buffer.flip();
                            ByteBufferUtil.debugAll(buffer);
                        }
                    } catch (Exception e) {     //如果客户端强行关闭连接,会产生一个read事件并发生异常
                        e.printStackTrace();
                        key.cancel();
                    }
                }
                iterator.remove();
            }
        }
    }
}
客户端
public class Client {
    public static void main(String[] args) throws IOException, InterruptedException {
        SocketChannel sc = SocketChannel.open();    //创建客户端
        sc.connect(new InetSocketAddress("localhost",8080));    //连接端口
        sc.write(ByteBuffer.wrap("hello,world".getBytes()));
        sc.close();
    }
}
边界问题的处理
以BIO为例,不处理边界问题时:
客户端
public class Client {
    public static void main(String[] args) throws IOException {
        Socket max = new Socket("localhost", 9000);
        OutputStream out = max.getOutputStream();
        out.write("hello".getBytes());
        out.write("world".getBytes());
        out.write("你好".getBytes());
        max.close();
    }
}
服务端
public class Server {
    public static void main(String[] args) throws IOException {
        ServerSocket ss=new ServerSocket(9000);
        while (true) {
            Socket s = ss.accept();
            InputStream in = s.getInputStream();
            byte[] arr = new byte[4];		//一个中文占三个字节,4个字节的缓冲区会出现半包现象
            while(true) {
                int read = in.read(arr);
                if(read == -1) {
                    break;
                }
                System.out.println(new String(arr, 0, read));
            }
        }
    }
}
输出
hell
owor
ld�
�好
由此可见,必须对消息的边界进行处理

处理思路:
固定消息长度,数据包大小一样,服务器按预定长度读取,缺点是浪费带宽
按分隔符拆分,预定义一个分隔符表示消息的结尾,缺点是效率低
TLV 格式,即 Type 类型、Length 长度、Value 数据,首先获取类型和长度,按照长度的大小分配合适的 buffer,缺点是 buffer 需要提前分配,如果内容过大,则影响 server 吞吐量
Http 1.1 是 TLV 格式
Http 2.0 是 LTV 格式
举例:按分隔符拆分 + 扩容Buffer的处理方式
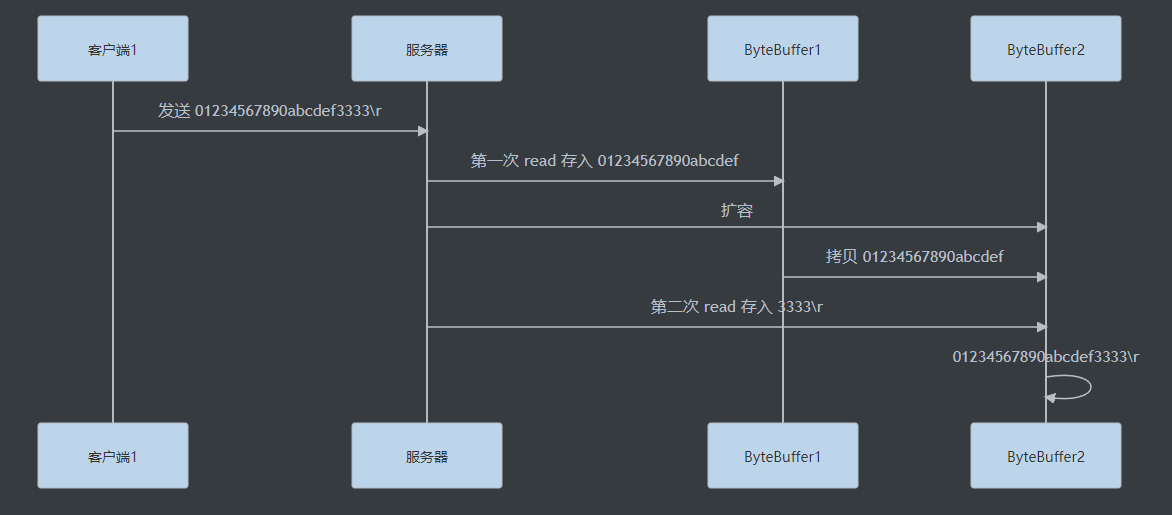
处理流程:(此处举例超过ByteBuffer容量的消息如何处理)
服务端
private static void split(ByteBuffer source) {
    source.flip();
    for (int i = 0; i < source.limit(); i++) {
        // 找到一条完整消息
        if (source.get(i) == '\n') {
            int length = i + 1 - source.position();
            ByteBuffer target = ByteBuffer.allocate(length);
            for (int j = 0; j < length; j++) {
                target.put(source.get());
            }
            debugAll(target);
        }
    }
    source.compact();
}

public static void main(String[] args) throws IOException {
    Selector selector = Selector.open();
    ServerSocketChannel ssc = ServerSocketChannel.open();
    ssc.configureBlocking(false);
    SelectionKey sscKey = ssc.register(selector, 0, null);
    sscKey.interestOps(SelectionKey.OP_ACCEPT);
    log.debug("sscKey:{}", sscKey);
    ssc.bind(new InetSocketAddress(8080));
    while (true) {
        selector.select();
        Iterator<SelectionKey> iter = selector.selectedKeys().iterator();
        while (iter.hasNext()) {
            SelectionKey key = iter.next();
            iter.remove();
            log.debug("key: {}", key);
            if (key.isAcceptable()) { // 如果是 accept
                ServerSocketChannel channel = (ServerSocketChannel) key.channel();
                SocketChannel sc = channel.accept();
                sc.configureBlocking(false);
                ByteBuffer buffer = ByteBuffer.allocate(16); // attachment,初始值16字节
                // 将一个 byteBuffer 作为附件关联到 selectionKey 上,每一个key拥有自己的byteBuffer
                SelectionKey scKey = sc.register(selector, 0, buffer);
                scKey.interestOps(SelectionKey.OP_READ);
                log.debug("{}", sc);
                log.debug("scKey:{}", scKey);
            } else if (key.isReadable()) { // 如果是 read
                try {
                    SocketChannel channel = (SocketChannel) key.channel();
                    // 获取 selectionKey 上关联的附件
                    ByteBuffer buffer = (ByteBuffer) key.attachment();
                    int read = channel.read(buffer);
                    if(read == -1) {
                        key.cancel();
                    } else {
                        split(buffer);
                        // 需要扩容
                        if (buffer.position() == buffer.limit()) {
                            ByteBuffer newBuffer = ByteBuffer.allocate(buffer.capacity() * 2);
                            buffer.flip();
                            newBuffer.put(buffer); // 0123456789abcdef3333\n
                            key.attach(newBuffer); // 关联新的附件
                        }
                    }
                } catch (IOException e) {
                    e.printStackTrace();
                    key.cancel();
                }
            }
        }
    }
}
客户端
SocketChannel sc = SocketChannel.open();
sc.connect(new InetSocketAddress("localhost", 8080));
sc.write(Charset.defaultCharset().encode("0123\n456789abcdef"));
sc.write(Charset.defaultCharset().encode("0123456789abcdef3333\n"));
ByteBuffer 大小分配
每个 channel 都需要记录可能被切分的消息,因为 ByteBuffer 不能被多个 channel 共同使用,因此需要为每个 channel 维护一个独立的 ByteBuffer
ByteBuffer 不能太大,比如一个 ByteBuffer 1Mb 的话,要支持百万连接就要 1Tb 内存,因此需要设计大小可变的 ByteBuffer
一种思路是首先分配一个较小的 buffer,例如 4k,如果发现数据不够,再分配 8k 的 buffer,将 4k buffer 内容拷贝至 8k buffer,优点是消息连续容易处理,缺点是数据拷贝耗费性能,参考实现 http://tutorials.jenkov.com/java-performance/resizable-array.html
另一种思路是用多个数组组成 buffer,一个数组不够,把多出来的内容写入新的数组,与前面的区别是消息存储不连续解析复杂,优点是避免了拷贝引起的性能损耗
7.处理 write 事件
非阻塞模式下,无法保证把buffer中所有数据都写入channel,因此需要追踪write()方法的返回值(代表实际写入字节数)
用selector监听所有channel的可写事件,每个channel都需要一个key来跟踪buffer,但这样又会导致占用内存过多,就有两阶段策略
当消息处理器第一次写入消息时,才将channel注册到selector上
selector检查channel上的可写事件,如果所有的数据写完了,就取消channel的注册。如果不取消,会每次可写均会触发write事件
举例:一次无法写完例子
服务端
public class Server {
    public static void main(String[] args) throws IOException {
        Selector selector = Selector.open();
        ServerSocketChannel ssc = ServerSocketChannel.open();
        ssc.configureBlocking(false);
        SelectionKey sscKey = ssc.register(selector, SelectionKey.OP_ACCEPT, null);
        ssc.bind(new InetSocketAddress(8080));

        while (true) {
            selector.select();
            Iterator<SelectionKey> iter = selector.selectedKeys().iterator();
            while (iter.hasNext()) {
                SelectionKey key = iter.next();
                iter.remove();
                log.debug("key: {}", key);

                if (key.isAcceptable()) {
                    ServerSocketChannel channel = (ServerSocketChannel) key.channel();
                    SocketChannel sc = channel.accept();
                    sc.configureBlocking(false);

                    //向客户端发送大量数据
                    StringBuilder sb = new StringBuilder();
                    for (int i = 0; i < 30000000; i++) {
                        sb.append('a');
                    }

                    ByteBuffer byteBuffer = Charset.defaultCharset().encode(sb.toString());
                    while (byteBuffer.hasRemaining()){
                        System.out.println(sc.write(byteBuffer));   //write不能保证一次将数据全部写入
                    }
                }
            }
        }
    }
}
客户端
public class Client {
    public static void main(String[] args) throws IOException, InterruptedException {
        SocketChannel sc = SocketChannel.open();    //创建客户端
        sc.connect(new InetSocketAddress("localhost", 8080));    //连接端口

        //接收数据
        int count = 0;
        while (true) {
            ByteBuffer byteBuffer = ByteBuffer.allocate(1024 * 1024);
            System.out.println(count += sc.read(byteBuffer));
            byteBuffer.clear();
        }
    }
}
输出:服务端
4587485
0
4718556
4194272
0
4587485
0
0
9437112
0
...
0
2475090
服务端由于输出缓冲区大小的限制,分了多次才将数据完整写出
注意:write为何要取消?
只要向channel发送数据时,socket缓冲可写,这个事件会频繁触发,因此应当只在socket缓冲区写不下时再关注可写事件,数据写完之后再取消关注
由于发送大数据量时是while一直阻塞,所以需要对上述代码改进
4.3 多线程优化 Selector
现在都是多核 cpu,设计时要充分考虑别让 cpu 的力量被白白浪费。前面的代码只有一个选择器,没有充分利用多核 cpu,如何改进呢?
建议分为两组选择器:
单线程配一个选择器,专门处理accept事件
创建 cpu 核心数的线程,每个线程配一个选择器,轮流处理read事件
public class MultiThreadServer {
    public static void main(String[] args) throws IOException {
        Thread.currentThread().setName("boss");

        ServerSocketChannel ssc = ServerSocketChannel.open();
        ssc.configureBlocking(false);


        Selector boss = Selector.open();
        SelectionKey sscKey = ssc.register(boss, SelectionKey.OP_ACCEPT, null);
        ssc.bind(new InetSocketAddress(8080));

        //初始化Worker线程组
        Worker[] workers = new Worker[Runtime.getRuntime().availableProcessors()];
        for (int i = 0; i < workers.length; i++) {
            workers[i] = new Worker("Worker-" + i);
        }
        AtomicInteger index = new AtomicInteger();

        while (true) {
            boss.select();
            Iterator<SelectionKey> iter = boss.selectedKeys().iterator();
            while (iter.hasNext()) {
                SelectionKey key = iter.next();
                iter.remove();

                if (key.isAcceptable()) {
                    ServerSocketChannel channel = (ServerSocketChannel) key.channel();
                    SocketChannel sc = channel.accept();
                    sc.configureBlocking(false);
                    //将读事件分散关联到worker的selector上
                    workers[index.getAndIncrement() % workers.length].register(sc);
                    log.info("将{}的读事件绑定到worker线程", sc.getRemoteAddress());
                }
            }
        }
    }

    static class Worker implements Runnable {
        private Thread thread;
        private Selector selector;
        private ConcurrentLinkedQueue<Runnable> queue;
        private String name;

        public Worker(String name) throws IOException {
            this.name = name;
            thread = new Thread(this, name);
            selector = Selector.open();
            queue = new ConcurrentLinkedQueue<>();
            thread.start();
        }

        //注意:当多线程时,selector的select()方法先于register()方法,会阻塞在select()方法处,不能进行绑定操作
        public void register(SocketChannel sc) {
            queue.add(() -> {
                try {
                    sc.register(selector, SelectionKey.OP_READ, null);
                } catch (ClosedChannelException e) {
                    throw new RuntimeException(e);
                }
            });
            selector.wakeup();  //取消select()方法的阻塞
        }

        @Override
        public void run() {
            while (true) {
                try {
                    selector.select();     //由于worker线程先于主线程的注册方法,会一直在此处阻塞,等待wakeup
                    Runnable task = queue.poll();
                    if (task != null) {
                        task.run();
                    }

                    Iterator<SelectionKey> iterator = selector.selectedKeys().iterator();
                    while (iterator.hasNext()) {
                        SelectionKey key = iterator.next();
                        iterator.remove();
                        if (key.isReadable()) {
                            log.info("worker线程输出日志");
                            ByteBuffer byteBuffer = ByteBuffer.allocate(16);
                            SocketChannel channel = (SocketChannel) key.channel();
                            channel.read(byteBuffer);
                            byteBuffer.flip();
                            ByteBufferUtil.debugAll(byteBuffer);
                        }
                    }
                } catch (IOException e) {
                    throw new RuntimeException(e);
                }
            }
        }
    }
}
如何拿到cpu个数?
Runtime.getRuntime().availableProcessors()如果工作在docker容器下,因为容器不是物理隔离的,会拿到物理cpu个数,而不是容器申请时的个数。这个问题直到jdk 10才修复,使用 jvm 参数UseContainerSupport配置,默认开启
4.4 UDP
UDP 是无连接的,client 发送数据不会管 server 是否开启
server 这边的 receive 方法会将接收到的数据存入 byte buffer,但如果数据报文超过 buffer 大小,多出来的数据会被默默抛弃
举例:
服务端
public class UdpServer {
    public static void main(String[] args) {
        try (DatagramChannel channel = DatagramChannel.open()) {
            channel.socket().bind(new InetSocketAddress(9999));
            System.out.println("waiting...");
            ByteBuffer buffer = ByteBuffer.allocate(32);
            channel.receive(buffer);
            buffer.flip();
            debug(buffer);
        } catch (IOException e) {
            e.printStackTrace();
        }
    }
}
客户端
public class UdpClient {
    public static void main(String[] args) {
        try (DatagramChannel channel = DatagramChannel.open()) {
            ByteBuffer buffer = StandardCharsets.UTF_8.encode("hello");
            InetSocketAddress address = new InetSocketAddress("localhost", 9999);
            channel.send(buffer, address);
        } catch (Exception e) {
            e.printStackTrace();
        }
    }
}
服务端输出
waiting...

         +-------------------------------------------------+
         |  0  1  2  3  4  5  6  7  8  9  a  b  c  d  e  f |
+--------+-------------------------------------------------+----------------+
|00000000| 68 65 6c 6c 6f                                  |hello           |
+--------+-------------------------------------------------+----------------+
5.NIO vs BIO vs AIO
5.1 stream vs channel
stream不会自动缓冲数据,channel会利用系统提供的发送缓冲区、接收缓冲区(更为底层)
stream仅支持阻塞API,channel同时支持阻塞、非阻塞API,网络channel可配合selector实现多路复用
二者均为全双工,即读写可以同时进行
5.2 IO 模型
同步阻塞、同步非阻塞、同步多路复用、异步阻塞(没有此情况)、异步非阻塞
同步:线程自己去获取结果(一个线程)
异步:线程自己不去获取结果,而是由其它线程送结果(至少两个线程)
当调用一次channel.read()或stream.read()后,会切换至操作系统内核态来完成真正数据读取,而读取又分为两个阶段,分别为:
等待数据阶段
复制数据阶段
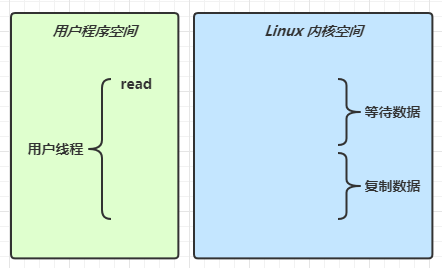
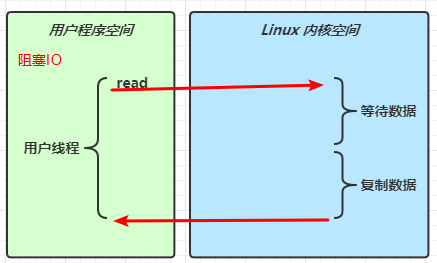
同步阻塞 IO
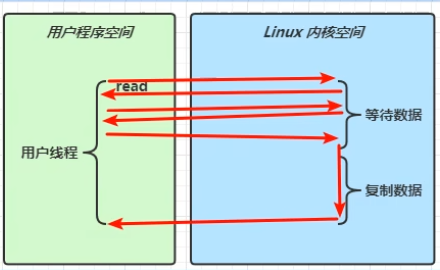
同步非阻塞 IO
等待数据时不阻塞,但复制数据时阻塞
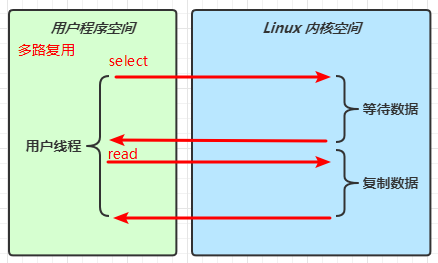
同步多路复用
信号驱动
预先在内核中设置一个回调函数,当某个事件发生时,内核使用信号(SIGIO)通知进程来处理(运行回调函数)
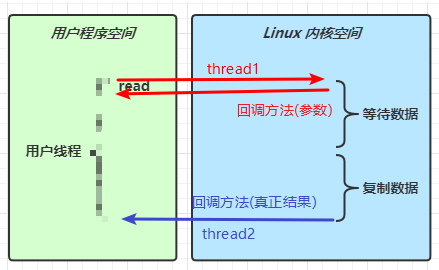
异步 IO
阻塞 IO vs 多路复用

5.3 零拷贝
1.传统 IO 问题
传统的 IO 将一个文件通过 socket 写出
File f = new File("helloword/data.txt");
RandomAccessFile file = new RandomAccessFile(file, "r");

byte[] buf = new byte[(int)f.length()];
file.read(buf);

Socket socket = ...;
socket.getOutputStream().write(buf);
内部工作流程是这样的:
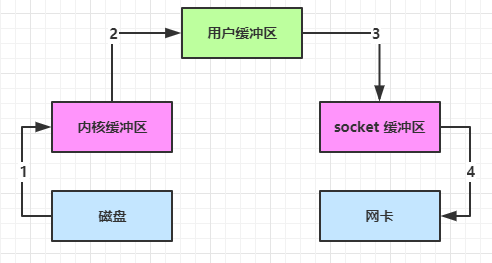
java 本身并不具备 IO 读写能力,因此read()方法调用后,要从 java 程序的用户态切换至内核态,去调用操作系统(Kernel)的读能力,将数据读入内核缓冲区。这期间用户线程阻塞,操作系统使用 DMA(Direct Memory Access)来实现文件读,其间也不会使用 cpu
DMA 也可以理解为硬件单元,用来解放 cpu 完成文件 IO
从内核态切换回用户态,将数据从内核缓冲区读入用户缓冲区(即 byte[] buf),这期间 cpu 会参与拷贝,无法利用 DMA
调用 write 方法,这时将数据从用户缓冲区(byte[] buf)写入 socket 缓冲区,cpu 会参与拷贝
接下来要向网卡写数据,这项能力 java 又不具备,因此又得从用户态切换至内核态,调用操作系统的写能力,使用 DMA 将 socket 缓冲区的数据写入网卡,不会使用 cpu
可以看到中间环节较多,java 的 IO 实际不是物理设备级别的读写,而是缓存的复制,底层的真正读写是操作系统来完成的
用户态与内核态的切换发生了 3 次,这个操作比较重量级
数据拷贝了共 4 次
2.NIO 优化
通过 DirectByteBuf
ByteBuffer.allocate(10) HeapByteBuffer 使用的是 java 内存
ByteBuffer.allocateDirect(10) DirectByteBuffer 使用的是操作系统内存
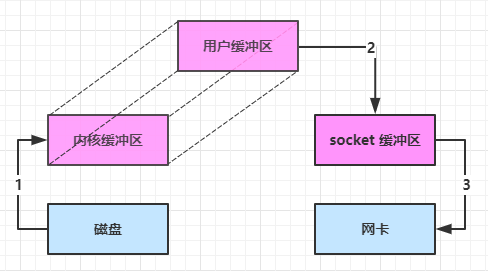
大部分步骤与优化前相同,不再赘述。唯有一点:java 可以使用 DirectByteBuf 将堆外内存映射到 jvm 内存中来直接访问使用
这块内存不受 jvm 垃圾回收的影响,因此内存地址固定,有助于 IO 读写
java 中的 DirectByteBuf 对象仅维护了此内存的虚引用,内存回收分成两步
DirectByteBuf 对象被垃圾回收,将虚引用加入引用队列
通过专门线程访问引用队列,根据虚引用释放堆外内存
减少了一次数据拷贝,用户态与内核态的切换次数没有减少
进一步优化(底层采用了 linux 2.1 后提供的 sendFile 方法),java 中对应着两个 channel 调用 transferTo/transferFrom 方法拷贝数据
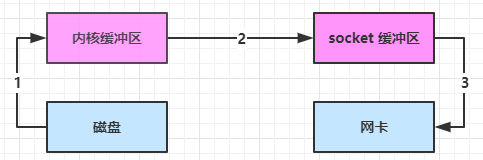
java 调用 transferTo 方法后,要从 java 程序的用户态切换至内核态,使用 DMA将数据读入内核缓冲区,不会使用 cpu
数据从内核缓冲区传输到 socket 缓冲区,cpu 会参与拷贝
最后使用 DMA 将 socket 缓冲区的数据写入网卡,不会使用 cpu
可以看到
只发生了一次用户态与内核态的切换
数据拷贝了 3 次
进一步优化(linux 2.4)
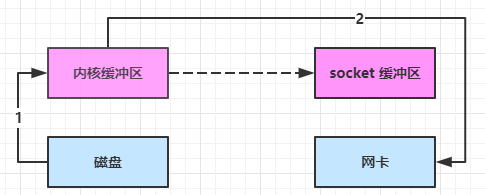
java 调用 transferTo 方法后,要从 java 程序的用户态切换至内核态,使用 DMA将数据读入内核缓冲区,不会使用 cpu
只会将一些 offset 和 length 信息拷入 socket 缓冲区,几乎无消耗
使用 DMA 将内核缓冲区的数据写入网卡,不会使用 cpu
整个过程仅只发生了一次用户态与内核态的切换,数据拷贝了 2 次。所谓的【零拷贝】,并不是真正无拷贝,而是在不会拷贝重复数据到 jvm 内存中,零拷贝的优点有:
更少的用户态与内核态的切换
不利用 cpu 计算,减少 cpu 缓存伪共享
零拷贝适合小文件传输
5.4 AIO
AIO 用来解决数据复制阶段的阻塞问题
同步意味着,在进行读写操作时,线程需要等待结果,还是相当于闲置
异步意味着,在进行读写操作时,线程不必等待结果,而是将来由操作系统来通过回调方式由另外的线程来获得结果
异步模型需要底层操作系统(Kernel)提供支持
Windows 系统通过 IOCP 实现了真正的异步 IO
Linux 系统异步 IO 在 2.6 版本引入,但其底层实现还是用多路复用模拟了异步 IO,性能没有优势
1.文件 AIO
举例:AsynchronousFileChannel
主函数
public class FileAIO {
    public static void main(String[] args) throws IOException, InterruptedException {
        AsynchronousFileChannel channel = AsynchronousFileChannel.open(Paths.get("data.txt"), StandardOpenOption.READ);
        ByteBuffer byteBuffer = ByteBuffer.allocate(16);

        log.debug("read begin..");
        //参数1:ByteBuffer; 参数2:读取的起始地址; 参数3:附件; 参数4:回调对象
        channel.read(byteBuffer, 0, byteBuffer, new CompletionHandler<Integer, ByteBuffer>() {
            //read成功后
            @Override
            public void completed(Integer result, ByteBuffer attachment) {
                attachment.flip();
                ByteBufferUtil.debugAll(attachment);
                log.debug("read completed..");
            }

            //read失败后
            @Override
            public void failed(Throwable exc, ByteBuffer attachment) {
                exc.printStackTrace();
            }
        });
        log.debug("read end..");
        Thread.sleep(1000);
    }
}注意:默认文件 AIO 使用的线程都是守护线程,所以最后要执行Thrad.sleep()以避免守护线程意外结束
输出
19:57:02 [DEBUG] [main] o.e.MultiThreadServer - read begin..
19:57:02 [DEBUG] [main] o.e.MultiThreadServer - read end..
+--------+-------------------- all ------------------------+----------------+
position: [0], limit: [11]
         +-------------------------------------------------+
         |  0  1  2  3  4  5  6  7  8  9  a  b  c  d  e  f |
+--------+-------------------------------------------------+----------------+
|00000000| 6f 6e 65 74 77 6f 74 68 72 65 65 00 00 00 00 00 |onetwothree.....|
+--------+-------------------------------------------------+----------------+
19:57:02 [DEBUG] [Thread-12] o.e.MultiThreadServer - read completed..
注意:
响应文件读取成功的是另一个线程 Thread-12
主线程并没有 IO 操作阻塞
2.网络 AIO
注:未测试
public class AioServer {
    public static void main(String[] args) throws IOException {
        AsynchronousServerSocketChannel ssc = AsynchronousServerSocketChannel.open();
        ssc.bind(new InetSocketAddress(8080));
        ssc.accept(null, new AcceptHandler(ssc));
        System.in.read();
    }

    private static void closeChannel(AsynchronousSocketChannel sc) {
        try {
            System.out.printf("[%s] %s close\n", Thread.currentThread().getName(), sc.getRemoteAddress());
            sc.close();
        } catch (IOException e) {
            e.printStackTrace();
        }
    }

    private static class ReadHandler implements CompletionHandler<Integer, ByteBuffer> {
        private final AsynchronousSocketChannel sc;

        public ReadHandler(AsynchronousSocketChannel sc) {
            this.sc = sc;
        }

        @Override
        public void completed(Integer result, ByteBuffer attachment) {
            try {
                if (result == -1) {
                    closeChannel(sc);
                    return;
                }
                System.out.printf("[%s] %s read\n", Thread.currentThread().getName(), sc.getRemoteAddress());
                attachment.flip();
                System.out.println(Charset.defaultCharset().decode(attachment));
                attachment.clear();
                // 处理完第一个 read 时,需要再次调用 read 方法来处理下一个 read 事件
                sc.read(attachment, attachment, this);
            } catch (IOException e) {
                e.printStackTrace();
            }
        }

        @Override
        public void failed(Throwable exc, ByteBuffer attachment) {
            closeChannel(sc);
            exc.printStackTrace();
        }
    }

    private static class WriteHandler implements CompletionHandler<Integer, ByteBuffer> {
        private final AsynchronousSocketChannel sc;

        private WriteHandler(AsynchronousSocketChannel sc) {
            this.sc = sc;
        }

        @Override
        public void completed(Integer result, ByteBuffer attachment) {
            // 如果作为附件的 buffer 还有内容,需要再次 write 写出剩余内容
            if (attachment.hasRemaining()) {
                sc.write(attachment);
            }
        }

        @Override
        public void failed(Throwable exc, ByteBuffer attachment) {
            exc.printStackTrace();
            closeChannel(sc);
        }
    }

    private static class AcceptHandler implements CompletionHandler<AsynchronousSocketChannel, Object> {
        private final AsynchronousServerSocketChannel ssc;

        public AcceptHandler(AsynchronousServerSocketChannel ssc) {
            this.ssc = ssc;
        }

        @Override
        public void completed(AsynchronousSocketChannel sc, Object attachment) {
            try {
                System.out.printf("[%s] %s connected\n", Thread.currentThread().getName(), sc.getRemoteAddress());
            } catch (IOException e) {
                e.printStackTrace();
            }
            ByteBuffer buffer = ByteBuffer.allocate(16);
            // 读事件由 ReadHandler 处理
            sc.read(buffer, buffer, new ReadHandler(sc));
            // 写事件由 WriteHandler 处理
            sc.write(Charset.defaultCharset().encode("server hello!"), ByteBuffer.allocate(16), new WriteHandler(sc));
            // 处理完第一个 accpet 时,需要再次调用 accept 方法来处理下一个 accept 事件
            ssc.accept(null, this);
        }

        @Override
        public void failed(Throwable exc, Object attachment) {
            exc.printStackTrace();
        }
    }
}
第二章 Netty 入门
1.Netty 概述
Netty 是一个异步的、基于事件驱动的网络应用框架,用于快速开发可维护、高性能的网络服务器和客户端
Netty 在 Java 网络应用框架中的地位就好比:Spring 框架在 JavaEE 开发中的地位。以下的框架都使用了 Netty,因为它们有网络通信需求:
Cassandra - nosql 数据库
Spark - 大数据分布式计算框架
Hadoop - 大数据分布式存储框架
RocketMQ - ali 开源的消息队列
ElasticSearch - 搜索引擎
gRPC - rpc 框架
Dubbo - rpc 框架
Spring 5.x - flux api 完全抛弃了 tomcat ,使用 netty 作为服务器端
Zookeeper - 分布式协调框架
Netty 的优势:
Netty vs NIO,工作量大,bug 多
需要自己构建协议
解决 TCP 传输问题,如粘包、半包
epoll 空轮询导致 CPU 100%
对 API 进行增强,使之更易用,如FastThreadLocal->ThreadLocal,ByteBuf=>ByteBuffer
Netty vs 其它网络应用框架
Mina 由 apache 维护,将来 3.x 版本可能会有较大重构,破坏 API 向下兼容性,Netty 的开发迭代更迅速,API 更简洁、文档更优秀
久经考验,16年,Netty 版本
2.x 2004
3.x 2008
4.x 2013
5.x 已废弃(没有明显的性能提升,维护成本高)
2.快速使用
开发一个简单的服务器端和客户端
客户端向服务器端发送 hello, world
服务器仅接收,不返回
举例:
加入Maven依赖
<dependency>
    <groupId>io.netty</groupId>
    <artifactId>netty-all</artifactId>
    <version>4.1.39.Final</version>
</dependency>
服务端
public class Server {
    public static void main(String[] args) throws IOException, InterruptedException {
        new ServerBootstrap() //服务端启动器,负责组装Netty组件
                .group(new NioEventLoopGroup()) // 1
                .channel(NioServerSocketChannel.class) // 2
                .childHandler(new ChannelInitializer<NioSocketChannel>() { // 3
                    @Override
                    protected void initChannel(NioSocketChannel ch) { //连接建立后,调用初始化方法
                        ch.pipeline().addLast(new StringDecoder()); // 5
                        ch.pipeline().addLast(new SimpleChannelInboundHandler<String>() { // 6
                            @Override
                            protected void channelRead0(ChannelHandlerContext ctx, String msg) {
                                System.out.println(msg);
                            }
                        });
                    }
                }) .bind(8080); // 4
    }
}
代码解读
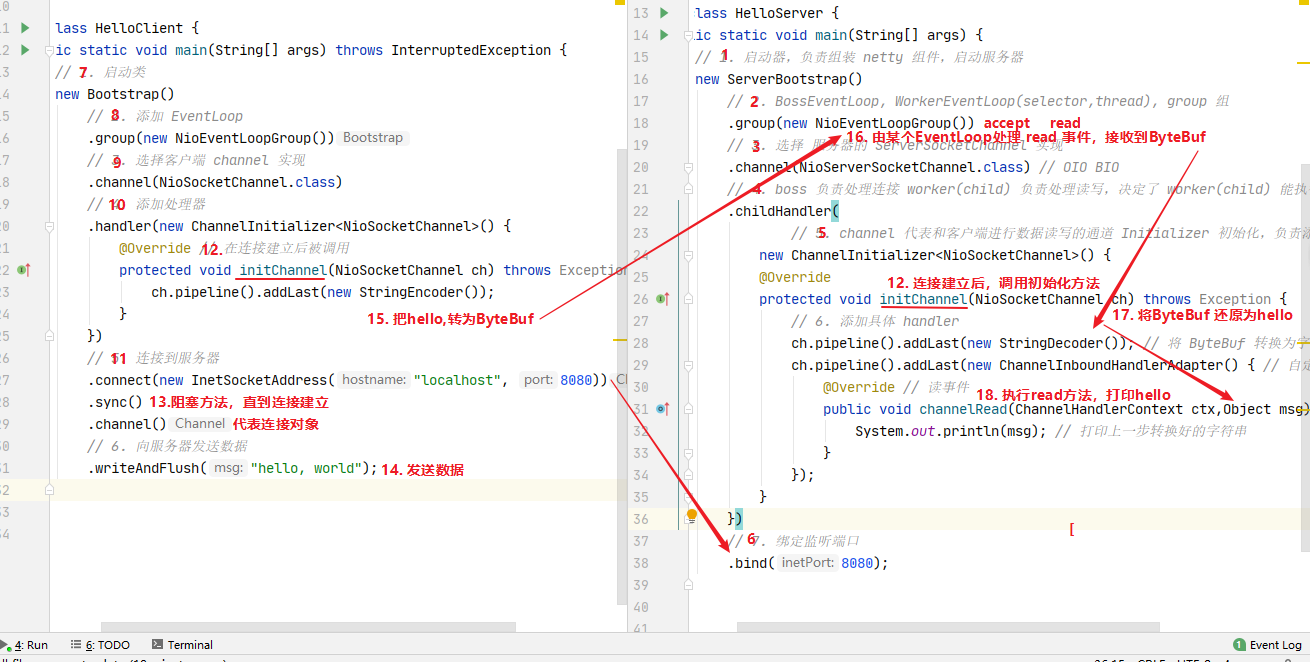
1 处,创建NioEventLoopGroup监听accept事件,NioEventLoopGroup可以简单理解为线程池 + Selector后面会详细展开
2 处,选择服务Scoket实现类,其中NioServerSocketChannel表示基于NIO的服务器端实现,其它实现还有

3 处,childHandler()方法表示接下来添加的处理器都是给SocketChannel用的,而不是给ServerSocketChannel。ChannelInitializer处理器(仅执行一次),它的作用是待客户端SocketChannel建立连接后,执行initChannel以便添加更多的处理器
4 处,ServerSocketChannel 绑定的监听端口
5 处,SocketChannel 的处理器,解码 ByteBuf => String
6 处,SocketChannel 的业务处理器,会使用上一个处理器的处理结果执行自己的逻辑
客户端
public class Client {
    public static void main(String[] args) throws InterruptedException {
        new Bootstrap()
                .group(new NioEventLoopGroup()) // 1
                .channel(NioSocketChannel.class) // 2
                .handler(new ChannelInitializer<NioSocketChannel>() { // 3
                    @Override
                    protected void initChannel(NioSocketChannel ch) {  //连接建立后,调用初始化方法
                        ch.pipeline().addLast(new StringEncoder()); // 8
                    }
                })
                .connect("127.0.0.1", 8080) // 4
                .sync() // 5
                .channel() // 6
                .writeAndFlush(new Date() + ": hello world!"); // 7
    }
}
代码解读
1 处,创建 NioEventLoopGroup,同 Server
2 处,选择客户 Socket 实现类,NioSocketChannel 表示基于 NIO 的客户端实现,其它实现还有

3 处,添加 SocketChannel 的处理器,ChannelInitializer 处理器(仅执行一次),它的作用是待客户端 SocketChannel 建立连接后,执行 initChannel 以便添加更多的处理器
4 处,指定要连接的服务器和端口
5 处,Netty 中很多方法都是异步的,如 connect,但sync()方法是阻塞等待connect建立连接完毕的
6 处,获取 channel 对象,它即为通道抽象,可以进行数据读写操作
7 处,写入消息并清空缓冲区
8 处,消息会经过通道 编码器handler 处理,这里是将 String => ByteBuf 发出
数据经过网络传输,到达服务器端,服务器端 5 和 6 处的 handler 先后被触发,走完一个流程
代码流程:
把 channel 理解为数据的通道
把 msg 理解为流动的数据,例如最开始输入是 ByteBuf,但经过 pipeline 的加工,会变成其它类型对象,最后输出又变成 ByteBuf
把 handler 理解为数据的处理工序
工序有多道,合在一起就是 pipeline,pipeline 负责发布事件(读、读取完成...)传播给每个 handler, handler 对自己感兴趣的事件进行处理(重写了相应事件处理方法)
handler 分 Inbound(入站) 和 Outbound(出站) 两类
把 eventLoop 理解为处理数据的工人
工人可以管理多个 channel 的 io 操作,并且一旦工人负责了某个 channel,就要负责到底(绑定)
工人既可以执行 io 操作,也可以进行任务处理,每位工人有任务队列,队列里可以堆放多个 channel 的待处理任务,任务分为普通任务、定时任务
工人按照 pipeline 顺序,依次按照 handler 的规划(代码)处理数据,可以为每道工序指定不同的工人
3.Netty 的组件
3.1 EventLoop & EventLoopGroup
事件循环对象
EventLoop 本质是一个单线程执行器(同时维护了一个 Selector),里面有 run 方法处理 Channel 上源源不断的 io 事件
所以EventLoop既可以执行普通run()方法、定时任务,也可以处理io事件
它的继承关系比较复杂
一条线是继承自 JUC.ScheduledExecutorService 因此包含了线程池中所有的方法
另一条线是继承自 netty 自己的 OrderedEventExecutor
提供了 boolean inEventLoop(Thread thread) 方法判断一个线程是否属于此 EventLoop
提供了 parent() 方法来看看自己属于哪个 EventLoopGroup
事件循环组
EventLoopGroup 是一组 EventLoop,Channel 一般会调用 EventLoopGroup 的 register 方法来绑定其中一个 EventLoop,后续这个 Channel 上的 io 事件都由此 EventLoop 来处理(保证了 io 事件处理时的线程安全)
继承自 netty 自己的 EventExecutorGroup
实现了 Iterable 接口提供遍历 EventLoop 的能力
另有 next 方法获取集合中下一个 EventLoop
1.创建
主函数
public static void main(String[] args) throws Exception {
    // 内部创建了两个 EventLoop, 每个 EventLoop 维护一个线程
    // NioEventLoopGroup group = new NioEventLoopGroup(2);		//能够执行io事件、普通任务、定时任务
    DefaultEventLoopGroup group = new DefaultEventLoopGroup(2);	//能够执行普通任务、定时任务
    System.out.println(group.next());
    System.out.println(group.next());
    System.out.println(group.next());

    //也可以使用for-each形式输出
    for (EventExecutor eventLoop : group) {
        System.out.println(eventLoop);
    }
}
默认线程数 = 核心数 * 2
输出
io.netty.channel.DefaultEventLoop@60f82f98
io.netty.channel.DefaultEventLoop@35f983a6
io.netty.channel.DefaultEventLoop@60f82f98		//内部以轮询方式处理任务

io.netty.channel.DefaultEventLoop@60f82f98
io.netty.channel.DefaultEventLoop@35f983a6
2.关闭
推荐使用shutdownGracefully()方法关闭事件循环组。该方法会首先切换EventLoopGroup到关闭状态从而拒绝新的任务的加入,然后在任务队列的任务都处理完成后,停止线程的运行。从而确保整体应用是在正常有序的状态下退出的
public static void main(String[] args) throws IOException, InterruptedException{
    NioEventLoopGroup group = new NioEventLoopGroup(2);
    group.shutdownGracefully();		//关闭后整个进程才能停止
}
3.NioEventLoop 处理 io 事件
服务端
@Slf4j
public class Server {
    public static void main(String[] args) throws Exception {
        new ServerBootstrap()
                .group(new NioEventLoopGroup())
                .channel(NioServerSocketChannel.class)
                .childHandler(new ChannelInitializer<NioSocketChannel>() {
                    @Override
                    protected void initChannel(NioSocketChannel nioSocketChannel) throws Exception {
                        nioSocketChannel.pipeline().addLast(new ChannelInboundHandlerAdapter() {
                            @Override
                            public void channelRead(ChannelHandlerContext ctx, Object msg) throws Exception {
                                ByteBuf buf = (ByteBuf) msg;
                                log.debug(buf.toString(Charset.defaultCharset()));      //建议强制使用某个固定字符集
                            }
                        });
                    }
                }).bind(8080);
    }
}
客户端,启动两次并对输出稍作修改
public class Client {
    public static void main(String[] args) throws InterruptedException {
        NioEventLoopGroup nioEventLoopGroup = new NioEventLoopGroup();
        Channel channel = new Bootstrap()
                .group(nioEventLoopGroup)
                .channel(NioSocketChannel.class)
                .handler(new ChannelInitializer<NioSocketChannel>() {
                    @Override
                    protected void initChannel(NioSocketChannel ch) {
                        ch.pipeline().addLast(new StringEncoder());
                    }
                })
                .connect("127.0.0.1", 8080)
                .sync()
                .channel();
        channel.writeAndFlush("Hello,World!");
        Thread.sleep(1000);     //直接发送的话服务端会发生粘包,在一行输出
        channel.writeAndFlush("你好,世界!");
        nioEventLoopGroup.shutdownGracefully();
    }
}
输出
20:05:19 [DEBUG] [nioEventLoopGroup-2-2] o.example.Server - Hello,World!
20:05:20 [DEBUG] [nioEventLoopGroup-2-2] o.example.Server - 你好,世界! //可以看到是一个线程在处理消息
20:05:38 [DEBUG] [nioEventLoopGroup-2-1] o.example.Server - Hello,World.
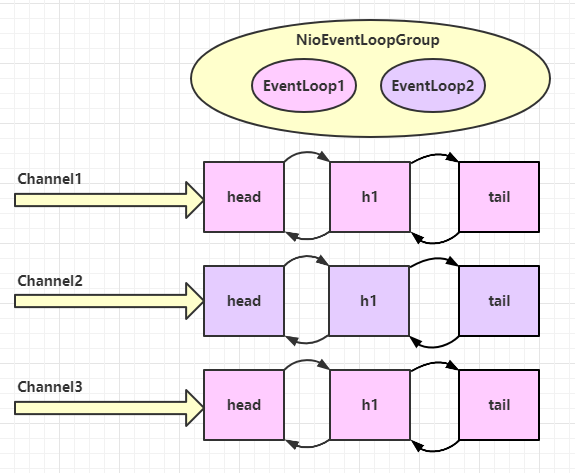
20:05:39 [DEBUG] [nioEventLoopGroup-2-1] o.example.Server - 你好,世界。 可以看到两个工人轮流处理 channel,但工人与 channel 之间进行了绑定。head、h1、tail是handler
改进:将EventLoop的职责划分清楚,若此时划分 1 个Boss、2 个Worker,需要用到group(EventLoopGroup parentGroup, EventLoopGroup childGroup)方法指定boos和worker
服务端
public class Server {
    public static void main(String[] args) throws Exception {
        new ServerBootstrap()
                //第一个只处理ServerSocketChannel的Accept事件,第二个负责SocketChannel上的读写事件
                .group(new NioEventLoopGroup(1), new NioEventLoopGroup(2))
                .channel(NioServerSocketChannel.class)
                .childHandler(new ChannelInitializer<NioSocketChannel>() {
                    @Override
                    protected void initChannel(NioSocketChannel nioSocketChannel) throws Exception {
                        nioSocketChannel.pipeline().addLast(new ChannelInboundHandlerAdapter() {
                            @Override
                            public void channelRead(ChannelHandlerContext ctx, Object msg) throws Exception {
                                ByteBuf buf = (ByteBuf) msg;
                                log.debug(buf.toString(Charset.defaultCharset()));      //建议强制使用某个固定字符集
                            }
                        });
                    }
                }).bind(8080);
    }
}
Boss的NioEventLoopGroup()不需要指定线程数,因为ServerSocketChannel只有一个,每次都只会使用BossGroup中固定的一个EventLoop
虽然会因为默认而导致EventLoop数量被设置为核心数 * 2,但线程池的线程是随用随创建,不会增加真正的线程数
客户端代码不变,启动三次并对输出稍作修改
public class Client {
    public static void main(String[] args) throws InterruptedException {
        Channel channel = new Bootstrap()
                .group(new NioEventLoopGroup())
                .channel(NioSocketChannel.class)
                .handler(new ChannelInitializer<NioSocketChannel>() {
                    @Override
                    protected void initChannel(NioSocketChannel ch) {
                        ch.pipeline().addLast(new StringEncoder());
                    }
                })
                .connect("127.0.0.1", 8080)
                .sync()
                .channel();
        channel.writeAndFlush("Hello,World?");
        Thread.sleep(1000);
        channel.writeAndFlush("你好,世界?");
    }
}
输出
20:29:44 [DEBUG] [nioEventLoopGroup-3-1] o.example.Server - Hello,World!
20:29:45 [DEBUG] [nioEventLoopGroup-3-1] o.example.Server - 你好,世界!
20:30:00 [DEBUG] [nioEventLoopGroup-3-2] o.example.Server - Hello,World.
20:30:01 [DEBUG] [nioEventLoopGroup-3-2] o.example.Server - 你好,世界。
20:30:07 [DEBUG] [nioEventLoopGroup-3-1] o.example.Server - Hello,World?
20:30:08 [DEBUG] [nioEventLoopGroup-3-1] o.example.Server - 你好,世界?
再改进:假设hanler2耗时较长,那么就会耽误当前EventLoop处理其他连接的读写事件,所以可以将耗时较长的Handler分发给另一个独立的EventLoopGroup处理
服务端
public class Server {
    public static void main(String[] args) throws Exception {
        //使用DefaultEventLoopGroup处理handler2
        DefaultEventLoopGroup defaultEventLoopGroup = new DefaultEventLoopGroup();

        new ServerBootstrap()
            .group(new NioEventLoopGroup(1), new NioEventLoopGroup(2))
            .channel(NioServerSocketChannel.class)
            .childHandler(new ChannelInitializer<NioSocketChannel>() {
                @Override
                protected void initChannel(NioSocketChannel nioSocketChannel) throws Exception {
                    nioSocketChannel.pipeline().addLast("h1", new ChannelInboundHandlerAdapter() {      //h1
                        @Override
                        public void channelRead(ChannelHandlerContext ctx, Object msg) throws Exception {
                            ByteBuf buf = (ByteBuf) msg;
                            log.debug(buf.toString(Charset.defaultCharset()));
                            ctx.fireChannelRead(msg);       //传递消息给下一个handler
                        }
                    });
                    nioSocketChannel.pipeline().addLast(defaultEventLoopGroup, "h2", new ChannelInboundHandlerAdapter() { //h2
                        @Override
                        public void channelRead(ChannelHandlerContext ctx, Object msg) throws Exception {
                            ByteBuf buf = (ByteBuf) msg;
                            log.debug(buf.toString(Charset.defaultCharset()));
                        }
                    });
                }
            }).bind(8080);
    }
}
客户端
public class Client {
    public static void main(String[] args) throws InterruptedException {
        Channel channel = new Bootstrap()
                .group(new NioEventLoopGroup())
                .channel(NioSocketChannel.class)
                .handler(new ChannelInitializer<NioSocketChannel>() {
                    @Override
                    protected void initChannel(NioSocketChannel ch) {
                        ch.pipeline().addLast(new StringEncoder());
                    }
                })
                .connect("127.0.0.1", 8080)
                .sync()
                .channel();
        channel.writeAndFlush("Hello,World.");
    }
}
输出
20:47:43 [DEBUG] [nioEventLoopGroup-4-1] o.example.Server - Hello,World.
20:47:43 [DEBUG] [defaultEventLoopGroup-2-1] o.example.Server - Hello,World.		//由defaultEventLoopGroup处理h2
可以看到 h1 由nioEventLoopGroup执行,而 h2 由defaultEventLoopGroup执行。优势是即使第一条消息的 h2 没有执行完,也不会妨碍 h1 接受下一条消息
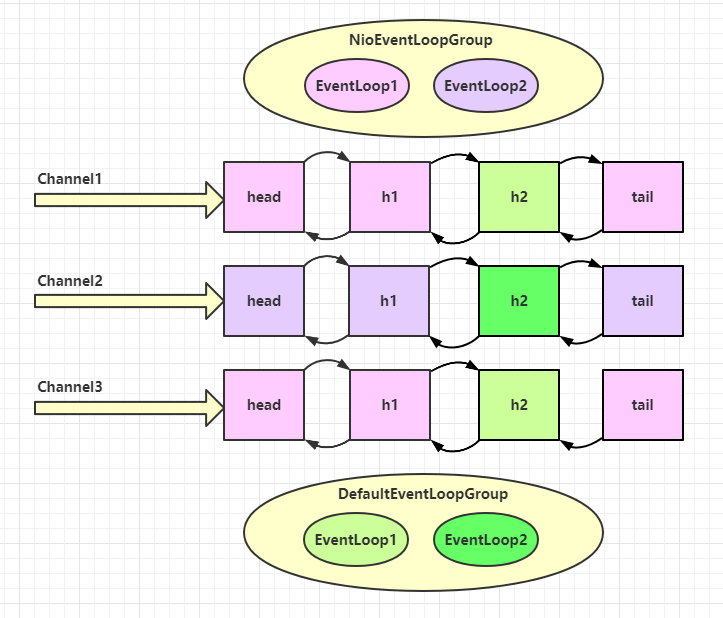
问题:handler 执行中如何切换 EnentLoop 的?
当handler执行完毕时,会执行关键代码io.netty.channel.AbstractChannelHandlerContext#invokeChannelRead()判断是否需要更换线程
static void invokeChannelRead(final AbstractChannelHandlerContext next, Object msg) {
    final Object m = next.pipeline.touch(ObjectUtil.checkNotNull(msg, "msg"), next);
    // 下一个 handler 的事件循环是否与当前的事件循环是同一个线程
    EventExecutor executor = next.executor();

    // 是,直接调用
    if (executor.inEventLoop()) {
        next.invokeChannelRead(m);
    }
    // 不是,将要执行的代码作为任务提交给下一个事件循环处理(换人)
    else {
        executor.execute(new Runnable() {
            @Override
            public void run() {
                next.invokeChannelRead(m);
            }
        });
    }
}
如果两个 handler 绑定的是同一个线程,那么就直接调用
否则,把要调用的代码封装为一个任务对象,由下一个 handler 的线程来调用
4.NioEventLoop 处理普通任务
NioEventLoop 除了可以处理 io 事件,同样可以向它提交普通任务
public static void main(String[] args) throws Exception {
    NioEventLoopGroup nioWorkers = new NioEventLoopGroup(2);

    log.debug("server start...");
    Thread.sleep(2000);
    nioWorkers.execute(() -> {
        log.debug("normal task...");
    });

    Future<Integer> submit = nioWorkers.submit(() -> {        //与execute()方法效果相同,但submit()方法有返回值
        return 100;
    });
    log.debug(submit.get().toString());
}
输出
19:42:19 [DEBUG] [main] o.example.Server - server start...
19:42:21 [DEBUG] [nioEventLoopGroup-2-1] o.example.Server - normal task...
19:42:21 [DEBUG] [main] o.example.Server - 100
可以用来执行耗时较长的任务
5.NioEventLoop 处理定时任务
public static void main(String[] args) throws IOException, InterruptedException, ExecutionException {
    NioEventLoopGroup nioWorkers = new NioEventLoopGroup(2);

    log.debug("server start...");
    Thread.sleep(2000);
    nioWorkers.scheduleAtFixedRate(() -> {
        log.debug("running...");
    }, 0, 1, TimeUnit.SECONDS);		//四个参数:定时任务、初始时间、间隔时间、时间单位
}
输出
19:43:35 [DEBUG] [main] o.example.Server - server start...
19:43:37 [DEBUG] [nioEventLoopGroup-2-1] o.example.Server - running...
19:43:38 [DEBUG] [nioEventLoopGroup-2-1] o.example.Server - running...
19:43:39 [DEBUG] [nioEventLoopGroup-2-1] o.example.Server - running...
19:43:40 [DEBUG] [nioEventLoopGroup-2-1] o.example.Server - running...
...
3.2 Channel
通过ChannelFuture对象的Channel()方法可以获得nio连接的channel对象
channel 的主要方法:
close()可以用来关闭 channel
closeFuture也可以用来处理 channel 的关闭
sync()方法作用是同步等待 channel 关闭
addListener()方法是异步等待 channel 关闭
pipeline()方法添加处理器
write()方法将数据写入
writeAndFlush()方法将数据写入并刷出
1.ChannelFuture
connect()方法会返回一个ChannelFuture对象
由于服务端代码复杂,以举例客户端代码为主。简写的客户端代码:
public class Client {
    public static void main(String[] args) throws InterruptedException {
        new Bootstrap()
                .group(new NioEventLoopGroup())
                .channel(NioSocketChannel.class)
                .handler(new ChannelInitializer<NioSocketChannel>() {
                    @Override
                    protected void initChannel(NioSocketChannel ch) {
                        ch.pipeline().addLast(new StringEncoder());
                    }
                })
                .connect("127.0.0.1", 8080)
                .sync()
                .channel()
                .writeAndFlush("Hello,World.");
    }
}
现在把它拆开来看
public class Client {
    public static void main(String[] args) throws InterruptedException {
        ChannelFuture channelFuture = new Bootstrap()
                .group(new NioEventLoopGroup())
                .channel(NioSocketChannel.class)
                .handler(new ChannelInitializer<NioSocketChannel>() {
                    @Override
                    protected void initChannel(NioSocketChannel ch) {
                        ch.pipeline().addLast(new StringEncoder());
                    }
                })
                .connect("127.0.0.1", 8080);	//返回的是 ChannelFuture 对象,它的作用是利用`channel()`方法来获取 Channel 对象

        channelFuture.sync();
        Channel channel = channelFuture.channel();
        channel.writeAndFlush("Hello,World.");
    }
}注意:connect()方法是异步非阻塞的,意味着不等连接建立,主线程就可以继续向下执行。因此 channelFuture 对象中不能立刻获得到正确的 Channel 对象,可能会出现无法发送消息的错误
举例:
ChannelFuture channelFuture = new Bootstrap()
    .group(new NioEventLoopGroup())
    .channel(NioSocketChannel.class)
    .handler(new ChannelInitializer<Channel>() {
        @Override
        protected void initChannel(Channel ch) {
            ch.pipeline().addLast(new StringEncoder());
        }
    })
    .connect("127.0.0.1", 8080);

log.debug("{}", channelFuture.channel());	// 1
channelFuture.sync(); // 2
log.debug("{}", channelFuture.channel()); // 3
执行到 1 时,连接未建立,打印 [id: 0x2e1884dd]
执行到 2 时,sync()方法是阻塞住当前线程,直到nio线程连接建立完成。[要么采用sleep的方式,使主线程休眠一会也能正确获得 channel ]
执行到 3 时,连接建立,打印 [id: 0x2e1884dd, L:/127.0.0.1:57191 - R:/127.0.0.1:8080]
除了用sync()方法可以让异步操作同步以外,还可以使用回调的方式:
ChannelFuture channelFuture = new Bootstrap()
    .group(new NioEventLoopGroup())
    .channel(NioSocketChannel.class)
    .handler(new ChannelInitializer<Channel>() {
        @Override
        protected void initChannel(Channel ch) {
            ch.pipeline().addLast(new StringEncoder());
        }
    })
    .connect("127.0.0.1", 8080);

log.debug("{}", channelFuture.channel()); // 1
connectFuture.addListener(new ChannelFutureListener() {
    @Override
    public void operationComplete(ChannelFuture future) throws Exception {
        log.debug("{}", channelFuture.channel());	// 2
    }
});
执行到 1 时,连接未建立,打印 [id: 0x749124ba]
ChannelFutureListener 会在连接建立时由建立nio连接的线程调用(其中的operationComplete()方法),因此执行到 2 时,连接肯定建立了,打印 [id: 0x749124ba, L:/127.0.0.1:57351 - R:/127.0.0.1:8080]
2.CloseFuture
channel.close()方法也是一个异步非阻塞的方法,如果不等待关闭连接就处理后续操作也可能出现问题,举例:
public class Client {
    public static void main(String[] args) throws InterruptedException {
        ChannelFuture channelFuture = new Bootstrap()
                .group(new NioEventLoopGroup())
                .channel(NioSocketChannel.class)
                .handler(new ChannelInitializer<NioSocketChannel>() {
                    @Override
                    protected void initChannel(NioSocketChannel ch) {
                        //使用Netty提供的LoggingHandler指定输出级别为debug,可以方便观察每一步的状态
                        ch.pipeline().addLast(new LoggingHandler(LogLevel.DEBUG));
                        ch.pipeline().addLast(new StringEncoder());
                    }
                })
                .connect("127.0.0.1", 8080);

        Channel channel = channelFuture.sync().channel();
        log.debug("{}", channel);
        new Thread(() -> {
            Scanner scanner = new Scanner(System.in);
            while (true) {
                String line = scanner.nextLine();
                if ("Q".equals(line)) {
                    channel.close();
                    log.debug("处理关闭后操作");
                    break;
                }
                channel.writeAndFlush(line);
            }

        }, "input").start();
    }
}
需要修改logback.xml的日志级别才能使LoggingHandler正确输出日志
<logger name="io.netty.handler.logging.LoggingHandler" level="DEBUG" additivity="false">
<appender-ref ref="STDOUT"/>
</logger>
14:00:34 [DEBUG] [nioEventLoopGroup-2-1] i.n.h.l.LoggingHandler - [id: 0x223434c1] REGISTERED
14:00:34 [DEBUG] [nioEventLoopGroup-2-1] i.n.h.l.LoggingHandler - [id: 0x223434c1] CONNECT: /127.0.0.1:8080
14:00:34 [DEBUG] [nioEventLoopGroup-2-1] i.n.h.l.LoggingHandler - [id: 0x223434c1, L:/127.0.0.1:57927 - R:/127.0.0.1:8080] ACTIVE
14:00:34 [DEBUG] [main] o.example.Client - [id: 0x223434c1, L:/127.0.0.1:57927 - R:/127.0.0.1:8080]
aabb
14:00:35 [DEBUG] [nioEventLoopGroup-2-1] i.n.h.l.LoggingHandler - [id: 0x223434c1, L:/127.0.0.1:57927 - R:/127.0.0.1:8080] WRITE: 4B
         +-------------------------------------------------+
         |  0  1  2  3  4  5  6  7  8  9  a  b  c  d  e  f |
+--------+-------------------------------------------------+----------------+
|00000000| 61 61 62 62                                     |aabb            |
+--------+-------------------------------------------------+----------------+
14:00:35 [DEBUG] [nioEventLoopGroup-2-1] i.n.h.l.LoggingHandler - [id: 0x223434c1, L:/127.0.0.1:57927 - R:/127.0.0.1:8080] FLUSH
Q
14:01:14 [DEBUG] [nioEventLoopGroup-2-1] i.n.h.l.LoggingHandler - [id: 0x223434c1, L:/127.0.0.1:57927 - R:/127.0.0.1:8080] CLOSE	// 1.
14:01:14 [DEBUG] [input] o.example.Client - 处理关闭后操作		// 2.
14:01:14 [DEBUG] [nioEventLoopGroup-2-1] i.n.h.l.LoggingHandler - [id: 0x223434c1, L:/127.0.0.1:57927 ! R:/127.0.0.1:8080] INACTIVE
14:01:14 [DEBUG] [nioEventLoopGroup-2-1] i.n.h.l.LoggingHandler - [id: 0x223434c1, L:/127.0.0.1:57927 ! R:/127.0.0.1:8080] UNREGISTERED注意:可以看到 关闭nio连接和 处理关闭后操作是由两个不同的线程完成的,这就导致可能nio连接还未关闭,后续操作就开始处理了
Netty 提供了ClosedFuture对象处理关闭操作,可以有两种关闭方法:1.同步处理关闭操作 2.异步处理关闭操作
同步处理关闭操作
public class Client {
    public static void main(String[] args) throws InterruptedException {
        ChannelFuture channelFuture = new Bootstrap()
            .group(new NioEventLoopGroup())
            .channel(NioSocketChannel.class)
            .handler(new ChannelInitializer<NioSocketChannel>() {
                @Override
                protected void initChannel(NioSocketChannel ch) {
                    //使用Netty提供的LoggingHandler指定输出级别为debug,可以方便观察每一步的状态
                    ch.pipeline().addLast(new LoggingHandler(LogLevel.DEBUG));
                    ch.pipeline().addLast(new StringEncoder());
                }
            })
            .connect("127.0.0.1", 8080);

        Channel channel = channelFuture.sync().channel();
        log.debug("{}", channel);
        new Thread(() -> {
            Scanner scanner = new Scanner(System.in);
            while (true) {
                String line = scanner.nextLine();
                if ("Q".equals(line)) {
                    channel.close();
                    break;
                }
                channel.writeAndFlush(line);
            }

        }, "input").start();

        ChannelFuture closeFuture = channel.closeFuture();		//同步阻塞式关闭连接
        log.debug("等待断开连接");
        closeFuture.sync();
        log.debug("已断开连接");
    }
}
14:17:47 [DEBUG] [nioEventLoopGroup-2-1] i.n.h.l.LoggingHandler - [id: 0x7d57f6dc] REGISTERED
14:17:47 [DEBUG] [nioEventLoopGroup-2-1] i.n.h.l.LoggingHandler - [id: 0x7d57f6dc] CONNECT: /127.0.0.1:8080
14:17:47 [DEBUG] [nioEventLoopGroup-2-1] i.n.h.l.LoggingHandler - [id: 0x7d57f6dc, L:/127.0.0.1:58472 - R:/127.0.0.1:8080] ACTIVE
14:17:47 [DEBUG] [main] o.example.Client - [id: 0x7d57f6dc, L:/127.0.0.1:58472 - R:/127.0.0.1:8080]
14:17:47 [DEBUG] [main] o.example.Client - 等待断开连接
Q
14:17:49 [DEBUG] [nioEventLoopGroup-2-1] i.n.h.l.LoggingHandler - [id: 0x7d57f6dc, L:/127.0.0.1:58472 - R:/127.0.0.1:8080] CLOSE
14:17:49 [DEBUG] [main] o.example.Client - 已断开连接
14:17:49 [DEBUG] [nioEventLoopGroup-2-1] i.n.h.l.LoggingHandler - [id: 0x7d57f6dc, L:/127.0.0.1:58472 ! R:/127.0.0.1:8080] INACTIVE
14:17:49 [DEBUG] [nioEventLoopGroup-2-1] i.n.h.l.LoggingHandler - [id: 0x7d57f6dc, L:/127.0.0.1:58472 ! R:/127.0.0.1:8080] UNREGISTERED等待断开连接和 已断开连接都是由主线程执行,且 已断开连接一定会阻塞等待真正断开连接时才执行
异步处理关闭操作
public class Client {
    public static void main(String[] args) throws InterruptedException {
        ChannelFuture channelFuture = new Bootstrap()
                .group(new NioEventLoopGroup())
                .channel(NioSocketChannel.class)
                .handler(new ChannelInitializer<NioSocketChannel>() {
                    @Override
                    protected void initChannel(NioSocketChannel ch) {
                        //使用Netty提供的LoggingHandler指定输出级别为debug,可以方便观察每一步的状态
                        ch.pipeline().addLast(new LoggingHandler(LogLevel.DEBUG));
                        ch.pipeline().addLast(new StringEncoder());
                    }
                })
                .connect("127.0.0.1", 8080);

        Channel channel = channelFuture.sync().channel();
        log.debug("{}", channel);
        new Thread(() -> {
            Scanner scanner = new Scanner(System.in);
            while (true) {
                String line = scanner.nextLine();
                if ("Q".equals(line)) {
                    channel.close();
                    break;
                }
                channel.writeAndFlush(line);
            }
        }, "input").start();

        ChannelFuture closeFuture = channel.closeFuture();
        log.debug("等待断开连接");
        closeFuture.addListener(new ChannelFutureListener() {		//添加Listener,由关闭nio连接的线程执行operationComplete()方法
            @Override
            public void operationComplete(ChannelFuture future) throws Exception {
                log.debug("已断开连接");
            }
        });
    }
}
14:20:21 [DEBUG] [nioEventLoopGroup-2-1] i.n.h.l.LoggingHandler - [id: 0xb0a7ce69] REGISTERED
14:20:21 [DEBUG] [nioEventLoopGroup-2-1] i.n.h.l.LoggingHandler - [id: 0xb0a7ce69] CONNECT: /127.0.0.1:8080
14:20:21 [DEBUG] [nioEventLoopGroup-2-1] i.n.h.l.LoggingHandler - [id: 0xb0a7ce69, L:/127.0.0.1:58599 - R:/127.0.0.1:8080] ACTIVE
14:20:21 [DEBUG] [main] o.example.Client - [id: 0xb0a7ce69, L:/127.0.0.1:58599 - R:/127.0.0.1:8080]
14:20:21 [DEBUG] [main] o.example.Client - 等待断开连接
Q
14:20:25 [DEBUG] [nioEventLoopGroup-2-1] i.n.h.l.LoggingHandler - [id: 0xb0a7ce69, L:/127.0.0.1:58599 - R:/127.0.0.1:8080] CLOSE
14:20:25 [DEBUG] [nioEventLoopGroup-2-1] o.example.Client - 已断开连接 //与断开连接的线程是同一个线程
14:20:25 [DEBUG] [nioEventLoopGroup-2-1] i.n.h.l.LoggingHandler - [id: 0xb0a7ce69, L:/127.0.0.1:58599 ! R:/127.0.0.1:8080] INACTIVE
14:20:25 [DEBUG] [nioEventLoopGroup-2-1] i.n.h.l.LoggingHandler - [id: 0xb0a7ce69, L:/127.0.0.1:58599 ! R:/127.0.0.1:8080] UNREGISTERED3.异步的提升
问题:
为什么不在一个线程中去执行建立连接、去执行关闭 channel,那样不是也可以吗?非要用这么复杂的异步方式:比如一个线程发起建立连接,另一个线程去真正建立连接
笼统地回答:因为 netty 异步方式用了多线程、多线程就效率高。其实这些认识都比较片面,多线程和异步所提升的效率并不是所认为的
思考下面的场景,4 个医生给人看病,每个病人花费 20 分钟,而且医生看病的过程中是以病人为单位的,一个病人看完了,才能看下一个病人。假设病人源源不断地来,可以计算一下 4 个医生一天工作 8 小时,处理的病人总数是:4 * 8 * 3 = 96
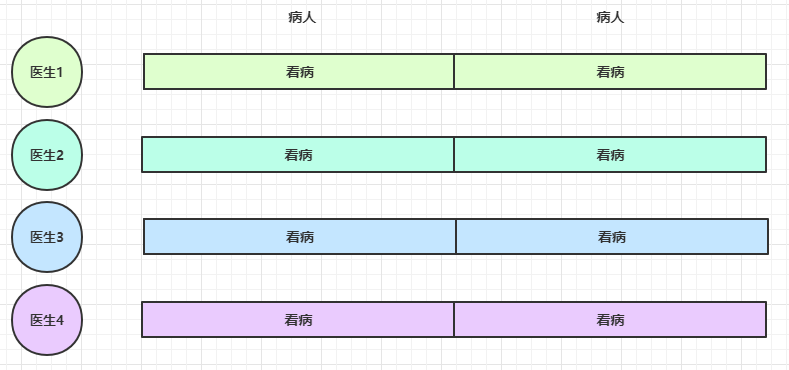
经研究发现,看病可以细分为四个步骤,经拆分后每个步骤需要 5 分钟,如下

因此可以做如下优化,只有一开始,医生 2、3、4 分别要等待 5、10、15 分钟才能执行工作,但只要后续病人源源不断地来,他们就能够满负荷工作,并且处理病人的能力提高到了 4 * 8 * 12 效率几乎是原来的四倍
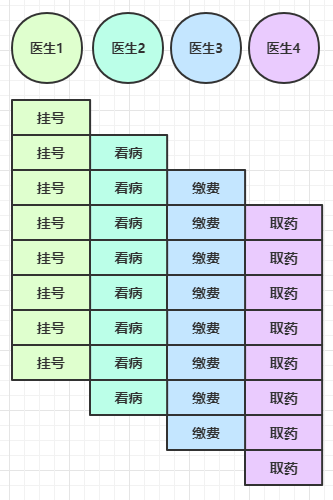
要点
单线程没法异步提高效率,必须配合多线程、多核 cpu 才能发挥异步的优势
异步并没有缩短响应时间,反而有所增加
合理进行任务拆分,也是利用异步的关键
3.3 Future & Promise
在异步处理时,经常用到这两个接口
首先要说明 netty 中的 Future 与 jdk 中的 Future 同名,但是是两个接口,netty 的 Future 继承自 jdk 的 Future,而 Promise 又对 netty Future 进行了扩展
jdk Future 只能同步等待任务结束(成功或失败)才能得到结果
netty Future 可以同步等待任务结束得到结果,也可以异步方式得到结果,但都是要等任务结束
netty Promise 不仅有 netty Future 的功能,而且脱离了任务独立存在,只作为两个线程间传递结果的容器
功能/名称 | jdk Future | netty Future | Promise |
cancel | 取消任务 | - | - |
isCanceled | 任务是否取消 | - | - |
isDone | 任务是否完成,不能区分成功失败 | - | - |
get | 获取任务结果,阻塞等待 | - | - |
getNow | - | 获取任务结果,非阻塞,还未产生结果时返回 null | - |
await | - | 等待任务结束,如果任务失败,不会抛异常,而是通过 isSuccess 判断 | - |
sync | - | 等待任务结束,如果任务失败,抛出异常 | - |
isSuccess | - | 判断任务是否成功 | - |
cause | - | 获取失败信息,非阻塞,如果没有失败,返回null | - |
addLinstener | - | 添加回调,异步接收结果 | - |
setSuccess | - | - | 设置成功结果 |
setFailure | - | - | 设置失败结果 |
1.jdk Future
1.同步任务
public static void main(String[] args) throws Exception {
    ExecutorService executorService = Executors.newFixedThreadPool(1);
    Future<?> submit = executorService.submit(() -> {
        log.debug("执行计算");
        Thread.sleep(1000);
        return 100;
    });
    log.debug("等待结果");
    log.debug("结果是 {}", submit.get());		//阻塞等待结果
}
18:05:36 [DEBUG] [pool-1-thread-1] org.example.Main - 执行计算
18:05:36 [DEBUG] [main] org.example.Main - 等待结果
18:05:37 [DEBUG] [main] org.example.Main - 结果是 1002.netty Future
1.同步任务
public static void main(String[] args) throws Exception {
    EventLoop eventLoop = new NioEventLoopGroup().next();
    Future<Integer> future = eventLoop.submit(new Callable<Integer>() {
        @Override
        public Integer call() throws Exception {
            log.debug("执行计算");
            Thread.sleep(1000);
            return 100;
        }
    });

    log.debug("等待结果");
    log.debug("结果是 {}", future.get());        //阻塞等待结果
}
18:09:36 [DEBUG] [nioEventLoopGroup-2-1] org.example.Main - 执行计算
18:09:36 [DEBUG] [main] org.example.Main - 等待结果
18:09:37 [DEBUG] [main] org.example.Main - 结果是 1002.异步任务
public static void main(String[] args) throws Exception {
    EventLoop eventLoop = new NioEventLoopGroup().next();
    Future<Integer> future = eventLoop.submit(new Callable<Integer>() {
        @Override
        public Integer call() throws Exception {
            log.debug("执行计算");
            Thread.sleep(1000);
            return 100;
        }
    });

    future.addListener(new GenericFutureListener<Future<? super Integer>>() {
        @Override
        public void operationComplete(Future<? super Integer> future) throws Exception {
            log.debug("等待结果");
            log.debug("结果是 {}", future.getNow());        //异步返回结果,不会发生阻塞
        }
    });
}
18:11:15 [DEBUG] [nioEventLoopGroup-2-1] org.example.Main - 执行计算
18:11:16 [DEBUG] [nioEventLoopGroup-2-1] org.example.Main - 等待结果
18:11:16 [DEBUG] [nioEventLoopGroup-2-1] org.example.Main - 结果是 1003.Promise
1.同步处理任务成功
public static void main(String[] args) throws Exception {
    DefaultEventLoop eventExecutors = new DefaultEventLoop();
    DefaultPromise<Integer> promise = new DefaultPromise<>(eventExecutors);     //创建结果对象

    eventExecutors.execute(() -> {
        try {
            log.debug("执行计算");
            Thread.sleep(1000);
        } catch (InterruptedException e) {
            e.printStackTrace();
        }

        promise.setSuccess(100);
        log.debug("set success, {}", 100);
    });

    log.debug("等待结果");
    log.debug("结果是 {}", promise.getNow());      // 还没有结果,返回null
    log.debug("结果是 {}", promise.get());
}
18:18:22 [DEBUG] [defaultEventLoop-1-1] org.example.Main - 执行计算
18:18:22 [DEBUG] [main] org.example.Main - 等待结果
18:18:22 [DEBUG] [main] org.example.Main - 结果是 null
18:18:23 [DEBUG] [defaultEventLoop-1-1] org.example.Main - set success, 100
18:18:23 [DEBUG] [main] org.example.Main - 结果是 1002.异步处理任务成功
public static void main(String[] args) throws Exception {
    DefaultEventLoop eventExecutors = new DefaultEventLoop();
    DefaultPromise<Integer> promise = new DefaultPromise<>(eventExecutors);

    eventExecutors.execute(() -> {
        try {
            log.debug("执行计算");
            Thread.sleep(1000);
        } catch (Exception e) {
            e.printStackTrace();
        }
        log.debug("set success, {}", 100);
        promise.setSuccess(100);
    });

    promise.addListener(future -> {			// 设置回调,异步接收结果
        // 这里的 future 就是上面的 promise
        log.debug("结果是 {}", future.getNow());
    });
}
18:42:13 [DEBUG] [defaultEventLoop-1-1] org.example.Main - 执行计算
18:42:14 [DEBUG] [defaultEventLoop-1-1] org.example.Main - set success, 100
18:42:14 [DEBUG] [defaultEventLoop-1-1] org.example.Main - 结果是 1003.同步处理任务失败 - sync & get
public static void main(String[] args) throws Exception {
    DefaultEventLoop eventExecutors = new DefaultEventLoop();
    DefaultPromise<Integer> promise = new DefaultPromise<>(eventExecutors);

    eventExecutors.execute(() -> {
        try {
            log.debug("执行计算");
            Thread.sleep(1000);
            int i = 1 / 0;
        } catch (Exception e) {
            promise.setFailure(e);      //设置失败值
            log.debug("set failure, {}", e.toString());
        }
    });

    log.debug("等待结果");
    log.debug("结果是 {}", promise.getNow());
    promise.sync();		//有异常时会抛出
    log.debug("结果是 {}", promise.get()); // get() 也会抛出异常,但是会用 ExecutionException 包一层异常
}
18:26:45 [DEBUG] [main] org.example.Main - 等待结果
18:26:45 [DEBUG] [defaultEventLoop-1-1] org.example.Main - 执行计算
18:26:45 [DEBUG] [main] org.example.Main - 结果是 null
18:26:46 [DEBUG] [defaultEventLoop-1-1] org.example.Main - set failure, java.lang.ArithmeticException: / by zero
Exception in thread "main" java.util.concurrent.ExecutionException: java.lang.ArithmeticException: / by zero
at io.netty.util.concurrent.AbstractFuture.get(AbstractFuture.java:41)
at org.example.Main.main(Main.java:32)
Caused by: java.lang.ArithmeticException: / by zero
...
at java.lang.Thread.run(Thread.java:750)4.同步处理任务失败 - await
public static void main(String[] args) throws Exception {
    DefaultEventLoop eventExecutors = new DefaultEventLoop();
    DefaultPromise<Integer> promise = new DefaultPromise<>(eventExecutors);

    eventExecutors.execute(() -> {
        try {
            log.debug("执行计算");
            Thread.sleep(1000);
            int i = 1 / 0;
        } catch (Exception e) {
            promise.setFailure(e);
            log.debug("set failure, {}", e.toString());
        }
    });

    log.debug("等待结果");
    log.debug("结果是 {}", promise.getNow());
    promise.await(); // 可添加超时时间。与 sync() 和 get() 区别在于,不会抛异常
    log.debug("结果是 {}", (promise.isSuccess() ? promise.getNow() : promise.cause()).toString());
}
18:39:38 [DEBUG] [defaultEventLoop-1-1] org.example.Main - 执行计算
18:39:38 [DEBUG] [main] org.example.Main - 等待结果
18:39:38 [DEBUG] [main] org.example.Main - 结果是 null
18:39:39 [DEBUG] [defaultEventLoop-1-1] org.example.Main - set failure, java.lang.ArithmeticException: / by zero
18:39:39 [DEBUG] [main] org.example.Main - 结果是 java.lang.ArithmeticException: / by zero5.异步处理任务失败
public static void main(String[] args) throws Exception {
    DefaultEventLoop eventExecutors = new DefaultEventLoop();
    DefaultPromise<Integer> promise = new DefaultPromise<>(eventExecutors);

    eventExecutors.execute(() -> {
        try {
            log.debug("执行计算");
            Thread.sleep(1000);
            int i = 1 / 0;
        } catch (Exception e) {
            promise.setFailure(e);
            log.debug("set failure, {}", e.toString());
        }
    });

    promise.addListener(future -> {
        log.debug("结果是 {}", (promise.isSuccess() ? promise.getNow() : promise.cause()).toString());
    });
}
18:42:51 [DEBUG] [defaultEventLoop-1-1] org.example.Main - 执行计算
18:42:52 [DEBUG] [defaultEventLoop-1-1] org.example.Main - 结果是 java.lang.ArithmeticException: / by zero
18:42:52 [DEBUG] [defaultEventLoop-1-1] org.example.Main - set failure, java.lang.ArithmeticException: / by zero6.await 死锁检查
public static void main(String[] args) throws Exception {
    DefaultEventLoop eventExecutors = new DefaultEventLoop();
    DefaultPromise<Integer> promise = new DefaultPromise<>(eventExecutors);

    eventExecutors.submit(() -> {
        System.out.println("1");
        try {
            promise.await();
            // 注意不能仅捕获 InterruptedException 异常
            // 否则 死锁检查抛出的 BlockingOperationException 会继续向上传播
            // 而提交的任务会被包装为 PromiseTask,它的 run 方法中会 catch 所有异常然后设置为 Promise 的失败结果而不会抛出
        } catch (Exception e) {
            e.printStackTrace();
        }
        System.out.println("2");
    });
    eventExecutors.submit(() -> {
        System.out.println("3");
        try {
            promise.await();
        } catch (Exception e) {
            e.printStackTrace();
        }
        System.out.println("4");
    });
}
1
2
3
4
io.netty.util.concurrent.BlockingOperationException: DefaultPromise@74eb3598(incomplete)
...
io.netty.util.concurrent.BlockingOperationException: DefaultPromise@74eb3598(incomplete)
...
at java.lang.Thread.run(Thread.java:750)3.4 Handler & Pipeline
1.Pipeline 的执行流程
ChannelHandler 用来处理 Channel 上的各种事件,分为入站、出站两种。所有 ChannelHandler 被连成一串,就是 Pipeline
入站处理器通常是 ChannelInboundHandlerAdapter 的子类,主要用来读取客户端数据,写回结果
出站处理器通常是 ChannelOutboundHandlerAdapter 的子类,主要对写回结果进行加工
打个比喻,每个 Channel 是一个产品的加工车间,Pipeline 是车间中的流水线,ChannelHandler 就是流水线上的各道工序,而后面要讲的 ByteBuf 是原材料,经过很多工序的加工:先经过一道道入站工序,再经过一道道出站工序最终变成产品
服务端
publicclassServer {
    publicstaticvoidmain(String[] args) throwsException {
        newServerBootstrap()
                .group(newNioEventLoopGroup())
                .channel(NioServerSocketChannel.class)
                .childHandler(newChannelInitializer<NioSocketChannel>() {
                    protectedvoidinitChannel(NioSocketChannelch) {
                        ch.pipeline().addLast("h1", newChannelInboundHandlerAdapter() {      //入站处理器
                            @Override
                            publicvoidchannelRead(ChannelHandlerContextctx, Objectmsg) {
                                System.out.println(1);
                                ctx.fireChannelRead(msg); // 1
                            }
                        });
                        ch.pipeline().addLast("h2", newChannelInboundHandlerAdapter() {      //入站处理器
                            @Override
                            publicvoidchannelRead(ChannelHandlerContextctx, Objectmsg) {
                                System.out.println(2);
                                ctx.fireChannelRead(msg); // 2
                            }
                        });
                        ch.pipeline().addLast("h3", newChannelInboundHandlerAdapter() {
                            @Override
                            publicvoidchannelRead(ChannelHandlerContextctx, Objectmsg) {
                                System.out.println(3);
                                // 3 只有向channel写入数据才会触发出站处理器
                                ctx.channel().writeAndFlush(ctx.alloc().buffer().writeBytes("this is server".getBytes()));
                                // ch.writeAndFlush(ctx.alloc().buffer().writeBytes("this is server".getBytes()));  //效果一致
                            }
                        });
                        ch.pipeline().addLast("h4", newChannelOutboundHandlerAdapter() {     //出站处理器
                            @Override
                            publicvoidwrite(ChannelHandlerContextctx, Objectmsg,
                                              ChannelPromisepromise) {
                                System.out.println(4);
                                ctx.write(msg, promise); // 4
                            }
                        });
                        ch.pipeline().addLast("h5", newChannelOutboundHandlerAdapter() {
                            @Override
                            publicvoidwrite(ChannelHandlerContextctx, Objectmsg,
                                              ChannelPromisepromise) {
                                System.out.println(5);
                                ctx.write(msg, promise); // 5
                            }
                        });
                        ch.pipeline().addLast("h6", newChannelOutboundHandlerAdapter() {
                            @Override
                            publicvoidwrite(ChannelHandlerContextctx, Objectmsg,
                                              ChannelPromisepromise) {
                                System.out.println(6);
                                ctx.write(msg, promise); // 6
                            }
                        });
                    }
                })
                .bind(8080);
    }
}
客户端
publicclassClient {
    publicstaticvoidmain(String[] args) throwsInterruptedException {
        newBootstrap()
            .group(newNioEventLoopGroup())
            .channel(NioSocketChannel.class)
            .handler(newChannelInitializer<Channel>() {
                @Override
                protectedvoidinitChannel(Channelch) {
                    ch.pipeline().addLast(newStringEncoder());
                }
            })
            .connect("127.0.0.1", 8080)
            .sync()
            .channel()
            .writeAndFlush("hello,world");
    }
}
服务端输出
1
2
3
6
5
4
可以看到,ChannelInboundHandlerAdapter 是按照 addLast 的顺序执行的,而 ChannelOutboundHandlerAdapter 是按照 addLast 的逆序执行的。ChannelPipeline 的实现是一个 ChannelHandlerContext(包装了 ChannelHandler) 组成的双向链表

入站处理器中,ctx.fireChannelRead(msg) 是调用下一个入站处理器
如果注释掉 1 处代码,则仅会打印 1
如果注释掉 2 处代码,则仅会打印 1 2
3 处的ctx.channel().writeAndFlush(ctx.alloc().buffer().writeBytes("this is server".getBytes()));会从尾部开始触发后续出站处理器的执行
如果注释掉 3 处代码,则仅会打印 1 2 3
类似的,出站处理器中,ctx.write(msg, promise) 的调用会触发上一个出站处理器
如果注释掉 6 处代码,则仅会打印 1 2 3 6
注意:ctx.channel().write(msg) vs ctx.write(msg)
都是触发出站处理器的执行
ctx.channel().write(msg) 从尾部开始查找出站处理器
ctx.write(msg) 是从当前节点找上一个出站处理器
3 处的 ctx.channel().write(msg) 如果改为 ctx.write(msg) 仅会打印 1 2 3,因为节点 3 之前没有其它出站处理器了
6 处的 ctx.write(msg, promise) 如果改为 ctx.channel().write(msg) 会打印 1 2 3 6 6 6... 因为 ctx.channel().write() 是从尾部开始查找,结果又是节点6 自己
服务端 pipeline 触发的原始流程,图中数字代表了处理步骤的先后次序
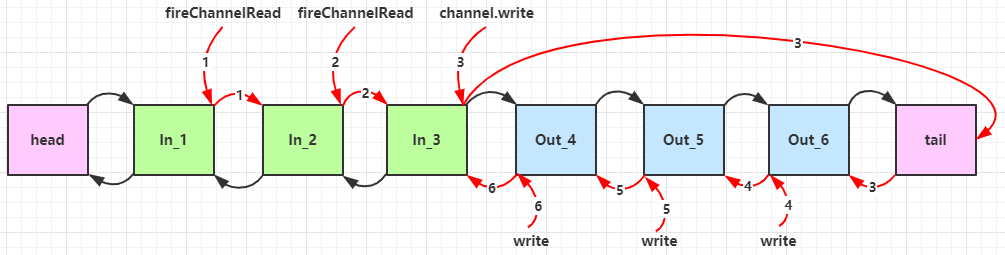
2.Handler 的消息传递
在 pipeline 的处理流程中,可以将上一个 handler 的处理流程传递给下一个 handler
protectedvoidinitChannel(NioSocketChannelch) {
    ch.pipeline().addLast("h1", newChannelInboundHandlerAdapter() {
        @Override
        publicvoidchannelRead(ChannelHandlerContextctx, Objectmsg) {
            ByteBufbuf= (ByteBuf) msg;
            Stringstr=buf.toString(Charset.defaultCharset());
            ctx.fireChannelRead(str); // 将处理结果传递给下一个handler
        }
    });
    ch.pipeline().addLast("h2", newChannelInboundHandlerAdapter() {
        @Override
        publicvoidchannelRead(ChannelHandlerContextctx, Objectmsg) {
            System.out.println(msg.toString());
            // ctx.fireChannelRead(str);    //后续没有入站处理器的话可以不进行处理
        }
    });
}
3.EmbeddedChannel 测试类
Netty 提供了它所谓的 Embedded 传输,用于测试 ChannelHandler。这个传输是一种特殊的 Channel 实现— EmbeddedChannel— 的功能,这个实现提供了通过 ChannelPipeline 传播事件的简便方法
publicstaticvoidmain(String[] args) throwsException {
ChannelInboundHandlerAdapterh1=newChannelInboundHandlerAdapter() {
@Override
publicvoidchannelRead(ChannelHandlerContextctx, Objectmsg) throwsException {
log.debug("1");
super.channelRead(ctx, msg);
}
};
ChannelInboundHandlerAdapterh2=newChannelInboundHandlerAdapter() {
@Override
publicvoidchannelRead(ChannelHandlerContextctx, Objectmsg) throwsException {
log.debug("2");
super.channelRead(ctx, msg);
}
};
ChannelOutboundHandlerAdapterh3=newChannelOutboundHandlerAdapter() {
@Override
publicvoidwrite(ChannelHandlerContextctx, Objectmsg, ChannelPromisepromise) throwsException {
log.debug("3");
super.write(ctx, msg, promise);
}
};
ChannelOutboundHandlerAdapterh4=newChannelOutboundHandlerAdapter() {
@Override
publicvoidwrite(ChannelHandlerContextctx, Objectmsg, ChannelPromisepromise) throwsException {
log.debug("4");
super.write(ctx, msg, promise);
}
};
EmbeddedChannelchannel=newEmbeddedChannel(h1, h2, h3, h4);
//模拟入站操作
channel.writeInbound(ByteBufAllocator.DEFAULT.buffer().writeBytes("hello".getBytes())); //只输出1,2
//模拟出站操作
channel.writeOutbound(ByteBufAllocator.DEFAULT.buffer().writeBytes("world".getBytes()));//只输出3,4
}3.5 ByteBuf
是对字节数据的封装,且具有以下优势:
池化 - 可以重用池中 ByteBuf 实例,更节约内存,减少内存溢出的可能
读写指针分离,不需要像 ByteBuffer 一样切换读写模式
可以自动扩容
支持链式调用,使用更流畅
很多地方体现零拷贝,例如 slice、duplicate、CompositeByteBuf
1.创建
ByteBufbuffer=ByteBufAllocator.DEFAULT.buffer(10); //创建了一个默认的 ByteBuf(池化基于直接内存的 ByteBuf),初始容量是 10,可以自动扩容
log(buffer);
readindex:0writeindex:0capacity:10
其中 log() 方法参考如下
privatestaticvoidlog(ByteBufbuffer) {
    intlength=buffer.readableBytes();
    introws=length/16+ (length%15==0?0 : 1) +4;
    StringBuilderbuf=newStringBuilder(rows*80*2)
        .append("read index:").append(buffer.readerIndex())
        .append(" write index:").append(buffer.writerIndex())
        .append(" capacity:").append(buffer.capacity())
        .append(io.netty.util.internal.StringUtil.NEWLINE);
    io.netty.buffer.ByteBufUtil.appendPrettyHexDump(buf, buffer);
    System.out.println(buf.toString());
}
2.直接内存 vs 堆内存
可以使用下面的代码来创建池化基于堆的 ByteBuf
ByteBufbuffer=ByteBufAllocator.DEFAULT.heapBuffer(10); //分配效率高,读写效率低也可以使用下面的代码来创建池化基于直接内存的 ByteBuf
ByteBufbuffer=ByteBufAllocator.DEFAULT.directBuffer(10); //分配效率低,读写效率高直接内存创建和销毁的代价昂贵,但读写性能高(少一次内存复制),适合配合池化功能一起用
直接内存对 GC 压力小,因为这部分内存不受 JVM 垃圾回收的管理,但也要注意及时主动释放
3.池化 vs 非池化
池化的最大意义在于可以重用 ByteBuf,优点有
没有池化,则每次都得创建新的 ByteBuf 实例,这个操作对直接内存代价昂贵,就算是堆内存,也会增加 GC 压力
有了池化,则可以重用池中 ByteBuf 实例,并且采用了与 jemalloc 类似的内存分配算法提升分配效率
高并发时,池化功能更节约内存,减少内存溢出的可能
池化功能是否开启,可以通过下面的系统环境变量来设置
-Dio.netty.allocator.type={unpooled|pooled}4.1 以后,非 Android 平台默认启用池化实现,Android 平台启用非池化实现
4.1 之前,池化功能还不成熟,默认是非池化实现
4.组成
ByteBuf 由四部分组成
最开始读写指针都在 0 位置,随着数据的写入,写指针后移,直到达到容量后会发生扩容,但不能超过最大容量
对比 NIO 中的 ByteBuff,ByteBuf抛弃了原来只有一个指针,写完后需要flip()才能继续读的问题,且增加了动态扩容的功能
5.写入
方法列表(省略一些不重要的方法)
方法签名 | 含义 | 备注 |
writeBoolean(boolean value) | 写入 boolean 值 | 用一字节 01|00 代表 true|false |
writeByte(int value) | 写入 byte 值 | |
writeShort(int value) | 写入 short 值 | |
writeInt(int value) | 写入 int 值 | 大端写入,即 0x250,写入后 00 00 02 50 |
writeIntLE(int value) | 写入 int 值 | 小端写入,即 0x250,写入后 50 02 00 00 |
writeLong(long value) | 写入 long 值 | |
writeChar(int value) | 写入 char 值 | |
writeFloat(float value) | 写入 float 值 | |
writeDouble(double value) | 写入 double 值 | |
writeBytes(ByteBuf src) | 写入 netty 的 ByteBuf | |
writeBytes(byte[] src) | 写入 byte[] | |
writeBytes(ByteBuffer src) | 写入 nio 的 ByteBuffer | |
int writeCharSequence(CharSequence sequence, Charset charset) | 写入字符串 |
注意
这些方法的未指明返回值的,其返回值都是 ByteBuf,意味着可以链式调用
网络传输,默认习惯是 Big Endian
举例:
先写入 4 个字节
buffer.writeBytes(new byte[]{1, 2, 3, 4});
log(buffer);
read index:0 write index:4 capacity:10
+-------------------------------------------------+
| 0 1 2 3 4 5 6 7 8 9 a b c d e f |
+--------+-------------------------------------------------+----------------+
|00000000| 01 02 03 04 |.... |
+--------+-------------------------------------------------+----------------+再写入一个 int 整数,也是 4 个字节
buffer.writeInt(5);
log(buffer);
read index:0 write index:8 capacity:10
+-------------------------------------------------+
| 0 1 2 3 4 5 6 7 8 9 a b c d e f |
+--------+-------------------------------------------------+----------------+
|00000000| 01 02 03 04 00 00 00 05 |........ |
+--------+-------------------------------------------------+----------------+还有一类方法是 set 开头的一系列方法,也可以写入数据,但不会改变写指针位置
6.扩容
再对上例写入一个 int 整数时,容量不够了(初始容量是 10),这时会引发扩容
buffer.writeInt(6);
log(buffer);
扩容规则:
如何写入后数据大小未超过 512,则选择下一个 16 的整数倍,例如写入后大小为 12 ,则扩容后 capacity 是 16
如果写入后数据大小超过 512,则选择下一个 2^n,例如写入后大小为 513,则扩容后 capacity 是 210=1024(29=512 已经不够了)
扩容不能超过 max capacity
结果是
read index:0 write index:12 capacity:16
         +-------------------------------------------------+
         |  0  1  2  3  4  5  6  7  8  9  a  b  c  d  e  f |
+--------+-------------------------------------------------+----------------+
|00000000| 01 02 03 04 00 00 00 05 00 00 00 06             |............    |
+--------+-------------------------------------------------+----------------+
7.读取
例如读了 4 次,每次一个字节
System.out.println(buffer.readByte());
System.out.println(buffer.readByte());
System.out.println(buffer.readByte());
System.out.println(buffer.readByte());
log(buffer);
1
2
3
4
read index:4 write index:12 capacity:16
+-------------------------------------------------+
| 0 1 2 3 4 5 6 7 8 9 a b c d e f |
+--------+-------------------------------------------------+----------------+
|00000000| 00 00 00 05 00 00 00 06 |........ |
+--------+-------------------------------------------------+----------------+读过的内容,就属于废弃部分了,再读只能读那些尚未读取的部分
如果需要重复读取 int 整数 5,怎么办?
可以在 read 前先做个标记 mark
buffer.markReaderIndex();	//标记读指针位置
System.out.println(buffer.readInt());
log(buffer);
5
read index:8 write index:12 capacity:16
+-------------------------------------------------+
| 0 1 2 3 4 5 6 7 8 9 a b c d e f |
+--------+-------------------------------------------------+----------------+
|00000000| 00 00 00 06 |.... |
+--------+-------------------------------------------------+----------------+这时要重复读取的话,重置到标记位置 reset
buffer.resetReaderIndex();
log(buffer);
readindex:4writeindex:12capacity:16
+-------------------------------------------------+
| 0 1 2 3 4 5 6 7 8 9 a b c d e f|
+--------+-------------------------------------------------+----------------+
|00000000|0000000500000006 |........ |
+--------+-------------------------------------------------+----------------+还有另一种办法是采用 get 开头的一系列方法,这些方法不会改变 read index
8.retain & release
由于 Netty 中有堆外内存的 ByteBuf 实现,堆外内存最好是手动来释放,而不是等 GC 垃圾回收
UnpooledHeapByteBuf 使用的是 JVM 内存,只需等 GC 回收内存即可
UnpooledDirectByteBuf 使用的就是直接内存了,需要特殊的方法来回收内存
PooledByteBuf 和它的子类使用了池化机制,需要更复杂的规则来回收内存(包括池的回收和ByteBuf占用的内存回收到池中两部分,此处以还回池为主)
回收内存的源码实现,请关注具体方法的不同实现:protected abstract void deallocate()
Netty 采用引用计数法来控制回收内存,每个 ByteBuf 都实现了 ReferenceCounted 接口
每个 ByteBuf 对象的初始计数为 1
调用 release 方法计数减 1,如果计数为 0,ByteBuf 内存被回收
调用 retain 方法计数加 1,表示调用者没用完之前,其它 handler 即使调用了 release 也不会造成回收
当计数为 0 时,底层内存会被回收,这时即使 ByteBuf 对象还在,其各个方法均无法正常使用
那么谁来负责 release 掉 ByteBuf 占用的内存或者还回 ByteBuf 占用的池化区域呢?
并不是我们想象的每一个 handler 都要 release
ByteBufbuf= ...
try {
    ...
} finally {
    buf.release();
}
因为 pipeline 的存在,一般需要将 ByteBuf 传递给下一个 ChannelHandler,如果在 finally 中 release 了,就失去了传递性(除非在这个 ChannelHandler 内部时,这个 ByteBuf 已完成了它的使命,那么便无须再传递可以释放掉)
注意:ByteBuf netty 提供的 tail handler 最终会对入站的 ByteBuf 进行释放,而 head handler 会对出站的 ByteBuf 进行释放。由他们两个释放的前提是中途 handler 没有对 ByteBuf 进行释放
基本规则是,谁是最后使用者,谁负责 release,详细分析如下:
起点,对于 NIO 实现来讲,在 io.netty.channel.nio.AbstractNioByteChannel.NioByteUnsafe#read 方法中首次创建 ByteBuf 放入 pipeline(line 163 pipeline.fireChannelRead(byteBuf))
入站 ByteBuf 处理原则
对原始 ByteBuf 不做处理,调用 ctx.fireChannelRead(msg) 向后传递,这时无须 release
将原始 ByteBuf 转换为其它类型的 Java 对象,这时 ByteBuf 就没用了,必须 release
如果不调用 ctx.fireChannelRead(msg) 向后传递,那么也必须 release
注意各种异常,如果 ByteBuf 没有成功传递到下一个 ChannelHandler,必须 release
假设消息一直向后传,那么 TailContext 会负责释放未处理消息(原始的 ByteBuf)
出站 ByteBuf 处理原则
出站消息最终都会转为 ByteBuf 输出,一直向前传,由 HeadContext flush 后 release
异常处理原则
有时候不清楚 ByteBuf 被引用了多少次,但又必须彻底释放,可以循环调用 release 直到返回 true
举例:TailContext 释放未处理消息逻辑
// io.netty.channel.DefaultChannelPipeline#onUnhandledInboundMessage(java.lang.Object)
protectedvoidonUnhandledInboundMessage(Objectmsg) {
    try {
        logger.debug(
            "Discarded inbound message {} that reached at the tail of the pipeline. "+
            "Please check your pipeline configuration.", msg);
    } finally {
        ReferenceCountUtil.release(msg);    //释放 ByteBuf
    }
}
// io.netty.util.ReferenceCountUtil#release(java.lang.Object)
publicstaticbooleanrelease(Objectmsg) {
    if (msginstanceofReferenceCounted) {
        return ((ReferenceCounted) msg).release();
    }
    returnfalse;
}
9.slice
零拷贝的体现之一,对原始 ByteBuf 进行切片成多个 ByteBuf,切片后的 ByteBuf 并没有发生内存复制,还是使用原始 ByteBuf 的内存,切片后的 ByteBuf 维护独立的 read,write 指针
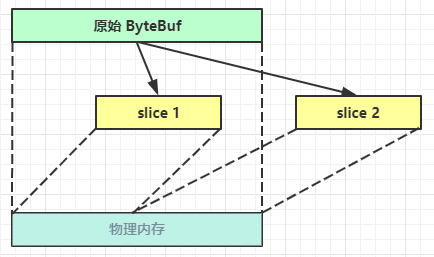
举例:
原始 ByteBuf 进行一些初始操作
ByteBuf origin = ByteBufAllocator.DEFAULT.buffer(10);
origin.writeBytes(new byte[]{1, 2, 3, 4});
origin.readByte();
System.out.println(ByteBufUtil.prettyHexDump(origin));		//也可以使用创建部分自定义的log()方法格式化输出
+-------------------------------------------------+
| 0 1 2 3 4 5 6 7 8 9 a b c d e f |
+--------+-------------------------------------------------+----------------+
|00000000| 02 03 04 |... |
+--------+-------------------------------------------------+----------------+这时调用 slice 进行切片,无参 slice 是从原始 ByteBuf 的 read index 到 write index 之间的内容进行切片,切片后的 max capacity 被固定为这个区间的大小,因此不能追加 write
ByteBuf slice = origin.slice(); //无参方法会找到所有可read范围内的元素,也可以使用重载函数指定起始位置和长度
System.out.println(ByteBufUtil.prettyHexDump(slice));
// slice.writeByte(5); //切片后不运行再增加数据,如果执行会报 IndexOutOfBoundsException 异常 +-------------------------------------------------+
| 0 1 2 3 4 5 6 7 8 9 a b c d e f |
+--------+-------------------------------------------------+----------------+
|00000000| 02 03 04 |... |
+--------+-------------------------------------------------+----------------+如果原始 ByteBuf 再次读操作(又读了一个字节),但 slice 不受影响,因为它有独立的读写指针
origin.readByte();
System.out.println(ByteBufUtil.prettyHexDump(origin));
System.out.println(ByteBufUtil.prettyHexDump(slice)); +-------------------------------------------------+
| 0 1 2 3 4 5 6 7 8 9 a b c d e f |
+--------+-------------------------------------------------+----------------+
|00000000| 03 04 |.. |
+--------+-------------------------------------------------+----------------+
         +-------------------------------------------------+
         |  0  1  2  3  4  5  6  7  8  9  a  b  c  d  e  f |
+--------+-------------------------------------------------+----------------+
|00000000| 02 03 04                                        |...             |
+--------+-------------------------------------------------+----------------+如果 slice 的内容发生了更改,这时原始 ByteBuf 也会受影响,因为底层都是同一块内存
slice.setByte(2, 5);
System.out.println(ByteBufUtil.prettyHexDump(slice));
System.out.println(ByteBufUtil.prettyHexDump(origin));
+-------------------------------------------------+
| 0 1 2 3 4 5 6 7 8 9 a b c d e f |
+--------+-------------------------------------------------+----------------+
|00000000| 02 03 05 |... |
+--------+-------------------------------------------------+----------------+
+-------------------------------------------------+
| 0 1 2 3 4 5 6 7 8 9 a b c d e f |
+--------+-------------------------------------------------+----------------+
|00000000| 03 05 |.. |
+--------+-------------------------------------------------+----------------+若 slice 释放了 ByteBuf 内存,则原有的 ByteBuf 也无法访问
slice.release();
System.out.println(ByteBufUtil.prettyHexDump(origin));
Exception in thread "main" io.netty.util.IllegalReferenceCountException: refCnt: 0
如果不希望切片能直接释放 ByteBuf 内存,从而导致原数组不能正常使用的话,可以使用retain()方法将引用计数器 +1
origin.retain();
slice.release();
System.out.println(ByteBufUtil.prettyHexDump(origin));
      +-------------------------------------------------+
      |  0  1  2  3  4  5  6  7  8  9  a  b  c  d  e  f |
+--------+-------------------------------------------------+----------------+
|00000000| 03 05                                           |..              |
+--------+-------------------------------------------------+----------------+
10.duplicate
零拷贝的体现之一,截取了原始 ByteBuf 所有内容,并且没有 max capacity 的限制,也是与原始 ByteBuf 使用同一块底层内存,只是读写指针是独立的
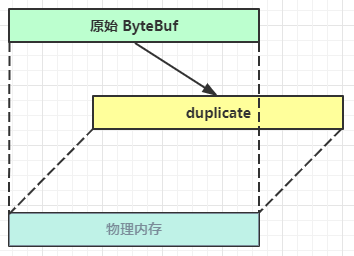
11.copy
会将底层内存数据进行深拷贝,因此无论读写,都与原始 ByteBuf 无关
ByteBuf origin = ByteBufAllocator.DEFAULT.buffer(10);
origin.writeBytes(new byte[]{1, 2, 3, 4});

ByteBuf copy = origin.copy();
copy.setByte(2, 5);
System.out.println(ByteBufUtil.prettyHexDump(origin));
System.out.println(ByteBufUtil.prettyHexDump(copy));
+-------------------------------------------------+
| 0 1 2 3 4 5 6 7 8 9 a b c d e f |
+--------+-------------------------------------------------+----------------+
|00000000| 01 02 03 04 |.... |
+--------+-------------------------------------------------+----------------+
+-------------------------------------------------+
| 0 1 2 3 4 5 6 7 8 9 a b c d e f |
+--------+-------------------------------------------------+----------------+
|00000000| 01 02 05 04 |.... |
+--------+-------------------------------------------------+----------------+12.CompositeByteBuf
零拷贝的体现之一,可以将多个 ByteBuf 合并为一个逻辑上的 ByteBuf,避免拷贝
举例:有两个 ByteBuf 如下
ByteBuf buf1 = ByteBufAllocator.DEFAULT.buffer(5);
buf1.writeBytes(new byte[]{1, 2, 3, 4, 5});
ByteBuf buf2 = ByteBufAllocator.DEFAULT.buffer(5);
buf2.writeBytes(new byte[]{6, 7, 8, 9, 10});
System.out.println(ByteBufUtil.prettyHexDump(buf1));
System.out.println(ByteBufUtil.prettyHexDump(buf2));
+-------------------------------------------------+
| 0 1 2 3 4 5 6 7 8 9 a b c d e f |
+--------+-------------------------------------------------+----------------+
|00000000| 01 02 03 04 05 |..... |
+--------+-------------------------------------------------+----------------+
+-------------------------------------------------+
| 0 1 2 3 4 5 6 7 8 9 a b c d e f |
+--------+-------------------------------------------------+----------------+
|00000000| 06 07 08 09 0a |..... |
+--------+-------------------------------------------------+----------------+现在需要一个新的 ByteBuf,内容来自于刚才的 buf1 和 buf2,如何实现?
方法1:
ByteBuf buf3 = ByteBufAllocator.DEFAULT.buffer(buf1.readableBytes() + buf2.readableBytes());
buf3.writeBytes(buf1);
buf3.writeBytes(buf2);
System.out.println(ByteBufUtil.prettyHexDump(buf3));
+-------------------------------------------------+
| 0 1 2 3 4 5 6 7 8 9 a b c d e f |
+--------+-------------------------------------------------+----------------+
|00000000| 01 02 03 04 05 06 07 08 09 0a |.......... |
+--------+-------------------------------------------------+----------------+这种方法不太好,因为进行了数据的内存复制操作
方法2:
CompositeByteBuf buf3 = ByteBufAllocator.DEFAULT.compositeBuffer();
// true 表示增加新的 ByteBuf 自动递增 write index, 否则 write index 会始终为 0
buf3.addComponents(true, buf1, buf2);
+-------------------------------------------------+
| 0 1 2 3 4 5 6 7 8 9 a b c d e f |
+--------+-------------------------------------------------+----------------+
|00000000| 01 02 03 04 05 06 07 08 09 0a |.......... |
+--------+-------------------------------------------------+----------------+CompositeByteBuf 是一个组合的 ByteBuf,它内部维护了一个 Component 数组,每个 Component 管理一个 ByteBuf,记录了这个 ByteBuf 相对于整体偏移量等信息,代表着整体中某一段的数据。
优点,对外是一个虚拟视图,组合这些 ByteBuf 不会产生内存复制
缺点,复杂了很多,多次操作会带来性能的损耗
13.Unpooled
Unpooled 是一个工具类,提供了非池化的 ByteBuf 创建、组合、复制等操作
这里仅介绍跟零拷贝相关的wrappedBuffer()方法,可以用来包装 ByteBuf
ByteBufbuf1=ByteBufAllocator.DEFAULT.buffer(5);
buf1.writeBytes(newbyte[]{1, 2, 3, 4, 5});
ByteBufbuf2=ByteBufAllocator.DEFAULT.buffer(5);
buf2.writeBytes(newbyte[]{6, 7, 8, 9, 10});
// 当包装 ByteBuf 个数超过一个时, 底层使用了 CompositeByteBuf
ByteBufbuf3=Unpooled.wrappedBuffer(buf1, buf2);
System.out.println(ByteBufUtil.prettyHexDump(buf3)); +-------------------------------------------------+
| 0 1 2 3 4 5 6 7 8 9 a b c d e f|
+--------+-------------------------------------------------+----------------+
|00000000|0102030405060708090a |.......... |
+--------+-------------------------------------------------+----------------+也可以用来包装普通字节数组,底层也不会有拷贝操作
ByteBufbuf4=Unpooled.wrappedBuffer(newbyte[]{1, 2, 3}, newbyte[]{4, 5, 6});
System.out.println(buf4.getClass());
System.out.println(ByteBufUtil.prettyHexDump(buf4));
classio.netty.buffer.CompositeByteBuf
+-------------------------------------------------+
| 0 1 2 3 4 5 6 7 8 9 a b c d e f|
+--------+-------------------------------------------------+----------------+
|00000000|010203040506 |...... |
+--------+-------------------------------------------------+----------------+4.双向通信
4.1 快速使用
举例:实现一个 echo server
服务端
@Slf4j
publicclassServer {
publicstaticvoidmain(String[] args) {
log.info("server start..");
NioEventLoopGroupboss=newNioEventLoopGroup(1);
NioEventLoopGroupworker=newNioEventLoopGroup(3);
try {
ServerBootstrapserverBootstrap=newServerBootstrap()
.channel(NioServerSocketChannel.class)
.group(boss, worker)
.childHandler(newChannelInitializer<SocketChannel>() {
@Override
protectedvoidinitChannel(SocketChannelch) throwsException {
ch.pipeline().addLast(newChannelInboundHandlerAdapter() {
@Override
publicvoidchannelActive(ChannelHandlerContextctx) throwsException {
log.debug("connected {}", ctx.channel());
super.channelActive(ctx);
}
@Override
publicvoidchannelInactive(ChannelHandlerContextctx) throwsException {
log.debug("disconnect {}", ctx.channel());
super.channelInactive(ctx);
}
@Override
publicvoidchannelRead(ChannelHandlerContextctx, Objectmsg) {
ByteBufbuffer= (ByteBuf) msg;
System.out.println(buffer.toString(Charset.defaultCharset()));
// 建议使用 ctx.alloc() 创建 ByteBuf
ByteBufresponse=ctx.alloc().buffer();
response.writeBytes(buffer);
ctx.writeAndFlush(response);
// buffer 可以释放,也可以等待 tail 释放。但是 response 不能释放
buffer.release();
}
});
}
});
ChannelFuturechannelFuture=serverBootstrap.bind(8080).sync();
log.info("server started");
channelFuture.channel().closeFuture().sync();
} catch (InterruptedExceptione) {
log.error("server error", e);
} finally {
boss.shutdownGracefully();
worker.shutdownGracefully();
log.info("server closed..");
}
}
}客户端
@Slf4j
publicclassClient {
publicstaticvoidmain(String[] args) {
log.info("client start..");
NioEventLoopGroupgroup=newNioEventLoopGroup();
try {
Bootstrapbootstrap=newBootstrap();
bootstrap.channel(NioSocketChannel.class);
bootstrap.group(group);
bootstrap.handler(newChannelInitializer<SocketChannel>() {
@Override
protectedvoidinitChannel(SocketChannelch) throwsException {
ch.pipeline().addLast(newStringEncoder());
ch.pipeline().addLast(newChannelInboundHandlerAdapter() {
@Override
publicvoidchannelActive(ChannelHandlerContextctx) throwsException {
newThread(() -> {
Scannerscanner=newScanner(System.in);
while (true) {
Stringline=scanner.nextLine();
if ("q".equals(line)) {
ctx.channel().close();
break;
}
ctx.channel().writeAndFlush(line);
}
}).start();
}
@Override
publicvoidchannelRead(ChannelHandlerContextctx, Objectmsg) throwsException {
ByteBufbuffer= (ByteBuf) msg;
System.out.println(buffer.toString(Charset.defaultCharset()));
buffer.release();
}
});
}
});
ChannelFuturechannelFuture=bootstrap.connect("127.0.0.1", 8080).sync();
log.info("client started");
channelFuture.channel().closeFuture().sync();
} catch (InterruptedExceptione) {
log.error("client error", e);
} finally {
group.shutdownGracefully();
log.info("client close..");
}
}
}4.2 读和写的误解
我最初在认识上有这样的误区,认为只有在 netty,nio 这样的多路复用 IO 模型时,读写才不会相互阻塞,才可以实现高效的双向通信,但实际上,Java Socket 是全双工的:在任意时刻,线路上存在A 到 B 和 B 到 A 的双向信号传输。即使是阻塞 IO,读和写是可以同时进行的,只要分别采用读线程和写线程即可,读不会阻塞写、写也不会阻塞读
举例:
服务端
publicclassTestServer {
publicstaticvoidmain(String[] args) throwsIOException {
ServerSocketss=newServerSocket(8888);
Sockets=ss.accept();
newThread(() -> {
try {
BufferedReaderreader=newBufferedReader(newInputStreamReader(s.getInputStream()));
while (true) {
System.out.println(reader.readLine());
}
} catch (IOExceptione) {
e.printStackTrace();
}
}).start();
newThread(() -> {
try {
BufferedWriterwriter=newBufferedWriter(newOutputStreamWriter(s.getOutputStream()));
// 例如在这个位置加入 thread 级别断点,可以发现即使不写入数据,也不妨碍前面线程读取客户端数据
for (inti=0; i<100; i++) {
writer.write(String.valueOf(i));
writer.newLine();
writer.flush();
}
} catch (IOExceptione) {
e.printStackTrace();
}
}).start();
}
}客户端
public class TestClient {
    public static void main(String[] args) throws IOException {
        Socket s = new Socket("localhost", 8888);

        new Thread(() -> {
            try {
                BufferedReader reader = new BufferedReader(new InputStreamReader(s.getInputStream()));
                while (true) {
                    System.out.println(reader.readLine());
                }
            } catch (IOException e) {
                e.printStackTrace();
            }
        }).start();

        new Thread(() -> {
            try {
                BufferedWriter writer = new BufferedWriter(new OutputStreamWriter(s.getOutputStream()));
                for (int i = 0; i < 100; i++) {
                    writer.write(String.valueOf(i));
                    writer.newLine();
                    writer.flush();
                }
            } catch (IOException e) {
                e.printStackTrace();
            }
        }).start();
    }
}
第三章 Netty 进阶
1. 粘包与半包
1.1 粘包现象
服务端
publicclassServer {
publicstaticvoidmain(String[] args) {
NioEventLoopGroupboss=newNioEventLoopGroup(1);
NioEventLoopGroupworker=newNioEventLoopGroup();
try {
ServerBootstrapserverBootstrap=newServerBootstrap()
.channel(NioServerSocketChannel.class)
.group(boss, worker)
.childHandler(newChannelInitializer<SocketChannel>() {
@Override
protectedvoidinitChannel(SocketChannelch) throwsException {
ch.pipeline().addLast(newLoggingHandler(LogLevel.DEBUG));
ch.pipeline().addLast(newChannelInboundHandlerAdapter() {
//建立channel连接后,就会触发active事件。此处也可以使用sync()阻塞或者回调的方式实现
@Override
publicvoidchannelActive(ChannelHandlerContextctx) throwsException {
log.debug("connected {}", ctx.channel());
super.channelActive(ctx);
}
@Override
publicvoidchannelInactive(ChannelHandlerContextctx) throwsException {
log.debug("disconnect {}", ctx.channel());
super.channelInactive(ctx);
}
});
}
});
ChannelFuturechannelFuture=serverBootstrap.bind(8080);
log.debug("{} binding...", channelFuture.channel());
channelFuture.sync();
log.debug("{} bound...", channelFuture.channel());
channelFuture.channel().closeFuture().sync();
} catch (InterruptedExceptione) {
log.error("server error", e);
} finally {
boss.shutdownGracefully();
worker.shutdownGracefully();
log.debug("stopped");
}
}
}客户端:共发送 10 个消息,每个消息是 16 字节
publicclassClient {
publicstaticvoidmain(String[] args) {
NioEventLoopGroupgroup=newNioEventLoopGroup();
try {
Bootstrapbootstrap=newBootstrap();
bootstrap.channel(NioSocketChannel.class);
bootstrap.group(group);
bootstrap.handler(newChannelInitializer<SocketChannel>() {
@Override
protectedvoidinitChannel(SocketChannelch) throwsException {
log.debug("connetted...");
ch.pipeline().addLast(newChannelInboundHandlerAdapter() {
@Override
publicvoidchannelActive(ChannelHandlerContextctx) throwsException {
log.debug("sending...");
for (inti=0; i<10; i++) {
ByteBufbuffer=ctx.alloc().buffer();
buffer.writeBytes(newbyte[]{0, 1, 2, 3, 4, 5, 6, 7, 8, 9, 10, 11, 12, 13, 14, 15});
ctx.channel().writeAndFlush(buffer);
}
ctx.fireChannelActive();
}
});
}
});
ChannelFuturechannelFuture=bootstrap.connect("127.0.0.1", 8080).sync();
channelFuture.channel().close();
channelFuture.channel().closeFuture().sync();
} catch (InterruptedExceptione) {
log.error("client error", e);
} finally {
group.shutdownGracefully();
}
}
}输出:服务器端的某次输出,可以看到一次就接收了 160 个字节,而非分 10 次接收
15:10:02 [DEBUG] [main] o.example.Server- [id: 0x82e8d928] binding...
15:10:02 [DEBUG] [main] o.example.Server- [id: 0x82e8d928, L:/0:0:0:0:0:0:0:0:8080] bound...
15:10:10 [DEBUG] [nioEventLoopGroup-3-1] i.n.h.l.LoggingHandler- [id: 0x7be7a75a, L:/127.0.0.1:8080-R:/127.0.0.1:51490] REGISTERED
15:10:10 [DEBUG] [nioEventLoopGroup-3-1] i.n.h.l.LoggingHandler- [id: 0x7be7a75a, L:/127.0.0.1:8080-R:/127.0.0.1:51490] ACTIVE
15:10:10 [DEBUG] [nioEventLoopGroup-3-1] o.example.Server-connected [id: 0x7be7a75a, L:/127.0.0.1:8080-R:/127.0.0.1:51490]
15:10:10 [DEBUG] [nioEventLoopGroup-3-1] i.n.h.l.LoggingHandler- [id: 0x7be7a75a, L:/127.0.0.1:8080-R:/127.0.0.1:51490] READ: 160B
         +-------------------------------------------------+
         |  0  1  2  3  4  5  6  7  8  9  a  b  c  d  e  f|
+--------+-------------------------------------------------+----------------+
|00000000|000102030405060708090a0b0c0d0e0f|................|
|00000010|000102030405060708090a0b0c0d0e0f|................|
|00000020|000102030405060708090a0b0c0d0e0f|................|
|00000030|000102030405060708090a0b0c0d0e0f|................|
|00000040|000102030405060708090a0b0c0d0e0f|................|
|00000050|000102030405060708090a0b0c0d0e0f|................|
|00000060|000102030405060708090a0b0c0d0e0f|................|
|00000070|000102030405060708090a0b0c0d0e0f|................|
|00000080|000102030405060708090a0b0c0d0e0f|................|
|00000090|000102030405060708090a0b0c0d0e0f|................|
+--------+-------------------------------------------------+----------------+
15:10:10 [DEBUG] [nioEventLoopGroup-3-1] i.n.h.l.LoggingHandler- [id: 0x7be7a75a, L:/127.0.0.1:8080-R:/127.0.0.1:51490] READCOMPLETE
15:10:10 [DEBUG] [nioEventLoopGroup-3-4] i.n.h.l.LoggingHandler- [id: 0x7be7a75a, L:/127.0.0.1:8080!R:/127.0.0.1:51490] INACTIVE
15:10:10 [DEBUG] [nioEventLoopGroup-3-4] o.example.Server-disconnect [id: 0x7be7a75a, L:/127.0.0.1:8080!R:/127.0.0.1:51490]
15:10:10 [DEBUG] [nioEventLoopGroup-3-4] i.n.h.l.LoggingHandler- [id: 0x7be7a75a, L:/127.0.0.1:8080!R:/127.0.0.1:51490] UNREGISTERED
1.2 半包现象
客户端:客户端希望发送 1 个消息,这个消息是 160 字节
publicclassClient {
publicstaticvoidmain(String[] args) {
NioEventLoopGroupgroup=newNioEventLoopGroup();
try {
Bootstrapbootstrap=newBootstrap();
bootstrap.channel(NioSocketChannel.class);
bootstrap.group(group);
bootstrap.option(ChannelOption.SO_SNDBUF, 160); //可设置输出缓冲区大小
bootstrap.handler(newChannelInitializer<SocketChannel>() {
@Override
protectedvoidinitChannel(SocketChannelch) throwsException {
log.debug("connetted...");
ch.pipeline().addLast(newChannelInboundHandlerAdapter() {
@Override
publicvoidchannelActive(ChannelHandlerContextctx) throwsException {
log.debug("sending...");
ByteBufbuffer=ctx.alloc().buffer();
for (inti=0; i<10; i++) { //共160个字节
buffer.writeBytes(newbyte[]{0, 1, 2, 3, 4, 5, 6, 7, 8, 9, 10, 11, 12, 13, 14, 15});
}
ctx.writeAndFlush(buffer);
ctx.fireChannelActive();
}
});
}
});
ChannelFuturechannelFuture=bootstrap.connect("127.0.0.1", 8080).sync();
channelFuture.channel().close();
channelFuture.channel().closeFuture().sync();
} catch (InterruptedExceptione) {
log.error("client error", e);
} finally {
group.shutdownGracefully();
}
}
}服务端:修改一下接收缓冲区,其它代码不变
public class Server {
publicstaticvoidmain(String[] args) {
NioEventLoopGroupboss=newNioEventLoopGroup(1);
NioEventLoopGroupworker=newNioEventLoopGroup();
try {
ServerBootstrapserverBootstrap=newServerBootstrap()
.channel(NioServerSocketChannel.class)
.option(ChannelOption.SO_RCVBUF, 10) //设置Socket接收缓冲区(滑动窗口)大小
.group(boss, worker)
.childHandler(newChannelInitializer<SocketChannel>() {
@Override
protectedvoidinitChannel(SocketChannelch) throwsException {
ch.pipeline().addLast(newLoggingHandler(LogLevel.DEBUG));
ch.pipeline().addLast(newChannelInboundHandlerAdapter() {
@Override
publicvoidchannelActive(ChannelHandlerContextctx) throwsException {
log.debug("connected {}", ctx.channel());
super.channelActive(ctx);
}
@Override
publicvoidchannelInactive(ChannelHandlerContextctx) throwsException {
log.debug("disconnect {}", ctx.channel());
super.channelInactive(ctx);
}
});
}
});
ChannelFuturechannelFuture=serverBootstrap.bind(8080);
log.debug("{} binding...", channelFuture.channel());
channelFuture.sync();
log.debug("{} bound...", channelFuture.channel());
channelFuture.channel().closeFuture().sync();
} catch (InterruptedExceptione) {
log.error("server error", e);
} finally {
boss.shutdownGracefully();
worker.shutdownGracefully();
log.debug("stopped");
}
}
}注意:serverBootstrap.option(ChannelOption.SO_RCVBUF, 10) 影响的底层接收缓冲区(即滑动窗口)大小,仅决定了 netty 读取的最小单位,netty 实际每次读取的一般是它的整数倍
输出:可以看到服务端接收的消息被分为两节,第一次 20 字节,第二次 140 字节
17:38:38 [DEBUG] [main] o.example.Server- [id: 0x412b6468] binding...
17:38:38 [DEBUG] [main] o.example.Server- [id: 0x412b6468, L:/0:0:0:0:0:0:0:0:8080] bound...
17:38:39 [DEBUG] [nioEventLoopGroup-3-1] i.n.h.l.LoggingHandler- [id: 0x92c84da2, L:/127.0.0.1:8080-R:/127.0.0.1:58569] REGISTERED
17:38:39 [DEBUG] [nioEventLoopGroup-3-1] i.n.h.l.LoggingHandler- [id: 0x92c84da2, L:/127.0.0.1:8080-R:/127.0.0.1:58569] ACTIVE
17:38:39 [DEBUG] [nioEventLoopGroup-3-1] o.example.Server-connected [id: 0x92c84da2, L:/127.0.0.1:8080-R:/127.0.0.1:58569]
17:38:39 [DEBUG] [nioEventLoopGroup-3-1] i.n.h.l.LoggingHandler- [id: 0x92c84da2, L:/127.0.0.1:8080-R:/127.0.0.1:58569] READ: 20B
+-------------------------------------------------+ //第一次20B
| 0 1 2 3 4 5 6 7 8 9 a b c d e f|
+--------+-------------------------------------------------+----------------+
|00000000|000102030405060708090a0b0c0d0e0f|................|
|00000010|00010203 |.... |
+--------+-------------------------------------------------+----------------+
17:38:39 [DEBUG] [nioEventLoopGroup-3-1] i.n.h.l.LoggingHandler- [id: 0x92c84da2, L:/127.0.0.1:8080-R:/127.0.0.1:58569] READCOMPLETE
17:38:39 [DEBUG] [nioEventLoopGroup-3-1] i.n.h.l.LoggingHandler- [id: 0x92c84da2, L:/127.0.0.1:8080-R:/127.0.0.1:58569] READ: 140B
+-------------------------------------------------+ //第二次140B
| 0 1 2 3 4 5 6 7 8 9 a b c d e f|
+--------+-------------------------------------------------+----------------+
|00000000|0405060708090a0b0c0d0e0f00010203|................|
|00000010|0405060708090a0b0c0d0e0f00010203|................|
|00000020|0405060708090a0b0c0d0e0f00010203|................|
|00000030|0405060708090a0b0c0d0e0f00010203|................|
|00000040|0405060708090a0b0c0d0e0f00010203|................|
|00000050|0405060708090a0b0c0d0e0f00010203|................|
|00000060|0405060708090a0b0c0d0e0f00010203|................|
|00000070|0405060708090a0b0c0d0e0f00010203|................|
|00000080|0405060708090a0b0c0d0e0f |............ |
+--------+-------------------------------------------------+----------------+
17:38:39 [DEBUG] [nioEventLoopGroup-3-1] i.n.h.l.LoggingHandler- [id: 0x92c84da2, L:/127.0.0.1:8080-R:/127.0.0.1:58569] READCOMPLETE
17:38:40 [DEBUG] [nioEventLoopGroup-3-1] i.n.h.l.LoggingHandler- [id: 0x92c84da2, L:/127.0.0.1:8080-R:/127.0.0.1:58569] READCOMPLETE
17:38:40 [DEBUG] [nioEventLoopGroup-3-1] i.n.h.l.LoggingHandler- [id: 0x92c84da2, L:/127.0.0.1:8080!R:/127.0.0.1:58569] INACTIVE
17:38:40 [DEBUG] [nioEventLoopGroup-3-1] o.example.Server-disconnect [id: 0x92c84da2, L:/127.0.0.1:8080!R:/127.0.0.1:58569]
17:38:40 [DEBUG] [nioEventLoopGroup-3-1] i.n.h.l.LoggingHandler- [id: 0x92c84da2, L:/127.0.0.1:8080!R:/127.0.0.1:58569] UNREGISTERED
1.3 粘/半包现象分析
粘包和半包问题的本质是因为 TCP 是流式协议,消息无边界
粘包
现象,发送 abc def,接收 abcdef
原因
应用层:接收方 ByteBuf 设置太大(Netty 默认 1024)
滑动窗口:假设发送方 256 bytes 表示一个完整报文,但由于接收方处理不及时且窗口大小足够大,这 256 bytes 字节就会缓冲在接收方的滑动窗口中,当滑动窗口中缓冲了多个报文就会粘包
滑动窗口
TCP 以一个段(segment)为单位,每发送一个段就需要进行一次确认应答(ack)处理,但如果这么做,缺点是包的往返时间越长性能就越差
为了解决此问题,引入了窗口概念,窗口大小即决定了无需等待应答而可以继续发送的数据最大值
窗口实际就起到一个缓冲区的作用,同时也能起到流量控制的作用
图中深色的部分即要发送的数据,高亮的部分即窗口
窗口内的数据才允许被发送,当应答未到达前,窗口必须停止滑动
如果 1001~2000 这个段的数据 ack 回来了,窗口就可以向前滑动
接收方也会维护一个窗口,只有落在窗口内的数据才能允许接收
Nagle 算法:会造成粘包
Nagle 算法
即使发送一个字节,也需要加入 tcp 头和 ip 头,也就是总字节数会使用 41 bytes,非常不经济。因此为了提高网络利用率,tcp 希望尽可能发送足够大的数据,这就是 Nagle 算法产生的缘由
该算法是指发送端即使还有应该发送的数据,但如果这部分数据很少的话,则进行延迟发送
如果 SO_SNDBUF 的数据达到 MSS,则需要发送
如果 SO_SNDBUF 中含有 FIN(表示需要连接关闭)这时将剩余数据发送,再关闭
如果 TCP_NODELAY = true,则需要发送
已发送的数据都收到 ack 时,则需要发送
上述条件不满足,但发生超时(一般为 200ms)则需要发送
除上述情况,延迟发送
半包
现象,发送 abcdef,接收 abc def
原因
应用层:接收方 ByteBuf 小于实际发送数据量
滑动窗口:假设接收方的窗口只剩了 128 bytes,发送方的报文大小是 256 bytes,这时放不下了,只能先发送前 128 bytes,等待 ack 后才能发送剩余部分,这就造成了半包
MSS 限制:当发送的数据超过 MSS 限制后,会将数据切分发送,就会造成半包
MSS 限制
链路层对一次能够发送的最大数据有限制,这个限制称之为 MTU(maximum transmission unit),不同的链路设备的 MTU 值也有所不同,例如
以太网的 MTU 是 1500
FDDI(光纤分布式数据接口)的 MTU 是 4352
本地回环地址的 MTU 是 65535 - 本地测试不走网卡
MSS 是最大段长度(maximum segment size),它是 MTU 刨去 tcp 头和 ip 头后剩余能够作为数据传输的字节数。ipv4 tcp 头占用 20 bytes,ip 头占用 20 bytes,因此以太网 MSS 的值为 1500 - 40 = 1460
TCP 在传递大量数据时,会按照 MSS 大小将数据进行分割发送
MSS 的值在三次握手时通知对方自己 MSS 的值,然后在两者之间选择一个小值作为 MSS
1.4 解决方案
短链接,发一个包建立一次连接,这样连接建立到连接断开之间就是消息的边界,缺点效率太低
每一条消息采用固定长度,缺点浪费空间
每一条消息采用分隔符,例如 \n,缺点需要转义
每一条消息分为 head 和 body,head 中包含 body 的长度,类似于 LTV 的设计思想
1.短链接
以解决粘包为例
客户端
publicclassClient {
publicstaticvoidmain(String[] args) {
// 分 10 次发送
for (inti=0; i<10; i++) {
send();
}
}
privatestaticvoidsend() {
NioEventLoopGroupgroup=newNioEventLoopGroup();
try {
Bootstrapbootstrap=newBootstrap();
bootstrap.channel(NioSocketChannel.class);
bootstrap.group(group);
bootstrap.handler(newChannelInitializer<SocketChannel>() {
@Override
protectedvoidinitChannel(SocketChannelch) throwsException {
log.debug("connetted...");
ch.pipeline().addLast(newChannelInboundHandlerAdapter() {
@Override
publicvoidchannelActive(ChannelHandlerContextctx) throwsException {
log.debug("sending...");
ByteBufbuffer=ctx.alloc().buffer();
buffer.writeBytes(newbyte[]{0, 1, 2, 3, 4, 5, 6, 7, 8, 9, 10, 11, 12, 13, 14, 15});
ctx.writeAndFlush(buffer);
ctx.fireChannelActive();
}
});
}
});
ChannelFuturechannelFuture=bootstrap.connect("127.0.0.1", 8080).sync();
channelFuture.channel().close();
channelFuture.channel().closeFuture().sync();
} catch (InterruptedExceptione) {
log.error("client error", e);
} finally {
group.shutdownGracefully();
}
}
}
缺点:半包用这种办法还是不好解决,因为接收方的缓冲区大小是有限的
当服务端设置接收缓冲区过小时,依然会出现半包问题
// .option(ChannelOption.SO_RCVBUF, 10) //除了设置Socket接收缓冲区大小之外,也可设置ByteBuf的大小
// 设置Netty接收缓冲区(ByteBuf)大小
.childOption(ChannelOption.RCVBUF_ALLOCATOR, new AdaptiveRecvByteBufAllocator(16, 16, 16)) //最小值,初始值,最大值
注意:Netty的 ByteBuf 强制规定最小值16,默认值1024。所以需要增加一点客户端发送的字节数
+-------------------------------------------------+
| 0 1 2 3 4 5 6 7 8 9 a b c d e f |
+--------+-------------------------------------------------+----------------+
|00000000| 00 01 02 03 04 05 06 07 08 09 0a 0b 0c 0d 0e 0f |................|
+--------+-------------------------------------------------+----------------+
...
+-------------------------------------------------+
| 0 1 2 3 4 5 6 7 8 9 a b c d e f |
+--------+-------------------------------------------------+----------------+
|00000000| 10 |. | //可以看到确实出现了半包问题
+--------+-------------------------------------------------+----------------+
2.固定长度
让所有数据包长度固定(假设长度为 8 字节)
服务端:服务器端加入
protected void initChannel(SocketChannel ch) throws Exception {
ch.pipeline().addLast(new FixedLengthFrameDecoder(8)); //固定8个字节为一个数据包
ch.pipeline().addLast(new LoggingHandler(LogLevel.DEBUG));
ch.pipeline().addLast(new ChannelInboundHandlerAdapter() {
//建立channel连接后,就会触发active事件。此处也可以使用sync()阻塞或者回调的方式实现
@Override
public void channelActive(ChannelHandlerContext ctx) throws Exception {
log.debug("connected {}", ctx.channel());
super.channelActive(ctx);
}
@Override
public void channelInactive(ChannelHandlerContext ctx) throws Exception {
log.debug("disconnect {}", ctx.channel());
super.channelInactive(ctx);
}
});
}
注意:Netty 中有很多 handler 是不能多个 channel 共享的,例如FixedLengthFrameDecoder、LineBasedFrameDecoder等,因为这些类对象会因避免半包问题的出现而记录 channel 未发完的数据,若多个线程共同使用该对象,会出现线程安全问题。但LoggingHandler就不会出现线程安全问题,因为其只是进行记录,不会保存信息。像LoggingHandler这种可以共享的对象,Netty在类的上方使用@Sharable注解标记
客户端
public class Client {
public static void main(String[] args) {
NioEventLoopGroup group = new NioEventLoopGroup();
try {
Bootstrap bootstrap = new Bootstrap();
bootstrap.channel(NioSocketChannel.class);
bootstrap.group(group);
bootstrap.handler(new ChannelInitializer<SocketChannel>() {
@Override
protected void initChannel(SocketChannel ch) throws Exception {
log.debug("connected...");
ch.pipeline().addLast(new LoggingHandler(LogLevel.DEBUG));
ch.pipeline().addLast(new ChannelInboundHandlerAdapter() {
@Override
public void channelActive(ChannelHandlerContext ctx) throws Exception {
log.debug("sending...");
// 发送内容随机的数据包
Random r = new Random();
char c = 'a';
ByteBuf buffer = ctx.alloc().buffer();
for (int i = 0; i < 4; i++) {
byte[] bytes = new byte[8]; //固定一个数据包为8字节
for (int j = 0; j < r.nextInt(8) + 1; j++) {
bytes[j] = (byte) c;
}
c++;
buffer.writeBytes(bytes);
}
ctx.writeAndFlush(buffer);
ctx.fireChannelActive();
}
});
}
});
ChannelFuture channelFuture = bootstrap.connect("127.0.0.1", 8080).sync();
channelFuture.channel().close();
channelFuture.channel().closeFuture().sync();
} catch (InterruptedException e) {
log.error("client error", e);
} finally {
group.shutdownGracefully();
}
}
}
注意:采用这种方法后,客户端什么时候 flush 都可以
输出:
客户端
20:43:29 [DEBUG] [nioEventLoopGroup-2-1] o.example.Client - connected...
20:43:29 [DEBUG] [nioEventLoopGroup-2-1] i.n.h.l.LoggingHandler - [id: 0xb53d1bb4] REGISTERED
20:43:29 [DEBUG] [nioEventLoopGroup-2-1] i.n.h.l.LoggingHandler - [id: 0xb53d1bb4] CONNECT: /127.0.0.1:8080
20:43:29 [DEBUG] [nioEventLoopGroup-2-1] i.n.h.l.LoggingHandler - [id: 0xb53d1bb4, L:/127.0.0.1:64130 - R:/127.0.0.1:8080] ACTIVE
20:43:29 [DEBUG] [nioEventLoopGroup-2-1] o.example.Client - sending...
20:43:29 [DEBUG] [nioEventLoopGroup-2-1] i.n.h.l.LoggingHandler - [id: 0xb53d1bb4, L:/127.0.0.1:64130 - R:/127.0.0.1:8080] WRITE: 32B
+-------------------------------------------------+
| 0 1 2 3 4 5 6 7 8 9 a b c d e f |
+--------+-------------------------------------------------+----------------+
|00000000| 61 61 61 00 00 00 00 00 62 62 00 00 00 00 00 00 |aaa.....bb......|
|00000010| 63 63 63 00 00 00 00 00 64 64 64 64 00 00 00 00 |ccc.....dddd....|
+--------+-------------------------------------------------+----------------+
20:43:29 [DEBUG] [nioEventLoopGroup-2-1] i.n.h.l.LoggingHandler - [id: 0xb53d1bb4, L:/127.0.0.1:64130 - R:/127.0.0.1:8080] FLUSH
20:43:29 [DEBUG] [nioEventLoopGroup-2-1] i.n.h.l.LoggingHandler - [id: 0xb53d1bb4, L:/127.0.0.1:64130 - R:/127.0.0.1:8080] CLOSE
20:43:29 [DEBUG] [nioEventLoopGroup-2-1] i.n.h.l.LoggingHandler - [id: 0xb53d1bb4, L:/127.0.0.1:64130 ! R:/127.0.0.1:8080] INACTIVE
20:43:29 [DEBUG] [nioEventLoopGroup-2-1] i.n.h.l.LoggingHandler - [id: 0xb53d1bb4, L:/127.0.0.1:64130 ! R:/127.0.0.1:8080] UNREGISTERED
服务端
20:43:27 [DEBUG] [main] o.example.Server - [id: 0xa9f4ec2c] binding...
20:43:27 [DEBUG] [main] o.example.Server - [id: 0xa9f4ec2c, L:/0:0:0:0:0:0:0:0:8080] bound...
20:43:29 [DEBUG] [nioEventLoopGroup-3-1] i.n.h.l.LoggingHandler - [id: 0x2a0562b7, L:/127.0.0.1:8080 - R:/127.0.0.1:64130] REGISTERED
20:43:29 [DEBUG] [nioEventLoopGroup-3-1] i.n.h.l.LoggingHandler - [id: 0x2a0562b7, L:/127.0.0.1:8080 - R:/127.0.0.1:64130] ACTIVE
20:43:29 [DEBUG] [nioEventLoopGroup-3-1] o.example.Server - connected [id: 0x2a0562b7, L:/127.0.0.1:8080 - R:/127.0.0.1:64130]
20:43:29 [DEBUG] [nioEventLoopGroup-3-1] i.n.h.l.LoggingHandler - [id: 0x2a0562b7, L:/127.0.0.1:8080 - R:/127.0.0.1:64130] READ: 8B
+-------------------------------------------------+
| 0 1 2 3 4 5 6 7 8 9 a b c d e f |
+--------+-------------------------------------------------+----------------+
|00000000| 61 61 61 00 00 00 00 00 |aaa..... |
+--------+-------------------------------------------------+----------------+
20:43:29 [DEBUG] [nioEventLoopGroup-3-1] i.n.h.l.LoggingHandler - [id: 0x2a0562b7, L:/127.0.0.1:8080 - R:/127.0.0.1:64130] READ: 8B
+-------------------------------------------------+
| 0 1 2 3 4 5 6 7 8 9 a b c d e f |
+--------+-------------------------------------------------+----------------+
|00000000| 62 62 00 00 00 00 00 00 |bb...... |
+--------+-------------------------------------------------+----------------+
20:43:29 [DEBUG] [nioEventLoopGroup-3-1] i.n.h.l.LoggingHandler - [id: 0x2a0562b7, L:/127.0.0.1:8080 - R:/127.0.0.1:64130] READ: 8B
+-------------------------------------------------+
| 0 1 2 3 4 5 6 7 8 9 a b c d e f |
+--------+-------------------------------------------------+----------------+
|00000000| 63 63 63 00 00 00 00 00 |ccc..... |
+--------+-------------------------------------------------+----------------+
20:43:29 [DEBUG] [nioEventLoopGroup-3-1] i.n.h.l.LoggingHandler - [id: 0x2a0562b7, L:/127.0.0.1:8080 - R:/127.0.0.1:64130] READ: 8B
+-------------------------------------------------+
| 0 1 2 3 4 5 6 7 8 9 a b c d e f |
+--------+-------------------------------------------------+----------------+
|00000000| 64 64 64 64 00 00 00 00 |dddd.... |
+--------+-------------------------------------------------+----------------+
20:43:29 [DEBUG] [nioEventLoopGroup-3-1] i.n.h.l.LoggingHandler - [id: 0x2a0562b7, L:/127.0.0.1:8080 - R:/127.0.0.1:64130] READ COMPLETE
20:43:29 [DEBUG] [nioEventLoopGroup-3-1] i.n.h.l.LoggingHandler - [id: 0x2a0562b7, L:/127.0.0.1:8080 - R:/127.0.0.1:64130] READ COMPLETE
20:43:29 [DEBUG] [nioEventLoopGroup-3-1] i.n.h.l.LoggingHandler - [id: 0x2a0562b7, L:/127.0.0.1:8080 ! R:/127.0.0.1:64130] INACTIVE
20:43:29 [DEBUG] [nioEventLoopGroup-3-1] o.example.Server - disconnect [id: 0x2a0562b7, L:/127.0.0.1:8080 ! R:/127.0.0.1:64130]
20:43:29 [DEBUG] [nioEventLoopGroup-3-1] i.n.h.l.LoggingHandler - [id: 0x2a0562b7, L:/127.0.0.1:8080 ! R:/127.0.0.1:64130] UNREGISTERED
可以看到服务端分了四个数据包处理结果,实际上如果FixedLengthFrameDecoder和LoggingHandler两个 Handler 对换位置的话就会发现还是发生粘包,而拆分粘包的操作就是由FixedLengthFrameDecoder拆分的
+-------------------------------------------------+
| 0 1 2 3 4 5 6 7 8 9 a b c d e f |
+--------+-------------------------------------------------+----------------+
|00000000| 61 61 61 00 00 00 00 00 62 62 00 00 00 00 00 00 |aaa.....bb......|
|00000010| 63 63 63 00 00 00 00 00 64 64 64 64 00 00 00 00 |ccc.....dddd....|
+--------+-------------------------------------------------+----------------+
固定长度方案的缺点是,数据包的大小不好把握
长度定的太大,浪费
长度定的太小,对某些数据包又显得不够
3.固定分隔符
Netty 提供的LineBasedFrameDecoder支持以 \n 或 \r\n 作为分隔符,如果超出指定长度仍未出现分隔符,则抛出异常。DelimiterBasedFrameDecoder与LineBasedFrameDecoder类似,只不过更加通用,允许指定任意特殊字符作为分隔符。还可以同时指定多个分隔符,如果在消息中的确有多个分隔符,将会选择内容最短的一个分隔符作为依据
服务端
ch.pipeline().addLast(new LineBasedFrameDecoder(1024)); //以LineBasedFrameDecoder为例
// ByteBuf delemiter= Unpooled.buffer();
// delemiter.writeBytes("&".getBytes());
// ch.pipeline().addLast(new DelimiterBasedFrameDecoder(1024, true, true, delemiter)); //长度、何时抛异常、是否去除分隔符、分隔符
ch.pipeline().addLast(new LoggingHandler(LogLevel.DEBUG));
客户端:在每条消息之后,加入\n分隔符
public class Client {
public static void main(String[] args) {
NioEventLoopGroup group = new NioEventLoopGroup();
try {
Bootstrap bootstrap = new Bootstrap();
bootstrap.channel(NioSocketChannel.class);
bootstrap.group(group);
bootstrap.handler(new ChannelInitializer<SocketChannel>() {
@Override
protected void initChannel(SocketChannel ch) throws Exception {
log.debug("connected...");
ch.pipeline().addLast(new LoggingHandler(LogLevel.DEBUG));
ch.pipeline().addLast(new ChannelInboundHandlerAdapter() {
@Override
public void channelActive(ChannelHandlerContext ctx) throws Exception {
log.debug("sending...");
Random r = new Random();
char c = 'a';
ByteBuf buffer = ctx.alloc().buffer();
for (int i = 0; i < 3; i++) {
for (int j = 1; j <= r.nextInt(16)+1; j++) {
buffer.writeByte((byte) c);
}
buffer.writeBytes("\n".getBytes()); //每条消息以 \n 结尾
c++;
}
ctx.writeAndFlush(buffer);
ctx.fireChannelActive();
}
});
}
});
ChannelFuture channelFuture = bootstrap.connect("127.0.0.1", 8080).sync();
channelFuture.channel().close();
channelFuture.channel().closeFuture().sync();
} catch (InterruptedException e) {
log.error("client error", e);
} finally {
group.shutdownGracefully();
}
}
}
输出
客户端:
21:14:43 [DEBUG] [nioEventLoopGroup-2-1] o.example.Client - connected...
21:14:43 [DEBUG] [nioEventLoopGroup-2-1] i.n.h.l.LoggingHandler - [id: 0xacff7f79] REGISTERED
21:14:43 [DEBUG] [nioEventLoopGroup-2-1] i.n.h.l.LoggingHandler - [id: 0xacff7f79] CONNECT: /127.0.0.1:8080
21:14:43 [DEBUG] [nioEventLoopGroup-2-1] i.n.h.l.LoggingHandler - [id: 0xacff7f79, L:/127.0.0.1:65496 - R:/127.0.0.1:8080] ACTIVE
21:14:43 [DEBUG] [nioEventLoopGroup-2-1] o.example.Client - sending...
21:14:43 [DEBUG] [nioEventLoopGroup-2-1] i.n.h.l.LoggingHandler - [id: 0xacff7f79, L:/127.0.0.1:65496 - R:/127.0.0.1:8080] WRITE: 13B
+-------------------------------------------------+
| 0 1 2 3 4 5 6 7 8 9 a b c d e f |
+--------+-------------------------------------------------+----------------+
|00000000| 61 0a 62 62 0a 63 63 63 63 63 63 63 0a |a.bb.ccccccc. | // .表示换行,显示问题
+--------+-------------------------------------------------+----------------+
21:14:43 [DEBUG] [nioEventLoopGroup-2-1] i.n.h.l.LoggingHandler - [id: 0xacff7f79, L:/127.0.0.1:65496 - R:/127.0.0.1:8080] FLUSH
21:14:43 [DEBUG] [nioEventLoopGroup-2-1] i.n.h.l.LoggingHandler - [id: 0xacff7f79, L:/127.0.0.1:65496 - R:/127.0.0.1:8080] CLOSE
21:14:43 [DEBUG] [nioEventLoopGroup-2-1] i.n.h.l.LoggingHandler - [id: 0xacff7f79, L:/127.0.0.1:65496 ! R:/127.0.0.1:8080] INACTIVE
21:14:43 [DEBUG] [nioEventLoopGroup-2-1] i.n.h.l.LoggingHandler - [id: 0xacff7f79, L:/127.0.0.1:65496 ! R:/127.0.0.1:8080] UNREGISTERED
服务端:
21:14:39 [DEBUG] [main] o.example.Server - [id: 0x72005fc1] binding...
21:14:39 [DEBUG] [main] o.example.Server - [id: 0x72005fc1, L:/0:0:0:0:0:0:0:0:8080] bound...
21:14:43 [DEBUG] [nioEventLoopGroup-3-1] i.n.h.l.LoggingHandler - [id: 0xbe959bc4, L:/127.0.0.1:8080 - R:/127.0.0.1:65496] REGISTERED
21:14:43 [DEBUG] [nioEventLoopGroup-3-1] i.n.h.l.LoggingHandler - [id: 0xbe959bc4, L:/127.0.0.1:8080 - R:/127.0.0.1:65496] ACTIVE
21:14:43 [DEBUG] [nioEventLoopGroup-3-1] o.example.Server - connected [id: 0xbe959bc4, L:/127.0.0.1:8080 - R:/127.0.0.1:65496]
21:14:43 [DEBUG] [nioEventLoopGroup-3-1] i.n.h.l.LoggingHandler - [id: 0xbe959bc4, L:/127.0.0.1:8080 - R:/127.0.0.1:65496] READ: 1B
+-------------------------------------------------+
| 0 1 2 3 4 5 6 7 8 9 a b c d e f |
+--------+-------------------------------------------------+----------------+
|00000000| 61 |a |
+--------+-------------------------------------------------+----------------+
21:14:43 [DEBUG] [nioEventLoopGroup-3-1] i.n.h.l.LoggingHandler - [id: 0xbe959bc4, L:/127.0.0.1:8080 - R:/127.0.0.1:65496] READ: 2B
+-------------------------------------------------+
| 0 1 2 3 4 5 6 7 8 9 a b c d e f |
+--------+-------------------------------------------------+----------------+
|00000000| 62 62 |bb |
+--------+-------------------------------------------------+----------------+
21:14:43 [DEBUG] [nioEventLoopGroup-3-1] i.n.h.l.LoggingHandler - [id: 0xbe959bc4, L:/127.0.0.1:8080 - R:/127.0.0.1:65496] READ: 7B
+-------------------------------------------------+
| 0 1 2 3 4 5 6 7 8 9 a b c d e f |
+--------+-------------------------------------------------+----------------+
|00000000| 63 63 63 63 63 63 63 |ccccccc |
+--------+-------------------------------------------------+----------------+
21:14:43 [DEBUG] [nioEventLoopGroup-3-1] i.n.h.l.LoggingHandler - [id: 0xbe959bc4, L:/127.0.0.1:8080 - R:/127.0.0.1:65496] READ COMPLETE
21:14:43 [DEBUG] [nioEventLoopGroup-3-1] i.n.h.l.LoggingHandler - [id: 0xbe959bc4, L:/127.0.0.1:8080 - R:/127.0.0.1:65496] READ COMPLETE
21:14:43 [DEBUG] [nioEventLoopGroup-3-1] i.n.h.l.LoggingHandler - [id: 0xbe959bc4, L:/127.0.0.1:8080 ! R:/127.0.0.1:65496] INACTIVE
21:14:43 [DEBUG] [nioEventLoopGroup-3-1] o.example.Server - disconnect [id: 0xbe959bc4, L:/127.0.0.1:8080 ! R:/127.0.0.1:65496]
21:14:43 [DEBUG] [nioEventLoopGroup-3-1] i.n.h.l.LoggingHandler - [id: 0xbe959bc4, L:/127.0.0.1:8080 ! R:/127.0.0.1:65496] UNREGISTERED
缺点:处理字符数据比较合适,但如果内容本身包含了分隔符(字节数据常常会有此情况),那么就会解析错误。除非使用Base64编解码,但是要自己实现编解码的逻辑,比较复杂
4.预设长度
在发送消息前,先约定用定长字节表示接下来数据的长度。使用netty 提供LengthFieldBasedFrameDecoder类
服务端
// 最大长度,长度起始地址偏移量(方便添加开头魔数),长度固定占用字节数,长度调整(方便魔数在长度和内容之间),剥离字节数(可以只处理内容而不处理长度)
ch.pipeline().addLast(new LengthFieldBasedFrameDecoder(1024, 0, 1, 0, 1));
ch.pipeline().addLast(new LoggingHandler(LogLevel.DEBUG));
举例:其余详见LengthFieldBasedFrameDecoder注释
lengthFieldOffset = 1 //长度起始地址偏移1个字节,跳过HDR1
lengthFieldLength = 2 //长度字段占两个字节
lengthAdjustment = -3 (= the length of HDR1 + LEN, negative) //内容在长度之后的1个字节偏移,跳过HDR2
initialBytesToStrip = 3 //从第三个字节后保留数据当作内容,也就是AFTER DECODE
BEFORE DECODE (16 bytes) AFTER DECODE (13 bytes)
+------+--------+------+----------------+ +------+----------------+
| HDR1 | Length | HDR2 | Actual Content |----->| HDR2 | Actual Content |
| 0xCA | 0x0010 | 0xFE | "HELLO, WORLD" | | 0xFE | "HELLO, WORLD" |
+------+--------+------+----------------+ +------+----------------+
客户端
public class Client {
public static void main(String[] args) {
NioEventLoopGroup group = new NioEventLoopGroup();
try {
Bootstrap bootstrap = new Bootstrap();
bootstrap.channel(NioSocketChannel.class);
bootstrap.group(group);
bootstrap.handler(new ChannelInitializer<SocketChannel>() {
@Override
protected void initChannel(SocketChannel ch) throws Exception {
log.debug("connected...");
ch.pipeline().addLast(new LoggingHandler(LogLevel.DEBUG));
ch.pipeline().addLast(new ChannelInboundHandlerAdapter() {
@Override
public void channelActive(ChannelHandlerContext ctx) throws Exception {
log.debug("sending...");
Random r = new Random();
char c = 'a';
ByteBuf buffer = ctx.alloc().buffer();
for (int i = 0; i < 3; i++) {
byte length = (byte) (r.nextInt(16) + 1);
// 先写入长度
buffer.writeByte(length);
// 再写入数据
for (int j = 0; j < length; j++) {
buffer.writeByte((byte) c);
}
c++;
}
ctx.writeAndFlush(buffer);
ctx.fireChannelActive();
}
});
}
});
ChannelFuture channelFuture = bootstrap.connect("127.0.0.1", 8080).sync();
channelFuture.channel().close();
channelFuture.channel().closeFuture().sync();
} catch (InterruptedException e) {
log.error("client error", e);
} finally {
group.shutdownGracefully();
}
}
}
输出
客户端:
20:09:08 [DEBUG] [nioEventLoopGroup-2-1] o.example.Client - connetted...
20:09:08 [DEBUG] [nioEventLoopGroup-2-1] i.n.h.l.LoggingHandler - [id: 0x57dc995e] REGISTERED
20:09:08 [DEBUG] [nioEventLoopGroup-2-1] i.n.h.l.LoggingHandler - [id: 0x57dc995e] CONNECT: /127.0.0.1:8080
20:09:08 [DEBUG] [nioEventLoopGroup-2-1] i.n.h.l.LoggingHandler - [id: 0x57dc995e, L:/127.0.0.1:60637 - R:/127.0.0.1:8080] ACTIVE
20:09:08 [DEBUG] [nioEventLoopGroup-2-1] o.example.Client - sending...
20:09:08 [DEBUG] [nioEventLoopGroup-2-1] i.n.h.l.LoggingHandler - [id: 0x57dc995e, L:/127.0.0.1:60637 - R:/127.0.0.1:8080] WRITE: 26B
+-------------------------------------------------+
| 0 1 2 3 4 5 6 7 8 9 a b c d e f |
+--------+-------------------------------------------------+----------------+
|00000000| 0c 61 61 61 61 61 61 61 61 61 61 61 61 08 62 62 |.aaaaaaaaaaaa.bb|
|00000010| 62 62 62 62 62 62 03 63 63 63 |bbbbbb.ccc |
+--------+-------------------------------------------------+----------------+
20:09:08 [DEBUG] [nioEventLoopGroup-2-1] i.n.h.l.LoggingHandler - [id: 0x57dc995e, L:/127.0.0.1:60637 - R:/127.0.0.1:8080] FLUSH
20:09:08 [DEBUG] [nioEventLoopGroup-2-1] i.n.h.l.LoggingHandler - [id: 0x57dc995e, L:/127.0.0.1:60637 - R:/127.0.0.1:8080] CLOSE
20:09:08 [DEBUG] [nioEventLoopGroup-2-1] i.n.h.l.LoggingHandler - [id: 0x57dc995e, L:/127.0.0.1:60637 ! R:/127.0.0.1:8080] INACTIVE
20:09:08 [DEBUG] [nioEventLoopGroup-2-1] i.n.h.l.LoggingHandler - [id: 0x57dc995e, L:/127.0.0.1:60637 ! R:/127.0.0.1:8080] UNREGISTERED
服务端:
20:09:06 [DEBUG] [main] o.example.Server - [id: 0x3c663bbb] binding...
20:09:06 [DEBUG] [main] o.example.Server - [id: 0x3c663bbb, L:/0:0:0:0:0:0:0:0:8080] bound...
20:09:08 [DEBUG] [nioEventLoopGroup-3-1] i.n.h.l.LoggingHandler - [id: 0x6148b9ae, L:/127.0.0.1:8080 - R:/127.0.0.1:60637] REGISTERED
20:09:08 [DEBUG] [nioEventLoopGroup-3-1] i.n.h.l.LoggingHandler - [id: 0x6148b9ae, L:/127.0.0.1:8080 - R:/127.0.0.1:60637] ACTIVE
20:09:08 [DEBUG] [nioEventLoopGroup-3-1] o.example.Server - connected [id: 0x6148b9ae, L:/127.0.0.1:8080 - R:/127.0.0.1:60637]
20:09:08 [DEBUG] [nioEventLoopGroup-3-1] i.n.h.l.LoggingHandler - [id: 0x6148b9ae, L:/127.0.0.1:8080 - R:/127.0.0.1:60637] READ: 12B
+-------------------------------------------------+
| 0 1 2 3 4 5 6 7 8 9 a b c d e f |
+--------+-------------------------------------------------+----------------+
|00000000| 61 61 61 61 61 61 61 61 61 61 61 61 |aaaaaaaaaaaa |
+--------+-------------------------------------------------+----------------+
20:09:08 [DEBUG] [nioEventLoopGroup-3-1] i.n.h.l.LoggingHandler - [id: 0x6148b9ae, L:/127.0.0.1:8080 - R:/127.0.0.1:60637] READ: 8B
+-------------------------------------------------+
| 0 1 2 3 4 5 6 7 8 9 a b c d e f |
+--------+-------------------------------------------------+----------------+
|00000000| 62 62 62 62 62 62 62 62 |bbbbbbbb |
+--------+-------------------------------------------------+----------------+
20:09:08 [DEBUG] [nioEventLoopGroup-3-1] i.n.h.l.LoggingHandler - [id: 0x6148b9ae, L:/127.0.0.1:8080 - R:/127.0.0.1:60637] READ: 3B
+-------------------------------------------------+
| 0 1 2 3 4 5 6 7 8 9 a b c d e f |
+--------+-------------------------------------------------+----------------+
|00000000| 63 63 63 |ccc |
+--------+-------------------------------------------------+----------------+
20:09:08 [DEBUG] [nioEventLoopGroup-3-1] i.n.h.l.LoggingHandler - [id: 0x6148b9ae, L:/127.0.0.1:8080 - R:/127.0.0.1:60637] READ COMPLETE
20:09:08 [DEBUG] [nioEventLoopGroup-3-1] i.n.h.l.LoggingHandler - [id: 0x6148b9ae, L:/127.0.0.1:8080 - R:/127.0.0.1:60637] READ COMPLETE
20:09:08 [DEBUG] [nioEventLoopGroup-3-1] i.n.h.l.LoggingHandler - [id: 0x6148b9ae, L:/127.0.0.1:8080 ! R:/127.0.0.1:60637] INACTIVE
20:09:08 [DEBUG] [nioEventLoopGroup-3-1] o.example.Server - disconnect [id: 0x6148b9ae, L:/127.0.0.1:8080 ! R:/127.0.0.1:60637]
20:09:08 [DEBUG] [nioEventLoopGroup-3-1] i.n.h.l.LoggingHandler - [id: 0x6148b9ae, L:/127.0.0.1:8080 ! R:/127.0.0.1:60637] UNREGISTERED
2.协议设计与解析
2.1 协议的意义
由于TCP/IP中消息传输基于流的方式,没有边界。而协议的目的就是划定消息的边界,制定通信双方要共同遵守的通信规则
例如:在网络上传输
下雨天留客天留我不留
是中文一句著名的无标点符号句子,在没有标点符号情况下,这句话有数种拆解方式,而意思却是完全不同,所以常被用作讲述标点符号的重要性
解读一:
下雨天留客,天留,我不留
解读二:
下雨天,留客天,留我不?留
如何设计协议呢?其实就是给网络传输的信息加上“标点符号”。但通过分隔符来断句不是很好,因为分隔符本身如果用于传输,那么必须加以区分。因此,下面一种协议较为常用
定长字节表示内容长度 + 实际内容
例如,假设一个中文字符长度为 3,按照上述协议的规则,发送信息方式如下,就不会被接收方弄错意思了
0f下雨天留客06天留09我不留
2.2 redis & http 协议举例
根据 redis 制定的协议向库中 set/get 数据
NioEventLoopGroup worker = new NioEventLoopGroup();
byte[] LINE = {13, 10};
try {
Bootstrap bootstrap = new Bootstrap();
bootstrap.channel(NioSocketChannel.class);
bootstrap.group(worker);
bootstrap.handler(new ChannelInitializer<SocketChannel>() {
@Override
protected void initChannel(SocketChannel ch) {
ch.pipeline().addLast(new LoggingHandler());
ch.pipeline().addLast(new ChannelInboundHandlerAdapter() {
// 会在连接 channel 建立成功后,会触发 active 事件
@Override
public void channelActive(ChannelHandlerContext ctx) {
set(ctx);
get(ctx);
}
private void set(ChannelHandlerContext ctx) {
ByteBuf buf = ctx.alloc().buffer();
buf.writeBytes("*3".getBytes()); //共几个参数 set aaa bbbb
buf.writeBytes(LINE); //参数之间需要使用 回车、换行
buf.writeBytes("$3".getBytes()); //set是3个字节
buf.writeBytes(LINE);
buf.writeBytes("set".getBytes());
buf.writeBytes(LINE);
buf.writeBytes("$3".getBytes()); //aaa是3个字节
buf.writeBytes(LINE);
buf.writeBytes("aaa".getBytes());
buf.writeBytes(LINE);
buf.writeBytes("$4".getBytes()); //bbbb是4个字节
buf.writeBytes(LINE);
buf.writeBytes("bbbb".getBytes());
buf.writeBytes(LINE);
ctx.writeAndFlush(buf);
}
private void get(ChannelHandlerContext ctx) {
ByteBuf buf = ctx.alloc().buffer(); //get aaa
buf.writeBytes("*2".getBytes());
buf.writeBytes(LINE);
buf.writeBytes("$3".getBytes());
buf.writeBytes(LINE);
buf.writeBytes("get".getBytes());
buf.writeBytes(LINE);
buf.writeBytes("$3".getBytes());
buf.writeBytes(LINE);
buf.writeBytes("aaa".getBytes());
buf.writeBytes(LINE);
ctx.writeAndFlush(buf);
}
@Override
public void channelRead(ChannelHandlerContext ctx, Object msg) throws Exception {
ByteBuf buf = (ByteBuf) msg;
System.out.println(buf.toString(Charset.defaultCharset()));
}
});
}
});
ChannelFuture channelFuture = bootstrap.connect("localhost", 6379).sync();
channelFuture.channel().close();
channelFuture.channel().closeFuture().sync();
} catch (InterruptedException e) {
log.error("client error", e);
} finally {
worker.shutdownGracefully();
}
http 协议编解码实现,使用 Netty 自带的HttpServerCodec编解码器
public static void main(String[] args) throws Exception {
NioEventLoopGroup boss = new NioEventLoopGroup();
NioEventLoopGroup worker = new NioEventLoopGroup();
try {
ServerBootstrap serverBootstrap = new ServerBootstrap();
serverBootstrap.channel(NioServerSocketChannel.class);
serverBootstrap.group(boss, worker);
serverBootstrap.childHandler(new ChannelInitializer<SocketChannel>() {
@Override
protected void initChannel(SocketChannel ch) throws Exception {
ch.pipeline().addLast(new LoggingHandler(LogLevel.DEBUG));
ch.pipeline().addLast(new HttpServerCodec()); //http编解码器,因为继承了Combine..所以编解码都可以做
//自定义方法处理HttpServerCodec解析的数据
/* ch.pipeline().addLast(new ChannelInboundHandlerAdapter() {
@Override
public void channelRead(ChannelHandlerContext ctx, Object msg) throws Exception {
log.debug("{}", msg.getClass());
// HttpServerCodec会将请求解析成两个部分
if (msg instanceof HttpRequest) { // 处理请求行,请求头
} else if (msg instanceof HttpContent) { // 处理请求体(Get请求没有请求体, 默认为空)
}
}
}); */
//使用Netty提供的方法处理,SimpleChannelInboundHandler<T>会只关系泛型类型的消息,指定HttpRequest后只会处理这个类型的
ch.pipeline().addLast(new SimpleChannelInboundHandler<HttpRequest>() {
@Override
protected void channelRead0(ChannelHandlerContext ctx, HttpRequest msg) throws Exception {
// 获取请求行
log.debug(msg.uri());
// 返回响应
DefaultFullHttpResponse response =
new DefaultFullHttpResponse(msg.protocolVersion(), HttpResponseStatus.OK); //设置版本和状态码
byte[] bytes = "<h1>Hello, world!</h1>".getBytes();
response.headers().setInt(io.netty.handler.codec.http.HttpHeaderNames.CONTENT_LENGTH, bytes.length); //长度
response.content().writeBytes(bytes);
// 写回响应
ctx.writeAndFlush(response);
}
});
}
});
ChannelFuture channelFuture = serverBootstrap.bind(8080).sync();
channelFuture.channel().closeFuture().sync();
} catch (InterruptedException e) {
log.error("server error", e);
} finally {
boss.shutdownGracefully();
worker.shutdownGracefully();
}
}
访问localhost:8080后,服务端输出:
20:55:14 [DEBUG] [nioEventLoopGroup-3-1] i.n.h.l.LoggingHandler - [id: 0xfce7ee26, L:/127.0.0.1:8080 - R:/127.0.0.1:62245] REGISTERED
20:55:14 [DEBUG] [nioEventLoopGroup-3-1] i.n.h.l.LoggingHandler - [id: 0xfce7ee26, L:/127.0.0.1:8080 - R:/127.0.0.1:62245] ACTIVE
20:55:14 [DEBUG] [nioEventLoopGroup-3-1] i.n.h.l.LoggingHandler - [id: 0xfce7ee26, L:/127.0.0.1:8080 - R:/127.0.0.1:62245] READ: 491B
+-------------------------------------------------+
| 0 1 2 3 4 5 6 7 8 9 a b c d e f |
+--------+-------------------------------------------------+----------------+
|00000000| 47 45 54 20 2f 20 48 54 54 50 2f 31 2e 31 0d 0a |GET / HTTP/1.1..|
|00000010| 48 6f 73 74 3a 20 6c 6f 63 61 6c 68 6f 73 74 3a |Host: localhost:|
|00000020| 38 30 38 30 0d 0a 55 73 65 72 2d 41 67 65 6e 74 |8080..User-Agent|
|00000030| 3a 20 4d 6f 7a 69 6c 6c 61 2f 35 2e 30 20 28 57 |: Mozilla/5.0 (W|
|00000040| 69 6e 64 6f 77 73 20 4e 54 20 31 30 2e 30 3b 20 |indows NT 10.0; |
|00000050| 57 69 6e 36 34 3b 20 78 36 34 3b 20 72 76 3a 31 |Win64; x64; rv:1|
|00000060| 30 38 2e 30 29 20 47 65 63 6b 6f 2f 32 30 31 30 |08.0) Gecko/2010|
|00000070| 30 31 30 31 20 46 69 72 65 66 6f 78 2f 31 30 38 |0101 Firefox/108|
|00000080| 2e 30 0d 0a 41 63 63 65 70 74 3a 20 74 65 78 74 |.0..Accept: text|
|00000090| 2f 68 74 6d 6c 2c 61 70 70 6c 69 63 61 74 69 6f |/html,applicatio|
|000000a0| 6e 2f 78 68 74 6d 6c 2b 78 6d 6c 2c 61 70 70 6c |n/xhtml+xml,appl|
|000000b0| 69 63 61 74 69 6f 6e 2f 78 6d 6c 3b 71 3d 30 2e |ication/xml;q=0.|
|000000c0| 39 2c 69 6d 61 67 65 2f 61 76 69 66 2c 69 6d 61 |9,image/avif,ima|
|000000d0| 67 65 2f 77 65 62 70 2c 2a 2f 2a 3b 71 3d 30 2e |ge/webp,*/*;q=0.|
|000000e0| 38 0d 0a 41 63 63 65 70 74 2d 4c 61 6e 67 75 61 |8..Accept-Langua|
|000000f0| 67 65 3a 20 7a 68 2d 43 4e 2c 7a 68 3b 71 3d 30 |ge: zh-CN,zh;q=0|
|00000100| 2e 38 2c 7a 68 2d 54 57 3b 71 3d 30 2e 37 2c 7a |.8,zh-TW;q=0.7,z|
|00000110| 68 2d 48 4b 3b 71 3d 30 2e 35 2c 65 6e 2d 55 53 |h-HK;q=0.5,en-US|
|00000120| 3b 71 3d 30 2e 33 2c 65 6e 3b 71 3d 30 2e 32 0d |;q=0.3,en;q=0.2.|
|00000130| 0a 41 63 63 65 70 74 2d 45 6e 63 6f 64 69 6e 67 |.Accept-Encoding|
|00000140| 3a 20 67 7a 69 70 2c 20 64 65 66 6c 61 74 65 2c |: gzip, deflate,|
|00000150| 20 62 72 0d 0a 43 6f 6e 6e 65 63 74 69 6f 6e 3a | br..Connection:|
|00000160| 20 6b 65 65 70 2d 61 6c 69 76 65 0d 0a 55 70 67 | keep-alive..Upg|
|00000170| 72 61 64 65 2d 49 6e 73 65 63 75 72 65 2d 52 65 |rade-Insecure-Re|
|00000180| 71 75 65 73 74 73 3a 20 31 0d 0a 53 65 63 2d 46 |quests: 1..Sec-F|
|00000190| 65 74 63 68 2d 44 65 73 74 3a 20 64 6f 63 75 6d |etch-Dest: docum|
|000001a0| 65 6e 74 0d 0a 53 65 63 2d 46 65 74 63 68 2d 4d |ent..Sec-Fetch-M|
|000001b0| 6f 64 65 3a 20 6e 61 76 69 67 61 74 65 0d 0a 53 |ode: navigate..S|
|000001c0| 65 63 2d 46 65 74 63 68 2d 53 69 74 65 3a 20 6e |ec-Fetch-Site: n|
|000001d0| 6f 6e 65 0d 0a 53 65 63 2d 46 65 74 63 68 2d 55 |one..Sec-Fetch-U|
|000001e0| 73 65 72 3a 20 3f 31 0d 0a 0d 0a |ser: ?1.... |
+--------+-------------------------------------------------+----------------+
20:55:14 [DEBUG] [nioEventLoopGroup-3-1] org.example.Main - /
20:55:14 [DEBUG] [nioEventLoopGroup-3-1] i.n.h.l.LoggingHandler - [id: 0xfce7ee26, L:/127.0.0.1:8080 - R:/127.0.0.1:62245] WRITE: 61B
+-------------------------------------------------+
| 0 1 2 3 4 5 6 7 8 9 a b c d e f |
+--------+-------------------------------------------------+----------------+
|00000000| 48 54 54 50 2f 31 2e 31 20 32 30 30 20 4f 4b 0d |HTTP/1.1 200 OK.|
|00000010| 0a 63 6f 6e 74 65 6e 74 2d 6c 65 6e 67 74 68 3a |.content-length:|
|00000020| 20 32 32 0d 0a 0d 0a 3c 68 31 3e 48 65 6c 6c 6f | 22....<h1>Hello|
|00000030| 2c 20 77 6f 72 6c 64 21 3c 2f 68 31 3e |, world!</h1> |
+--------+-------------------------------------------------+----------------+
20:55:14 [DEBUG] [nioEventLoopGroup-3-1] i.n.h.l.LoggingHandler - [id: 0xfce7ee26, L:/127.0.0.1:8080 - R:/127.0.0.1:62245] FLUSH
20:55:14 [DEBUG] [nioEventLoopGroup-3-1] i.n.h.l.LoggingHandler - [id: 0xfce7ee26, L:/127.0.0.1:8080 - R:/127.0.0.1:62245] READ COMPLETE
2.3 自定义协议
魔数,用来在第一时间判定是否是无效数据包
版本号,可以支持协议的升级
序列化算法,消息正文到底采用哪种序列化反序列化方式,可以由此扩展,例如:json、protobuf、hessian、jdk
指令类型,是登录、注册、单聊、群聊... 跟业务相关
请求序号,为了双工通信,提供异步能力
正文长度
消息正文
举例:根据上面的要素,设计一个登录请求消息和登录响应消息,并使用 Netty 完成收发
编解码器
@Slf4j
public class MessageCodec extends ByteToMessageCodec<Message> {
@Override
protected void encode(ChannelHandlerContext ctx, Message msg, ByteBuf out) throws Exception {
// 1. 4 字节的魔数
out.writeBytes(new byte[]{1, 2, 3, 4});
// 2. 1 字节的版本,
out.writeByte(1);
// 3. 1 字节的序列化方式 jdk 0 , json 1
out.writeByte(0);
// 4. 1 字节的指令类型
out.writeByte(msg.getMessageType());
// 5. 4 个字节
out.writeInt(msg.getSequenceId());
// 无意义,对齐填充
out.writeByte(0xff);
// 6. 获取内容的字节数组
ByteArrayOutputStream bos = new ByteArrayOutputStream();
ObjectOutputStream oos = new ObjectOutputStream(bos);
oos.writeObject(msg);
byte[] bytes = bos.toByteArray();
// 7. 长度
out.writeInt(bytes.length);
// 8. 写入内容
out.writeBytes(bytes);
}
@Override
protected void decode(ChannelHandlerContext ctx, ByteBuf in, List<Object> out) throws Exception {
int magicNum = in.readInt();
byte version = in.readByte();
byte serializerType = in.readByte();
byte messageType = in.readByte();
int sequenceId = in.readInt();
in.readByte();
int length = in.readInt();
byte[] bytes = new byte[length];
in.readBytes(bytes, 0, length);
ObjectInputStream ois = new ObjectInputStream(new ByteArrayInputStream(bytes));
Message message = (Message) ois.readObject();
log.debug("{}, {}, {}, {}, {}, {}", magicNum, version, serializerType, messageType, sequenceId, length);
log.debug("{}", message);
out.add(message);
}
}
主函数
EmbeddedChannel channel = new EmbeddedChannel(
new LoggingHandler(),
new LengthFieldBasedFrameDecoder(
1024, 12, 4, 0, 0),
new MessageCodec()
);
// encode
LoginRequestMessage message = new LoginRequestMessage("zhangsan", "123", "张三");
// channel.writeOutbound(message);
// decode
ByteBuf buf = ByteBufAllocator.DEFAULT.buffer();
new MessageCodec().encode(null, message, buf);
ByteBuf s1 = buf.slice(0, 100);
ByteBuf s2 = buf.slice(100, buf.readableBytes() - 100);
s1.retain(); // 引用计数 2
channel.writeInbound(s1); // release 1
channel.writeInbound(s2);
解读
什么时候可以加 @Sharable?
当 handler 不保存状态时,就可以安全地在多线程下被共享
但要注意对于编解码器类,不能继承 ByteToMessageCodec 或 CombinedChannelDuplexHandler 父类,他们的构造方法对 @Sharable 有限制
如果能确保编解码器不会保存状态,可以继承 MessageToMessageCodec 父类
@Slf4j
@ChannelHandler.Sharable
/**
* 必须和 LengthFieldBasedFrameDecoder 一起使用,确保接到的 ByteBuf 消息是完整的
*/
public class MessageCodecSharable extends MessageToMessageCodec<ByteBuf, Message> {
@Override
protected void encode(ChannelHandlerContext ctx, Message msg, List<Object> outList) throws Exception {
ByteBuf out = ctx.alloc().buffer();
// 1. 4 字节的魔数
out.writeBytes(new byte[]{1, 2, 3, 4});
// 2. 1 字节的版本,
out.writeByte(1);
// 3. 1 字节的序列化方式 jdk 0 , json 1
out.writeByte(0);
// 4. 1 字节的指令类型
out.writeByte(msg.getMessageType());
// 5. 4 个字节
out.writeInt(msg.getSequenceId());
// 无意义,对齐填充
out.writeByte(0xff);
// 6. 获取内容的字节数组
ByteArrayOutputStream bos = new ByteArrayOutputStream();
ObjectOutputStream oos = new ObjectOutputStream(bos);
oos.writeObject(msg);
byte[] bytes = bos.toByteArray();
// 7. 长度
out.writeInt(bytes.length);
// 8. 写入内容
out.writeBytes(bytes);
outList.add(out);
}
@Override
protected void decode(ChannelHandlerContext ctx, ByteBuf in, List<Object> out) throws Exception {
int magicNum = in.readInt();
byte version = in.readByte();
byte serializerType = in.readByte();
byte messageType = in.readByte();
int sequenceId = in.readInt();
in.readByte();
int length = in.readInt();
byte[] bytes = new byte[length];
in.readBytes(bytes, 0, length);
ObjectInputStream ois = new ObjectInputStream(new ByteArrayInputStream(bytes));
Message message = (Message) ois.readObject();
log.debug("{}, {}, {}, {}, {}, {}", magicNum, version, serializerType, messageType, sequenceId, length);
log.debug("{}", message);
out.add(message);
}
}
3.Netty 参数调优
1.CONNECT_TIMEOUT_MILLIS
属于 SocketChannal 参数
用在客户端建立连接时,如果在指定毫秒内无法连接,会抛出 timeout 异常
区别于 SO_TIMEOUT 主要用在阻塞 IO,阻塞 IO 中 accept,read 等都是无限等待的,如果不希望永远阻塞,使用它调整超时时间
@Slf4j
public class TestConnectionTimeout {
public static void main(String[] args) {
NioEventLoopGroup group = new NioEventLoopGroup();
try {
Bootstrap bootstrap = new Bootstrap()
.group(group)
.option(ChannelOption.CONNECT_TIMEOUT_MILLIS, 300)
.channel(NioSocketChannel.class)
.handler(new LoggingHandler());
ChannelFuture future = bootstrap.connect("127.0.0.1", 8080);
future.sync().channel().closeFuture().sync(); // 断点1
} catch (Exception e) {
e.printStackTrace();
log.debug("timeout");
} finally {
group.shutdownGracefully();
}
}
}
源码部分 io.netty.channel.nio.AbstractNioChannel.AbstractNioUnsafe#connect
@Override
public final void connect(
final SocketAddress remoteAddress, final SocketAddress localAddress, final ChannelPromise promise) {
// ...
// Schedule connect timeout.
int connectTimeoutMillis = config().getConnectTimeoutMillis();
if (connectTimeoutMillis > 0) {
connectTimeoutFuture = eventLoop().schedule(new Runnable() { //实际上是一个定时任务
@Override
public void run() {
ChannelPromise connectPromise = AbstractNioChannel.this.connectPromise;
ConnectTimeoutException cause =
new ConnectTimeoutException("connection timed out: " + remoteAddress);
if (connectPromise != null && connectPromise.tryFailure(cause)) { //connectPromise会通知主线程future的对象
close(voidPromise());
}
}
}, connectTimeoutMillis, TimeUnit.MILLISECONDS);
}
// ...
}
2.SO_BACKLOG
属于 ServerSocketChannal 参数,使用Option()方法设置
clientserversyns queue(半连接队列)accept queue(全连接队列)SYN_SENDSYN_RCVDESTABLISHEDESTABLISHEDbind()listen()connect()1. SYNput2. SYN + ACK3. ACKputaccept()clientserversyns queue(半连接队列)accept queue(全连接队列)
第一次握手,client 发送 SYN 到 server,状态修改为 SYN_SEND,server 收到,状态改变为 SYN_REVD,并将该请求放入 sync queue 队列
第二次握手,server 回复 SYN + ACK 给 client,client 收到,状态改变为 ESTABLISHED,并发送 ACK 给 server
第三次握手,server 收到 ACK,状态改变为 ESTABLISHED,将该请求从 sync queue 放入 accept queue
最后当 Netty 有 Accept 事件的处理能力时就会从 accept queue 队列中取出数据进行连接
其中
在 linux 2.2 之前,backlog 大小包括了两个队列的大小,在 2.2 之后,分别用下面两个参数来控制
sync queue - 半连接队列
大小通过 /proc/sys/net/ipv4/tcp_max_syn_backlog 指定,在 syncookies 启用的情况下,逻辑上没有最大值限制,这个设置便被忽略
accept queue - 全连接队列
其大小通过 /proc/sys/net/core/somaxconn 指定,在使用 listen 函数时,内核会根据传入的 backlog 参数与系统参数,取二者的较小值
如果 accpet queue 队列满了,server 将发送一个拒绝连接的错误信息到 client
Netty 中可以通过 option(ChannelOption.SO_BACKLOG, 值) 来设置大小。因为Accept时间的处理速度较快,所以可以通过断点调试方式暂停服务端的连接,调试断点为:io.netty.channel.nio.NioEventLoop#processSelectedKey
可以通过下面源码查看默认大小
public class DefaultServerSocketChannelConfig extends DefaultChannelConfig implements ServerSocketChannelConfig {
private volatile int backlog = NetUtil.SOMAXCONN;
// ...
}
bio 中更容易说明,不用 debug 模式
public class Server {
public static void main(String[] args) throws IOException {
ServerSocket ss = new ServerSocket(8888, 2);
Socket accept = ss.accept();
System.out.println(accept);
System.in.read();
}
}
客户端启动 4 个
public class Client {
public static void main(String[] args) throws IOException {
try {
Socket s = new Socket();
System.out.println(new Date()+" connecting...");
s.connect(new InetSocketAddress("localhost", 8888),1000);
System.out.println(new Date()+" connected...");
s.getOutputStream().write(1);
System.in.read();
} catch (IOException e) {
System.out.println(new Date()+" connecting timeout...");
e.printStackTrace();
}
}
}
第 1,2,3 个客户端都打印,但除了第一个处于 accpet 外,其它两个都处于 accept queue 中
Tue Apr 21 20:30:28 CST 2020 connecting...
Tue Apr 21 20:30:28 CST 2020 connected...
第 4 个客户端连接时
Tue Apr 21 20:53:58 CST 2020 connecting...
Tue Apr 21 20:53:59 CST 2020 connecting timeout...
java.net.SocketTimeoutException: connect timed out
3.ulimit -n [数量]
属于操作系统参数,用于限定进程打开FD文件描述符的数量
属于临时参数,建议使用启动脚本配置
4.TCP_NODELAY
Netty 默认为false(开启nagle算法),容易造成粘包现象
属于 SocketChannal 参数
5.SO_SNDBUF & SO_RCVBUF
发送缓冲区和接收缓冲区,但操作系统底层可根据需要自动调整大小,故可不需要对其设置
SO_SNDBUF 属于 SocketChannal 参数
SO_RCVBUF 既可用于 SocketChannal 参数,也可以用于 ServerSocketChannal 参数(建议设置到 ServerSocketChannal 上)
6.ALLOCATOR
分配器对象,用于分配 ByteBuf,ctx.alloc()就是获取的 ALLOCATOR 对象
属于 SocketChannal 参数
可以在 VM option 里进行设置是否池化:-Dio.netty.allocator.type=unpooled、是否使用直接内存:-Dio.netty.noPreferDirect=false
对于IO数据交换,Netty会强制使用直接存储
7.RCVBUF_ALLOCATOR
控制 Netty 接收缓冲区大小
属于 SocketChannal 参数
负责入站数据的分配,决定入站缓冲区的大小(并可动态调整),IO通信统一采用 direct 直接内存,具体池化还是非池化由 allocator 决定
第四章 Netty 源码解析
1.启动剖析
我们就来看看 netty 中对下面的代码(NIO建立连接)是怎样进行处理的
//1 netty 中使用 NioEventLoopGroup (简称 nio boss 线程)来封装线程和 selector
Selector selector = Selector.open();
//2 创建 NioServerSocketChannel,同时会初始化它关联的 handler,以及为原生 ssc 存储 config
NioServerSocketChannel attachment = new NioServerSocketChannel();
//3 创建 NioServerSocketChannel 时,创建了 java 原生的 ServerSocketChannel
ServerSocketChannel serverSocketChannel = ServerSocketChannel.open();
serverSocketChannel.configureBlocking(false);
//4 启动 nio boss 线程执行接下来的操作
//5 注册(仅关联 selector 和 NioServerSocketChannel),未关注事件
SelectionKey selectionKey = serverSocketChannel.register(selector, 0, attachment);
//6 head -> 初始化器 -> ServerBootstrapAcceptor -> tail,初始化器是一次性的,只为添加 acceptor
//7 绑定端口
serverSocketChannel.bind(new InetSocketAddress(8080));
//8 触发 channel active 事件,在 head 中关注 op_accept 事件
selectionKey.interestOps(SelectionKey.OP_ACCEPT);
首先看serverBootstrap.bind()方法,入口 io.netty.bootstrap.ServerBootstrap#bind
关键代码 io.netty.bootstrap.AbstractBootstrap#doBind
private ChannelFuture doBind(final SocketAddress localAddress) {
// 1. 执行初始化和注册 regFuture 会由 initAndRegister 设置其是否完成,从而回调 3.2 处代码
final ChannelFuture regFuture = initAndRegister();
final Channel channel = regFuture.channel();
if (regFuture.cause() != null) {
return regFuture;
}
// 2. 因为是 initAndRegister 异步执行,需要分两种情况来看,调试时也需要通过 suspend 断点类型加以区分
// 2.1 如果已经完成
if (regFuture.isDone()) {
ChannelPromise promise = channel.newPromise();
// 3.1 立刻调用 doBind0
doBind0(regFuture, channel, localAddress, promise);
return promise;
}
// 2.2 还没有完成
else {
final PendingRegistrationPromise promise = new PendingRegistrationPromise(channel);
// 3.2 回调 doBind0
regFuture.addListener(new ChannelFutureListener() {
@Override
public void operationComplete(ChannelFuture future) throws Exception {
Throwable cause = future.cause();
if (cause != null) {
// 处理异常...
promise.setFailure(cause);
} else {
promise.registered();
// 3. 由注册线程去执行 doBind0
doBind0(regFuture, channel, localAddress, promise);
}
}
});
return promise;
}
}
关注initAndRegister()方法,关键代码 io.netty.bootstrap.AbstractBootstrap#initAndRegister
final ChannelFuture initAndRegister() {
Channel channel = null;
try {
channel = channelFactory.newChannel();
// 1.1 初始化 - 做的事就是添加一个初始化器 ChannelInitializer
init(channel);
} catch (Throwable t) {
// 处理异常...
return new DefaultChannelPromise(new FailedChannel(), GlobalEventExecutor.INSTANCE).setFailure(t);
}
// 1.2 注册 - 做的事就是将原生 channel 注册到 selector 上
ChannelFuture regFuture = config().group().register(channel);
if (regFuture.cause() != null) {
// 处理异常...
}
return regFuture;
}
初始化关键代码 io.netty.bootstrap.ServerBootstrap#init
// 这里 channel 实际上是 NioServerSocketChannel
void init(Channel channel) throws Exception {
final Map<ChannelOption<?>, Object> options = options0();
synchronized (options) {
setChannelOptions(channel, options, logger);
}
final Map<AttributeKey<?>, Object> attrs = attrs0();
synchronized (attrs) {
for (Entry<AttributeKey<?>, Object> e: attrs.entrySet()) {
@SuppressWarnings("unchecked")
AttributeKey<Object> key = (AttributeKey<Object>) e.getKey();
channel.attr(key).set(e.getValue());
}
}
ChannelPipeline p = channel.pipeline();
final EventLoopGroup currentChildGroup = childGroup;
final ChannelHandler currentChildHandler = childHandler;
final Entry<ChannelOption<?>, Object>[] currentChildOptions;
final Entry<AttributeKey<?>, Object>[] currentChildAttrs;
synchronized (childOptions) {
currentChildOptions = childOptions.entrySet().toArray(newOptionArray(0));
}
synchronized (childAttrs) {
currentChildAttrs = childAttrs.entrySet().toArray(newAttrArray(0));
}
// 为 NioServerSocketChannel 添加初始化器
p.addLast(new ChannelInitializer<Channel>() {
@Override
public void initChannel(final Channel ch) throws Exception {
final ChannelPipeline pipeline = ch.pipeline();
ChannelHandler handler = config.handler();
if (handler != null) {
pipeline.addLast(handler);
}
// 初始化器的职责是将 ServerBootstrapAcceptor 加入至 NioServerSocketChannel
ch.eventLoop().execute(new Runnable() {
@Override
public void run() {
pipeline.addLast(new ServerBootstrapAcceptor(
ch, currentChildGroup, currentChildHandler, currentChildOptions, currentChildAttrs));
}
});
}
});
}
注册关键代码 io.netty.channel.AbstractChannel.AbstractUnsafe#register
public final void register(EventLoop eventLoop, final ChannelPromise promise) {
// 一些检查,略...
AbstractChannel.this.eventLoop = eventLoop;
if (eventLoop.inEventLoop()) {
register0(promise);
} else {
try {
// 首次执行 execute 方法时,会启动 nio 线程,之后注册等操作在 nio 线程上执行
// 因为只有一个 NioServerSocketChannel 因此,也只会有一个 boss nio 线程
// 这行代码完成的事情是 main -> nio boss 线程的切换
eventLoop.execute(new Runnable() {
@Override
public void run() {
register0(promise);
}
});
} catch (Throwable t) {
// 日志记录...
closeForcibly();
closeFuture.setClosed();
safeSetFailure(promise, t);
}
}
}
关键代码io.netty.channel.AbstractChannel.AbstractUnsafe#register0
private void register0(ChannelPromise promise) {
try {
if (!promise.setUncancellable() || !ensureOpen(promise)) {
return;
}
boolean firstRegistration = neverRegistered;
// 1.2.1 原生的 nio channel 绑定到 selector 上,注意此时没有注册 selector 关注事件,附件为 NioServerSocketChannel
doRegister();
neverRegistered = false;
registered = true;
// 1.2.2 执行 NioServerSocketChannel 初始化器的 initChannel
pipeline.invokeHandlerAddedIfNeeded();
// 回调 3.2 io.netty.bootstrap.AbstractBootstrap#doBind0
safeSetSuccess(promise);
pipeline.fireChannelRegistered();
// 对应 server socket channel 还未绑定,isActive 为 false
if (isActive()) {
if (firstRegistration) {
pipeline.fireChannelActive();
} else if (config().isAutoRead()) {
beginRead();
}
}
} catch (Throwable t) {
// Close the channel directly to avoid FD leak.
closeForcibly();
closeFuture.setClosed();
safeSetFailure(promise, t);
}
}
关键代码io.netty.channel.nio.AbstractNioChannel#doRegister
protected void doRegister() throws Exception {
boolean selected = false;
while(true) {
try {
// 将原生的javaChannel注册到selector上
this.selectionKey = this.javaChannel().register(this.eventLoop().unwrappedSelector(), 0, this);
return;
} catch (CancelledKeyException var3) {
if (selected) {
throw var3;
}
this.eventLoop().selectNow();
selected = true;
}
}
}
关键代码 io.netty.channel.ChannelInitializer#initChannel
private boolean initChannel(ChannelHandlerContext ctx) throws Exception {
if (initMap.add(ctx)) { // Guard against re-entrance.
try {
// 1.2.2.1 执行初始化
initChannel((C) ctx.channel());
} catch (Throwable cause) {
exceptionCaught(ctx, cause);
} finally {
// 1.2.2.2 移除初始化器
ChannelPipeline pipeline = ctx.pipeline();
if (pipeline.context(this) != null) {
pipeline.remove(this);
}
}
return true;
}
return false;
}
关键代码 io.netty.bootstrap.AbstractBootstrap#doBind0
// 3.1 或 3.2 执行 doBind0
private static void doBind0(
final ChannelFuture regFuture, final Channel channel,
final SocketAddress localAddress, final ChannelPromise promise) {
channel.eventLoop().execute(new Runnable() {
@Override
public void run() {
if (regFuture.isSuccess()) {
// 绑定操作,调用链较长
channel.bind(localAddress, promise).addListener(ChannelFutureListener.CLOSE_ON_FAILURE);
} else {
promise.setFailure(regFuture.cause());
}
}
});
}
关键代码 io.netty.channel.AbstractChannel.AbstractUnsafe#bind
public final void bind(final SocketAddress localAddress, final ChannelPromise promise) {
assertEventLoop();
if (!promise.setUncancellable() || !ensureOpen(promise)) {
return;
}
if (Boolean.TRUE.equals(config().getOption(ChannelOption.SO_BROADCAST)) &&
localAddress instanceof InetSocketAddress &&
!((InetSocketAddress) localAddress).getAddress().isAnyLocalAddress() &&
!PlatformDependent.isWindows() && !PlatformDependent.maybeSuperUser()) {
// 记录日志...
}
boolean wasActive = isActive();
try {
// 3.3 执行端口绑定
doBind(localAddress);
} catch (Throwable t) {
safeSetFailure(promise, t);
closeIfClosed();
return;
}
if (!wasActive && isActive()) {
invokeLater(new Runnable() {
@Override
public void run() {
// 3.4 触发 active 事件
pipeline.fireChannelActive();
}
});
}
safeSetSuccess(promise);
}
3.3 关键代码 io.netty.channel.socket.nio.NioServerSocketChannel#doBind
protected void doBind(SocketAddress localAddress) throws Exception {
if (PlatformDependent.javaVersion() >= 7) {
javaChannel().bind(localAddress, config.getBacklog()); //ServerSocketChannel绑定端口号
} else {
javaChannel().socket().bind(localAddress, config.getBacklog());
}
}
3.4 关键代码 io.netty.channel.DefaultChannelPipeline.HeadContext#channelActive
public void channelActive(ChannelHandlerContext ctx) {
ctx.fireChannelActive();
// 触发 read (NioServerSocketChannel 上的 read 不是读取数据,只是为了触发 channel 的事件注册)
readIfIsAutoRead();
}
关键代码 io.netty.channel.nio.AbstractNioChannel#doBeginRead
protected void doBeginRead() throws Exception {
// Channel.read() or ChannelHandlerContext.read() was called
final SelectionKey selectionKey = this.selectionKey;
if (!selectionKey.isValid()) {
return;
}
readPending = true;
final int interestOps = selectionKey.interestOps();
// readInterestOp 取值是 16,在 NioServerSocketChannel 创建时初始化好,代表关注 accept 事件
if ((interestOps & readInterestOp) == 0) {
selectionKey.interestOps(interestOps | readInterestOp);
}
}
2.NioEventLoop 剖析
NioEventLoop 线程不仅要处理 IO 事件,还要处理 Task(包括普通任务和定时任务),
提交任务代码 io.netty.util.concurrent.SingleThreadEventExecutor#execute
public void execute(Runnable task) {
if (task == null) {
throw new NullPointerException("task");
}
boolean inEventLoop = inEventLoop();
// 添加任务,其中队列使用了 jctools 提供的 mpsc 无锁队列
addTask(task);
if (!inEventLoop) {
// inEventLoop 如果为 false 表示由其它线程来调用 execute,即首次调用,这时需要向 eventLoop 提交首个任务,启动死循环,会执行到下面的 doStartThread
startThread(); //内部通过CAS修改状态位实现
if (isShutdown()) {
// 如果已经 shutdown,做拒绝逻辑,代码略...
}
}
if (!addTaskWakesUp && wakesUpForTask(task)) {
// 如果线程由于 IO select 阻塞了,添加的任务的线程需要负责唤醒 NioEventLoop 线程
wakeup(inEventLoop);
}
}
唤醒 select 阻塞线程io.netty.channel.nio.NioEventLoop#wakeup
@Override
protected void wakeup(boolean inEventLoop) {
if (!inEventLoop && wakenUp.compareAndSet(false, true)) { //CAS保证了多个线程提交任务时,wakeup不会被频繁调用
selector.wakeup();
}
}
启动 EventLoop 主循环 io.netty.util.concurrent.SingleThreadEventExecutor#doStartThread
private void doStartThread() {
assert thread == null;
executor.execute(new Runnable() {
@Override
public void run() {
// 将线程池的当前线程保存在成员变量中,以便后续使用
thread = Thread.currentThread();
if (interrupted) {
thread.interrupt();
}
boolean success = false;
updateLastExecutionTime();
try {
// 调用外部类 SingleThreadEventExecutor 的 run 方法,进入死循环,run 方法见下
SingleThreadEventExecutor.this.run();
success = true;
} catch (Throwable t) {
logger.warn("Unexpected exception from an event executor: ", t);
} finally {
// 清理工作,代码略...
}
}
});
}
io.netty.channel.nio.NioEventLoop#run 主要任务是执行死循环,不断看有没有新任务,有没有 IO 事件
protected void run() {
for (;;) {
try {
try {
// calculateStrategy 的逻辑如下:
// 有任务,会执行一次 selectNow,清除上一次的 wakeup 结果,无论有没有 IO 事件,都会跳过 switch
// 没有任务,会匹配 SelectStrategy.SELECT,看是否应当阻塞
switch (selectStrategy.calculateStrategy(selectNowSupplier, hasTasks())) {
case SelectStrategy.CONTINUE:
continue;
case SelectStrategy.BUSY_WAIT:
case SelectStrategy.SELECT:
// 因为 IO 线程和提交任务线程都有可能执行 wakeup,而 wakeup 属于比较昂贵的操作,因此使用了一个原子布尔对象 wakenUp,它取值为 true 时,表示该由当前线程唤醒
// 进行 select 阻塞,并设置唤醒状态为 false
boolean oldWakenUp = wakenUp.getAndSet(false);
// 如果在这个位置,非 EventLoop 线程抢先将 wakenUp 置为 true,并 wakeup
// 下面的 select 方法不会阻塞
// 等 runAllTasks 处理完成后,到再循环进来这个阶段新增的任务会不会及时执行呢?
// 因为 oldWakenUp 为 true,因此下面的 select 方法就会阻塞,直到超时
// 才能执行,让 select 方法无谓阻塞
select(oldWakenUp);
if (wakenUp.get()) {
selector.wakeup();
}
default:
}
} catch (IOException e) {
rebuildSelector0();
handleLoopException(e);
continue;
}
cancelledKeys = 0;
needsToSelectAgain = false;
// ioRatio 默认是 50
final int ioRatio = this.ioRatio;
if (ioRatio == 100) {
try {
processSelectedKeys();
} finally {
// ioRatio 为 100 时,总是运行完所有非 IO 任务
runAllTasks();
}
} else {
final long ioStartTime = System.nanoTime();
try {
processSelectedKeys(); // 处理普通 IO 事件
} finally {
// 记录 io 事件处理耗时
final long ioTime = System.nanoTime() - ioStartTime;
// 运行非 IO 任务,一旦超时会退出 runAllTasks
runAllTasks(ioTime * (100 - ioRatio) / ioRatio);
}
}
} catch (Throwable t) {
handleLoopException(t);
}
try {
if (isShuttingDown()) {
closeAll();
if (confirmShutdown()) {
return;
}
}
} catch (Throwable t) {
handleLoopException(t);
}
}
}
注意:这里有个费解的地方就是 wakeup,它既可以由提交任务的线程来调用(比较好理解),也可以由 EventLoop 线程来调用(比较费解),这里要知道 wakeup 方法的效果:
由非 EventLoop 线程调用,会唤醒当前在执行 select 阻塞的 EventLoop 线程
由 EventLoop 自己调用,会本次的 wakeup 会取消下一次的 select 操作
参考下图:
io.netty.channel.nio.NioEventLoop#select
private void select(boolean oldWakenUp) throws IOException {
Selector selector = this.selector;
try {
int selectCnt = 0;
long currentTimeNanos = System.nanoTime();
// 计算等待时间
// * 没有 scheduledTask,超时时间为 1s
// * 有 scheduledTask,超时时间为 `下一个定时任务执行时间 - 当前时间`
long selectDeadLineNanos = currentTimeNanos + delayNanos(currentTimeNanos);
for (;;) {
long timeoutMillis = (selectDeadLineNanos - currentTimeNanos + 500000L) / 1000000L;
// 如果超时,退出循环
if (timeoutMillis <= 0) {
if (selectCnt == 0) {
selector.selectNow();
selectCnt = 1;
}
break;
}
// 如果期间又有 task 退出循环,如果没这个判断,那么任务就会等到下次 select 超时时才能被执行
// wakenUp.compareAndSet(false, true) 是让非 NioEventLoop 不必再执行 wakeup
if (hasTasks() && wakenUp.compareAndSet(false, true)) {
selector.selectNow();
selectCnt = 1;
break;
}
// select 有限时阻塞
// 注意 nio 有 bug,当 bug 出现时,select 方法即使没有时间发生,也不会阻塞住,导致不断空轮询,cpu 占用 100%
int selectedKeys = selector.select(timeoutMillis);
// 计数加 1
selectCnt ++;
// 醒来后,如果有 IO 事件、或是由非 EventLoop 线程唤醒,或者有任务,退出循环
if (selectedKeys != 0 || oldWakenUp || wakenUp.get() || hasTasks() || hasScheduledTasks()) {
break;
}
if (Thread.interrupted()) {
// 线程被打断,退出循环
// 记录日志
selectCnt = 1;
break;
}
long time = System.nanoTime();
if (time - TimeUnit.MILLISECONDS.toNanos(timeoutMillis) >= currentTimeNanos) {
// 如果超时,计数重置为 1,下次循环就会 break
selectCnt = 1;
}
// 计数超过阈值,由 io.netty.selectorAutoRebuildThreshold 指定,默认 512
// 这是为了解决 nio 空轮询 bug
else if (SELECTOR_AUTO_REBUILD_THRESHOLD > 0 &&
selectCnt >= SELECTOR_AUTO_REBUILD_THRESHOLD) {
// 重建 selector
selector = selectRebuildSelector(selectCnt);
selectCnt = 1;
break;
}
currentTimeNanos = time;
}
if (selectCnt > MIN_PREMATURE_SELECTOR_RETURNS) {
// 记录日志
}
} catch (CancelledKeyException e) {
// 记录日志
}
}
处理 keys io.netty.channel.nio.NioEventLoop#processSelectedKeys
private void processSelectedKeys() {
if (selectedKeys != null) {
// 通过反射将 Selector 实现类中的就绪事件集合替换为 SelectedSelectionKeySet
// SelectedSelectionKeySet 底层为数组实现,可以提高遍历性能(原本为 HashSet)
processSelectedKeysOptimized();
} else {
processSelectedKeysPlain(selector.selectedKeys());
}
}
底层的处理方法 io.netty.channel.nio.NioEventLoop#processSelectedKey
private void processSelectedKey(SelectionKey k, AbstractNioChannel ch) {
final AbstractNioChannel.NioUnsafe unsafe = ch.unsafe();
// 当 key 取消或关闭时会导致这个 key 无效
if (!k.isValid()) {
// 无效时处理...
return;
}
try {
int readyOps = k.readyOps();
// 连接事件
if ((readyOps & SelectionKey.OP_CONNECT) != 0) {
int ops = k.interestOps();
ops &= ~SelectionKey.OP_CONNECT;
k.interestOps(ops);
unsafe.finishConnect();
}
// 可写事件
if ((readyOps & SelectionKey.OP_WRITE) != 0) {
ch.unsafe().forceFlush();
}
// 可读或可接入事件
if ((readyOps & (SelectionKey.OP_READ | SelectionKey.OP_ACCEPT)) != 0 || readyOps == 0) {
// 如果是可接入 io.netty.channel.nio.AbstractNioMessageChannel.NioMessageUnsafe#read
// 如果是可读 io.netty.channel.nio.AbstractNioByteChannel.NioByteUnsafe#read
unsafe.read();
}
} catch (CancelledKeyException ignored) {
unsafe.close(unsafe.voidPromise());
}
}
3.accept 剖析
观察 nio 中如下代码,查看在 netty 中的流程
//1 阻塞直到事件发生
selector.select();
Iterator<SelectionKey> iter = selector.selectedKeys().iterator();
while (iter.hasNext()) {
//2 拿到一个事件
SelectionKey key = iter.next();
//3 如果是 accept 事件
if (key.isAcceptable()) {
//4 执行 accept
SocketChannel channel = serverSocketChannel.accept();
channel.configureBlocking(false);
//5 关注 read 事件
channel.register(selector, SelectionKey.OP_READ);
}
// ...
}
先来看可接入事件处理(accept)
io.netty.channel.nio.AbstractNioMessageChannel.NioMessageUnsafe#read
public void read() {
assert eventLoop().inEventLoop();
final ChannelConfig config = config();
final ChannelPipeline pipeline = pipeline();
final RecvByteBufAllocator.Handle allocHandle = unsafe().recvBufAllocHandle();
allocHandle.reset(config);
boolean closed = false;
Throwable exception = null;
try {
try {
do {
// doReadMessages 中执行了 accept 并创建 NioSocketChannel 作为消息放入 readBuf
// readBuf 是一个 ArrayList 用来缓存消息
int localRead = doReadMessages(readBuf);
if (localRead == 0) {
break;
}
if (localRead < 0) {
closed = true;
break;
}
// localRead 为 1,就一条消息,即接收一个客户端连接
allocHandle.incMessagesRead(localRead);
} while (allocHandle.continueReading());
} catch (Throwable t) {
exception = t;
}
int size = readBuf.size();
for (int i = 0; i < size; i ++) {
readPending = false;
// 触发 read 事件,让 pipeline 上的 handler 处理,这时是处理
// io.netty.bootstrap.ServerBootstrap.ServerBootstrapAcceptor#channelRead
pipeline.fireChannelRead(readBuf.get(i));
}
readBuf.clear();
allocHandle.readComplete();
pipeline.fireChannelReadComplete();
if (exception != null) {
closed = closeOnReadError(exception);
pipeline.fireExceptionCaught(exception);
}
if (closed) {
inputShutdown = true;
if (isOpen()) {
close(voidPromise());
}
}
} finally {
if (!readPending && !config.isAutoRead()) {
removeReadOp();
}
}
}
pipeline.fireChannelRead(readBuf.get(i));会进入acceptorHandler处理,关键代码 io.netty.bootstrap.ServerBootstrap.ServerBootstrapAcceptor#channelRead
public void channelRead(ChannelHandlerContext ctx, Object msg) {
// 这时的 msg 是 NioSocketChannel
final Channel child = (Channel) msg;
// NioSocketChannel 添加 childHandler 即初始化器
child.pipeline().addLast(childHandler);
// 设置选项
setChannelOptions(child, childOptions, logger);
for (Entry<AttributeKey<?>, Object> e: childAttrs) {
child.attr((AttributeKey<Object>) e.getKey()).set(e.getValue());
}
try {
// 注册 NioSocketChannel 到 nio worker 线程,接下来的处理也移交至 nio worker 线程
childGroup.register(child).addListener(new ChannelFutureListener() {
@Override
public void operationComplete(ChannelFuture future) throws Exception {
if (!future.isSuccess()) {
forceClose(child, future.cause());
}
}
});
} catch (Throwable t) {
forceClose(child, t);
}
}
又回到了熟悉的 io.netty.channel.AbstractChannel.AbstractUnsafe#register 方法
public final void register(EventLoop eventLoop, final ChannelPromise promise) {
// 一些检查,略...
AbstractChannel.this.eventLoop = eventLoop;
if (eventLoop.inEventLoop()) {
register0(promise);
} else {
try {
// 这行代码完成的事实是 nio boss -> nio worker 线程的切换
eventLoop.execute(new Runnable() {
@Override
public void run() {
register0(promise);
}
});
} catch (Throwable t) {
// 日志记录...
closeForcibly();
closeFuture.setClosed();
safeSetFailure(promise, t);
}
}
}
io.netty.channel.AbstractChannel.AbstractUnsafe#register0
private void register0(ChannelPromise promise) {
try {
if (!promise.setUncancellable() || !ensureOpen(promise)) {
return;
}
boolean firstRegistration = neverRegistered;
doRegister();
neverRegistered = false;
registered = true;
// 执行初始化器,执行前 pipeline 中只有 head -> 初始化器 -> tail
pipeline.invokeHandlerAddedIfNeeded();
// 执行后就是 head -> logging handler -> my handler -> tail
safeSetSuccess(promise);
pipeline.fireChannelRegistered();
if (isActive()) {
if (firstRegistration) {
// 触发 pipeline 上 active 事件
pipeline.fireChannelActive();
} else if (config().isAutoRead()) {
beginRead();
}
}
} catch (Throwable t) {
closeForcibly();
closeFuture.setClosed();
safeSetFailure(promise, t);
}
}
回到了熟悉的代码 io.netty.channel.DefaultChannelPipeline.HeadContext#channelActive
public void channelActive(ChannelHandlerContext ctx) {
ctx.fireChannelActive();
// 触发 read (NioSocketChannel 这里 read,只是为了触发 channel 的事件注册,还未涉及数据读取)
readIfIsAutoRead();
}
io.netty.channel.nio.AbstractNioChannel#doBeginRead
protected void doBeginRead() throws Exception {
// Channel.read() or ChannelHandlerContext.read() was called
final SelectionKey selectionKey = this.selectionKey;
if (!selectionKey.isValid()) {
return;
}
readPending = true;
// 这时候 interestOps 是 0
final int interestOps = selectionKey.interestOps();
if ((interestOps & readInterestOp) == 0) {
// 关注 read 事件
selectionKey.interestOps(interestOps | readInterestOp);
}
}
4.read 剖析
再来看可读事件 io.netty.channel.nio.AbstractNioByteChannel.NioByteUnsafe#read,注意发送的数据未必能够一次读完,因此会触发多次 nio read 事件,一次事件内会触发多次 pipeline read,一次事件会触发一次 pipeline read complete
public final void read() {
final ChannelConfig config = config();
if (shouldBreakReadReady(config)) {
clearReadPending();
return;
}
final ChannelPipeline pipeline = pipeline();
// io.netty.allocator.type 决定 allocator 的实现
final ByteBufAllocator allocator = config.getAllocator();
// 用来分配 byteBuf,确定单次读取大小
final RecvByteBufAllocator.Handle allocHandle = recvBufAllocHandle();
allocHandle.reset(config);
ByteBuf byteBuf = null;
boolean close = false;
try {
do {
byteBuf = allocHandle.allocate(allocator);
// 读取
allocHandle.lastBytesRead(doReadBytes(byteBuf));
if (allocHandle.lastBytesRead() <= 0) {
byteBuf.release();
byteBuf = null;
close = allocHandle.lastBytesRead() < 0;
if (close) {
readPending = false;
}
break;
}
allocHandle.incMessagesRead(1);
readPending = false;
// 触发 read 事件,让 pipeline 上的 handler 处理,这时是处理 NioSocketChannel 上的 handler
pipeline.fireChannelRead(byteBuf);
byteBuf = null;
}
// 是否要继续循环
while (allocHandle.continueReading());
allocHandle.readComplete();
// 触发 read complete 事件
pipeline.fireChannelReadComplete();
if (close) {
closeOnRead(pipeline);
}
} catch (Throwable t) {
handleReadException(pipeline, byteBuf, t, close, allocHandle);
} finally {
if (!readPending && !config.isAutoRead()) {
removeReadOp();
}
}
}
io.netty.channel.DefaultMaxMessagesRecvByteBufAllocator.MaxMessageHandle#continueReading(io.netty.util.UncheckedBooleanSupplier)
publicbooleancontinueReading(UncheckedBooleanSuppliermaybeMoreDataSupplier) {
return
// 一般为 true
config.isAutoRead() &&
// respectMaybeMoreData 默认为 true
// maybeMoreDataSupplier 的逻辑是如果预期读取字节与实际读取字节相等,返回 true
(!respectMaybeMoreData||maybeMoreDataSupplier.get()) &&
// 小于最大次数,maxMessagePerRead 默认 16
totalMessages<maxMessagePerRead&&
// 实际读到了数据
totalBytesRead>0;
}


 784
784

 被折叠的 条评论
为什么被折叠?
被折叠的 条评论
为什么被折叠?
 到【灌水乐园】发言


