


首先我们先执行一条命令,查看我们的linux是否有mysql
sudo find / -name mysql

出现的是代表我们自身linux中含有mysql的文件存在位置,接下来我们先把文件删除掉
输入命令删除
rm -rf /etc/selinux/targeted/active/modules/100/mysql
rm -rf /usr/lib64/mysql
rm -rf /usr/share/mysql
删除完毕后再次输入命令查找,sudo find / -name mysql,如果没有的话我们就可以开始安装了
检查msql用户组和用户是否存在,如果没有,那么就创建
cat /etc/group | grep mysql
cat /etc/passwd |grep mysql
groupadd mysql
useradd -r -g mysql mysql
下载mysql的linux版本
百度网盘链接如下:
链接:https://pan.baidu.com/s/1oOzoz1ouir_b7vrlXrlH8Q
提取码:z196
官方下载mysql的linux版本 https://dev.mysql.com/downloads/mysql/
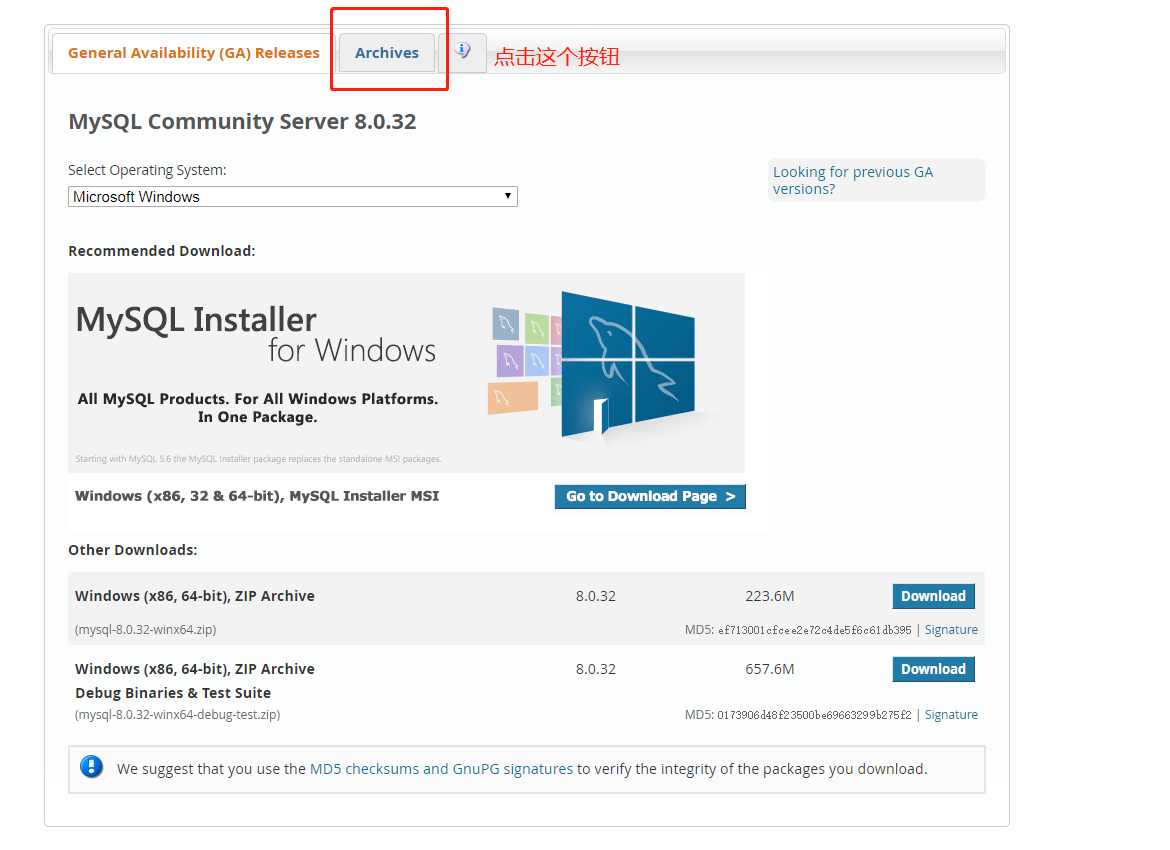
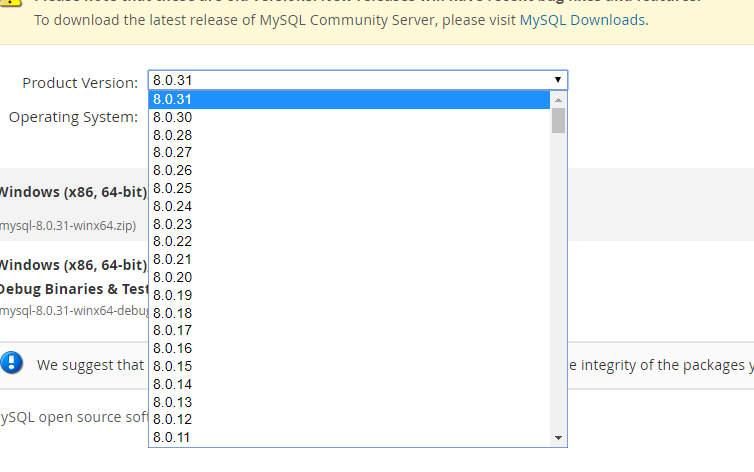
在这里我们选择响应的版本
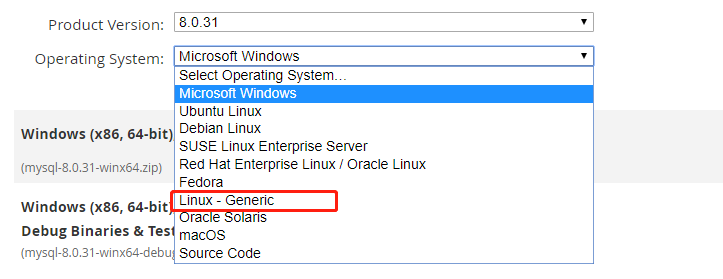
点击此按钮我们选择对应的操作系统
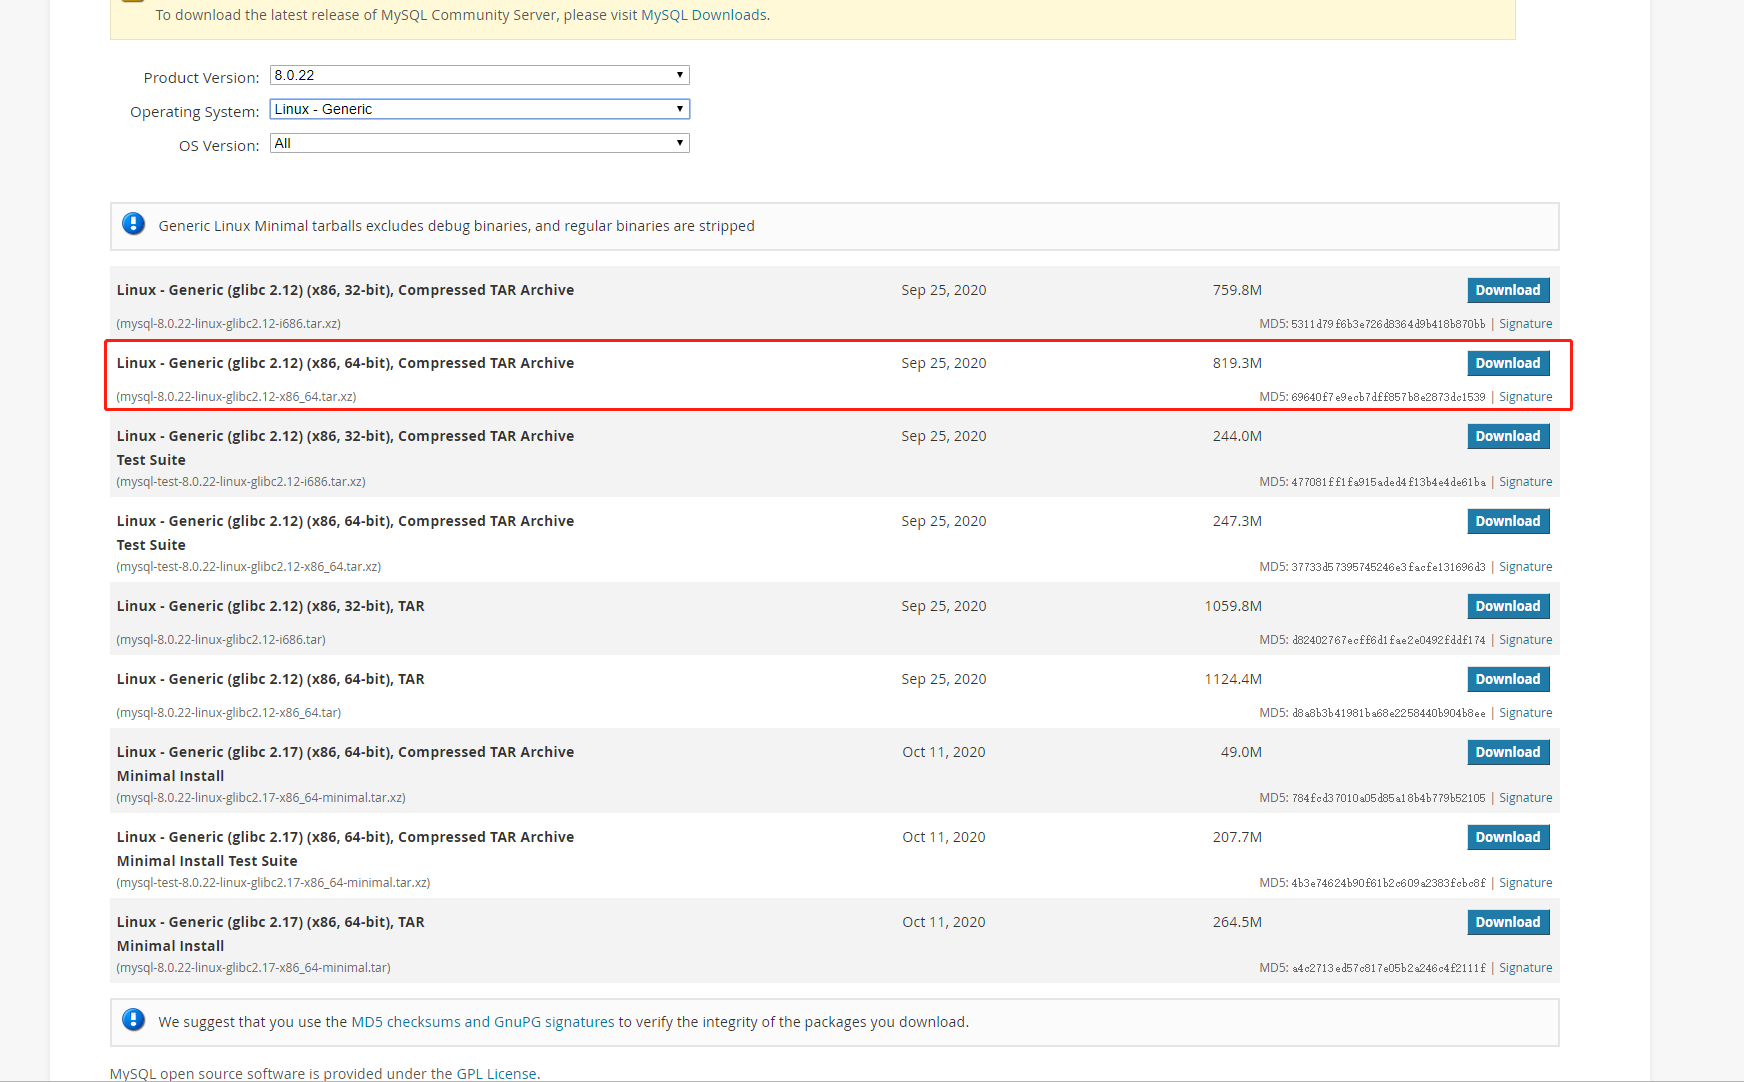
之后我们直接点击下载按钮即可。
之后我们把他上传到linux中,我放在了/usr/local文件夹下
进入到/usr/local文件下
cd /usr/local
输入 ls 查看文件夹中的目录,确认我们的压缩包是否在local文件中,如果在的话我们开始解压
tar xvJf mysql-8.0.22-linux-glibc2.12-x86_64.tar.xz
如果文件夹的名称不是mysql,那么就用命令进行重命名
mv ***** nacos #前提确保命令所在的是当前local的目录
进入mysql文件夹中,常见data文件夹
cd /usr/local/mysql/
#创建文件夹 mkdir data
# 给文件夹授权 chown -R root:root /usr/local/mysql
# 给文件夹授权chown -R mysql:mysql /usr/local/mysql/data/
先安装一些必备的文件和工具:
先检查该链接库文件有没有安装使用,命令进行核查。
并安装文件,安装完成之后重新初始化,输入y回车即可安装
# 检测命令rpm -qa|grep libaio
#安装包,yum install libaio默认安装的是32位的,必须指定安装64位的
yum install libaio-devel.x86_64
#numactl 通过将 CPU 划分多个 node 减少 CPU 对总线资源的竞争,一般使用在高配置服务器部署多个 CPU 消耗性服务使用。
yum -y install numactl
# 初始化数据库,mysql的bin目录下的mysqld命令
/usr/local/mysql/bin/mysqld --initialize --user=mysql --basedir=/usr/local/mysql --datadir=/usr/local/mysql/data
临时密码:root@localhost:后面的那串代码

#这个密码一定要先记录下来,后边还需要用到。
在/usr/local/mysql/supprot-files目录下用 touch my-default.cnf 命令创建一个文件,并配置权限
cd /usr/local/mysql/supprot-files #进入该目录下
touch my-default.cnf 创建touch my-default.cnf文件
chmod 777 ./my-default.cnf
然后使用以下命令复制过去,其实也就是空白页:
cp /usr/local/mysql/support-files/my-default.cnf /etc/my.cnf
配置my.cnf
vim /etc/my.cnf #编辑此文件 进入文件后按s即可编辑 退出时按下Esc 然后shift+: 输入wq #确定并退出 之后回车即可退出编辑
#复制一下内容:包括[mysqlId]
[mysqld]
# These are commonly set, remove the # and set as required.
basedir = /usr/local/mysql
datadir = /usr/local/mysql/data
socket = /tmp/mysql.sock
log-error = /usr/local/mysql/data/error.log
pid-file = /usr/local/mysql/data/mysql.pid
port = 3306
#lower_case_table_names = 1
# server_id = .....
# socket = .....
#lower_case_table_names = 1
max_allowed_packet=32M
default-authentication-plugin = mysql_native_password
#lower_case_file_system = on
#lower_case_table_names = 1
log_bin_trust_function_creators = ON
# Remove leading # to set options mainly useful for reporting servers.
# The server defaults are faster for transactions and fast SELECTs.
# Adjust sizes as needed, experiment to find the optimal values.
# join_buffer_size = 128M
# sort_buffer_size = 2M
# read_rnd_buffer_size = 2M
sql_mode=NO_ENGINE_SUBSTITUTION,STRICT_TRANS_TABLES
#至此结束
如果后期mysql运行报错,可以直接到log-error = /usr/local/mysql/data/error.log目录下直接查看错误日志
命令:cat /usr/local/mysql/data/error.log
设置开机自启
cd /usr/local/mysql/support-files
cp mysql.server /etc/init.d/mysql
chmod +x /etc/init.d/mysql
注册服务并检测
chkconfig --add mysql #注册
如果没有chkconfig命令就执行下方命令:
rpm -aq |grep chkconfig
export PATH=/sbin:$PATH
chkconfig
echo $PATH
PATH="$PATH":/sbin
echo $PATH
#检测: chkconfig --list mysql
etc/ld.so.conf要配置路径,不然报错:
vim /etc/ld.so.conf
# 添加如下内容:
/usr/local/mysql/lib
配置环境变量: vim /etc/profile
添加如下内容,全部复制过去即可:
export PATH=$PATH:/usr/local/mysql/bin:/usr/local/mysql/lib
保存退出后,重新加载文件:source /etc/profile
登陆,修改密码: #输入密码时密码不会显示
[root@VM_0_3_centos support-files]# service mysql start #启动
Starting MySQL.. SUCCESS!
[root@VM_0_3_centos support-files]# mysql -uroot -p #登录
Enter password: #输入密码
Welcome to the MySQL monitor. Commands end with ; or \g.
Your MySQL connection id is 82
Server version: 8.0.20
Copyright (c) 2000, 2020, Oracle and/or its affiliates. All rights reserved.
Oracle is a registered trademark of Oracle Corporation and/or its
affiliates. Other names may be trademarks of their respective
owners.
Type 'help;' or '\h' for help. Type '\c' to clear the current input statement.
#修改mysql密码:
mysql> alter user 'root'@'localhost' identified by 'root'; #后边的root代表你的新密码
Query OK, 0 rows affected (0.01 sec)
mysql> exit #退出mysql
问题解决:
如果出现mysqld_safe A mysqld process already exists:则杀掉mysql进程重新启动:

ps aux |grep mysqld
kill -9 进程号
然后重新启动mysql服务。
查看MySQL服务是否启动:systemctl status mysql
停止服务:systemctl stop mysql
开启Navicat远程连接:
# 登录
[root@VM_0_3_centos support-files]# mysql -uroot -p
Enter password:
Welcome to the MySQL monitor. Commands end with ; or \g.
Your MySQL connection id is 2582
Server version: 8.0.20 MySQL Community Server - GPL
Copyright (c) 2000, 2020, Oracle and/or its affiliates. All rights reserved.
Oracle is a registered trademark of Oracle Corporation and/or its
affiliates. Other names may be trademarks of their respective
owners.
Type 'help;' or '\h' for help. Type '\c' to clear the current input statement.
# 选择mysql数据库
mysql> use mysql
Reading table information for completion of table and column names
You can turn off this feature to get a quicker startup with -A
Database changed
# 查看用户信息
mysql> select host, user, authentication_string, plugin from user;
+-----------+------------------+------------------------------------------------------------------------+-----------------------+
| host | user | authentication_string | plugin |
+-----------+------------------+------------------------------------------------------------------------+-----------------------+
| localhost | mysql.infoschema | $A$005$THISISACOMBINATIONOFINVALIDSALTANDPASSWORDTHATMUSTNEVERBRBEUSED | caching_sha2_password |
| localhost | mysql.session | $A$005$THISISACOMBINATIONOFINVALIDSALTANDPASSWORDTHATMUSTNEVERBRBEUSED | caching_sha2_password |
| localhost | mysql.sys | $A$005$THISISACOMBINATIONOFINVALIDSALTANDPASSWORDTHATMUSTNEVERBRBEUSED | caching_sha2_password |
| localhost | root | $A$005$=!..iRO=k:x_>qiFtXTYJmwgur/2pJH1mfk26FBL.1YZOC.YcBw8auuFFM0 | caching_sha2_password |
+-----------+------------------+------------------------------------------------------------------------+-----------------------+
4 rows in set (0.00 sec)
# 更新root信息
mysql> update user set host = '%' where user = 'root';
Query OK, 1 row affected (0.02 sec)
Rows matched: 1 Changed: 1 Warnings: 0
# 授权root用户可以远程登陆,失败
mysql> GRANT ALL ON *.* TO 'root'@'%';
ERROR 1410 (42000): You are not allowed to create a user with GRANT
# 立即生效,重新授权
mysql> flush privileges;
Query OK, 0 rows affected (0.02 sec)
# 授权root用户可以远程登陆
mysql> GRANT ALL ON *.* TO 'root'@'%';
Query OK, 0 rows affected (0.02 sec)
# 立即生效
mysql> flush privileges;
Query OK, 0 rows affected (0.01 sec)
# MySQL 8.0 配置mysql_native_password身份验证插件的密码
mysql> alter user 'root'@'%' identified with mysql_native_password by '*****';
Query OK, 0 rows affected (0.01 sec)
# 立即生效
mysql> flush privileges;
Query OK, 0 rows affected (0.00 sec)
# 退出
mysql> exit
Bye
mysql常用命令:
查看mysql进程:ps aux |grep mysqld
杀掉mysql进程:kill -9 进程号
查看MySQL服务是否启动:systemctl status mysql
停止服务:service mysql stop
重启mysql:service mysql restart
连接数据库:
mysql -uroot -p
然后输入密码
创建并使用数据库:
创建数据库:create database 库名称;
显示数据库:mysql> show databases;
使用数据库:mysql> use 库名称;
查看数据库下的表信息:show tables;
查询表信息:select * from 你的表名称


 被折叠的 条评论
为什么被折叠?
被折叠的 条评论
为什么被折叠?
 到【灌水乐园】发言


