


 本文详细介绍了Linux操作系统中的用户分类(管理员、普通用户和虚拟用户),重点讲解了passwd文件结构、用户创建与管理、密码设置、文件属主属组修改以及bash环境问题的解决方案。涉及用户相关命令如useradd、passwd、chown等的使用和常见问题解决方法。
1.操作系统用户类
用户类型: 作用
root 管理员 拥有最高权限,类似皇帝
oldboy 普通用户 拥有个人用户的最高权限 类似平民 登录系统(优化系统,更加安全)
虚拟用户 傀儡用户 启动进程必须使用一个用户来运行,此用户不需要登录操作系统,只为了运行程序而存在


系统分类表示方式: 使用UID表示 类似身份证号
用户 UID号码(系统默认)
管理员 0
普通用户 1000+
虚拟用户: 1-999
2.用户相关配置的文件passwd
[root@oldboyedu ~]# head -1 /etc/passwd
root:x:0:0:root:/root:/bin/bash
以冒号分割
第一列: 用户名称 管理员普通用户和虚拟用户体现的位置
第二列: x 用户的密码
第三列: 0 用户的UID号
第四列: 0 用户的GID号 小组的号码
第五列: root 描述信息 可写可不要
第六列: /root 用户的家目录 管理员/root 普通该用户oldboy家目录--->/home/oldboy/
第七列: 命令解释器
/bin/bash 普通用户包括root,允许登录操作系统
/sbin/nologin 虚拟用户 不允许登录操作系统

创建用户的流程:
1.创建用户(useradd oldboy)
2.系统会将/etc/skel/隐藏的环境变量文件 复制到/home/oldboy/家目录中隐藏文件
3.系统将隐藏文件属主属组修改为普通用户

如果出现了bash版本号如何解决?
第一步: 注释掉/etc/profile中的PS1变量(如果有PS1变量,如果没有,直接第二步)
第二步: 删除隐藏文件重新登录系统
[root@bubble ~]# rm -rf .bash_profile .bash
.bash_history .bash_logout .bash_profile .bashrc
[root@bubble ~]# rm -rf .bash_profile .bashrc
[root@bubble ~]# exit
-bash-4.2#
-bash-4.2#
-bash-4.2#

第三步: 解决方法 复制模版文件到家目录
-bash-4.2# cp /etc/skel/.* .
查看是否复制成功 .bash_profile和.bashrc
-bash-4.2# ll .bash*
-rw------- 1 root root 22021 Mar 20 12:02 .bash_history
-rw-r--r-- 1 root root 18 Mar 20 12:02 .bash_logout
-rw-r--r-- 1 root root 193 Mar 20 12:02 .bash_profile
-rw-r--r-- 1 root root 231 Mar 20 12:02 .bashrc

第四步: 退出重新连接操作系统
exit(ctrl+d)
第四步: 如果不退出可以让profile直接运行一次
使用. 或者source
-bash-4.2# . .bash_profile
[root@db01 ~]#
[root@db01 ~]#
PS1变量: 临时修改
[root@db01 /etc/sysconfig/network-scripts]#PS1='[\u \t@\h \w]\$'
[root 11:56:17@db01 /etc/sysconfig/network-scripts]#
[root 11:56:18@db01 /etc/sysconfig/network-scripts]#
[root 11:56:18@db01 /etc/sysconfig/network-scripts]#
[root 11:56:18@db01 /etc/sysconfig/network-scripts]#
[root 11:56:18@db01 /etc/sysconfig/network-scripts]#
[root 11:56:19@db01 /etc/sysconfig/network-scripts]#
永久修改写入/etc/profile

答: 出现以上问题是由于误删除了家目录下的隐藏文件.bash_profile .bashrc
解决方法 复制/etc/skel/目录下的隐藏文件 到家目录
然后重新连接即可
3.用户相关命令
1.useradd		添加用户
语法格式:
		useradd [参数选项] 用户名称
参数选项:
-s		指定解释器	/bin/bash	/sbin/nologin
-u		指定UID	身份证	如果不指定默认往后排
-g		指定GID组号
-M		不创建家目录,如果不使用-M创建家目录
-G		附加组	了解

案例1.创建一个普通用户oldboy,默认可以不加任何参数
[root@buble ~]# useradd oldboy
查看普通用户的信息
[root@bubble ~]# id oldboy
uid=1000(oldboy) gid=1001(oldboy) groups=1001(oldboy)

过滤etc下的oldboy
[root@bubble ~]# grep 'oldboy' /etc/passwd
oldboy:x:1000:1001::/home/oldboy:/bin/bash

案例2.创建一个虚拟用户 oldboy 指定UID 666 不创建家目录 不允许登录
[root@bubble ~]# userdel -r oldboy
[root@bubble ~]# useradd -u666 -M -s /sbin/nologin oldboy
[root@bubble ~]# id oldboy
uid=666(oldboy) gid=1000(oldboy) groups=1000(oldboy)

案例3.创建一个虚拟用户 uid888 gid888 不创建家目录 不允许登录系统 test01
笔试题:
[root@db01 ~]# useradd -u888 -g888 -M -s /sbin/nologin test01
useradd: group '888' does not exist
组888 不存在

第一步: 创建组
[root@bubble ~]# groupadd -g888 test01
第二步: 创建组
[root@bubble ~]# useradd -u888 -g888 -M -s /sbin/nologin test01
[root@bubble ~]# id test01
uid=888(test01) gid=888(test01) groups=888(test01)

每次只能删除一个用户:
userdel 删除用户
-r 删除用户相关的所有文件
案例:使用awk和sed批量创建10个用户
[root@bubble ~]# echo oldboy{1..10}|xargs -n1|awk '{print "useradd"}{print $1}'|xargs -n2|bash

[root@bubble ~]# echo oldboy{1..10}|xargs -n1|sed -r "s#(.*)#useradd \1#g"|bash
案例:使用awk和sed批量创建删除10个用户
[root@bubble ~]# echo oldboy{1..10}|xargs -n1|awk '{print "userdel -r"}{print $1}'|xargs -n3|bash

[root@bubble ~]# echo oldboy{1..10}|xargs -n1|sed -r "s#(.*)#userdel -r \1#g"|bash
给用户设置密码两种方式
passwd 给用户设置密码
方法1. 交互式
passwd 用户名称 回车修改密码
案例.修改root的密码
[root@bubble ~]# passwd
Changing password for user root.
New password: #输入新的密码
BAD PASSWORD: The password is a palindrome
Retype new password: #在此输入新的密码
passwd: all authentication tokens updated successfully.
[root@bubble ~]#
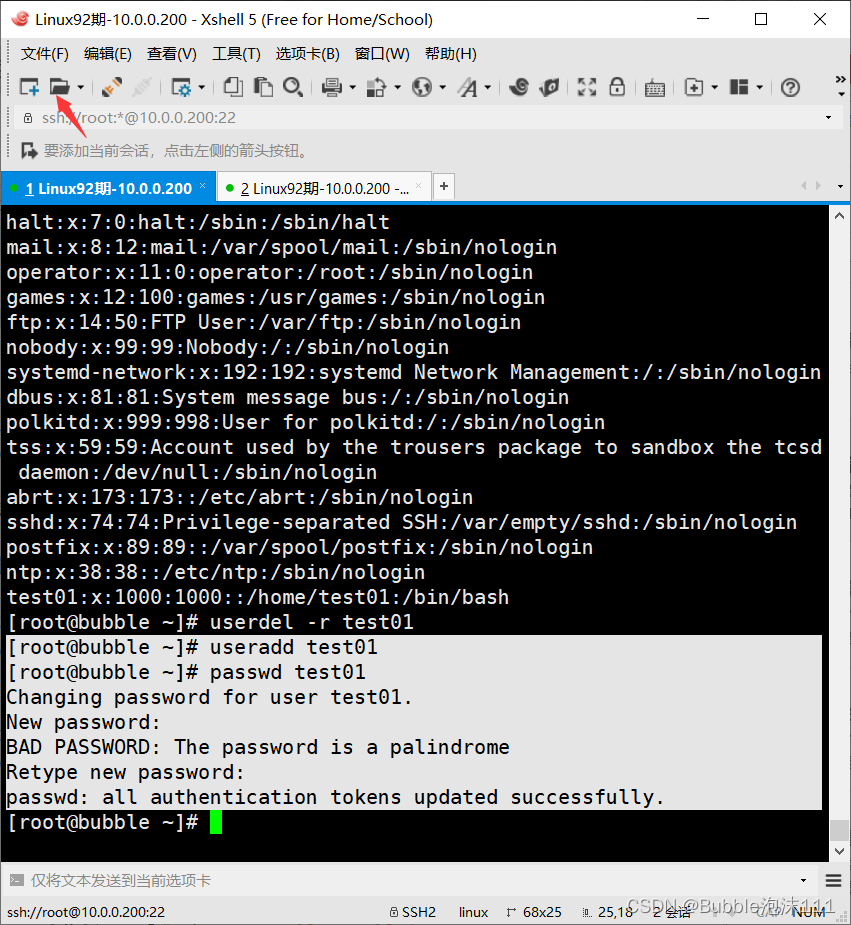
案例2.给test01设置一个密码
[root@bubble ~]# useradd test01
[root@bubble ~]# passwd test01
Changing password for user test01.
New password: #密码为1
BAD PASSWORD: The password is a palindrome
Retype new password: #密码为1
passwd: all authentication tokens updated successfully.
使用xshell通过test01进行远程连接Linux系统
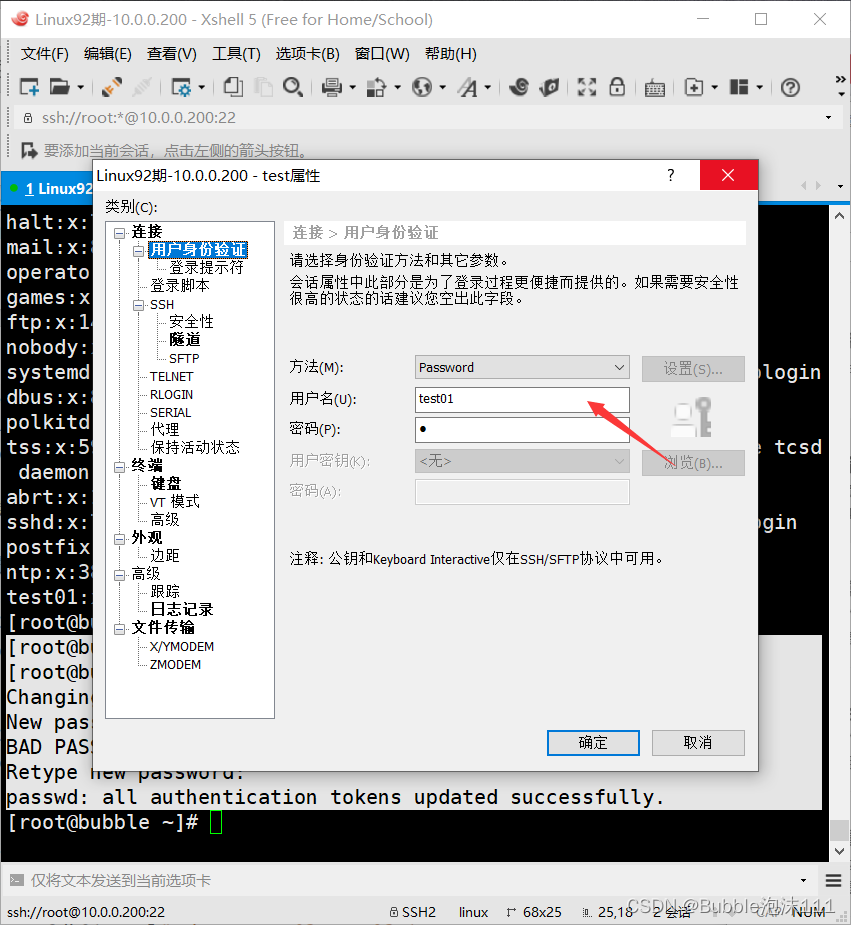
点击确定连接即可
方法2.免交互配置密码
[root@bubble ~]# echo 1|passwd --stdin test01
Changing password for user test01.
passwd: all authentication tokens updated successfully.
[root@bubble ~]# echo 1|passwd --stdin root
Changing password for user root.
passwd: all authentication tokens updated successfully.
chown 修改文件的属主和属组
[root@bubble tmp]# ll 1.txt
-rw-r--r-- 1 root root 0 Mar 20 18:30 1.txt
[root@bubble tmp]# chown test01.test01 1.txt
[root@bubble tmp]# ll 1.txt
-rw-r--r-- 1 test01 test01 0 Mar 20 18:30 1.txt
递归修改目录及目录以下所有文件的属主属组:
[root@bubble ~]# mkdir oldboy
[root@bubble ~]# mkdir oldboy/{1..3}.txt
[root@bubble ~]# ll oldboy/
total 0
drwxr-xr-x. 2 root root 6 Mar 20 18:45 1.txt
drwxr-xr-x. 2 root root 6 Mar 20 18:45 2.txt
drwxr-xr-x. 2 root root 6 Mar 20 18:45 3.txt

默认只修改目录的属主和属组
[root@bubble ~]# chown test01.test01 oldboy
[root@bubble ~]# ll
total 4
-rw-r--r--. 1 test01 test01  4 Mar 20 18:44 1.txt
drwxr-xr-x. 5 test01 test01 45 Mar 20 18:45 oldboy


[root@bubble ~]# ll oldboy/
total 0
drwxr-xr-x. 2 root root 6 Mar 20 18:45 1.txt
drwxr-xr-x. 2 root root 6 Mar 20 18:45 2.txt
drwxr-xr-x. 2 root root 6 Mar 20 18:45 3.txt


[root@bubble ~]# chown root.root oldboy		修改会root
[root@bubble ~]# chown -R test01.test01 oldboy
[root@bubble ~]# ll
total 4
-rw-r--r--. 1 test01 test01  4 Mar 20 18:44 1.txt
drwxr-xr-x. 5 test01 test01 45 Mar 20 18:45 oldboy
[root@bubble ~]# ll oldboy/
total 0
drwxr-xr-x. 2 test01 test01 6 Mar 20 18:45 1.txt
drwxr-xr-x. 2 test01 test01 6 Mar 20 18:45 2.txt
drwxr-xr-x. 2 test01 test01 6 Mar 20 18:45 3.txt
su - 切换用户
1.root切换到普通用户 不需要密码
2.普通用户切换到root 需要root的密码
3.普通用户切换到普通用户 需要密码

案例1.root用户切换到test01用户
[root@bubble ~]# su - test01


案例2.普通用户切换到普通用户 test02
[test01@bubble ~]$ su - test02
Password:
4.总结
用户管理
1.用户分类
 1)管理员    0        拥有最高执行权限
 2)虚拟用户  1-999    运行服务的
 3)普通用户  1000+    管理自己相关的文件

2.用户相关的配置文件
  1)/etc/passwd
  作用:
  我们在登录操作系统,passwd会验证用户名和密码

  root:x:0:0:root:/root:/bin/bash

  第一列:用户名称
  第二列:密码文件
  第三列:UID
  第四列:GID
  第五列:用户描述
  第六列:用户的家目录
  第七列:bash解释器

  2)/etc/shadow
  作用:
  密码文件

3.用户相关的目录
 1)/etc/skel
 出现bash解释器如何处理:
 第一步:cp /etc/skel/.* .
 第二步:source .bash_profile 或者 . .bash_profile 或者重启服务或者重新连接(个人感觉重新连接最快)

4.用户命令
  1)查看用户信息
  id 用户名
  cat /etc/passwd


 2)创建用户
 useradd 用户名
 参数:
  -u
  -g
  -M
  -s
  -G
 添加用户组 groupadd -g组号 用户名
    这里注意在创建用户是指定GID需要先创建GID


 3)删除用户
 userdel -r 用户名


 4)设置密码
 交互式
 passwd 用户名

 非交互
 echo 密码|passwd --stdin 用户名


 5)修改文件属主属组
 chown 属主.属组 文件名称
      -R  #递归修改


 被折叠的 条评论
为什么被折叠?
被折叠的 条评论
为什么被折叠?
 到【灌水乐园】发言


