


感兴趣的朋友可以去我的语雀平台进行查看更多的知识。
https://www.yuque.com/ambition-bcpii/muziteng
6. Pipe 和 FileLock
6.1 Pipe
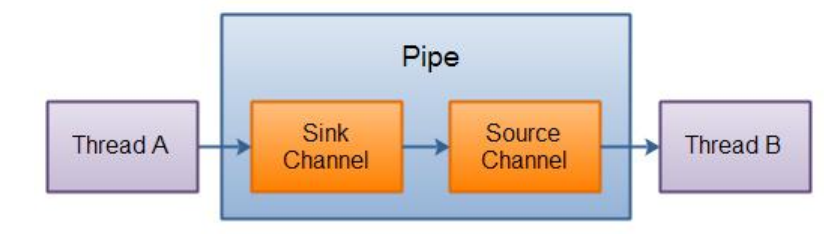
Java NIO 管道是 2 个线程之间的单向数据连接。Pipe 有一个 source 通道和一个 sink通道。数据会被写到 sink 通道,从 source 通道读
取。
用法
public void testPipe() throws IOException {
    // 1. 获取通道
    Pipe pipe = Pipe.open();
    // 2. 获取 Sink 通道,用来传输数据
    Pipe.SinkChannel sinkChannel = pipe.sink();
    // 3. 向 sink 通道写入数据
    ByteBuffer byteBuffer = ByteBuffer.allocate(1024);
    byteBuffer.put("Hello,World".getBytes(StandardCharsets.UTF_8));
    byteBuffer.flip();
    sinkChannel.write(byteBuffer);
    // 4. 获取 source 通道,用来接受 sink 通道的数据
    Pipe.SourceChannel sourceChannel = pipe.source();
    // 5. 接受数据 并保存到缓冲区
    ByteBuffer byteBuffer2 = ByteBuffer.allocate(1024);
    int length = sourceChannel.read(byteBuffer2);
    System.out.println(new String(byteBuffer2.array(), 0, length));

    sourceChannel.close();
    sinkChannel.close();
}
6.2 FileLock
6.2.1 简介
文件锁在 OS 中很常见,如果多个程序同时访问、修改同一个文件,很容易因为文件数据不同步而出现问题。给文件加一个锁,同一时
间,只能有一个程序修改此文件,或者程序都只能读此文件,这就解决了同步问题。
文件锁是进程级别的,不是线程级别的。文件锁可以解决多个进程并发访问、修改同一个文件的问题,但不能解决多线程并发访问、修改
同一文件的问题。使用文件锁时,同一进程内的多个线程,可以同时访问、修改此文件。
文件锁是当前程序所属的 JVM 实例持有的,一旦获取到文件锁(对文件加锁),要调用 release(),或者关闭对应的 FileChannel 对象,
或者当前 JVM 退出,才会释放这个锁。
一旦某个进程(比如说 JVM 实例)对某个文件加锁,则在释放这个锁之前,此进程不能再对此文件加锁,就是说 JVM 实例在同一文件上
的文件锁是不重叠的(进程级别不能重复在同一文件上获取锁)。
6.2.2 分类
-
排它锁:又叫独占锁。对文件加排它锁后,该进程可以对此文件进行读写,该进程独占此文件,其他进程不能读写此文件,直到该进
程释放文件锁。
-
共享锁:某个进程对文件加共享锁,其他进程也可以访问此文件,但这些进程都只能读此文件,不能写。线程是安全的。只要还有一
个进程持有共享锁,此文件就只能读,不能写。
6.2.3 获取文件锁方法
文件锁要通过 FileChannel 对象使用。
-
lock()//对整个文件加锁,默认为排它锁。 -
lock(long position, long size, booean shared)//自定义加锁方式。前 2 个参数指定要加锁的部分(可以只对此文件的部分内容加锁),第三个参数值指定是否是共享锁。 -
tryLock()//对整个文件加锁,默认为排它锁。 -
tryLock(long position, long size, booean shared)//自定义加锁方式。
lock 与 tryLock 的区别:
lock 是阻塞式的,如果未获取到文件锁,会一直阻塞当前线程,直到获取文件锁。
tryLock 和 lock 的作用相同,只不过 tryLock 是非阻塞式的,tryLock 是尝试获取文件锁,获取成功就返回锁对象,否则返回 null,
不会阻塞当前线程。
两个方法:
boolean isShared()//此文件锁是否是共享锁boolean isValid()//此文件锁是否还有效
用法
public void testFileLock() throws IOException {
    ByteBuffer byteBuffer = ByteBuffer.wrap("Hello,World".getBytes(StandardCharsets.UTF_8));
    String fp = "D:\\MyCode\\JavaProjects\\netty\\data.txt";
    Path path = Paths.get(fp);
    FileChannel fileChannel = FileChannel.open(path, StandardOpenOption.WRITE, StandardOpenOption.APPEND);
    //        fileChannel.position(fileChannel.size() - 1);
    FileLock lock = fileChannel.tryLock(0, Long.MAX_VALUE, false);
    System.out.println("共享锁:" + lock.isShared());
    fileChannel.write(byteBuffer);
    fileChannel.close();
    System.out.println("写法操完成");
    // 读取数据
    readPrint(fp);
}

private void readPrint(String path) throws IOException {
    FileReader fileReader = new FileReader(path);
    BufferedReader bufferedReader = new BufferedReader(fileReader);
    String str = bufferedReader.readLine();
    System.out.println("读取内容");
    while (str != null) {
        System.out.println("  " + str);
        str = bufferedReader.readLine();
    }
    fileReader.close();
    bufferedReader.close();
}
7. NIO 中的其他类
7.1 Path
7.1.1 概述
Java Path 实例表示文件系统中的路径。一个路径可以指向一个文件或一个目录。路径可以是绝对路径,也可以是相对路径。
在许多方面,java.nio.file.Path 接口类似于 java.io.File 类,但是有一些差别。不过,在许多情况下,可以使用 Path 接口来替换 File 类的
使用。
7.1.2 Path 使用
// 1. 创建绝对路径
Path path1 = Paths.get("D:\\java_config\\Java\\jdk-17.0.4");
System.out.println(path1);  // D:\java_config\Java\jdk-17.0.4
// 2. 创建相对路径
Path path2 = Paths.get("D:\\", "java_config\\Java");
System.out.println(path2);  // D:\java_config\Java

// Path 接口的 normalize()方法可以使路径标准化。
// 标准化意味着它将移除所有在路径字符串的中间的.和..代码,并解析路径字符串所引用的路径
String originalPath = "D:\\java_config\\..\\jdk-17.0.4";
Path path3 = Paths.get(originalPath);
System.out.println(path3);  // D:\java_config\..\jdk-17.0.4
Path path4 = path3.normalize();
System.out.println(path4);  // D:\jdk-17.0.4
7.2 Files
7.2.1 概述
Java NIO Files 类(java.nio.file.Files)提供了几种操作文件系统中的文件的方法。
java.nio.file.Files 类与 java.nio.file.Path 实例一起工作,因此在学习 Files 类之前,需要先了解 Path 类。
7.2.2 Files 使用
检查文件是否存在
Path path = Paths.get("helloword/data.txt");
System.out.println(Files.exists(path));
创建一级目录
Path path = Paths.get("helloword/d1");
Files.createDirectory(path);
- 如果目录已存在,会抛异常 FileAlreadyExistsException
- 不能一次创建多级目录,否则会抛异常 NoSuchFileException
创建多级目录
Path path = Paths.get("helloword/d1/d2");
Files.createDirectories(path);
拷贝文件
Path source = Paths.get("helloword/data.txt");
Path target = Paths.get("helloword/target.txt");

Files.copy(source, target);
- 如果文件已存在,会抛异常 FileAlreadyExistsException
如果希望用 source 覆盖掉 target,需要用 StandardCopyOption 来控制
Files.copy(source, target, StandardCopyOption.REPLACE_EXISTING);
移动文件
Path source = Paths.get("helloword/data.txt");
Path target = Paths.get("helloword/data.txt");

Files.move(source, target, StandardCopyOption.ATOMIC_MOVE);
- StandardCopyOption.ATOMIC_MOVE 保证文件移动的原子性
删除文件
Path target = Paths.get("helloword/target.txt");
Files.delete(target);
- 如果文件不存在,会抛异常 NoSuchFileException
删除目录
Path target = Paths.get("helloword/d1");
Files.delete(target);
- 如果目录还有内容,会抛异常 DirectoryNotEmptyException
遍历目录文件
public static void main(String[] args) throws IOException {
    Path path = Paths.get("D:\\java_config\\Java\\jdk-17.0.4");
    AtomicInteger dirCount = new AtomicInteger();
    AtomicInteger fileCount = new AtomicInteger();
    Files.walkFileTree(path, new SimpleFileVisitor<>() {
        @Override
        public FileVisitResult preVisitDirectory(Path dir, BasicFileAttributes attrs) throws IOException {
            dirCount.getAndIncrement();
            return super.preVisitDirectory(dir, attrs);
        }

        @Override
        public FileVisitResult visitFile(Path file, BasicFileAttributes attrs) throws IOException {
            fileCount.getAndIncrement();
            return super.visitFile(file, attrs);
        }
    });
    System.out.println("文件夹个数:" + dirCount);	// 88
    System.out.println("文件个数:" + fileCount);	// 416
}
统计 jar 的数目
Path path = Paths.get("C:\\Program Files\\Java\\jdk1.8.0_91");
AtomicInteger fileCount = new AtomicInteger();
Files.walkFileTree(path, new SimpleFileVisitor<Path>(){
    @Override
    public FileVisitResult visitFile(Path file, BasicFileAttributes attrs)
        throws IOException {
        if (file.toFile().getName().endsWith(".jar")) {
            fileCount.incrementAndGet();
        }
        return super.visitFile(file, attrs);
    }
});
System.out.println(fileCount); // 724
删除多级目录
Path path = Paths.get("d:\\a");
Files.walkFileTree(path, new SimpleFileVisitor<Path>(){
    @Override
    public FileVisitResult visitFile(Path file, BasicFileAttributes attrs)
        throws IOException {
        Files.delete(file);
        return super.visitFile(file, attrs);
    }

    @Override
    public FileVisitResult postVisitDirectory(Path dir, IOException exc)
        throws IOException {
        Files.delete(dir);
        return super.postVisitDirectory(dir, exc);
    }
});
删除是危险操作,确保要递归删除的文件夹没有重要内容
拷贝多级目录
long start = System.currentTimeMillis();
String source = "D:\\Snipaste-1.16.2-x64";
String target = "D:\\Snipaste-1.16.2-x64aaa";

Files.walk(Paths.get(source)).forEach(path -> {
    try {
        String targetName = path.toString().replace(source, target);
        // 是目录
        if (Files.isDirectory(path)) {
            Files.createDirectory(Paths.get(targetName));
        }
        // 是普通文件
        else if (Files.isRegularFile(path)) {
            Files.copy(path, Paths.get(targetName));
        }
    } catch (IOException e) {
        e.printStackTrace();
    }
});
long end = System.currentTimeMillis();
System.out.println(end - start);
7.3 AsynchronousFileChannel
7.3.1 概述
在 Java 7 中,Java NIO 中添加了 AsynchronousFileChannel,也就是异步地将数据写入文件。
7.3.2 使用
读取数据方式一:
public void test1() throws IOException {
    Path path = Paths.get("D:\\MyCode\\JavaProjects\\netty\\data.txt");
    // 第二个参数是一个或多个打开选项,它告诉 AsynchronousFileChannel 在文件上执行什么操作
    AsynchronousFileChannel fileChannel
        = AsynchronousFileChannel.open(path, StandardOpenOption.READ);
    ByteBuffer byteBuffer = ByteBuffer.allocate(1024);
    // 通过 Future 进行读取数据
    Future<Integer> future = fileChannel.read(byteBuffer, 0);
    while (!future.isDone()) {
        System.out.println("reading....");
    }
    byteBuffer.flip();
    byte[] data = new byte[byteBuffer.limit()];
    byteBuffer.get(data);
    System.out.println(new String(data));
    byteBuffer.clear();
}
读取数据方式二:
public void test2() throws IOException {
    Path path = Paths.get("D:\\MyCode\\JavaProjects\\netty\\data.txt");
    // 第二个参数是一个或多个打开选项,它告诉 AsynchronousFileChannel 在文件上执行什么操作
    AsynchronousFileChannel fileChannel
        = AsynchronousFileChannel.open(path, StandardOpenOption.READ);
    ByteBuffer byteBuffer = ByteBuffer.allocate(1024);
    // 调用 read()方法,该方法将一个 CompletionHandler 作为参数
    fileChannel.read(byteBuffer, 0, byteBuffer, new CompletionHandler<Integer, ByteBuffer>() {
        // 读取操作完成,调用该方法
        @Override
        public void completed(Integer result, ByteBuffer attachment) {
            System.out.println("result = " + result);
            attachment.flip();
            byte[] data = new byte[attachment.limit()];
            attachment.get(data);
            System.out.println(new String(data));
            attachment.clear();
        }

        // 读取失败 调用该方法
        @Override
        public void failed(Throwable exc, ByteBuffer attachment) {
            System.out.println("读取失败!!!");
        }
    });
}
对于 completed()方法的参数传递一个整数,它告诉我们读取了多少字节,以及传递给 read()方法的“附件”。“附件”是 read()方法的
第三个参数。在本代码中,它是 ByteBuffer,数据也被读取。
写数据方式一:
public void test3() throws IOException {
    Path path = Paths.get("D:\\MyCode\\JavaProjects\\netty\\out.txt");
    AsynchronousFileChannel fileChannel
        = AsynchronousFileChannel.open(path, StandardOpenOption.WRITE);
    ByteBuffer byteBuffer = ByteBuffer.allocate(1024);
    byteBuffer.put("Hello,World".getBytes(StandardCharsets.UTF_8));
    byteBuffer.flip();
    // 通过 Future 进行写入
    Future<Integer> future = fileChannel.write(byteBuffer, 0);
    while (!future.isDone()) {
        System.out.println("writing...");
    }
    System.out.println("Write Over");
}
写数据方式二:
public void test4() throws IOException {
    Path path = Paths.get("D:\\MyCode\\JavaProjects\\netty\\out.txt");
    if (!Files.exists(path)) {
        Files.createDirectory(path);
    }
    AsynchronousFileChannel fileChannel
        = AsynchronousFileChannel.open(path, StandardOpenOption.WRITE);
    ByteBuffer byteBuffer = ByteBuffer.allocate(1024);
    byteBuffer.put("Hello,World!!!".getBytes(StandardCharsets.UTF_8));
    byteBuffer.flip();
    // 通过 CompletionHandler 进行写入
    fileChannel.write(byteBuffer, 0, byteBuffer, new CompletionHandler<Integer, ByteBuffer>() {
        @Override
        public void completed(Integer result, ByteBuffer attachment) {
            System.out.println("bytes written:" + result);  // bytes written:14
        }

        @Override
        public void failed(Throwable exc, ByteBuffer attachment) {
            System.out.println("Write failed");
        }
    });
}
8. 多人聊天工作室案例
8.1 服务端代码
public class ChatServer {

    /**
     * 启动服务器
     */
    public void startServer() throws IOException {
        // 1. 创建 Selector 选择器
        Selector selector = Selector.open();
        // 2. 创建 ServerSocketChannel 通道
        ServerSocketChannel serverSocketChannel = ServerSocketChannel.open();
        // 3. 为 channel 通道绑定监听端口 设置非阻塞
        serverSocketChannel.bind(new InetSocketAddress(8000));
        serverSocketChannel.configureBlocking(false);
        // 4. 把 channel 通道注册选择器中
        serverSocketChannel.register(selector, SelectionKey.OP_ACCEPT);
        System.out.println("服务器已经启动成功了");
        // 5. 循环,等待是否有新连接接入
        while (true) {
            // 获取 channel 数量
            int readChannel = selector.select();
            if (readChannel == 0) {
                continue;
            }
            // 获取可用的 channel
            Set<SelectionKey> selectionKeys = selector.selectedKeys();
            // 遍历集合
            Iterator<SelectionKey> iter = selectionKeys.iterator();
            while (iter.hasNext()) {
                SelectionKey selectionKey = iter.next();
                // 移除 set 集合当前的 selectionKey
                iter.remove();
                // 6. 根据就绪状态。调用对应方法实现具体业务操作
                if (selectionKey.isAcceptable()) {
                    // 6.1 如果 accept 状态
                    acceptOperator(serverSocketChannel, selector);
                } else if (selectionKey.isReadable()) {
                    // 6.2 如果 readable 状态
                    readOperator(selector, selectionKey);
                }
            }
        }
    }

    /**
     * 处理可读状态操作
     *
     * @param selector     selector
     * @param selectionKey selectorKey
     */
    private void readOperator(Selector selector, SelectionKey selectionKey) throws IOException {
        // 1. 从 selectorKey 中获取已经就绪的 channel
        SocketChannel socketChannel = (SocketChannel) selectionKey.channel();
        // 2. 创建 buffer
        ByteBuffer byteBuffer = ByteBuffer.allocate(1024);
        // 3. 循环方式读取客户端消息
        int readLength = socketChannel.read(byteBuffer);
        StringBuilder message = new StringBuilder();
        if (readLength > 0) {
            // 切换读模式
            byteBuffer.flip();
            // 读取内容
            message.append(StandardCharsets.UTF_8.decode(byteBuffer));
        }
        // 4. 将 channel 再次注册到选择器上,监听可读状态
        socketChannel.register(selector, SelectionKey.OP_READ);
        // 5. 把客户端发送消息,广播到其他客户端
        if (message.length() > 0) {
            // 广播给其他客户端
            System.out.println(message);
            castOtherClient(message, selector, socketChannel);
        }
    }

    /**
     * 广播给其他客户端
     *
     * @param message       message
     * @param selector      selector
     * @param socketChannel socketChannel
     */
    private void castOtherClient(StringBuilder message, Selector selector, SocketChannel socketChannel) throws IOException {
        // 1. 获取所有已经接入客户端
        Set<SelectionKey> selectionKeySet = selector.keys();
        // 2. 循环向所有 channel 广播消息
        for (SelectionKey selectionKey : selectionKeySet) {
            // 获取每个 channel
            Channel targetChannel = selectionKey.channel();
            // 不需要给自己发送
            if (targetChannel instanceof SocketChannel target && targetChannel != socketChannel) {
                target.write(StandardCharsets.UTF_8.encode(message.toString()));
            }
        }
    }

    /**
     * 处理接入状态操作
     *
     * @param serverSocketChannel ssc
     * @param selector            selector
     */
    private void acceptOperator(ServerSocketChannel serverSocketChannel, Selector selector) throws IOException {
        // 1. 接入状态,创建 socketChannel
        SocketChannel socketChannel = serverSocketChannel.accept();
        // 2. 设置非阻塞模式
        socketChannel.configureBlocking(false);
        // 3. 把 channel 注册到 selector 选择器上,并且监听可读状态
        socketChannel.register(selector, SelectionKey.OP_READ);
        // 4. 客户端回复信息
        socketChannel.write(StandardCharsets.UTF_8.encode("欢迎进入聊天室,请注意隐私安全"));
    }

    /**
     * 启动主方法
     *
     * @param args args
     */
    public static void main(String[] args) {
        try {
            new ChatServer().startServer();
        } catch (IOException e) {
            e.printStackTrace();
        }
    }
}
8.2 客户端代码
public class ChatClient {

    /**
     * 启动客户端方法
     */
    public void startClient(String name) throws IOException {
        // 1. 连接服务器端
        SocketChannel socketChannel = SocketChannel.open();
        socketChannel.connect(new InetSocketAddress("localhost", 8000));
        // 接受服务器端响应数据
        Selector selector = Selector.open();
        socketChannel.configureBlocking(false);
        socketChannel.register(selector, SelectionKey.OP_READ);
        // 创建线程
        new Thread(new ClientThread(selector)).start();
        // 2. 向服务器端发送消息
        Scanner scanner = new Scanner(System.in);
        while (scanner.hasNextLine()) {
            String msg = scanner.nextLine();
            if (msg.length() > 0) {
                socketChannel.write(StandardCharsets.UTF_8.encode(name + ":" + msg));
            }
        }
    }
}
public class ClientThread implements Runnable {

    private Selector selector;

    public ClientThread(Selector selector) {
        this.selector = selector;
    }

    @Override
    public void run() {
        try {
            // 5. 循环,等待是否有新连接接入
            while (true) {
                // 获取 channel 数量
                int readChannel = selector.select();
                if (readChannel == 0) {
                    continue;
                }
                // 获取可用的 channel
                Set<SelectionKey> selectionKeys = selector.selectedKeys();
                // 遍历集合
                Iterator<SelectionKey> iter = selectionKeys.iterator();
                while (iter.hasNext()) {
                    SelectionKey selectionKey = iter.next();
                    // 移除 set 集合当前的 selectionKey
                    iter.remove();
                    // 6. 根据就绪状态。调用对应方法实现具体业务操作
                    if (selectionKey.isReadable()) {
                        // 6.2 如果 readable 状态
                        readOperator(selector, selectionKey);
                    }
                }
            }
        } catch (Exception e) {
            e.printStackTrace();
        }
    }

    /**
     * 处理可读状态操作
     *
     * @param selector     selector
     * @param selectionKey selectorKey
     */
    private void readOperator(Selector selector, SelectionKey selectionKey) throws IOException {
        // 1. 从 selectorKey 中获取已经就绪的 channel
        SocketChannel socketChannel = (SocketChannel) selectionKey.channel();
        // 2. 创建 buffer
        ByteBuffer byteBuffer = ByteBuffer.allocate(1024);
        // 3. 循环方式读取客户端消息
        int readLength = socketChannel.read(byteBuffer);
        StringBuilder message = new StringBuilder();
        if (readLength > 0) {
            // 切换读模式
            byteBuffer.flip();
            // 读取内容
            message.append(StandardCharsets.UTF_8.decode(byteBuffer));
        }
        // 4. 将 channel 再次注册到选择器上,监听可读状态
        socketChannel.register(selector, SelectionKey.OP_READ);
        if (message.length() > 0) {
            System.out.println(message);
        }
    }
}


 被折叠的 条评论
为什么被折叠?
被折叠的 条评论
为什么被折叠?
 到【灌水乐园】发言


