


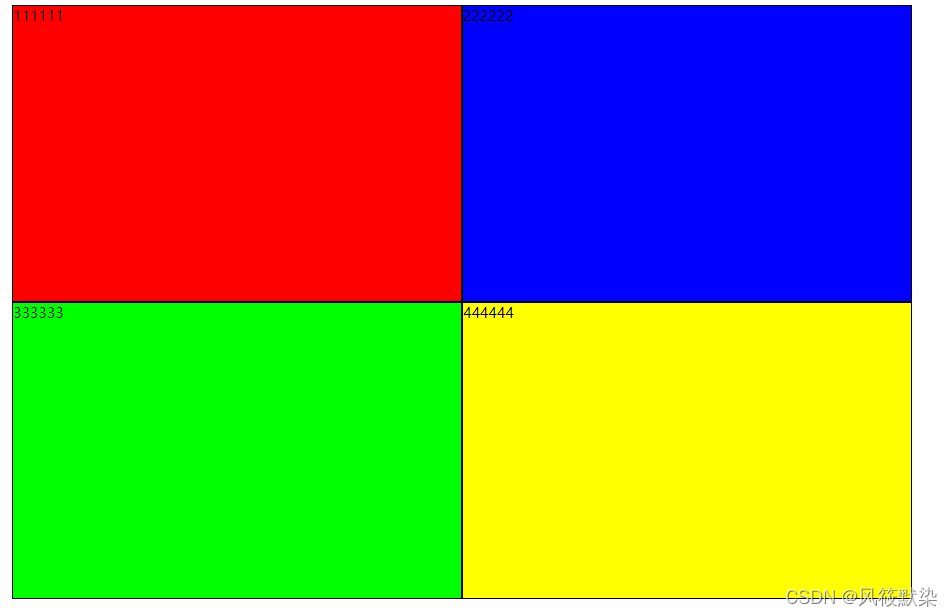
效果图(前):
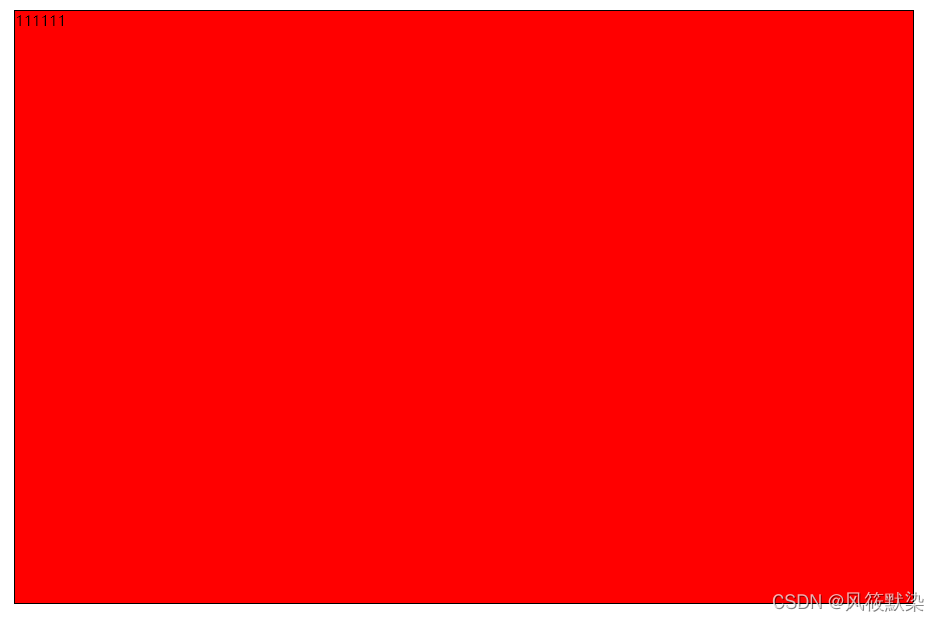
效果图(后):
<!DOCTYPE html>
<html lang="en">
<head>
	<meta charset="UTF-8">
	<meta name="viewport" content="width=device-width, initial-scale=1.0">
	<meta http-equiv="X-UA-Compatible" content="ie=edge">
	<title>Document</title>
	<style>
		.fade-enter-active,.fade-leave-active {
			transition: opacity 0.1s;
		}
		.fade-enter,.fade-leave-to
			{
			opacity: 0;
		}
		.getHello {
			width: 400px;
			height: 400px;
			background-color: skyblue;
		}
		body,html {
			width: 100%;
			height: 100%;
		}
		ul {
			width: 1000px;
			height: 660px;
		}
		li {
			width: 50%;
			height: 50%;
			float: left;
			list-style: none;
			box-sizing: border-box;
			border: 1px solid black;
		}
		.clearfix::after {
			height: 0;
			line-height: 0;
			display: block;
			clear: both;
			visibility: hidden;
		}
		.li_a{background-color: #FF0000;}
		.li_b{background-color: #0000FF;}
		.li_c{background-color: #00FF00;}
		.li_d{background-color: #FFFF00;}
	</style>
</head>
<body>
	<div id="demo">
		<transition name="fade">
			<ul class="clearfix">
				<li ref="fenpin" @dblclick="dbClick1($event)" :style="{width:width1,height:height1}" v-if="one2" class="li_a">
					111111
				</li>
				<li ref="fenpin" @dblclick="dbClick2($event)" :style="{width:width2,height:height2}" v-if="two2" class="li_b">
					222222
				</li>
				<li ref="fenpin" @dblclick="dbClick3($event)" :style="{width:width3,height:height3}" v-if="three2" class="li_c">
					333333
				</li>
				<li ref="fenpin" @dblclick="dbClick4($event)" :style="{width:width4,height:height4}" v-if="four2" class="li_d">
					444444
				</li>
			</ul>
		</transition>
	</div>
	<!-- 引入vue -->
	<script src="https://cdn.jsdelivr.net/npm/vue@2.6.10/dist/vue.js"></script>
	<script>
		window.onload = function() {
			var vm = new Vue({
				el: '#demo',
				data: {
					width1: "50%",
					height1: "50%",
					width2: "50%",
					height2: "50%",
					width3: "50%",
					height3: "50%",
					width4: "50%",
					height4: "50%",
					items: {
						key1: 'one',
						key2: 'two',
						key3: 'three',
						key4: 'four',
					},
					one2: true,
					two2: true,
					three2: true,
					four2: true,
				},
				methods: {
					Open: function() {
						if (this.width == "400px") {
							console.log(22)
							this.width = "100%"
							this.height = "100vh"
						} else {
							this.width = "400px"
							this.height = "400px"
						}
					},
					dbClick1: function(e) {
						if (this.width1 == "50%") {
							this.two2 = false;
							this.three2 = false;
							this.four2 = false;
							this.width1 = "100%";
							this.height1 = "100%";
						} else {
							this.two2 = true;
							this.three2 = true;
							this.four2 = true;
							this.width1 = "50%";
							this.height1 = "50%";
						}
						console.log(e.target);
					},
					dbClick2: function(e) {
						if (this.width2 == "50%") {
							this.one2 = false;
							this.three2 = false;
							this.four2 = false;
							this.width2 = "100%";
							this.height2 = "100%";
						} else {
							this.one2 = true;
							this.three2 = true;
							this.four2 = true;
							this.width2 = "50%";
							this.height2 = "50%";
						}
						console.log(e.target);
					},
					dbClick3: function(e) {
						if (this.width3 == "50%") {
							this.one2 = false;
							this.two2 = false;
							this.four2 = false;
							this.width3 = "100%";
							this.height3 = "100%";
						} else {
							this.two2 = true;
							this.one2 = true;
							this.four2 = true;
							this.width3 = "50%";
							this.height3 = "50%";
						}
						console.log(e.target);
					},
					dbClick4: function(e) {
						if (this.width4 == "50%") {
							this.one2 = false;
							this.two2 = false;
							this.three2 = false;
							this.width4 = "100%";
							this.height4 = "100%";
						} else {
							this.two2 = true;
							this.one2 = true;
							this.three2 = true;
							this.width4 = "50%";
							this.height4 = "50%";
						}
						console.log(e.target);
					},
				},
			})
		}
	</script>
</body>
</html>


 5170
5170

 被折叠的 条评论
为什么被折叠?
被折叠的 条评论
为什么被折叠?
 到【灌水乐园】发言


