


 本文深入探讨Java多线程中的volatile关键字,强调其内存可见性但不保证原子性。接着讲解wait()和notify()方法的使用注意事项,以及它们与sleep()的区别。通过单例模式和生产消费者模型展示了多线程的实战应用,并介绍了Java标准库中的阻塞队列和定时器的使用。
文章目录
volatile 关键字
volatile 能保证内存可见性
volatile可以保证共享变量的可见性,强制线程从主内存中读取变量值.
相较于普通共享变量,volatile修饰的共享变量可以保证贡献变量的可见性
- 当线程读取
volatile关键字修饰的共享变量时,无论工作内存中是否有该变量的值,都会强制从主内存中读取变量到工作内存 - 当线程将
volatile关键字修饰的共享变量写入到主内存中时,如果此时有其他线程正在读取此共享变量,其他线程会等待,直到共享变量写入主内存后,操作结束,这样保证了其他线程读取的一定是刷新后的变量
/**
 * @autor hh
 * @date 2022/06/25 15:55
 */
public class VolatileTest {
    private static class Counter {
        private static volatile int flag = 0;

        void increase() {
            while (flag == 0) {
                //一直循环
            }
            System.out.println(Thread.currentThread().getName() + "被中断");
        }
    }

    public static void main(String[] args) {
        Counter counter = new Counter();
        Thread t1 = new Thread(() -> {
            counter.increase();
        });

        Thread t2 = new Thread(() -> {
            System.out.println("请修改flag的值:");
            Scanner scanner = new Scanner(System.in);
            Counter.flag = scanner.nextInt();
        });

        t1.start();
        t2.start();
    }
}

//执行效果,当用户输入非0值的时候,线程1不会停止,这显然是一个bug

//但是将flag用volatile修饰时,输入非0值,线程1终止
volatile不保证原子性
public class ThreadsSafeTest {
    static class Counter {
        //给count加上volatile关键字
        volatile int count = 0;

        //去掉synchronized关键字
        void increase() {
            count++;
        }
    }

    public static void main(String[] args) throws InterruptedException {
        Counter counter = new Counter();
        Thread t1 = new Thread(() ->{
            for (int i = 0; i < 50000; i++) {
                counter.increase();
            }
        });

        Thread t2 = new Thread(() ->{
            for (int i = 0; i < 50000; i++) {
                counter.increase();
            }
        });

        t1.start();
        t2.start();

        t1.join();
        t2.join();
        System.out.println(counter.count);
    }
}
//可以看到这段程序运行得到的结果仍旧不是100000
wait和notify方法
由于线程之间是抢占式执行的, 因此线程之间执行的先后顺序难以预知.
但是实际开发中有时候我们希望合理的协调多个线程之间的执行先后顺序.
/**
 * wait 和 notify 方法
 *
 * @autor hh
 * @date 2022/06/25 20:58
 */
public class WaitDemo01 {
    private static class WaitTask implements Runnable {

        private Object lock;

        public WaitTask(Object obj) {
            this.lock = obj;
        }

        @Override
        public void run() {
            synchronized (lock) {
                System.out.println(Thread.currentThread().getName() + "进入等待状态");
                try {
                    lock.wait();
                } catch (InterruptedException e) {
                    e.printStackTrace();
                }
                System.out.println(Thread.currentThread().getName() + "被唤醒");
            }
        }
    }

    private static class NotifyTask implements Runnable {

        private Object lock;

        public NotifyTask(Object obj) {
            this.lock = obj;
        }

        @Override
        public void run() {
            synchronized (lock) {
                System.out.println("准备唤醒");
                lock.notify();
                System.out.println("唤醒结束");
            }
        }
    }

    public static void main(String[] args) throws InterruptedException {
        Object lock = new Object();
        //创建3个线程
        Thread t1 = new Thread(new WaitTask("lock"), "t1");
        t1.start();
        Thread t2 = new Thread(new WaitTask("lock"), "t2");
        t2.start();
        Thread t3 = new Thread(new WaitTask("lock"), "t3");
        t3.start();
        Thread t4 = new Thread(new NotifyTask("lock"), "notify线程");
        //唤醒第一个调用wait的线程
        t4.start();
    }
}

//运行结果:
t1进入等待状态
t2进入等待状态
t3进入等待状态
准备唤醒
唤醒结束
t1被唤醒
注意点
wait和notify方法的使用必须搭配synchronized同步代码块使用.wait脱离synchronized使用会直接抛出异常,因为没有获取锁的对象 (通俗的说,你都没有对象获取锁,你让谁等待呢?)
- notify脱离
synchronized使用也会报错 (连等待的对象都不知道是谁,该唤醒谁呢?)

- 如果有多个线程等待,则有线程调度器随机挑选出一个呈 wait 状态的线程。(并没有 “先来后到”)
- 在notify()方法后,当前线程不会马上释放该对象锁,要等到执行notify()方法的线程将程序执行完,也就是退出同步代码块之后才会释放对象锁.
处于waiting的线程,在被唤醒时也要获取notify中的同步锁.
notifyAll()方法
notify方法只是唤醒某一个等待线程. 使用notifyAll方法可以一次唤醒所有的等待线程.
wait()和sleep()的对比(面试题)
这两个其实没有可比性,一个是线程之间通信使用的,另一个是让线程阻塞一段时间
唯一相同点是让线程放弃执行一段时间.
总结
- wait方法是Object类提供的方法,需要搭配synchronized锁来使用,调用wait方法会释放锁,线程进入阻塞,被其他线程唤醒或者超时自动唤醒,唤醒之后的线程需要再次竞争synchronized锁才能继续执行。
- sleep方法是Thread类提供的方法,调用sleep方法的线程进入TIMED_WAITING状态,不会释放锁,时间到自动唤醒
多线程案例
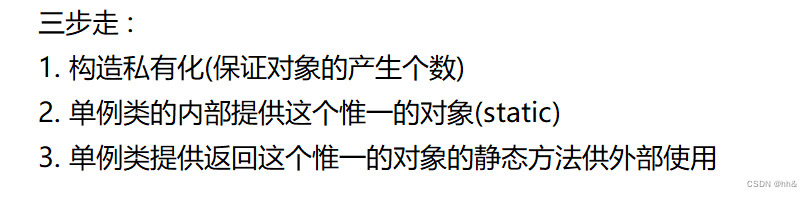
单例模式
饿汉模式
单例模式是校招中最常考的设计模式之一.
啥是设计模式?
设计模式好比象棋中的 “棋谱”. 红方当头炮, 黑方马来跳. 针对红方的一些走法, 黑方应招的时候有一些固定的套路. 按照套路来走局势就不会吃亏.
软件开发中也有很多常见的 “问题场景”. 针对这些问题场景, 大佬们总结出了一些固定的套路. 按照这个套路来实现代码, 也不会吃亏.
/**
 * 单例模式:
 * 饿汉模式--饥不择食:不管外部需不需要对象,
 * 只要这个类加载到JVM,我就给它创建一个对象.
 *
 * @autor
 * @date 2022/06/25 23:36
 */
public class SingleTon {
    //内部创建一个对象(唯一的一个对象)

    //这个唯一的成员变量应该是静态的
    //为什么?
    //类中的成员变量必须对象来访问,我外部连对象都没有,那我如何访问?
    private static SingleTon singleTon = new SingleTon();

    private SingleTon() {
    }

    public static SingleTon getSingleTon() {
        return singleTon;
    }
}

/**
 * @autor hh
 * @date 2022/06/25 23:48
 */
public class Main {
    public static void main(String[] args) {
        //不能再去new对象,因为构造方法私有化了
//        SingleTon s4 = new SingleTon();

        SingleTon s1 = SingleTon.getSingleTon();
        SingleTon s2 = SingleTon.getSingleTon();
        SingleTon s3 = SingleTon.getSingleTon();
        System.out.println(s1 == s2);
        System.out.println(s2 == s3);
    }
}
创建饿汉单例模式:
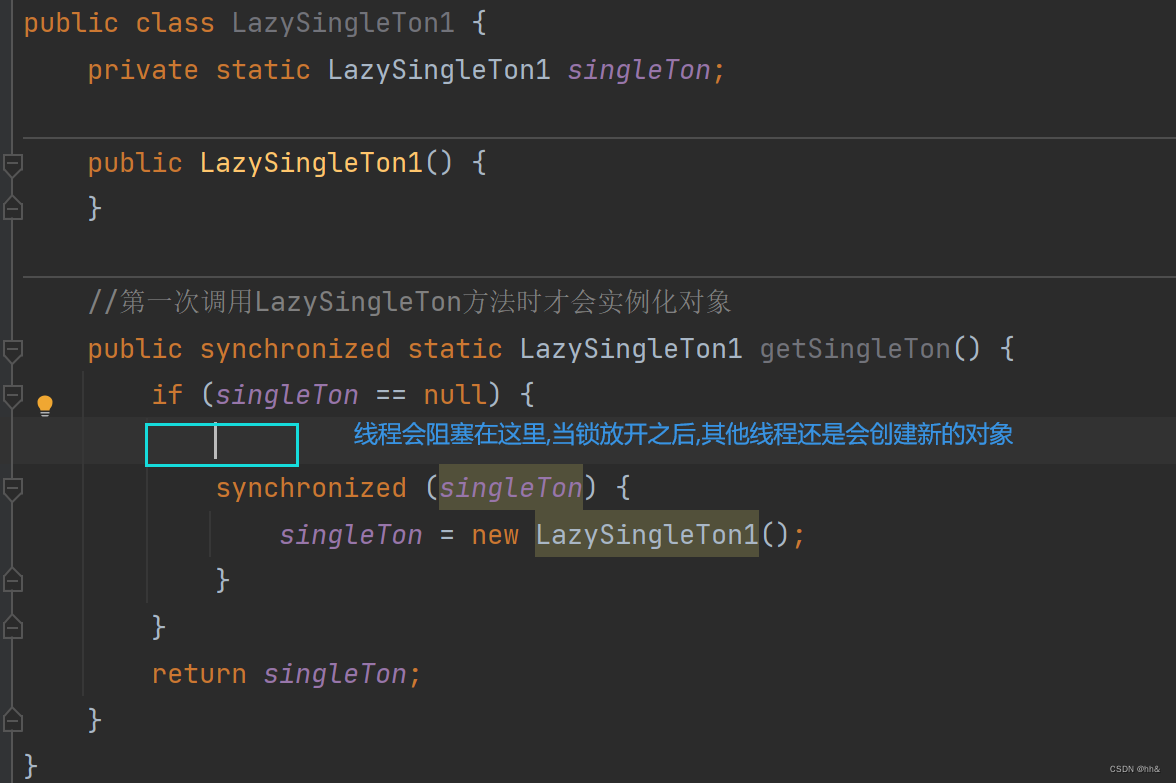
懒汉模式
懒加载模式
系统初始化时,我不需要这个对象,等到第一次需要这个对象的时候,我才实例化,这样做节省了很多的空间和时间.
单线程版本
/**
 * 懒汉模式 -- 单线程版本
 * 懒加载模式,第一次使用时才会初始化对象
 * @autor hh
 * @date 2022/06/25 23:59
 */
public class LazySingleTon {
    private static LazySingleTon singleTon;

    public LazySingleTon() {
    }

    //第一次调用LazySingleTon方法时才会实例化对象
    public static LazySingleTon getSingleTon() {
        if (singleTon == null) {
            singleTon = new LazySingleTon();
        }
        return singleTon;
    }
}
多线程版本
上面的单线程版本是存在线程安全问题的,
线程安全问题发生在首次创建实例时. 如果在多个线程中同时调用 getInstance 方法, 就可能导致创建出多个实例.(三个线程同时创建了3个对象)
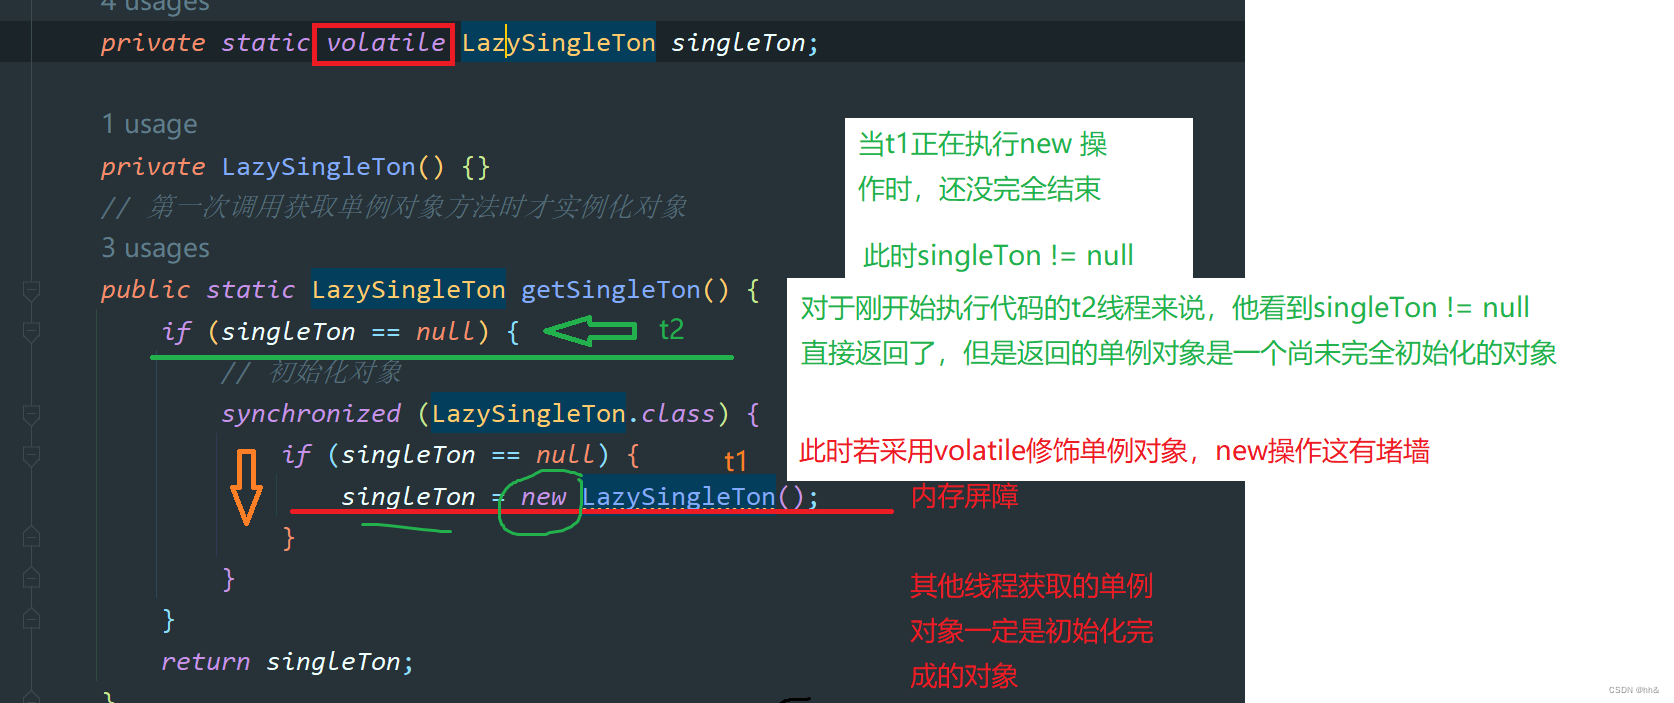
如何解决线程安全
- 直接在
getSingleTon()加锁,当时getSingleTon()为静态方法,锁的粒度太粗,不推荐 - 二次检查
/**
 * 懒汉模式--多线程版本
 * 双重检查
 * @autor hh
 * @date 2022/06/26 0:22
 */
public class LazySingleTon1 {
    private static volatile LazySingleTon1 singleTon;

    public LazySingleTon1() {
    }

    //第一次调用LazySingleTon方法时才会实例化对象
    public static LazySingleTon1 getSingleTon() {
        if (singleTon == null) {
            synchronized (singleTon) {
                if (singleTon == null) {
                    singleTon = new LazySingleTon1();
                }

            }
        }
        return singleTon;
    }
}
通过使用volatile关键字来使单例对象实例化过程中不被中断
阻塞式队列
阻塞队列是什么
阻塞队列是一种特殊的队列. 也遵守 “先进先出” 的原则.
阻塞队列能是一种线程安全的数据结构, 并且具有以下特性:
-
当队列满的时候, 继续入队列就会阻塞, 直到有其他线程从队列中取走元素.
-
当队列空的时候, 继续出队列也会阻塞, 直到有其他线程往队列中插入元素.
阻塞队列的一个典型应用场景就是 “生产者消费者模型”. 这是一种非常典型的开发模型.
标准库中的阻塞队列
在 Java 标准库中内置了阻塞队列. 如果我们需要在一些程序中使用阻塞队列, 直接使用标准库中的即可.
- BlockingQueue 是一个接口. 真正实现的类是 LinkedBlockingQueue.
- put 方法用于阻塞式的入队列, take 用于阻塞式的出队列.
- BlockingQueue 也有 offer, poll, peek 等方法, 但是这些方法不带有阻塞特性.
/**
 * 阻塞队列
 * @autor hh
 * @date 2022/06/26 15:02
 */
public class Test {
    public static void main(String[] args) throws InterruptedException {
        BlockingQueue<Integer> blockingQueue = new LinkedBlockingQueue<>();
        //取出队列中的元素,此时队列中没有元素,就会阻塞在这里
        blockingQueue.take();
        //向队列中添加元素
        blockingQueue.put(1);
    }
}
生产消费者模型
使用java标准库中的阻塞式队列
public class Main {
    public static void main(String[] args) {
        BlockingQueue<Integer> blockingQueue = new LinkedBlockingQueue<>();
        Thread producer = new Thread(() -> {
            while (true) {
                Integer val = null;
                try {
                    val = blockingQueue.take();
                } catch (InterruptedException e) {
                    e.printStackTrace();
                }
                System.out.println("消费者消费了" + val);
            }
        }, "消费者");

        Thread Customer = new Thread(() -> {
            while (true) {
                Random random = new Random();
                int i = random.nextInt(100);
                try {
                    blockingQueue.put(i);
                } catch (InterruptedException e) {
                    e.printStackTrace();
                }
                System.out.println("生产者生产了" + i);
                try {
                    Thread.sleep(1000);
                } catch (InterruptedException e) {
                    e.printStackTrace();
                }
            }
        });
        Customer.start();
        producer.start();
    }
}
简单实现阻塞式队列
public class ProduceAndCustomer {
    public static void main(String[] args) {
        //创建一个容器来模拟存储生产的商品
        List<Object> goods = new ArrayList<>();

        //创建生产者线程
        Thread producer = new Thread(() -> {
            int count = 0;
            while (true) {
                synchronized (goods) {
                    if (goods.size() > 0) {
                        //有商品,让生产者休息
                        try {
                            goods.wait();
                        } catch (InterruptedException e) {
                            e.printStackTrace();
                        }
                    } else {
                        //生产者继续生产商品
                        goods.add("商品" + ++count);
                        System.out.println("生产者生产商品" + count);
                    }
                }
            }
        }, "生产者");

        //创建消费者线程
        Thread customer = new Thread(() -> {
            int count = 0;
            while (true) {
                synchronized (goods) {
                    if (goods.size() > 0) {
                        //消费商品
                        goods.remove("商品" + ++count);
                        System.out.println("消费者消费商品" + count);
                    } else {
                        //唤醒生产者生产商品
                        goods.notify();
                    }
                }
            }
        });
        customer.start();
        producer.start();
    }
}
定时器
定时器是什么
定时器也是软件开发中的一个重要组件. 类似于一个 “闹钟”. 达到一个设定的时间之后, 就执行某个指定好的代码.

定时器是一种实际开发中非常常用的组件. 比如网络通信中, 如果对方 500ms 内没有返回数据, 则断开连接尝试重连. 比如一个 Map, 希望里面的某个 key 在 3s 之后过期(自动删除). 类似于这样的场景就需要用到定时器.
标准库中的定时器
标准库中提供了一个 Timer 类. Timer 类的核心方法为 schedule .
- schedule 包含两个参数. 第一个参数指定即将要执行的任务代码,
- 第二个参数指定多长时间之后 执行 (单位为毫秒).
public class TimeTest {
    public static void main(String[] args) {
        Timer timer = new Timer();
        //3s之后执行这个任务
        //如果加上后面的period参数1000,就表示3s后开始执行,每隔1s执行一次
        timer.schedule(new TimerTask() {
            @Override
            public void run() {
                System.out.println("hello world");
            }
        }, 3000, 1000);
    }
}


 491
491

 被折叠的 条评论
为什么被折叠?
被折叠的 条评论
为什么被折叠?
 到【灌水乐园】发言


