


1、ViewRootImpl和DecorView
ViewRootImpl是连接WindowManager和DecorView的纽带,View的measure、layout、draw三大流程均是通过ViewRootImpl开始的。
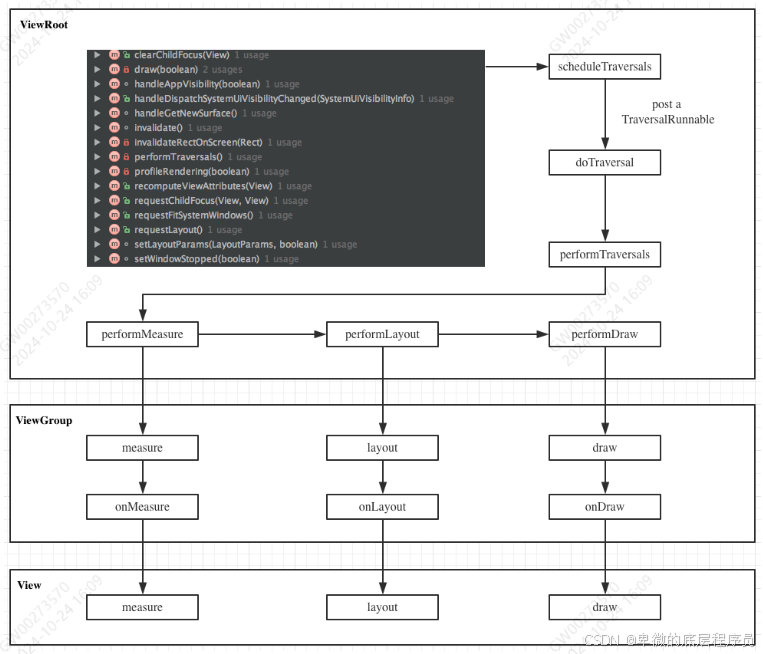
View的绘制流程是从ViewRoot的performTraversals开始的,经过measure、layout、draw才能将一个View绘制出来。
private void performTraversals() {
    ...
    if (...) {
        ...
        if (...) {
            ...
            if (...) {
                ...
                performMeasure(childWidthMeasureSpec, childHeightMeasureSpec);
                ...
                layoutRequested = true;
            }
        }
    }...

    final boolean didLayout = layoutRequested && (!mStopped || mReportNextDraw);
    ...
    if (didLayout) {
        performLayout(lp, mWidth, mHeight);
        ...
    }

    ...
    boolean cancelDraw = mAttachInfo.mTreeObserver.dispatchOnPreDraw() || !isViewVisible;

    if (!cancelDraw && !newSurface) {
        ...
        performDraw();
    }...
}
ViewRoot整体流程树如图:
measure过程决定了View的宽高,Measure完成后,可以通过getMeasuredWidth和getMeasuredHeight方法来获取View测量后的宽高。
需要注意的ViewGroup继承至View,所以ViewGroup的measure方法实际上就是View的measure方法。View会在measure方法中调用onMeasure方法,而ViewGroup会在onMeasure中完成对子View的measure操作。如果子元素也是ViewGroup,也会沿着控件树继续传递下去,直到最后的节点是View为止。
View会在onMeasure方法中设置自己的宽高;而ViewGroup并没有实现此方法,该方法需要ViewGroup的具体子类去实现。下面是View.onMeasure方法的代码:
protected void onMeasure(int widthMeasureSpec, int heightMeasureSpec) {
    setMeasuredDimension(getDefaultSize(getSuggestedMinimumWidth(), widthMeasureSpec),
            getDefaultSize(getSuggestedMinimumHeight(), heightMeasureSpec));
}
layout调用过程和measure调用过程一致。layout过程将会决定View怎么进行摆放。
draw调用过程与上面的两个过程有点不一样,顶层View的draw在ViewRootImpl#drawSoftware方法中调用,其传递是通过dispatchDraw来实现的,onDraw仅仅用来draw自身的内容。
2 、MeasureSpec(View的内部类)
MeasureSpec会在测量过程中将View的LayoutParams根据父容器的规则进行转换,通过这个MeasureSpec可以测量View的宽高。
2.1 MeasureSpec的详细描述
public static class MeasureSpec {
    private static final int MODE_SHIFT = 30;
    private static final int MODE_MASK  = 0x3 << MODE_SHIFT;
    ...

    /**
     * Measure specification mode: The parent has not imposed any constraint
     * on the child. It can be whatever size it wants.
     */
    public static final int UNSPECIFIED = 0 << MODE_SHIFT;

    /**
     * Measure specification mode: The parent has determined an exact size
     * for the child. The child is going to be given those bounds regardless
     * of how big it wants to be.
     */
    public static final int EXACTLY     = 1 << MODE_SHIFT;

    /**
     * Measure specification mode: The child can be as large as it wants up
     * to the specified size.
     */
    public static final int AT_MOST     = 2 << MODE_SHIFT;

    /**
     * Creates a measure specification based on the supplied size and mode.
     *
     * The mode must always be one of the following:
     * <ul>
     *  <li>{@link android.view.View.MeasureSpec#UNSPECIFIED}</li>
     *  <li>{@link android.view.View.MeasureSpec#EXACTLY}</li>
     *  <li>{@link android.view.View.MeasureSpec#AT_MOST}</li>
     * </ul>
     *
     * <p><strong>Note:</strong> On API level 17 and lower, makeMeasureSpec's
     * implementation was such that the order of arguments did not matter
     * and overflow in either value could impact the resulting MeasureSpec.
     * {@link android.widget.RelativeLayout} was affected by this bug.
     * Apps targeting API levels greater than 17 will get the fixed, more strict
     * behavior.</p>
     *
     * @param size the size of the measure specification
     * @param mode the mode of the measure specification
     * @return the measure specification based on size and mode
     */
    public static int makeMeasureSpec(@IntRange(from = 0, to = (1 << MeasureSpec.MODE_SHIFT) - 1) int size,
                                      @MeasureSpecMode int mode) {
        if (sUseBrokenMakeMeasureSpec) {
            return size + mode;
        } else {
            return (size & ~MODE_MASK) | (mode & MODE_MASK);
        }
    }

    ...

    /**
     * Extracts the mode from the supplied measure specification.
     *
     * @param measureSpec the measure specification to extract the mode from
     * @return {@link android.view.View.MeasureSpec#UNSPECIFIED},
     *         {@link android.view.View.MeasureSpec#AT_MOST} or
     *         {@link android.view.View.MeasureSpec#EXACTLY}
     */
    @MeasureSpecMode
    public static int getMode(int measureSpec) {
        //noinspection ResourceType
        return (measureSpec & MODE_MASK);
    }

    /**
     * Extracts the size from the supplied measure specification.
     *
     * @param measureSpec the measure specification to extract the size from
     * @return the size in pixels defined in the supplied measure specification
     */
    public static int getSize(int measureSpec) {
        return (measureSpec & ~MODE_MASK);
    }
    ...
}
MeasureSpec是一个32位int型值,高两位代表测量模式SpecMode,低30位代表测量规格SpecSize。MeasureSpec将SpecMode和SpecSize打包成一个int值来存储。上面就是其提供的打包、解包方法。
SpecMode有三类:
- UNSPECIFIED
00 000000 00000000 00000000 00000000
父容器对View没有任何限制,要多大给多大。这种情况一般用于系统内部。 - EXACTLY (match_parent以及具体的数值)
01 000000 00000000 00000000 00000000
父容器已经决定了View的精确尺寸,View的最终大小就是此时SpecSize所指定的大小。它对应于match_parent以及具体的数值。 - AT_MOST (wrap_content)
10 000000 00000000 00000000 00000000
View想要多大就有多大,但是不能超过SpecSize。它对应于wrap_content。
2.2 MeasureSpec和LayoutParams的对应关系
系统内部是通过MeasureSpec来进行View的测量,但是我们可以使用LayoutParams来更改这个结果,然后在根据这个MeasureSpec来确定View的最后宽高。注意:MeasureSpec不仅仅由 LayoutParams决定,它还有父容器一起决定。
对于DecorView和普通View来说,MeasureSpec的转换过程略有不同。对于DecorView,因为其本身已经是顶级View了,没有父容器,所以其MeasureSpec由窗口尺寸和自身LayoutParams共同确定。
2.3 DecorView的测量过程
DecorView是一个继承至FrameLayout的顶级View,一般情况下它内部会包含一个竖直方向的LinearLayout。这个LinearLayout有两个部分,上面部分是标题栏,下面部分是id为content的内容栏,所谓的setContentView就是指这个View。
下面看看DecorView的测量过程,具体代码在ViewRootImpl#measureHierarchy方法中,desiredWindowWidth、desiredWindowHeight是Window的尺寸:
childWidthMeasureSpec = getRootMeasureSpec(desiredWindowWidth, lp.width);
childHeightMeasureSpec = getRootMeasureSpec(desiredWindowHeight, lp.height);
performMeasure(childWidthMeasureSpec, childHeightMeasureSpec);getRootMeasureSpec方法如下:
private static int getRootMeasureSpec(int windowSize, int rootDimension) {
    int measureSpec;
    switch (rootDimension) {

    case ViewGroup.LayoutParams.MATCH_PARENT:
        // Window can't resize. Force root view to be windowSize.
        measureSpec = MeasureSpec.makeMeasureSpec(windowSize, MeasureSpec.EXACTLY);
        break;
    case ViewGroup.LayoutParams.WRAP_CONTENT:
        // Window can resize. Set max size for root view.
        measureSpec = MeasureSpec.makeMeasureSpec(windowSize, MeasureSpec.AT_MOST);
        break;
    default:
        // Window wants to be an exact size. Force root view to be that size.
        measureSpec = MeasureSpec.makeMeasureSpec(rootDimension, MeasureSpec.EXACTLY);
        break;
    }
    return measureSpec;
}
在上面代码中,DecorView的MeasureSpec的产生过程已经很明确了:
- MATCH_PARENT:精确模式,大小为窗口尺寸
- WRAP_CONTENT:最大模式,大小不能超过窗口
- 固定大小:精确模式,大小为LayoutParams中指定的大小。
对普通View来说,View的测量过程由ViewGroup传递而来,先看一下ViewGroup#measureChild方法:
protected void measureChild(View child, int parentWidthMeasureSpec,
        int parentHeightMeasureSpec) {
    final LayoutParams lp = child.getLayoutParams();

    final int childWidthMeasureSpec = getChildMeasureSpec(parentWidthMeasureSpec,
            mPaddingLeft + mPaddingRight, lp.width);
    final int childHeightMeasureSpec = getChildMeasureSpec(parentHeightMeasureSpec,
            mPaddingTop + mPaddingBottom, lp.height);

    child.measure(childWidthMeasureSpec, childHeightMeasureSpec);
}上面代码会对子View进行measure,在调用之前会通过getChildMeasureSpec来得到子View的MeasureSpec,参数中spec是Parent的spec:
public static int getChildMeasureSpec(int spec, int padding, int childDimension) {
    int specMode = MeasureSpec.getMode(spec);
    int specSize = MeasureSpec.getSize(spec);

    int size = Math.max(0, specSize - padding);

    int resultSize = 0;
    int resultMode = 0;

    switch (specMode) {
    // Parent has imposed an exact size on us
    case MeasureSpec.EXACTLY:
        if (childDimension >= 0) {
            resultSize = childDimension;
            resultMode = MeasureSpec.EXACTLY;
        } else if (childDimension == LayoutParams.MATCH_PARENT) {
            // Child wants to be our size. So be it.
            resultSize = size;
            resultMode = MeasureSpec.EXACTLY;
        } else if (childDimension == LayoutParams.WRAP_CONTENT) {
            // Child wants to determine its own size. It can't be
            // bigger than us.
            resultSize = size;
            resultMode = MeasureSpec.AT_MOST;
        }
        break;

    // Parent has imposed a maximum size on us
    case MeasureSpec.AT_MOST:
        if (childDimension >= 0) {
            // Child wants a specific size... so be it
            resultSize = childDimension;
            resultMode = MeasureSpec.EXACTLY;
        } else if (childDimension == LayoutParams.MATCH_PARENT) {
            // Child wants to be our size, but our size is not fixed.
            // Constrain child to not be bigger than us.
            resultSize = size;
            resultMode = MeasureSpec.AT_MOST;
        } else if (childDimension == LayoutParams.WRAP_CONTENT) {
            // Child wants to determine its own size. It can't be
            // bigger than us.
            resultSize = size;
            resultMode = MeasureSpec.AT_MOST;
        }
        break;

    // Parent asked to see how big we want to be
    case MeasureSpec.UNSPECIFIED:
        if (childDimension >= 0) {
            // Child wants a specific size... let him have it
            resultSize = childDimension;
            resultMode = MeasureSpec.EXACTLY;
        } else if (childDimension == LayoutParams.MATCH_PARENT) {
            // Child wants to be our size... find out how big it should
            // be
            resultSize = View.sUseZeroUnspecifiedMeasureSpec ? 0 : size;
            resultMode = MeasureSpec.UNSPECIFIED;
        } else if (childDimension == LayoutParams.WRAP_CONTENT) {
            // Child wants to determine its own size.... find out how
            // big it should be
            resultSize = View.sUseZeroUnspecifiedMeasureSpec ? 0 : size;
            resultMode = MeasureSpec.UNSPECIFIED;
        }
        break;
    }
    //noinspection ResourceType
    return MeasureSpec.makeMeasureSpec(resultSize, resultMode);
}
从代码中不难看出,子View的MeasureSpec是由父容器MeasureSpec和自身LayoutParams有关。padding是父容器中已经占用的空间大小,因此子元素可用大小需要减去这部分。此方法清楚的展示了普通View的MeasureSpec的创建过程,由该方法转化而来的表如下:
| EXACTLY(parent) | AT_MOST(parent) | UNSPECIFIED(parent) | |
|---|---|---|---|
| dp/px | EXACTLY childSize | EXACTLY childSize | EXACTLY childSize |
| match_parent | EXACTLY parentSize | AT_MOST parentSize | UNSPECIFIED 0 |
| wrap_content | AT_MOST parentSize | AT_MOST parentSize | UNSPECIFIED 0 |
3、View的绘制流程
View的工作流程指measure、layout、draw三大流程,即测量、布局和绘制。其中,measure确定View的测量宽高,layout确定View的最终宽高和四个顶点的位置,而draw则将View绘制到屏幕上。
3.1 measure过程
3.1.1 View的measure过程
View的measure过程是由measure方法完成的, 此方法是一个fianl方法. 进入此方法会调用View的onMeasure方法. 具体的实现看onMeasure方法即可:
protected void onMeasure(int widthMeasureSpec, int heightMeasureSpec) {
    setMeasuredDimension(getDefaultSize(getSuggestedMinimumWidth(), widthMeasureSpec),
            getDefaultSize(getSuggestedMinimumHeight(), heightMeasureSpec));
}
setMeasureDimension( )方法会设定View的宽度和高度.
getDefaultSize我们只看AT_MOST和EXACTLY的情况,因此可以简单的理解为此方法就是返回的size就是specSize。
    public static int getDefaultSize(int size, int measureSpec) {
        int result = size;
        int specMode = MeasureSpec.getMode(measureSpec);
        int specSize = MeasureSpec.getSize(measureSpec);

        switch (specMode) {
        case MeasureSpec.UNSPECIFIED:
            result = size;
            break;
        case MeasureSpec.AT_MOST:
        case MeasureSpec.EXACTLY:
            result = specSize;
            break;
        }
        return result;
    }
至于UNSPECIFIED,一般用于系统内部的测量过程.此时,View的大小为getSuggestedMinimumWidth和getSuggestedMinimumHeight。从源码中可以看出,如果View没有背景,那么View的宽度为mMinWidth(即android:minWidth指定的值);如果View有背景,则宽度为max(mMinWidth, mBackground.getMinimumWidth())。
    protected int getSuggestedMinimumWidth() {
        return (mBackground == null) ? mMinWidth : max(mMinWidth, mBackground.getMinimumWidth());
}mBackground是一个Drawable对象,其getMinimumWidth方法如下:
public int getMinimumWidth() {
    final int intrinsicWidth = getIntrinsicWidth();
    return intrinsicWidth > 0 ? intrinsicWidth : 0;
}因此getMinimumWidth返回的就是Drawable的原始宽度,若没有原始宽度则返回0。不是所有的Drawable对象都有原始宽度,ShapeDrawable没有原始宽高,而BitmapDrawable就有。
3.1.2 ViewGroup的measure过程 (拓展)
对于ViewGroup来说,除了完成自己的measure外,还会遍历调用所有子元素的measure方法,各个子元素再递归执行这个过程。ViewGroup是一个抽象类,因此它并没有重写View的onMeasure方法,这个方法需要具体的ViewGroup类(比如LinearLayout、RelativeLayout等)来实现。下面我们通过LinearLayout来分析。 首先我们看一下LinearLayout#onMeasure方法:
@Override
protected void onMeasure(int widthMeasureSpec, int heightMeasureSpec) {
    if (mOrientation == VERTICAL) {
        measureVertical(widthMeasureSpec, heightMeasureSpec);
    } else {
        measureHorizontal(widthMeasureSpec, heightMeasureSpec);
    }
}LinearLayout会根据orientation的值来调用不同的方法,此处我们选择竖直方向的measureVertical方法:
void measureVertical(int widthMeasureSpec, int heightMeasureSpec) {
    ...
    // See how tall everyone is. Also remember max width.
    for (int i = 0; i < count; ++i) {
        final View child = getVirtualChildAt(i);

        final boolean useExcessSpace = lp.height == 0 && lp.weight > 0;
        if (heightMode == MeasureSpec.EXACTLY && useExcessSpace) {
            // Optimization: don't bother measuring children who are only
            // laid out using excess space. These views will get measured
            // later if we have space to distribute.
            final int totalLength = mTotalLength;
            mTotalLength = Math.max(totalLength, totalLength + lp.topMargin + lp.bottomMargin);
            skippedMeasure = true;
        } else {
           ...
            // Determine how big this child would like to be. If this or
            // previous children have given a weight, then we allow it to
            // use all available space (and we will shrink things later
            // if needed).
            final int usedHeight = totalWeight == 0 ? mTotalLength : 0;
            measureChildBeforeLayout(child, i, widthMeasureSpec, 0,
                    heightMeasureSpec, usedHeight);

            final int childHeight = child.getMeasuredHeight();
            ...

            final int totalLength = mTotalLength;
            mTotalLength = Math.max(totalLength, totalLength + childHeight + lp.topMargin +
                   lp.bottomMargin + getNextLocationOffset(child));
            ...
        }
    ...
    // Add in our padding
    mTotalLength += mPaddingTop + mPaddingBottom;
    int heightSize = mTotalLength;

    // Check against our minimum height
    heightSize = Math.max(heightSize, getSuggestedMinimumHeight());

    // Reconcile our calculated size with the heightMeasureSpec
    int heightSizeAndState = resolveSizeAndState(heightSize, heightMeasureSpec, 0);
    heightSize = heightSizeAndState & MEASURED_SIZE_MASK;

    ...

    if (!allFillParent && widthMode != MeasureSpec.EXACTLY) {
        maxWidth = alternativeMaxWidth;
    }
    maxWidth += mPaddingLeft + mPaddingRight;

    // Check against our minimum width
    maxWidth = Math.max(maxWidth, getSuggestedMinimumWidth());

    setMeasuredDimension(resolveSizeAndState(maxWidth, widthMeasureSpec, childState),
            heightSizeAndState);
    ...
}上面的代码描述了主要逻辑,我们可以看出在LinearLayout的measureVertical方法会在会判断LinearLayout的heightSpecMode。如果是精确模式且子元素高为0、有权重,则直接设置高度,然后跳过测量;如果是AT_MOST,则需要测量。系统会通过measureChildBeforeLayout--->measureChildWithMargins--->child.measure,这样各个子元素就依次进入measure过程,然后系统会通过mTotalLength变量存储自身测量出来的高度。每测量一个元素,mTotalLength就会增加,增加部分包括子元素的高度以及子元素的在竖直方向上的margin。 子元素测量完成后,LinearLayout会测量自己的大小,其具体过程是通过View#resolveSizeAndState方法来完成的:
public static int resolveSizeAndState(int size, int measureSpec, int childMeasuredState) {
    final int specMode = MeasureSpec.getMode(measureSpec);
    final int specSize = MeasureSpec.getSize(measureSpec);
    final int result;
    switch (specMode) {
        case MeasureSpec.AT_MOST:
            if (specSize < size) {
                result = specSize | MEASURED_STATE_TOO_SMALL;
            } else {
                result = size;
            }
            break;
        case MeasureSpec.EXACTLY:
            result = specSize;
            break;
        case MeasureSpec.UNSPECIFIED:
        default:
            result = size;
    }
    return result | (childMeasuredState & MEASURED_STATE_MASK);
}
针对竖直的LinearLayout而言,它在水平方向的测量过程遵循View的测量过程。在竖直方向的测量过程和View稍有不同:如果是match_parent或具体数字(也就是EXACTLY模式),那么其过程和View一样;如果是wrap_content,那么其高度是所有子元素加上竖直方向padding之和,但是不能超过父容器的剩余空间。
View的measure过程是三大流程中最复杂的一个,measure完成后,可以通过getMeasuredWidth/Height方法来获取View的测量宽高。需要注意,在某些极端情况下,系统会进行多次测量,此时在onMeasure中拿到的测量宽高可能是不准确的,比较好的方式是在onLayout中去获取测量宽高。
3.2 layout过程
ViewGroup的位置被确定后,会在onLayout中遍历所有的子元素并调用其layout方法,子元素的layout方法又会调用onLayout方法。layout方法确定View本身的位置,onLayout方法会确定所有子元素的位置。
3.2.1 View的layout过程
public void layout(int l, int t, int r, int b) {
    // ...省略代码...

	// 1.将当前 View 的上下左右四个边距进行备份。
    int oldL = mLeft;
    int oldT = mTop;
    int oldB = mBottom;
    int oldR = mRight;
	// 2.判断当前 View 的位置是否发生变化。
    boolean changed = isLayoutModeOptical(mParent) ?
            setOpticalFrame(l, t, r, b) : setFrame(l, t, r, b);

    if (changed || (mPrivateFlags & PFLAG_LAYOUT_REQUIRED) == PFLAG_LAYOUT_REQUIRED) {
    	// 3.当位置发生变化时,触发onLayout重新进行位置计算。
        onLayout(changed, l, t, r, b);

        // ...省略代码...
    }
	// ...省略代码...
}对于View来说,最终都会通过setFrame方法来设定View的四个位置参数,这些参数一旦确定,View在父容器中的位置也就确定了。然后会调用onLayout方法,此方法会让父容器用来确定子元素位置( 在View和ViewGroup中都是一个空实现,在各个ViewGroup的子类中会实现 )。 下面是setFrame的部分代码,这里我们看到有对四个位置参数的赋值操作:
protected boolean setFrame(int left, int top, int right, int bottom) {
    boolean changed = false;
    // ...省略代码...

	// 对比子 View 前后两次 layout 时位置是否发生变化
    if (mLeft != left || mRight != right || mTop != top || mBottom != bottom) {
    	// 位置发生改变
        changed = true;

        // Remember our drawn bit
        int drawn = mPrivateFlags & PFLAG_DRAWN;

        int oldWidth = mRight - mLeft;
        int oldHeight = mBottom - mTop;
        int newWidth = right - left;
        int newHeight = bottom - top;
        boolean sizeChanged = (newWidth != oldWidth) || (newHeight != oldHeight);

        // Invalidate our old position
        invalidate(sizeChanged);
		// 将变化后的位置值进行保存
        mLeft = left;
        mTop = top;
        mRight = right;
        mBottom = bottom;
        mRenderNode.setLeftTopRightBottom(mLeft, mTop, mRight, mBottom);

        // ...省略代码...
    }
    return changed;
}
小结 :
-
View 的位置设置是在
View.layout()方法中。 -
View.onLayout()方法是计算子 View 的位置。 -
单一 View 没有子 View,因此 onLayout 是空实现,所有逻辑都在
View.layout()方法中。
3.2.2 ViewGroup的layout过程
步骤:
-
先计算自身ViewGroup的位置 (
View.layout())。 -
再遍历子 View 并确定自身子 View 在 ViewGroup 的位置 (
ViewGroup.onLayout() --> View.layout())。
public void layout(int l, int t, int r, int b) {
    // ...省略代码...

	// 1.先确定容器 LinearLayout 容器的位置。setFrame() 方法在上面分析过,此处不再重复。
    boolean changed = isLayoutModeOptical(mParent) ?
            setOpticalFrame(l, t, r, b) : setFrame(l, t, r, b);

    if (changed || (mPrivateFlags & PFLAG_LAYOUT_REQUIRED) == PFLAG_LAYOUT_REQUIRED) {
    	// 2.当位置发生变化时,触发LinearLayout.onLayout方法。
        onLayout(changed, l, t, r, b);
        // ...省略代码...
    }
	// ...省略代码...
}ViewGroup本身的layout过程调用的是super.layout方法,不同的是ViewGroup还要对子元素进行layout操作。但是由于ViewGroup是一个抽象类,所以onLayout在ViewGroup中是一个空实现。我们这里看LinearLayout的方法:
protected void onLayout(boolean changed, int l, int t, int r, int b) {
    if (mOrientation == VERTICAL) {
        layoutVertical(l, t, r, b);
    } else {
        layoutHorizontal(l, t, r, b);
    }
}我们还是只看竖直方向的layoutVertical方法,这个方法逻辑还是很清楚的。它会对所有子元素调用setChildFrame方法,其中childTop会不断累加,这就意味着后面的元素被放置在靠下的位置。并且setFrame中传入的width、height两个参数就是这个子元素的测量宽高。
void layoutVertical(int left, int top, int right, int bottom) {
	final int paddingLeft = mPaddingLeft;
    int childTop;
    int childLeft;
    // Where right end of child should go
    final int width = right - left;
    int childRight = width - mPaddingRight;
    // Space available for child
    int childSpace = width - paddingLeft - mPaddingRight;

    // ...省略代码...

    // 1.遍历子View
    for (int i = 0; i < count; i++) {
        final View child = getVirtualChildAt(i);
        if (child == null) {
            childTop += measureNullChild(i);
        } else if (child.getVisibility() != GONE) {
        	// 2.获取子View的大小。getMeasuredWidth() 的值在 measure 流程结束后就会有值。
            final int childWidth = child.getMeasuredWidth();
            final int childHeight = child.getMeasuredHeight();

            final LinearLayout.LayoutParams lp = (LinearLayout.LayoutParams) child.getLayoutParams();
            // ...省略代码...
            childTop += lp.topMargin;
            // 3.设置子 View 的具体位置
            setChildFrame(child, childLeft, childTop + getLocationOffset(child), childWidth, childHeight);
            childTop += childHeight + lp.bottomMargin + getNextLocationOffset(child);

            i += getChildrenSkipCount(child, i);
        }
    }
}至于setChildFrame方法,它仅仅是调用子元素的layout方法。这样layout操作就会传递到子元素中,子元素会继续这么执行,一直到完成整个View树的layout过程。
private void setChildFrame(View child, int left, int top, int width, int height) {
	// 4.具体的设置子 View 的位置是在 View.layout() 方法中进行的。
    child.layout(left, top, left + width, top + height);
}
3.3 draw过程
View的draw过程相比之于measrue过程,也是比较简单的。并且在我们自定义View时,也经常需要重写onDraw方法,来绘制出我们要实现的效果。
绘制的流程也是起始于ViewRootImpl#perfomTraversals,ViewRootImpl#performDraw() 方法调用了ViewRootImpl#draw(boolean fullRedrawNeeded) ,其中这个boolean类型的形参,作用是判断是否需要重新绘制全部视图。最后调用的DecorView.draw(canvas)方法,自此开始了正式的绘制流程。
ViewGroup当中并没有实现draw(Canvas canvas)与onDraw(Canvas canvas)方法,所以所有View都是调用View#draw方法, 其源码如下:
    /**
     * Manually render this view (and all of its children) to the given Canvas.
     * The view must have already done a full layout before this function is
     * called.  When implementing a view, implement
     * {@link #onDraw(android.graphics.Canvas)} instead of overriding this method.
     * If you do need to override this method, call the superclass version.
     *
     * @param canvas The Canvas to which the View is rendered.
     */
    @CallSuper
    public void draw(Canvas canvas) {
        final int privateFlags = mPrivateFlags;

		//@author www.yaoxiaowen.com
		// dirtyOpaque 标志位,判断该view是否透明,如果透明,它就可以省略一些步骤
        final boolean dirtyOpaque = (privateFlags & PFLAG_DIRTY_MASK) == PFLAG_DIRTY_OPAQUE &&
                (mAttachInfo == null || !mAttachInfo.mIgnoreDirtyState);
        mPrivateFlags = (privateFlags & ~PFLAG_DIRTY_MASK) | PFLAG_DRAWN;

        /*
         * Draw traversal performs several drawing steps which must be executed
         * in the appropriate order:
         *
         *      1. Draw the background
         *      2. If necessary, save the canvas' layers to prepare for fading
         *      3. Draw view's content
         *      4. Draw children
         *      5. If necessary, draw the fading edges and restore layers
         *      6. Draw decorations (scrollbars for instance)
         */

        // Step 1, draw the background, if needed
        int saveCount;

        if (!dirtyOpaque) {
            drawBackground(canvas);
        }

        // skip step 2 & 5 if possible (common case)
        final int viewFlags = mViewFlags;
        boolean horizontalEdges = (viewFlags & FADING_EDGE_HORIZONTAL) != 0;
        boolean verticalEdges = (viewFlags & FADING_EDGE_VERTICAL) != 0;
        if (!verticalEdges && !horizontalEdges) {
            // Step 3, draw the content
            if (!dirtyOpaque) onDraw(canvas);

            // Step 4, draw the children
            dispatchDraw(canvas);

            // Overlay is part of the content and draws beneath Foreground
            if (mOverlay != null && !mOverlay.isEmpty()) {
                mOverlay.getOverlayView().dispatchDraw(canvas);
            }

            // Step 6, draw decorations (foreground, scrollbars)
            onDrawForeground(canvas);

            // we're done...
            return;
        }

       //...
    }
View的绘制过程遵循以下6步:
-
绘制View背景。
drawBackground -
保存当前图层信息。(可跳过)
-
绘制View内容。
onDraw(canvas) -
绘制子View。(如果有的话)。
dispatchDraw(canvas) -
绘制View的褪色边缘,类似于阴影效果。(可跳过)
-
绘制View的装饰。(比如滚动条)。
onDrawForeground(canvas)
其中,如果View本身是透明的,则不需要绘制背景以及自身,所以跳过了1、3两步;其次,如果View本身不需要绘制 fading edge,则跳过2、5两步。
参考:View学习(四)-View的绘制(draw)过程 - eleven_yw - 博客园
View#onDraw(Canvas)方法是空实现,这是因为不同View有不同的内容,所以具体各个子View都有不同的绘制内容。而我们在自定义View的时候,也一定要重写该方法。


 230
230

 被折叠的 条评论
为什么被折叠?
被折叠的 条评论
为什么被折叠?
 到【灌水乐园】发言


