


简介
概述
- Flume是Cloudera公司开发的后来贡献给了Apache的一套用于进行日志的收集(collecting)、汇聚(aggregating)和传输(movlng)的机制
- 在大数据中,有超过70%的数据来源是日志 - 日志是大数据的基石
- Flume版本:
- Flume0.X:Flume-og,配置结构复杂,并且对分布式支持不好
- Flume1.X:Flume-ng,配置结构进行简化,并且很好的支持分布式
基本概念
-
Event:事件
-
Flume会将收集到的日志封装成Event对象,一个Event对象就是一条日志
-
Event本质上就说一个Json串,固定包含两个部分headers和body
{
    "headers":{},
 	"body":""
}
-
-
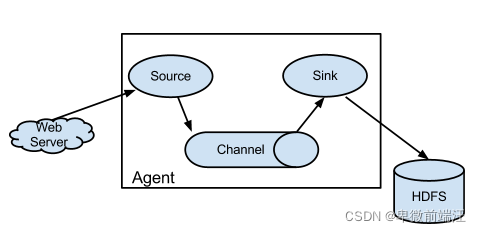
Agent:是Flume流动结构的基本组成,固定的包含至少3个组件
- Source:从数据源采集数据 - conllecting
- Channel:临时存储数据 - aggregating
- Sink:将数据写到目的地 - moving
流动模型
-
单级流动
-
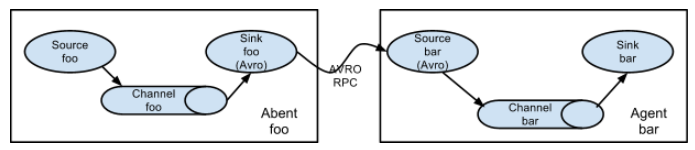
多级流动
-
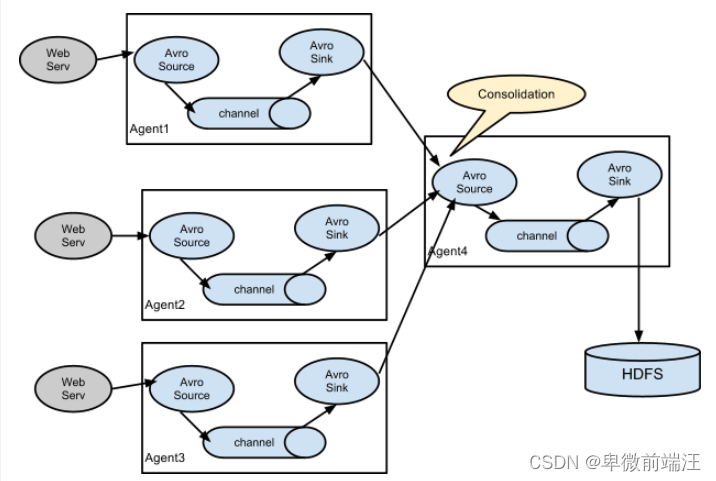
扇入流动
-
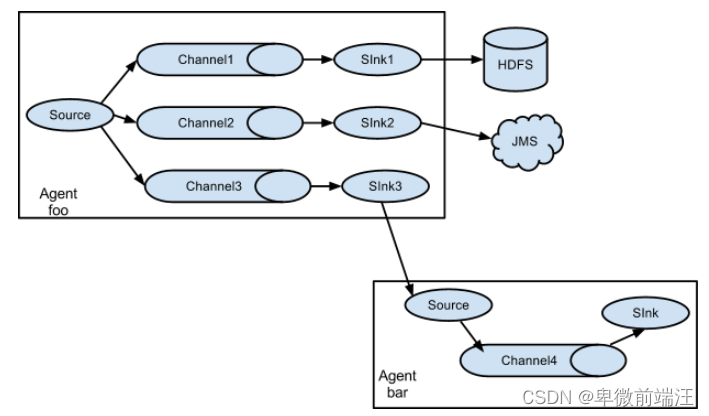
扇出流动
- 复杂流动:需要根据需求将上述流动进行组合,构成了复杂流动
安装和入门
-
进入安装目录下,下载Flume的安装包
-
解压
tar -vxf apache-flume-1.9.0-bin.tar.gz -
重命名
mv apache-flume-1.9.0-bin.tar.gz flume-1.9.0 -
添加环境变量
vim /etc/profile.d/flumehome.sh #文件中添加 export FLUME_HOME=/home/software/flume-1.9.0 export PATH=$FLUME_HOME$/bin #保存退出,重新生效 source /etc/profile.d/flumehome.sh -
校验环境变量
flume-ng version -
进去Flume安装目录的lib目录中,解决连接冲突问题
cd /home/software/flume-1.9.0/lib/ rm -rf guava—11.0.2.jar cp /home/software/hadoop-3.1.3/share/hadoop/common/lib/guava-27.0-jre.jar ./ -
构建数据目录
cd /home/software/flume-1.9.0 mkdir data -
入门:编写格式文件
vim basic.properties在文件中添加
# 给Agent起名
# 给Source起名
a1.sources = s1
# 给Channels起名
a1.channels = c1
# 给Sink起名
a1.sinks = k1


# 配置Source
a1.sources.s1.type = netcat
a1.sources.s1.bind = 0.0.0.0
a1.sources.s1.port = 8090


# 配置Channel
a1.channels.c1.type = memory
a1.channels.c1.capacity = 10000
a1.channels.c1.transactionCapacity = 100


# 配置Sink
a1.sinks.k1.type = logger


# 将Source和Channel进行绑定
a1.sources.s1.channels = c1
# 将Sink和Channel进行绑定
a1.sinks.k1.channel = c1
Source
AVRO Source
-
AVRO Source:采集被AVRO序列化之后的数据,然后将数据反序列化之后进行存储和传输。可以结合AVRO Sink来实现多级、扇入和扇出流动
-
示例
-
格式文件
a1.sources = s1 a1.channels = c1 a1.sinks = k1 # 配置AVRO Source # 类型只能是AVRO a1.sources.s1.type = avro # 监听的主机名/IP a1.sources.s1.bind = hadoop01 # 绑定的端口号 a1.sources.s1.port = 8090 a1.channels.c1.type = memory a1.sinks.k1.type = logger a1.sources.s1.channels = c1 a1.sinks.k1.channel = c1 -
启动Flume
flume-ng agent -n a1 -c $FLUME_HOME/conf -f avrosource.properties -Dflume.root.logger=INFO,console -
启动Flume的AVRO客户端来发送数据
flume-ng avro-client -H hadoop01 -p 8090 -F a.txt -Dflume.root.logger=INFO,console
-
Exec Source
-
Exec Source:监听指定的Linux命令,然后将命令的执行结果作为日志进行收集
-
案例:监听指定的文件,获取这个文件中新添的数据
-
格式
a1.sources = s1 a1.channels = c1 a1.sinks = k1 # 配置Exec Source # 类型必须是exec a1.sources.s1.type = exec # 监听的命令 a1.sources.s1.command = tail -F /home/software/flume-1.9.0/data/a.txt # 命令类型 a1.sources.s1.shell = /bin/sh -c a1.channels.c1.type = memory a1.sinks.k1.type = logger a1.sources.s1.channels = c1 a1.sinks.k1.channel = c1 -
启动命令
flume-ng agent -n a1 -c $FLUME_HOME/conf -f execsource.properties -Dflume.root.logger=INFO,console
-
Spooling Diretory Source
-
Spooling Directory Source:监听指定的目录,如果目录中产生了新的文件,那么会自动收集新文件中的内容
-
如果不指定,那么被收集完的文件会自动添加一个后缀
.COMPLETED -
示例
-
格式文件
a1.sources = s1 a1.channels = c1 a1.sinks = k1 # 配置Spooling Directory Source # 类型必须是spooldir a1.sources.s1.type = spooldir # 监听的目录 a1.sources.s1.spoolDir = /home/flumedata a1.channels.c1.type = memory a1.sinks.k1.type = logger a1.sources.s1.channels = c1 a1.sinks.k1.channel = c1 -
启动命令
flume-ng agent -n a1 -c $FLUME_HOME/conf -f spooldirsource.properties -Dflume.root.logger=INFO,console
-
Sequence Generator Source
-
Sequence Generator Source:序列产生器。从0开始不断递增,递增到指定大小。如果不指定,那么会递增到
Long.MAX_VALUE -
示例
-
格式文件
a1.sources = s1 a1.channels = c1 a1.sinks = k1 # 配置Sequence Generator Source # 类型必须是seq a1.sources.s1.type = seq # 结束值 a1.sources.s1.totalEvents = 200 a1.channels.c1.type = memory a1.sinks.k1.type = logger a1.sources.s1.channels = c1 a1.sinks.k1.channel = c1 -
启动命令
flume-ng agent -n a1 -c $FLUME_HOME/conf -f seqsource.properties -Dflume.root.logger=INFO,console
-
HTTP Source
-
HTTP Source:监听HTTP请求,但是只能监听GET和POST请求。其中GET请求只能用于实验,因此只用这个Source来监听POST请求
-
示例
-
格式文件
a1.sources = s1 a1.channels = c1 a1.sinks = k1 # 配置HTTP Source # 类型必须是http a1.sources.s1.type = http # 监听的端口号 a1.sources.s1.port = 8090 a1.channels.c1.type = memory a1.sinks.k1.type = logger a1.sources.s1.channels = c1 a1.sinks.k1.channel = c1 -
启动命令
flume-ng agent -n a1 -c $FLUME_HOME/conf -f httpsource.properties -Dflume.root.logger=INFO,console -
发送POST请求
curl -X POST -d '[{"headers":{"class":"bigdata"},"body":"testing"}]' http://hadoop01:8090
-
Custom Source
-
Custom Source:自定义Source,需要定义一个类实现Source接口的子接口之一:
EventDrivenSource或者PollableSource- EventDrivenSource:事件驱动Source - 被动型Source。在产生数据之后,才需要定义线程获取数据
- PollableSource:拉去Source - 主动型Source。无论是否有数据,都有自己提供线程去查询是否有数据
-
自定义Source
-
导入POM文件
<?xml version="1.0" encoding="UTF-8"?> <project xmlns="http://maven.apache.org/POM/4.0.0" xmlns:xsi="http://www.w3.org/2001/XMLSchema-instance" xsi:schemaLocation="http://maven.apache.org/POM/4.0.0 http://maven.apache.org/xsd/maven-4.0.0.xsd"> <modelVersion>4.0.0</modelVersion> <groupId>djh.lb</groupId> <artifactId>flume</artifactId> <version>1.0-SNAPSHOT</version> <properties> <maven.compiler.source>8</maven.compiler.source> <maven.compiler.target>8</maven.compiler.target> </properties> <dependencies> <dependency> <groupId>org.apache.flume</groupId> <artifactId>flume-ng-core</artifactId> <version>1.9.0</version> </dependency> <dependency> <groupId>org.apache.flume</groupId> <artifactId>flume-ng-sdk</artifactId> <version>1.9.0</version> </dependency> <dependency> <groupId>org.apache.flume</groupId> <artifactId>flume-ng-configuration</artifactId> <version>1.9.0</version> </dependency> </dependencies> </project>-
代码
package djh.lb.flume.auth.source; import org.apache.flume.Context; import org.apache.flume.Event; import org.apache.flume.EventDrivenSource; import org.apache.flume.channel.ChannelProcessor; import org.apache.flume.conf.Configurable; import org.apache.flume.event.EventBuilder; import org.apache.flume.source.AbstractSource; import java.util.HashMap; import java.util.Map; import java.util.concurrent.ExecutorService; import java.util.concurrent.Executors; // 模拟:Sequence Generator Source public class AuthSource extends AbstractSource implements EventDrivenSource, Configurable { private long step; // 步长 private long end; // 结束值 private ExecutorService es; // 线程池 // 获取指定的属性值 @Override public void configure(Context context) { // 如果没有指定步长,那么默认步长为1 step = context.getLong("step", 1L); // 如果没有指定结束值,那么默认结束值为Long.MAX_VALUE end = context.getLong("end", Long.MAX_VALUE); } // 启动Source @Override public synchronized void start() { // 初始化线程池 es = Executors.newFixedThreadPool(5); // 获取ChannelProcessor ChannelProcessor cp = this.getChannelProcessor(); // 提交任务 es.submit(new Add(step, end, cp)); } // 结束Source @Override public synchronized void stop() { if (es != null) es.shutdown(); } } class Add implements Runnable { private final long step; private final long end; private final ChannelProcessor cp; public Add(long step, long end, ChannelProcessor cp) { this.step = step; this.end = end; this.cp = cp; } @Override public void run() { for (long i = 0; i < end; i += step) { // 将每一次递增的数据作为日志进行收集 // 构建headers Map<String, String> headers = new HashMap<>(); headers.put("time", System.currentTimeMillis() + ""); // 构建body部分 byte[] body = (i + "").getBytes(); // Flume会将收集到的数据封装成Event对象 Event e = EventBuilder.withBody(body, headers); // 需要将数据传递给Channel cp.processEvent(e); } } } -
生成jar包,放到Flume安装目录的子目录lib下
-
编写格式文件
a1.sources = s1 a1.channels = c1 a1.sinks = k1 # 配置Custom Source # 类型必须是类的全路径名 a1.sources.s1.type = djh.lb.flume.auth.source.AuthSource # 递增步长 a1.sources.s1.step = 5 # 结束值 a1.sources.s1.end = 100 a1.channels.c1.type = memory a1.sinks.k1.type = logger a1.sources.s1.channels = c1 a1.sinks.k1.channel = c1 -
启动命令
flume-ng agent -n a1 -c $FLUME_HOME/conf -f authsource.properties -Dflume.root.logger=INFO,console
-
-
Channel
Memory Channel
- Memory Channel:将收集到的数据临时存储到内存的队列中。在存储的时候,如果队列已满,那么后续的数据会被阻塞
- 如果不指定,那么队列的容量默认为100,即意味着在队列中可以存储100条数据。可以通过capacity这个属性来修改。实际过程中,一般会将这个属性的值改成10w-30w,也可以考虑到50w
transactionCapacity:决定了Source每一批给Channel的数据量,也决定了Channel每一批给Sink的数据量。如果不指定,这个属性的默认值为100- Memory Channel适合于要求速度而不要求可靠性的场景
File Channel
-
File Channel:将收集到的数据临时存储到磁盘的文件中。在存储的时候,如果不指定,会将数据临时存储到
~/.flume/file-channel.data中 -
checkpoinDir:记录检查点的目录位置。检查点就说Sink获取的数据的位置,默认是
~/.flume/file-channel/checkpoint -
File Channel适用于要求可靠性而不要求速度的场景
-
示例
- 格式文件
a1.sources = s1 a1.channels = c1 a1.sinks = k1 a1.sources.s1.type = netcat a1.sources.s1.bind = 0.0.0.0 a1.sources.s1.port = 8090 # 配置File Channel # 类型必须是file a1.channels.c1.type = file # 数据临时存储路径 a1.channels.c1.dataDirs = /home/flumedata/data # 检查点临时存储路径 a1.channels.c1.checkpointDir = /home/flumedata/checkpoint a1.sinks.k1.type = logger a1.sources.s1.channels = c1 a1.sinks.k1.channel = c1-
启动命令
flume-ng agent -n a1 -c $FLUME_HOME/conf -f filechannel.properties -Dflume.root.logger=INFO,console
其他Channel
- JDBC Channel:将收集到的数据临时存储到数据库中。目前为止,JDBC Channel只支持Derby数据库,由于Derby数据库的特性(微型、单连接),导致实际开发中不使用这个Channel
- Spillable Memory Channel:先考虑将收集到的数据临时存储到内存中,如果内存队列被塞满,那么不会阻塞而是会将数据临时存储到磁盘上。
Sink
HDFS Sink
-
HDFS Sink:将数据最终写到HDFS上。在写出数据的时候,每隔30s滚动一次,在HDFS上生成一个文件,这样会在HDFS上生成大量的小文件。因此实际过程中需要将滚动时间来进行修改,可以通过属性
hdfs.rollInterval来修改 -
hdfs.rollCount:写入文件中的数据条数。默认数量为10,如果达到这个条数,那么这个文件也会产生滚动,也会导致产生大量的小文件。如果这个属性设置为0,那么不会根据数据条数进行滚动 -
hdfs.rollSize:滚动时候的文件大小。默认是1024B,也就意味着在HDFS上,文件达到1KB大小就会产生滚动。如果这个属性设置为0,则表示不会根据文件大小来进行滚动。 -
hdfs.fileType:HDFS上文件的存储类型,包含:SequenceFile(序列文件),DataStream(文本文件),CompressedStream(压缩文件)。默认值是SequenceFile。如果指定为CompressedStream,那么还需要指定hdfs.codeC属性的值 -
示例
-
格式文件
a1.sources = s1 a1.channels = c1 a1.sinks = k1 a1.sources.s1.type = netcat a1.sources.s1.bind = hadoop01 a1.sources.s1.port = 8090 a1.channels.c1.type = memory a1.channels.c1.capacity = 10000 a1.channels.c1.transactionCapacity = 100 # 配置HDFS Sink # 类型必须是hdfs a1.sinks.k1.type = hdfs # 文件在HDFS上的存储路径 a1.sinks.k1.hdfs.path = hdfs://hadoop01:9000/flumedata # 滚动间隔时间 a1.sinks.k1.hdfs.rollInterval = 3600 # 文件的滚动大小 a1.sinks.k1.hdfs.rollSize = 134217728 # 数据条数 a1.sinks.k1.hdfs.rollCount = 1000000 # 文件类型 a1.sinks.k1.hdfs.fileType = DataStream a1.sources.s1.channels = c1 a1.sinks.k1.channel = c1 -
启动HDFS
start-dfs.sh -
启动Flume
flume-ng agent -n a1 -c $FLUME_HOME/conf -f hdfssink.properties -Dflume.root.logger=INFO,console
-
Logger Sink
- Logger Sink:将收集到的数据打印到控制台上。在打印的时候,对中文支持不好。还需要注意的是,Logger Sink为了防止过多的数据占满屏幕,还进行了限制:如果body部分的字节超过16位,超过部分不打印,可以通过属性
maxBytesToLog来修改
File Roll Sink
-
File Roll Sink:将收集到的数据最终写到本地磁盘上。在写出的时候,每隔30s滚动一次生成一个小文件
-
示例
-
格式文件:
a1.sources = s1 a1.channels = c1 a1.sinks = k1 # 配置Source a1.sources.s1.type = netcat a1.sources.s1.bind = 0.0.0.0 a1.sources.s1.port = 8090 # 配置Channel a1.channels.c1.type = memory a1.channels.c1.capacity = 10000 a1.channels.c1.transactionCapacity = 100 # 配置File Roll Sink # 类型必须是file_roll a1.sinks.k1.type = file_roll # 文件存储位置 a1.sinks.k1.sink.directory = /home/flumedata # 文件滚动间隔时间 a1.sinks.k1.sink.rollInterval = 3600 # 将Source和Channel进行绑定 a1.sources.s1.channels = c1 # 将Sink和Channel进行绑定 a1.sinks.k1.channel = c1 -
启动命令
flume-ng agent -n a1 -c $FLUME_HOME/conf -f filerollsink.properties -Dflume.root.logger=INFO,console
-
AVRO Sink
-
AVRO Sink:将数据序列化之后写出,结合AVRO Source来实现多级扇入、扇出流动模型
-
多级流动
-
第一个节点
a1.sources = s1 a1.channels = c1 a1.sinks = k1 a1.sources.s1.type = netcat a1.sources.s1.bind = hadoop01 a1.sources.s1.port = 8090 a1.channels.c1.type = memory a1.channels.c1.capacity = 10000 a1.channels.c1.transactionCapacity = 100 a1.sinks.k1.type = avro a1.sinks.k1.hostname = hadoop02 a1.sinks.k1.port = 8090 a1.sources.s1.channels = c1 a1.sinks.k1.channel = c1 -
第二个节点
a1.sources = s1 a1.channels = c1 a1.sinks = k1 a1.sources.s1.type = avro a1.sources.s1.bind = hadoop02 a1.sources.s1.port = 8090 a1.channels.c1.type = memory a1.channels.c1.capacity = 10000 a1.channels.c1.transactionCapacity = 100 a1.sinks.k1.type = avro a1.sinks.k1.hostname = hadoop03 a1.sinks.k1.port = 8090 a1.sources.s1.channels = c1 a1.sinks.k1.channel = c1 -
第三个节点
a1.sources = s1 a1.channels = c1 a1.sinks = k1 a1.sources.s1.type = avro a1.sources.s1.bind = hadoop03 a1.sources.s1.port = 8090 a1.channels.c1.type = memory a1.channels.c1.capacity = 10000 a1.channels.c1.transactionCapacity = 100 a1.sinks.k1.type = logger a1.sources.s1.channels = c1 a1.sinks.k1.channel = c1 -
按顺序启动hadoop03、hadoop02、hadoop01
flume-ng agent -n a1 -c $FLUME_HOME/conf -f duoji.properties -Dflume.root.logger=INFO,console
-
-
扇入流动
-
第一个和第二个节点
a1.sources = s1 a1.channels = c1 a1.sinks = k1 a1.sources.s1.type = netcat a1.sources.s1.bind = 0.0.0.0 a1.sources.s1.port = 8090 a1.channels.c1.type = memory a1.channels.c1.capacity = 10000 a1.channels.c1.transactionCapacity = 100 a1.sinks.k1.type = avro a1.sinks.k1.hostname = hadoop03 a1.sinks.k1.port = 8090 a1.sources.s1.channels = c1 a1.sinks.k1.channel = c1 -
第三个节点
a1.sources = s1 a1.channels = c1 a1.sinks = k1 a1.sources.s1.type = avro a1.sources.s1.bind = 0.0.0.0 a1.sources.s1.port = 8090 a1.channels.c1.type = memory a1.channels.c1.capacity = 10000 a1.channels.c1.transactionCapacity = 100 a1.sinks.k1.type = logger a1.sources.s1.channels = c1 a1.sinks.k1.channel = c1 -
先启动hadoop01或者hadoop02,最后启动hadoop03
flume-ng agent -n a1 -c $FLUME_HOME/conf -f shanru.properties -Dflume.root.logger=INFO,console
-
-
多级扇出
-
第一个节点
a1.sources = s1 a1.channels = c1 c2 a1.sinks = k1 k2 a1.sources.s1.type = netcat a1.sources.s1.bind = 0.0.0.0 a1.sources.s1.port = 8090 a1.channels.c1.type = memory a1.channels.c2.type = memory a1.sinks.k1.type = avro a1.sinks.k1.hostname = hadoop02 a1.sinks.k1.port = 8090 a1.sinks.k2.type = avro a1.sinks.k2.hostname = hadoop03 a1.sinks.k2.port = 8090 a1.sources.s1.channels = c1 c2 a1.sinks.k1.channel = c1 a1.sinks.k2.channel = c2 -
第二和第三个节点
a1.sources = s1 a1.channels = c1 a1.sinks = k1 a1.sources.s1.type = avro a1.sources.s1.bind = 0.0.0.0 a1.sources.s1.port = 8090 a1.channels.c1.type = memory a1.channels.c1.capacity = 10000 a1.channels.c1.transactionCapacity = 100 a1.sinks.k1.type = logger a1.sources.s1.channels = c1 a1.sinks.k1.channel = c1 -
先启动hadoop02或者hadoop03,最后启动hadoop01
flume-ng agent -n a1 -c $FLUME_HOME/conf -f shanchu.properties -Dflume.root.logger=INFO,console
-
Custom Sink
-
Custom Sink:Flume允许用户进行自定义Sink,需要定义一个类实现Sink接口
-
示例
-
代码
package cn.tedu.flume.auth.sink; import org.apache.flume.*; import org.apache.flume.conf.Configurable; import org.apache.flume.sink.AbstractSink; import java.io.FileNotFoundException; import java.io.PrintStream; import java.util.Map; // 模拟:File Roll Sink public class AuthSink extends AbstractSink implements Sink, Configurable { private String path; private PrintStream ps; // 获取属性 @Override public void configure(Context context) { // 获取用户指定的路径 path = context.getString("path"); // 判断用户是否指定了路径 if (path == null || path.equals("")) throw new IllegalArgumentException("路径没有指定!!!"); } // 启动Sink @Override public synchronized void start() { // 初始化打印流 try { ps = new PrintStream(path + "/" + System.currentTimeMillis()); } catch (FileNotFoundException e) { e.printStackTrace(); } } @Override public Status process() { // 获取Channel Channel c = this.getChannel(); // 获取事务 Transaction t = c.getTransaction(); // 开启事务 t.begin(); // 获取数据 Event e; try { while ((e = c.take()) != null) { // 获取headers Map<String, String> headers = e.getHeaders(); // 写出headers部分 ps.println("headers:"); for (Map.Entry<String, String> en : headers.entrySet()) { ps.println("\t" + en.getKey() + "=" + en.getValue()); } // 获取body部分 byte[] body = e.getBody(); // 写出body部分 ps.println("body:"); ps.println("\t" + new String(body)); } // 提交事务 t.commit(); return Status.READY; } catch (Exception ex) { // 回滚事务 t.rollback(); return Status.BACKOFF; } finally { // 关闭事务 t.close(); } } // 关闭Sink @Override public synchronized void stop() { if (ps != null) ps.close(); } } -
完成之后,打成jar包,放到Flume安装目录的子目录lib下
-
格式文件
a1.sources = s1 a1.channels = c1 a1.sinks = k1 a1.sources.s1.type = http a1.sources.s1.port = 8090 a1.channels.c1.type = memory a1.channels.c1.capacity = 10000 a1.channels.c1.transactionCapacity = 100 # 配置Custom Sink # 类型必须是类的全路径名 a1.sinks.k1.type = cn.tedu.flume.auth.sink.AuthSink # 存储位置 a1.sinks.k1.path = /home/flumedata a1.sources.s1.channels = c1 a1.sinks.k1.channel = c1 -
启动命令
flume-ng agent -n a1 -c $FLUME_HOME/conf -f authsink.properties -Dflume.root.logger=INFO,console -
发送数据
curl -X POST -d '[{"headers":{"subject":"bigdata","class":"18计科G"},"body":"Welcome"}]' http://hadoop01:8090
curl -X POST -d '[{"headers":{"date":"20220317","time":"11:44"},"body":"testing"}]' http://hadoop01:8090
-
Sink Processor
- Sink Processor:Sink处理器,本质上是一个Sink Group(Sink组),在使用的时候,会将一个或者多个Sink绑定到同一个组中,同一个组中的Sink执行相同的功能
- Sink Processor提供了3种模式
- default:默认模式。在扇出结构中,如果不指定,那么默认使用的就是这个模式。在这个模式下,每一个Sink都对应了一个单独的Sink Group
- failover:奔溃恢复模式。在使用的时候,需要将多个Sink绑定到一个组中,需要给一个Sink来指定一个优先级,只要高优先级的Sink存货,数据就不会发送给低优先级的Sink
- load balancing:负载均衡模式。在使用的时候,也需要将多个Sink绑定到一个组中,需要给Sink指定均衡模式。Flume中,提供了两种均衡模式:round_robin(轮询),random(随机)
Interceptor
概述
- Interceptor:是Source的子组件,也就意味着是配置在Source上的
- 不同于Selecetor,Interceptor可以配置多个,构成拦截器链
Timestamp Interceptor
- Timestamp Interceptor:会在事件的Event部分来添加一个timestamp字段用于标记数据被收集的时间
- Timesamp Interceptor结合HDFS Sink来实现数据的按天存放
Host Interceptor
- Host Interceptor:在事件的headers中添加一个host字段用于标记数据的来源主机
Static Interceptor
Static Interceptor:在事件的headers部分添加指定字段,可以用于标记
UUID Interceptor
UUID Interceptor:在数据的headers部分来添加一个id字段,用于标记数据的唯一性
Search and Replace Interceptor
Search and Replace Interceptor:在使用的时候需要指定一个正则表达式,会将符合正则表达式的数据替换为指定形式
Regex Filtering Interceptor
Regex Filtering Interceptor:在使用的时候需要指定正则表达式,根据excludeEvents的属性的值来确定过滤规则。当excludeEvents属性的值为true的时候,符合正则表达式的值会被过滤掉;当excludeEvents属性值为fales的时候,不符合正则表达式的数据会被过滤掉
Custom Interceptor
Custom Interceptor:Flume支持用于自定义拦截器,在使用的时候需要定义一个类实现Interceptor接口
a1.sources = s1
a1.channels = c1
a1.sinks = k1

a1.sources.s1.type = netcat
a1.sources.s1.bind = 0.0.0.0
a1.sources.s1.port = 8090
a1.sources.s1.interceptors = i1
# 自定义Interceptor
a1.sources.s1.interceptors.i1.type = cn.tedu.flume.auth.source.AuthInterceptor$B
uilder

a1.channels.c1.type = memory
a1.channels.c1.capacity = 10000
a1.channels.c1.transactionCapacity = 100

a1.sinks.s1.channels = c1

a1.sources.s1.channels = c1
a1.sinks.k1.channel = c1
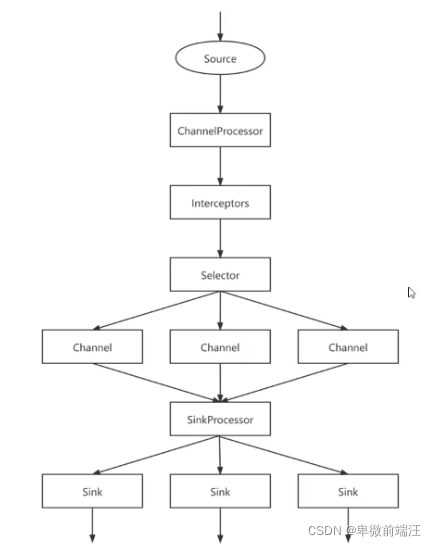
Flume执行流程


 1122
1122

 被折叠的 条评论
为什么被折叠?
被折叠的 条评论
为什么被折叠?
 到【灌水乐园】发言


