载入数据
- 从文件夹中载入图片
BATCH_SIZE = 32
IMG_SIZE = (160, 160)
directory = "dataset/"
train_dataset = image_dataset_from_directory(directory,
                                             shuffle=True,
                                             batch_size=BATCH_SIZE,
                                             image_size=IMG_SIZE,
                                             validation_split=0.2,
                                             subset='training',
                                             seed=42)
validation_dataset = image_dataset_from_directory(directory,
                                             shuffle=True,
                                             batch_size=BATCH_SIZE,
                                             image_size=IMG_SIZE,
                                             validation_split=0.2,
                                             subset='validation',
                                             seed=42)
- 打印几张图片
class_names = train_dataset.class_names

plt.figure(figsize=(10, 10))
for images, labels in train_dataset.take(1):
    for i in range(9):
        ax = plt.subplot(3, 3, i + 1)
        plt.imshow(images[i].numpy().astype("uint8"))
        plt.title(class_names[labels[i]])
        plt.axis("off")
数据增强(Data Augmentation)
- 仅仅简单的旋转、平移
# UNQ_C1
# GRADED FUNCTION: data_augmenter
def data_augmenter():
    '''
    Create a Sequential model composed of 2 layers
    Returns:
        tf.keras.Sequential
    '''
    ### START CODE HERE
    data_augmentation = tf.keras.Sequential()
    data_augmentation.add(RandomFlip('horizontal'))
    data_augmentation.add(RandomRotation(0.2))
    ### END CODE HERE

    return data_augmentation
载入模型,并使用迁移学习修改模型

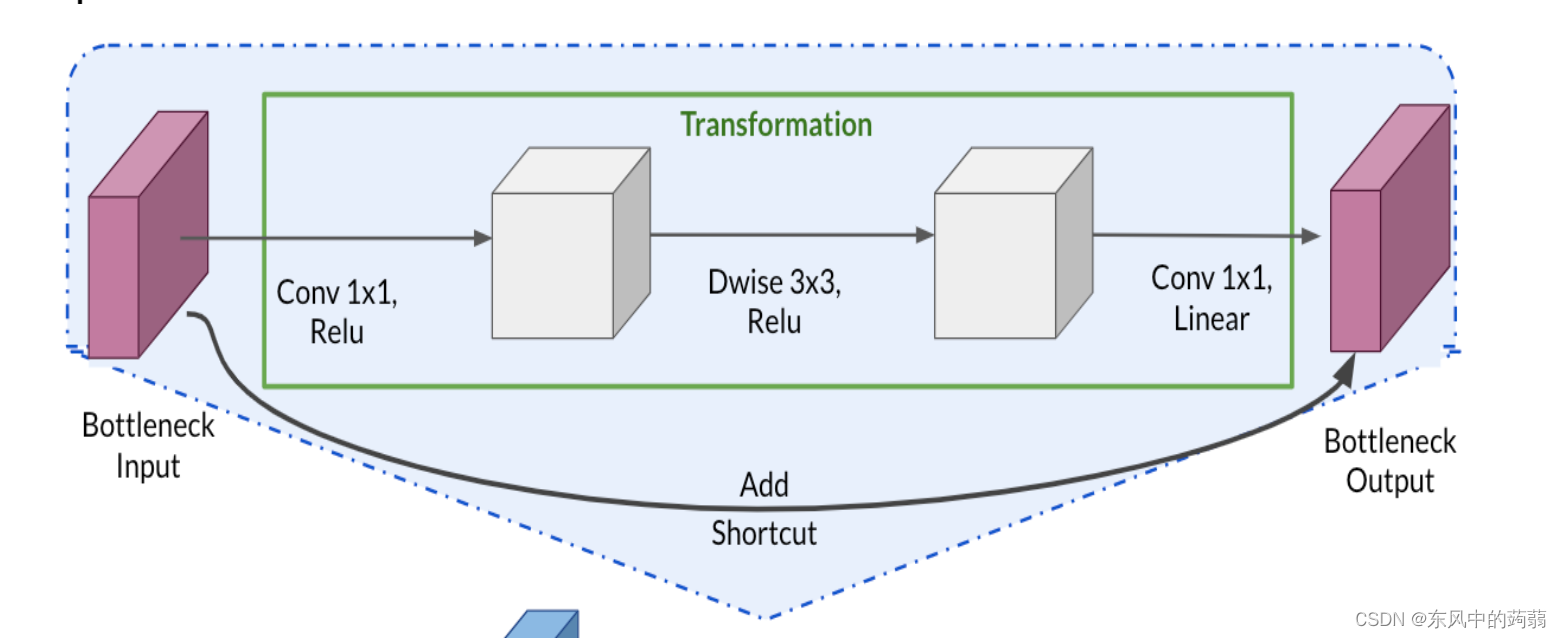
- 载入 Mobile_v2
IMG_SHAPE = IMG_SIZE + (3,)
base_model = tf.keras.applications.MobileNetV2(input_shape=IMG_SHAPE,
                                               include_top=True,
                                               weights='imagenet')
迁移学习(transfer learning)
首先,我们要了解迁移学习的主要原理,它的根据人们使用神经网络的经验,进行总结之后发现:
- 神经网络的前几层学习到的是较为低级的特征,例如图案的边,或者其他简单线条组成的图案,这些是很多图片都公有的特征
- 越往后,神经网络学习到的特征就越高级,例如,学习猫的图片,最后几层的神经网络可能就是 猫耳图案的高级(数据集特有的特征)特征。
- 基于上述的经验总结,我们可以将一个训练好的模型的浅层神经网络直接拿过来使用,然后更改最后几层的神经网络结果,最后我们只更新最后几层的参数,浅层的参数不变,调低学习率对模型进行微调之后就可以达到 他人训练好的模型为我所有的目的
- 迁移学习适用于:类似任务(猫和狗之类的任务),算力不足(具有很大的模型但算力不能支持从头训练),还可以借用开源的模型…
# UNQ_C2
# GRADED FUNCTION
def alpaca_model(image_shape=IMG_SIZE, data_augmentation=data_augmenter()):
    ''' Define a tf.keras model for binary classification out of the MobileNetV2 model
    Arguments:
        image_shape -- Image width and height
        data_augmentation -- data augmentation function
    Returns:
    Returns:
        tf.keras.model
    '''


    input_shape = image_shape + (3,)

    ### START CODE HERE

    base_model = tf.keras.applications.MobileNetV2(input_shape=input_shape,
                                                   include_top=False, # <== Important!!!!
                                                   weights='imagenet') # From imageNet

    # freeze the base model by making it non trainable
    base_model.trainable = False

    # create the input layer (Same as the imageNetv2 input size)
    inputs = tf.keras.Input(shape=input_shape)

    # apply data augmentation to the inputs
    x = data_augmentation(inputs)

    # data preprocessing using the same weights the model was trained on
    x = preprocess_input(x)

    # set training to False to avoid keeping track of statistics in the batch norm layer
    x = base_model(x, training=False)

    # add the new Binary classification layers
    # use global avg pooling to summarize the info in each channel
    x = tf.keras.layers.GlobalAveragePooling2D()(x)
    # include dropout with probability of 0.2 to avoid overfitting
    x = tf.keras.layers.Dropout(0.2)(x)

    # use a prediction layer with one neuron (as a binary classifier only needs one)
    outputs = tf.keras.layers.Dense(units=1)(x)

    ### END CODE HERE

    model = tf.keras.Model(inputs, outputs)

    return model
- Mobile_v2 的最后几层是用于10中分类任务的,我们设置include_top = False,舍弃他们,然后使用Function Api 添加新的分类器。
- 设置 trainable = False,使得我们不更新前面的参数
但是我们知道,最后几层的神经网络学习的是高级特征,我们需要对最后几层神经网络进行微调,使得这几层神经网络学习到我们数据集想要的特征,因此我们对最后几层神经网络进行‘解冻’。
model2 = alpaca_model(IMG_SIZE, data_augmentation)
# UNQ_C3
base_model = model2.layers[4]
base_model.trainable = True
# Let's take a look to see how many layers are in the base model
print("Number of layers in the base model: ", len(base_model.layers))

# Fine-tune from this layer onwards
fine_tune_at = 120

### START CODE HERE

# Freeze all the layers before the `fine_tune_at` layer
for layer in base_model.layers[:fine_tune_at]:
    layer.trainable = False

# Define a BinaryCrossentropy loss function. Use from_logits=True
loss_function=tf.keras.losses.BinaryCrossentropy(from_logits=True)
# Define an Adam optimizer with a learning rate of 0.1 * base_learning_rate
optimizer = tf.keras.optimizers.Adam(learning_rate=0.1*base_learning_rate)
# Use accuracy as evaluation metric
metrics=['accuracy']

### END CODE HERE

model2.compile(loss=loss_function,
              optimizer = optimizer,
              metrics=metrics)
fine_tune_epochs = 5
total_epochs =  initial_epochs + fine_tune_epochs

history_fine = model2.fit(train_dataset,
                         epochs=total_epochs,
                         initial_epoch=history.epoch[-1],
                         validation_data=validation_dataset)


 本文介绍了如何使用Keras加载数据集,应用数据增强技术如旋转和平移来扩充样本。接着,利用预训练的MobileNetV2模型进行迁移学习,通过设置`include_top=False`并冻结早期层,添加新的分类层。然后,微调模型的最后几层,调整学习率,使用二元交叉熵损失函数和Adam优化器进行训练。整个过程展示了如何在有限的计算资源下,有效地利用迁移学习改进模型性能。


 196
196

 被折叠的 条评论
为什么被折叠?


