


 本文详细介绍了Nginx的编译安装、系统服务管理、配置文件详解,包括访问控制、状态统计,以及如何设置基于域名、端口和IP的虚拟主机。通过示例步骤,读者将掌握Nginx的全面配置技巧。
一、编译安装Nginx
1、关闭防火墙,上传nginx软件包到/opt目录下


2、解压安装包
[root@localhost opt]# tar -xzf nginx-1.12.2.tar.gz

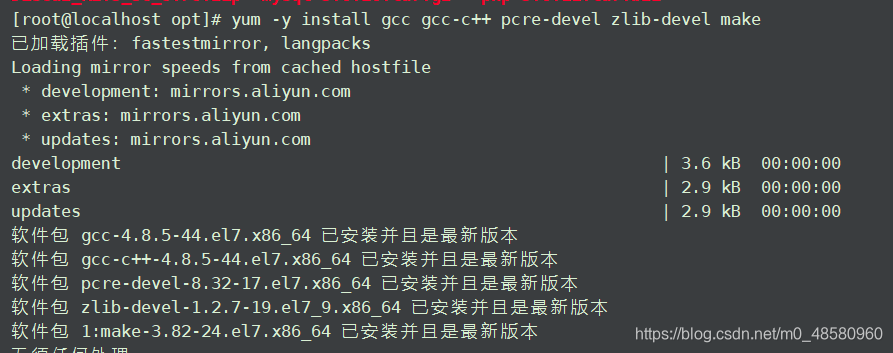
3、安装依赖包
yum -y install gcc gcc-c++ pcre-devel zlib-devel make
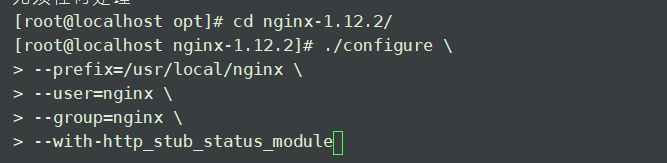
4、编译安装Nginx,并启动nginx
[root@localhost opt]# cd nginx-1.12.2/
[root@localhost nginx-1.12.2]# ./configure \
> --prefix=/usr/local/nginx \        #指定安装目录
> --user=nginx \                     #指定管理用户
> --group=nginx \                    #指定组
> --with-http_stub_status_module     #开启状态统计模块
编译安装
make && make install
为nginx命令做软链接 方便开启
ln -s /usr/local/nginx/sbin/* /usr/local/sbin/
添加nginx进行管理
useradd -M -s /sbin/nologin nginx
检查nginx语法
nginx -t #类似于httpd -t

启动nginx
nginx
停止nginx服务
cat /usr/local/nginx/logs/nginx.pid   #先查看nginx的进程号
kill -3 <进程号>          杀掉nginx进程
kill -s QUIT <进程号>      退出nginx
killall -3 nginx
killall -s QUIT nginx
重载nginx服务
kill -1 <进程号>
kill -s HUP <进程号>
killall -1 nginx
killall -s HUP <进程号>
二、添加nginx系统服务
1、service管理
vim /etc/init.d/nginx
#!/bin/bash
# chkconfig: - 99 20							# chkcofig - “-” 表示不启用开机启动管理 (同时 若不加“#”, chkconfig add nginx 会加载不到配置)
# description: Nginx Service Control Script    #启动信息
COM="/usr/local/nginx/sbin/nginx"				#命令程序文件位置(nginx)
PID="/usr/local/nginx/logs/nginx.pid"			#pid文件
case "$1" in
start)
   $COM
   ;;
stop)
   kill -s QUIT $(cat $PID)
   ;;
restart)
   $0 stop
   $0 start
   ;;
reload)
   kill -s HUP $(cat $PID)
   ;;
*)
       echo "Usage: $0 {start|stop|restart|reload}"
       exit 1
esac
exit 0
chmod +x /etc/init.d/nginx    #添加执行权限
chkconfig --add nginx         #添加为系统服务
systemctl stop nginx
systemctl start nginx
可在/etc/rc.d/init.d目录下查看到nginx服务

2、使用systemctl管理
vim /usr/lib/systemd/system/nginx.service
[Unit]
Description=nginx							#描述
After=network.target						#描述服务类别
[Service]
Type=forking								#后台运行类型
PIDFile =/usr/local/nginx/logs/nginx.pid	#PID文件位置
ExecStart=/usr/local/nginx/sbin/nginx		#启动服务
ExecrReload=/bin/kill -s HUP $MAINPID		#根据PID重载配置
ExecrStop=/bin/kill -s QUIT $MAINPID		#根据PID终止进程
PrivateTmp=true
[Install]
WantedBy=multi-user.target					#启动级别
chmod 754 /lib/systemd/system/nginx.service		#设置754权限是一种安全优化
systemctl start nginx.service
systemctl enable nginx.service

三、nginx配置文件
[root@localhost ~]# cp /usr/local/nginx/conf/nginx.conf /usr/local/nginx/conf/nginx.conf.bak     #备份

cat /usr/local/nginx/conf/nginx.conf     ##查看nginx配置文件
	#user nobody;		##默认运行/管理用户
	worker processes1;		#工作进程运行数量,可配置成服务器内核数*2,如果网站访问量不大,一般设为1
	#error_ log  logs/error .log;   			##错误日志文件路径/级别
	#error_ log	logs/error. log	notice;		##相对路径/usr/local/nginx
	#error_ log	logs|/error. log	info;    (notice和info是日志级别)
	#pid		logs/ nginx.pid;				#pid文件位置
events {						## 事件
	worker connections 1024; 		#每个进程最多处理的连接数量
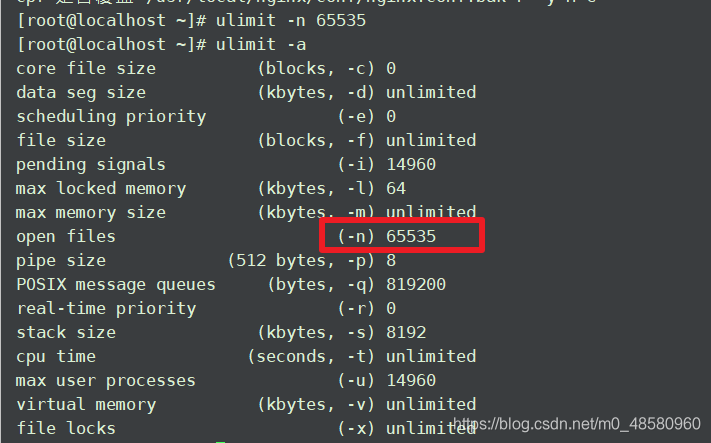
如果提高每个进程连接数,还需要执行“ulimit -n 65535”命令临时修改本地每个进程可以打开的最大文件数,因为在linux平台上进行高并发TCP连接处理时,最高的并发数量都要收到系统对用户单一进程同时可打开文件数量的限制。
ulimit -a:查询当前限制
ulimit -n 65535   临时是修改同时打开最大文件数65535
配置文件中http协议的配置
http {												#http协议的配置
	include	mime. types;					#文件扩展名与文件类型映射表
	default_ type	application/octet-stream;		#默认文件类型
	#log_ format	main	' $remote_ addr - $remote_user [$time_ 		local] "$request" '	#日志格式设置(日志主要支持的格式)
	#									'$status $body_bytes_sent "$http referer"
	#									' "Shttp_ user_ agent" "$http_ x_ forwarded_ for" ';
	#access_ log	logs/access.log main;		#访问日志位置,默认注释
	sendfile	on;							##支持文件发送(下载)
	#tcp_ nopush	on;						#此项允许或禁止使用socket的		TCP_CORK的选项(发送数据包前先缓存数据),此选项仅在使用		sendfile的时候使用
	#keepalive_ timeout 0;				##连接保持超时时间,单位:秒
	keepalive_timeout 65;                #设置最大连接保持时间65s
	#gzip on; 							#压缩模块on表示开启
配置文件中server端配置
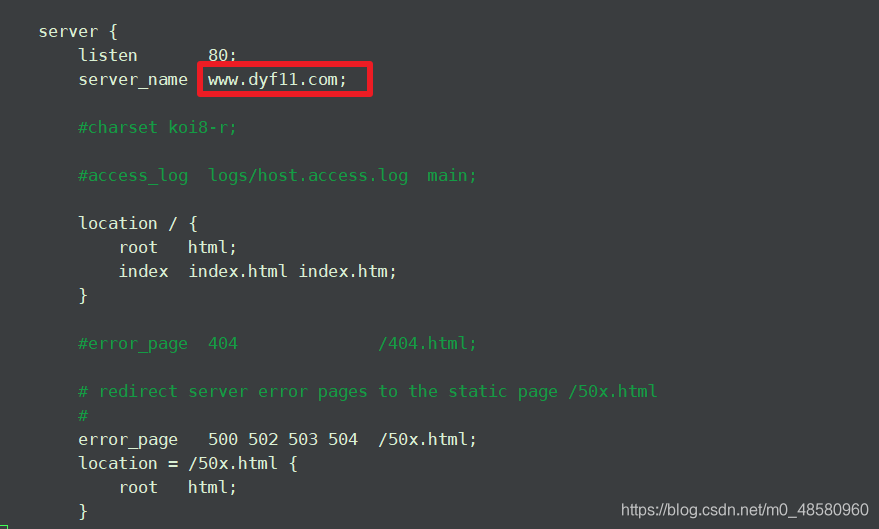
server {											##web服务相关的一些配置
	listen 		80;								##默认监听端口
	server name		www.dyf11.com;			##站点域名;在本地没有dns服务下,可以支持域名访问
	#charset koi8-r;							##字符集支持( 修改为中文) UTF-8
	#access_ log logs/host.access.1og main;		##此web服务的主访问日志只保存htpd服务的访问日志
	location / {									##“/"根目录配置( 浏览器中,www. baidu. com./  根代表html
	root		html;								##网页的目录文件;网站根目录的位置/usr/local/nginx/html ( 相对路径)
	index	index.html index. htm;		##支持的首页文件格式
	#error_ page	404			/ 404.html;
	# redirect server error pages to the static page /50x.html
	error_ page		500 502 503 504 /50x. html;		##当发生错误的时候能够显示一个预定义的错误页面
	location = /50x.html {			##错误页面配置
	root	html ;
	}
支持PHP及跳转模块
        # proxy the PHP scripts to Apache listening on 127.0.0.1:80       #和PHP做对接
        #
        #location ~ \.php$ {
        #    proxy_pass   http://127.0.0.1;
        #}

        # pass the PHP scripts to FastCGI server listening on 127.0.0.1:9000
        #
        #location ~ \.php$ {
        #    root           html;
        #    fastcgi_pass   127.0.0.1:9000;
        #    fastcgi_index  index.php;
        #    fastcgi_param  SCRIPT_FILENAME  /scripts$fastcgi_script_name;
        #    include        fastcgi_params;
        #}

        # deny access to .htaccess files, if Apache's document root
        # concurs with nginx's one
        #
        #location ~ /\.ht {
        #    deny  all;
        #}
    }


    # another virtual host using mix of IP-, name-, and port-based configuration
    #
    #server {                               ##虚拟主机配置
    #    listen       8000;
    #    listen       somename:8080;
    #    server_name  somename  alias  another.alias;
nginx加密模块
# HTTPS server													##HTTPS的配置
#
#server {
#	listen				443 ssl;                 #监听的端口
#	server name			localhost;
#	ssl certi ficate 			cert . pem;     #生成加密证书
#	ssl_ certificate key		cert. key;      #生成密钥
#	ssl session cache		shared: SSL: 1m;
#	ssl session timeout		5m;
#	ssl_ ciphers HIGH: ! aNULL: !MD5;
#	ssl_ prefer_ server_ ciphers .	on;
#	location / {
#		root	html ;
#		index index .html index. htm;
#
}
#}
配置本地域名映射

访问域名

四、访问状态统计
1、使用nginx -V 查看是否有http_stub_status_module模块

2、修改nginx.conf配置文件,指定访问位置并添加stub_status配置
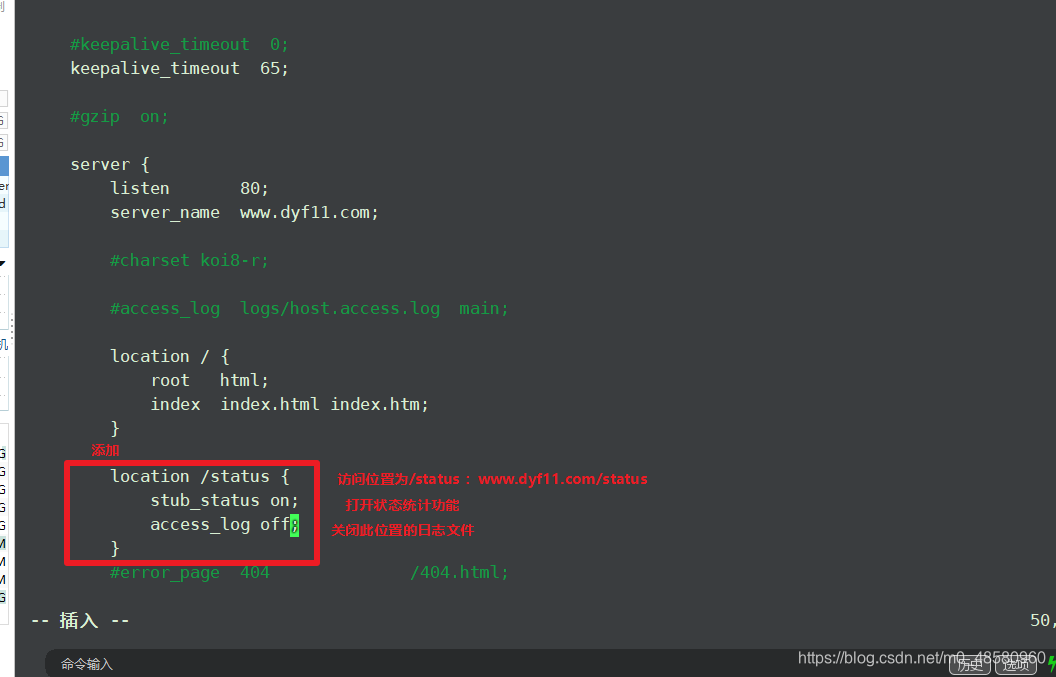
3、重载或重启nginx服务

4、结果
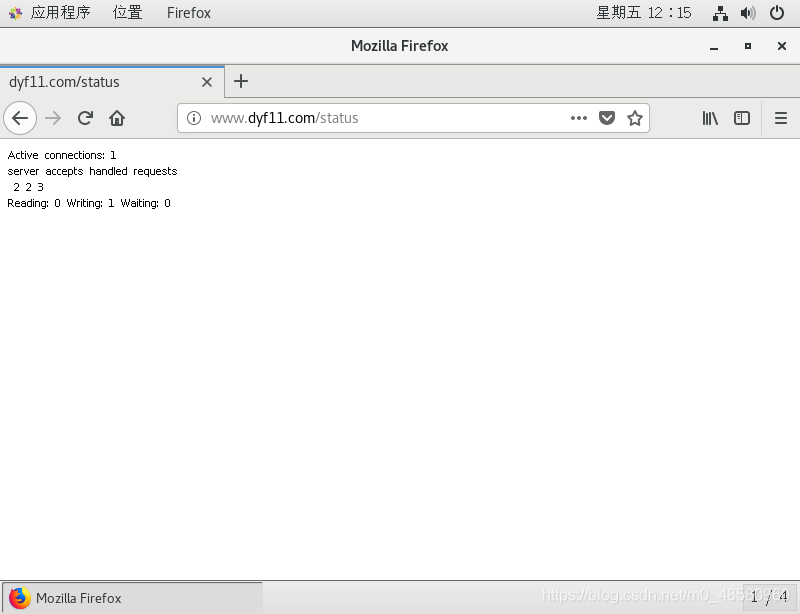
Active connections :表示当前的活动连接数;
service accepts handled requests:表示已经处理的连接信息,三个数字依次表示已处理的连接数、成功的TCP握手次数、已处理的请求数
五、给予网页访问控制
1、生成用户密码认证文件
安装
yum -y install httpd-tools
添加一个htpasswd的用户
htpasswd -c /usr/local/nginx/passwd.db zhangsan

让密码文件能被nginx管理
[root@localhost ~]# chown nginx /usr/local/nginx/passwd.db
给予400权限
chmod 400 /usr/local/nginx/passwd.db
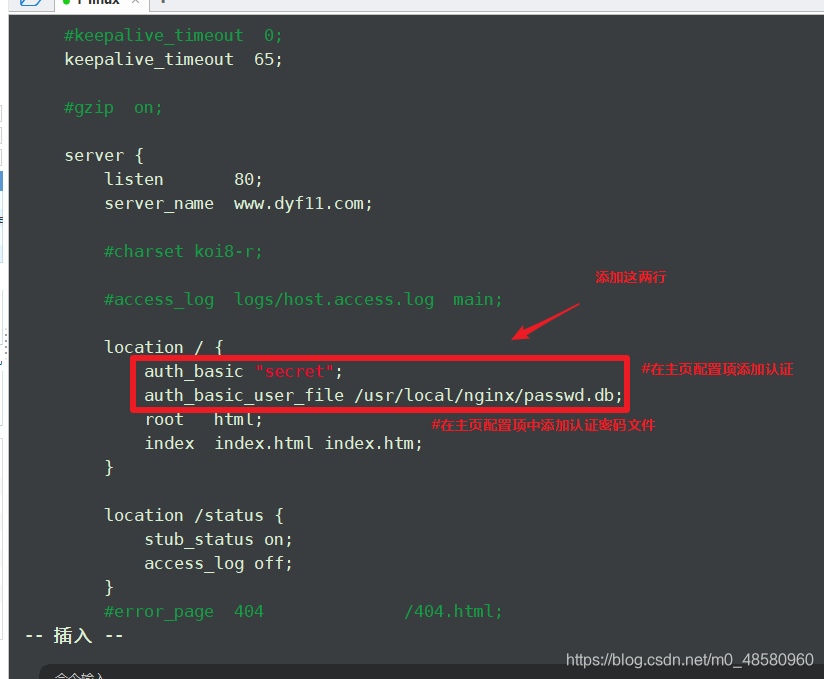
2、修改主配置文件相对于目录,添加认证配置项
3、重启服务

4、结果
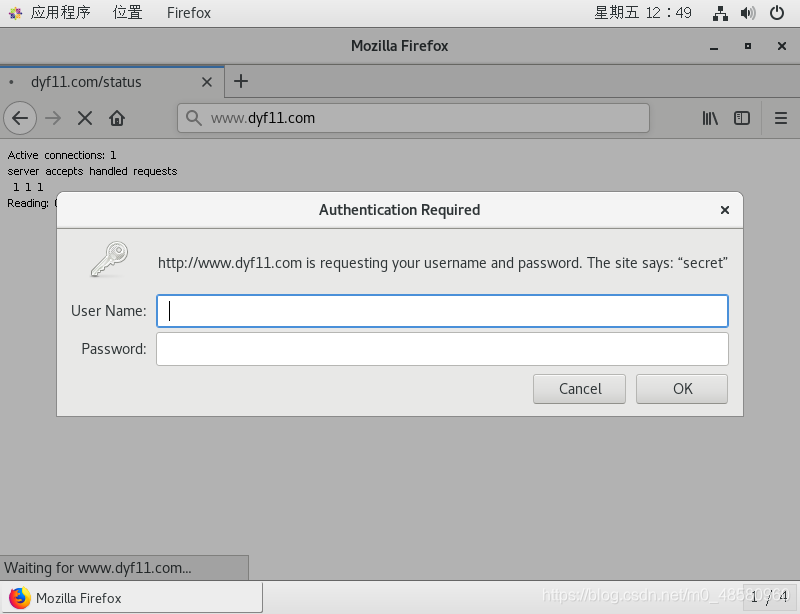
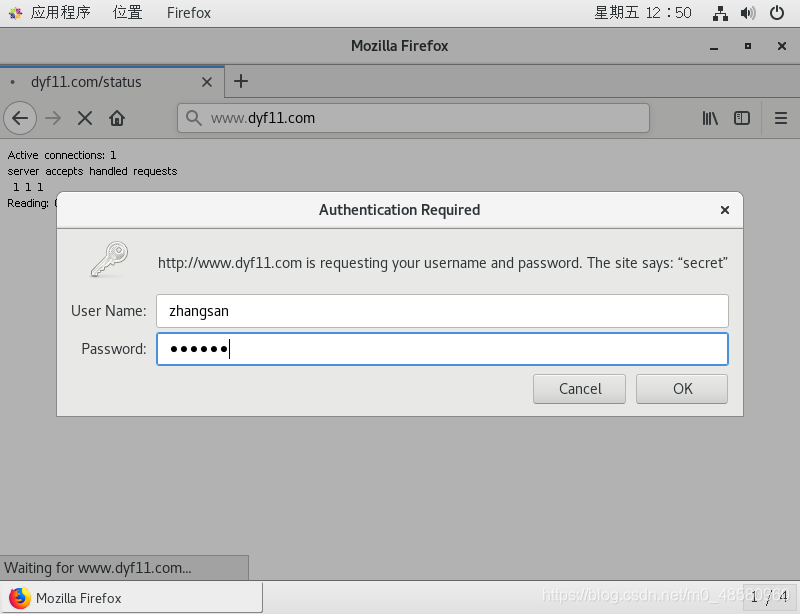
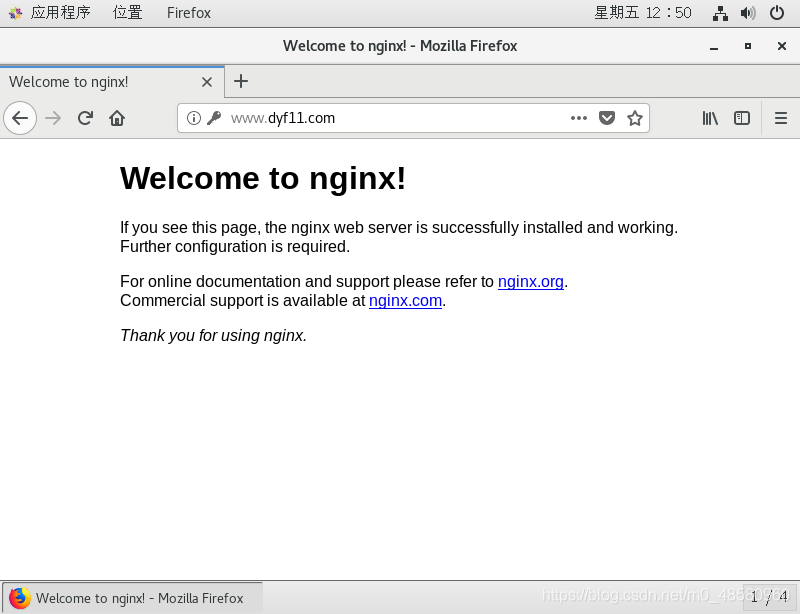
登录成功
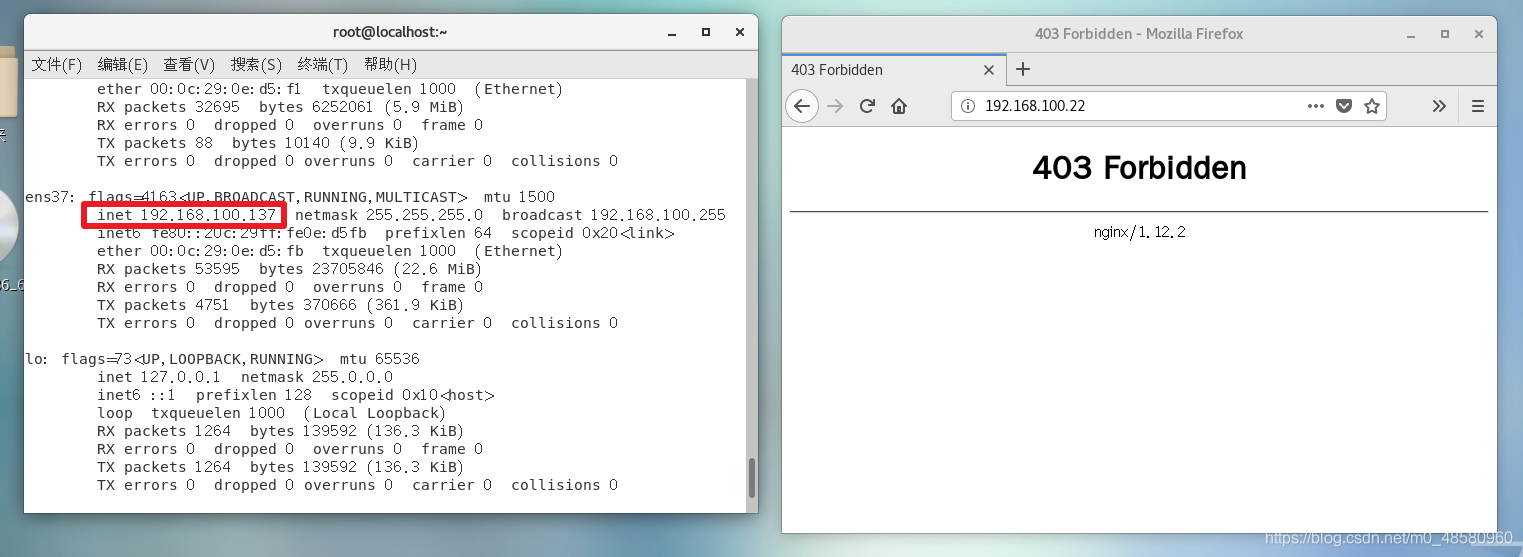
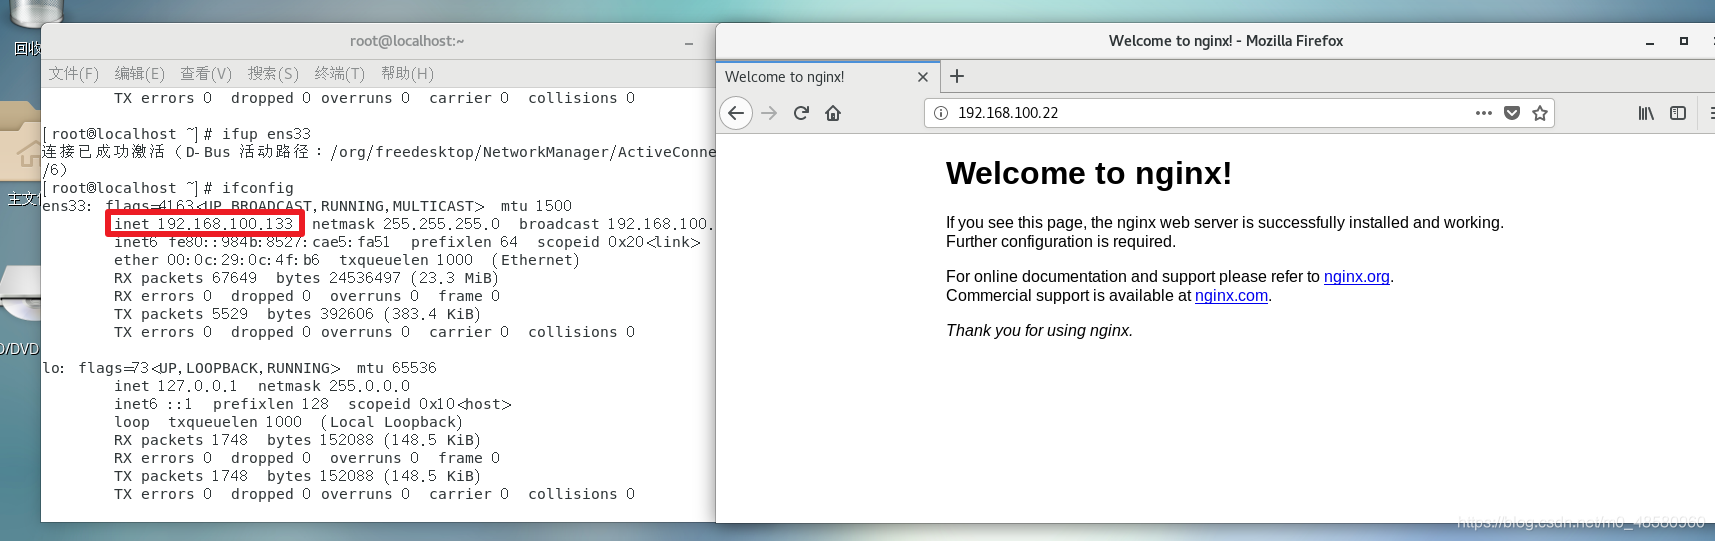
六、给予客户端的访问控制
1、访问控制规则如下
deny ip/ip段 :拒绝某个IP或IP段的客户端访问
allow ip/ip段 :允许某个IP或IP段的客户端访问
规则从上往下执行,如果匹配则停止,不继续往下匹配
vim /usr/local/nginx/conf/nginx.conf

重启nginx

2、结果
100.137不能够访问
100.133成功访问
七、虚拟主机
1、基于域名的Nginx虚拟主机
1、添加域名解析
echo "192.168.100.22 www.dyf11.com www.benet.com www.ddyyff.com" >> /etc/hosts

2、准备虚拟站点的网页文件
mkdir -p /var/www/html/benet
mkdir -p /var/www/html/ddyyff
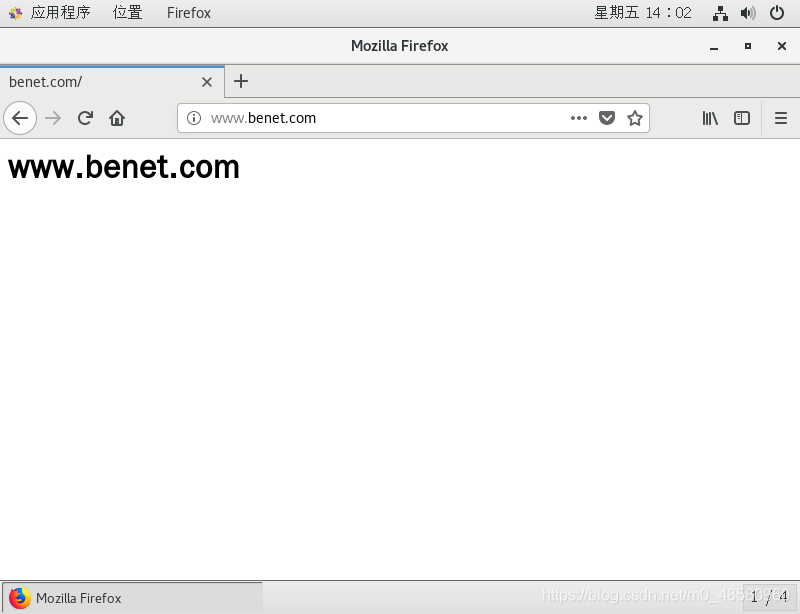
echo "<h1> www.benet.com </h1>" > /var/www/html/benet/index.html
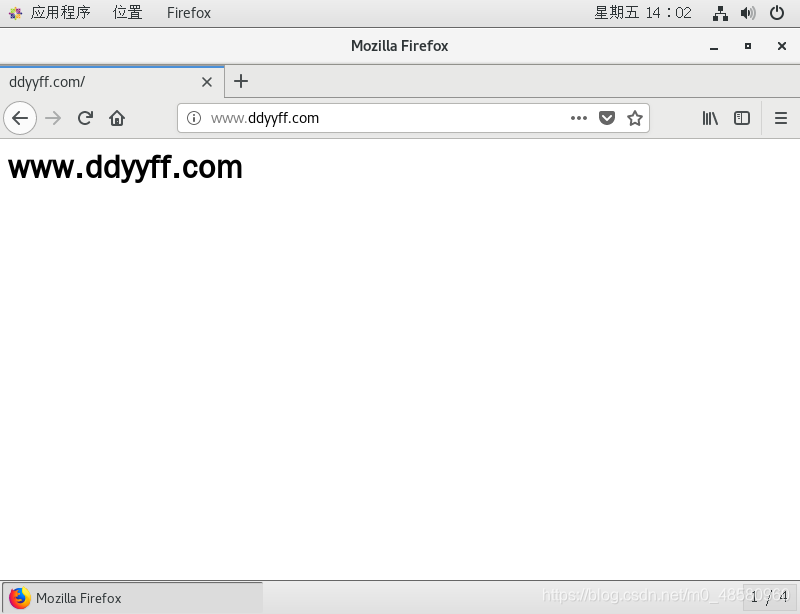
echo "<h1> www.ddyyff.com </h1>" > /var/www/html/ddyyff/index.html

3、修改配置文件
vim /usr/local/nginx/conf/nginx.conf
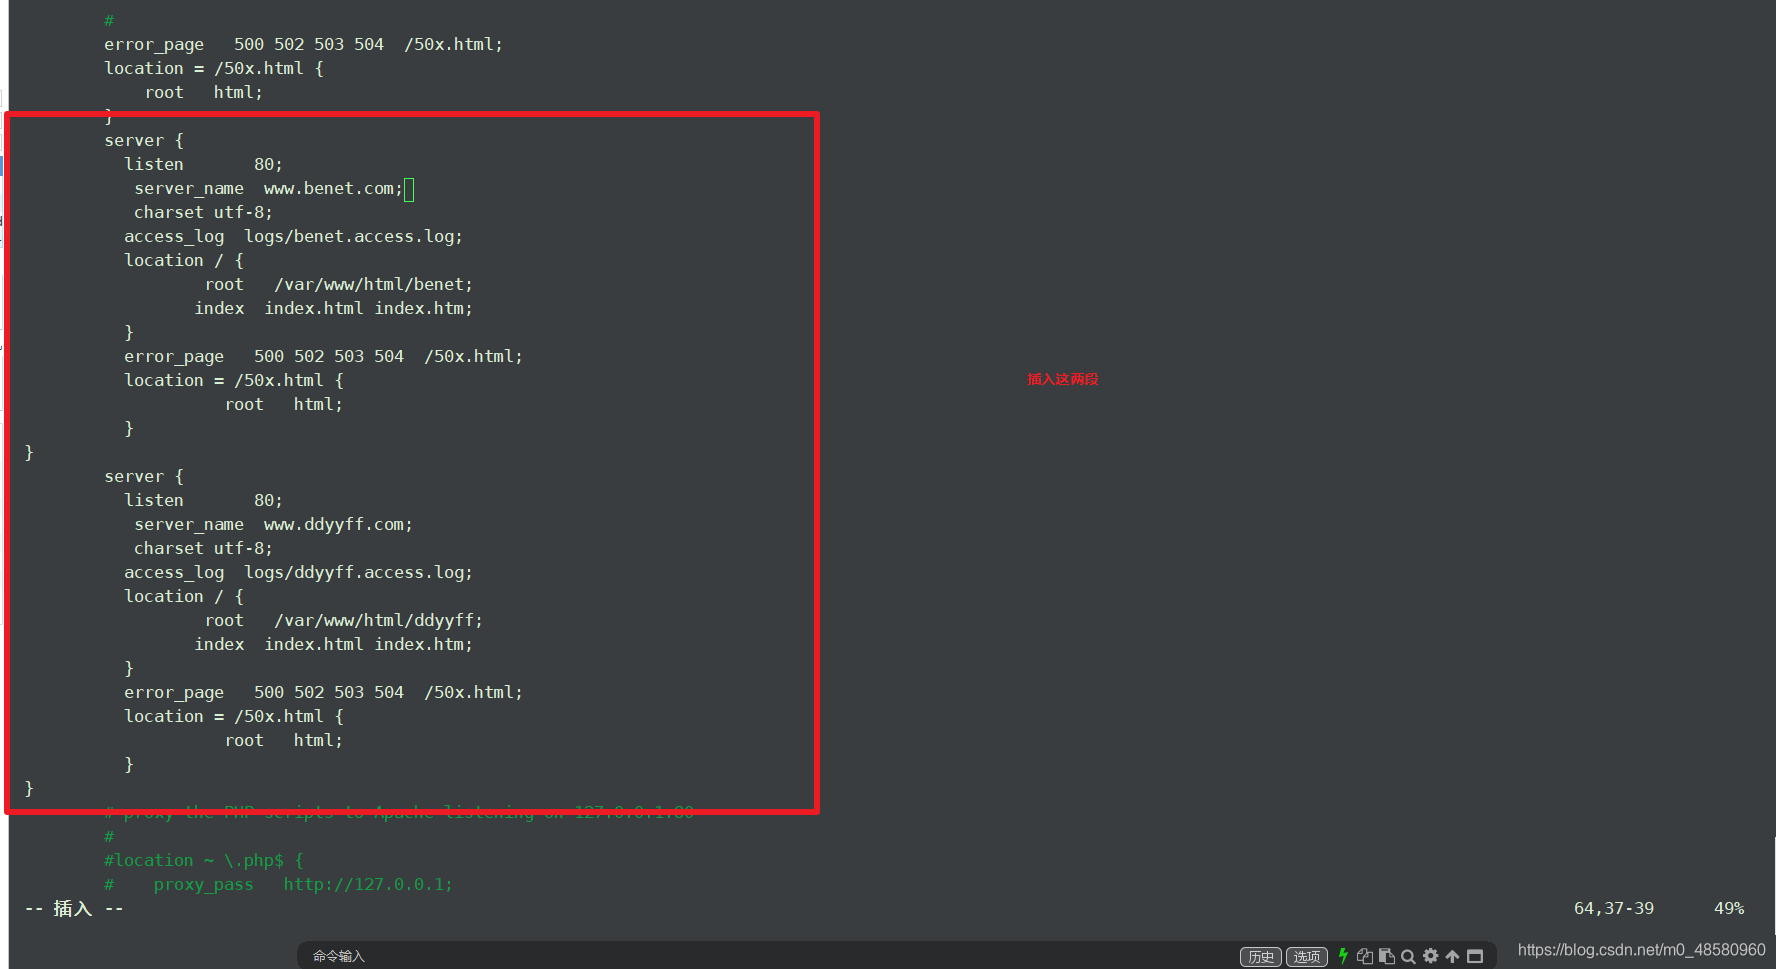
4、重启nginx
5、结果
2、基于端口的虚拟主机
1、创建8080端口的网页文件

2、到主配置文件修改
[root@localhost html]# vim /usr/local/nginx/conf/nginx.conf
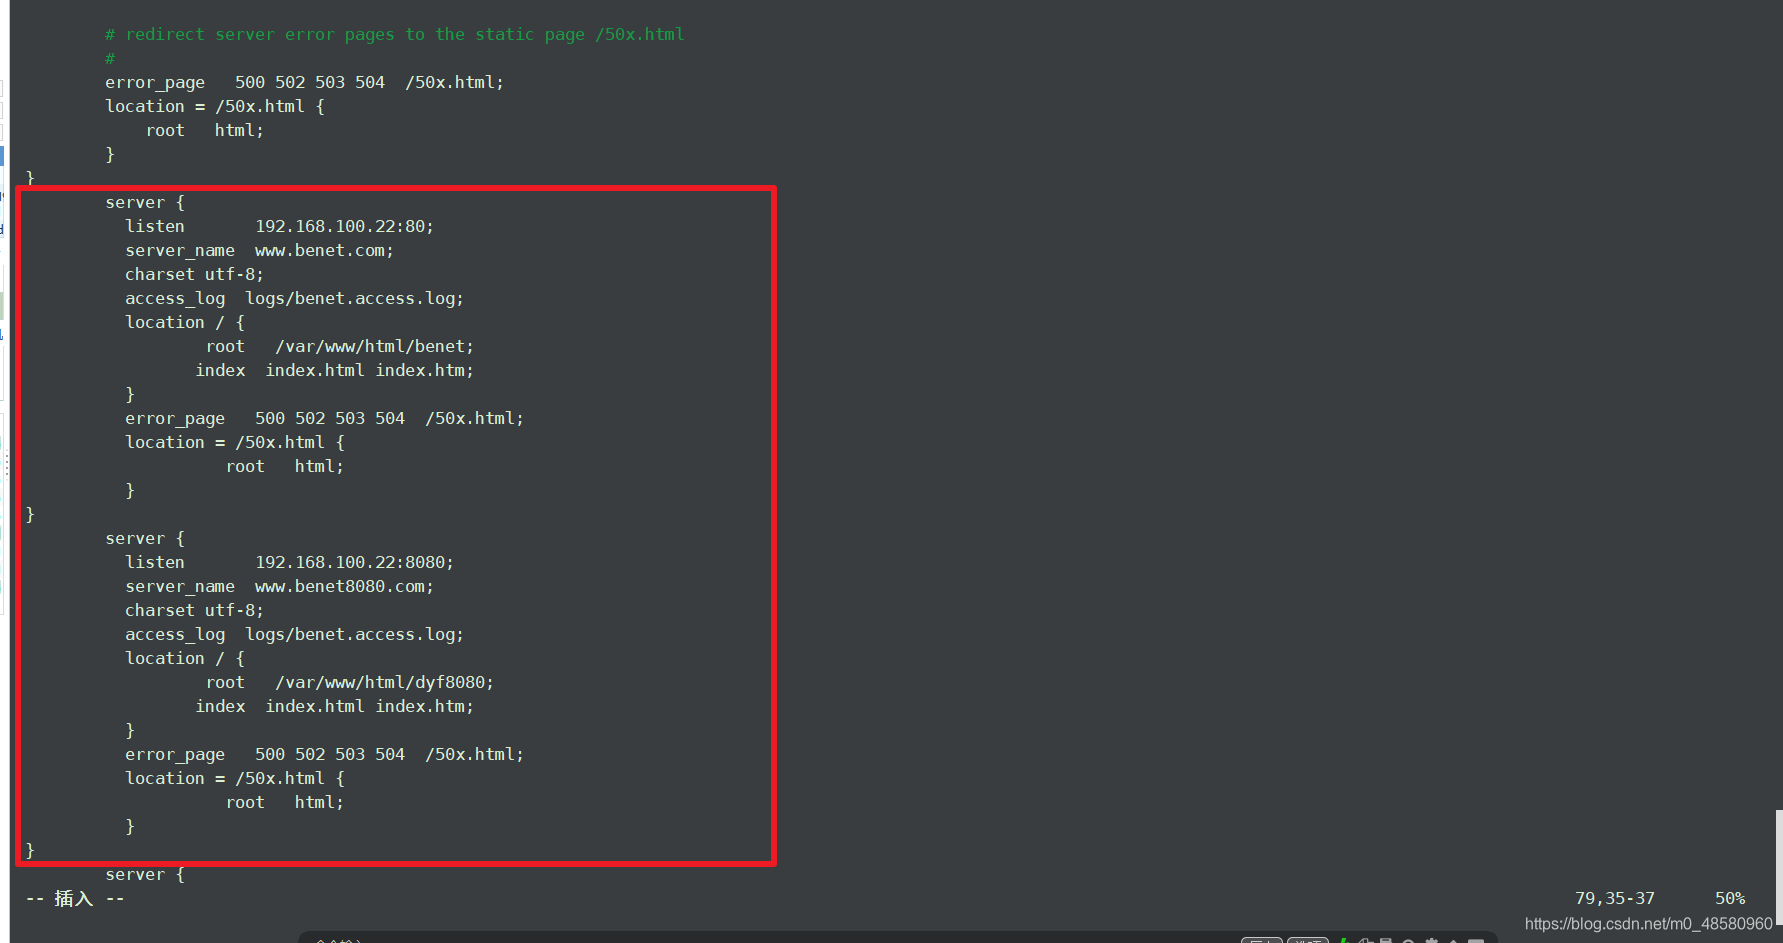
3、重启nginx
4、结果


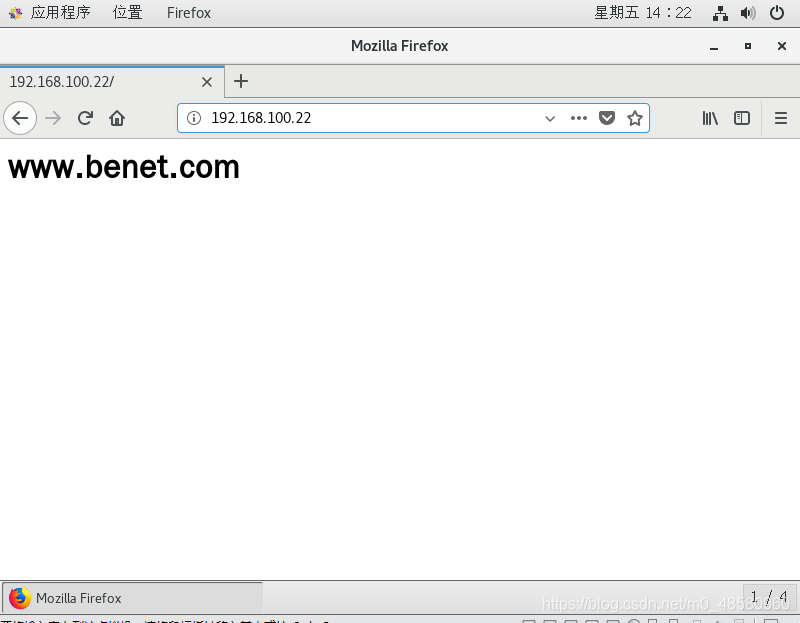
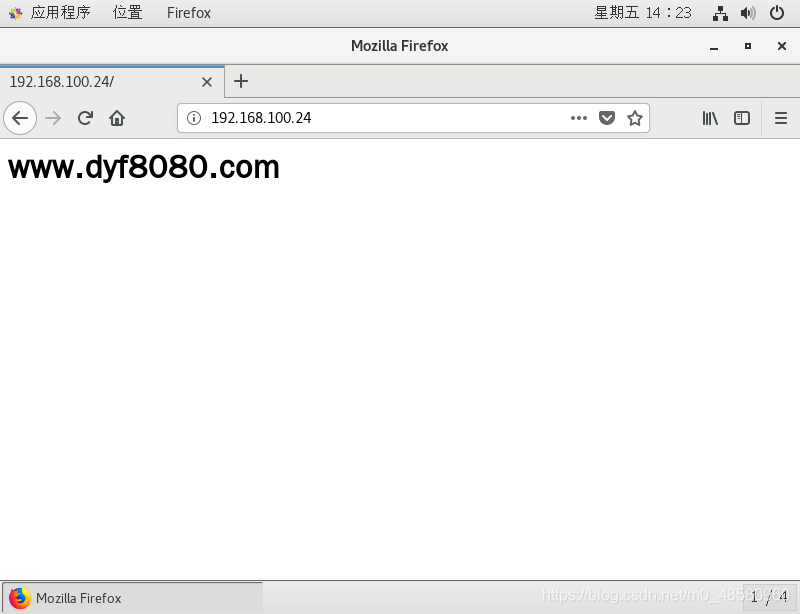
3、基于IP的虚拟主机
1、临时配置一张虚拟网卡

2、到主配置文件修改
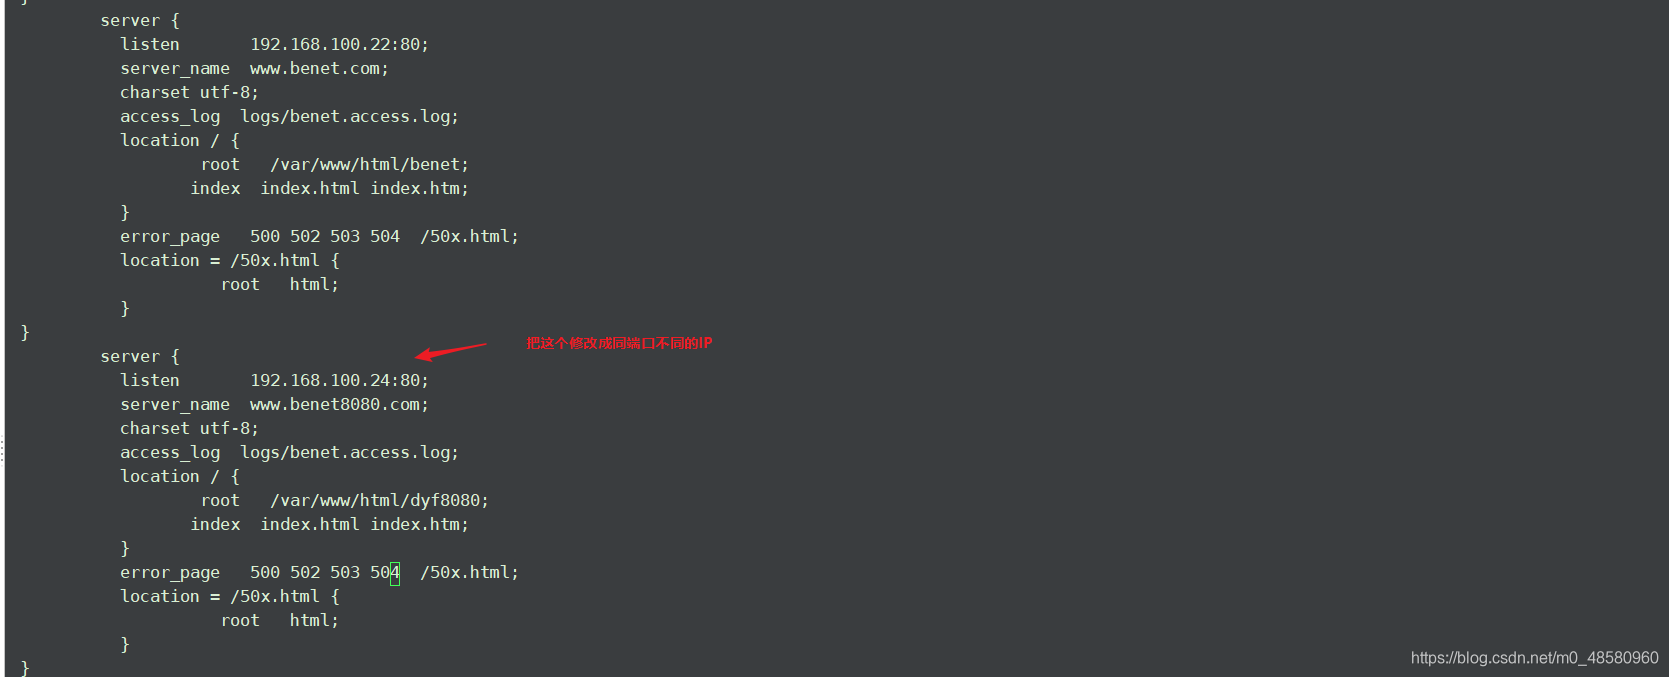
3、重启nginx
4、结果


 被折叠的 条评论
为什么被折叠?
被折叠的 条评论
为什么被折叠?
 到【灌水乐园】发言


