


App 启动流程(基于Android8.0):
1.点击桌面 App图标,Launcher进程向systemserver进程的AMS发起 startActivity请求(binder方式) ,system _server 进程收到请求后,向 Zygote 进程发送创建进程的请求(socket请求),Zygote 进程 fork 出App进程(socket请求);
2.App 进程初始化过程如下:
1).应用进程默认的java异常处理机制(可以实现监听、拦截应用进程所有的Java crash的逻辑);
2).JNI调用启动进程的binder线程池(注意应用进程的binder线程池资源是自己创建的并非从zygote父进程继承的);
3).通过反射创建ActivityThread对象并调用其“main”入口方法。
3.ActivityThread#main函数初始化的主要逻辑是:
①.创建并启动主线程的loop消息循环;
自此:主线程就有了完整的 Looper、MessageQueue、Handler
ActivityThread 的 Handler 就可以开始处理 Message,包括 Application、Activity、ContentProvider、Service、Broadcast 等组件的生命周期函数,都会以 Message 的形式,在主线程按照顺序处理。
主线程就进入阻塞状态,等待 Message,一旦有 Message 发过来,主线程就会被唤醒,处理 Message,处理完成之后,如果没有其他的 Message 需要处理,那么主线程就会进入休眠阻塞状态继续等待。
可以说Android系统的运行是受消息机制驱动的,而整个消息机制是由上面所说的四个关键角色相互配合实现的。
②.通过binder调用AMS的attachApplication接口将自己attach注册到AMS中。
AMS服务在执行应用的attachApplication注册请求过程中,发送ScheduleLaunActivity给ApplicationThread,会通过oneway类型的binder调用应用进程ApplicationThread的bindApplication接口(bindApplication接口函数实现:通过Hanlder往应用主线程消息队列post BIND_APPLICATION消息,触发在主线程执行handleBindApplication初始化函数)
4.ActivityThread.handleBindApplication()初始化过程中在应用主线程中,主要完成如下几件事件:
①根据框架传入的ApplicationInfo信息创建应用APK对应的LoadedApk对象;
②创建应用Application的Context对象;
③创建类加载器ClassLoader对象并触发Art虚拟机执行OpenDexFilesFromOat动作加载应用APK的Dex文件;
④通过LoadedApk加载应用APK的Resource资源;
⑤调用LoadedApk的makeApplication函数,创建应用的Application对象;
⑥执行应用Application#onCreate生命周期函数(APP应用开发者能控制的第一行代码)(应用全局状态的初始化点,例如初始化全局变量、加载共享资源等);
5.AMS调用client.handleLaunchActivity,然后执行ActivityThread的performLaunchActivity方法
此方法中做了哪些操作:
①.通过类加载器创建Activity
②.调用attach方法:
1.关联上下文
2.创建PhoneWindow对象
3.设置窗口回调接口
③.调用callActivityCreate
调用actiivty的oncreate方法
5.1.Activity的oncreate方法中做了什么?
setContentView后 -> phoneWindow.setContentView()
1.installDecor;创建decorView
2.无转场动画时候执行mLayoutInflate.inflate(layoutResId,mContentParent ,渲染布局,将xml转成java对象
3.phoneWindow的构造函数里mLayoutInflater = LayoutInflate.from(context))
installDecor方法:
1.generateDecor方法主要就是创建DecorView,拿到contentParent
2.generareLayout(mDecor)中属性设置,xml中的一些属性,然后把选出的布局文件add到DecorView上
3.decorView.setWindow(this)
DecorView:FrameLayout类的子类:
通常认为DecorView是Android视图树的根节点,也就是最顶层的View.
DecorView内部包含一个LinearLayout,在这个LinearLayout里面有上下三个部分
1.上面是个ViewStub,
2.中间的是TitleView,根据Activity的主题设置的
3.最下面是个ContentViews,就是布局文件
xml转成java对象是通过LayoutInflate对象的inflate方法,LayoutInflater是一个抽象类,不能实例化,此对象获取方式有三种
1).在 Activity 中通过 getLayoutInflater()获取
2).LayoutInflater里静态方法from(context)获取
3).context.getSystemService(Context.LAYOUT INFLATER SERVICE)获取
inflate方法中:
首先通过 resource对象把 resld 指向的 xml 文件转换为XmlResourceParser
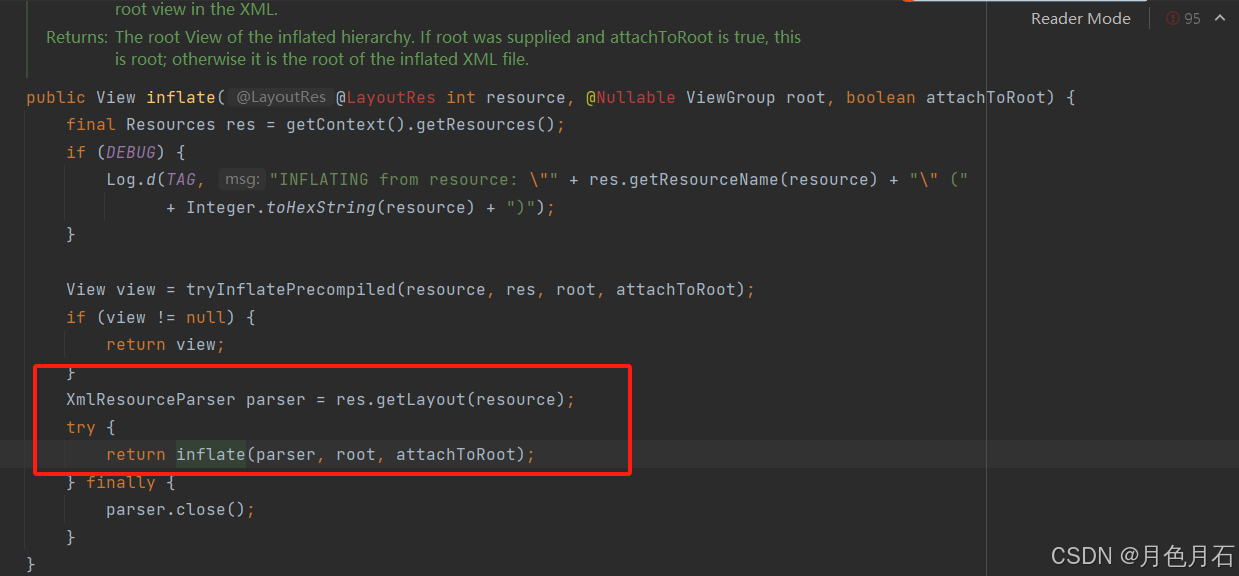
在infalte方法中
   public View inflate(XmlPullParser parser, @Nullable ViewGroup root, boolean attachToRoot) {
    synchronized (mConstructorArgs) {
    	.......
        View result = root;
        //如果提供了root并且attachToRoot为true,则这个方法返回的就是root
		//否则它返回的是XML文件的根。

            if (TAG_MERGE.equals(name)) {
                if (root == null || !attachToRoot) {
                    throw new InflateException("<merge /> can be used only with a valid "
                            + "ViewGroup root and attachToRoot=true");
                }
                //如果 Xml根标签是 TAG_MERGE(即merge),则 root 不能为空,attachToRoot必须为 true,否则抛异常
                rInflate(parser, root, inflaterContext, attrs, false);	//重要方法1
            } else {
                // Temp is the root view that was found in the xml
                final View temp = createViewFromTag(root, name, inflaterContext, attrs);
                //重要方法2,createViewFromTag
                ViewGroup.LayoutParams params = null;

                if (root != null) {
                    // Create layout params that match root, if supplied
                    params = root.generateLayoutParams(attrs);
                    if (!attachToRoot) {
                        // Set the layout params for temp if we are not
                        // attaching. (If we are, we use addView, below)
                        temp.setLayoutParams(params);
                    }
                }

                // Inflate all children under temp against its context.
                rInflateChildren(parser, temp, attrs, true);重要方法3

                // We are supposed to attach all the views we found (int temp)
                // to root. Do that now.
                if (root != null && attachToRoot) {
                    root.addView(temp, params);
                }

                // Decide whether to return the root that was passed in or the
                // top view found in xml.
                if (root == null || !attachToRoot) {
                    result = temp;
                }
            }
        }
        return result;
    }
}
1.rInflate方法中不能使用merge做子节点,createViewFromTag创建根View对象,递归遍历所有的子标签rInflateChildren,创建view对象并添加到根View上
    void rInflate(XmlPullParser parser, View parent, Context context,
        AttributeSet attrs, boolean finishInflate) throws XmlPullParserException, IOException {

        final int depth = parser.getDepth();
        int type;
        boolean pendingRequestFocus = false;

        while (((type = parser.next()) != XmlPullParser.END_TAG ||
                parser.getDepth() > depth) && type != XmlPullParser.END_DOCUMENT) {

            if (type != XmlPullParser.START_TAG) {
                continue;
            }

            final String name = parser.getName();

            if (TAG_REQUEST_FOCUS.equals(name)) {
                pendingRequestFocus = true;
                consumeChildElements(parser);
            } else if (TAG_TAG.equals(name)) {
                parseViewTag(parser, parent, attrs);
            } else if (TAG_INCLUDE.equals(name)) {
                if (parser.getDepth() == 0) {
                    throw new InflateException("<include /> cannot be the root element");
                }
                parseInclude(parser, context, parent, attrs);
            } else if (TAG_MERGE.equals(name)) {
            	//不能使用merge作为根标签
                throw new InflateException("<merge /> must be the root element");
            } else {
            	//创建View不能
                final View view = createViewFromTag(parent, name, context, attrs);
                final ViewGroup viewGroup = (ViewGroup) parent;
                final ViewGroup.LayoutParams params = viewGroup.generateLayoutParams(attrs);
                rInflateChildren(parser, view, attrs, true);
                viewGroup.addView(view, params);
            }
        }

        if (pendingRequestFocus) {
            parent.restoreDefaultFocus();
        }

        if (finishInflate) {
            parent.onFinishInflate();
        }
}
2.如果没有merge根节点,通过createViewFromTag创建temp根节点View对象,如果传进来的root不为null,第三个参数为true,root的LayoutParams赋值给temp根节点,然后rInflateChildren,遍历所有的标签添加到temp,temp被添加到root,inflate方法返回的是root,
如果root==null,此方法返回的是temp根节点
createViewFromTag方法中先tryCreateView(通过factory创View),如果那几个factory没有创建出view的话,去判断自定义View与否,
==如果有.view = onCreateView(context, parent, name, attrs);
==否则view = createView(context, name, null, attrs);
==最终会反射调用两参的构造方法,且构造器会缓存到layoutInfater中sConstructorMap:HashMap<viewName, constructor>)
View createViewFromTag(View parent, String name, Context context, AttributeSet attrs,
        boolean ignoreThemeAttr) {
	。。。。。。
    try {
        View view = tryCreateView(parent, name, context, attrs);

        if (view == null) {
            final Object lastContext = mConstructorArgs[0];
            mConstructorArgs[0] = context;
            try {
                if (-1 == name.indexOf('.')) {
                    view = onCreateView(context, parent, name, attrs);
                } else {
                    view = createView(context, name, null, attrs);
                }
            } finally {
                mConstructorArgs[0] = lastContext;
            }

        return view;
    }
}
tryCreateView方法
public final View tryCreateView(XXX)
    View view;
    if (mFactory2 != null) {
        view = mFactory2.onCreateView(parent, name, context, attrs);
    } else if (mFactory != null) {
        view = mFactory.onCreateView(name, context, attrs);
    } else {
        view = null;
    }

    if (view == null && mPrivateFactory != null) {
        view = mPrivateFactory.onCreateView(parent, name, context, attrs);
    }

    return view;
}
最终调用到createView
public final View createView(@NonNull Context viewContext, @NonNull String name,
        @Nullable String prefix, @Nullable AttributeSet attrs)
        throws ClassNotFoundException, InflateException {

    Constructor<? extends View> constructor = sConstructorMap.get(name);
    if (constructor != null && !verifyClassLoader(constructor)) {
        constructor = null;
        sConstructorMap.remove(name);
    }
    Class<? extends View> clazz = null;

    try {
        Trace.traceBegin(Trace.TRACE_TAG_VIEW, name);

        if (constructor == null) {
            // Class not found in the cache, see if it's real, and try to add it
            clazz = Class.forName(prefix != null ? (prefix + name) : name, false,
                    mContext.getClassLoader()).asSubclass(View.class);

            if (mFilter != null && clazz != null) {
                boolean allowed = mFilter.onLoadClass(clazz);
                if (!allowed) {
                    failNotAllowed(name, prefix, viewContext, attrs);
                }
            }
            constructor = clazz.getConstructor(mConstructorSignature);
            constructor.setAccessible(true);
            sConstructorMap.put(name, constructor);
        } else {
            // If we have a filter, apply it to cached constructor
            if (mFilter != null) {
                // Have we seen this name before?
                Boolean allowedState = mFilterMap.get(name);
                if (allowedState == null) {
                    // New class -- remember whether it is allowed
                    clazz = Class.forName(prefix != null ? (prefix + name) : name, false,
                            mContext.getClassLoader()).asSubclass(View.class);
                    boolean allowed = clazz != null && mFilter.onLoadClass(clazz);
                    mFilterMap.put(name, allowed);

                } else if (allowedState.equals(Boolean.FALSE)) {
                    failNotAllowed(name, prefix, viewContext, attrs);
                }
            }
        }
            return view;
        }
    }
}
6.AMS调用client.handleResumeActivity,执行ActivityThread的performResumeActiivty方法
调用到resume->onResume->makeVisible->wm.addview(DecorView)
addview真正完成添加和显示过程,自此开始绘制流程
wm.addview实际是调用的windowManagerGlobal的addView 方法
该方法中创建ViewRootImpl对象,并调用了ViewRootImpl.setView方法
绘制流程的起点viewRootImpl.setView
Activity对View的管理委托给Window,外界访问Window是通过WindowManager,windowManager实现了viewManager接口(具有addView,updateView,removeView能力),因此WindowManager具有对view的管理能力,WindowManagerImpl继承了WindowManager,但是并没有实现WindowManager的三大操作,而是将所有的操作全部委托给WindowManagerGlobal来实现。
WindowManagerGlobal以工厂的形式向外提供自己的实例,存储Window对应的所有View:Window对应的所有ViewRootImpl,Window对应的所有的布局参数,存储正在被删除的View对象,或者说是那些已经调用removeView方法但是删除操作还未完成的Window对象
1.windowManagerGlobla全局单例被WindowManagerImpl持有,被转移处理
2.WindowManagerImpl implements WindowManager extends ViewManager
内部维护如下几个列表:
mViews:存储所有Window所对应的View
mRoots:存储的是所有Window所对应的ViewRootImpl
mParams:存储的是所有Window所对应的布局参数
mDyingView:存储了那些正在被删除的View对象,或者说是那些已经调用了removeView方法但是删除操作还未完成的Window对象
ViewRootImpl:是window和view之间的桥梁,可以处理两边的对象,联结起来。
持有mWindowSession,类型是IWindowSession,它是一个Binder对象,真正的实现类是Session
Window的添加过程是一次IPC调用
requestLayout之后 IWindowSession
View树的树根,并管理view树
触发view的测量、布局和绘制
输入响应的中转站: ViewRootImpl --> DecorView --> Activity --> PhoneWindow --> DecorView --> ViewGroup --> View 为什么DecorView不直接把事件分发给子view呢?因为窗口要有一些处理,比如打电话脸部靠近屏幕的时候不会响应点击;在比如dialog点击外部区域收起弹窗
负责与wms进行进程间通信: (ViewRootImpl-->IWindowSession)本地进程 --------Binder通信-------- SystemService进程(WMS的Session)
WindowManagerService
WindowManagerService去处理Window的添加请求
WindowManagerService内部会为每一个应用保留一个单独的Session
7.绘制流程的起点viewRootImpl.setView
调用requestLayout
1.校验主线程
2.调用scheduleTraversals()
scheduleTraversals中:
1.往主线程的Handler对应的MessageQueue发送一个同步屏障消息
2.监听vsync信号
同步屏障作用:
在调用requestLayout后到vsync信号到达的这段时间内,不能在主线程执行其他任何任务,保证ui显示是第一位的;
当vsync信号到来,把doTraversal这个函数包裹成一个异步消息加入到messageQueue。
doTraversal中:
1屏障解除
2.performTraversals()开始绘制三大流程
8.performTraversals()中调用:
performMeasure(childWidthMeasureSpec, childHeightMeasureSpec);
performLayout(lp, mWidth, mHeight);
performDraw();
绘制流程是由最外层的View开始,一步一步向内传递执行。
而整个过程又是递归等待的,最外层的View需要等内层所有的View执行完绘制流程才结束
8.1 performMeasure
measure流程开始执行之前
1.会先计算出DecorView的MeasureSpec。如果是match_parent就是屏幕的宽高
2.然后执行DecorView的measure()方法开始整个View树的测量
measure()方法是被final修饰了的,派生类都不能重写,所有View都会执行到View类的measure()方法。
ViewGroup:
1.onMeasure()方法中遍历所有子View,通过执行measureChildWithMargins()方法,先计算出子View的MeasureSpec再调用子View的measure()方法传递执行measure流程。
2.ViewGroup在所有子View的measure流程都执行结束后,再调用setMeasuredDimension()方法给自己的mMeasureWidth/Height赋值。
单一View直接测量自己的值并赋值
MeasureSpec32未,前两位是mode,后三十位是size.
每一个view都有自己的MeasureSpec,子view在测量自己的MeasureSpec时,有两个重要参数,mode和size,子view的大小根据父view的模式和size来限定。
8.2 performLayout:
通过4个点来确定子View在父View中的位置。同时也可以通过点的距离来计算出View的大小。

1.执行DecorView的layout()方法来开始整个View树的layout流程。而DecorView包括其他的ViewGroup都没有另外实现layout()方法,都会执行到View的layout()方法。
2.layout()方法中会先执行setFrme()方法确定View自己在父View中的位置,接着再执行onLayout()方法来遍历所有的子View,计算出子View在自己心中的位置(4个点)后,再执行子View的layout流程。
不同的ViewGroup有着不同的方式来安排子View在自己心中的位置。 所以View类中的onLayout()是一个空方法,等着View们自己去实现。
自定义ViewGroup的时候如果不在onLayout方法中安排子View的位置,将看不见子View。
ViewGroup:
1.确定自己在父View中的位置
2.遍历所有子View,计算出在自己心中的位置(4个点)后,再执行子View的layout流程
单一View直接布局自己
8.3 PerformDraw:
通过层层调用会执行到View的draw()方法
draw()方法中:
drawBackground(canvas);//绘制自己的背景
onDraw(canvas)//空实现,绘制自己的内容,自定义时重写该方法
dispatchDraw(canvas);//绘制子View,ViewGroup来说dispatchDraw就是去绘制子 View
onDrawForeground(canvas);//绘制滚动条
9.自定义View流程
9.1 自定义单一View Demo:圆形进度条(CircleProgressBar)
1. 定义自定义View类
首先,我们需要创建一个继承自View的类,比如CircleProgressBar。
public class CircleProgressBar extends View {
    // 构造函数
    public CircleProgressBar(Context context) {
        super(context);
        // 初始化
    }

    public CircleProgressBar(Context context, AttributeSet attrs) {
        super(context, attrs);
        // 从XML属性中获取值(如果有的话)
    }

    public CircleProgressBar(Context context, AttributeSet attrs, int defStyleAttr) {
        super(context, attrs, defStyleAttr);
        // 使用默认样式
    }
}
-
重写onMeasure方法
为了确定View的大小,我们需要重写onMeasure方法。在这个例子中,我们可能希望进度条有一个固定的大小。@Override protected void onMeasure(int widthMeasureSpec, int heightMeasureSpec) { //其中,DEFAULT_WIDTH和DEFAULT_HEIGHT是定义的默认宽度和高度。 int width = resolveSize(DEFAULT_WIDTH, widthMeasureSpec); int height = resolveSize(DEFAULT_HEIGHT, heightMeasureSpec); // 设置最小宽度和高度 setMeasuredDimension(Math.max(width, height), Math.max(width, height)); } -
重写onDraw方法
在onDraw方法中,我们使用Canvas对象来绘制自定义View的内容。private int progress = 0; // 进度值 private Paint paint; // 绘制工具 // ... 其他初始化代码 ... @Override protected void onDraw(Canvas canvas) { super.onDraw(canvas); // 绘制背景圆 paint.setColor(Color.LTGRAY); canvas.drawCircle(getWidth() / 2, getHeight() / 2, getWidth() / 2 - 10, paint); // 根据进度绘制前景圆 if (progress > 0) { paint.setColor(Color.BLUE); double sweepAngle = 360 * progress / 100.0; // 将进度转换为角度 canvas.drawArc(new RectF(10, 10, getWidth() - 10, getHeight() - 10), -90, (float) sweepAngle, true, paint); } // 可以添加其他绘制代码... } -
提供设置进度的方法
了从外部设置进度值,我们需要提供一个公共方法。public void setProgress(int progress) { if (progress < 0) progress = 0; if (progress > 100) progress = 100; this.progress = progress; invalidate(); // 请求重绘View } -
在Activity或Fragment中使用自定义View
在XML布局文件中添加自定义View:<com.example.myapp.CircleProgressBar android:id="@+id/circleProgressBar" android:layout_width="wrap_content" android:layout_height="wrap_content" app:layout_constraintBottom_toBottomOf="parent" app:layout_constraintEnd_toEndOf="parent" app:layout_constraintStart_toStartOf="parent" app:layout_constraintTop_toTopOf="parent"/>
在Activity或Fragment中设置进度:
CircleProgressBar circleProgressBar = findViewById(R.id.circleProgressBar);
circleProgressBar.setProgress(50); // 设置进度为50%
9.2 自定义ViewGroup
当涉及到自定义ViewGroup时,我们通常会创建一个继承自ViewGroup或其子类(如LinearLayout、RelativeLayout等)的类,并在其中管理子View的布局和交互。下面是一个简单的自定义ViewGroup的例子,我们将创建一个名为CustomLayout的类,它水平地排列其子View,并允许设置每个子View之间的间距。
-
定义自定义ViewGroup类
首先,我们需要创建一个继承自ViewGroup的类。假设我们想要创建一个简单的水平布局,我们可以命名为CustomHorizontalLayout。public class CustomHorizontalLayout extends ViewGroup { // 构造函数 public CustomHorizontalLayout(Context context) { super(context); } public CustomHorizontalLayout(Context context, AttributeSet attrs) { super(context, attrs); } public CustomHorizontalLayout(Context context, AttributeSet attrs, int defStyleAttr) { super(context, attrs, defStyleAttr); } // ... 其他代码 ... } -
重写关键方法
onMeasure:用于测量View的大小。在自定义ViewGroup中,我们需要遍历子View并测量它们的大小,然后根据需要设置整个ViewGroup的大小。
onLayout:用于确定子View在ViewGroup中的位置。在自定义ViewGroup中,我们需要根据测量的结果和自定义的布局逻辑来放置子View。@Override protected void onMeasure(int widthMeasureSpec, int heightMeasureSpec) { // 遍历子View并测量它们的大小 measureChildren(widthMeasureSpec, heightMeasureSpec); // 设置整个ViewGroup的大小(这里简单起见,假设和父容器一样大) setMeasuredDimension(resolveSize(getSuggestedMinimumWidth(), widthMeasureSpec), resolveSize(getSuggestedMinimumHeight(), heightMeasureSpec)); } @Override protected void onLayout(boolean changed, int l, int t, int r, int b) { // 根据需要确定子View的位置 final int count = getChildCount(); int left = getPaddingLeft(); int top = getPaddingTop(); for (int i = 0; i < count; i++) { final View child = getChildAt(i); if (child.getVisibility() != View.GONE) { final int childWidth = child.getMeasuredWidth(); child.layout(left, top, left + childWidth, top + child.getMeasuredHeight()); left += childWidth; } } }
10.绘制相关问题:
10.1 RequestLayout,onLayout,onDraw,onDrawChild的区别
RequestLayout:调用onMeasure和onlayout的过程,根据标记位判断是否调用onDraw;
onLayout:针对ViewGroup,让子View分布好位置
onDraw:绘制控件本身(背景,canvas图层,内容,子View,fading边缘和装饰)
onDrawChild:回调每个子控件的onDraw方法
10.2怎么优化自定义View
①:减少冗余代码,尤其onDraw的代码,尽量减少调用刷新方法的频率
②:避免在onDraw里面处理内存分配逻辑
③:每次执行RequestLayout非常耗时,使用自定义ViewGroup,onlayout可以直接对子控件布局
④:减少View的层级,避免冗余复杂
10.3 怎么测量view的大小
10.3.1. OnGlobalLayoutListener获取
ViewTreeObserver.addOnGlobalLayoutListener() 监听View的onLayout()绘制过程,一旦layout触发变化,立即回调onLayoutChange方法。
在布局发生改变或者某个视图的可视状态发生改变时调用该事件,会被多次调用,
注意,使用完也要主要调用removeOnGlobalListener()方法移除监听事件。避免后续每一次发生全局View变化均触发该事件,影响性能。
    ViewTreeObserver vto = view.getViewTreeObserver();
        vto.addOnGlobalLayoutListener(new OnGlobalLayoutListener() {
        @Override
        public void onGlobalLayout() {
            view.getViewTreeObserver().removeGlobalOnLayoutListener(this);
            Log.i(TAG, "width: " + view.getWidth());
            Log.i(TAG, "height: " + view.getHeight());
        }
    });
10.3.2. OnPreDrawListener获取
在视图将要绘制时调用该监听事件,会被调用多次,因此获取到视图的宽度和高度后要移除该监听事件。这同样是 ViewTreeObserver 的接口。
OnPreDrawListener是在draw之前的回调,此时已经 layout 过,可以获取到 View 的宽高值。OnPreDrawListener还可以控制绘制流程,返回false的时候就取消当前绘制流程,View会再schedule下一次绘制:
   getWindow().getDecorView().getViewTreeObserver().addOnPreDrawListener(new ViewTreeObserver.OnPreDrawListener() {
       @Override
       public boolean onPreDraw() {
           getTextWidthHeight();
           getWindow().getDecorView().getViewTreeObserver().removeOnPreDrawListener(this);
           return false;
       }
   });
10.3.3. OnLayoutChangeListener获取
在视图的 layout 改变时调用该事件,会被多次调用,因此需要在获取到视图的宽度和高度后执行 remove 方法移除该监听事件。
    view.addOnLayoutChangeListener(new View.OnLayoutChangeListener() {
       @Override
       public void onLayoutChange(View v, int left, int top, int right, int bottom,int oldLeft, int oldTop, int oldRight, int oldBottom) {
            view.removeOnLayoutChangeListener(this);
            int w = view.getWidth();
            int h = view.getHeight();
      }
   });
10.3.4. 重写View的onSizeChanged,该方法会在onCreate之后,onDraw之前调用
在视图的大小发生改变时调用该方法,会被多次调用,因此获取到宽度和高度后需要考虑禁用掉代码。该实现方法需要继承 View,且多次被调用,不建议使用。
    @Override
    protected void onSizeChanged(int w, int h, int oldw, int oldh) {
        super.onSizeChanged(w, h, oldw, oldh);
        Log.i("TAG", "width = " + getWidth() + "height = " + getHeight());
    }
10.3.5. 使用View.post()方法
利用Handler通信机制,发送一个Runnable到MessageQueue中,当View布局处理完成时,自动发送消息,通知UI进程。借此机制,巧妙获取View的高宽属性,代码简洁,相比ViewTreeObserver监听处理,还不需要手动移除观察者监听事件。
    view.post(new Runnable() {
            @Override
            public void run() {
                int width = view.getWidth();
                int measuredWidth = view.getMeasuredWidth();
                Log.i(TAG, "width: " + width);
                Log.i(TAG, "measuredWidth: " + measuredWidth);
            }
        });
post实现:
   public boolean post(Runnable action) {
        final AttachInfo attachInfo = mAttachInfo;
        // 添加到AttachInfo的Handler消息队列中
        if (attachInfo != null) {
            return attachInfo.mHandler.post(action);
        }


        // 加入到这个View的消息队列中
        getRunQueue().post(action);
        return true;
    }

   private HandlerActionQueue getRunQueue() {
        if (mRunQueue == null) {
            mRunQueue = new HandlerActionQueue();
        }
        return mRunQueue;
}
post方法中,首先判断attachInfo成员变量是否为空,如果不为空,则直接加入到对应的Handler消息队列中。否则走getRunQueue().post(action); 从Attach字面意思来理解,其实就可以知道,当View执行attach时,才会拿到mAttachInfo, 因此我们在onResume或者onCreate中调用view.post(),其实走的是getRunQueue().post(action)。
mAttachInfo在什么时机才会赋值。 两部分:
一个是ViewRootImpl第一次performTraversals的时候会分发
二个是ViewGroup.addView的时候会把自己的attachInfo传递给子view
10.4. 判断第一帧渲染完成的方法
10.4.1 通过onWindowFocusChanged方法
当Activity的窗口获得焦点并且为第一次运行时(即focus为true),可以认为第一帧已经渲染完成。但这种方法有一个缺点,即Activity可能并没有真正完全渲染出来,只是时间点很接近。
缺点:应用的Activity需要继承重写该方法的基类, 无法全局监听;这时Activity并没有真正渲染出来, 只是时间点很接近了。
10.4.2 通过监听DecorView的绘制事件
对DecorView添加onDrawListener或onPreDrawListener。当DecorView执行了onDraw方法时,可以认为第一帧绘制完成。这种方法可以全局实现ActivityLifeCallBack,无需Activity继承特定的基类。
10.4.3 使用Choreographer类
Choreographer类用于协调动画、输入和绘制的定时任务。它接收来自显示子系统的垂直同步(vsync)信号,并安排作为下一帧渲染工作的一部分的工作。通过注册一个监听垂直同步信号的回调,并在其回调方法doFrame中处理,可以知道第一个垂直同步信号的接收点,从而判断第一帧的绘制时间点。
10.4.4 向DecorView添加1像素的View, 在onDraw函数里监听下一个vsync事件认为渲染完成;
PS: 该View是DecorView的最后一个子View, 因为安卓是深度优先递归measure、layout、draw, 所以该View是最后一下执行onDraw函数。
注册ActivityLifecycleCallbacks, 在onCreate时向DecorView添加1像素的透明View,并在View执行onDraw时添加监听vsync, 以第一次执行vsync认为当前Activity渲染完成;
public class MyApplication extends Application {
    @Override
    public void onCreate() {
        super.onCreate();
        registerActivityLifecycleCallbacks(new Application.ActivityLifecycleCallbacks() {
            @Override
            public void onActivityCreated(Activity activity, Bundle savedInstanceState) {
                CustomerView customerView = new CustomerView(activity);
                ViewGroup.LayoutParams layoutParams = new ViewGroup.LayoutParams(1, 1);
                customerView.setBackgroundColor(Color.TRANSPARENT);
                customerView.setLayoutParams(layoutParams);
                ((ViewGroup) activity.getWindow().getDecorView()).addView(customerView);
            }//....

            public class CustomerView extends View {
                public CustomerView(Context context) {
                    super(context);
                }

                public CustomerView(Context context, AttributeSet attrs) {
                    super(context, attrs);
                }

                public CustomerView(Context context, AttributeSet attrs, int defStyleAttr) {
                    super(context, attrs, defStyleAttr);
                }

                @Override
                public void onWindowFocusChanged(boolean hasWindowFocus) {
                    super.onWindowFocusChanged(hasWindowFocus);
                    Log.d("brycegao", "brycegao MainActivity CustomerView onWindowFocus: " + hasWindowFocus);
                }

                @Override
                protected void onDraw(Canvas canvas) {
                    super.onDraw(canvas);
                    Log.d("brycegao", "brycegao MainActivity CustomerView onDraw");//参考https://www.jianshu.com/p/e5f9fba7294aChoreographer.getInstance().postFrameCallback(new Choreographer.FrameCallback() {@Override public void doFrame(long frameTimeNanos) {//监听vsync, 执行该回调时认为View已经渲染完成Log.d("brycegao", "brycegao MainActivity CustomerView vsync");//Choreographer.getInstance().postFrameCallback(this);  //计算帧率,预期每隔16ms执行一次}});}
                }
            }
        });
    }
}
10.4.5 View执行完成onDraw后post个Message, 当执行Message时认为第一帧结束; 在Activity的onCreate函数结束后发post个消息, 执行该Runnable时认为第一帧绘制完成。
  mHandler = new Handler();
  getWindow().getDecorView().post(new Runnable() {
     @Override
     public void run() {
        Log.d("brycegao", "brycegao MainActivity decorview post");
        Thread.dumpStack();
        mHandler.post(new Runnable() {
           //认为第一帧绘制完成
           @Override
           public void run() {
              Log.d("brycegao", "brycegao MainActivity process custom message: "+ tvContent.getWidth());
           }
        });
     }
  });
在onCreate函数执行setContentView后会执行2次performTrasvel, 从而在上面日志中看到2次onMeasure, 但onLayout、onDraw执行了1次。
注意: View.post方法和Handler的post方法是有区别的,
在onCreate函数里执行View.post方法并不会向MessageQueue里添加Message;
而是等待View执行了onAttachToWindow函数时向主线程MessageQueue里添加Message,
这时消息队列里已经有performTrasvel对应的Message。 所以也可以用这种方式判断。
  public boolean post(Runnable action) {
    final AttachInfo attachInfo = mAttachInfo;
    //在dispatchOnAttachToWindow函数里赋值//onCreate函数里attachInfo为null
    if (attachInfo != null) {
        return attachInfo.mHandler.post(action);
    }// Postpone the runnable until we know on which thread it needs to run.// Assume that the runnable will be successfully placed after
    attach.getRunQueue().post(action); //onCreate函数会走到这里,在dispatchOnAttach里运行
    return true;
}

void dispatchAttachedToWindow(AttachInfo info, int visibility) {
    mAttachInfo = info;//
    // 。。。// Transfer all pending runnables.
    if (mRunQueue != null) {
        mRunQueue.executeActions(info.mHandler);
        mRunQueue = null;
    }
    performCollectViewAttributes(mAttachInfo, visibility);
    onAttachedToWindow();
    //...
}
10.5 requestLayout、invalidate 和 postInvalidate方法
子view需要刷新时,就调用invalidate,找到自己的父view并通知他刷新自己
根据源码:
View首先通过成员变量mParent记录自己的父View,然后将attachInfo中保存的信息告诉父View来刷新自己
postInvalidate子线程中使用
invalidate主线程中调用
requestLayout() 和 invalidate区别以及原因:
requestLayout: requestLayout会直接递归调用父窗口的requestLayout,直到ViewRootImpl,然后触发peformTraversals,由于mLayoutRequested为true,会导致onMeasure和onLayout被调用。不一定会触发OnDraw。requestLayout触发onDraw可能是因为在在layout过程中发现l,t,r,b和以前不一样,那就会触发一次invalidate,所以触发了onDraw,也可能是因为别的原因导致mDirty非空(比如在跑动画)
invalidate: view的invalidate不会导致ViewRootImpl的invalidate被调用,而是递归调用父view的invalidateChildInParent,直到ViewRootImpl的invalidateChildInParent,然后触发peformTraversals,会导致当前view被重绘,由于mLayoutRequested为false,不会导致onMeasure和onLayout被调用,而OnDraw会被调用
postInvalidate: postInvalidate是在非UI线程中调用,invalidate则是在UI线程中调用。
一般来说,只要刷新的时候就调用invalidate,需要重新measure就调用requestLayout,后面再跟个invalidate(为了保证重绘),这是我个人的理解


 被折叠的 条评论
为什么被折叠?
被折叠的 条评论
为什么被折叠?
 到【灌水乐园】发言


