


 本文详细介绍了在CentOS7系统上,如何作为非root用户下载、安装、配置PostgreSQL,包括安装readline和zlib依赖,以及通过GDB进行调试的步骤。在安装过程中强调了配置选项和权限设置,并提供了初始化数据库集群和创建数据库实例的方法。
零、前置条件
- 系统CentOS 7,并已联网,已安装gcc或者g++编译器,GNU make版本3.80或以上,系统有至少一个除root之外的普通用户
user- gcc安装-参考链接
- 查看make命令的版本——
make --version - 更新make版本-参考链接
- postgresql的使用一般不用
root用户,而是普通用户,这里假设普通用户名为user。Linux创建新用户-参考链接
- Xshell建立起与CentOS 7系统的会话
- Xftp同样建立了与CentOS 7的链接
一、下载、转移、解压
下载
- 首先在本地打开以链接,下载
postgresql-xx.x,readline-7.0,zlib-1.2.xx
https://www.postgresql.org/ftp/source/
PostgresSQL建议下载最新版本,打开后的版本列表中,选择最新的正式版本,最好不要选带beta的
http://ftp.gnu.org/gnu/readline/readline-7.0.tar.gz
- 下载
zlib前,先开官网http://www.zlib.net/看一下最新版本号,比如这里是1.2.13,那么下面下载链接中的版本号就改成最新的版本号
http://www.zlib.net/zlib-1.x.xx.tar.gz
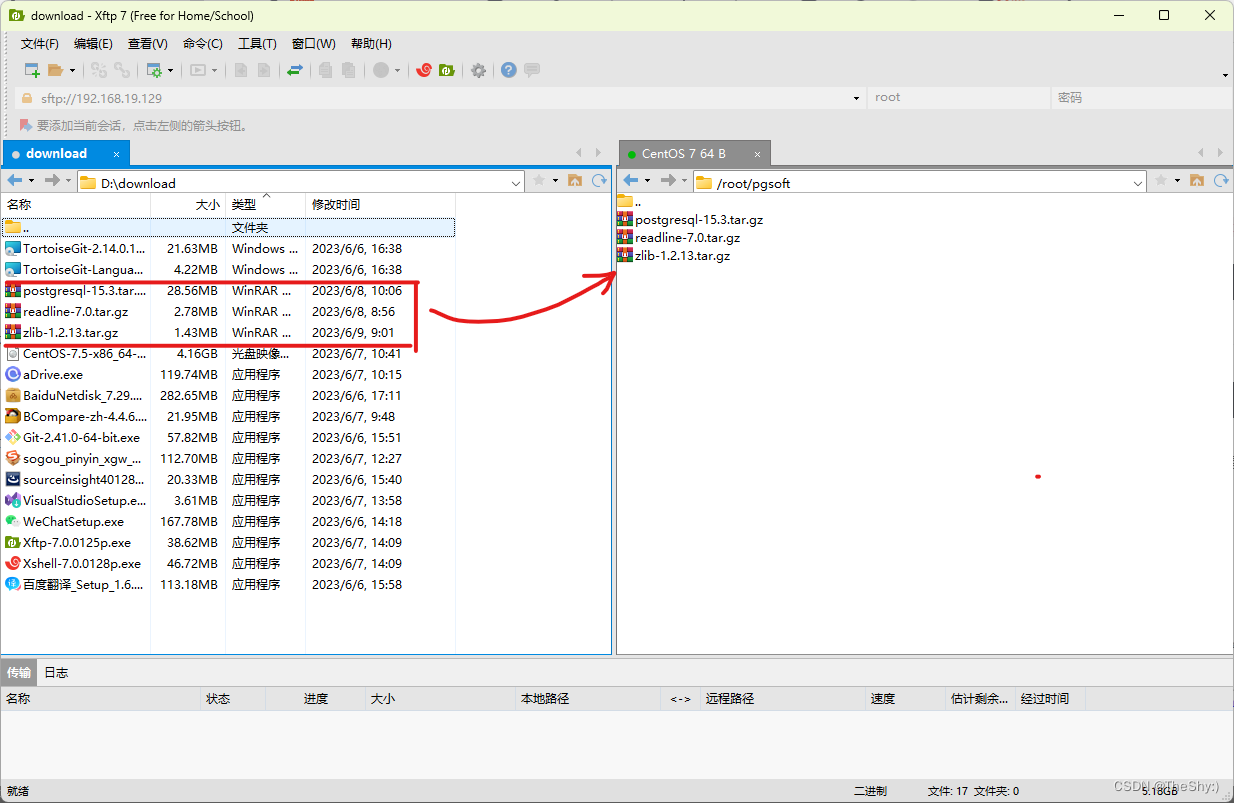
转移
- 在root用户下的
/root目录下操作
[root@localhost ~]# mkdir pgsoft
- 打开xftp,将刚刚下载好的三个压缩包拖到刚刚建立目录下面
/root/pgsoft
解压
[root@localhost pgsoft]# tar -xf readline-7.0.tar.gz
[root@localhost pgsoft]# tar -xf zlib-1.x.xx.tar.gz
[root@localhost pgsoft]# tar -xf postgresql-xx.x.tar.gz
- 版本号根据实际情况来
二、安装
readline安装
[root@localhost pgsoft]# cd readline-7.0
[root@localhost readline-7.0]# ./configure
[root@localhost readline-7.0]# make
[root@localhost readline-7.0]# make install
- 安装readline开发包
readline-devel,不然后面安装postgresql时会提示错误configure: error: readline library not found
[root@localhost readline-7.0]# yum install readline-devel
zlib安装
[root@localhost readline-7.0]# cd /root/pgsoft/zlib-1.x.xx
[root@localhost zlib-1.x.xx]# ./configure
[root@localhost zlib-1.x.xx]# make
[root@localhost zlib-1.x.xx]# make install
postgresql安装
# 为pg安装新建一个目录/opt/pgsql-xx.x
[root@localhost ~]# mkdir -p /opt/pgsql-xx.x

# 将opt目录的拥有权给予给普通用户user
[root@localhost ~]# chown user -R /opt

# 进入下载转移解压后的postgresql目录
[root@localhost ~]# cd /root/pgsoft/postgresql-xx.x

# 配置postgresql
[root@localhost postgresql-xx.x]# ./configure --prefix=/opt/pgsql-xx.x --enable-debug --enable-depend --enable-cassert CFLAGS=-O0
# 解释一下配置项:
# --prefix : 指定安装的目录
# --enable-debug : 把所有程序和库以带有调试符号的方式编译
# --enable-cassert : 打开服务器中的断言(assertion)检查,它会检查许多”不可能发生”的条件。
# --enable-depend : 打开自动依赖性跟踪。
# CFLAGS=-O0 : 关闭优化

# 编译postgresql,这一步耗时稍微较长
[root@localhost postgresql-xx.x]# make world

# 安装postgresql
[root@localhost postgresql-xx.x]# make install -world
- 验证postgres是否安装成功
# 查看安装目录/opt/pgsql-xx.x,安装成功的话会出现以下四个目录
[root@localhost postgresql-15.3]# ll /opt/pgsql-xx.x/
总用量 16
drwxr-xr-x. 2 root root 4096 6月   9 09:29 bin
drwxr-xr-x. 6 root root 4096 6月   9 09:29 include
drwxr-xr-x. 4 root root 4096 6月   9 09:29 lib
drwxr-xr-x. 6 root root 4096 6月   9 09:29 share

# 查看安装的postgres版本是否对应,这里以15.3版本为例
[root@localhost postgresql-15.3]# /opt/pgsql-15.3/bin/postgres --version
postgres (PostgreSQL) 15.3
三、安装数据簇
- 数据簇(Databese Cluster),即后续数据库使用中数据存放的目录
# 递归创建新目录,版本号记得根据实际情况更换
[root@localhost ~]# mkdir -p /pgdata/15.4/poc/{data,archive,scripts,backup}

# 将该目录的拥有权赋给普通用户user
[root@localhost ~]# chown -R user /pgdata/15.4/

# 初始化数据目录
# 首先由root切换到普通用户
[root@localhost pgsoft]# su - user
上一次登录:五 6月  9 09:32:48 CST 2023pts/0 上
# 进入数据目录,用initdb命令初始化该目录,初始化成功后最后出现Success字样
[user@localhost ~]$ cd /pgdata/15.4/poc
[user@localhost poc]$ /opt/pgsql-15.4/bin/initdb  -D /pgdata/15.4/poc/data/ -E UTF-8
……
……
Success. You can now start the database server using:
    /opt/pgsql-15.3/bin/pg_ctl -D /pgdata/15.4/poc/data/ -l logfile start

# 对数据目录开放读写执行权限
[userb@localhost poc]$ chmod 0700 data/

# 启动PostgreSQL,启动成功后最后一行会出现server started
[userb@localhost poc]$ /opt/pgsql-15.4/bin/pg_ctl -D /pgdata/15.4/poc/data/ start
waiting for server to start....2023-06-09 09:43:50.826 CST [18923] LOG:  starting PostgreSQL 15.4 on x86_64-pc-linux-gnu, compiled by gcc (GCC) 4.8.5 20150623 (Red Hat 4.8.5-44), 64-bit
2023-06-09 09:43:50.828 CST [18923] LOG:  listening on IPv6 address "::1", port 5432
2023-06-09 09:43:50.828 CST [18923] LOG:  listening on IPv4 address "127.0.0.1", port 5432
2023-06-09 09:43:50.832 CST [18923] LOG:  listening on Unix socket "/tmp/.s.PGSQL.5432"
2023-06-09 09:43:50.836 CST [18926] LOG:  database system was shut down at 2023-06-09 09:42:19 CST
2023-06-09 09:43:50.855 CST [18923] LOG:  database system is ready to accept connections
 done
server started
四、创建PostgreSQL第一个数据库实例
# 使用createdb命令创建第一个数据库实例,其实是创建了一个数据簇(Database Cluster),如果不产生任何响应则表示该步骤成功
[userb@localhost poc]$ /opt/pgsql-15.4/bin/createdb my_first_pgdb
五、将PostgreSQL的安装路径添加到Shell的搜索路径
# 注意切换到普通用户
[root@localhost ~]# su - user

# 当前环境变量中的路径,修改文件./bashrc和./ash_profile,把以下话语添加进去,这里以./bashrc为例
[user@localhost ~]$ vim .bashrc
[user@localhost ~]$ cat .bashrc
# .bashrc

# Source global definitions
if [ -f /etc/bashrc ]; then
	. /etc/bashrc
fi

# 改成自己实际的安装路径
export PATH=/opt/pgsql-15.4/bin:$PATH							# 这一句是添加pg可执行文件
export LD_LIBRARY_PATH=/opt/pgsql-15.4/lib/:$LD_LIBRARY_PATH	# 这一句是添加pg的动态库
# Uncomment the following line if you don't like systemctl's auto-paging feature:
# export SYSTEMD_PAGER

# User specific aliases and functions

# 重启普通用户的系统文件
[user@localhost ~]$ source .bashrc

# 验证是否有效,不在安装目录下,直接运行postgres --version如果能出现相关信息,则表示已经添加成功
[user@localhost ~]$ postgres --version
postgres (PostgreSQL) 15.4

# 添加完成路径后可以直接使用/opt/pgsql-15.3/bin下的命令,而不需要加绝对路径
# 例如:上面创建数据库实例,可以直接写成
[user@localhost poc]$ createdb my_first_pgdb
# 例如:访问创建的数据库
[user@localhost poc]$ psql -p my_first_pgdb
六、GDB调试
- 首先确保安装之前的配置环节,就是
./configure的环境加上了--enable-debug参数,也就是在编译执行源码的过程中带了-g可调试选项。如果没有带的话:
# 回到源码所在目录,也就是/root/pgsoft/postgresql-xx.x
# 清除所有已经编译安装的可执行文件,以及配置
[root@localhost postgresql-15.3]# make disclean
# 然后再重新配置安装(./configure --prefix=/opt/pgsql-xx.x --enable-debug --enable-depend --enable-cassert CFLAGS=-O0 && make world && make install -world),详见二、安装中的PostgreSQL安装
- Xshell上开一个复制会话
- 在第一个会话中进入数据库,没有表的创建一个(CREATE TABLE tbl_name(type colA, type colB, ……); ),再插入几个元组数据
# 开启pg服务(如果没开的话,开了的话跳过就好)
[usera@localhost ~]$ pg_ctl -D /pgdata/15.3/poc/data/ start
pg_ctl: another server might be running; trying to start server anyway
waiting for server to start....2023-06-28 09:38:29.623 CST [3401] LOG:  starting PostgreSQL 15.3 on x86_64-pc-linux-gnu, compiled by gcc (GCC) 4.8.5 20150623 (Red Hat 4.8.5-44), 64-bit
2023-06-28 09:38:29.625 CST [3401] LOG:  listening on IPv6 address "::1", port 5432
2023-06-28 09:38:29.625 CST [3401] LOG:  listening on IPv4 address "127.0.0.1", port 5432
2023-06-28 09:38:29.636 CST [3401] LOG:  listening on Unix socket "/tmp/.s.PGSQL.5432"
2023-06-28 09:38:29.737 CST [3404] LOG:  database system was interrupted; last known up at 2023-06-27 11:30:22 CST
2023-06-28 09:38:30.004 CST [3404] LOG:  database system was not properly shut down; automatic recovery in progress
2023-06-28 09:38:30.028 CST [3404] LOG:  redo starts at 0/196E228
2023-06-28 09:38:30.029 CST [3404] LOG:  invalid record length at 0/196E310: wanted 24, got 0
2023-06-28 09:38:30.029 CST [3404] LOG:  redo done at 0/196E2D8 system usage: CPU: user: 0.00 s, system: 0.00 s, elapsed: 0.00 s
2023-06-28 09:38:30.051 CST [3402] LOG:  checkpoint starting: end-of-recovery immediate wait
2023-06-28 09:38:30.055 CST [3402] LOG:  checkpoint complete: wrote 3 buffers (0.0%); 0 WAL file(s) added, 0 removed, 0 recycled; write=0.001 s, sync=0.001 s, total=0.006 s; sync files=2, longest=0.001 s, average=0.001 s; distance=0 kB, estimate=0 kB
2023-06-28 09:38:30.058 CST [3401] LOG:  database system is ready to accept connections
 done
server started

# 进入数据库
[usera@localhost ~]$ psql my_first_pgdb
psql (15.3)
Type "help" for help.

# 查询当前pg的会话服务进程(backend进程)的进程号pid
my_first_pgdb=# select pg_backend_pid();
 pg_backend_pid
----------------
           3418
(1 row)

my_first_pgdb=#
- 然后切换另一个会话
# 用pg进程的port进入调试
[root@localhost ~]# gdb -p 3418
GNU gdb (GDB) Red Hat Enterprise Linux 7.6.1-110.el7
Copyright (C) 2013 Free Software Foundation, Inc.
License GPLv3+: GNU GPL version 3 or later <http://gnu.org/licenses/gpl.html>
This is free software: you are free to change and redistribute it.
There is NO WARRANTY, to the extent permitted by law.  Type "show copying"
and "show warranty" for details.
This GDB was configured as "x86_64-redhat-linux-gnu".
For bug reporting instructions, please see:
<http://www.gnu.org/software/gdb/bugs/>.
Attaching to process 3418
Reading symbols from /opt/pgsql-15.3/bin/postgres...done.
Reading symbols from /lib64/libz.so.1...Reading symbols from /lib64/libz.so.1...(no debugging symbols found)...done.
(no debugging symbols found)...done.
Loaded symbols for /lib64/libz.so.1
Reading symbols from /lib64/libpthread.so.0...(no debugging symbols found)...done.
[Thread debugging using libthread_db enabled]
Using host libthread_db library "/lib64/libthread_db.so.1".
Loaded symbols for /lib64/libpthread.so.0
Reading symbols from /lib64/librt.so.1...(no debugging symbols found)...done.
Loaded symbols for /lib64/librt.so.1
Reading symbols from /lib64/libdl.so.2...(no debugging symbols found)...done.
Loaded symbols for /lib64/libdl.so.2
Reading symbols from /lib64/libm.so.6...(no debugging symbols found)...done.
Loaded symbols for /lib64/libm.so.6
Reading symbols from /lib64/libc.so.6...(no debugging symbols found)...done.
Loaded symbols for /lib64/libc.so.6
Reading symbols from /lib64/ld-linux-x86-64.so.2...(no debugging symbols found)...done.
Loaded symbols for /lib64/ld-linux-x86-64.so.2
Reading symbols from /lib64/libnss_files.so.2...(no debugging symbols found)...done.
Loaded symbols for /lib64/libnss_files.so.2
0x00007f692724f0c3 in __epoll_wait_nocancel () from /lib64/libc.so.6
Missing separate debuginfos, use: debuginfo-install glibc-2.17-326.el7_9.x86_64 zlib-1.2.7-17.el7.x86_64

# 例如:在exec_simple_query()函数处打断点,执行全称break也可以
(gdb) break exec_simple_query
Breakpoint 1 at 0x984694: file postgres.c, line 994.
(gdb)
- 切换第一个会话,执行任何一句简单的单表查询语句,会卡在当前位置
my_first_pgdb=# SELECT * FROM tbl_name;
- 切换第二个会话,执行continue(执行简写c也可以),指令的意思是执行到下一个断点处
(gdb) c
Continuing.

Breakpoint 1, exec_simple_query (query_string=0x2b77f60 "select * from weather;")
    at postgres.c:994
994		CommandDest dest = whereToSendOutput;

# 还可以通过bt查看当前时刻函数调用栈中的函数调用情况
(gdb) bt
#0  exec_simple_query (query_string=0x2b77f60 "select * from weather;")
    at postgres.c:994
#1  0x0000000000988f90 in PostgresMain (dbname=0x2ba23f8 "my_first_pgdb",
    username=0x2ba23d8 "usera") at postgres.c:4593
#2  0x00000000008c6598 in BackendRun (port=0x2b99cc0) at postmaster.c:4511
#3  0x00000000008c5f38 in BackendStartup (port=0x2b99cc0) at postmaster.c:4239
#4  0x00000000008c2542 in ServerLoop () at postmaster.c:1806
#5  0x00000000008c1e19 in PostmasterMain (argc=3, argv=0x2b72aa0) at postmaster.c:1478
#6  0x00000000007c7170 in main (argc=3, argv=0x2b72aa0) at main.c:202
- 其他命令可以查阅gdb命令大全
- 退出gdb调试,通过命令q
(gdb) c
Continuing.
^C
Program received signal SIGINT, Interrupt.
0x00007f692724f0c3 in __epoll_wait_nocancel () from /lib64/libc.so.6
(gdb) q
A debugging session is active.

	Inferior 1 [process 3418] will be detached.

Quit anyway? (y or n) y
Detaching from program: /opt/pgsql-15.3/bin/postgres, process 3418
[root@localhost ~]#
七、总结
-
./configure和make和make install的关系:./configure是是源代码安装的第一步,主要的作用是对即将安装的软件进行配置,检查当前的环境是否满足要安装软件的依赖关系(比如gcc),检测安装平台的目标特征。然后生成Makefile文件make用于编译,他从Makefile文件中读取指令。这一步报错的话,如果是缺少其他的第三方依赖,可以自己安装相关依赖后再次编译;如果是其他语法or语义错误,可以用./configure -help获取开发者联系方式,向开发者提交编译时提示的错误信息。make install用于安装,也是从Makefile中读取指令,将编译生成的可执行文件安装到指定的目录下(对应配置时的参数--prefix=/xx/x/),如果没有配置时指定安装目录,可执行文件默认放在/usr/local/bin,库文件默认放在/usr/local/lib,配置文件默认放在/usr/local/etc,其它的资源文件放在/usr/local/share。这一步一般需要root用户权限才能执行。- 安装源码,前两步是必不可少,且顺序不能变换的。
-
make clean和make disclean区别- 前者清除编译产生的可执行文件(
*.o)及目标文件 - 后者除了清除可执行文件和目标文件外,把configure所产生的
Makefile也清除掉。
- 前者清除编译产生的可执行文件(
-
PostgreSQL三个目录
- 源码目录:也就是解压缩之后的名为
postgresql-xx.x/的目录 - 安装目录:可执行文件(
createdb,psql等指令)和其他库文件,配置文件存放的位置,大部分bin/下的可执行文件都是二进制文件 - 数据簇目录:可以有很多个,每创建一个数据簇就有一个类似的目录,里面存放该数据簇中存储的所有数据库对象(包括关系表、索引、视图等等),不明白数据簇这一概念的可以去看一下原文:Chapter 1 Database Cluster, Databases, and Tables,翻译:PostpreSQL源码学习-Chapter1 Database Cluster, Databases and Tables
- 源码目录:也就是解压缩之后的名为


 985
985

 被折叠的 条评论
为什么被折叠?
被折叠的 条评论
为什么被折叠?
 到【灌水乐园】发言


