


 本文详细介绍了JavaScript中的DOM基础操作,包括通过ID、标签名和类名获取元素,事件处理程序,innerHTML和innerText的区别,分时操作,以及样式修改。此外,还讲解了事件委托的概念和实现,以及BOM的基础知识,如window事件、location和history。最后,探讨了jQuery的选择器、DOM操作和动画效果。
JS核心
一.DOM基础
1.获取标签元素
根据ID获取元素
document.getElementById()
1.网页从上往下加载 所以script要在标签下
2.get Element By Id 驼峰命名法
3.前面加document
4.get里面必须是字符串
		<div id="title1">标题</div>
	    var docu=document.getElementById('title1')
        console.log(docu)
        console.log(typeof docu)
根据标签名获取元素
document.getElementByTagName()
1.返回的是获取过来元素对象的集合 以伪数组形式储存
2.可以遍历打印里面的元素对象
3.如果页面只有一个li 返回的还是伪数组的形式
4.如果没有元素会返回空伪数组

    <ul>
        <li>DOMDOMDOM</li>
        <li>DOMDOMDOM</li>
        <li>DOMDOMDOM</li>
        <li>DOMDOMDOM</li>
        <li>DOMDOMDOM</li>
    </ul>
    <script>
        var lis = document.getElementsByTagName('li')
        console.log(lis)
        console.log(typeof lis)
     /*   for (var i = 0;i < lis.lenth;i++)
            console.log(lis[i])*/
    </script>

    <ol>
        <li>txt1</li>
        <li>txt2</li>
        <li>txt3</li>
        <li>txt4</li>
    </ol>
    <script>
        var ol = document.getElementsByTagName('ol');
        console.log(ol[0].getElementsByTagName('li'));
	</script>
根据类名获取元素
document.getElementsByClassName()
    <div class="box">box</div>
    <div class="box">box</div>
    <div class="box">box</div>
    <script>
        var boxs=document.getElementsByClassName('box')
        console.log(boxs)
    </script>
querySelector 选择
var box=document.querySelector('.box')		// 类  必须有 .
var div=document.querySelector('#title1')	// id  必须有 #
var li =document.querySelector('li')		// 标签 直接填标签名
2.事件基础
三要素: 事件源 事件类型 事件处理程序
- 事件源:按钮,链接,图片…
- 事件类型:如何触发 (鼠标点击,鼠标经过,键盘按下…)
- 事件处理程序: 通过一个函数赋值完成
例子
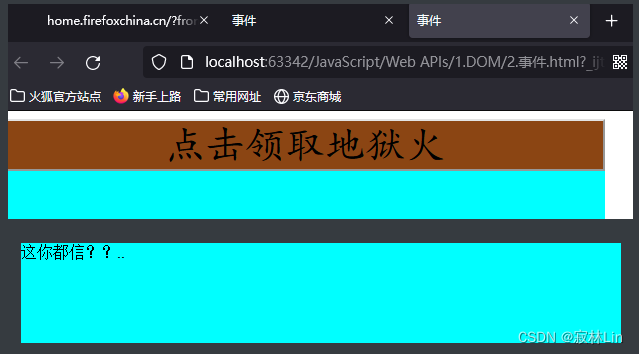
<!DOCTYPE html>
<html lang="en">
<head>
    <meta charset="UTF-8">
    <title>事件</title>
    <style>
        #diyuhuo{
            font-size: 40px;
            font-family: 楷体;
            width: 600px;
            background-color: saddlebrown;
        }
        .container{
            position: absolute;
            background: aqua;
            height: 100px;
            width: 600px;
        }
    </style>
</head>
<body>
        <div class="container">
            地狱火
            <button id="diyuhuo">
                点击领取地狱火
            </button>
        </div>
        <script>
        var btn=document.querySelector('#diyuhuo');
        var div=document.querySelector('.container')
        btn.hover=function (){
            btn.innerText= '快点我!!!'
        }
        btn.οnclick=function(){
            div.innerText='这你都信??..'
        }
        </script>
</body>
</html>
3.innerHTML:
-
innerHTML识别标签
-
innerText不识别标签
xxx.innnerHTML="<strong>粗体字</strong>"
都可读写,修改标签的内容
4.分时操作
<body>
    <div>
        <box id="title">
            time
        </box>
    </div>
    <script>
        var box=document.querySelector('#title')
        var time = new Date() //获取系统时间
        var boxtime =time.getSeconds()
        if (boxtime>0&&boxtime<=20){
            box.innerHTML = "<strong>现在是上旬</strong>"
        }else if (boxtime>20&&boxtime<=40){
            box.innerHTML = "<strong>现在是中旬</strong>"
        }else if (boxtime>40&&boxtime<=60){
            box.innerHTML = "<strong>现在是下旬</strong>"
        }
    </script>
</body>
5.选择修改样式
        div1.onclick=function() {
            flag++;
            if(flag==1){
                div1.style.backgroundColor="yellow";
                this.style.display='block';
            }else if(flag==2){
                div1.style.backgroundColor="blue";
            }else if(flag==3){
                this.style.backgroundColor="green";
            }else{
                this.style.opacity="1";
                flag=0;
            }
        }
6.循环精灵图
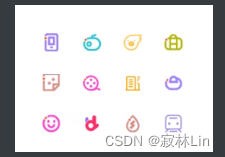
<!DOCTYPE html>
<html lang="en">
<head>
    <meta charset="UTF-8">
    <title>精灵图</title>
    <style>
        div{
            width:400px;
            height:300px;
            margin:auto;
        }
        div li{
            float:left;
            width:24px;
            height:24px;
            margin:25px;
            background:url(../../img/精灵图.png) no-repeat;
            list-style-type: none;
        }
    </style>
</head>
<body>
<div>
    <ul>
        <li></li>
        <li></li>
        <li></li>
        <li></li>
        <li></li>
        <li></li>
        <li></li>
        <li></li>
        <li></li>
        <li></li>
        <li></li>
        <li></li>
    </ul>
</div>
<script>
    var lis=document.querySelectorAll('li')
    for (let i=0; i<lis.length; i++){
        let index=24*i;
        lis[i].style.backgroundPosition='0 -'+index+'px';
    }
</script>
</body>
</html>
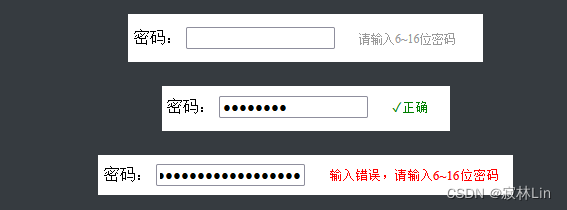
7.设置密码提示
<!DOCTYPE html>
<html lang="en">
<head>
    <meta charset="UTF-8">
    <title>passwordtips</title>
    <style>
        .register{
            margin-top:30px;
        }
        .tips{
            display:inline;
            font-size:12px;
            color:#999;
            padding-left: 20px;
        }

        .tipswrong{
            display:inline;
            color:red;
            font-size:13px;
            padding-left:20px;
        }
        .tipsright{
            display:inline;
            color:green;
            font-size:13px;
            padding-left:20px;
        }
    </style>
</head>
<body>
    <div class="register">
        密码:
        <input type="password" class="pwd">
        <p class="tips">请输入6~16位密码</p>
    </div>

    <script>
        /*首先判断的事件是表单失去焦点 onblur
        * 如果输入正确则提示正确✓
        * 如果输入不是6~16位,则提示错误
        * 采用className修改样式
        * */
        //1.获取元素
        var input=document.querySelector('.pwd');
        var tips=document.querySelector('.tips')
        input.onblur=function() {
            if (input.value.length < 6 || input.value.length > 16) {
                tips.className = 'tipswrong';
                tips.innerHTML = '输入错误,请输入6~16位密码'
            }
            if (input.value.length >= 6 && input.value.length <= 16) {
                tips.className = 'tipsright';
                tips.innerHTML = '✓正确'
            }
        }
    </script>
</body>
</html>
8.批量并排他
思路:
-
先遍历获取所有按钮,给上点击事件函数
-
循环中给出一个额外的循环来使所有元素属性还原
-
每点击一个就执行其事件,但之前已经还原所有其他元素
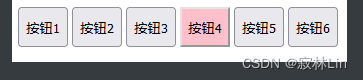
    <script>
        var btn=document.querySelectorAll('button');
        //1.先遍历选择所有按钮 给上事件函数
        for(let i =0;i<btn.length;i++)
        {
            btn[i].onclick =function () {
                for(let j = 0; j < btn.length; j++) {
                    btn[j].style.backgroundColor='';
                }
               this.style.backgroundColor='pink'
            }
        }
    </script>
二.重点核心
回顾:
1.元素
-
创建:
document.write innnerHTML createElement -
增:
appendChild insertBefore -
删:
removeChild -
改:
元素属性:src/href/title 元素内容: innerHTML innerText 表单元素: value type disabled... 元素样式:style className -
查:
DOM的API方法:getElementByid getElementByTagName ...
H5新方法:querySelector()  querySelectorAll()
节点操作:父(parentNode)、子(children)、兄(previousElementSibling)(nextElementSibling)
2.属性
主要针对自定义属性
-
setAttribute
-
getAttribute
-
removeAttribute
3.事件

4.绑定、解除事件
-
div.οnclick=function(){ — div.οnclick=null
}
-
div.addEventListener(‘click’,fn) — removeEventListener
function fn{
}
5.DOM事件流
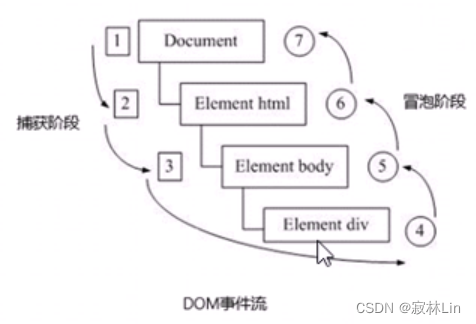
addEventListener('事件类型',function())

            d.addEventListener('click',function (){
                 alert(123);
                 d.removeEventListener('click')
                },true)
冒泡阶段 参数为 false son->father->body->html->document
阻止冒泡:
function fn(e) {
        alert('son')

        //  e.stopPropagation();  阻止冒泡
        // e.cancelBubble = true;  取消冒泡

        if (e && e.stopPropagation){    //如果认识e 和 stopPropagation 就用
            e.stopPropagation();
        }else{                          //否则用老版本window.event.cancelBubble
            window.e.cancelBubble = true
        }
    }
捕获阶段 参数为 true document->html->body->father->son
6.事件对象
获得事件信息,比如点击坐标,按的哪个键、所绑定的元素….
function(event){
	consolo.log(event);		//可以得到事件的相关信息
}
7.事件委托
原理:
不是每个子节点单独设置事件监听器,而是事件监听器设置在其父节点上,然后利用冒泡原理影响设置每个子节点。
案例:
给ul注册点击事件,然后利用事件对象的target来找到当前点击的li ,因为点击li,事件会冒泡到ul上,
ul有注册事件,就会触发事件监听器。
作用:
只操作一次DOM,提高了程序性能
<!DOCTYPE html>
<html lang="en">
<head>
    <meta charset="UTF-8">
    <title>Title</title>
</head>
<body>
<!--  非常常用  给父节点添加侦听器  通过事件冒泡影响子节点-->
    <ul style="list-style-type: none;">
        <li>西南石油大学</li>
        <li>西南石油大学</li>
        <li>西南石油大学</li>
        <li>西南石油大学</li>
        <li>西南石油大学</li>
    </ul>
<script>
    var ul=document.querySelector('ul')
    ul.addEventListener('click',fn)
    var flag=0
    function fn(e){
        //e.target指向子元素
        if(e.target.style.backgroundColor=='')
            e.target.style.backgroundColor='pink';
        else
            e.target.style.backgroundColor='';
    }
</script>
</body>
</html>
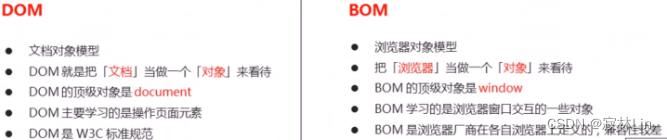
三.BOM基础
BOM缺乏标准, JavaScript语法的标准化组织是ECMA , DOM的标准化组织是W3C , BOM最初是Netscape浏览器标准的一部分。
1.window常用事件
- load 页面加载
- DOMContentLoaded 快速页面加载 (优先加载主要内容,再加载图片、样式信息…)
- resize 窗口大小变化事件
1.1.时间、计时器
- +new Date() 如果不传入任何参数,那么得到的就是当下的时间距离1970年1月1日0时0分0秒的毫秒数。
var nowTime = +new Date('2022-4-20 20:00:00');
//nowTime是1970-1-1 00:00:00 到 2022-4-20 20:00:00 之间的毫秒数
- 一般在数据前加上“+”是将数据转化为number类型
+'1'+2=3; //true
- parseInt方法接收两个参数 parseInt(string,radix)
string:要被解析的值。如果参数不是一个字符串,则将其转换为字符串(toString)。字符串开头的空白符将会被忽略。
parseInt('123'); // 123radix:可选。从 2 到 36,表示被解析的值的进制。例如说指定 10 就等于指定十进位。
parseInt(“11”, 2); // 3 (2+1)
1.2.执行机制
- 主线程执行栈 存放 同步任务 (console.log(),alert)
- 任务队列 存放 异步任务 (回调函数 如:setTiomeout)
事件循环:由于主线程不断的重复获得任务、执行任务、再获取任务、再执行,所以这种机制被称为事件循环( event loop )。
2.location
3.navigator.userAgent
navigator 包含设备信息
//判断用户打开网页的设备 一般判断是pc端还是移动端
4.history
常用方法:
- back()
- forward()
- go(x) 前进x页 x<0后退x页
四.网页特效
1.元素偏移量
- offsetLeft
- offsetTop
2.立即执行函数
立即执行函数最大的作用就是独立创建了一个作用域,里面所有的变量都是局部变量不会有命名冲突的情况。
//写法1   fn可不写
(function fn(a,b){
    console.log("hello")
    console.log(parseInt(a)+parseInt(b));
})('1','1');    //这里可以传参

   //写法2
    var div=document.querySelector('div');
    (function (e){
        console.log("hello2");
        console.log(e.innerText);
    }(div));

document.documentElement	//获取网页根元素
window.devicePixelRatio		//获取dpr物理像素比
dpr=	pc端:1		移动端:2
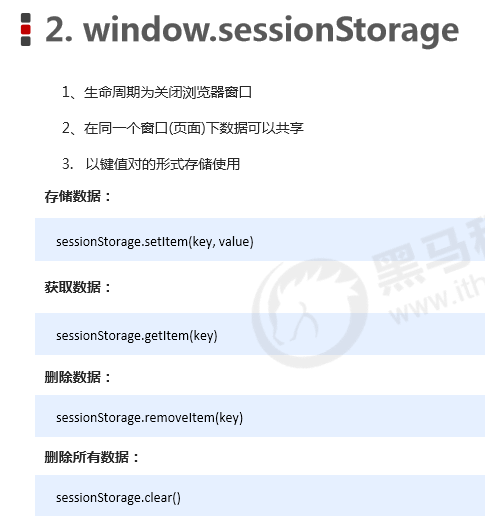
4.本地存储
-
window.sessionStorage
-
window.localStorage
随着互联网的快速发展,基于网页的应用越来越普遍,同时也变的越来越复杂,为了满足各种各样的需求,会经 常性在本地存储大量的数据,HTML5规范提出了相关解决方案。
本地存储特性
- 数据存储在用户浏览器中
- 设置、读取方便、甚至页面刷新不丢失数据
- 容量较大,sessionStorage约5M、localStorage约20M
- 只能存储字符串,可以将对象JSON.stringify() 编码后存储
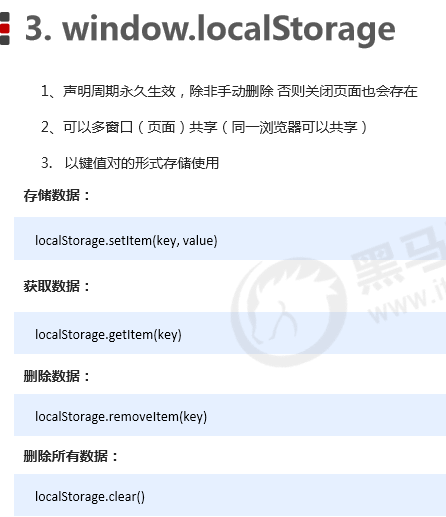
<!DOCTYPE html>
<html lang="en">

<head>
    <meta charset="UTF-8">
    <meta name="viewport" content="width=device-width, initial-scale=1.0">
    <meta http-equiv="X-UA-Compatible" content="ie=edge">
    <title>Document</title>
</head>

<body>
    <input type="text" id="username"> <input type="checkbox" name="" id="remember"> 记住用户名
    <script>
        var username = document.querySelector('#username');
        var remember = document.querySelector('#remember');
        if (localStorage.getItem('username')) {
            username.value = localStorage.getItem('username');
            remember.checked = true;
        }
        remember.addEventListener('change', function() {
            if (this.checked) {
                localStorage.setItem('username', username.value)
            } else {
                localStorage.removeItem('username');
            }
        })
    </script>
</body>
五.jQuery
1.$是jQuery的顶级对象
//等待文档加载完再执行函数
$(function() {
    $('div').hide();
})
2.jQuery对象和Dom对象
-
$(‘div’)[0] 实际上已经将jquery对象转化为dom对象
3.jQuery常用API
3.1基本选择器:
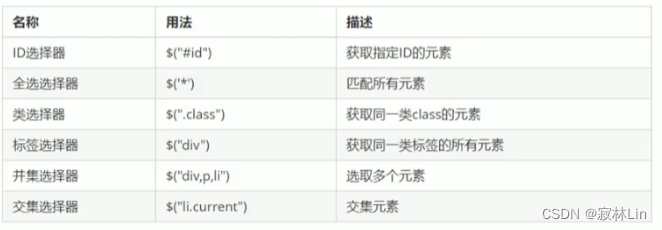
隐式迭代
遍历内部DOM元素的过程叫隐式迭代
$(‘li’).css(“background”,”pink”);
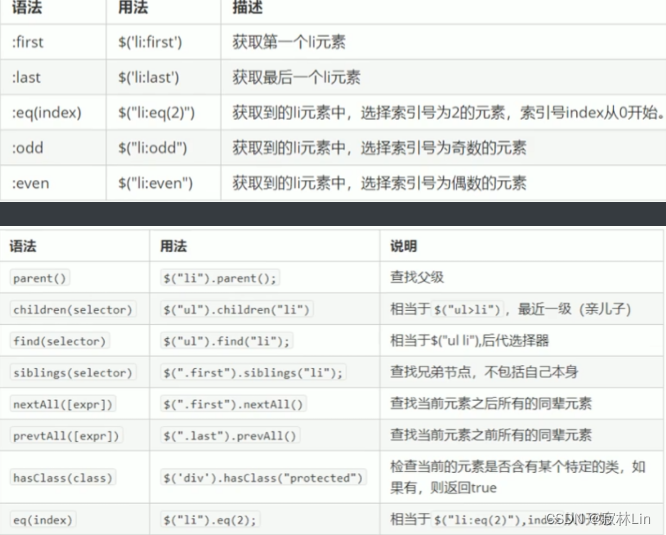
3.2筛选选择器
4.类操作
//利用一个新的类改变css属性
//add  remove  toggle
$('#btn1').click(function() {
    $('div').removeClass('classB').addClass('classA');
})
$('#btn2').click(function() {
    $('div').removeClass('classA').addClass('classB');
})
//toggle切换类  一次添加 再点一次移除
$('#btn3').click(function (){
    $('div').toggle('classC')
5.动画效果
extend


 被折叠的 条评论
为什么被折叠?
被折叠的 条评论
为什么被折叠?
 到【灌水乐园】发言


