


修改配置文件activemq.xml
在你activemq安装目录的conf下面,修改前记得备份
备份命令:
cp activemq.xml activemq.xml.bk
打开配置文件
找到下面这个:
        <persistenceAdapter>
            <kahaDB directory="${activemq.data}/kahadb"/>
        </persistenceAdapter>
这是默认的,你可以看下你安装目录下的 data 目录,下面会有一个kahadb的目录,这里面就是默认持久化的保存目录
现在修改为JDBC形式的:
        <persistenceAdapter>
            <jdbcPersistenceAdapter dataSource="#mysql-ds"/>
        </persistenceAdapter>
这些都在官方的网站上:
http://activemq.apache.org/persistence.html
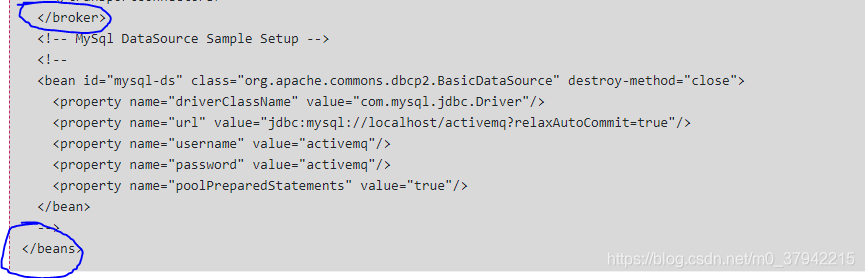
既然有数据源,那么就的需要配置数据源,所以在xml中配置数据源
官方默认
<bean id="mysql-ds" class="org.apache.commons.dbcp2.BasicDataSource" destroy-method="close">
    <property name="driverClassName" value="com.mysql.jdbc.Driver"/>
    <property name="url" value="jdbc:mysql://localhost/activemq?relaxAutoCommit=true"/>
    <property name="username" value="activemq"/>
    <property name="password" value="activemq"/>
    <property name="poolPreparedStatements" value="true"/>
  </bean>
自定义数据源
<bean id="mysql-ds" class="com.mchange.v2.c3p0.ComboPooledDataSource"
          destroy-method="close">
     <property name="driverClass" value="com.mysql.jdbc.Driver"/>
     <property name="jdbcUrl" value="jdbc:mysql://localhost/activemq?relaxAutoCommit=true"/>
     <property name="user" value="数据库用户名"/>
     <property name="password" value="密码"/>
    </bean>
PS:一定,一定要注意数据源参数名称,不然你启动不了的,有的是driverClassName,有的是driverClass;还有bean的id id=“mysql-ds” 和前面的要对应起来;
数据源写在这里:
配置好后,启动之前去数据库把数据库 先建起来 ;再把数据库连接jar包上传上去,如果采用自定义数据库连接池还需要传对应的jar上去
启动后,过几秒使用命令查看服务是否启动成功
linux:
netstat -anp | grep 你的端口号
windows:
netstat -ano | findstr 你的端口号
查不到就看看自己哪里配置错了
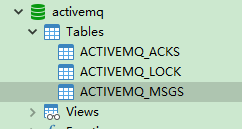
启动成功后看下数据库中是否有三张表被自动建起来了
SpringBoot实现ActiveMQ 队列(Queue)模式持久化
生产者
新建一个SpringBoot工程:
pom.xml
        <dependency>
            <groupId>org.springframework.boot</groupId>
            <artifactId>spring-boot-starter-activemq</artifactId>
        </dependency>
有这一个就行
application.yml
server:
  port: 8080
spring:
  activemq:
    broker-url: tcp://你的ip地址:61616
  jms:
#pub-sub-domain false表示queue模式
    pub-sub-domain: false
    template:
      delivery-mode: persistent
delivery-mode: persistent 表示持久化
delivery-mode: non_persistent 表示非持久化,这里使用持久化
配置类
@Configuration
public class ActiveMQConfig {
    @Bean
    public Queue getQueue(){
        return new ActiveMQQueue("SpringBoot_MQ");//队列名称是SpringBoot_MQ
    }

}
服务
package com.ysf.controller;

import org.springframework.beans.factory.annotation.Autowired;
import org.springframework.jms.core.JmsMessagingTemplate;
import org.springframework.scheduling.annotation.Scheduled;
import org.springframework.stereotype.Service;

import javax.jms.Topic;

@Service
public class PersistenceController {
    @Autowired
    Queue queue;

    @Autowired
    JmsMessagingTemplate jmsMessagingTemplate;

    @Scheduled(fixedDelay = 3000)
    public void send(){
        jmsMessagingTemplate.convertAndSend(queue,"springboot整合ActiveMQ测试队列持久化");
        System.out.println("已发送");
    }
}
@Scheduled(fixedDelay = 3000) 表示定时发送,每隔三秒
启动类
@SpringBootApplication
@EnableScheduling
@EnableJms
public class SpringbootamqpersistenceApplication {

    public static void main(String[] args) {
        SpringApplication.run(SpringbootamqpersistenceApplication.class, args);
    }

}
@EnableScheduling 表示开启定时任务
@EnableJms 表示开启Jms服务
写在上面那个配置类也行
消费者
新建一个SpringBoot工程
pom.xml
和生产者的一样
application.yml
把生产者的端口号改下
配置类
和生产者的一样
服务
package com.ysf.controller;

import org.springframework.beans.factory.annotation.Autowired;
import org.springframework.jms.annotation.JmsListener;
import org.springframework.jms.core.JmsMessagingTemplate;
import org.springframework.stereotype.Component;

import javax.jms.*;

@Component
public class PersistenceConsumerController {

    @JmsListener(destination = "SpringBoot_MQ")
    public void getMessage(String text) {
        System.out.println(text);
    }
  }
@JmsListener(destination = “SpringBoot_MQ”) 表示监听队列名称是SpringBoot_MQ的队列
这个和生产者中配置的是一致的
启动类
package 你的包名;

import org.springframework.boot.SpringApplication;
import org.springframework.boot.autoconfigure.SpringBootApplication;

@SpringBootApplication
@EnableJms
public class Springbootamqpersistence2Application {

    public static void main(String[] args) {
        SpringApplication.run(Springbootamqpersistence2Application.class, args);
    }

}
@EnableJms 开启Jms服务,有的不加也没问题
测试
启动生产者
查看控制台

查看数据库ACTIVEMQ_MSGS表数据

持久化数据了
PS: 先启动生产者,别急着启动消费者,不然数据没数据的
启动消费者
这时候一启动,消费者就会获取到消息,
控制台上面就会显示消费者数量1个,出队消息多少条
查看数据库,发现数据没有了,因为消费者一消费,数据就被删除了

PS:有问题,哪里写的不好欢迎留言,不想误人子弟 ;这些都是测试通过的


 194
194

 被折叠的 条评论
为什么被折叠?
被折叠的 条评论
为什么被折叠?
 到【灌水乐园】发言


