


Spring5(IoC和DI)
Spring的出现是为了简化应用开发,可以让更少的代码实现更多的功能。它是一个轻量级的DI/Ioc和AOP容器的开源框架,致力于构建轻量级JavaEE应用。其本身不仅涵盖了传统开发,还拓展到移动端,大数据等领域具体可查看https://spring.io/projects
容器:从程序设计的角度来说是装对象的对象,存在对对象放入、拿出等操作。容器管理着对象的生命周期(创建,销毁等),如Tomcat就是Servlet和Jsp的容器。
Spring为JavaEE的每层都提供了解决方案,所以也可以说Spring是JavaEE的全栈式框架。
Spring的优势(因为还没有深入学习,现在看没有什么概念。可以先了解一下)
1.Spring能帮我们低侵入/低耦合地根据配置文件创建及组装对象之间的依赖关系。
2.Spring面向切面编程能帮我们无耦合的实现日志记录,性能统计,安全控制等。
3.Spring能非常简单的且强大的声明式事务控制。
4.Spring提供了与第三方数据访问框架(Hibernate、JPA)无缝集成,且自己也提供了一套JDBC模板来方便的访问数据库。
5.Spring提供与第三方Web(如Struts1/2,JSF)框架无缝集成,且自己也提供了一套SpringMVC框架,来方便Web层搭建。
6.Spring能方便的与如Java Mail、任务调度、缓存框架等技术整合,降低开发难度。
Spring的核心
IoC:Inversion of Control(控制反转)将原来在程序中手动创建对象的控制权,交给Spring框架来管理。
反控:调用者只负责从Spring容器中获取需要使用的对象,不必关心对象的创建过程,也不关心该对象依赖对象的创建以及依赖关系的组装,把创建对象的控制反转权交给了Spring框架。
正控:若调用者想要使用某个对象,其自身就得负责该对象以及该对象所依赖对象的创建和组装。
DI:Dependency Injection(依赖注入)在Spring创建对象的过程中,将对象属性(常量,对象,集合)通过配置设值给该对象。
Spring IOC容器是如何知道哪些是它应该管理的对象:
此时需要配置文件,SpringIoC容器通过读取配置文件中的配置元数据,通过元数据对应用中的各个对象进行实例化及装配。
元数据的配置有三种方式:
1.XML-based configuration 基于XML文件配置
<?xml version="1.0" encoding="UTF-8"?>
<beans xmlns="http://www.springframework.org/schema/beans"
	xmlns:xsi="http://www.w3.org/2001/XMLSchema-instance"
	xsi:schemaLocation="http://www.springframework.org/schema/beans http://www.springframework.org/schema/beans/spring-beans.xsd">

	<!--告诉Spring控制器,需要管理哪些类的创建 -->
	<bean id="helloWorld" class="cn.bhy.helloworld.HelloWorld">
		<!-- 寻找setUsername方法,进行属性赋值 注意name属性和bean中的set方法名有关系,跟属性没有关系 -->
		<property name="username" value="张三"></property>
		<property name="age" value="20"></property>
	</bean>
</beans>
2.Annotation-based configuration 基于注解配置
3.Java-based configuration基于Java代码配置
SpringIoC管理bean的原理
1.通过Resource对象加载配置文件
2.解析配置文件,得到指定名称的bean
3.解析bean元素,id作为bean的名字,class用于反射得到bean的实例 注意:此时需要有个一个无参构造器,与访问权限无关
4.调用getBean方法的时候,从容器中返回对象实例
手写模拟IoC实现
@Test
	public void testSpringIoC() throws Exception {
		HelloWorld hello = null;
		//--------------模拟springIoC的工作流程--------------------
		String path = "cn.bhy.helloworld.HelloWorld"; //类路径
		Class clzz = Class.forName(path);
		Constructor con = clzz.getConstructor(); //获取对象的无参构造器
		con.setAccessible(true);
		Object obj = con.newInstance(); //创建独享
		BeanInfo beanInfo = Introspector.getBeanInfo(clzz, Object.class); //获取对象的BeanInfo
		PropertyDescriptor[] pro =beanInfo.getPropertyDescriptors();//获取对象所有属性
		for(PropertyDescriptor pd:pro) { //遍历属性,对比属性名并赋值
			String propertyName = pd.getName();
			if("username".equals(propertyName)){
				pd.getWriteMethod().invoke(obj, "李四");
			}else if("age".equals(propertyName)) {
				pd.getWriteMethod().invoke(obj, 33);
			}
		}
		hello = (HelloWorld) obj;
		hello.sayHello();
	}
public class HelloWorld {
	private String username;
	private int age;
	public void setUsername(String username) {
		this.username = username;
	}

	public void setAge(int age) {
		this.age = age;
	}

	public void sayHello() {
		System.out.println("欢迎来到Spring5的世界"+username+" "+age+"岁");
	}

}
getBean方法的三种签名
Object getBean(String name) throws BeansException;根据配置文件中的id获取bean,需要强转,因为返回类型为Object
<T> T getBean(Class<T> requiredType) throws BeansException;根据类获取bean,不需要强转。注意:如果配置文件中有多个同类型的bean配置,则会报错
<T> T getBean(String name, @Nullable Class<T> requiredType) throws BeansException;根据配置文件中的id 和类型获取bean,不需要强转,也不限制配置文件中同类型bean的配置
@Autowired注解默认按照byType来查找bean,如果有多个同类型的bean则继续使用byName方式来继续查找。加入@Qualifier("z")注解后,主动设置通过z来进行byName方式查找。否则按@Autowired修饰的属性名查找。
一:IoC容器
1.BeanFactory和ApplicationContext
public class App {
	/**
	 * 使用BeanFactory创建bean
	 * @throws Exception
	 */
	@Test
	void testName() throws Exception {
		Resource resource = new ClassPathResource("cn/bhy/container/container.xml");
		BeanFactory beanFactory = new XmlBeanFactory(resource);
		Person person =beanFactory.getBean("person", Person.class);
		System.out.println(person);
	}
	/**
	 * 使用ApplicationContext创建bean
	 * @throws Exception
	 */
	@Test
	void testName_one() throws Exception {
		ApplicationContext atx = new ClassPathXmlApplicationContext("cn/bhy/container/container.xml");
		Person person=atx.getBean("person", Person.class);
		System.out.println(person);
	}
}
BeanFactory:Spring最底层的接口,只提供了IoC功能,负责创建、组装、管理bean,在应用中一般不使用。
ApplicationContext接口继承了BeanFactory,除此之外还提供AOP集成、国际化处理、事件传播、统一资源加载等功能。
2.bean创建时机
BeanFactory需要等到获取某个bean的时候才去创建--延迟初始化。
ApplicationContext在启动Spring容器的时候就会创建所有的bean。
二:bean实例化方式
1.构造器初始化:需要有无参构造器(跟访问权限无关)
2.静态工厂方法实例化:解决系统遗留问题(配置文件上factory-method属性配置静态方法名称)
3.实例工厂方法实例化:解决系统遗留问题(配置文件需要配置两个bean)
4.实现FactoryBean接口实例化:实例工厂变种。工厂类实现FactoryBean接口。配置文件只需配置一个bean即可。
三:bean的作用域
singleton:单例
prototype:多例
request:每次请求都返回一个新的bean实例
session:每次会话都返回一个新的bean实例
application:整个应用中只有一个实例
websocket:websocket的完整生命周期中将创建并提供一个实例。
四:bean的初始化和销毁
1.可以在配置文件中配置init-method属性(初始化方法,在构造器执行之后立马执行)
destroy-method(定义销毁之前的方法,在销毁之前执行) 注意:scope为多例时,不会调用destroy- method定义的方法
2.在普通测试情况下通过applicationContext获取bean实例的话不会主动调用destroy-method中定义的方法
解决方法:1.可以手动调用bean容器的关闭方法close()
2.引入jar包lombok在需要被关闭的bean容器上用@Cleanup注解
3.手动调用容器的registerShutdownHook()
五:bean的实例化过程
1.启动Spring容器
2.创建bean对象 -->调用bean的构造器
3.调用bean对象的init-method初始化方法
4.获取bean对象,调用bean对象中的某一个方法
5.调用bean对象的destroy-method销毁方法
6.Spring容器销毁
DI通过XML配置装配
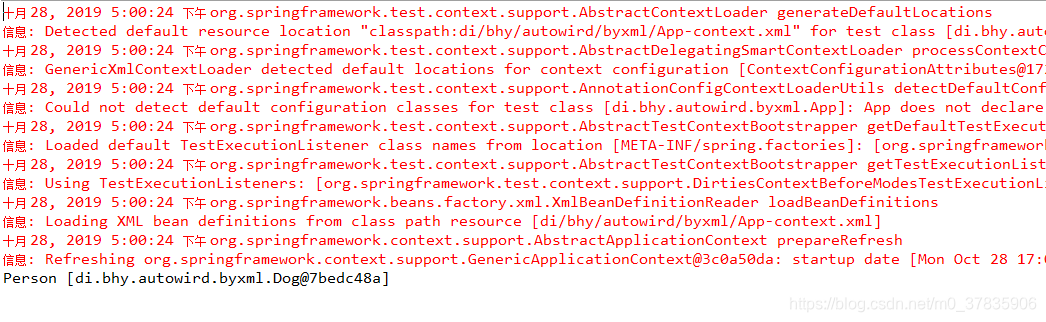
一:XML自动装配(不推荐) 可以设置autowire属性进行装配。注意byName是对应set方法的方法名(setDog对应dog)
package di.bhy.autowird.byxml;

public class Dog {
}
package di.bhy.autowird.byxml;

public class Person {
	private Dog dog;

	public void setDog(Dog dog) {
		this.dog = dog;
	}
	public String toString() {
	return "Person ["+dog+"]";
	}
}
<?xml version="1.0" encoding="UTF-8"?>
<beans xmlns="http://www.springframework.org/schema/beans"
	xmlns:xsi="http://www.w3.org/2001/XMLSchema-instance"
	xsi:schemaLocation="http://www.springframework.org/schema/beans http://www.springframework.org/schema/beans/spring-beans.xsd">
<bean id="dog" class="di.bhy.autowird.byxml.Dog"></bean>
<bean id="person" class="di.bhy.autowird.byxml.Person" autowire="byName"/>
</beans>
package di.bhy.autowird.byxml;

import org.junit.jupiter.api.Test;
import org.springframework.beans.factory.annotation.Autowired;
import org.springframework.test.context.junit.jupiter.SpringJUnitConfig;

@SpringJUnitConfig
public class App {
	@Autowired
	private Person person;
	@Test
	void test() throws Exception {
		System.out.println(person);
	}
}
运行结果:
二:通过setter方法注入
数据类型:常量类型(固定不变)
对象类型(引用类型)
集合类型<set><list>等
常量和对象类型:
package di.bhy.autowird.bysetter;
/**
 * Cat类
 */
public class Cat {
	private String name; //属性name

	public void setName(String name) {
		this.name = name;
	}

	public String getName() {
		return name;
	}

}
package di.bhy.autowird.bysetter;
/**
*Person类
*/
public class Person {
private Cat cat; //cat类作为属性
public void setCat(Cat cat) {
this.cat = cat;
}
public String toString() {
return "Person [cat=" + cat +"name is "+cat.getName()+ "]";
}
}
package di.bhy.autowird.bysetter;

import java.math.BigDecimal;
/**
 *Employee类
 */
public class Employee {
	private String name; //name属性 提供set方法
	private Integer age; //age属性 提供set方法
	private BigDecimal salary; //salary属性 提供salary方法
	public void setName(String name) {
		this.name = name;
	}
	public void setAge(Integer age) {
		this.age = age;
	}
	public void setSalary(BigDecimal salary) {
		this.salary = salary;
	}
	public String toString() {
		return "Employee [name=" + name + ", age=" + age + ", salary=" + salary + "]";
	}

}
<?xml version="1.0" encoding="UTF-8"?>
<beans xmlns="http://www.springframework.org/schema/beans"
	xmlns:xsi="http://www.w3.org/2001/XMLSchema-instance"
	xsi:schemaLocation="http://www.springframework.org/schema/beans http://www.springframework.org/schema/beans/spring-beans.xsd">
<!--常量类型注入 name属性值对应set方法名 (setName ->name)-->
<bean id="employee" class="di.bhy.autowird.bysetter.Employee" autowire="byName">
	<property name="name" value="张三"></property>
	<property name="age" value="1"></property>
	<property name="salary" value="23.456"></property>
</bean>
<!--常量类型注入 name属性值对应set方法名 (setName ->name)-->
<bean id="cat" class="di.bhy.autowird.bysetter.Cat">
	<property name="name" value="咖啡"></property>
</bean>
<!--对象类型注入 ref属性值对应要配置的bean的id-->
<bean id="person" class="di.bhy.autowird.bysetter.Person">
	<property name="cat" ref="cat"></property>
</bean>
</beans>
package di.bhy.autowird.bysetter;

import org.junit.jupiter.api.Test;
import org.springframework.beans.factory.annotation.Autowired;
import org.springframework.test.context.junit.jupiter.SpringJUnitConfig;
/**
 * App测试类
 */
@SpringJUnitConfig
public class App {
	@Autowired
	private Employee employee;
	@Autowired
	private Person person;
	@Test
	void test() throws Exception {
		System.out.println(employee);
	}
	@Test
	void testOne() throws Exception {
		System.out.println(person);
	}
}
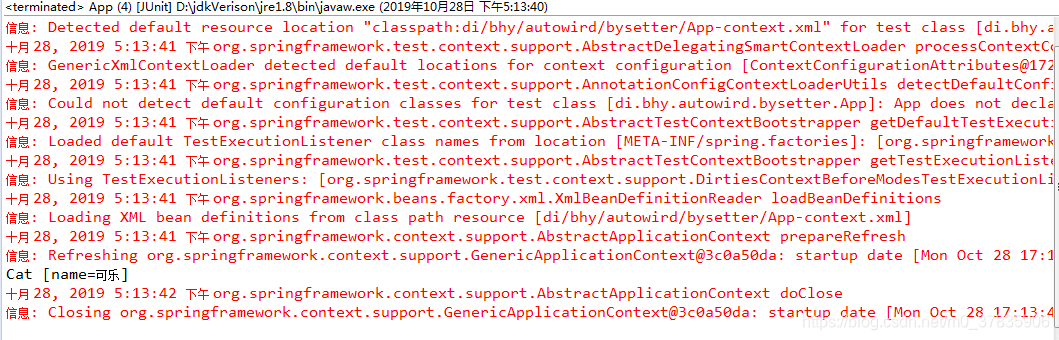
常量注入简单形式:
package di.bhy.autowird.bysetter;

public class Cat {
	private String name;

	public void setName(String name) {
		this.name = name;
	}

	public String toString() {
		return "Cat [name=" + name + "]";
	}

}
<?xml version="1.0" encoding="UTF-8"?>
<beans xmlns="http://www.springframework.org/schema/beans"
	xmlns:xsi="http://www.w3.org/2001/XMLSchema-instance"
	xmlns:p="http://www.springframework.org/schema/p" <!--注意新增-->
	xsi:schemaLocation="http://www.springframework.org/schema/beans http://www.springframework.org/schema/beans/spring-beans.xsd">
<bean id="cat" class="di.bhy.autowird.bysetter.Cat"
	p:name="可乐"
/>
</beans>
package di.bhy.autowird.bysetter;

import org.junit.jupiter.api.Test;
import org.springframework.beans.factory.annotation.Autowired;
import org.springframework.test.context.junit.jupiter.SpringJUnitConfig;

@SpringJUnitConfig
public class App {
	@Autowired
	private Cat cat;
	@Test
	void testTwo() throws Exception {
		System.out.println(cat);
	}
}
运行结果:
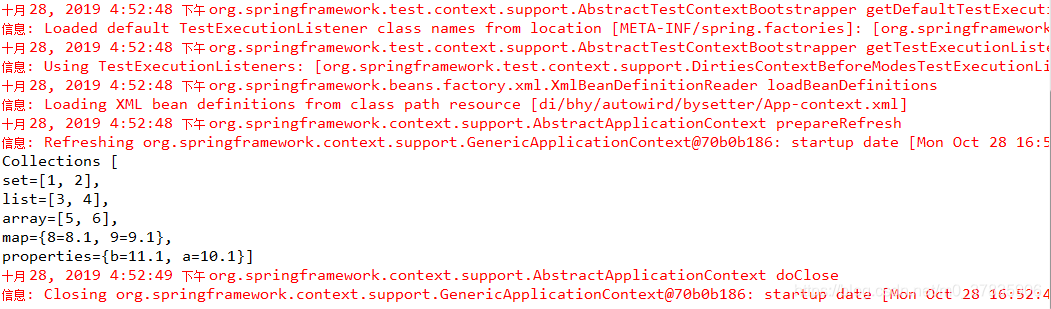
集合类型:
package di.bhy.autowird.bysetter;

import java.util.Arrays;
import java.util.List;
import java.util.Map;
import java.util.Properties;
import java.util.Set;
/**
 * 集合类
 * @author bhy
 * 包含Set,List,String数组,Map,Properties类型属性并提供set方法
 */
public class Collections {
	private Set<String> set;
	private List<String> list;
	private String[] array;
	private Map<String,String> map;
	private Properties properties;
	public void setSet(Set<String> set) {
		this.set = set;
	}
	public void setList(List<String> list) {
		this.list = list;
	}
	public void setArray(String[] array) {
		this.array = array;
	}
	public void setMap(Map<String, String> map) {
		this.map = map;
	}
	public void setProperties(Properties properties) {
		this.properties = properties;
	}
	public String toString() {
		return "Collections [\nset=" + set + ", \nlist=" + list + ", \narray=" + Arrays.toString(array) + ", \nmap=" + map
				+ ", \nproperties=" + properties + "]";
	}
}
<?xml version="1.0" encoding="UTF-8"?>
<beans xmlns="http://www.springframework.org/schema/beans"
xmlns:xsi="http://www.w3.org/2001/XMLSchema-instance"
xsi:schemaLocation="http://www.springframework.org/schema/beans http://www.springframework.org/schema/beans/spring-beans.xsd">
<!-- 集合注入 -->
<bean id="collections" class="di.bhy.autowird.bysetter.Collections">
<property name="set">
<set>
<value>1</value>
<value>2</value>
</set>
</property>
<property name="list">
<list>
<value>3</value>
<value>4</value>
</list>
</property>
<property name="array">
<array>
<value>5</value>
<value>6</value>
</array>
</property>
<property name="map">
<map>
<entry key="8" value="8.1"></entry>
<entry key="9" value="9.1"></entry>
</map>
</property>
<!-- Properties有多种赋值写法,这种是比较常用、简便的方法 -->
<property name="properties">
<value>
a=10.1
b=11.1
</value>
</property>
</bean>
</beans>package di.bhy.autowird.bysetter;
import org.junit.jupiter.api.Test;
import org.springframework.beans.factory.annotation.Autowired;
import org.springframework.test.context.junit.jupiter.SpringJUnitConfig;
@SpringJUnitConfig
public class App {
@Autowired
private Collections collections;
@Test
void testTwo() throws Exception {
System.out.println(collections);
}
}
运行结果:
三:构造器注入
package di.bhy.autowird.byconstructor;

import java.util.Arrays;
import java.util.List;
import java.util.Map;
import java.util.Properties;
import java.util.Set;
/**
 * 集合类
 * @author bhy
 * 包含Set,List,String数组,Map,Properties类型属性
 */
public class Collections {
	private Set<String> set;
	private List<String> list;
	private String[] array;
	private Map<String,String> map;
	private Properties properties;

	public Collections(Set<String> set, List<String> list, String[] array, Map<String, String> map,
			Properties properties) {
		this.set = set;
		this.list = list;
		this.array = array;
		this.map = map;
		this.properties = properties;
	}

	public String toString() {
		return "Collections [\nset=" + set + ", \nlist=" + list + ", \narray=" + Arrays.toString(array) + ", \nmap=" + map
				+ ", \nproperties=" + properties + "]";
	}
}
package di.bhy.autowird.byconstructor;
/**
 * Employee类
 * @author bhy
 *
 */
public class Employee {
	private String newName;
	private String oldName;
	private Integer age;
	private Collections collections;
	public Employee(String newName, String oldName, Integer age, Collections collections) {
		this.newName = newName;
		this.oldName = oldName;
		this.age = age;
		this.collections = collections;
	}
	@Override
	public String toString() {
		return "Employee [newName=" + newName + ", oldName=" + oldName + ", age=" + age + ", collections=" + collections
				+ "]";
	}
}
<?xml version="1.0" encoding="UTF-8"?>
<beans xmlns="http://www.springframework.org/schema/beans"
	xmlns:xsi="http://www.w3.org/2001/XMLSchema-instance"
	xsi:schemaLocation="http://www.springframework.org/schema/beans http://www.springframework.org/schema/beans/spring-beans.xsd">
<bean id="collections" class="di.bhy.autowird.byconstructor.Collections">
	<constructor-arg type="Set" value="1,2,3,4,5"></constructor-arg>
	<constructor-arg type="List" value="6,7,8,9,10"></constructor-arg>
	<constructor-arg name="array">
		<array>
			<value>11</value>
			<value>12</value>
		</array>
	</constructor-arg>
	<constructor-arg index="3">
		<map>
			<entry key="a" value="1"></entry>
			<entry key="b" value="2"></entry>
		</map>
	</constructor-arg>
	<constructor-arg type="Properties">
		<props>
			<prop key="c">3</prop>
			<prop key="d">4</prop>
		</props>
	</constructor-arg>
</bean>
<bean id="employee" class="di.bhy.autowird.byconstructor.Employee">
    <!-- index属性代表注入类的第几个属性从0开始 -->
	<constructor-arg index="1" value="旧名字"/>
	<constructor-arg index="0" value="新名字"/>
	<constructor-arg name="age" value="99"></constructor-arg>
	<constructor-arg ref="collections"></constructor-arg>
</bean>
</beans>
package di.bhy.autowird.byconstructor;
import org.junit.jupiter.api.Test;
import org.springframework.beans.factory.annotation.Autowired;
import org.springframework.test.context.junit.jupiter.SpringJUnitConfig;
@SpringJUnitConfig
public class App {
@Autowired
private Employee employee;
@Test
void testName() throws Exception {
System.out.println(employee);
}
}
四:bean元素继承
package di.bhy.autowird.aboutextends;
/**
 * SomeBean1类,包含两个公共属性和一个非公共属性
 * @author bhy
 * 提供set方法并重写toString方法
 */
public class SomeBean1 {
	private String name;
	private Integer age;
	private String color;
	public void setName(String name) {
		this.name = name;
	}
	public void setAge(Integer age) {
		this.age = age;
	}
	public void setColor(String color) {
		this.color = color;
	}
	@Override
	public String toString() {
		return "SomeBean1 [name=" + name + ", age=" + age + ", color=" + color + "]";
	}

}
package di.bhy.autowird.aboutextends;
/**
 * SomeBean2类,包含两个公共属性和一个非公共属性
 * @author bhy
 * 提供set方法并重写toString方法
 */
public class SomeBean2 {
	private String name;
	private Integer age;
	private Integer weight;
	public void setName(String name) {
		this.name = name;
	}
	public void setAge(Integer age) {
		this.age = age;
	}
	public void setWeight(Integer weight) {
		this.weight = weight;
	}
	@Override
	public String toString() {
		return "SomeBean2 [name=" + name + ", age=" + age + ", weight=" + weight + "]";
	}

}
<?xml version="1.0" encoding="UTF-8"?>
<beans xmlns="http://www.springframework.org/schema/beans"
	xmlns:xsi="http://www.w3.org/2001/XMLSchema-instance"
	xsi:schemaLocation="http://www.springframework.org/schema/beans http://www.springframework.org/schema/beans/spring-beans.xsd">
	<!-- 抽离的公共属性,abstract=true修饰,表示不需要实例化 -->
	<bean id="someBean" abstract="true">
		<property name="name" value="张三"></property>
		<property name="age" value="23"></property>
	</bean>
	<!-- 设置父级bean为someBean 并为自己独有属性赋值 -->
	<bean id="someBean1" class="di.bhy.autowird.aboutextends.SomeBean1" parent="someBean">
		<property name="color" value="red"></property>
	</bean>
	<!-- 设置父级bean为someBean 并为自己独有属性赋值 -->
	<bean id="someBean2" class="di.bhy.autowird.aboutextends.SomeBean2" parent="someBean">
		<property name="weight" value="158"></property>
	</bean>
</beans>
package di.bhy.autowird.aboutextends;
import org.junit.jupiter.api.Test;
import org.springframework.beans.factory.annotation.Autowired;
import org.springframework.test.context.junit.jupiter.SpringJUnitConfig;
/**
 * 测试类
 * @author bhy
 * 输出两个bean
 */
@SpringJUnitConfig
public class App {
	@Autowired
	private SomeBean1 someBean1;
	@Autowired
	private SomeBean2 someBean2;
	@Test
	void testName() throws Exception {
		System.out.println(someBean1);
		System.out.println(someBean2);
	}
}
五:配置数据库连接池
<?xml version="1.0" encoding="UTF-8"?>
<beans xmlns="http://www.springframework.org/schema/beans"
xmlns:xsi="http://www.w3.org/2001/XMLSchema-instance"
xsi:schemaLocation="http://www.springframework.org/schema/beans http://www.springframework.org/schema/beans/spring-beans.xsd">
<bean id="ds" class="com.alibaba.druid.pool.DruidDataSource">
<!-- 注意高版本的mysql驱动和url信息以如下方式书写 -->
<property name="driverClassName" value="com.mysql.cj.jdbc.Driver"></property>
<property name="url" value="jdbc:mysql://localhost:3306/bhy?useUnicode=true&characterEncoding=utf-8&userSSL=false&serverTimezone=GMT%2B8"></property>
<property name="username" value="root"></property>
<property name="password" value="root"></property>
<property name="initialSize" value="2"></property>
</bean>
</beans>
package di.bhy.autowird.aboutjdbc;
import java.sql.Connection;
import java.sql.PreparedStatement;
import java.sql.ResultSet;
import org.junit.jupiter.api.Test;
import org.springframework.beans.factory.annotation.Autowired;
import org.springframework.test.context.junit.jupiter.SpringJUnitConfig;
import com.alibaba.druid.pool.DruidDataSource;
import lombok.Cleanup;
@SpringJUnitConfig
public class App {
	@Autowired
	DruidDataSource ds;
	@Test
	void testName() throws Exception {
		@Cleanup
		Connection conn=ds.getConnection();
		@Cleanup
		PreparedStatement ps = conn.prepareStatement("select * from user");
		@Cleanup
		ResultSet rs = ps.executeQuery();
		while(rs.next()) {
			System.out.println("userID:"+rs.getString("userID"));
			System.out.println("userName:"+rs.getString("userName"));
			System.out.print("password:"+rs.getString("password"));
		}
	}
}
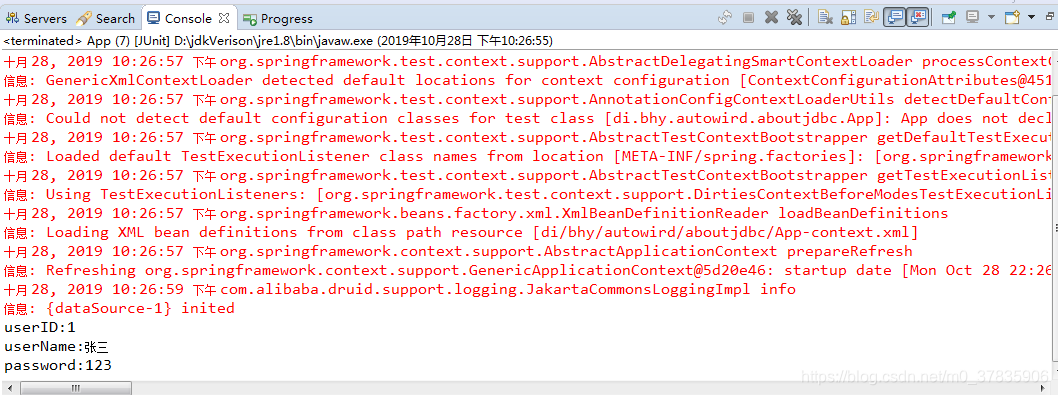
运行结果:
外部文件形式配置jdbc
db.properties
driverClassName=com.mysql.cj.jdbc.Driver
url=jdbc:mysql://localhost:3306/bhy?useUnicode=true&characterEncoding=utf-8&userSSL=false&serverTimezone=GMT%2B8
username=root
password=root
initialSize=2
注意:1.高版本的驱动书写方法 2.url在xml中需替换& 3.如果在外部文件引入属性值,则要设置覆盖系统属性,否则避免使用username作为key传值。
<?xml version="1.0" encoding="UTF-8"?>
<beans xmlns="http://www.springframework.org/schema/beans"
xmlns:xsi="http://www.w3.org/2001/XMLSchema-instance"
xmlns:context="http://www.springframework.org/schema/context"
xsi:schemaLocation="http://www.springframework.org/schema/beans
http://www.springframework.org/schema/beans/spring-beans.xsd
http://www.springframework.org/schema/context
http://www.springframework.org/schema/context/spring-context-4.3.xsd">
<!-- 读取properties文件 -->
<context:property-placeholder location="classpath:db.properties" system-properties-mode="FALLBACK"/>
<bean id="ds" class="com.alibaba.druid.pool.DruidDataSource">
<!-- 注意1:高版本的mysql驱动信息以如下方式书写 -->
<property name="driverClassName" value="${driverClassName}"></property>
<!-- 注意2:url信息在mxl配置需把&替换成& 如果在properties配置则不用替换
useUnicode=true&characterEncoding=utf-8&userSSL=false&serverTimezone=GMT%2B8
-->
<property name="url" value="${url}"></property>
<!-- 注意3:如果在properties文件中设置值,则不能以username作为key。也可以在ntext:property-placeholder 设置属性system-properties-mode="FALLBACK" 覆盖系统属性-->
<property name="username" value="${username}"></property>
<property name="password" value="${password}"></property>
<property name="initialSize" value="${initialSize}"></property>
</bean>
</beans>
package di.bhy.autowird.aboutjdbc;
import java.sql.Connection;
import java.sql.PreparedStatement;
import java.sql.ResultSet;
import org.junit.jupiter.api.Test;
import org.springframework.beans.factory.annotation.Autowired;
import org.springframework.test.context.junit.jupiter.SpringJUnitConfig;
import com.alibaba.druid.pool.DruidDataSource;
import lombok.Cleanup;
@SpringJUnitConfig
public class App {
	@Autowired
	DruidDataSource ds;
	@Test
	void testName() throws Exception {
		@Cleanup
		Connection conn=ds.getConnection();
		@Cleanup
		PreparedStatement ps = conn.prepareStatement("select * from user");
		@Cleanup
		ResultSet rs = ps.executeQuery();
		while(rs.next()) {
			System.out.println("userID:"+rs.getString("userID"));
			System.out.println("userName:"+rs.getString("userName"));
			System.out.print("password:"+rs.getString("password"));
		}
	}
}
通过注解自动装配
略
通过java代码装配
略
注册案例(IOC+DI)
package register.bhy.demo.dao.impl;

import java.sql.Connection;
import java.sql.PreparedStatement;
import java.sql.SQLException;
import javax.sql.DataSource;
import lombok.Cleanup;
import lombok.Setter;
import register.bhy.demo.dao.UserDao;
import register.bhy.demo.model.User;
public class UserDaoImpl implements UserDao{
	//lombok提供set方法
	@Setter
	private DataSource datasource;
	public void inserUser(User user) throws SQLException {
		System.out.println("dao中的inserUser()方法");
		@Cleanup
		Connection conn=datasource.getConnection();
		@Cleanup
		PreparedStatement ps = conn.prepareStatement("insert into user(userID,userName,password,status) values(?,?,?,?)");
		ps.setString(1,user.getUserID()); //添加参数
		ps.setString(2,user.getUserName());
		ps.setString(3,user.getPassword());
		ps.setString(4,user.getStatus());
		int x = ps.executeUpdate(); //返回操作行数
		if(x>0){
			System.out.println("插入成功");
		}
	}
}
package register.bhy.demo.dao;

import java.sql.SQLException;
import register.bhy.demo.model.User;
public interface UserDao {
	//插入操作
	public void inserUser(User user)throws SQLException;
}
package register.bhy.demo.service.impl;

import java.sql.SQLException;
import lombok.Setter;
import register.bhy.demo.dao.UserDao;
import register.bhy.demo.model.User;
import register.bhy.demo.service.UserService;
public class UserServiceImpl implements UserService{
	@Setter
	private UserDao userDao;

	public void inserUser(User user) throws SQLException {
		System.out.println("service中的inserUser()方法");
		userDao.inserUser(user);
	}
}
package register.bhy.demo.service;

import java.sql.SQLException;
import register.bhy.demo.model.User;
public interface UserService {
	//插入操作
	public void inserUser(User user) throws SQLException;
}
package register.bhy.demo.action;

import java.sql.SQLException;
import lombok.Setter;
import register.bhy.demo.model.User;
import register.bhy.demo.service.UserService;
public class UserAction {
	@Setter
	private UserService userService;
	public void inserUser(User user) throws SQLException {
		System.out.println("action中的inserUser()方法");
		userService.inserUser(user);
	}
}
package register.bhy.demo;
import org.junit.jupiter.api.Test;
import org.springframework.beans.factory.annotation.Autowired;
import org.springframework.test.context.junit.jupiter.SpringJUnitConfig;
import register.bhy.demo.action.UserAction;
import register.bhy.demo.model.User;
@SpringJUnitConfig
public class App {
	@Autowired
	private UserAction userAction;
	@Autowired
	private User user;
	@Test
	void testName() throws Exception {
		userAction.inserUser(user);
	}
}
<?xml version="1.0" encoding="UTF-8"?>
<beans xmlns="http://www.springframework.org/schema/beans"
xmlns:xsi="http://www.w3.org/2001/XMLSchema-instance"
xmlns:context="http://www.springframework.org/schema/context"
xsi:schemaLocation="http://www.springframework.org/schema/beans
http://www.springframework.org/schema/beans/spring-beans.xsd
http://www.springframework.org/schema/context
http://www.springframework.org/schema/context/spring-context-4.3.xsd">
<!-- 读取properties文件 -->
<context:property-placeholder location="classpath:db.properties" system-properties-mode="FALLBACK"/>
<bean id="datasource" class="com.alibaba.druid.pool.DruidDataSource">
<!-- 注意1:高版本的mysql驱动信息以如下方式书写 -->
<property name="driverClassName" value="${driverClassName}"></property>
<!-- 注意2:url信息在mxl配置需把&替换成& 如果在properties配置则不用替换
useUnicode=true&characterEncoding=utf-8&userSSL=false&serverTimezone=GMT%2B8
-->
<property name="url" value="${url}"></property>
<!-- 注意3:如果在properties文件中设置值,则不能以username作为key。也可以在ntext:property-placeholder 设置属性system-properties-mode="FALLBACK" 覆盖系统属性-->
<property name="username" value="${username}"></property>
<property name="password" value="${password}"></property>
<property name="initialSize" value="${initialSize}"></property>
</bean>
<bean id="userDao" class="register.bhy.demo.dao.impl.UserDaoImpl">
<property name="datasource" ref="datasource"></property>
</bean>
<bean id="userService" class="register.bhy.demo.service.impl.UserServiceImpl">
<property name="userDao" ref="userDao"></property>
</bean>
<bean id="userAction" class="register.bhy.demo.action.UserAction">
<property name="userService" ref="userService"></property>
</bean>
<bean id="user" class="register.bhy.demo.model.User">
<property name="userID" value="4"></property>
<property name="userName" value="王五"></property>
<property name="password" value="1234"></property>
<property name="status" value="2"></property>
</bean>
</beans>
使用注解配置
DI注解
一、@Autowired (Spring提供)
1.可以让Spring自动的把属性对应的对象找出来,并注入对象
2.可以用在setter方法上
3.可以同时注入多个对象
@Autowired
	public void setter(OtherBean otherBean,OtherBean other2) {}
4.可以注入一些Spring内置对象,如BeanFactory,ServletContext等
5.默认情况下Autowired注解必须找到对应的对象,否则会报错,可以设置 @Autowired(required=false)来避免
6.第三方程序:Spring3.0之前,需要手动配置Autowired注解的解析程序 <context:annotation-config/>
在web开发中必须配置
7.Autowired寻找bean的方式
7.1首先按照依赖对象的类型来查找,如果找到则注入
7.2如果在Spring上下文中找到多个匹配的类型,再按照名字去找,如果没有匹配报错
7.3可以通过使用@Qualifer("other")标签来规定依赖对象按照bean的id和类型的组合形式去查找
二、@Resource (JavaEE规范提供)
1.可以让Spring自动的把属性需要的对象找出来,并注入到对象
2.可以用在字段或setter方法上面
3.可以注入一些Spring内置的重要对象,比如BeanFactory,ServletContext
4.Resource注解必须能找到对应的对象,否则报错
5.第三方程序:Spring3.0之前,需要手动配置Resource注解的解析程序:<context:annotation-config/>
6.Resource寻找注解的方法
6.1首先按照名字去找,如果找到则注入
6.2如果按照名字找不到,则按照类型去找,如果存在多个类型则报错
6.3可以直接使用@Resource(name=""),这种情况下只能按照name去找,如果找不到则报错不会继续按照类型去查找
三、@Value 可以给属性赋值 @Value("9999")或读取配置文件中的属性@Value("${server}")
IOC注解
一、@Component默认id为类型首字母小写/@Component("someBean") IOC注解,配置注解后可省略<bean>标签配置
bean组件板型:四个组件的功能是相同的,只是用于标注不同类型的组件
@Component泛指组件,当组件不好归类的时候,我们可以使用这个注解进行标注。
@Repository用于标注数据访问组件,即DAO组件
@Service用于标注业务层组件
@Controller用于标注控制层组件(如Struts中的Action,SpringMVC中的Controller)
使用IOC注解时需要配置IOC注解的解析器:<context:component-scan base-package=""/>表示去哪些包中及其子包中去扫描组件注解,多个包可用逗号分隔。
作用域注解,初始化和销毁注解
一、@Scope("prototype")设置bean对象的生命周期 此处为多例
二、@PostConstruct构建对象之后执行 和bean中的init-method属性效果一致
三、@PreDestroy销毁之前执行的方法 和bean中的destroy-method属性效果一致
使用注解模拟用户注册
package di.bhy.autowirdtwo.demo.controller;

import org.springframework.beans.factory.annotation.Autowired;
import org.springframework.stereotype.Controller;
import di.bhy.autowirdtwo.demo.model.User;
import di.bhy.autowirdtwo.demo.service.UserService;
@Controller  //标注控制层组件(把类创建控制权交给spring)
public class UserController {
	@Autowired //注入UserService对象
	private UserService userService;
	public void insertUser(User user){ //插入用户方法
		System.out.println("进入UserController中的insertUser()方法");
		userService.insertUser(user); //调用service层插入方法   参数:User对象
	}
}
package di.bhy.autowirdtwo.demo.service;
import di.bhy.autowirdtwo.demo.model.User;
public interface UserService {
	//插入用户
	public void insertUser(User user);
}
package di.bhy.autowirdtwo.demo.service.impl;

import org.springframework.beans.factory.annotation.Autowired;
import org.springframework.stereotype.Service;
import di.bhy.autowirdtwo.demo.dao.UserDao;
import di.bhy.autowirdtwo.demo.model.User;
import di.bhy.autowirdtwo.demo.service.UserService;
@Service //标注业务层组件(创建对象交给Spring)
public class UserServiceImpl implements UserService{
	@Autowired //注入UserDao
	private UserDao userDao;
	public void insertUser(User user) { //service层插入方法
		System.out.println("进入到UserServiceImpl的inserUser()方法");
		userDao.insertUser(user); //调用dao层的插入方法   参数:User对象
	}
}
package di.bhy.autowirdtwo.demo.dao;

import di.bhy.autowirdtwo.demo.model.User;
public interface UserDao {
	//插入用户
	public void insertUser(User user);
}
package di.bhy.autowirdtwo.demo.dao.impl;

import java.sql.Connection;
import java.sql.PreparedStatement;
import javax.sql.DataSource;
import org.springframework.beans.factory.annotation.Autowired;
import org.springframework.stereotype.Repository;
import di.bhy.autowirdtwo.demo.dao.UserDao;
import di.bhy.autowirdtwo.demo.model.User;
import lombok.Cleanup;
import lombok.SneakyThrows;
@Repository //标注数据访问组件
public class UserDaoImpl implements UserDao{
	@Autowired //注入DataSource
	private DataSource datasource;
	@SneakyThrows //解决异常
	public void insertUser(User user) {
		System.out.println("进入dao层insertUser()方法");
		@Cleanup //清除
		Connection conn = datasource.getConnection();
		@Cleanup
		PreparedStatement ps=conn.prepareStatement("insert into user (userID,userName,password,status) values (?,?,?,?)");
		ps.setString(1, user.getUserID());
		ps.setString(2, user.getUserName());
		ps.setString(3, user.getPassword());
		ps.setString(4, user.getStatus());
		int a = ps.executeUpdate();
		if(a>0) { //判断影响行数,大于0 则插入成功 反之插入失败
			System.out.println("插入成功");
		}else {
			System.out.println("插入失败");
		}
	}
}
package di.bhy.autowirdtwo.demo.model;
import org.springframework.stereotype.Component;
import lombok.Getter;
import lombok.Setter;
import lombok.ToString;
@Component@Setter@Getter@ToString //lombok注解提供set,get,toString方法
public class User {
private String userID;
private String userName;
private String password;
private String status;
}
<?xml version="1.0" encoding="UTF-8"?>
<beans xmlns="http://www.springframework.org/schema/beans"
xmlns:xsi="http://www.w3.org/2001/XMLSchema-instance"
xmlns:context="http://www.springframework.org/schema/context"
xsi:schemaLocation="http://www.springframework.org/schema/beans
http://www.springframework.org/schema/beans/spring-beans.xsd
http://www.springframework.org/schema/context
http://www.springframework.org/schema/context/spring-context-4.3.xsd">
<!-- 读取properties文件 -->
<context:component-scan base-package="di.bhy.autowirdtwo.demo"></context:component-scan>
<context:property-placeholder location="classpath:db.properties" system-properties-mode="FALLBACK"/>
<bean id="datasource" class="com.alibaba.druid.pool.DruidDataSource">
<!-- 注意1:高版本的mysql驱动信息以如下方式书写 -->
<property name="driverClassName" value="${driverClassName}"></property>
<!-- 注意2:url信息在mxl配置需把&替换成& 如果在properties配置则不用替换
useUnicode=true&characterEncoding=utf-8&userSSL=false&serverTimezone=GMT%2B8
-->
<property name="url" value="${url}"></property>
<!-- 注意3:如果在properties文件中设置值,则不能以username作为key。也可以在ntext:property-placeholder 设置属性system-properties-mode="FALLBACK" 覆盖系统属性-->
<property name="username" value="${username}"></property>
<property name="password" value="${password}"></property>
<property name="initialSize" value="${initialSize}"></property>
</bean>
</beans>
driverClassName=com.mysql.cj.jdbc.Driver
url=jdbc:mysql://localhost:3306/bhy?useUnicode=true&characterEncoding=utf-8&userSSL=false&serverTimezone=GMT%2B8
username=root
password=root
initialSize=2
package di.bhy.autowirdtwo.demo;

import org.junit.jupiter.api.Test;
import org.springframework.beans.factory.annotation.Autowired;
import org.springframework.test.context.junit.jupiter.SpringJUnitConfig;
import di.bhy.autowirdtwo.demo.controller.UserController;
import di.bhy.autowirdtwo.demo.model.User;
@SpringJUnitConfig
public class App {
	@Autowired
	private UserController userController;
	@Test
	void testName() throws Exception {
		//创建User对象并赋值
		User user = new User();
		user.setUserID("5");
		user.setUserName("马六");
		user.setPassword("1223454678");
		user.setStatus("2");
		//调用Controller的插入方法
		userController.insertUser(user);
	}
}


 298
298

 被折叠的 条评论
为什么被折叠?
被折叠的 条评论
为什么被折叠?
 到【灌水乐园】发言


