


 本文详细介绍了Spring中Bean的多例作用域,包括多实例bean的初始化、作用域、自定义作用域和销毁。此外,还探讨了注解配置方式,特别是AnnotationConfigApplicationContext的使用和ConfigurationClassPostProcessor类的作用。最后,文章深入讲解了动态代理,包括JDK原生动态代理和CGLIB动态代理的原理及示例代码。
一、Bean的多例作用域
1、多实例bean的初始化
1)多实例bean在每次获取bean的时候都会触发getBean操作,因此每次获取都是创建了一个新的对象返回,不论是多线程获取或者是同一个线程获取两次,都是返回一个新的实例对象。
2)多例模式情况,如果出现循环依赖,会直接报错
org.springframework.beans.factory.support.AbstractBeanFactory#doGetBean
//如果是scope 是Prototype的,校验是否有出现循环依赖,如果有则直接报错
if (isPrototypeCurrentlyInCreation(beanName)) {
throw new BeanCurrentlyInCreationException(beanName);
}
else if (mbd.isPrototype()) {
// It's a prototype -> create a new instance.
Object prototypeInstance = null;
try {
beforePrototypeCreation(beanName);
prototypeInstance = createBean(beanName, mbd, args);
}finally {
afterPrototypeCreation(beanName);
}
//改方法是FactoryBean接口的调用入口
bean = getObjectForBeanInstance(prototypeInstance, name, beanName, mbd);
}
2、Bean的作用域
Scope如果是Prototype时,不管是不是同一个线程,只要是getBean就会得到一个新的实例。
Request作用域时,是把实例存储到request对象中
Session作用域时,是把实例存储到session对象中,request和session作用域只会在web环境才会存在(例如Tomcat服务)
else {
String scopeName = mbd.getScope();
final Scope scope = this.scopes.get(scopeName);
if (scope == null) {
throw new IllegalStateException("No Scope registered for scope name '" + scopeName + "'");
}
try {
Object scopedInstance = scope.get(beanName, () -> {
beforePrototypeCreation(beanName);
try {
return createBean(beanName, mbd, args);
}finally {
afterPrototypeCreation(beanName);
}
});
//该方法是FactoryBean接口的调用入口
bean = getObjectForBeanInstance(scopedInstance, name, beanName, mbd);
}catch (IllegalStateException ex) {
throw new BeanCreationException(beanName,
"Scope '" + scopeName + "' is not active for the current thread; consider " +
"defining a scoped proxy for this bean if you intend to refer to it from a singleton", ex);
}
}
/** Map from scope identifier String to corresponding Scope. */
private final Map<String, Scope> scopes = new LinkedHashMap<>(8);
3、自定义作用域
3.1、要获取BeanFactory对象,必须实现BeanFactoryPostProcessor接口才能获取BeanFactory对象。
@Component
public class CustomBeanFactoryPostProcessor implements BeanFactoryPostProcessor {
@Override
public void postProcessBeanFactory(ConfigurableListableBeanFactory beanFactory) throws BeansException {
beanFactory.registerScope("hankinScope",new CustomScope());
}
}
3.2、调用registerScope方法把自定义的scope注册进去
beanFactory.registerScope("hankinScope",new CustomScope());
3.3、写一个类实现scope接口
public class CustomScope implements Scope {
private ThreadLocal local = new ThreadLocal();
//这个方法就是自己管理bean
@Override
public Object get(String name, ObjectFactory<?> objectFactory) {
System.out.println("=============CustomScope========");
if(local.get() != null) {
return local.get();
} else {
//这个方法就是掉createbean方法获得一个实例
Object object = objectFactory.getObject();
local.set(object);
return object;
}
}
@Component
@Scope("hankinScope")
public class CustomScopeBean {
private String username;
public String getUsername() {
return this.username;
}
public void setUsername(String username) {
this.username = username;
}
}
4、Bean的销毁
在bean创建完成后就会对这个bean注册一个销毁的Adapter对象,代码如下:
// Register bean as disposable.
try {
//注册bean销毁时的类DisposableBeanAdapter
registerDisposableBeanIfNecessary(beanName, bean, mbd);
}
registerDisposableBean(beanName, new DisposableBeanAdapter(bean, beanName, mbd, getBeanPostProcessors(), acc));
这个DisposableBeanAdapter对象就是负责bean销毁的类。在这个类中收集了该bean是否实现了DisposableBean接口,是否配置destroy-method属性,过滤了DestructionAwareBeanPostProcessor类型的接口。
然后bean是在什么时候被销毁呢,在tomcat关闭的时候就会调用到servlet中的销毁方法
protected void registerDisposableBeanIfNecessary(String beanName, Object bean, RootBeanDefinition mbd) {
AccessControlContext acc = (System.getSecurityManager() != null ? getAccessControlContext() : null);
if (!mbd.isPrototype() && requiresDestruction(bean, mbd)) {
if (mbd.isSingleton()) {
// Register a DisposableBean implementation that performs all destruction
// work for the given bean: DestructionAwareBeanPostProcessors,
// DisposableBean interface, custom destroy method.
registerDisposableBean(beanName,
new DisposableBeanAdapter(bean, beanName, mbd, getBeanPostProcessors(), acc));
}else {// A bean with a custom scope...
Scope scope = this.scopes.get(mbd.getScope());
if (scope == null) {
throw new IllegalStateException("No Scope registered for scope name '" + mbd.getScope() + "'");
}
scope.registerDestructionCallback(beanName,
new DisposableBeanAdapter(bean, beanName, mbd, getBeanPostProcessors(), acc));
}
}
}
在这个方法中就会最终掉用到DisposableBeanAdapter类的,destroy()方法,该方法就会根据前面的收集进行调用。
@Override
public void run() {
destroy();
}
@Override
public void destroy() {
if (!CollectionUtils.isEmpty(this.beanPostProcessors)) {
for (DestructionAwareBeanPostProcessor processor : this.beanPostProcessors) {
processor.postProcessBeforeDestruction(this.bean, this.beanName);
}
}
if (this.invokeDisposableBean) {
if (logger.isTraceEnabled()) {
logger.trace("Invoking destroy() on bean with name '" + this.beanName + "'");
}
try {
if (System.getSecurityManager() != null) {
AccessController.doPrivileged((PrivilegedExceptionAction<Object>) () -> {
((DisposableBean) this.bean).destroy();
return null;
}, this.acc);
}else {
((DisposableBean) this.bean).destroy();
}
} catch (Throwable ex) {
String msg = "Invocation of destroy method failed on bean with name '" + this.beanName + "'";
if (logger.isDebugEnabled()) {
logger.info(msg, ex);
} else {
logger.info(msg + ": " + ex);
}
}
}
if (this.destroyMethod != null) {
invokeCustomDestroyMethod(this.destroyMethod);
} else if (this.destroyMethodName != null) {
Method methodToCall = determineDestroyMethod(this.destroyMethodName);
if (methodToCall != null) {
invokeCustomDestroyMethod(methodToCall);
}
}
}
org.springframework.web.context.support.ServletContextScope#destroy在tomcat关闭的时候就会调用到servlet中的销毁方法
public void destroy() {
Iterator var1 = this.destructionCallbacks.values().iterator();
while(var1.hasNext()) {
Runnable runnable = (Runnable)var1.next();
runnable.run();
}
this.destructionCallbacks.clear();
}
public class ServletContextScope implements Scope, DisposableBean {
private final ServletContext servletContext;
private final Map<String, Runnable> destructionCallbacks = new LinkedHashMap();
二、注解配置方式解析
1、入口AnnotationConfigApplicationContext
public AnnotationConfigApplicationContext(Class<?>... annotatedClasses) {
this();
register(annotatedClasses);
refresh();
}
1.1、This()方法说明:
该方法做了两件事,第一解析注解配置(功能与xml配置标签解析一样),第二bean扫描
public AnnotationConfigApplicationContext() {
this.reader = new AnnotatedBeanDefinitionReader(this);
this.scanner = new ClassPathBeanDefinitionScanner(this);
}
第一:注解解析
public AnnotatedBeanDefinitionReader(BeanDefinitionRegistry registry, Environment environment) {
Assert.notNull(registry, "BeanDefinitionRegistry must not be null");
Assert.notNull(environment, "Environment must not be null");
this.registry = registry;
this.conditionEvaluator = new ConditionEvaluator(registry, environment, null);
AnnotationConfigUtils.registerAnnotationConfigProcessors(this.registry);
}
第二:bean扫描
public ClassPathBeanDefinitionScanner(BeanDefinitionRegistry registry, boolean useDefaultFilters,
Environment environment, @Nullable ResourceLoader resourceLoader) {
Assert.notNull(registry, "BeanDefinitionRegistry must not be null");
this.registry = registry;
//使用默认的过滤器
if (useDefaultFilters) {//@Service @Component
registerDefaultFilters();
}
setEnvironment(environment);
setResourceLoader(resourceLoader);
}
注意:注解解析最后会将对应的属性都放入到beanDefinitionMap里面。
public static Set<BeanDefinitionHolder> registerAnnotationConfigProcessors(
BeanDefinitionRegistry registry, @Nullable Object source) {
DefaultListableBeanFactory beanFactory = unwrapDefaultListableBeanFactory(registry);
if (beanFactory != null) {
if (!(beanFactory.getDependencyComparator() instanceof AnnotationAwareOrderComparator)) {
beanFactory.setDependencyComparator(AnnotationAwareOrderComparator.INSTANCE);
}
if (!(beanFactory.getAutowireCandidateResolver() instanceof ContextAnnotationAutowireCandidateResolver)) {
beanFactory.setAutowireCandidateResolver(new ContextAnnotationAutowireCandidateResolver());
}
}
Set<BeanDefinitionHolder> beanDefs = new LinkedHashSet<>(8);
if (!registry.containsBeanDefinition(CONFIGURATION_ANNOTATION_PROCESSOR_BEAN_NAME)) {
RootBeanDefinition def = new RootBeanDefinition(ConfigurationClassPostProcessor.class);
def.setSource(source);
beanDefs.add(registerPostProcessor(registry, def, CONFIGURATION_ANNOTATION_PROCESSOR_BEAN_NAME));
}
if (!registry.containsBeanDefinition(AUTOWIRED_ANNOTATION_PROCESSOR_BEAN_NAME)) {
RootBeanDefinition def = new RootBeanDefinition(AutowiredAnnotationBeanPostProcessor.class);
def.setSource(source);
beanDefs.add(registerPostProcessor(registry, def, AUTOWIRED_ANNOTATION_PROCESSOR_BEAN_NAME));
}
return beanDefs;
}
private static BeanDefinitionHolder registerPostProcessor(
BeanDefinitionRegistry registry, RootBeanDefinition definition, String beanName) {
definition.setRole(BeanDefinition.ROLE_INFRASTRUCTURE);
// bean注册,将bean放入到beanDefinitionMap中
registry.registerBeanDefinition(beanName, definition);
return new BeanDefinitionHolder(definition, beanName);
}
private final Map<String, BeanDefinition> beanDefinitionMap = new ConcurrentHashMap<>(64);
1.2、register(annotatedClasses)方法解析
最后方法会调用到如下的注册代码中,与xml配置方式调用方法一样,最后放入map中。
org.springframework.beans.factory.support.BeanDefinitionReaderUtils#registerBeanDefinition
public static void registerBeanDefinition(
BeanDefinitionHolder definitionHolder, BeanDefinitionRegistry registry)
throws BeanDefinitionStoreException {
// Register bean definition under primary name.
String beanName = definitionHolder.getBeanName();
//完成BeanDefinition的注册,重点看,重要程度 5
registry.registerBeanDefinition(beanName, definitionHolder.getBeanDefinition());
//建立别名和 id的映射,这样就可以根据别名获取到id
// Register aliases for bean name, if any.
String[] aliases = definitionHolder.getAliases();
if (aliases != null) {
for (String alias : aliases) {
registry.registerAlias(beanName, alias);
}
}
}
org.springframework.beans.factory.support.DefaultListableBeanFactory#registerBeanDefinition
else {
//把beanDefinition缓存到map中 Still in startup registration phase
this.beanDefinitionMap.put(beanName, beanDefinition);
//把beanName放到beanDefinitionNames list中,这个list着重记住,bean实例化的时候需要用到
this.beanDefinitionNames.add(beanName);
this.manualSingletonNames.remove(beanName);
}
1.3、refresh()方法
org.springframework.context.support.AbstractApplicationContext#refresh
该方法是spring容器初始化的核心方法。是spring容器初始化的核心流程,是一个典型的父类模板设计模式的运用,根据不同的上下文对象,会掉到不同的上下文对象子类方法中。
核心上下文子类有:
ClassPathXmlApplicationContext
FileSystemXmlApplicationContext
AnnotationConfigApplicationContext
EmbeddedWebApplicationContext(springboot)
/*
* 方法重要程度:
* 0:不重要,可以不看
* 1:一般重要,可看可不看
* 5:非常重要,一定要看
* */
@Override
public void refresh() throws BeansException, IllegalStateException {
synchronized (this.startupShutdownMonitor) {
//为容器初始化做准备,重要程度:0 Prepare this context for refreshing.
prepareRefresh();
/**重要程度:5
1、创建BeanFactory对象
* 2、xml解析
* 传统标签解析:bean、import等
* 自定义标签解析 如:<context:component-scan base-package="com.chj"/>
* 自定义标签解析流程:
* a、根据当前解析标签的头信息找到对应的namespaceUri
* b、加载spring所以jar中的spring.handlers文件。并建立映射关系
* c、根据namespaceUri从映射关系中找到对应的实现了NamespaceHandler接口的类
* d、调用类的init方法,init方法是注册了各种自定义标签的解析类
* e、根据namespaceUri找到对应的解析类,然后调用paser方法完成标签解析
* 3、把解析出来的xml标签封装成BeanDefinition对象
* */
ConfigurableListableBeanFactory beanFactory = obtainFreshBeanFactory();
/*
* 给beanFactory设置一些属性值,可以不看
* */
// Prepare the bean factory for use in this context.
prepareBeanFactory(beanFactory);
try {
// Allows post-processing of the bean factory in context subclasses.
postProcessBeanFactory(beanFactory);
/*
* BeanDefinitionRegistryPostProcessor
* BeanFactoryPostProcessor
* 完成对这两个接口的调用
* */
// Invoke factory processors registered as beans in the context.
invokeBeanFactoryPostProcessors(beanFactory);
/*
* 把实现了BeanPostProcessor接口的类实例化,并且加入到BeanFactory中
* */
// Register bean processors that intercept bean creation.
registerBeanPostProcessors(beanFactory);
/*
* 国际化,重要程度2
* */
// Initialize message source for this context.
initMessageSource();
//初始化事件管理类
// Initialize event multicaster for this context.
initApplicationEventMulticaster();
//这个方法着重理解模板设计模式,因为在springboot中,这个方法是用来做内嵌tomcat启动的
// Initialize other special beans in specific context subclasses.
onRefresh();
/*
* 往事件管理类中注册事件类
* */
// Check for listener beans and register them.
registerListeners();
/*
* 这个方法是spring中最重要的方法,没有之一
* 所以这个方法一定要理解要具体看
* 1、bean实例化过程
* 2、ioc
* 3、注解支持
* 4、BeanPostProcessor的执行
* 5、Aop的入口
* */
// Instantiate all remaining (non-lazy-init) singletons.
finishBeanFactoryInitialization(beanFactory);
// Last step: publish corresponding event.
finishRefresh();
}catch (BeansException ex) {
if (logger.isWarnEnabled()) {
logger.warn("Exception encountered during context initialization - " +
"cancelling refresh attempt: " + ex);
}
// Destroy already created singletons to avoid dangling resources.
destroyBeans();
// Reset 'active' flag.
cancelRefresh(ex);
// Propagate exception to caller.
throw ex;
}finally {
// Reset common introspection caches in Spring's core, since we
// might not ever need metadata for singleton beans anymore...
resetCommonCaches();
}
}
}
2、ConfigurationClassPostProcessor类
这个类作用很大,支持了:
@Configuration @ComponentScan @Import @ImportResource @PropertySource @Order等注解,对理解 springboot帮助很大,真正的可以做到xml的0配置。
三、动态代理
1、动态代理是什么?
动态代理:是使用反射和字节码的技术,在运行期创建指定接口或类的子类(动态代理)以及其实例对象的技术,通过这个技术可以无侵入性的为代码进行增强;
Java的动态代理技术实现主要有两种方式:JDK原生动态代理、CGLIB动态代理
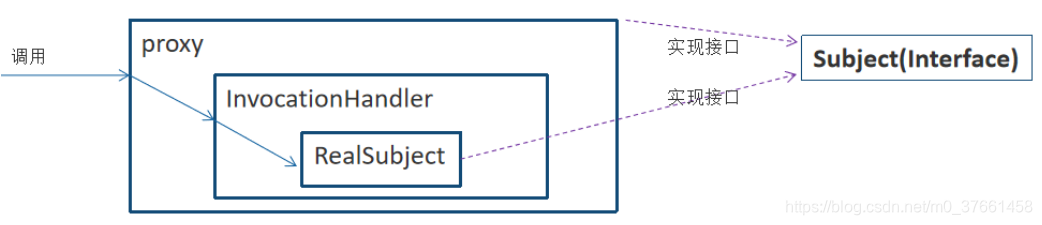
2、JDK原生动态代理
Proxy:Proxy是所有动态代理的父类,它提供了一个静态方法来创建动态代理的class对象和实例。
@CallerSensitive
public static Object newProxyInstance(ClassLoader loader,Class<?>[] interfaces, InvocationHandler h)
final InvocationHandler ih = h;
return cons.newInstance(new Object[]{h});
InvocationHandler:每个动态代理实例都有一个关联的InvocationHandler。在代理实例上调用方法时,方法调用将被转发到InvocationHandler的invoke方法。
2.1、被代理对象的接口实现类:
public class Hankin implements People {
//TODO before 在小明找到对象之前,需要父母帮忙找对象
@Override
public void findMM() {
System.out.println("I'm Hankin, No time go out, but I need to find MM!");
}
//TODO after 帮助小明结婚,带孩子
}
2.2、代理对象实现InvocationHandler接口
public class Parent implements InvocationHandler {
private People people;
public Parent(People people) {
this.people = people;
}
// TODO 动态代理增强方法invoke
@Override
public Object invoke(Object proxy, Method method, Object[] args) throws Throwable {
//TODO 前置增强方法调用
before();
//TODO 这个method反射对象就是被代理的对象中的方法(比如:findMM方法)
method.invoke(people,null);
//TODO 后置增强方法调用
after();
return null;
}
private void before(){
System.out.println("我是小明的父母,需要帮助小明找对象!");
}
private void after(){
System.out.println("我是小明的父母,我要帮助小明结婚,结完婚还要帮助小明照顾孩子!");
}
}
java.lang.reflect.Method#invoke
@CallerSensitive
public Object invoke(Object obj, Object... args)throws IllegalAccessException, IllegalArgumentException,
InvocationTargetException{
if (!override) {
if (!Reflection.quickCheckMemberAccess(clazz, modifiers)) {
Class<?> caller = Reflection.getCallerClass();
checkAccess(caller, clazz, obj, modifiers);
}
}
MethodAccessor ma = methodAccessor; // read volatile
if (ma == null) {
ma = acquireMethodAccessor();
}
return ma.invoke(obj, args);
}
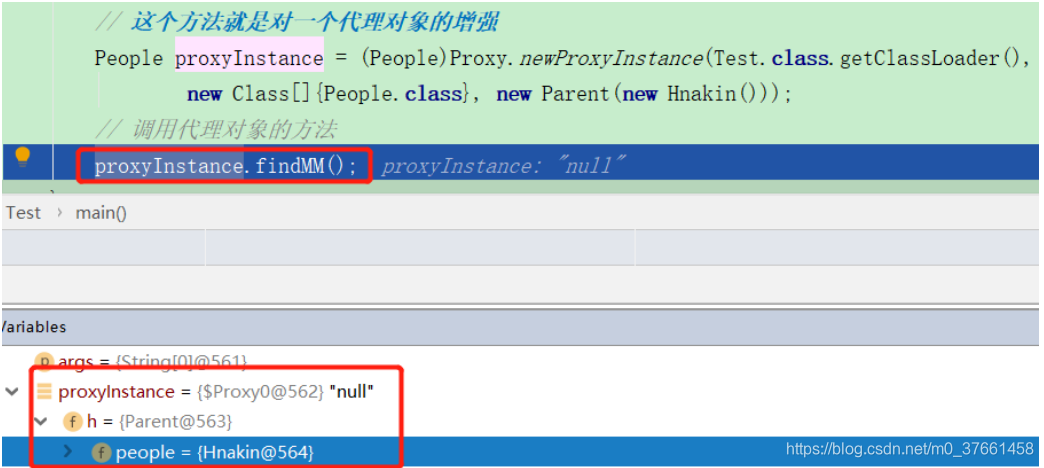
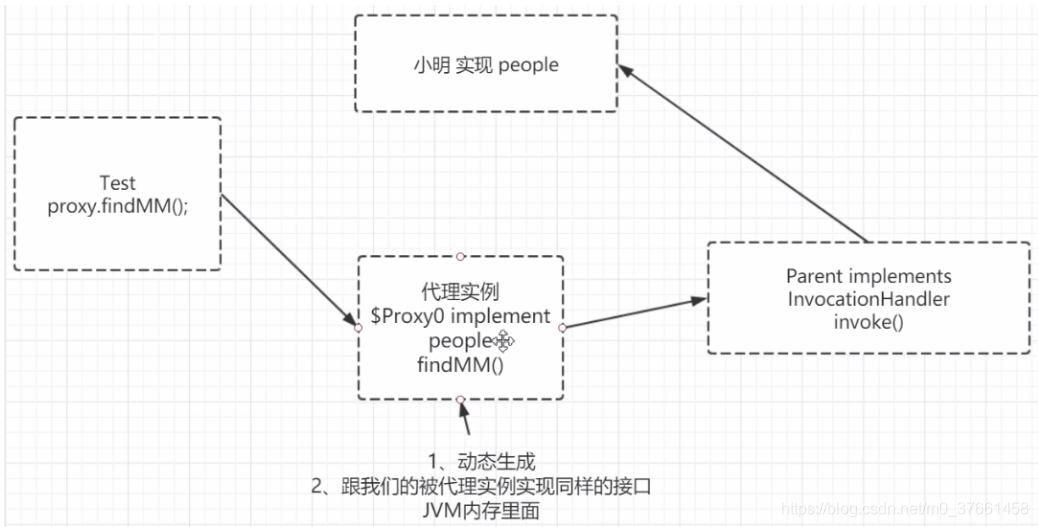
2.3、测试类代码:
通过java反之机制获取代理对象增加实例
public class Test {
public static void main(String[] args) {
//TODO 参数newProxyInstance(ClassLoader loader,Class<?>[] interfaces,InvocationHandler h)
// 这个方法就是对一个代理对象的增强
People proxyInstance = (People)Proxy.newProxyInstance(Test.class.getClassLoader(),
new Class[]{People.class}, new Parent(new Hnakin()));
// 调用代理对象的方法
proxyInstance.findMM();
}
}
注意:
“$Proxy0”:就是动态代理生成的代理实现类对象,只有在JVM运行时才会动态加载,
”h”变量:就是指具体的增强类方法,比如这里就是我实现了InvocationHandler接口的增强类UserServiceInterceptor。
“Peolpe={Hankin@564}”:就是具体的被代理增强的对象实例。
2.4、执行结果:
我是小明的父母,需要帮助小明找对象!
I'm Hnakin, No time go out, but I need to find MM!
我是小明的父母,我要帮助小明结婚,结完婚还要帮助小明照顾孩子!
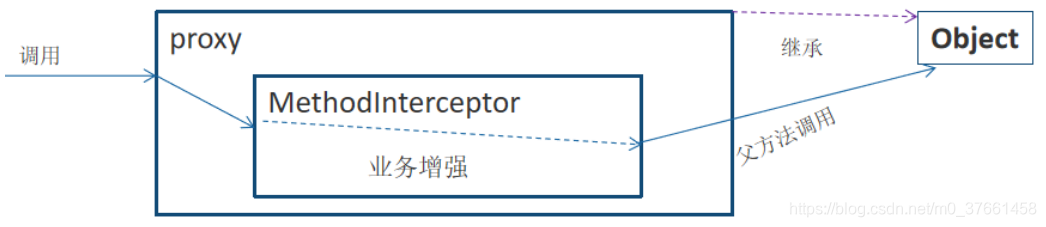
3、CGLIB动态代理
3.1、原理
CGLIB(Code Generation Library)是一个基于ASM的字节码生成库,它允许我们在运行时对字节码进行修改和动态生成,CGLIB通过继承方式实现代理。
Enhancer:来指定要代理的目标对象、实际处理代理逻辑的对象,最终通过调用create()方法得到代理对象,对这个对象所有非final方法的调用都会转发给MethodInterceptor。
MethodInterceptor:动态代理对象的方法调用都会转发到intercept方法进行增强;
3.2、增强类代码示例:
public class UserServiceInterceptor implements MethodInterceptor {
private static Logger logger = Logger.getLogger(UserServiceInterceptor.class.getName());
//TODO 调用cglib动态增强方法
public Object intercept(Object obj, Method method, Object[] args,MethodProxy proxy) throws Throwable {
if(args!=null && args.length>0 && args[0] instanceof User){
User user = (User) args[0];
if(user.getName().trim().length() <= 1){
throw new RuntimeException("用户姓名输入长度需要大于1!");
}
}
//Object ret = proxy.invoke(delegate, args);
Object ret = proxy.invokeSuper(obj, args);
logger.info("数据库操作成功!");
return ret;
}
}
3.3、测试类代码:
public class TestCglibProxy {
public static void main(String[] args) {
User user = new User();
user.setAddress("地址");
user.setAge(20);
// user.setName("hankin");
Enhancer enhancer = new Enhancer();
enhancer.setSuperclass(UserServiceImpl.class);
enhancer.setCallback(new UserServiceInterceptor());
UserServiceImpl usi1 = (UserServiceImpl) enhancer.create();
usi1.addUser(user);
System.out.println("---------------------");
System.out.println(usi1.hashCode());
}
}
JDK原生动态代理是Java原生支持的,不需要任何外部依赖,但是它只能基于接口进行代理;
CGLIB通过继承的方式进行代理,无论目标对象有没有实现接口都可以代理,但是无法处理final的情况。


 173万+
173万+

 被折叠的 条评论
为什么被折叠?
被折叠的 条评论
为什么被折叠?
 到【灌水乐园】发言


