


 本文详细介绍如何从零开始搭建SSH(Struts2+Spring+Hibernate)框架,实现用户登录功能。涵盖开发环境配置、编码步骤及测试方法,适合SSH框架初学者。
前言:
本文叙述了从零开始搭建SSH(Struts2+Spring+Hibernate)框架的详细过程,适用于SSH框架初学者。本例实现了用户登录功能,经多方测试保证该例可正常运行,相应加jar包随文章提供。
开发工具:MyEclipse
服务器:tomcat
数据库:MySql
SSH开发流程
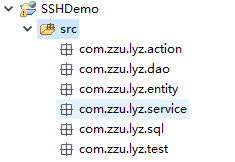
开发结束后的目录结构

一.搭建环境
1、导jar包
2、在web.xml中配置核心过滤器
3、tomcat服务器配置
4、数据库配置
1、jar包
我整理好的jar包:链接:https://pan.baidu.com/s/1FhyGVZvt9_hly1YLDHBSgQ
提取码:1mdx
也可以自己去官网下载整理,注意版本问题就行,下面是地址:
Struts jar包官网下载地址:http://struts.apache.org/download.cgi#struts252
Spring jar包官网下载地址:https://repo.spring.io/webapp/#/artifacts/browse/tree/General/libs-release-local/org/springframework/spring/4.2.2.RELEASE/spring-framework-4.2.2.RELEASE-dist.zip
hibernate jar包官网下载地址:http://hibernate.org/orm/
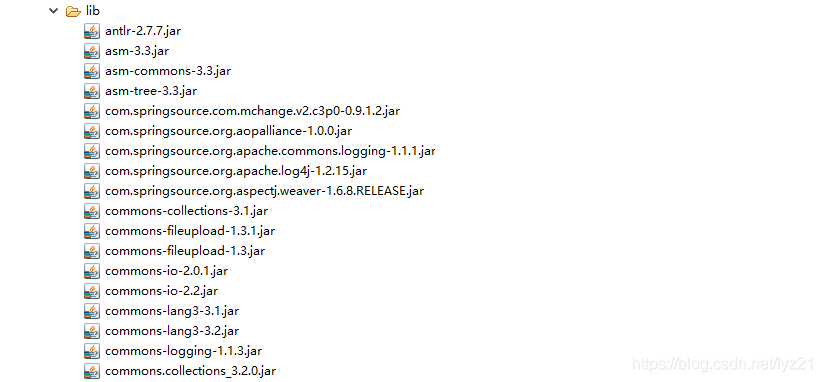
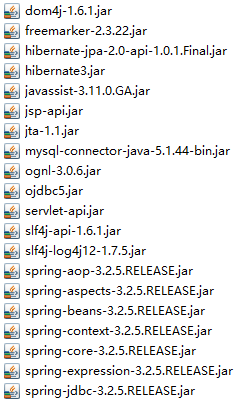
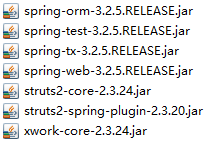
导入jar包后不要忘记 build path
2、web.xml
  <!-- struts的核心过滤器 -->
  <filter>
		<filter-name>struts2</filter-name>
		<filter-class>org.apache.struts2.dispatcher.ng.filter.StrutsPrepareAndExecuteFilter</filter-class>
	</filter>
	<filter-mapping>
		<filter-name>struts2</filter-name>
		<url-pattern>/*</url-pattern>
	</filter-mapping>
	<!-- spring核心监听器 -->
	<listener>
		<listener-class>org.springframework.web.context.ContextLoaderListener</listener-class>
	</listener>
	<!-- applicationContext.xml的路径 -->
	<context-param>
		<param-name>contextConfigLocation</param-name>
		<param-value>classpath:applicationContext.xml</param-value>
	</context-param>
3、tomcat配置
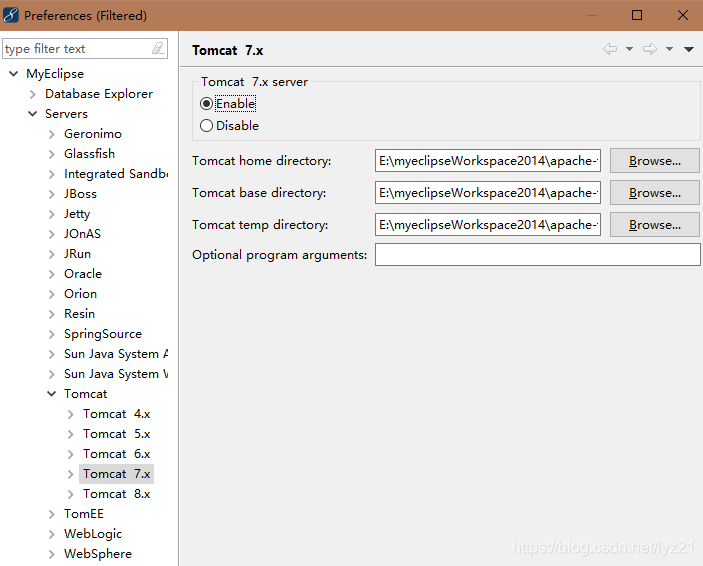
E:\myeclipseWorkspace2014\apache-tomcat-7.0.32
E:\myeclipseWorkspace2014\apache-tomcat-7.0.32
E:\myeclipseWorkspace2014\apache-tomcat-7.0.32\temp
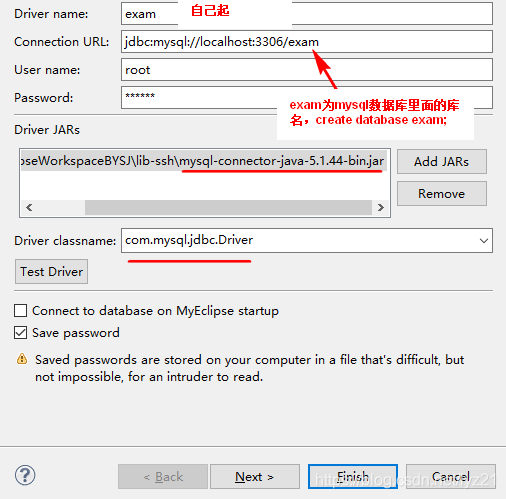
4、数据库
二、编码
1、创建包结构
2、创建库表
3、创建实体类、映射文件
4、Dao,DaoImpl
5、hibernate.cfg.xml。先配置hibernate,可测试Daoimpl是否正确
6、Service,ServiceImpl
7、Action
8、struts.xml
9、applicationContext.xml
10、view
1、创建包结构
2、库表
create table t_user(
	id int primary key auto_increment,
	name varchar(20) not null,
	password varchar(20) not null
)
--插入数据
insert into t_user (name,password) values('user1','123');
附 MySql常用语句
--用windows命令行打开mysql,-u 后面跟用户名
mysql –h localhost –u root –p ;
--密码:123456
--查询所有数据库:
show databases;
--查询所有用户:
select user from mysql.user;
--创建数据库,库名为exam:
create database exam;
--查询库中共有多少表:
select table_name from information_schema.tables where table_schema='exam';
--或者
show tables from test;
3.1、实体类 User.java
package com.zzu.lyz.entity;
/* 对应表数据库表t_user
 * 具体映射关系在User.hbm.xml中
 * */
public class User {
	/*属性对应表中列名*/
	private int id;
	private String name;
	private String password;
//	get、set、toString方法
	public int getId() {
		return id;
	}
	public void setId(int id) {
		this.id = id;
	}
	public String getName() {
		return name;
	}
	public void setName(String name) {
		this.name = name;
	}
	public String getPassword() {
		return password;
	}
	public void setPassword(String password) {
		this.password = password;
	}
	@Override
	public String toString() {
		return "User [id=" + id + ", name=" + name + ", password=" + password
				+ "]";
	}
}
3.2、User.hbm.xml映射文件
<?xml version="1.0" encoding="utf-8"?>
<!DOCTYPE hibernate-mapping PUBLIC "-//Hibernate/Hibernate Mapping DTD 3.0//EN"
"http://www.hibernate.org/dtd/hibernate-mapping-3.0.dtd">
<hibernate-mapping>
	<!-- name:类路径; table:库表名 ; catalog:默认数据库库名,最好省略不写 -->
    <class name="com.zzu.lyz.entity.User" table="t_user" catalog="exam">
        <!-- 属性名 对应 列名 ;generator生成方式  -->
        <id name="id" type="java.lang.Integer">
            <column name="id" />
            <generator class="native" />
        </id>
        <property name="name" type="java.lang.String">
            <column name="name" length="20" not-null="true" />
        </property>
        <property name="password" type="java.lang.String">
            <column name="password" length="20" not-null="true" />
        </property>
    </class>
</hibernate-mapping>
4.1、UserDao.java
package com.zzu.lyz.dao;
import com.zzu.lyz.entity.User;
public interface UserDao {
	public User selectByName(String name);
}
4.2、UserDaoImpl.java
package com.zzu.lyz.dao;
import java.util.List;
import org.hibernate.Query;
import org.hibernate.SessionFactory;
import org.hibernate.cfg.Configuration;
import org.hibernate.classic.Session;
import com.zzu.lyz.entity.User;
public class UserDaoImpl implements UserDao{
//	需要sessionFactory对象,就在类中定义为属性,生成get、set方法,其后在spring的xml文件中注册
//	即通过注入方式获取
	private SessionFactory sessionFactory;
	public SessionFactory getSessionFactory() {
		return sessionFactory;
	}
	public void setSessionFactory(SessionFactory sessionFactory) {
		this.sessionFactory = sessionFactory;
	}
	@Override
	public User selectByName(String name) {
		//获取session
		/*
		 获取session的两种方式,一种直接使用spring注册的sessionFactory,
		 一种使用传统写法,传统写法可以使用test测试
		 */
		//传统
		Configuration cfg=new Configuration().configure();
		sessionFactory=cfg.buildSessionFactory();
		//上面两行不要直接用下面一行,定义类属性sessionFactory,通过spring获取
		Session session = sessionFactory.openSession();

		String hql="from User where name = '"+name+"'";
		Query query = session.createQuery(hql);
		List<User> list = query.list();
		User user1=null;
		for (User user : list) {
			user1=user;
		}
		return user1;
	}
}
5.1、hibernate.cfg.xml
<!DOCTYPE hibernate-configuration PUBLIC
	"-//Hibernate/Hibernate Configuration DTD 3.0//EN"
	"http://www.hibernate.org/dtd/hibernate-configuration-3.0.dtd">
<hibernate-configuration>
	<session-factory>
		<!-- 数据库连接参数  mysql-->
		<property name="connection.driver_class">com.mysql.jdbc.Driver</property>
		<property name="connection.url">jdbc:mysql://localhost:3306/exam?useSSL=false</property>
		<property name="connection.username">root</property>
		<property name="connection.password">123456</property>
		<!-- 与hibernate自身相关的参数  -->
		<property name="dialect">org.hibernate.dialect.MySQLDialect</property>
		<property name="show_sql">true</property>
		<property name="format_sql">true</property>
		<!-- <property name="javax.persistence.validation.mode">none</property> -->
		<property name="current_session_context_class">thread</property>
		<property name="javax.persistence.validation.mode">none</property>
		<!-- 映射的注册 -->
		<mapping resource="com/zzu/lyz/entity/User.hbm.xml"/>
	</session-factory>
</hibernate-configuration>
5.2、TestUser.java (测试)
public class TestUser {
	UserDao dao=new UserDaoImpl();
	@Test
	public void testDaoSelectByName(){
		User user = dao.selectByName("user1");
		System.out.println(user.toString());
	}
}
6.1、UserService.java
package com.zzu.lyz.service;
import com.zzu.lyz.entity.User;
public interface UserService {
	public User selectByName(String name);
}
6.2、UserServiceImpl.java
package com.zzu.lyz.service;
import com.zzu.lyz.dao.UserDao;
import com.zzu.lyz.entity.User;
public class UserServiceImpl implements UserService{
	//通过注入方式获取userDao
	private UserDao userDao;
	public UserDao getUserDao() {
		return userDao;
	}
	public void setUserDao(UserDao userDao) {
		this.userDao = userDao;
	}
	@Override
	public User selectByName(String name) {
		//以后的业务逻辑写在此处
		User user = userDao.selectByName(name);
		return user;
	}
}
7、UserAction.java
package com.zzu.lyz.action;
import com.opensymphony.xwork2.ActionContext;
import com.opensymphony.xwork2.ActionSupport;
import com.zzu.lyz.entity.User;
import com.zzu.lyz.service.UserService;
//继承ActionSupport
public class UserAction extends ActionSupport {
	//注入获取userService
	private UserService userService=null;
	//从前台获取user对象
	private User user;
	public UserService getUserService() {
		return userService;
	}
	public void setUserService(UserService userService) {
		this.userService = userService;
	}
	public User getUser() {
		return user;
	}
	public void setUser(User user) {
		this.user = user;
	}
	public String login(){
		//调用userservice的方法
		User user2 = userService.selectByName(user.getName());
		//若没有返回的user,说明name错误
		if (user2==null) {
			return ERROR;
		}
		//对比密码是否正确
		if (user.getPassword().equals(user2.getPassword())) {
			//若正确,将user存入值栈
			ActionContext context=ActionContext.getContext();
			ValueStack valueStack = context.getValueStack();
			valueStack.setValue("#session.user", user2);
			return SUCCESS;
		}else {
			return ERROR;
		}
    }
}
8、struts.xml
<?xml version="1.0" encoding="UTF-8"?>
<!DOCTYPE struts PUBLIC "-//Apache Software Foundation//DTD Struts Configuration 2.1.7//EN" "struts-2.1.7.dtd" >
<struts>
	<!-- 告知Struts2运行时使用Spring来创建对象 -->
 	<constant name="struts.objectFactory" value="spring" />
	<package name="user" extends="struts-default">
		<!-- 登录 -->
		<action name="login" class="com.zzu.lyz.action.UserAction" method="login">
			<result name="success">/index.jsp</result>
		</action>
	</package>
</struts>
运行时访问:http://localhost:8989/SSHDemo/login
9、applicationContext.xml
<?xml version="1.0" encoding="UTF-8"?>
<beans xmlns="http://www.springframework.org/schema/beans"
        xmlns:xsi="http://www.w3.org/2001/XMLSchema-instance"
        xmlns:p="http://www.springframework.org/schema/p"
        xmlns:aop="http://www.springframework.org/schema/aop"
        xmlns:context="http://www.springframework.org/schema/context"
        xmlns:jee="http://www.springframework.org/schema/jee"
        xmlns:tx="http://www.springframework.org/schema/tx"
        xsi:schemaLocation="
            http://www.springframework.org/schema/aop http://www.springframework.org/schema/aop/spring-aop-4.2.xsd
            http://www.springframework.org/schema/beans http://www.springframework.org/schema/beans/spring-beans-4.2.xsd
            http://www.springframework.org/schema/context http://www.springframework.org/schema/context/spring-context-4.2.xsd
            http://www.springframework.org/schema/jee http://www.springframework.org/schema/jee/spring-jee-4.2.xsd
            http://www.springframework.org/schema/tx http://www.springframework.org/schema/tx/spring-tx-4.2.xsd">
    <!-- 所有需要类的实例都由srping去管理 -->
    <bean id="userAction" class="com.zzu.lyz.action.UserAction" scope="prototype">
        <property name="userService" ref="userService"/>
    </bean>
    <bean id="userService" class="com.zzu.lyz.service.UserServiceImpl" scope="prototype">
        <property name="userDao" ref="userDao"/>
    </bean>
    <bean id="userDao" class="com.zzu.lyz.dao.UserDaoImpl" scope="prototype">
        <!-- 把sessionFactory 注入给IndexDao -->
        <property name="sessionFactory" ref="sessionFactory" />
    </bean>

     <!-- 添加sessionFactory bane ,注意,该类是Spring提供的。不同的jar包有不同的写法,注意! -->
	<!--  <bean id="sessionFactory" class="org.springframework.orm.hibernate5.LocalSessionFactoryBean" scope="prototype">-->
 	<bean id="sessionFactory" class="org.springframework.orm.hibernate3.annotation.AnnotationSessionFactoryBean" scope="prototype">
        <!-- 注入Hibernate 配置文件路径,前面要加上  classpath:-->
        <property name="configLocation" value="classpath:hibernate.cfg.xml"/>
    </bean>
</beans>

10.1、error.jsp
<%@ page language="java" import="java.util.*" pageEncoding="UTF-8"%>
<%@ taglib uri="/struts-tags" prefix="s" %>
<%
String path = request.getContextPath();
String basePath = request.getScheme()+"://"+request.getServerName()+":"+request.getServerPort()+path+"/";
%>
<!DOCTYPE HTML PUBLIC "-//W3C//DTD HTML 4.01 Transitional//EN">
<html>
  <head>
  </head>
  <body>
	登录失败!
  </body>
</html>
10.2、succeed.jsp
<%@ page language="java" import="java.util.*" pageEncoding="UTF-8"%>
<%@ taglib uri="/struts-tags" prefix="s" %>
<%
String path = request.getContextPath();
String basePath = request.getScheme()+"://"+request.getServerName()+":"+request.getServerPort()+path+"/";
%>
<!DOCTYPE HTML PUBLIC "-//W3C//DTD HTML 4.01 Transitional//EN">
<html>
  <head>
  </head>
  <body>
	<table border="1">
    	<tr>
        	<td>id</td>
        	<td>姓名</td>
        	<td>密码</td>
    	</tr>
        <tr>
           	<td><s:property value="#session.user.id"/></td>
           	<td><s:property value="#session.user.name"/></td>
           	<td><s:property value="#session.user.password"/></td>
        </tr>
	</table>
  </body>
</html>
此时可用如下url测试前面工作是否正确:
http://localhost:8989/SSHDemo/login?user.name=user1&user.password=123
其中 user1是库表中用户名,123是库表中user1的密码,此时会登录正确
10.3、login.jsp
<%@ page language="java" import="java.util.*" pageEncoding="UTF-8"%>
<%@ taglib uri="/struts-tags" prefix="s" %>
<%
String path = request.getContextPath();
String basePath = request.getScheme()+"://"+request.getServerName()+":"+request.getServerPort()+path+"/";
%>
<!DOCTYPE HTML PUBLIC "-//W3C//DTD HTML 4.01 Transitional//EN">
<html>
  <head>
  </head>
  <body>
    <form  id="loginForm" method="post" action="<%=path%>/login">
		<input type="text"  name="user.name" id="name" placeholder="姓名" required="required" /><br>
		<input type="password"  name="user.password" id="password" placeholder="密码" required="required" /><br>
		<button type="submit" id="form-submit">Login</button>
	</form>
  </body>
</html>
到此SSH框架就已顺利搭建完成,祝各位同学学习顺利!


 被折叠的 条评论
为什么被折叠?
被折叠的 条评论
为什么被折叠?
 到【灌水乐园】发言


