


 本文档详细介绍了如何在Eclipse中安装并配置PyDev插件进行Python开发,包括安装Python环境、导入Eclipse偏好设置、创建Python项目及运行首个Python程序等步骤。
From: http://www.rose-hulman.edu/class/csse/resources/Eclipse/eclipse-python-configuration.htm
Python开发工具: eclipse For pydev
在eclipse中如何配置pydev
How to Configure Eclipse for Python
Rose-Hulman Institute of Technology -
Computer Science & Software Engineering
Python3 must be installed before the complete instillation can be completed. If you don't have Python installed you can install it using these directions
Install the PyDev plug-in for Eclipse
-
Launch Eclipse
-
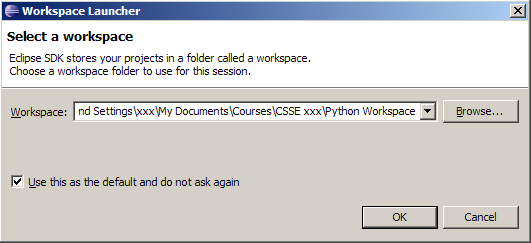
Launch Eclipse. A screen like this should appear, where you can choose which workspace to open. (If not, go to
File → Switch Workspace → Other) - Screenshots read 'Python 3.1', which is the old version. You will be installing Python 3.2.
-
Browse the csse120 folder which you created when installing Eclipse. Select "Use this as the default and do not ask again".
-
If you do, Eclipse will automatically use this workspace next time you open Eclipse. If you want to change the workspace later you can always go to File → Switch Workspace... to be sent back to the Workspace Launcher window.
-
-
You should now see Eclipse's Welcome screen:

Click on the arrow on the right to go to the workbench.

This is where you'll do most of your work in Eclipse.
-
-
Download PyDev from within Eclipse
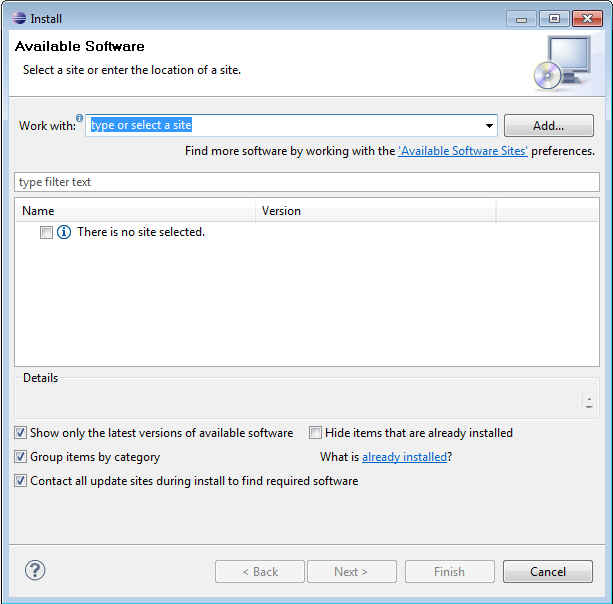
- Go to Help → Install New Software
-
Enter http://pydev.org/updates in the Work with: field.
-
After several seconds, two options should appear. Select the PyDev for Eclipse option. Do not select the "PyDev Mylyn Integration" flag.

- Click "Next" and "OK" to continue installing PyDev.
- Select "I accept the terms of the license agreement", then click "Finish". The installer will begin to download the plug-in.
- Note: When you see the Selection Needed dialog box, you must manually check the box before pressing okay. If you do not, it appears that the installation is continuing, but it is not. You must uninstall PyDev, then reinstall.

- A security warning may appear asking whether you trust the software being installed- click "ok", then ensure the correct items are selected and click yes. The instillation process will continue.
- When the installation is complete, you will be asked if you want to restart Eclipse. Select "Yes". You may see a Subclipse Usage dialog, just uncheck the box and continue.
- Go to Help → Install New Software
-
Configure PyDev
- Python must be installed to configure PyDev.
-
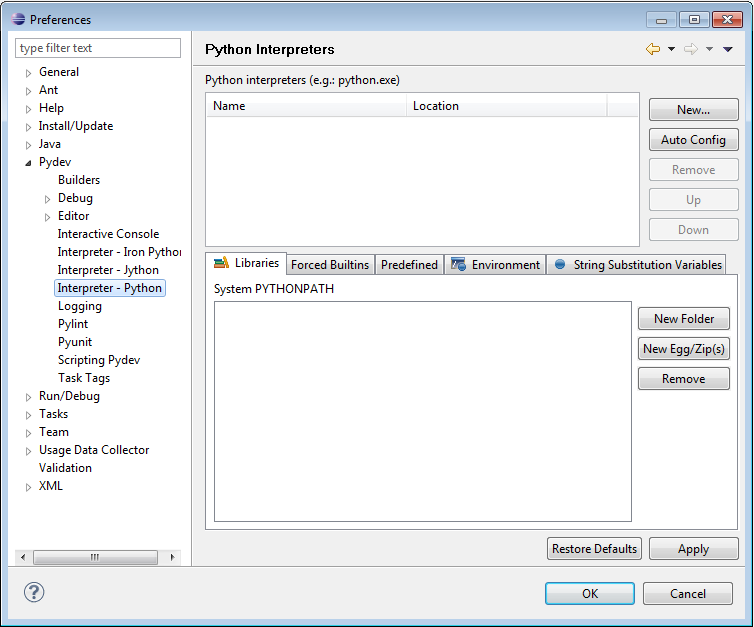
Go to Window → Preferences. In the Preferences window, expand PyDev and select Interpreter-Python.
-
Click "New..." and type Python32 for the Interpreter name. For the Interpreter executable, browse to your copy of Python (C:\Program Files\Python32\python.exe), and press Open.
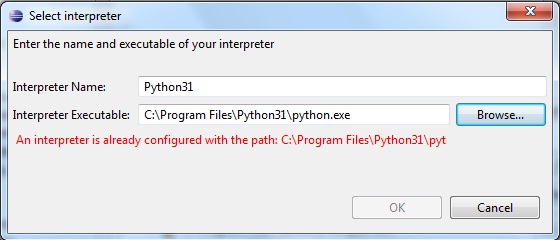
Click "OK" and the Selection Needed Window will appear.
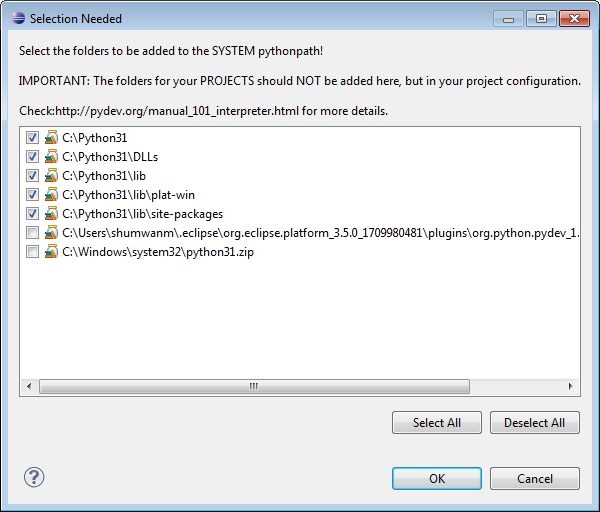
- Select all but the PySrc and python32.zip and click OK as many times as necessary to exit the preferences. The default selection should be fine.
- The Interpreter is now set up so that the code you write can be interpreted for the computer to run. You are now ready to start running code.
Installing Eclipse Preferences for Python
-
Download the Eclipse Preferences
-
Unzip this Preferences for csse120 file, placing its sole unzipped file (EclipsePreference-2011-06.epf) in any convenient location (your desktop, My Documents folder, etc).
-
-
Import the Preferences
-
Launch Eclipse.
-
If Eclipse offers to Select a Workspace, browse to C:\EclipseWorkspace\csse120.
-
If the csse 120 workspace does not appear automatically, choose File → Switch Workspace → Other, and click Next.
-
-
Now you are ready to set the preferences for the workspace:
-
Choose File → Import
-
In the Import dialog box, select General → Preferences and click Next.
-
When the Import Preferences dialog opens, select Browse and find the EclipsePreferences-2011-06.epf file that you unzipped and saved above.
-
Back in the Import Preferences dialog, check Import All, then select Finish.
-
As before, if the Subclipse Usage dialog makes an appearance, uncheck the box and continue.
-
Confirm that the installation did not leave behind unintended files by checking if there is:
-
random .eclipse folder anywhere, possibly in the folder immediately above My Documents.
-
Any extra users (for example, the installer), in C:\Users
-
Extra Eclipse workspaces anywhere except for the folders inside C:\EclipseWorkspaces.
-
-
-
Writing Your First Python Program
-
Switch to the Python perspective
-
Go to Window → Open Perspective → Other and choose PyDev, then click OK. If you look at the upper right corner you will see that the perspective has changed from "Java" to "PyDev".
-
Perspectives are designed to have the most useful tools within reach for whatever task you are doing (for example writing Java code or writing Python code). If you look in the File→ New menu you will see that there are different options with the different perspective.
PyDev Perspective Java Perspective 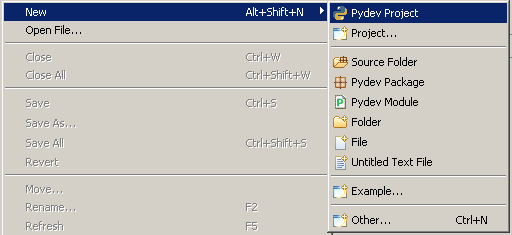

As you can see, perspectives greatly affect the look of the Eclipse program.
-
-
Create a new project
- Go to File → New → PyDev Project to start a wizard.
-
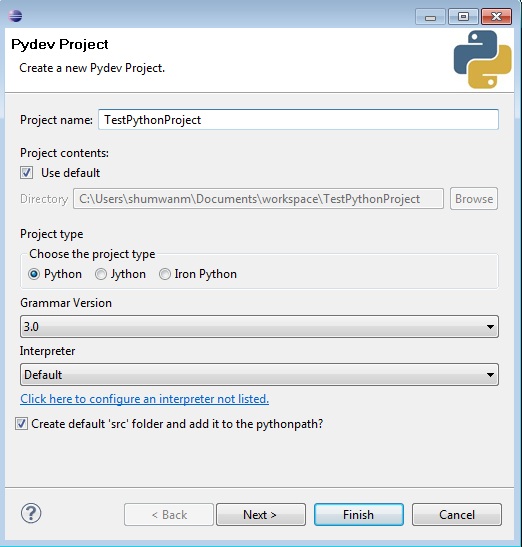
In the next window that appears, enter the name of your project and select "python" and 3.0"; as the type. Make sure "create default 'src' folder and add it to the pythonpath?" is selected. Click Finish.
-
If you look at the upper left corner of the workspace (in the Package Explorer view), you should now see your newly created project with a "src" folder inside.

-
Create a new module
-
Select the project you just created and go to File → New → PyDev Module. This will launch a new PyDev Module Wizard where you should enter a name for your module and make sure it is in the right location. Leave the Package field blank and select Finish.

-
Look in the Package Explorer view and you will see an icon of your new file inside the src folder, which Eclipse created when you made the new project before.

The file should be opened in the open space in the center of the workspace-the Editor view. (If not, right click on the greeting.py icon and select Open.) You will see a tab with the name of your file.

-
-
Write and run the program
-
Here's a program to greet the world. Simply type
print('Hello, World!')into the file. You may remove the default doc comment or leave it there; Python ignores it.
-
Right click on the file and select Save (or press Ctrl+S) to save the file.
- Finally, choose the greeting.py icon, and go to Run → Run As → Python Run to run your program.
(A quicker alternative is to right-click on the greeting.py icon, and select Run As → Python Run, or press Ctrl+F11.)

-
Look at the bottom of your screen at the Console view and you will see the message you told the computer to print.

Congratulations! You have written your first program with Python.
-
Configure PyDev for Productivity
-
Add line numbers
- Add line numbers by right-clicking in the margin at the left side of the code view and click on Show Line Numbers.
-
Change the comment color to one you can read more easily
- Go to Window → Preferences. Open PyDev and select Editors (actually click on 'Editors', don't just expand it). In the Appearance Color Options dropdown menu, select Comments. Then change it to a brighter color (perhaps fuchsia?).
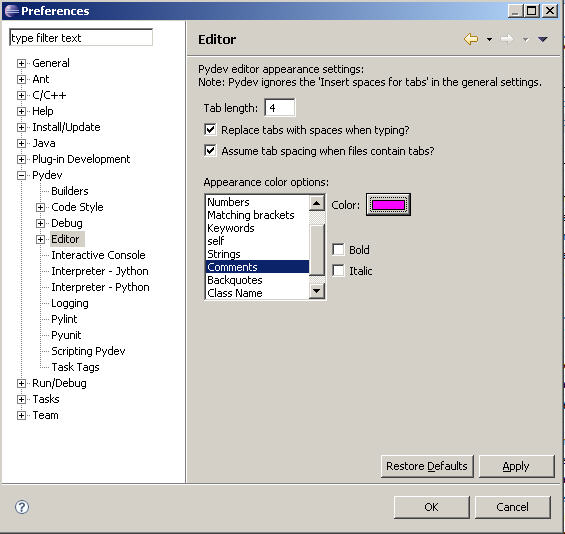
- Go to Window → Preferences. Open PyDev and select Editors (actually click on 'Editors', don't just expand it). In the Appearance Color Options dropdown menu, select Comments. Then change it to a brighter color (perhaps fuchsia?).
-
Turn on Task view to show TODO: items and add a CONSIDER: tag
- Go to Window → Show View → Tasks.
- Window → Preferences → PyDev → Task Tags, and add CONSIDER: to the end of the list.
- To get the task tags to show, run the program once, or select Project → Clean


 5668
5668

 被折叠的 条评论
为什么被折叠?
被折叠的 条评论
为什么被折叠?
 到【灌水乐园】发言


