


这是《软件开发框架Ⅱ》课程相关的难点资源文章。
1、spring历史类库下载问题:
springframework版本为:5.0.2,由于当前官网www.spring.io中已经无法直接找到历史版本的二进制版本的库,需要进到repo.spring.io进行下载。
①第一种方法,maven中央仓库根据自己的需要逐个下载库文件:
https://mvnrepository.com/artifact/org.springframework
②第二种方法:进到spring官网的repo库中,https://repo.spring.io/ui/repos/tree
选择Artifacory->snapshot->org->springframework->spring找到对应的版本,这里都是snapshot版本,如本课使用的5.0.2,使用如下包即可。
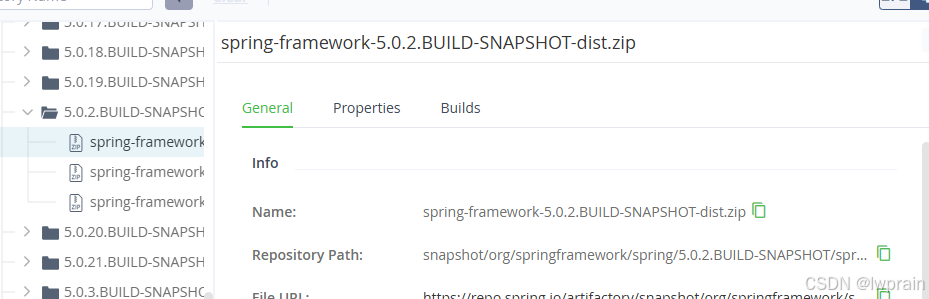
其实最终的访问路径是这个:
https://repo.spring.io/artifactory/snapshot/org/springframework/spring/5.0.2.BUILD-SNAPSHOT/spring-framework-5.0.2.BUILD-SNAPSHOT-dist.zip
apo其他组件下载地址:
https://repo1.maven.org/maven2/aopalliance/aopalliance/1.0/aopalliance-1.0.jar
对应maven导入代码:
<!-- https://mvnrepository.com/artifact/aopalliance/aopalliance -->
<dependency>
    <groupId>aopalliance</groupId>
    <artifactId>aopalliance</artifactId>
    <version>1.0</version>
</dependency>
https://repo1.maven.org/maven2/org/aspectj/aspectjweaver/1.8.9/aspectjweaver-1.8.9.jar
aspectjweaver
<dependency>
    <groupId>one.gfw</groupId>
    <artifactId>aspectjweaver</artifactId>
    <version>1.8.9</version>
</dependency>
commons-logging下载:
https://commons.apache.org/proper/commons-logging/download_logging.cgi
2、工程创建问题:
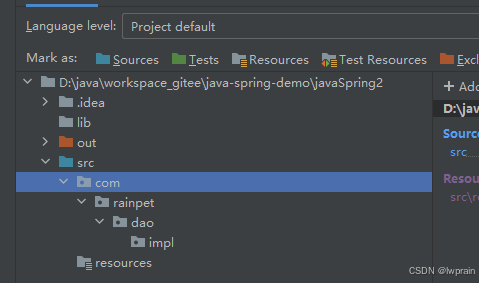
①idea中,使用Empty Project创建,手工创建src目录;创建lib目录,并将相关的依赖Jar放到其中。
其一,Project Structure设置中,ProjectSettings中,需要调整如下项目:
其二,Project的SDK版本为1.8,Language level为1.8。
其三,Modules中,工程名,将src设置为Sources。
其四,libraries中,添加类库lib的目录。
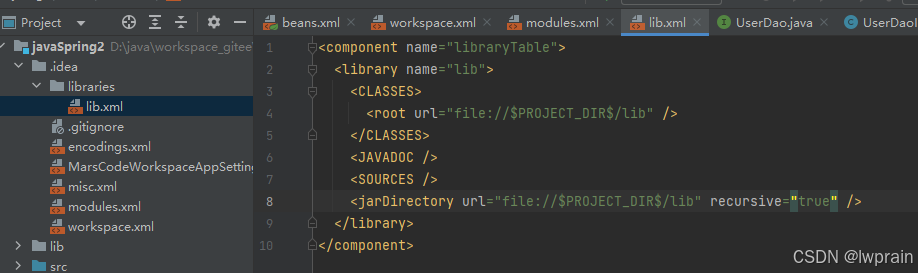
将.idea中libraries中的Lib.xml文件中,recursive值改为true
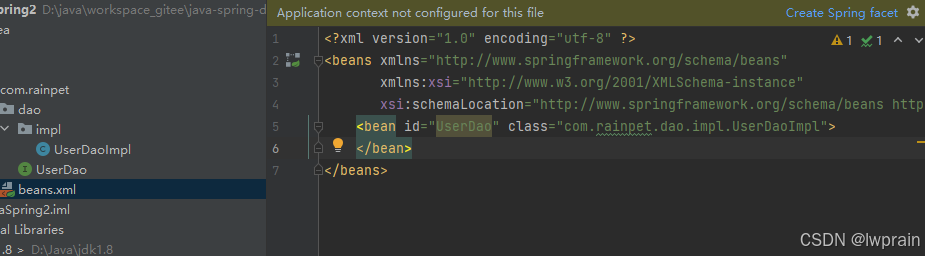
②、beans.xml的问题。
基本内容如下,文件要放到src下(此处可以增加一个resouces,同时在Project Structrue中,将此目录标记为resouce即可),也就是项目的源代码根路径上。:
<?xml version="1.0" encoding="utf-8" ?>
<beans xmlns="http://www.springframework.org/schema/beans"
       xmlns:xsi="http://www.w3.org/2001/XMLSchema-instance"
       xsi:schemaLocation="http://www.springframework.org/schema/beans http://www.springframework.org/schema/beans/spring-beans.xsd">
    <bean id="UserDao" class="com.rainpet.dao.impl.UserDaoImpl">
    </bean>
</beans>
打开beans.xml文件,idea会自动识别spring,点击“Create Spring facet”。
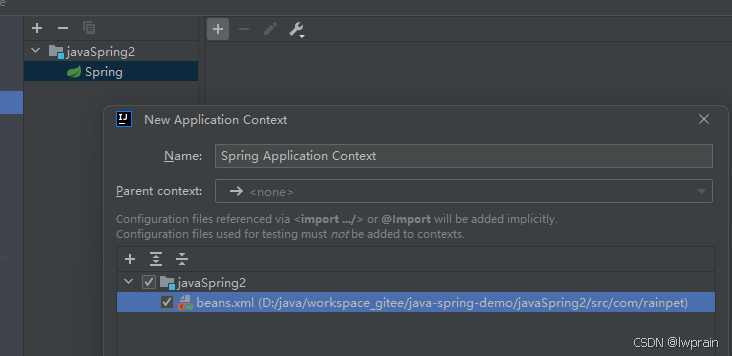
勾选对应的beans.xml文件,一步步点确认即可。
③eclipse工程创建问题:
新建一个Java工程,JRE,Use a project specific JRE,选择jdk1.8路径。
点完成。
新的创建工程中,添加一个目录lib。
在Preferences中,Java/Build Path/User Libraries中添加一个lib,在lib上点击,点击Add JARS,将lib文件添加进lib中。
在工程上点右键,属性,在Libraries中,Add Library,选择User libraries,确认退出。
自然有多种方法,可以根据实际情况选择。
src下创建beans.xml,各个需要的包及代码即可。
3、命名空间引入
① aop、ioc、事务、mybatis、SpringMvc试验相关的beans.xml的关键命名空间引入:
<?xml version="1.0" encoding="utf-8" ?>
<beans xmlns="http://www.springframework.org/schema/beans"
       xmlns:xsi="http://www.w3.org/2001/XMLSchema-instance"
       xmlns:tx="http://www.springframework.org/schema/tx"
       xmlns:mvc="http://www.springframework.org/schema/mvc"
       xmlns:aop="http://www.springframework.org/schema/aop"
       xmlns:context="http://www.springframework.org/schema/context"
       xsi:schemaLocation="http://www.springframework.org/schema/beans
        http://www.springframework.org/schema/beans/spring-beans.xsd
        http://www.springframework.org/schema/mvc
        http://www.springframework.org/schema/mvc/spring-mvc.xsd
        http://www.springframework.org/schema/context
        http://www.springframework.org/schema/context/spring-context.xsd
        http://www.springframework.org/schema/tx
        http://www.springframework.org/schema/tx/spring-tx.xsd
        http://www.springframework.org/schema/aop
        http://www.springframework.org/schema/aop/spring-aop.xsd
">
    <bean id="user" class="org.rainpet.entity.User">
    </bean>
</beans>
② aop、ioc、事务、mybatis相关试验的Pom.xml的主要依赖引入
<properties>
        <maven.compiler.source>8</maven.compiler.source>
        <maven.compiler.target>8</maven.compiler.target>
        <project.build.sourceEncoding>UTF-8</project.build.sourceEncoding>
        <spring.version>5.3.39</spring.version>
    </properties>
<dependencies>
        <dependency>
            <groupId>org.springframework</groupId>
            <artifactId>spring-context</artifactId>
            <version>${spring.version}</version>
        </dependency>
        <dependency>
            <groupId>org.springframework</groupId>
            <artifactId>spring-beans</artifactId>
            <version>${spring.version}</version>
        </dependency>
        <dependency>
            <groupId>org.springframework</groupId>
            <artifactId>spring-aop</artifactId>
            <version>${spring.version}</version>
        </dependency>
        <dependency>
            <groupId>org.springframework</groupId>
            <artifactId>spring-expression</artifactId>
            <version>${spring.version}</version>
        </dependency>
        <dependency>
            <groupId>org.springframework</groupId>
            <artifactId>spring-core</artifactId>
            <version>${spring.version}</version>
        </dependency>
        <dependency>
            <groupId>commons-logging</groupId>
            <artifactId>commons-logging</artifactId>
            <version>1.1.3</version>
        </dependency>
        <dependency>
            <groupId>aspectj</groupId>
            <artifactId>aspectj-tools</artifactId>
            <version>1.0.6</version>
        </dependency>
        <dependency>
            <groupId>org.aspectj</groupId>
            <artifactId>aspectjrt</artifactId>
            <version>1.9.7</version>
        </dependency>
        <dependency>
            <groupId>org.aspectj</groupId>
            <artifactId>aspectjweaver</artifactId>
            <version>1.9.7</version>
        </dependency>
        <dependency>
            <groupId>org.springframework</groupId>
            <artifactId>spring-jdbc</artifactId>
            <version>${spring.version}</version>
        </dependency>
        <dependency>
            <groupId>org.mybatis</groupId>
            <artifactId>mybatis</artifactId>
            <version>3.5.9</version>
        </dependency>
        <dependency>
            <groupId>org.mybatis</groupId>
            <artifactId>mybatis-spring</artifactId>
            <version>2.1.1</version>
        </dependency>
        <dependency>
            <groupId>org.apache.logging.log4j</groupId>
            <artifactId>log4j-core</artifactId>
            <version>2.22.0</version>
        </dependency>
        <dependency>
            <groupId>org.apache.logging.log4j</groupId>
            <artifactId>log4j-api</artifactId>
            <version>2.22.0</version>
        </dependency>
        <dependency>
            <groupId>com.mysql</groupId>
            <artifactId>mysql-connector-j</artifactId>
            <version>8.0.33</version>
        </dependency>

    </dependencies>
③ log4j2的依赖加入:
<dependency>
            <groupId>org.apache.logging.log4j</groupId>
            <artifactId>log4j-core</artifactId>
            <version>2.22.0</version>
        </dependency>
        <dependency>
            <groupId>org.apache.logging.log4j</groupId>
            <artifactId>log4j-api</artifactId>
            <version>2.22.0</version>
        </dependency>
log4j2的配置文件,文件名:log4j2.xml
<?xml version="1.0" encoding="UTF-8"?>
<Configuration status="WARN">
    <Appenders>
        <!-- 控制台输出 -->
        <Console name="Console" target="SYSTEM_OUT">
            <PatternLayout pattern="%d{yyyy-MM-dd HH:mm:ss.SSS} [%t] %-5level %logger{36} - %msg%n"/>
        </Console>

        <!-- 文件滚动日志(按日期归档) -->
        <RollingFile name="File" fileName="logs/app.log"
                     filePattern="logs/app-%d{yyyy-MM-dd}.log.gz">
            <PatternLayout pattern="%d{yyyy-MM-dd HH:mm:ss.SSS} [%t] %-5level %logger{36} - %msg%n"/>
            <Policies>
                <TimeBasedTriggeringPolicy interval="1" modulate="true"/>
            </Policies>
        </RollingFile>
    </Appenders>

    <Loggers>
        <!-- 指定包日志级别  com.rainpet包里面按照如下的配置执行,其他的按照根日志配置执行-->
        <Logger name="com.rainpet" level="debug" additivity="false">
            <AppenderRef ref="Console"/>
<!--            <AppenderRef ref="File"/>-->
        </Logger>

        <!-- 根日志配置 -->
        <Root level="debug">
            <AppenderRef ref="Console"/>
            <AppenderRef ref="File"/>
        </Root>
    </Loggers>
</Configuration>
引用示例代码:
LogManager.getLogger().info("Hello World!");
包:
import org.apache.logging.log4j.LogManager;
④ jar包打包相关配置:
<build>
        <plugins>
            <plugin>
                <groupId>org.apache.maven.plugins</groupId>
                <artifactId>maven-compiler-plugin</artifactId>
                <version>3.8.1</version>
                <configuration>
                    <source>1.8</source>
                    <target>1.8</target>
                    <encoding>UTF-8</encoding>
                </configuration>
            </plugin>
            <plugin>
                <groupId>org.springframework.boot</groupId>
                <artifactId>spring-boot-maven-plugin</artifactId>
                <version>2.6.3</version>
                <configuration>
                    <mainClass>org.rainpet.SpringApplication</mainClass>
                    <skip>true</skip>
                </configuration>
                <executions>
                    <execution>
                        <id>repackage</id>
                        <goals>
                            <goal>repackage</goal>
                        </goals>
                    </execution>
                </executions>
            </plugin>
        </plugins>
    </build>
4、事务相关问题
①声明式事务相关beans.xml内容 方法一,不使用注解:
<?xml version="1.0" encoding="utf-8" ?>
<beans xmlns="http://www.springframework.org/schema/beans"
       xmlns:xsi="http://www.w3.org/2001/XMLSchema-instance"
       xmlns:tx="http://www.springframework.org/schema/tx"
       xmlns:aop="http://www.springframework.org/schema/aop"
       xmlns:context="http://www.springframework.org/schema/context"
       xsi:schemaLocation="http://www.springframework.org/schema/beans
        http://www.springframework.org/schema/beans/spring-beans.xsd
        http://www.springframework.org/schema/context
        http://www.springframework.org/schema/context/spring-context.xsd
        http://www.springframework.org/schema/tx
        http://www.springframework.org/schema/tx/spring-tx.xsd
        http://www.springframework.org/schema/aop
        http://www.springframework.org/schema/aop/spring-aop.xsd
">
<!--    <context:component-scan base-package="com.rainpet"/>-->
    <bean id="dataSource" class="org.springframework.jdbc.datasource.DriverManagerDataSource">
        <property name="url" value="jdbc:mysql://172.20.94.32:3306/mall"/>
        <property name="username" value="hau"/>
        <property name="password" value="123123"/>
        <property name="driverClassName" value="com.mysql.cj.jdbc.Driver"/>
    </bean>
    <bean id="jdbcTemplate" class="org.springframework.jdbc.core.JdbcTemplate">
        <property name="dataSource" ref="dataSource"/>
    </bean>
    <bean id="transactionManager" class="org.springframework.jdbc.datasource.DataSourceTransactionManager">
        <property name="dataSource" ref="dataSource"/>
    </bean>

    <tx:advice id="transaction" transaction-manager="transactionManager">
        <!-- 配置事务的传播行为和隔离级别 -->
        <tx:attributes>
            <tx:method name="*" propagation="REQUIRED" isolation="READ_COMMITTED"/>
        </tx:attributes>
    </tx:advice>
    <aop:config>
        <aop:pointcut id="pointcut" expression="execution(* *Money(..))"/>
        <aop:advisor advice-ref="transaction" pointcut-ref="pointcut"/>
    </aop:config>

    <bean id="accountDao" class="com.rainpet.dao.impl.AccountDaoSpringTxImpl">
        <property name="jdbcTemplate" ref="jdbcTemplate"/>
    </bean>
</beans>
业务类的方法,简写:
public class AccountDaoSpringTxImpl implements AccountDao {
    private JdbcTemplate jdbcTemplate;
	public void setJdbcTemplate(JdbcTemplate jdbcTemplate) {
	        this.jdbcTemplate = jdbcTemplate;
	}
    public Double getMoney(String username) {
        Double money=jdbcTemplate.queryForObject("select money from t_account where username=?",Double.class,username);
        System.out.println("get "+username+"'s Money "+money.toString());
        return money;
    }
    @Override
    public boolean subMoney(String username, Double money) {
        PreparedStatement psmt = null;
        int retCount=0;
        retCount=jdbcTemplate.update("update t_account set money=money-? where username=?",money,username);
        System.out.println("subMoney amount "+money.toString()+" successfully");
        if(getMoney(username)<0){
            System.out.println(username+"的余额小于0,扣减失败!");
            throw new RuntimeException("余额不足");
//            return false;
        }
        return true;
    }

    @Override
    public boolean transferMoney(String sourceusername, String desusername, Double money) {
        try{
            boolean addflag= this.addMoney(desusername,money);
//            Integer a=1/0;
            System.out.println("adding amount "+money.toString());
            return subflag&&addflag;
        }catch (Exception e){
            e.printStackTrace();
            System.out.println("transferMoney failed");
            throw e;
//            return false;
        }
    }
  }
②方法二
<?xml version="1.0" encoding="utf-8" ?>
<beans xmlns="http://www.springframework.org/schema/beans"
xmlns:xsi="http://www.w3.org/2001/XMLSchema-instance"
xmlns:tx="http://www.springframework.org/schema/tx"
xmlns:aop="http://www.springframework.org/schema/aop"
xmlns:context="http://www.springframework.org/schema/context"
xsi:schemaLocation="http://www.springframework.org/schema/beans
http://www.springframework.org/schema/beans/spring-beans.xsd
http://www.springframework.org/schema/context
http://www.springframework.org/schema/context/spring-context.xsd
http://www.springframework.org/schema/tx
http://www.springframework.org/schema/tx/spring-tx.xsd
http://www.springframework.org/schema/aop
http://www.springframework.org/schema/aop/spring-aop.xsd
">
<!-- <context:component-scan base-package="com.rainpet"/>-->
<bean id="dataSource" class="org.springframework.jdbc.datasource.DriverManagerDataSource">
<property name="url" value="jdbc:mysql://172.20.94.32:3306/mall"/>
<property name="username" value="hau"/>
<property name="password" value="123123"/>
<property name="driverClassName" value="com.mysql.cj.jdbc.Driver"/>
</bean>
<bean id="jdbcTemplate" class="org.springframework.jdbc.core.JdbcTemplate">
<property name="dataSource" ref="dataSource"/>
</bean>
<bean id="transactionManager" class="org.springframework.jdbc.datasource.DataSourceTransactionManager">
<property name="dataSource" ref="dataSource"/>
</bean>
<!-- <tx:advice id="transaction" transaction-manager="transactionManager">-->
<!-- <!– 配置事务的传播行为和隔离级别 –>-->
<!-- <tx:attributes>-->
<!-- <tx:method name="*" propagation="REQUIRED" isolation="READ_COMMITTED"/>-->
<!-- </tx:attributes>-->
<!-- </tx:advice>-->
<!-- <aop:config>-->
<!-- <aop:pointcut id="pointcut" expression="execution(* *Money(..))"/>-->
<!-- <aop:advisor advice-ref="transaction" pointcut-ref="pointcut"/>-->
<!-- </aop:config>-->
<tx:annotation-driven transaction-manager="transactionManager"/>
<bean id="accountDao" class="com.rainpet.dao.impl.AccountDaoSpringTxImpl">
<property name="jdbcTemplate" ref="jdbcTemplate"/>
</bean>
</beans>
此时业务方法就需要加上注解了:
```java
public class AccountDaoSpringTxImpl implements AccountDao {
    private JdbcTemplate jdbcTemplate;
	public void setJdbcTemplate(JdbcTemplate jdbcTemplate) {
	        this.jdbcTemplate = jdbcTemplate;
	}
    public Double getMoney(String username) {
        Double money=jdbcTemplate.queryForObject("select money from t_account where username=?",Double.class,username);
        System.out.println("get "+username+"'s Money "+money.toString());
        return money;
    }
    @Override
    public boolean subMoney(String username, Double money) {
        PreparedStatement psmt = null;
        int retCount=0;
        retCount=jdbcTemplate.update("update t_account set money=money-? where username=?",money,username);
        System.out.println("subMoney amount "+money.toString()+" successfully");
        if(getMoney(username)<0){
            System.out.println(username+"的余额小于0,扣减失败!");
            throw new RuntimeException("余额不足");
//            return false;
        }
        return true;
    }

    @Override
    @Transactional(rollbackFor = Exception.class)
    public boolean transferMoney(String sourceusername, String desusername, Double money) {
        try{
            boolean addflag= this.addMoney(desusername,money);
//            Integer a=1/0;
            System.out.println("adding amount "+money.toString());
            return subflag&&addflag;
        }catch (Exception e){
            e.printStackTrace();
            System.out.println("transferMoney failed");
            throw e;
//            return false;
        }
    }
  }
5、spring mybatis整合关键文件:
不需要加@Mapper注解,也不用@MapperScan扫包
mybatis-spring.xml
<?xml version="1.0" encoding="utf-8" ?>
<beans xmlns="http://www.springframework.org/schema/beans"
       xmlns:xsi="http://www.w3.org/2001/XMLSchema-instance"
       xmlns:tx="http://www.springframework.org/schema/tx"
       xmlns:aop="http://www.springframework.org/schema/aop"
       xmlns:context="http://www.springframework.org/schema/context"
       xmlns:mybatis-spring="http://mybatis.org/schema/mybatis-spring"
       xsi:schemaLocation="http://www.springframework.org/schema/beans
        http://www.springframework.org/schema/beans/spring-beans.xsd
        http://www.springframework.org/schema/context
        http://www.springframework.org/schema/context/spring-context.xsd
        http://www.springframework.org/schema/tx
        http://www.springframework.org/schema/tx/spring-tx.xsd
        http://www.springframework.org/schema/aop
        http://www.springframework.org/schema/aop/spring-aop.xsd
        http://mybatis.org/schema/mybatis-spring
        http://mybatis.org/schema/mybatis-spring/mybatis-spring.xsd
">
    <context:component-scan base-package="org.rainpet"/>
    <context:property-placeholder location="db.properties"/>
    <bean id="dataSource" class="org.springframework.jdbc.datasource.DriverManagerDataSource">
        <property name="driverClassName" value="${db.driver}"/>
        <property name="url" value="${db.url}"/>
        <property name="username" value="${db.username}"/>
        <property name="password" value="${db.password}"/>
    </bean>
<!--    <bean id="dataSource2" class="org.apache.ibatis.datasource.pooled.PooledDataSource">-->
<!--        <property name="driver" value="${driver}"/>-->
<!--        <property name="url" value="${url}"/>-->
<!--        <property name="username" value="${username}"/>-->
<!--        <property name="password" value="${password}"/>-->
<!--    </bean>-->
    <bean id="jdbcTemplate" class="org.springframework.jdbc.core.JdbcTemplate">
        <property name="dataSource" ref="dataSource"/>
    </bean>
    <bean id="transactionManager" class="org.springframework.jdbc.datasource.DataSourceTransactionManager">
        <property name="dataSource" ref="dataSource"/>
    </bean>
    <tx:annotation-driven transaction-manager="transactionManager"/>
<!--    <mybatis-spring:scan base-package="org.rainpet.dao"/>-->
    <import resource="classpath:mybatisConfig.xml"/>
    <bean id="sqlSessionFactory" class="org.mybatis.spring.SqlSessionFactoryBean">
        <property name="configLocation" value="classpath:mybatisConfig.xml"/>
        <property name="dataSource" ref="dataSource"/>
        <property name="mapperLocations" value="classpath:org/rainpet/dao/*.xml"/>
    </bean>
    <bean class="org.mybatis.spring.mapper.MapperScannerConfigurer">
        <!-- 扫描所有dao接口 -->
        <property name="basePackage" value="org.rainpet.dao"></property>
        <property name="sqlSessionFactoryBeanName" value="sqlSessionFactory"></property>
    </bean>
</beans>
mybatisConfig.xml
<?xml version="1.0" encoding="utf-8" ?>
<!DOCTYPE configuration
        PUBLIC "-//mybatis.org//DTD Mapper 3.0//EN"
        "http://mybatis.org/dtd/mybatis-3-config.dtd">
<configuration>
    <settings>
        <setting name="logImpl" value="STDOUT_LOGGING"/>
    </settings>
    <typeAliases>
        <typeAlias type="org.rainpet.entity.Order" alias="order"/>
    </typeAliases>
    <mappers>
<!--       <mapper resource="dao/OrderMapper2.xml"/>-->
<!--         <package name="org.rainpet.dao"/>-->
    </mappers>
</configuration>
db.properties
db.driver=com.mysql.cj.jdbc.Driver
db.url=jdbc:mysql://127.0.0.1:3306/mall?useUnicode=true&characterEncoding=utf8&useSSL=false&serverTimezone=UTC&allowPublicKeyRetrieval=true
db.username=root
db.password=123123
Test2Service.java
import org.rainpet.dao.OrderDao2;
import org.rainpet.entity.Order;
import org.springframework.beans.factory.annotation.Autowired;
import org.springframework.stereotype.Service;

import java.util.List;

@Service
public class Test2Service {

    @Autowired
    private OrderDao2 orderDao2;

    public void hello() {
        List<Order> orderList= orderDao2.findAll();
        System.out.println(orderList);
    }
}
TestService.java
import org.apache.ibatis.session.SqlSessionFactory;
import org.rainpet.dao.OrderDao2;
import org.rainpet.entity.Order;
import org.springframework.beans.factory.annotation.Autowired;
import org.springframework.stereotype.Service;

import java.util.List;

@Service
public class TestService {

    @Autowired
    private SqlSessionFactory sqlSessionFactory;

    public void hello() {
        OrderDao2 orderDao2=sqlSessionFactory.openSession().getMapper(OrderDao2.class);
        List<Order> orderList= orderDao2.findAll();
        System.out.println(orderList);
    }
}
主程序关键代码:
ApplicationContext context=new ClassPathXmlApplicationContext("mybatis-spring.xml");
        Order order=new Order();
        order.setOrderAddress("北京2");
        TestService testService= context.getBean("testService",TestService.class);
        testService.hello();

        Test2Service test2Service= context.getBean("test2Service",Test2Service.class);
        test2Service.hello();

        SqlSessionFactory sqlSessionFactory=context.getBean(SqlSessionFactory.class);
        Integer count=sqlSessionFactory.openSession().getMapper(OrderDao2.class).save(order);
        System.out.println("count:"+count);
6、全注解情况下的mybatis和spring的整合(不是用springboot)
①入口方法的主代码
AnnotationConfigApplicationContext context=new AnnotationConfigApplicationContext(AppConfig.class);
Test2Service test2Service= context.getBean("test2Service",Test2Service.class);
        test2Service.hello();
②主配置类:AppConfig.java
import org.springframework.context.annotation.*;
import org.springframework.context.support.PropertySourcesPlaceholderConfigurer;

@Configuration
@ComponentScan("org.rainpet")
@EnableAspectJAutoProxy
@PropertySource("classpath:db.properties")
public class AppConfig {
    @Bean
    public static PropertySourcesPlaceholderConfigurer propertySourcesPlaceholderConfigurer() {
        return new PropertySourcesPlaceholderConfigurer();
    }
}
③Mybatis的配置类:MybatisConfig.java
import org.apache.ibatis.session.SqlSessionFactory;
import org.mybatis.spring.SqlSessionFactoryBean;
import org.mybatis.spring.annotation.MapperScan;
import org.springframework.context.annotation.Bean;
import org.springframework.context.annotation.Configuration;
import org.springframework.core.io.support.PathMatchingResourcePatternResolver;
import org.springframework.jdbc.datasource.DriverManagerDataSource;

import javax.sql.DataSource;

@Configuration
@MapperScan("org.rainpet.dao")
public class MybatisConfig {
    @Bean
    public DataSource dataSource() {
        DriverManagerDataSource dataSource = new DriverManagerDataSource();
        dataSource.setDriverClassName("com.mysql.cj.jdbc.Driver");
        dataSource.setUrl("jdbc:mysql://172.20.94.32:3306/mall");
        dataSource.setUsername("hau");
        dataSource.setPassword("123123");
        return dataSource;
    }

    @Bean
    public SqlSessionFactory sqlSessionFactory() throws Exception {
        SqlSessionFactoryBean sessionFactory = new SqlSessionFactoryBean();
        sessionFactory.setDataSource(dataSource());
        sessionFactory.setMapperLocations(new PathMatchingResourcePatternResolver()
                .getResources("classpath*:mapper/*.xml")); // 替换为您的 Mapper XML 文件路径
        sessionFactory.setTypeAliasesPackage("org.rainpet.entity");
        return sessionFactory.getObject();
    }
}
④启用别名的entity后,会自动的给包中的类别加个首字母小写的别名,也可以再次用@Alias注解指定其他别名:
import org.apache.ibatis.type.Alias;

import java.sql.Date;
import java.time.LocalDateTime;

@Alias("order2")
public class Order {
    private int orderId;
    private LocalDateTime orderTime;
    private String orderAddress;
    private Date orderDate;

    @Override
    public String toString() {
        return "Order{" +
                "orderId=" + orderId +
                ", orderTime=" + orderTime +
                ", orderAddress='" + orderAddress + '\'' +
                ", orderDate=" + orderDate +
                '}';
    }
    public Date getOrderDate() {
        return orderDate;
    }
    public void setOrderDate(Date orderDate) {
        this.orderDate = orderDate;
    }
    public String getOrderAddress() {
        return orderAddress;
    }
    public void setOrderAddress(String orderAddress) {
        this.orderAddress = orderAddress;
    }
    public int getOrderId() {
        return orderId;
    }
    public void setOrderId(int orderId) {
        this.orderId = orderId;
    }
    public LocalDateTime getOrderTime() {
        return orderTime;
    }
    public void setOrderTime(LocalDateTime orderTime) {
        this.orderTime = orderTime;
    }
}
7、spring、springmvc、mybatis整合,遇到localdatetime类型显示为数组的情况,如下图:

处理方法:
springmvc-servlet.xml文件:
<?xml version="1.0" encoding="UTF-8" ?>
<beans xmlns="http://www.springframework.org/schema/beans"
       xmlns:xsi="http://www.w3.org/2001/XMLSchema-instance"
       xmlns:mvc="http://www.springframework.org/schema/mvc"
       xmlns:tx="http://www.springframework.org/schema/tx"
       xmlns:context="http://www.springframework.org/schema/context"
       xsi:schemaLocation="http://www.springframework.org/schema/beans
       http://www.springframework.org/schema/beans/spring-beans.xsd
       http://www.springframework.org/schema/mvc
       http://www.springframework.org/schema/mvc/spring-mvc.xsd
       http://www.springframework.org/schema/tx
       http://www.springframework.org/schema/tx/spring-tx.xsd
       http://www.springframework.org/schema/context
       http://www.springframework.org/schema/context/spring-context.xsd">
    <context:component-scan base-package="org.rainpet"/>
    <mvc:annotation-driven>
        <mvc:message-converters>
            <bean class="org.springframework.http.converter.json.MappingJackson2HttpMessageConverter">
                <property name="objectMapper" ref="objectMapper"/>
            </bean>
        </mvc:message-converters>
    </mvc:annotation-driven>

    <context:property-placeholder location="classpath:db.properties"/>
    <bean id="dataSource" class="org.springframework.jdbc.datasource.DriverManagerDataSource">
        <property name="driverClassName" value="${db.driver}"/>
        <property name="url" value="${db.url}"/>
        <property name="username" value="${db.username}"/>
        <property name="password" value="${db.password}"/>
    </bean>
    <bean id="transactionManager" class="org.springframework.jdbc.datasource.DataSourceTransactionManager">
        <property name="dataSource" ref="dataSource"/>
    </bean>
    <tx:annotation-driven transaction-manager="transactionManager"/>
    <!--    <mybatis-spring:scan base-package="org.rainpet.dao"/>-->
<!--    <import resource="classpath:mybatisConfig.xml"/>-->
    <bean id="sqlSessionFactory" class="org.mybatis.spring.SqlSessionFactoryBean">
        <property name="configLocation" value="classpath:mybatisConfig.xml"/>
        <property name="dataSource" ref="dataSource"/>
        <property name="mapperLocations" value="classpath:mappers/*.xml"/>
    </bean>
    <bean class="org.mybatis.spring.mapper.MapperScannerConfigurer">
        <!-- 扫描所有dao接口 -->
        <property name="basePackage" value="org.rainpet.mapper"></property>
        <property name="sqlSessionFactoryBeanName" value="sqlSessionFactory"></property>
    </bean>

</beans>
还要创建配置类:JacksonConfig.java
import com.fasterxml.jackson.databind.ObjectMapper;
import com.fasterxml.jackson.databind.SerializationFeature;
import com.fasterxml.jackson.datatype.jsr310.JavaTimeModule;
import com.fasterxml.jackson.datatype.jsr310.ser.LocalDateTimeSerializer;
import org.springframework.context.annotation.Bean;
import org.springframework.context.annotation.Configuration;

import java.time.LocalDateTime;
import java.time.format.DateTimeFormatter;

@Configuration
public class JacksonConfig {

    public static final String DEFAULT_DATE_TIME_PATTERN = "yyyy-MM-dd HH:mm:ss";

    @Bean
    public ObjectMapper objectMapper() {
        ObjectMapper objectMapper = new ObjectMapper();
        JavaTimeModule javaTimeModule = new JavaTimeModule();

        // 配置LocalDateTime序列化格式
        javaTimeModule.addSerializer(LocalDateTime.class,
            new LocalDateTimeSerializer(DateTimeFormatter.ofPattern(DEFAULT_DATE_TIME_PATTERN)));

        objectMapper.registerModule(javaTimeModule);
        objectMapper.disable(SerializationFeature.WRITE_DATES_AS_TIMESTAMPS);

        return objectMapper;
    }
}
主要是此处:
<mvc:annotation-driven>
        <mvc:message-converters>
            <bean class="org.springframework.http.converter.json.MappingJackson2HttpMessageConverter">
                <property name="objectMapper" ref="objectMapper"/>
            </bean>
        </mvc:message-converters>
    </mvc:annotation-driven>
同时需要确保pom.xml文件内容:
<dependency>
      <groupId>com.fasterxml.jackson.core</groupId>
      <artifactId>jackson-core</artifactId>
      <version>2.13.4</version>
    </dependency>
    <dependency>
      <groupId>com.fasterxml.jackson.core</groupId>
      <artifactId>jackson-databind</artifactId>
      <version>2.13.4</version>
    </dependency>
    <dependency>
      <groupId>com.fasterxml.jackson.core</groupId>
      <artifactId>jackson-annotations</artifactId>
      <version>2.13.4</version>
    </dependency>
    <dependency>
      <groupId>com.fasterxml.jackson.datatype</groupId>
      <artifactId>jackson-datatype-jsr310</artifactId>
      <version>2.13.4</version> <!-- 请使用最新版本 -->
    </dependency>
8.数据源的几种常见用法(配置文件中):
①org.springframework.jdbc.datasource.DriverManagerDataSource 无连接池,很少
<bean id="dataSource" class="org.springframework.jdbc.datasource.DriverManagerDataSource">
    <property name="driverClassName" value="com.mysql.cj.jdbc.Driver"/>
    <property name="url" value="jdbc:mysql://localhost:3306/mydb"/>
    <property name="username" value="root"/>
    <property name="password" value="password"/>
</bean>
②org.apache.commons.dbcp2.BasicDataSource apache的DBCP( Database Connection Pool)的实现,使用的较多
<bean id="dataSource" class="org.apache.commons.dbcp2.BasicDataSource" destroy-method="close">
    <property name="driverClassName" value="com.mysql.cj.jdbc.Driver"/>
    <property name="url" value="jdbc:mysql://localhost:3306/mydb"/>
    <property name="username" value="root"/>
    <property name="password" value="password"/>
    <property name="initialSize" value="5"/>
    <property name="maxTotal" value="10"/>
    <property name="minIdle" value="2"/>
</bean>
③com.zaxxer.hikari.HikariDataSource Hikari数据源,支持连接池,同时也是springboot的默认数据源
<bean id="dataSource" class="com.zaxxer.hikari.HikariDataSource">
        <property name="jdbcUrl" value="jdbc:mysql://localhost:3306/your_database"/>
        <property name="username" value="your_username"/>
        <property name="password" value="your_password"/>
        <property name="driverClassName" value="com.mysql.cj.jdbc.Driver"/>
        <property name="maximumPoolSize" value="10"/>
        <property name="minimumIdle" value="2"/>
        <property name="idleTimeout" value="30000"/>
        <property name="connectionTimeout" value="5000"/>
    </bean>
.yml中:
spring:
  datasource:
    url: jdbc:mysql://localhost:3306/your_database
    username: your_username
    password: your_password
    driver-class-name: com.mysql.cj.jdbc.Driver
    hikari:
      maximum-pool-size: 10
      minimum-idle: 2
      idle-timeout: 30000
      connection-timeout: 5000
④com.alibaba.druid.pool.DruidDataSource 阿里巴巴的连接池
    <bean id="dataSource" class="com.alibaba.druid.pool.DruidDataSource" destroy-method="close">
        <property name="url" value="jdbc:mysql://localhost:3306/your_database"/>
        <property name="username" value="your_username"/>
        <property name="password" value="your_password"/>
        <property name="driverClassName" value="com.mysql.cj.jdbc.Driver"/>
        <property name="initialSize" value="5"/>
        <property name="maxActive" value="10"/>
        <property name="minIdle" value="2"/>
    </bean>
.yml版本:
spring:
  datasource:
    druid:
      url: jdbc:mysql://localhost:3306/your_database
      username: your_username
      password: your_password
      driver-class-name: com.mysql.cj.jdbc.Driver
      initial-size: 5
      max-active: 10
      min-idle: 2
      stat-view-servlet:
        enabled: true
        url-pattern: /druid/*
        login-username: admin
        login-password: admin
9、全注解,非spring boot情况下的,SSM的整合,主要使用了servlet的3.0开始的AbstractAnnotationConfigDispatcherServletInitializer支持。
webapp中,WEB-INF中增加一个目录:
services
里面增加一个文件名:
javax.servlet.ServletContainerInitializer
内容为SpringMVC项目的入口配置,WebInit.java,如下:
org.rainpet.config.WebInit
WebInit.java
package org.rainpet.config;

import org.springframework.web.filter.CharacterEncodingFilter;
import org.springframework.web.filter.HiddenHttpMethodFilter;
import org.springframework.web.servlet.support.AbstractAnnotationConfigDispatcherServletInitializer;

import javax.servlet.Filter;

/**
 * web工程的初始化,用来代替web.xml
 */
public class WebInit extends AbstractAnnotationConfigDispatcherServletInitializer {
    @Override
    protected Class<?>[] getRootConfigClasses() {
        return new Class[]{SpringConfig.class};
    }
    @Override
    protected Class<?>[] getServletConfigClasses() {
        return new Class[]{WebConfig.class};
    }
    @Override
    protected String[] getServletMappings() {
        return new String[]{"/"};
    }
    @Override
    protected Filter[] getServletFilters() {
        CharacterEncodingFilter characterEncodingFilter = new CharacterEncodingFilter();;
        characterEncodingFilter.setEncoding("UTF-8");
        characterEncodingFilter.setForceResponseEncoding(true);
        HiddenHttpMethodFilter hiddenHttpMethodFilter = new HiddenHttpMethodFilter();
        return new Filter[]{characterEncodingFilter, hiddenHttpMethodFilter};
    }
}
WebConfig.java
package org.rainpet.config;

import org.springframework.context.annotation.Bean;
import org.springframework.context.annotation.ComponentScan;
import org.springframework.context.annotation.Configuration;
import org.springframework.web.servlet.config.annotation.EnableWebMvc;
import org.springframework.web.servlet.ViewResolver;
import org.springframework.web.servlet.config.annotation.DefaultServletHandlerConfigurer;
import org.springframework.web.servlet.config.annotation.EnableWebMvc;
import org.springframework.web.servlet.config.annotation.WebMvcConfigurerAdapter;
import org.springframework.web.servlet.view.InternalResourceViewResolver;

@Configuration    //声明是配置类
@EnableWebMvc     //启动SpringMVC
@ComponentScan("org.rainpet")    //启动组件扫描
public class WebConfig extends WebMvcConfigurerAdapter {
    //配置JSP视图解析器
    @Bean
    public ViewResolver viewResolver(){
        InternalResourceViewResolver resolver = new InternalResourceViewResolver();
        resolver.setPrefix("/WEB-INF/views/");
        resolver.setSuffix(".jsp");
        return resolver;
    }
    //配置静态资源处理
    @Override
    public void configureDefaultServletHandling(
            DefaultServletHandlerConfigurer configurer){
        configurer.enable();
    }
}
SpringConfig.java
package org.rainpet.config;

import org.apache.ibatis.session.SqlSessionFactory;
import org.mybatis.spring.SqlSessionFactoryBean;
import org.mybatis.spring.annotation.MapperScan;
import org.springframework.beans.factory.annotation.Value;
import org.springframework.context.annotation.Bean;
import org.springframework.context.annotation.Configuration;
import org.springframework.core.io.support.PathMatchingResourcePatternResolver;
import org.springframework.jdbc.datasource.DriverManagerDataSource;

import javax.sql.DataSource;

@Configuration
@MapperScan("org.rainpet.mapper")
public class SpringConfig {
    @Bean
    public SqlSessionFactory sqlSessionFactory(DataSource dataSource) throws Exception {
        SqlSessionFactoryBean sessionFactory = new SqlSessionFactoryBean();
        sessionFactory.setDataSource(dataSource);
        sessionFactory.setMapperLocations(new PathMatchingResourcePatternResolver()
                .getResources("classpath:mappers/*.xml")); // 指定 Mapper XML 文件所在的位置
        sessionFactory.setTypeAliasesPackage("org.rainpet.entity");
        return sessionFactory.getObject();
    }
    @Bean
    public DataSource dataSource() {
        DriverManagerDataSource dataSource = null;
        try {
            dataSource = new DriverManagerDataSource ();
            dataSource.setDriverClassName("com.mysql.cj.jdbc.Driver");
            dataSource.setUrl("jdbc:mysql://localhost:3306/rainpet?useUnicode=true&characterEncoding=utf-8&serverTimezone=UTC");
            dataSource.setUsername("hau");
            dataSource.setPassword("123123");
//            return dataSource;
        }catch (Exception e){
            e.printStackTrace();
        }
        return dataSource;
    }
}
JacksonConfig.java 用于处理日期格式SR310的日期格式转换:
package org.rainpet.config;

import com.fasterxml.jackson.databind.ObjectMapper;
import com.fasterxml.jackson.databind.SerializationFeature;
import com.fasterxml.jackson.datatype.jsr310.JavaTimeModule;
import com.fasterxml.jackson.datatype.jsr310.ser.LocalDateTimeSerializer;
import org.springframework.context.annotation.Bean;
import org.springframework.context.annotation.Configuration;

import java.time.LocalDateTime;
import java.time.format.DateTimeFormatter;

@Configuration
public class JacksonConfig {

    public static final String DEFAULT_DATE_TIME_PATTERN = "yyyy-MM-dd HH:mm:ss";

    @Bean
    public ObjectMapper objectMapper() {
        ObjectMapper objectMapper = new ObjectMapper();
        JavaTimeModule javaTimeModule = new JavaTimeModule();

        // 配置LocalDateTime序列化格式
        javaTimeModule.addSerializer(LocalDateTime.class,
            new LocalDateTimeSerializer(DateTimeFormatter.ofPattern(DEFAULT_DATE_TIME_PATTERN)));

        objectMapper.registerModule(javaTimeModule);
        objectMapper.disable(SerializationFeature.WRITE_DATES_AS_TIMESTAMPS);

        return objectMapper;
    }
}
Hibernate验证器的快速失败设置,ValidationConfiguration.java
package org.rainpet.config;

import org.hibernate.validator.HibernateValidator;
import org.springframework.context.annotation.Bean;
import org.springframework.context.annotation.Configuration;

import javax.validation.Validation;

@Configuration
public class ValidationConfiguration {

    public ValidationConfiguration() {
        System.out.println("创建配置类对象:ValidationConfiguration");
    }

    @Bean
    public javax.validation.Validator validator() {
        return Validation.byProvider(HibernateValidator.class)
                .configure() // 开始配置
                .failFast(true) // 配置快速失败
                .buildValidatorFactory() // 构建Validator工厂
                .getValidator(); // 从Validator工厂中获取Validator对象
    }

}
Application.java 入口程序:
package org.rainpet;

import org.apache.catalina.Context;
import org.apache.catalina.LifecycleException;
import org.apache.catalina.Wrapper;
import org.apache.catalina.connector.Connector;
import org.apache.catalina.loader.WebappLoader;
import org.apache.catalina.startup.Tomcat;

import java.io.File;

public class Application {

    private static int port = 8080;
    private static String contextPath = "/";

    public static void run(){
        Tomcat tomcat = new Tomcat();
        String baseDir;
        if (Application.class.getResource("/") != null) {
            // 开发调试环境
            baseDir = new File("src/main/webapp").getAbsolutePath();
        } else {
            // 打包运行环境
            baseDir = new File(Application.class.getProtectionDomain().getCodeSource().getLocation().getPath())
                    .getParentFile().getAbsolutePath() + "/webapp";
        }
        //设置tomcat启动后的工作目录
        System.out.println("baseDir:"+baseDir);
        tomcat.setBaseDir(baseDir);
        //设置端口
        tomcat.setPort(port);
        //获取执行器,并设置io协议
        Connector connector = new Connector("org.apache.coyote.http11.Http11NioProtocol");
        //设置端口
        connector.setPort(port);
        //设置执行器
        tomcat.setConnector(connector);

        // 修改 context 配置
        Context ctx = tomcat.addWebapp(contextPath, baseDir);
        WebappLoader loader = new WebappLoader(Thread.currentThread().getContextClassLoader());
        ctx.setLoader(loader);

        System.out.println(baseDir);
        tomcat.enableNaming();
        try {
            tomcat.start();
        } catch (LifecycleException e) {
            System.err.println("tomcat 启动失败");
        }
        //tomcat启动后,让其阻塞,不让当前线程结束,等待处理请求,
        tomcat.getServer().await();
    }

    public static void main(String[] args) {
        run();
    }
}
pom.xml的打包部分:
<build>
    <plugins>
      <plugin>
        <groupId>org.springframework.boot</groupId>
        <artifactId>spring-boot-maven-plugin</artifactId>
        <version>2.6.13</version>
        <executions>
          <execution>
            <goals>
              <goal>repackage</goal>
            </goals>
            <configuration>
              <classifier>exec</classifier>
              <mainClass>org.rainpet.Application</mainClass>
            </configuration>
          </execution>
        </executions>
      </plugin>
    </plugins>
    <resources>
      <resource>
        <directory>src/main/resources</directory>
        <filtering>true</filtering>
        <includes>
          <include>**/*</include>
        </includes>
      </resource>
      <resource>
        <directory>src/main/webapp</directory>
        <targetPath>META-INF/resources</targetPath>
        <includes>
          <include>**/*</include>
        </includes>
      </resource>
    </resources>
  </build>
最后可能会遇到log4j2.xml文件不生效的情况:
需要配置pom.xml
增加依赖:log4j-slf4j2-impl,不然会提示:
SLF4J: Failed to load class "org.slf4j.impl.StaticLoggerBinder".
SLF4J: Defaulting to no-operation (NOP) logger implementation
<dependency>
      <groupId>org.apache.logging.log4j</groupId>
      <artifactId>log4j-slf4j2-impl</artifactId>
      <version>2.20.0</version>
    </dependency>
    <dependency>
      <groupId>org.apache.logging.log4j</groupId>
      <artifactId>log4j-core</artifactId>
      <version>2.22.0</version>
    </dependency>
    <dependency>
      <groupId>org.apache.logging.log4j</groupId>
      <artifactId>log4j-api</artifactId>
      <version>2.22.0</version>
    </dependency>
10、常见问题:
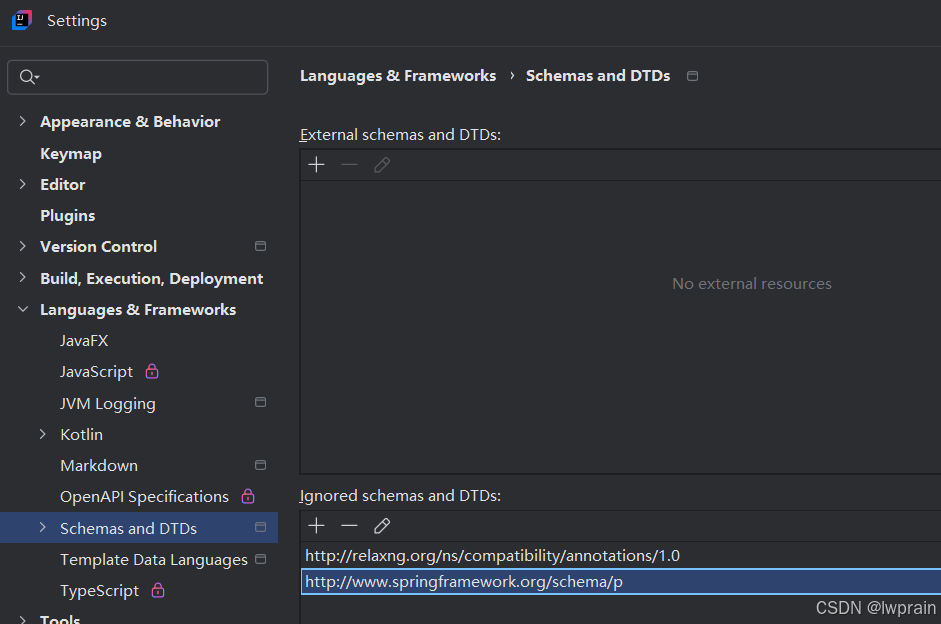
① idea 社区版中,p命名空间一直报红,提示错误,但是同样的代码在idea旗舰版中不提示错误。
beans.xml内容如下:
<?xml version="1.0" encoding="utf-8" ?>
<beans xmlns="http://www.springframework.org/schema/beans"
       xmlns:xsi="http://www.w3.org/2001/XMLSchema-instance"
       xmlns:p="http://www.springframework.org/schema/p"
       xsi:schemaLocation="http://www.springframework.org/schema/beans
       http://www.springframework.org/schema/beans/spring-beans.xsd
 ">
    <bean id="user" class="com.rainpet.entity.User" p:userId="1"/>

</beans>
处理方法:
在idea社区版中,设置-语言及框架-Schemas和DTDs中,忽略Schemas和DTDs,添加地址http://www.springframework.org/schema/p,保存即可,代码运行是无问题的。
②:今天遇到一例问题:
在实验室中试验代码是这个:
@Controller
public class HelloController{

@GetMapping(value = "/hello8",produces = {"application/json;"})
    @ResponseBody
    public Order hello8(){
        Order order=orderMapper.findById(1);
        return order;
    }
}
提示:
No converter for [class org.rainpet.entity.Order] with preset Content-Type ‘null’
检查了依赖:
<dependency>
      <groupId>com.fasterxml.jackson.core</groupId>
      <artifactId>jackson-core</artifactId>
      <version>2.13.4</version>
    </dependency>
    <dependency>
      <groupId>com.fasterxml.jackson.core</groupId>
      <artifactId>jackson-databind</artifactId>
      <version>2.13.4</version>
    </dependency>
    <dependency>
      <groupId>com.fasterxml.jackson.core</groupId>
      <artifactId>jackson-annotations</artifactId>
      <version>2.13.4</version>
    </dependency>
无问题。
检查了用法也无问题。
找了好久才发现,问题在于beans的命名空间,出错的是:
<?xml version="1.0" encoding="UTF-8" ?>
<beans xmlns="http://www.springframework.org/schema/beans"
       xmlns:xsi="http://www.w3.org/2001/XMLSchema-instance"
       xmlns:context="http://www.springframework.org/schema/context"
       xmlns:tx="http://www.springframework.org/schema/tx"
       xmlns:mvc="http://www.springframework.org/schema/tx"
       xsi:schemaLocation="http://www.springframework.org/schema/beans
       http://www.springframework.org/schema/beans/spring-beans.xsd
       http://www.springframework.org/schema/tx
        http://www.springframework.org/schema/tx/spring-tx.xsd
       http://www.springframework.org/schema/context
       http://www.springframework.org/schema/context/spring-context.xsd">
xmlns:mvc="http://www.springframework.org/schema/tx"
上面这一句错了。应该是:
<?xml version="1.0" encoding="UTF-8" ?>
<beans xmlns="http://www.springframework.org/schema/beans"
       xmlns:xsi="http://www.w3.org/2001/XMLSchema-instance"
       xmlns:mvc="http://www.springframework.org/schema/mvc"
       xmlns:tx="http://www.springframework.org/schema/tx"
       xmlns:context="http://www.springframework.org/schema/context"
       xsi:schemaLocation="http://www.springframework.org/schema/beans
       http://www.springframework.org/schema/beans/spring-beans.xsd
       http://www.springframework.org/schema/mvc
       http://www.springframework.org/schema/mvc/spring-mvc.xsd
       http://www.springframework.org/schema/tx
       http://www.springframework.org/schema/tx/spring-tx.xsd
       http://www.springframework.org/schema/context
       http://www.springframework.org/schema/context/spring-context.xsd">
无语了。。。


 2889
2889

 被折叠的 条评论
为什么被折叠?
被折叠的 条评论
为什么被折叠?
 到【灌水乐园】发言


