


通过使用anchors(锚定)来对矩形框元素进行布局
效果图如下:
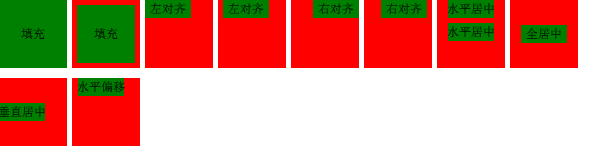
main.qml
import QtQuick 2.12
import QtQuick.Window 2.12

//窗口
Window {
    visible: true   //窗口可见
    width: 640  //窗口宽度
    height: 480 //窗口高度
    title: qsTr("Layout")   //窗口标题

    //矩形框
    RedRectangle {
        x:0; y:20    //矩形框位置

        //矩形框
        GreenRectangle {
            anchors.fill: parent    //锚定填充整个父部件
            text: "填充"  //文本内容
        }
    }

    //矩形框
    RedRectangle {
        x: (width + 5); y:20   //矩形框位置

        //矩形框
        GreenRectangle {
            anchors.fill: parent    //锚定填充整个父部件
            anchors.margins: 5  //锚定边框间距:5
            text: "填充"  //文本内容
        }
    }

    //矩形框
    RedRectangle {
        x: (width + 5) * 2; y:20   //矩形框位置

        //矩形框
        GreenRectangle {
            anchors.left: parent.left   //锚定左对齐
            text: "左对齐" //文本内容
        }
    }

    //矩形框
    RedRectangle {
        x: (width + 5) * 3; y:20   //矩形框位置

        //矩形框
        GreenRectangle {
            anchors.left: parent.left   //锚定左对齐
            anchors.margins: 5  //锚定边框间距:5
            text: "左对齐" //文本内容
        }
    }

    //矩形框
    RedRectangle {
        x: (width + 5) * 4; y:20   //矩形框位置

        //矩形框
        GreenRectangle {
            anchors.right: parent.right   //锚定右对齐
            text: "右对齐" //文本内容
        }
    }

    //矩形框
    RedRectangle {
        x: (width + 5) * 5; y:20   //矩形框位置

        //矩形框
        GreenRectangle {
            anchors.right: parent.right   //锚定右对齐
            anchors.margins: 5  //锚定边框间距:5
            text: "右对齐" //文本内容
        }
    }

    //矩形框
    RedRectangle {
        x: (width + 5) * 6; y:20   //矩形框位置

        //矩形框
        GreenRectangle {
            anchors.horizontalCenter: parent.horizontalCenter   //锚定水平居中
            text: "水平居中"    //文本内容
        }
    }

    //矩形框
    RedRectangle {
        x: (width + 5) * 6; y:20   //矩形框位置

        //矩形框
        GreenRectangle {
            id: greenRect1
            anchors.horizontalCenter: parent.horizontalCenter   //锚定水平居中
            text: "水平居中"    //文本内容
        }

        //矩形框
        GreenRectangle {
            id:greenRect2
            anchors.top:greenRect1.bottom   //锚定矩形框greenRect2的顶部到greenRect1的底部
            anchors.topMargin: 5    //锚定greenRect2矩形框的顶部边距间隔:5
            anchors.horizontalCenter: parent.horizontalCenter   //锚定水平居中
            text: "水平居中"    //文本内容
        }
    }

    //矩形框
    RedRectangle {
        x: (width + 5) * 7; y:20   //矩形框位置

        //矩形框
        GreenRectangle {
            anchors.centerIn:  parent   //锚定水平垂直居中
            text: "全居中" //文本内容
        }
    }

    RedRectangle {
        x: 0; y: height + 30   //矩形框位置

        //矩形框
        GreenRectangle {
            anchors.verticalCenter: parent.verticalCenter   //锚定垂直居中
            text: "垂直居中"    //文本内容
        }
    }

    RedRectangle {
        x: (width + 5); y: height + 30   //矩形框位置

        //矩形框
        GreenRectangle {
            anchors.horizontalCenter: parent.horizontalCenter   //锚定水平居中
            anchors.horizontalCenterOffset: -5  //锚定水平偏移
            text: "水平偏移"    //文本内容
        }
    }
}
GreenRectangle.qml
import QtQuick 2.0

//矩形框
Rectangle {
    width: 46   //矩形框宽度
    height: 18  //矩形框高度
    color: "green"  //矩形框颜色
    property alias text: label.text //文本别名,导出到外部使用

    //文本
    Text {
        id: label   //文本id
        anchors.centerIn: parent    //文本居中
        text: ""    //文本内容
    }
}
RedRectangle.qml
import QtQuick 2.0

//矩形框
Rectangle {
    id:redRect  //矩形框id
    width: 68   //矩形框宽度
    height: 68  //矩形框高度
    color: "red"    //矩形框颜色
}


 378
378

 被折叠的 条评论
为什么被折叠?
被折叠的 条评论
为什么被折叠?
 到【灌水乐园】发言


