


一、Vue快速上手
1. vue概念
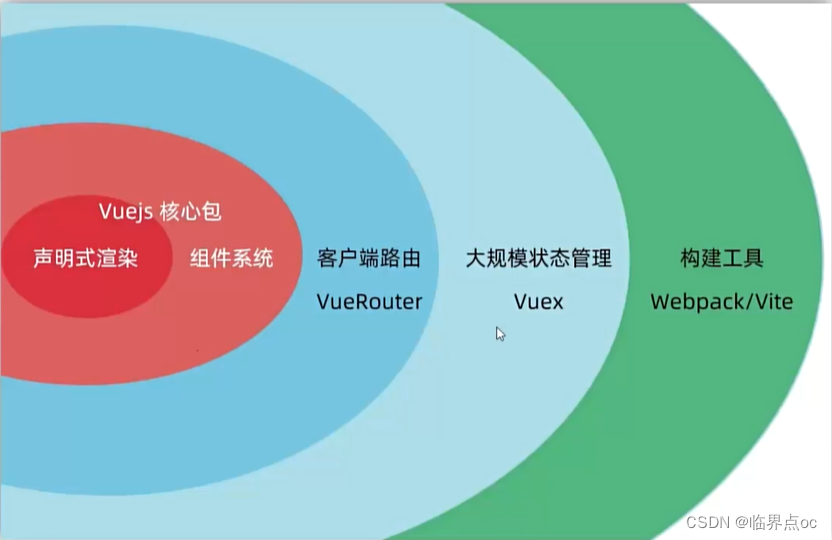
概念:Vue是一个用于 构建用户界面的 渐进式 框架
- 构建用户界面:基于数据动态渲染页面
- 渐进式:循序渐进的学习
- 框架:一套完整的项目解决方案,提升开发效率
优点:大大提升开发效率(70%)
缺点:需要理解记忆规则->官网
Vue的两种使用方式
- ①Vue核心包开发
场景:局部模块改造
- ②Vue核心包 & Vue插件工程化开发
场景:整站开发
2. 创建实例
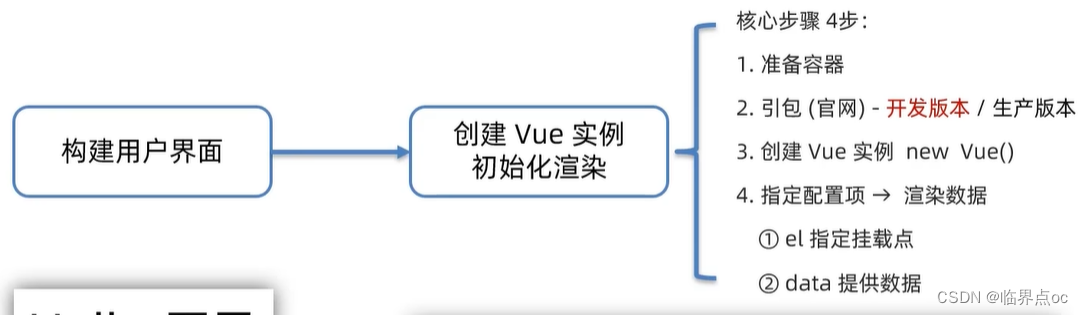
1. 准备容器
    <div id="app">
        <!--1. 准备容器-->
        {{msg}}
    </div>
2. 引包(官网)——开发版本
①下载vue.js

②使用在线版本:(我使用的是第二种方式)
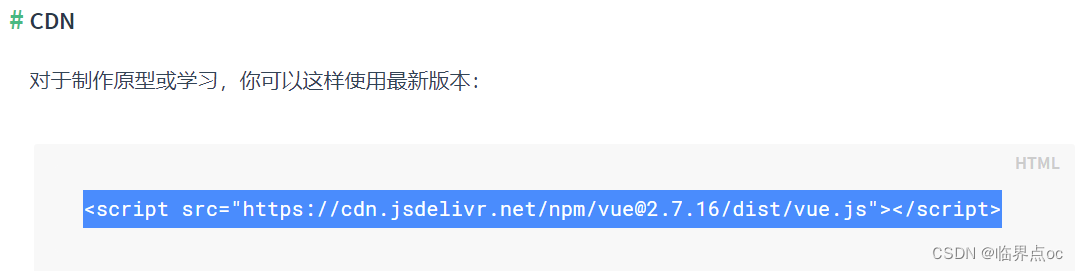
<script src="https://cdn.jsdelivr.net/npm/vue@2.7.16/dist/vue.js"></script>3. 创建Vue实例
        const app = new Vue({

        })
4. 指定配置项
const app = new Vue({
// 4. 通过el配置选择器,指定Vue管理的是哪个盒子
el: "#app",
// 通过data提供数据
data: {
msg: 'Hello Vue',
count: 666
}
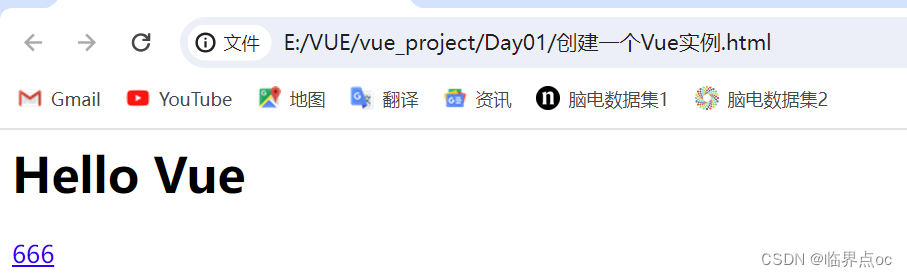
})完整代码:
<html>

<head></head>

<body>

    <div id="app">
        <!--1. 准备容器-->
        <h1>{{msg}}</h1>
        <a href="#">{{count}}</a>
    </div>

    <!--2. 引入开发版本包 — 包含完整的注释和警告-->
    <script src="https://cdn.jsdelivr.net/npm/vue@2.7.16/dist/vue.js"></script>

    <script>
        // 3. 一旦引入VueJS核心包,在全局环境,就有了Vue构造函数
        const app = new Vue({
            // 4. 通过el配置选择器,指定Vue管理的是哪个盒子
            el: "#app",
            // 通过data提供数据
            data: {
                msg: 'Hello Vue',
                count: 666
            }
        })
    </script>


</body>

</html>
效果:
3. 插值表达式
插值表达式是一种Vue的模板语法
1. 作用:利用表达式进行插值,渲染到页面中
表达式:是可以被求值的代码,JS引擎会将其计算出一个结果
2. 语法:{{ 表达式 }}
<h3>{{ title }} </h3>
<p>{{ nickname.toUpperCase() }} </p>
<p>{{ age >= 18 ? '成年' : '未成年' }}</p>
<p>{{ obj.name }} </p>
3. 注意点
- 使用的数据必须存在(data)
- 支持的是表达式,而非语句,比如:if for…
- 不能在标签属性中使用 {{}}插值
-
<p title="{{ username }}">我是p标签</p>
示例:
<html>
<head>
<title>Document</title>
</head>
<body>
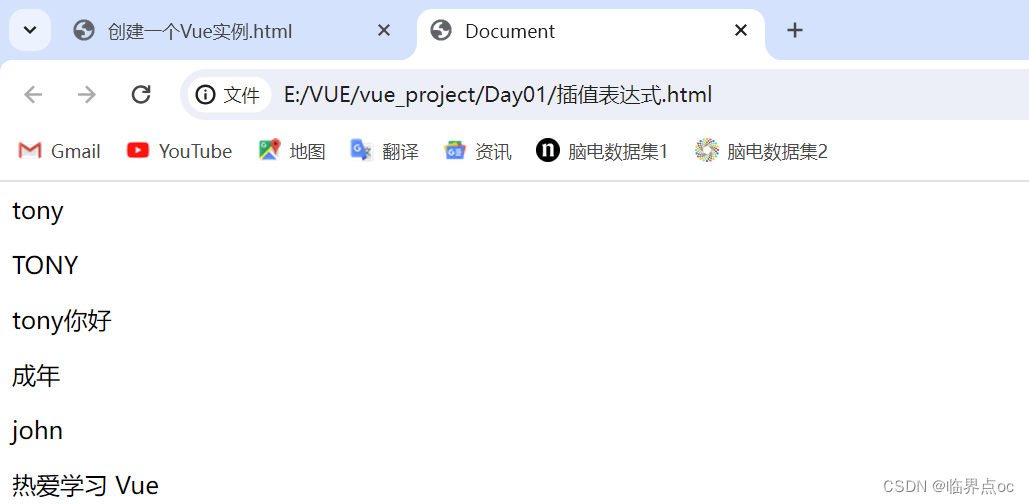
<div id="app">
<p>{{ nickname }}</p>
<p>{{ nickname.toUpperCase() }}</p>
<p>{{ nickname + '你好' }}</p>
<p>{{ age >= 18 ? '成年' : '未成年' }}</p>
<p>{{ friend.name }}</p>
<p>{{ friend.desc }}</p>
</div>
<script src="https://cdn.jsdelivr.net/npm/vue@2.7.16/dist/vue.js"></script>
<script>
const app = new Vue({
el: "#app",
data: {
nickname: 'tony',
age: 20,
friend: {
name: 'john',
desc: '热爱学习 Vue'
}
}
})
</script>
</body>
</html>效果:
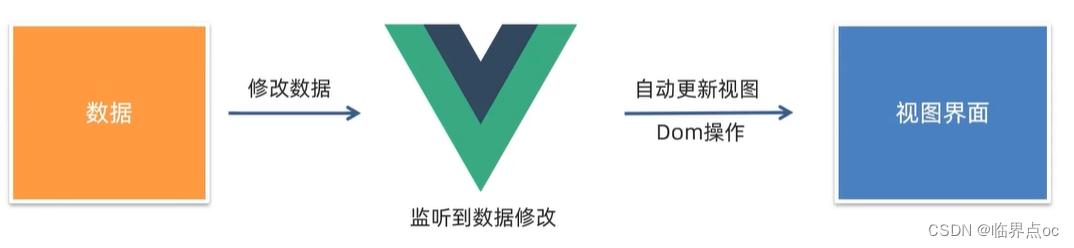
4. 响应式特性
响应式:数据变化,视图自动更新
如何访问或修改?data中的数据,最终会被添加到实例上
- ①访问数据:"实例.属性名"
- ②修改数据:"实例.属性名" = "值"
示例:
<html>
<head>
    <title>Document</title>
</head>

<body>

    <div id="app">
        {{msg}}
    </div>

    <script src="https://cdn.jsdelivr.net/npm/vue@2.7.16/dist/vue.js"></script>

    <script>
        const app = new Vue({
            el: "#app",
            data: {
                // 响应式数据
                msg: '你好,Vue'
            }
        })
    </script>

</body>
</html>通过控制台查看、修改数据

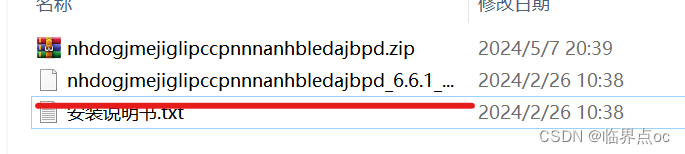
5. 开发者工具
1. 打开极简插件官网
2. 搜索vue,选择第一个
3. 下载并解压
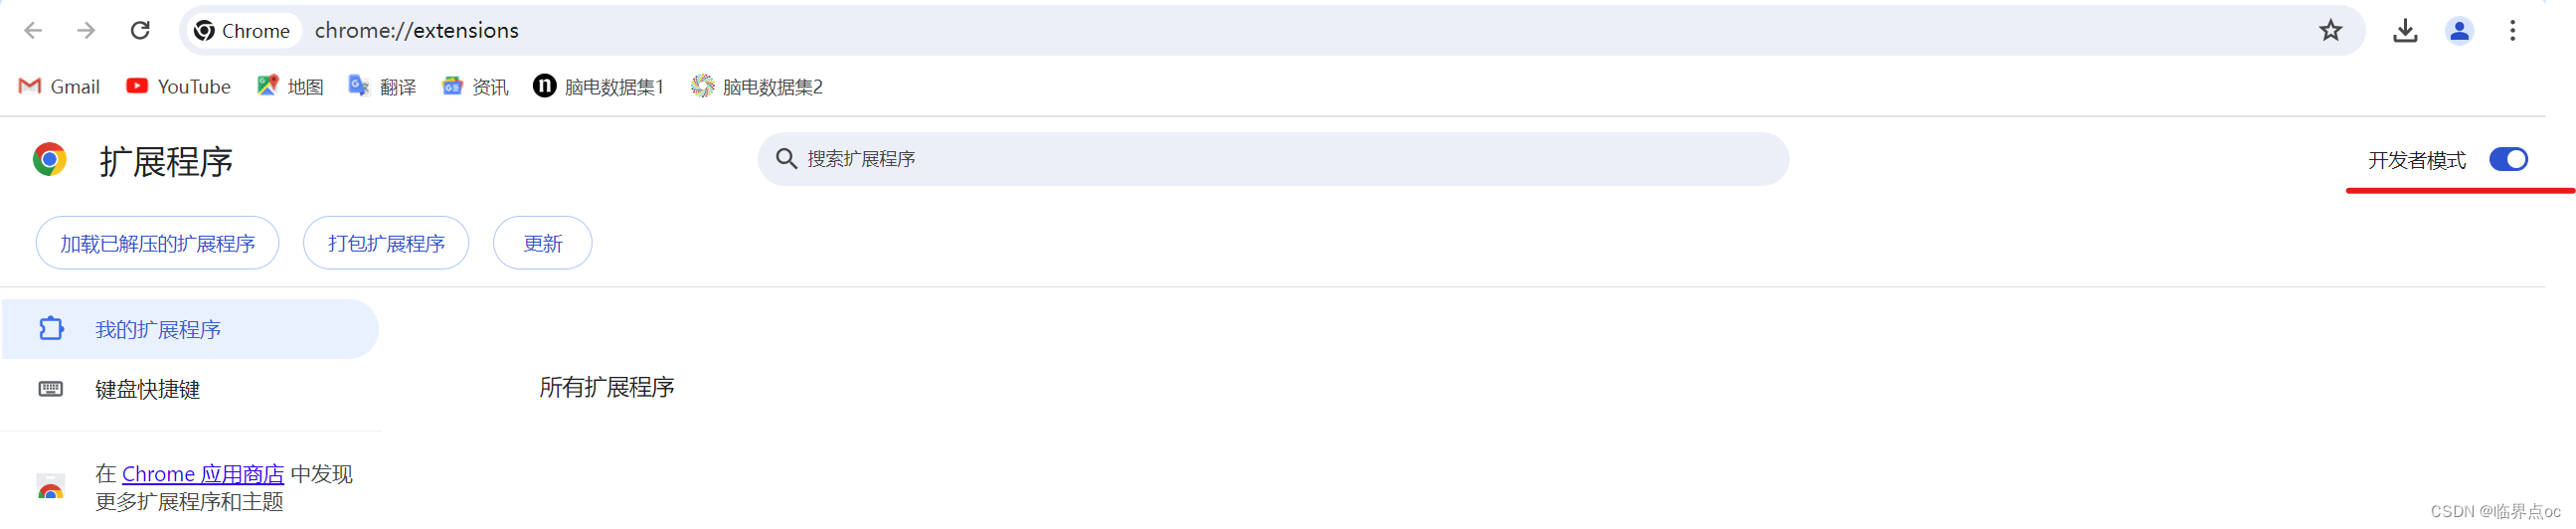
4. 打开Chrome浏览器 -> 点击右上角三个点 -> 扩展程序 -> 管理扩展程序 -> 开启“开发者模式”
5. 拖拽上面解压得到的.crx文件到Chrome的“管理扩展程序页面”空白处,进行安装

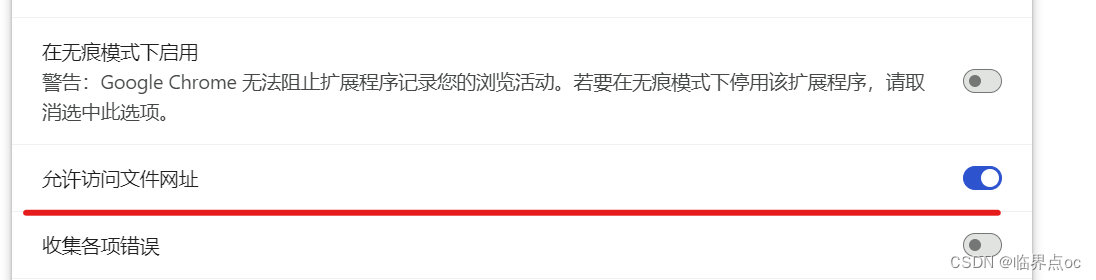
6. 点击“详情”,允许访问文件网址
7. 测试:重启浏览器 -> 右键 -> 检查 -> 检查有没有多出一个“vue"
注意,要打开刚刚写的网页好像才会显示,打开别人的网页不会显示
8. 通过调试工具修改数据,测试视图是否会跟着改变

二、Vue指令
Vue会根据不同的 【指令】,针对标签实现不同的 【功能】
指令:带有 v-前缀 的特殊标签属性
1. v-html
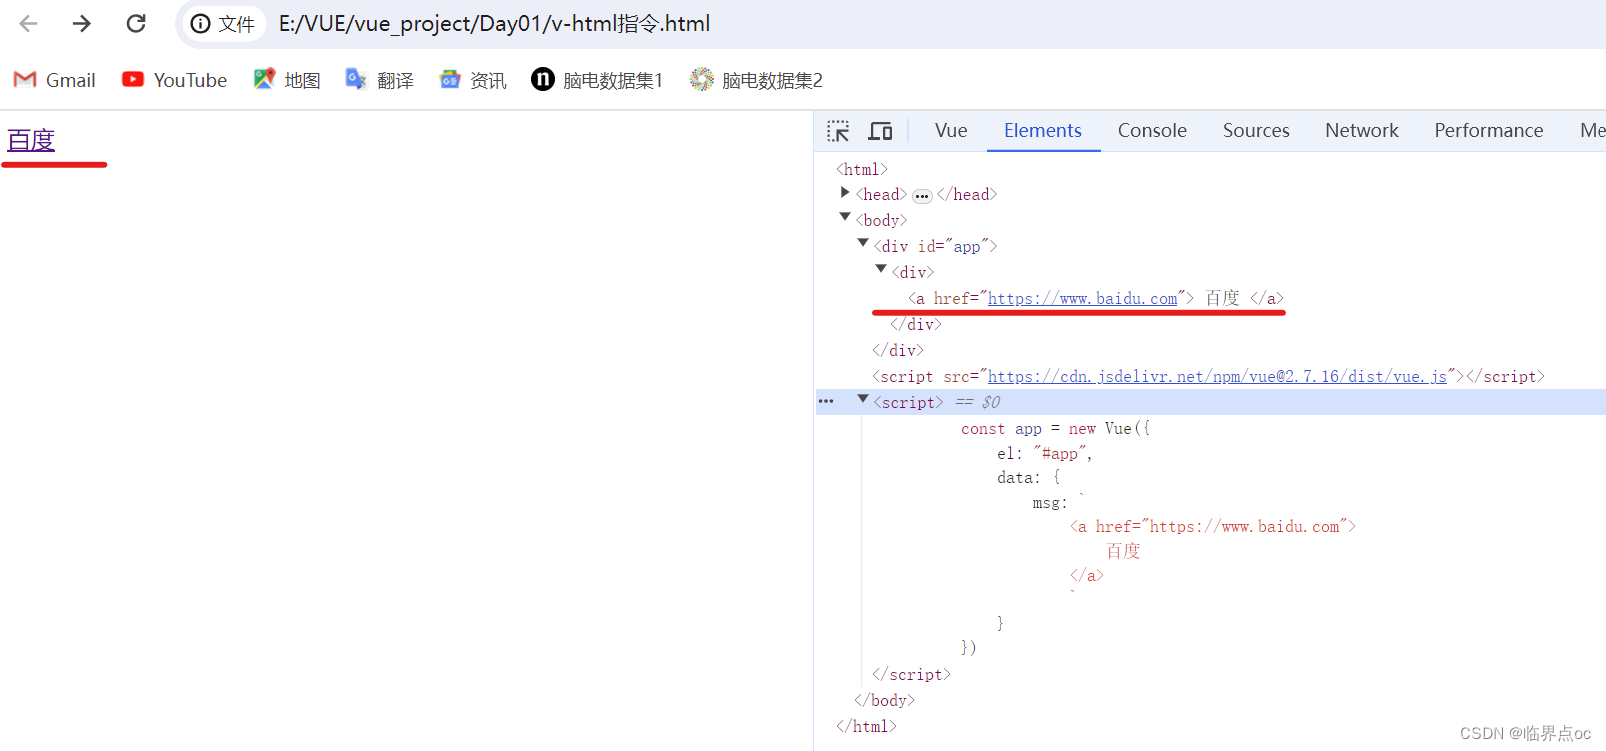
作用:设置元素的 innerHTML,动态渲染DOM节点
语法:v-html = "表达式"
示例:注意,msg的value值是被 `` 括起来的,即Tab键上面那个键
<html>
<head>
    <title>Document</title>
</head>

<body>

    <div id="app">
        <div v-html="msg"></div>
    </div>

    <script src="https://cdn.jsdelivr.net/npm/vue@2.7.16/dist/vue.js"></script>

    <script>
        const app = new Vue({
            el: "#app",
            data: {
                msg: `
                    <a href="https://www.baidu.com">
                        百度
                    </a>
                    `
            }
        })
    </script>

</body>
</html>
效果:点击”百度“,即可跳转到百度首页
可以到Vue官网查看相关的API:
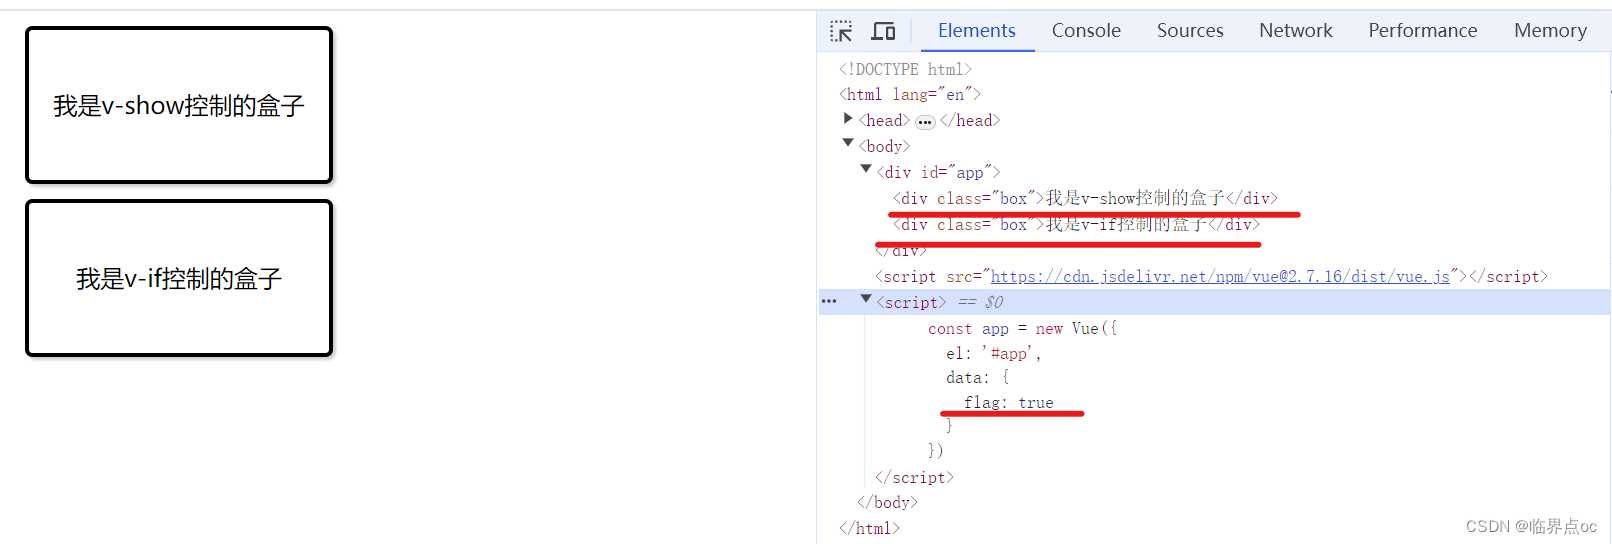
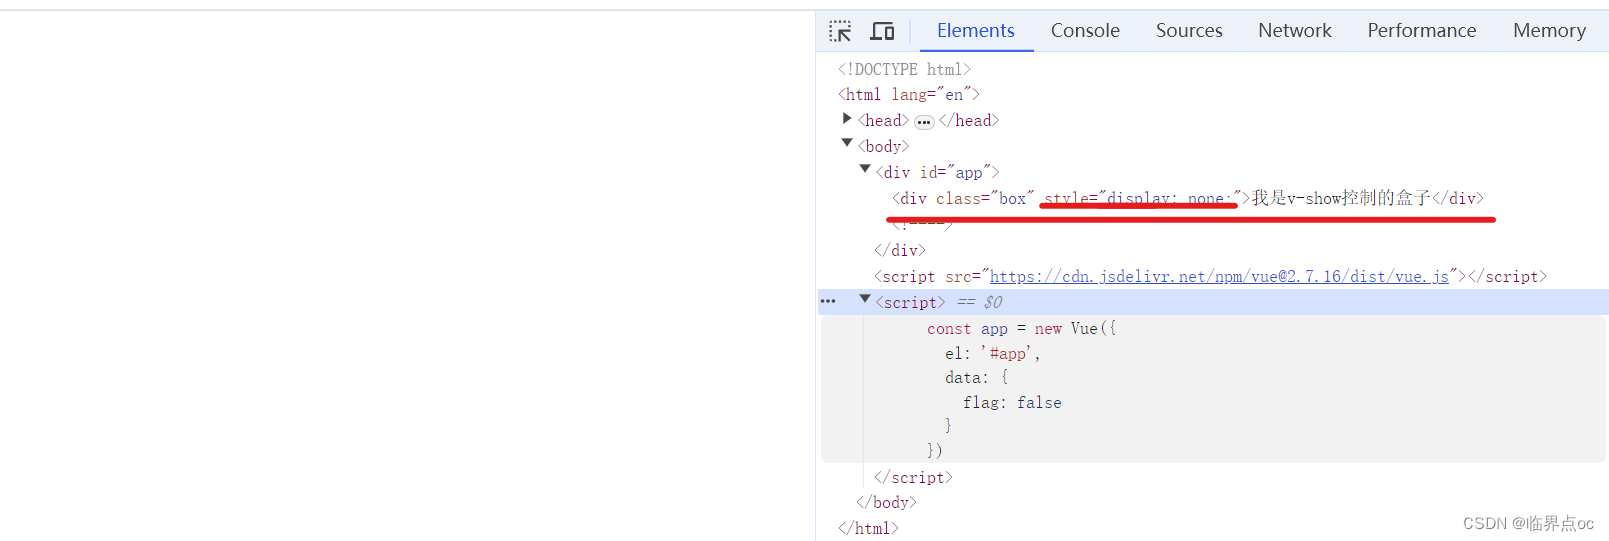
2. v-show
作用:控制元素显示隐藏
语法:v-show 隐藏= "表达式",表达式值为true显示,false隐藏
原理:切换 display:none 来控制显示隐藏
场景:频繁切换显示隐藏的场景
3. v-if
作用:控制元素显示隐藏(条件渲染)
语法:v-if = "表达式",表达式值true显示,false隐藏
原理:基于条件判断,是否创建或移除元素节点
场景:要么显示,要么隐藏,不频繁切换的场景
v-show和v-if的区别:
- v-show只是简单地切换元素的CSS属性:display。当条件判断为假时,元素的display属性将被赋值为none,仍保留在DOM中;反之,元素的display属性将被恢复为原有值;
- v-if是根据判断条件控制元素的创建和移除,v-if判定为假的元素不会出现在DOM中;
- v-show有更高的初始渲染开销,而v-if有更高的切换开销
示例:
<!DOCTYPE html>
<html lang="en">
<head>
  <meta charset="UTF-8">
  <meta http-equiv="X-UA-Compatible" content="IE=edge">
  <meta name="viewport" content="width=device-width, initial-scale=1.0">
  <title>Document</title>
  <style>
    .box {
      width: 200px;
      height: 100px;
      line-height: 100px;
      margin: 10px;
      border: 3px solid #000;
      text-align: center;
      border-radius: 5px;
      box-shadow: 2px 2px 2px #ccc;
    }
  </style>
</head>
<body>

  <div id="app">
    <div v-show="flag" class="box">我是v-show控制的盒子</div>
    <div v-if="flag" class="box">我是v-if控制的盒子</div>
  </div>

  <script src="https://cdn.jsdelivr.net/npm/vue@2.7.16/dist/vue.js"></script>

  <script>
    const app = new Vue({
      el: '#app',
      data: {
        flag: true
      }
    })
  </script>

</body>
</html>
flag为true时:
flag为false时:
4. v-else 和 v-else-if
作用:辅助v-if进行判断渲染
语法:v-else v-else-if = "表达式"
注意:需要紧挨着 v-if 一起使用
示例:
<!DOCTYPE html>
<html lang="en">
<head>
<meta charset="UTF-8">
<meta http-equiv="X-UA-Compatible" content="IE=edge">
<meta name="viewport" content="width=device-width, initial-scale=1.0">
<title>Document</title>
</head>
<body>
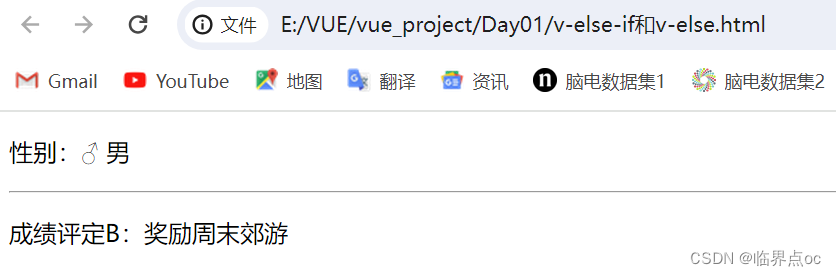
<div id="app">
<p v-if="gender === 1">性别:♂ 男</p>
<p v-else>性别:♀ 女</p>
<hr>
<p v-if="score >= 90">成绩评定A:奖励电脑一台</p>
<p v-else-if="score >= 70">成绩评定B:奖励周末郊游</p>
<p v-else-if="score >= 60">成绩评定C:奖励零食礼包</p>
<p v-else>成绩评定D:惩罚一周不能玩手机</p>
</div>
<script src="https://cdn.jsdelivr.net/npm/vue@2.7.16/dist/vue.js"></script>
<script>
const app = new Vue({
el: '#app',
data: {
gender: 1,
score: 80
}
})
</script>
</body>
</html>效果:
5. v-on
作用:注册事件 = 添加监听 + 提供处理逻辑。
Vue使用v-on指令监听DOM事件,开发者可以将事件代码通过v-on指令绑定到DOM节点上。
Vue为v-on提供了一种简写形式@,如 @click
语法:
- ①v-on:事件名 = “内联语句”
- ②v-on:事件名 = “methods中的函数名”
示例1:内联语句
<!DOCTYPE html>
<html lang="en">
<head>
  <meta charset="UTF-8">
  <meta http-equiv="X-UA-Compatible" content="IE=edge">
  <meta name="viewport" content="width=device-width, initial-scale=1.0">
  <title>Document</title>
</head>
<body>
  <div id="app">
    <button v-on:click="count--">-</button>
    <span>{{ count }}</span>
    <button @click="count++">+</button>
  </div>

  <script src="https://cdn.jsdelivr.net/npm/vue@2.7.16/dist/vue.js"></script>

  <script>
    const app = new Vue({
      el: '#app',
      data: {
        count: 666
      }
    })
  </script>
</body>
</html>
效果:

示例2:函数方式(无参)
<!DOCTYPE html>
<html lang="en">
<head>
<meta charset="UTF-8">
<meta http-equiv="X-UA-Compatible" content="IE=edge">
<meta name="viewport" content="width=device-width, initial-scale=1.0">
<title>Document</title>
</head>
<body>
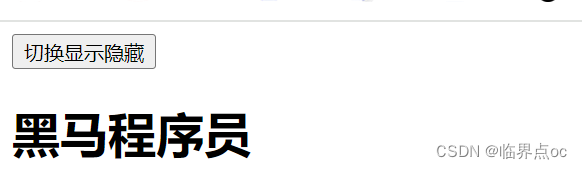
<div id="app">
<button @click="change">切换显示隐藏</button>
<h1 v-show="isShow">黑马程序员</h1>
</div>
<script src="https://cdn.jsdelivr.net/npm/vue@2.7.16/dist/vue.js"></script>
<script>
const app2 = new Vue({
el: '#app',
data: {
// 提供数据
isShow: false
},
methods: {
// 提供处理逻辑函数
change() {
// 让提供的所有methods中的函数,this都指向当前实例
this.isShow = !this.isShow
// app2.isShow = !app2.isShow
}
},
})
</script>
</body>
</html>效果:
示例3:函数方式(有参)
<!DOCTYPE html>
<html lang="en">
<head>
<meta charset="UTF-8">
<meta http-equiv="X-UA-Compatible" content="IE=edge">
<meta name="viewport" content="width=device-width, initial-scale=1.0">
<title>Document</title>
<style>
.box {
border: 3px solid #000000;
border-radius: 10px;
padding: 20px;
margin: 20px;
width: 200px;
}
h3 {
margin: 10px 0 20px 0;
}
p {
margin: 20px;
}
</style>
</head>
<body>
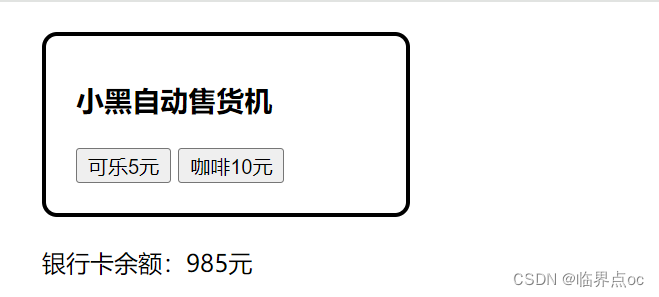
<div id="app">
<div class="box">
<h3>小黑自动售货机</h3>
<button @click="buy(5)">可乐5元</button>
<button @click="buy(10)">咖啡10元</button>
</div>
<p>银行卡余额:{{ money }}元</p>
</div>
<script src="https://cdn.jsdelivr.net/npm/vue@2.7.16/dist/vue.js"></script>
<script>
const app = new Vue({
el: '#app',
data: {
money: 1000
},
methods: {
buy(price) {
this.money -= price
}
},
})
</script>
</body>
</html>效果:
6. v-bind
作用:动态的设置html的标签属性 -> src、url、title ……
语法:v-bind:属性名="表达式",其中v-bind可以省略不写
示例:
<!DOCTYPE html>
<html lang="en">
<head>
  <meta charset="UTF-8">
  <meta http-equiv="X-UA-Compatible" content="IE=edge">
  <meta name="viewport" content="width=device-width, initial-scale=1.0">
  <title>Document</title>
</head>
<body>
  <div id="app">
    <!-- <img v-bind:src="imgUrl" v-bind:title="msg" alt=""> -->
    <!-- v-bind可以省略不写 -->
    <img :src="imgUrl" :title="msg" alt="">
  </div>

  <script src="https://cdn.jsdelivr.net/npm/vue@2.7.16/dist/vue.js"></script>

  <script>
    const app = new Vue({
      el: '#app',
      data: {
        msg: '猴子',
        imgUrl: 'imgs/10-01.png'
      }
    })
  </script>
</body>
</html>
效果:
图片切换案例 - 波仔学习之旅
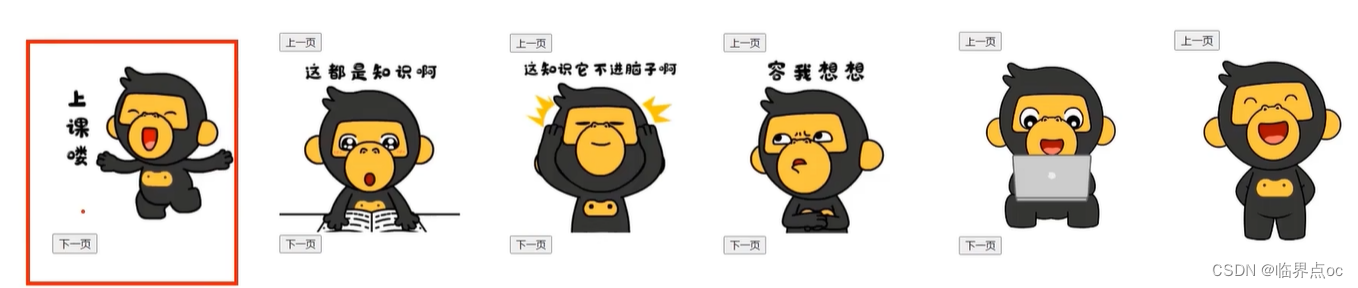
核心思路分析:
①数组存储图片路径 -> [图片1,图片2,图片3,···]
②准备下标index,数组[下标] -> v-bind设置src展示图片 -> 修改下标切换图片
<!DOCTYPE html>
<html lang="en">
<head>
  <meta charset="UTF-8">
  <meta http-equiv="X-UA-Compatible" content="IE=edge">
  <meta name="viewport" content="width=device-width, initial-scale=1.0">
  <title>Document</title>
</head>
<body>
  <div id="app">
    <button v-show="index > 0" @click="index--">上一页</button>
    <div>
      <img v-bind:src="list[index]" alt="">
    </div>
    <button v-show="index < list.length - 1" @click="index++">下一页</button>
  </div>

  <script src="https://cdn.jsdelivr.net/npm/vue@2.7.16/dist/vue.js"></script>

  <script>
    const app = new Vue({
      el: '#app',
      data: {
        list: [
          'imgs/10-01.png',
          'imgs/11-01.gif',
          'imgs/11-02.gif',
          'imgs/11-03.gif',
          'imgs/11-04.png',
          'imgs/11-05.png',
        ],
        index: 0,
      },
      methods: {

      },
    })
  </script>
</body>
</html>
7. v-for
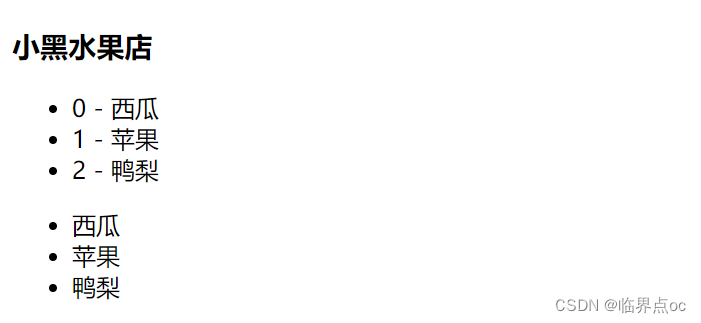
作用:基于数据循环,多次渲染整个元素 -> 数组、对象、数字···
遍历数组语法:item:每一项,index:下标
省略index:v-for = "item in 数组"
v-for="(item, index) in 数组"
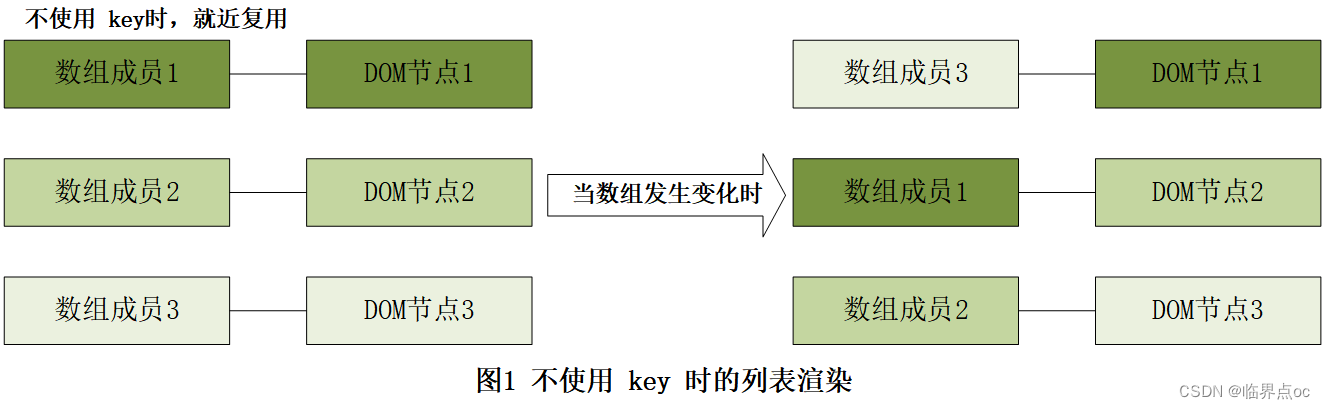
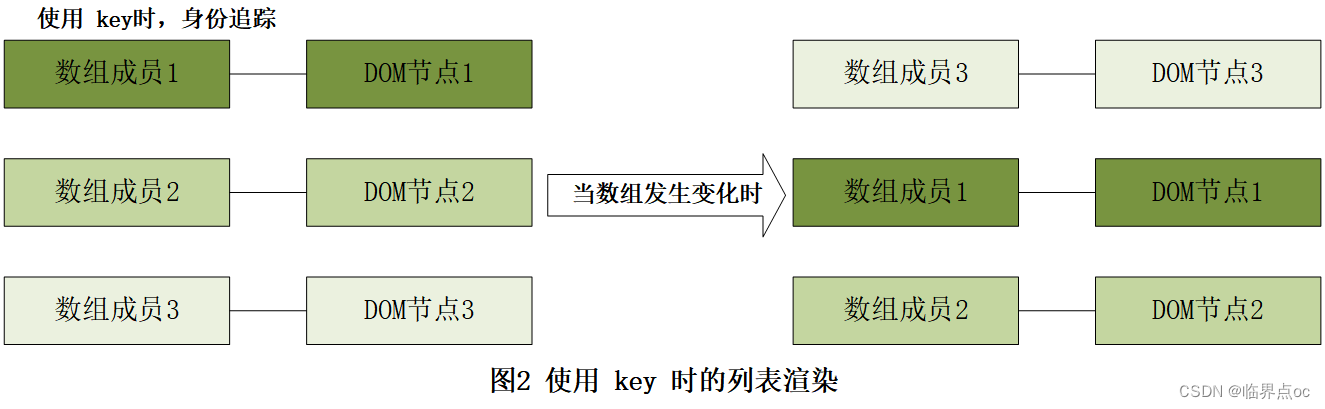
v-for中的key
语法:key属性 = “唯一标识”
作用:给列表项添加的唯一标识,便于Vue进行列表项的正确排序复用。
不加key:v-for的默认行为会尝试原地修改元素(就地复用)
在使用v-for时,最好为每个迭代元素提供一个值不重复的key。
注意点:
- ①key的值只能是字符串或数字类型;
- ②key的值必须具有唯一性;
- ③推荐使用id作为key(唯一),不推荐使用index作为key(会变化,不对应)
- 当列表渲染被重新执行(数组内容发生改变)时,如果不使用key,Vue会为数组成员就近复用已存在的DOM节点,如图1所示。
- 当使用key时,Vue会根据key的变化重新排列节点顺序,如图2所示,并将移除key不存在的节点。
示例:
<!DOCTYPE html>
<html lang="en">
<head>
  <meta charset="UTF-8">
  <meta http-equiv="X-UA-Compatible" content="IE=edge">
  <meta name="viewport" content="width=device-width, initial-scale=1.0">
  <title>Document</title>
</head>
<body>

  <div id="app">
    <h3>小黑水果店</h3>
    <ul>
        <li v-for="(item, index) in list"> {{index}} -  {{ item }}</li>
    </ul>

    <ul>
        <!-- 当不需要的时候index可以省略,此时括号也可以省略 -->
        <li v-for="item in list"> {{ item }}</li>
    </ul>
  </div>

  <script src="https://cdn.jsdelivr.net/npm/vue@2.7.16/dist/vue.js"></script>

  <script>
    const app = new Vue({
      el: '#app',
      data: {
        list: ['西瓜', '苹果', '鸭梨']
      }
    })
  </script>
</body>
</html>
效果:
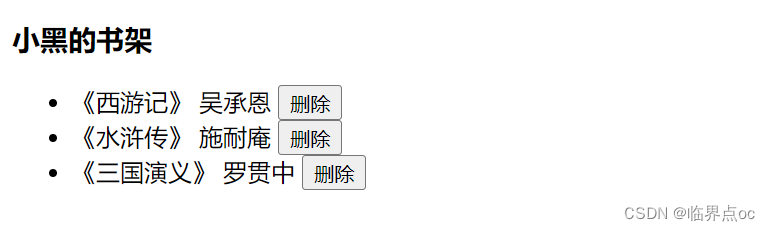
图书管理案例 - 小黑的书架
明确需求:①基本渲染 -> v-for;②删除功能
<!DOCTYPE html>
<html lang="en">
<head>
  <meta charset="UTF-8">
  <meta http-equiv="X-UA-Compatible" content="IE=edge">
  <meta name="viewport" content="width=device-width, initial-scale=1.0">
  <title>Document</title>
</head>
<body>

  <div id="app">
    <h3>小黑的书架</h3>
    <ul>
      <li v-for = "(item, index) in booksList" :key="item.id">
        <span> {{ item.name }}</span>
        <span>{{ item.author }}</span>
        <button @click="del(item.id)">删除</button>
      </li>
    </ul>
  </div>

  <script src="https://cdn.jsdelivr.net/npm/vue@2.7.16/dist/vue.js"></script>

  <script>
    const app = new Vue({
      el: '#app',
      data: {
        booksList: [
          { id: 1, name: '《红楼梦》', author: '曹雪芹' },
          { id: 2, name: '《西游记》', author: '吴承恩' },
          { id: 3, name: '《水浒传》', author: '施耐庵' },
          { id: 4, name: '《三国演义》', author: '罗贯中' }
        ]
      },
      methods: {
        del(id) {
            // filter:根据条件,保留满足条件的对应项,得到一个新数组(filter不会改变原数组)
            this.booksList = this.booksList.filter(item => item.id !== id)
        }
      },
    })
  </script>
</body>
</html>
效果:
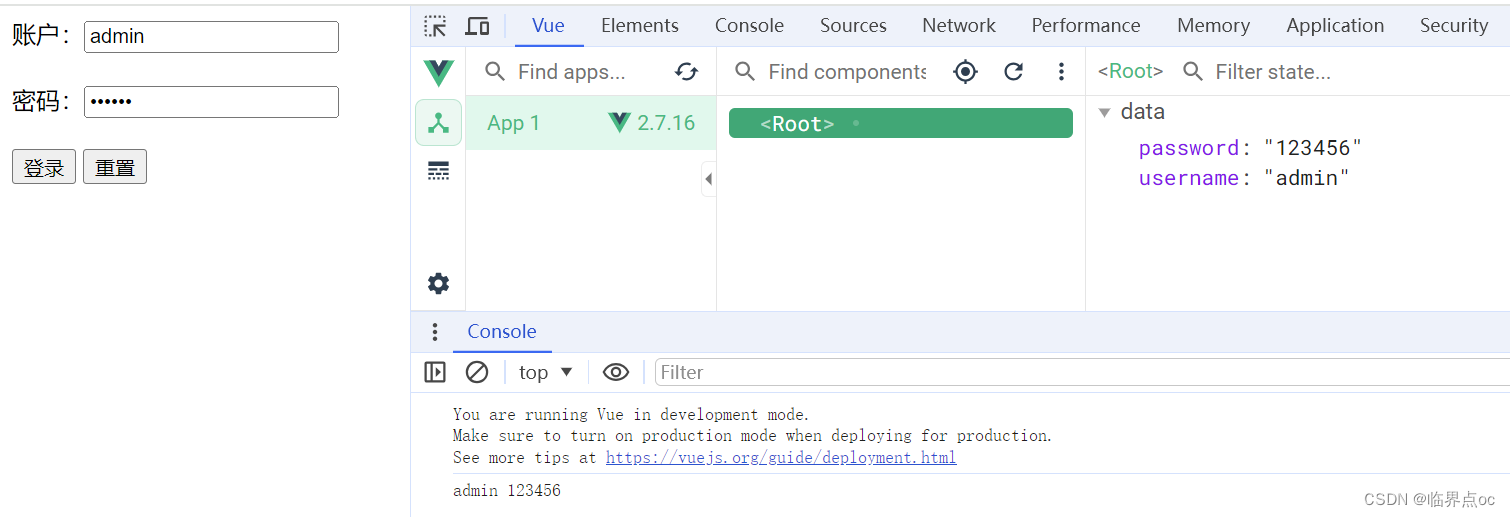
8. v-model
作用:给表单元素使用,双向数据绑定 -> 可以快速获取或设置表单元素内容
- ① 数据变化 -> 视图自动更新
- ② 视图变化 -> 数据自动更新
语法:v-model = '变量'
示例:
<!DOCTYPE html>
<html lang="en">
<head>
  <meta charset="UTF-8">
  <meta http-equiv="X-UA-Compatible" content="IE=edge">
  <meta name="viewport" content="width=device-width, initial-scale=1.0">
  <title>Document</title>
</head>
<body>

  <div id="app">
    <!-- v-model可以让数据和视图,形成双向数据绑定 -->
    账户:<input type="text" v-model="username"> <br><br>
    密码:<input type="password" v-model="password"> <br><br>
    <button @click="login()">登录</button>
    <button @click="reset()">重置</button>
  </div>

  <script src="https://cdn.jsdelivr.net/npm/vue@2.7.16/dist/vue.js"></script>

  <script>
    const app = new Vue({
      el: '#app',
      data: {
        username: '',
        password: ''
      },
      methods: {
        login() {
            console.log(this.username, this.password)
        },
        reset() {
            this.username = ''
            this.password = ''
        }
      }
    })
  </script>
</body>
</html>
效果:
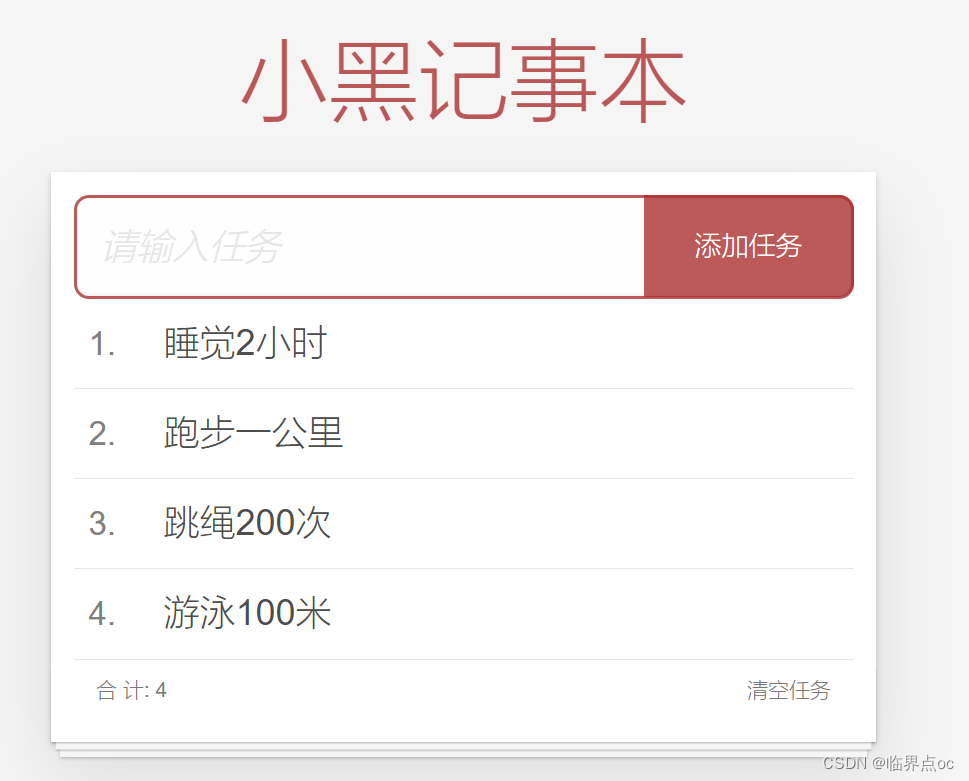
三、综合案例——小黑记事本
![]()
需求明确:① 列表渲染;②删除功能;③添加功能;④底部统计;⑤清空
html代码:
<!DOCTYPE html>
<html lang="en">
<head>
<meta charset="UTF-8" />
<meta http-equiv="X-UA-Compatible" content="IE=edge" />
<meta name="viewport" content="width=device-width, initial-scale=1.0" />
<link rel="stylesheet" href="./css/index.css" />
<title>记事本</title>
</head>
<body>

<!-- 主体区域 -->
<section id="app">
  <!-- 输入框 -->
  <header class="header">
    <h1>小黑记事本</h1>
    <!-- 添加功能
    1. 通过v-model绑定输入框,实时火区表单元素的内容
    2. 点击添加任务按钮,进行新增
    -->
    <input placeholder="请输入任务" class="new-todo" v-model="todoName" />
    <button class="add" @click="add">添加任务</button>
  </header>
  <!-- 列表区域 -->
  <section class="main">
    <ul class="todo-list">
      <li class="todo" v-for="(item, index) in list" :key="item.id">
        <div class="view">
          <span class="index">{{ index + 1}}.</span> <label>{{ item.name }}</label>
          <button class="destroy" @click="del(item.id)"></button>
        </div>
      </li>
    </ul>
  </section>
  <!-- 统计和清空 -->
  <!-- 如果没有任务了,隐藏底部 -->
  <footer class="footer" v-show="list.length > 0">
    <!-- 统计 -->
    <span class="todo-count">合 计:<strong> {{ list.length }} </strong></span>
    <!-- 清空 -->
    <button class="clear-completed" @click="clear">
      清空任务
    </button>
  </footer>
</section>

<!-- 底部 -->
<script src="https://cdn.jsdelivr.net/npm/vue@2.7.16/dist/vue.js"></script>

<script>

  const app = new Vue({
    el: '#app',
    data: {
      list: [
        {id: 1, name: '跑步一公里'},
        {id: 2, name: '跳绳200次'},
        {id: 3, name: '游泳100米'},
      ],
      todoName: ''
    },
    methods: {
        del(id) {
            this.list = this.list.filter(item => item.id !== id)
        },
        add() {
            if(this.todoName === '') {
                alert('请输入任务名称')
                return
            }
            this.list.unshift({
                id: +new Date(),  // 当前的时间戳
                // id: this.list.length + 1,
                name: this.todoName
            })
            this.todoName = ''
        },
        clear() {
            this.list = []
        }
    },
  })

</script>
</body>
</html>
css样式:index.css
html,
body {
  margin: 0;
  padding: 0;
}
body {
  background: #fff;
}
button {
  margin: 0;
  padding: 0;
  border: 0;
  background: none;
  font-size: 100%;
  vertical-align: baseline;
  font-family: inherit;
  font-weight: inherit;
  color: inherit;
  -webkit-appearance: none;
  appearance: none;
  -webkit-font-smoothing: antialiased;
  -moz-osx-font-smoothing: grayscale;
}

body {
  font: 14px 'Helvetica Neue', Helvetica, Arial, sans-serif;
  line-height: 1.4em;
  background: #f5f5f5;
  color: #4d4d4d;
  min-width: 230px;
  max-width: 550px;
  margin: 0 auto;
  -webkit-font-smoothing: antialiased;
  -moz-osx-font-smoothing: grayscale;
  font-weight: 300;
}

:focus {
  outline: 0;
}

.hidden {
  display: none;
}

#app {
  background: #fff;
  margin: 180px 0 40px 0;
  padding: 15px;
  position: relative;
  box-shadow: 0 2px 4px 0 rgba(0, 0, 0, 0.2), 0 25px 50px 0 rgba(0, 0, 0, 0.1);
}
#app .header input {
  border: 2px solid rgba(175, 47, 47, 0.8);
  border-radius: 10px;
}
#app .add {
  position: absolute;
  right: 15px;
  top: 15px;
  height: 68px;
  width: 140px;
  text-align: center;
  background-color: rgba(175, 47, 47, 0.8);
  color: #fff;
  cursor: pointer;
  font-size: 18px;
  border-radius: 0 10px 10px 0;
}

#app input::-webkit-input-placeholder {
  font-style: italic;
  font-weight: 300;
  color: #e6e6e6;
}

#app input::-moz-placeholder {
  font-style: italic;
  font-weight: 300;
  color: #e6e6e6;
}

#app input::input-placeholder {
  font-style: italic;
  font-weight: 300;
  color: gray;
}

#app h1 {
  position: absolute;
  top: -120px;
  width: 100%;
  left: 50%;
  transform: translateX(-50%);
  font-size: 60px;
  font-weight: 100;
  text-align: center;
  color: rgba(175, 47, 47, 0.8);
  -webkit-text-rendering: optimizeLegibility;
  -moz-text-rendering: optimizeLegibility;
  text-rendering: optimizeLegibility;
}

.new-todo,
.edit {
  position: relative;
  margin: 0;
  width: 100%;
  font-size: 24px;
  font-family: inherit;
  font-weight: inherit;
  line-height: 1.4em;
  border: 0;
  color: inherit;
  padding: 6px;
  box-shadow: inset 0 -1px 5px 0 rgba(0, 0, 0, 0.2);
  box-sizing: border-box;
  -webkit-font-smoothing: antialiased;
  -moz-osx-font-smoothing: grayscale;
}

.new-todo {
  padding: 16px;
  border: none;
  background: rgba(0, 0, 0, 0.003);
  box-shadow: inset 0 -2px 1px rgba(0, 0, 0, 0.03);
}

.main {
  position: relative;
  z-index: 2;
}

.todo-list {
  margin: 0;
  padding: 0;
  list-style: none;
  overflow: hidden;
}

.todo-list li {
  position: relative;
  font-size: 24px;
  height: 60px;
  box-sizing: border-box;
  border-bottom: 1px solid #e6e6e6;
}

.todo-list li:last-child {
  border-bottom: none;
}

.todo-list .view .index {
  position: absolute;
  color: gray;
  left: 10px;
  top: 20px;
  font-size: 22px;
}

.todo-list li .toggle {
  text-align: center;
  width: 40px;
  /* auto, since non-WebKit browsers doesn't support input styling */
  height: auto;
  position: absolute;
  top: 0;
  bottom: 0;
  margin: auto 0;
  border: none; /* Mobile Safari */
  -webkit-appearance: none;
  appearance: none;
}

.todo-list li .toggle {
  opacity: 0;
}

.todo-list li .toggle + label {
  /*
		Firefox requires `#` to be escaped - https://bugzilla.mozilla.org/show_bug.cgi?id=922433
		IE and Edge requires *everything* to be escaped to render, so we do that instead of just the `#` - https://developer.microsoft.com/en-us/microsoft-edge/platform/issues/7157459/
	*/
  background-image: url('data:image/svg+xml;utf8,%3Csvg%20xmlns%3D%22http%3A//www.w3.org/2000/svg%22%20width%3D%2240%22%20height%3D%2240%22%20viewBox%3D%22-10%20-18%20100%20135%22%3E%3Ccircle%20cx%3D%2250%22%20cy%3D%2250%22%20r%3D%2250%22%20fill%3D%22none%22%20stroke%3D%22%23ededed%22%20stroke-width%3D%223%22/%3E%3C/svg%3E');
  background-repeat: no-repeat;
  background-position: center left;
}

.todo-list li .toggle:checked + label {
  background-image: url('data:image/svg+xml;utf8,%3Csvg%20xmlns%3D%22http%3A//www.w3.org/2000/svg%22%20width%3D%2240%22%20height%3D%2240%22%20viewBox%3D%22-10%20-18%20100%20135%22%3E%3Ccircle%20cx%3D%2250%22%20cy%3D%2250%22%20r%3D%2250%22%20fill%3D%22none%22%20stroke%3D%22%23bddad5%22%20stroke-width%3D%223%22/%3E%3Cpath%20fill%3D%22%235dc2af%22%20d%3D%22M72%2025L42%2071%2027%2056l-4%204%2020%2020%2034-52z%22/%3E%3C/svg%3E');
}

.todo-list li label {
  word-break: break-all;
  padding: 15px 15px 15px 60px;
  display: block;
  line-height: 1.2;
  transition: color 0.4s;
}

.todo-list li.completed label {
  color: #d9d9d9;
  text-decoration: line-through;
}

.todo-list li .destroy {
  display: none;
  position: absolute;
  top: 0;
  right: 10px;
  bottom: 0;
  width: 40px;
  height: 40px;
  margin: auto 0;
  font-size: 30px;
  color: #cc9a9a;
  margin-bottom: 11px;
  transition: color 0.2s ease-out;
}

.todo-list li .destroy:hover {
  color: #af5b5e;
}

.todo-list li .destroy:after {
  content: '×';
}

.todo-list li:hover .destroy {
  display: block;
}

.todo-list li .edit {
  display: none;
}

.todo-list li.editing:last-child {
  margin-bottom: -1px;
}

.footer {
  color: #777;
  padding: 10px 15px;
  height: 20px;
  text-align: center;
  border-top: 1px solid #e6e6e6;
}

.footer:before {
  content: '';
  position: absolute;
  right: 0;
  bottom: 0;
  left: 0;
  height: 50px;
  overflow: hidden;
  box-shadow: 0 1px 1px rgba(0, 0, 0, 0.2), 0 8px 0 -3px #f6f6f6,
    0 9px 1px -3px rgba(0, 0, 0, 0.2), 0 16px 0 -6px #f6f6f6,
    0 17px 2px -6px rgba(0, 0, 0, 0.2);
}

.todo-count {
  float: left;
  text-align: left;
}

.todo-count strong {
  font-weight: 300;
}

.filters {
  margin: 0;
  padding: 0;
  list-style: none;
  position: absolute;
  right: 0;
  left: 0;
}

.filters li {
  display: inline;
}

.filters li a {
  color: inherit;
  margin: 3px;
  padding: 3px 7px;
  text-decoration: none;
  border: 1px solid transparent;
  border-radius: 3px;
}

.filters li a:hover {
  border-color: rgba(175, 47, 47, 0.1);
}

.filters li a.selected {
  border-color: rgba(175, 47, 47, 0.2);
}

.clear-completed,
html .clear-completed:active {
  float: right;
  position: relative;
  line-height: 20px;
  text-decoration: none;
  cursor: pointer;
}

.clear-completed:hover {
  text-decoration: underline;
}

.info {
  margin: 50px auto 0;
  color: #bfbfbf;
  font-size: 15px;
  text-shadow: 0 1px 0 rgba(255, 255, 255, 0.5);
  text-align: center;
}

.info p {
  line-height: 1;
}

.info a {
  color: inherit;
  text-decoration: none;
  font-weight: 400;
}

.info a:hover {
  text-decoration: underline;
}

/*
	Hack to remove background from Mobile Safari.
	Can't use it globally since it destroys checkboxes in Firefox
*/
@media screen and (-webkit-min-device-pixel-ratio: 0) {
  .toggle-all,
  .todo-list li .toggle {
    background: none;
  }

  .todo-list li .toggle {
    height: 40px;
  }
}

@media (max-width: 430px) {
  .footer {
    height: 50px;
  }

  .filters {
    bottom: 10px;
  }
}
效果:


 被折叠的 条评论
为什么被折叠?
被折叠的 条评论
为什么被折叠?
 到【灌水乐园】发言


