


 本文详细介绍了使用MVC模式设计和实现购物网站的过程,包括功能需求分析、数据库设计、实体类创建及数据库连接管理。通过分层架构,实现了用户、商品、订单等核心功能。
一、明确功能需求
1、在用户登录之后曹可以查看商品类别,查看商品、选购商品、生成并查看订单
2、只有管理员才有权限进入购物网后台管理,进行用户管理、类别管理、商品管理与订单管理
二、设计思路
1、采用MVC模式
分层架构:展现层(JSP)<——>控制层(Servlet)<——>业务层(Service)<——>模型层(Dao)<——>数据库(DB)
2、前台设计
3、后台设计
4、实现业务的大致流程图
三、实现步骤
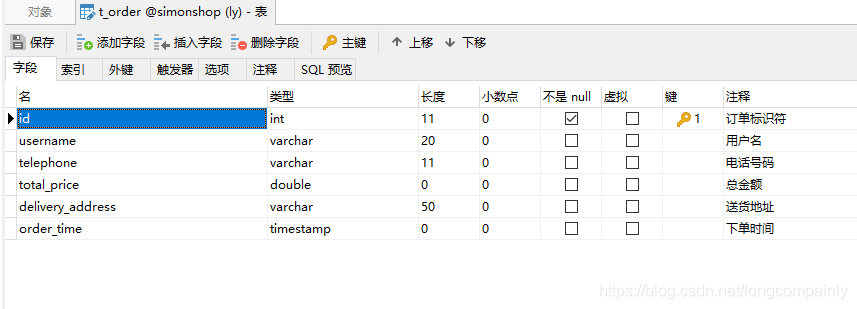
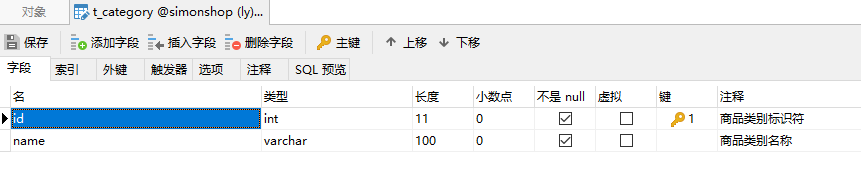
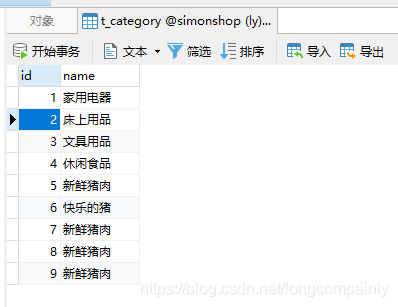
(一)、创建数据库,创建四张表
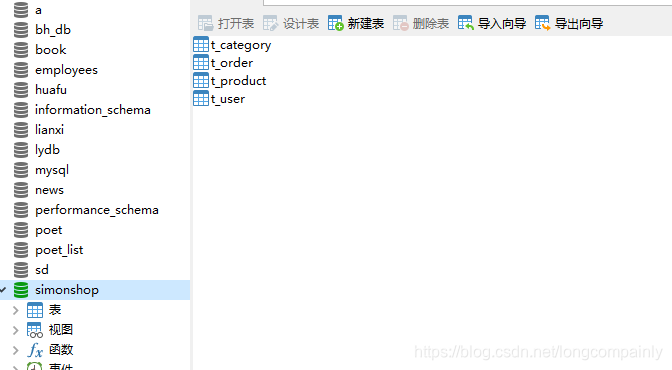
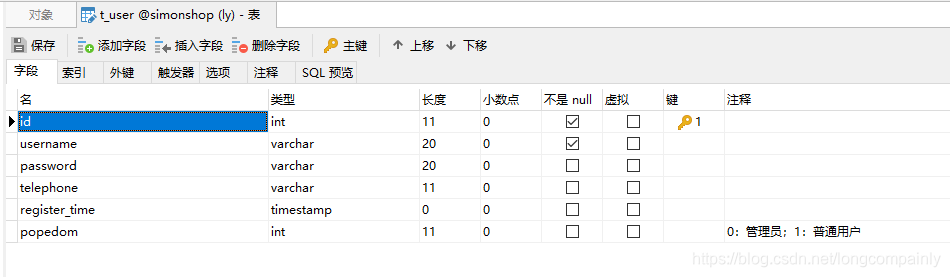
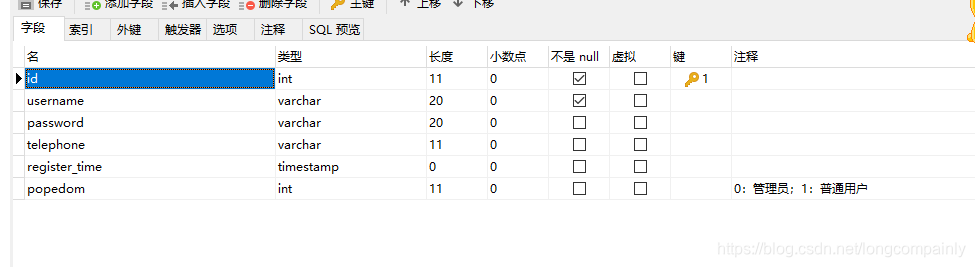
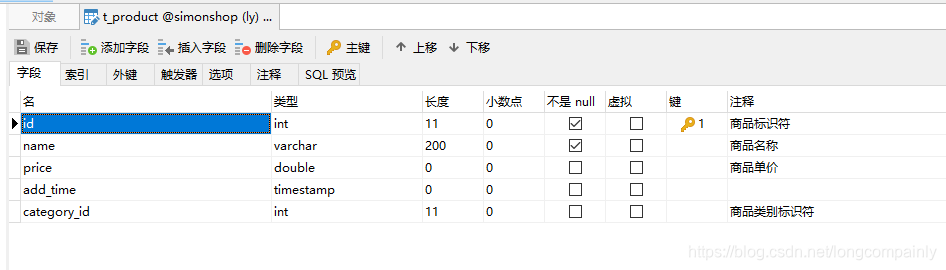
1、四张表的结构如下
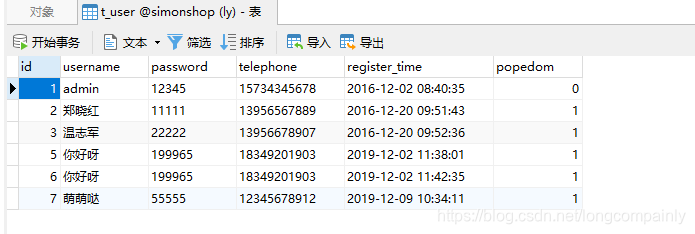
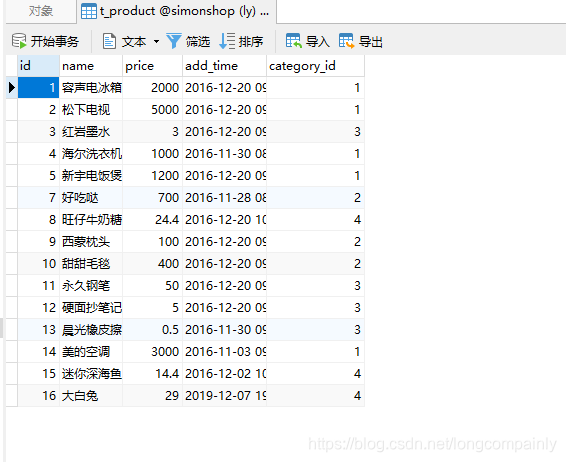
2、四张表的记录如下

(二)创建Web项目simonshop
1、创建Web项目simonshop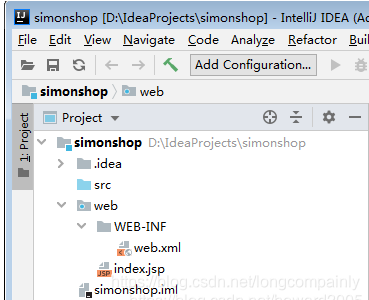
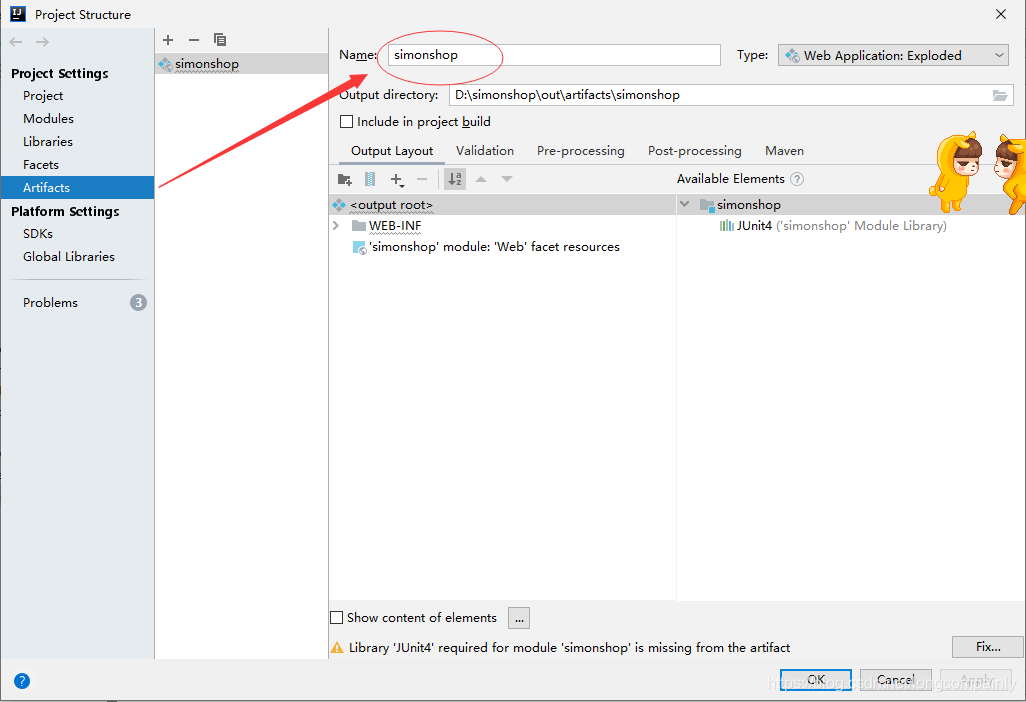
2、在项目结构窗口里设置Artifacts名称:simonshop
(
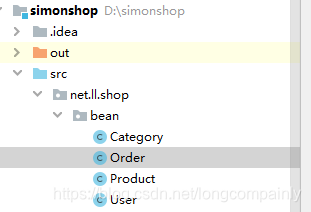
(三)创建实体类
在src里创建net.hw.shop.bean包,创建四个实体类:User、Category、Product与Order,与四张表t_user、t_category、t_product与t_order一一对应。
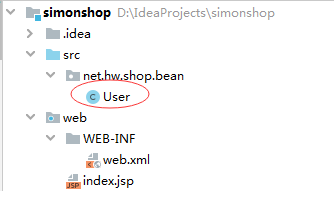
1、用户实体类User
/**

 * 功能:用户实体类

 * 作者:

 * 日期:2019年12月2日

 */

package net.ll.shop.bean;
import java.util.Date;

public class User {
   /**
     * 用户标识符
     */
    private int id;
    /**
     * 用户名
     */
    private String username;
    /**
     * 密码
     */
    private String password;
    /**
     * 电话号码
     */
    private String telephone;
    /**
     * 注册时间
     */
    private Date registerTime;
    /**
     * 权限(0:管理员;1:普通用户)
     */
    private int popedom;


    public int getId() {
        return id;
    }


    public void setId(int id) {
        this.id = id;
    }


    public String getUsername() {
        return username;
    }


    public void setUsername(String username) {
        this.username = username;
    }


    public String getPassword() {
        return password;
    }


    public void setPassword(String password) {
        this.password = password;
    }


    public String getTelephone() {
        return telephone;
    }


    public void setTelephone(String telephone) {
        this.telephone = telephone;
    }


    public Date getRegisterTime() {
        return registerTime;
    }


    public void setRegisterTime(Date registerTime) {
        this.registerTime = registerTime;
    }


    public int getPopedom() {
        return popedom;
    }


    public void setPopedom(int popedom) {
        this.popedom = popedom;
    }

    @Override
    public String toString() {
        return "User{" +
                "id=" + id +
                ", username='" + username + '\'' +
                ", password='" + password + '\'' +
                ", telephone='" + telephone + '\'' +
                ", registerTime=" + registerTime +
                ", popedom=" + popedom +
                '}';
    }
}
2、类别实体类Category
/**
 * 功能:商品类别实体类
 * 作者:
 * 日期:2019年12月2日
 */
package net.ll.shop.bean;

public class Category {
    /**
     * 类别标识符
     */
    private int id;
    /**
     * 类别名称
     */
    private String name;

    public int getId() {
        return id;
    }

    public void setId(int id) {
        this.id = id;
    }

    public String getName() {
        return name;
    }


    public void setName(String name) {
        this.name = name;
    }

    @Override
    public String toString() {
        return "Category{" +
                "id=" + id +
                ", name='" + name + '\'' +
                '}';
    }
}
3、商品实体类Product
/**

 * 功能:商品实体类

 * 作者:

 * 日期:2019年12月2日

 */

package net.ll.shop.bean;

import java.util.Date;

public class Product {
    /**
     * 商品标识符
     */
    private int id;
    /**
     * 商品名称
     */
    private String name;
    /**
     * 商品单价
     */
    private double price;
    /**
     * 商品上架时间
     */
    private Date addTime;
    /**
     * 商品所属类别标识符
     */
    private int categoryId;

    public int getId() {
        return id;
    }

    public void setId(int id) {
        this.id = id;
    }

    public String getName() {
        return name;
    }

    public void setName(String name) {
        this.name = name;
    }

    public double getPrice() {
        return price;
    }

    public void setPrice(double price) {
        this.price = price;
    }

    public Date getAddTime() {
        return addTime;
    }


    public void setAddTime(Date addTime) {
        this.addTime = addTime;
    }

    public int getCategoryId() {
        return categoryId;
    }

    public void setCategoryId(int categoryId) {
        this.categoryId = categoryId;
    }

    @Override
    public String toString() {
        return "Product{" +
                "id=" + id +
                ", name='" + name + '\'' +
                ", price=" + price +
                ", addTime=" + addTime +
                ", categoryId=" + categoryId +
                '}';
    }
}
4、订单实体类Order
/**
 * 功能:订单实体类
 * 作者:
 * 日期:2019年12月2日
 */
package net.ll.shop.bean;

import java.util.Date;

public class Order {
    /**
     * 订单标识符
     */
    private int id;
    /**
     * 用户名
     */
    private String username;
    /**
     * 联系电话
     */
    private String telephone;
    /**
     * 订单总金额
     */
    private double totalPrice;
    /**
     * 送货地址
     */
    private String deliveryAddress;
    /**
     * 下单时间
     */
    private Date orderTime;


    public int getId() {
        return id;
    }


    public void setId(int id) {
        this.id = id;
    }


    public String getUsername() {
        return username;
    }


    public void setUsername(String username) {
        this.username = username;
    }


    public String getTelephone() {
        return telephone;
    }


    public void setTelephone(String telephone) {
        this.telephone = telephone;
    }


    public double getTotalPrice() {
        return totalPrice;
    }


    public void setTotalPrice(double totalPrice) {
        this.totalPrice = totalPrice;
    }


    public String getDeliveryAddress() {
        return deliveryAddress;
    }


    public void setDeliveryAddress(String deliveryAddress) {
        this.deliveryAddress = deliveryAddress;
    }


    public Date getOrderTime() {
        return orderTime;
    }

    public void setOrderTime(Date orderTime) {
        this.orderTime = orderTime;
    }

    @Override
    public String toString() {
        return "Order{" +
                "id=" + id +
                ", username='" + username + '\'' +
                ", telephone='" + telephone + '\'' +
                ", totalPrice=" + totalPrice +
                ", deliveryAddress='" + deliveryAddress + '\'' +
                ", orderTime=" + orderTime +
                '}';
    }
}
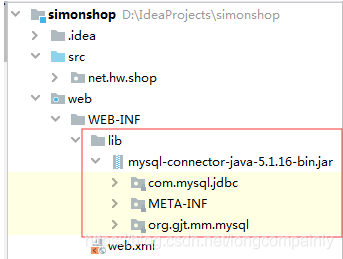
(四)创建数据库工具类ConnectionManager
1、在web\WEB-INF目录下创建lib子目录,添加MySQL驱动程序的jar包
2、在src下创建net.hw.shop.dbutil包,在里面创建ConnectionManager类

/**
 * 功能:数据库连接管理类
 * 作者:
 * 日期:2019年12月2日
 */
package net.ll.shop.dbutil;
import java.sql.Connection;
import java.sql.DriverManager;
import java.sql.SQLException;

import javax.swing.JOptionPane;

public class ConnectionManager {
    /**
     * 数据库驱动程序
     */
    private static final String DRIVER = "com.mysql.jdbc.Driver";
    /**
     * 数据库统一资源标识符
     */
    private static final String URL = "jdbc:mysql://localhost:3306/simonshop";
    /**
     * 数据库用户名d
     */
    private static final String USERNAME = "root";
    /**
     * 数据库密码
     */
    private static final String PASSWORD = "1225";
    /**
     * 私有化构造方法,拒绝实例化
     */
    private ConnectionManager() {
    }

    /**
     * 获得数据库连接
     *
     * @return 数据库连接对象
     */
    public static Connection getConnection() {
        // 定义数据库连接
        Connection conn = null;
        try {
            // 安装数据库驱动程序
            Class.forName(DRIVER);
            // 获得数据库连接
            conn = DriverManager.getConnection(URL
                    + "?useUnicode=true&characterEncoding=UTF8", USERNAME, PASSWORD);
        } catch (ClassNotFoundException e) {
            e.printStackTrace();
        } catch (SQLException e) {
            e.printStackTrace();
        }
        // 返回数据库连接
        return conn;
    }

    /**
     * 关闭数据库连接
     *
     * @param conn
     */
    public static void closeConnection(Connection conn) {
        // 判断数据库连接是否为空
        if (conn != null) {
            // 判断数据库连接是否关闭
            try {
                if (!conn.isClosed()) {
                    // 关闭数据库连接
                    conn.close();
                }
            } catch (SQLException e) {
                e.printStackTrace();
            }
        }
    }

    /**
     * 测试数据库连接是否成功
     *
     * @param args
     */

    public static void main(String[] args) {
        // 获得数据库连接
        Connection conn = getConnection();
        // 判断是否连接成功
        if (conn != null) {
            JOptionPane.showMessageDialog(null, "恭喜,数据库连接成功!");
        } else {
            JOptionPane.showMessageDialog(null, "遗憾,数据库连接失败!");
        }

        // 关闭数据库连接
        closeConnection(conn);
    }
}
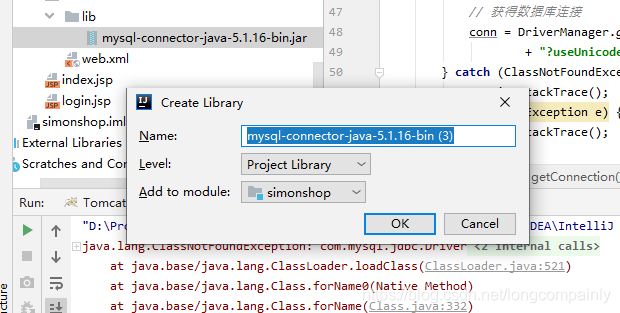
我有报错,但是本来是我已经添加过这个jar包,不知道怎么的就没有了,然后后来连接数据库不成功的时候,我突然想到去看到这个,然后确定是这里的问题
这里就是连接成功啦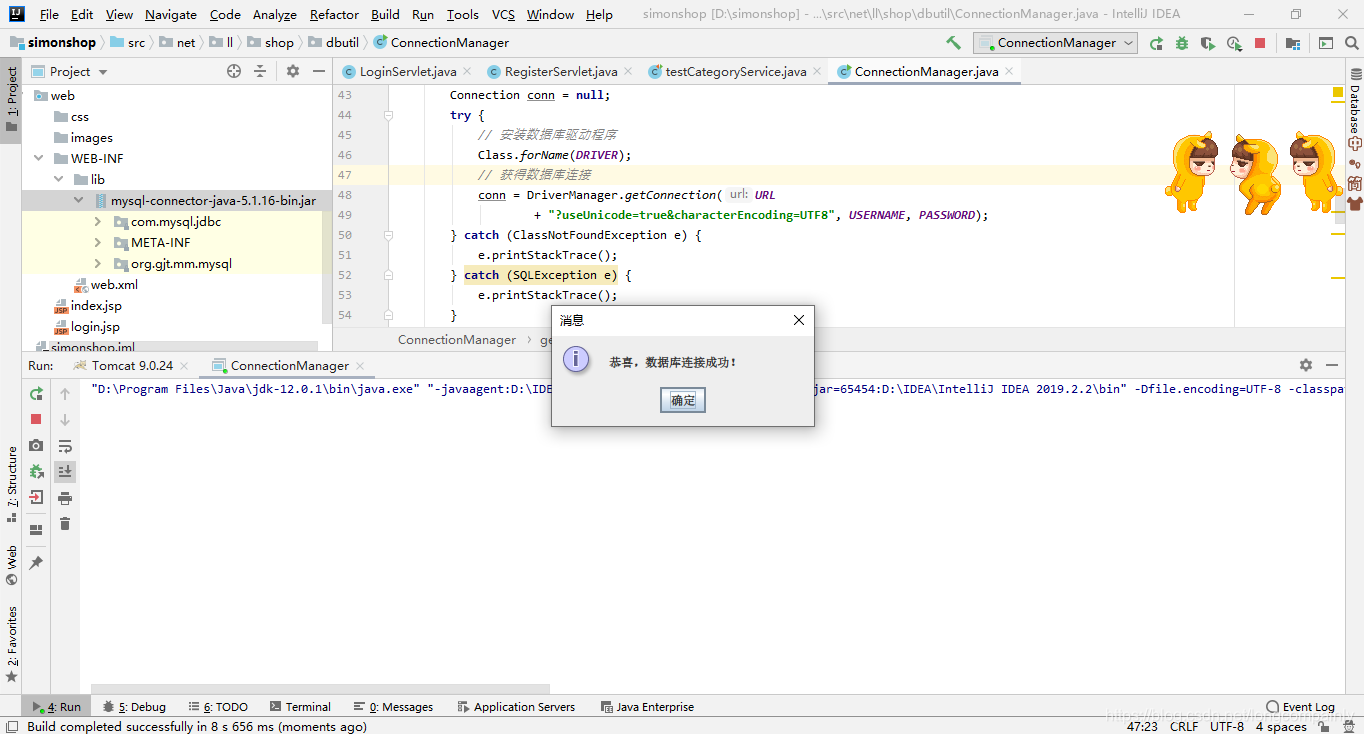


 1443
1443

 被折叠的 条评论
为什么被折叠?
被折叠的 条评论
为什么被折叠?
 到【灌水乐园】发言


