


揭秘!如何在Docker和K8S中高效调用GPU资源
参考:
安装Docker插件
https://docs.nvidia.com/datacenter/cloud-native/container-toolkit/latest/install-guide.html
Unbntu使用Docker调用GPU
https://blog.youkuaiyun.com/dw14132124/article/details/140534628
https://www.cnblogs.com/li508q/p/18444582
- 环境查看
系统环境
# lsb_release -a
NoLSBmodulesareavailable.
Distributor ID:Ubuntu
Description:Ubuntu22.04.4LTS
Release:22.04
Codename:jammy
# cat /etc/redhat-release
RockyLinuxrelease9.3(BlueOnyx)
软件环境
# kubectl version
Client Version:v1.30.2
Kustomize Version:v5.0.4-0.20230601165947-6ce0bf390ce3
Server Version:v1.25.16
WARNING:versiondifferencebetweenclient(1.30)andserver(1.25)exceedsthesupportedminorversionskewof+/-1
- 安装Nvidia的Docker插件
在有GPU资源的主机安装,改主机作为K8S集群的Node
设置源
# curl -fsSL https://nvidia.github.io/libnvidia-container/gpgkey | sudo gpg --dearmor -o /usr/share/keyrings/nvidia-container-toolkit-keyring.gpg \
  && curl -s -L https://nvidia.github.io/libnvidia-container/stable/deb/nvidia-container-toolkit.list | \
    sed 's#deb https://#deb [signed-by=/usr/share/keyrings/nvidia-container-toolkit-keyring.gpg] https://#g' | \
    sudo tee /etc/apt/sources.list.d/nvidia-container-toolkit.list
配置存储库以使用实验性软件包
# sed -i -e '/experimental/ s/^#//g' /etc/apt/sources.list.d/nvidia-container-toolkit.list
修改后把以下注释取消

更新
# sudo apt-getupdate
安装Toolkit
# sudo apt-get install -y nvidia-container-toolkit
配置Docker以使用Nvidia
# sudo nvidia-ctk runtime configure --runtime=docker
INFO[0000] Loading config from /etc/docker/daemon.json
INFO[0000] Wrote updated config to /etc/docker/daemon.json
INFO[0000] It is recommended that docker daemon be restarted.
这条命令会修改配置文件/etc/docker/daemon.json添加runtimes配置
# cat /etc/docker/daemon.json
{
"insecure-registries": [
"192.168.3.61"
    ],
"registry-mirrors": [
"https://7sl94zzz.mirror.aliyuncs.com",
"https://hub.atomgit.com",
"https://docker.awsl9527.cn"
    ],
"runtimes": {
"nvidia": {
"args": [],
"path": "nvidia-container-runtime"
        }
    }
重启docker
# systemctl daemon-reload
# systemctl restart docker
- 使用Docker调用GPU
验证配置
启动一个镜像查看GPU信息
~#   docker run --rm --runtime=nvidia --gpus all ubuntu nvidia-smi
Sat Oct 1201:33:332024
+-----------------------------------------------------------------------------------------+
| NVIDIA-SMI 555.42.06              Driver Version: 555.42.06      CUDA Version: 12.5     |
|-----------------------------------------+------------------------+----------------------+
| GPU  Name                 Persistence-M | Bus-Id          Disp.A | Volatile Uncorr. ECC |
| Fan  Temp   Perf          Pwr:Usage/Cap |           Memory-Usage | GPU-Util  Compute M. |
|                                         |                        |               MIG M. |
|=========================================+========================+======================|
|   0  NVIDIA GeForce RTX 4090        Off |   00000000:01:00.0 Off |                  Off |
|  0%   53C    P2             59W /  450W |    4795MiB /  24564MiB |      0%      Default |
|                                         |                        |                  N/A |
+-----------------------------------------+------------------------+----------------------+

+-----------------------------------------------------------------------------------------+
| Processes:                                                                              |
|  GPU   GI   CI        PID   TypeProcess name                              GPU Memory |
|        ID   ID                                                               Usage      |
|=========================================================================================|
|  No running processes found                                                             |
+-----------------------------------------------------------------------------------------+
该输出结果显示了 GPU 的详细信息,包括型号、温度、功率使用情况和内存使用情况等。这表明 Docker 容器成功地访问到了 NVIDIA GPU,并且 NVIDIA Container Toolkit 安装和配置成功。
- 使用K8S集群Pod调用GPU
以下操作在K8S机器的Master节点操作
安装K8S插件
下载最新版本
$ kubectl create -f https://raw.githubusercontent.com/NVIDIA/k8s-device-plugin/v0.16.1/deployments/static/nvidia-device-plugin.yml
yml文件内容如下
# cat nvidia-device-plugin.yml
apiVersion:apps/v1
kind:DaemonSet
metadata:
name:nvidia-device-plugin-daemonset
namespace:kube-system
spec:
selector:
matchLabels:
name:nvidia-device-plugin-ds
updateStrategy:
type:RollingUpdate
template:
metadata:
labels:
name:nvidia-device-plugin-ds
spec:
tolerations:
-key:nvidia.com/gpu
operator:Exists
effect:NoSchedule
# Mark this pod as a critical add-on; when enabled, the critical add-on
# scheduler reserves resources for critical add-on pods so that they can
# be rescheduled after a failure.
# See https://kubernetes.io/docs/tasks/administer-cluster/guaranteed-scheduling-critical-addon-pods/
priorityClassName:"system-node-critical"
containers:
-image:nvcr.io/nvidia/k8s-device-plugin:v0.16.1
name:nvidia-device-plugin-ctr
env:
-name:FAIL_ON_INIT_ERROR
value:"false"
securityContext:
allowPrivilegeEscalation:false
capabilities:
drop: ["ALL"]
volumeMounts:
-name:device-plugin
mountPath:/var/lib/kubelet/device-plugins
volumes:
-name:device-plugin
hostPath:
path:/var/lib/kubelet/device-plugins
使用DaemonSet方式部署在每一台node服务器部署
查看Pod日志
# kubectl logs -f nvidia-device-plugin-daemonset-8bltf -n kube-system
I1012 02:15:37.1710561 main.go:199] Starting FS watcher.
I1012 02:15:37.1712391 main.go:206] Starting OS watcher.
I1012 02:15:37.1721771 main.go:221] Starting Plugins.
I1012 02:15:37.1722361 main.go:278] Loading configuration.
I1012 02:15:37.1732241 main.go:303] Updating config withdefault resource matching patterns.
I1012 02:15:37.1737171 main.go:314]
Running with config:
{
"version": "v1",
"flags": {
"migStrategy": "none",
"failOnInitError": false,
"mpsRoot": "",
"nvidiaDriverRoot": "/",
"nvidiaDevRoot": "/",
"gdsEnabled": false,
"mofedEnabled": false,
"useNodeFeatureAPI": null,
"deviceDiscoveryStrategy": "auto",
"plugin": {
"passDeviceSpecs": false,
"deviceListStrategy": [
"envvar"
      ],
"deviceIDStrategy": "uuid",
"cdiAnnotationPrefix": "cdi.k8s.io/",
"nvidiaCTKPath": "/usr/bin/nvidia-ctk",
"containerDriverRoot": "/driver-root"
    }
  },
"resources": {
"gpus": [
      {
"pattern": "*",
"name": "nvidia.com/gpu"
      }
    ]
  },
"sharing": {
"timeSlicing": {}
  }
}
I1012 02:15:37.1737601 main.go:317] Retrieving plugins.
E1012 02:15:37.1740521factory.go:87] Incompatible strategy detected auto
E1012 02:15:37.1740861factory.go:88] If thisis a GPU node, did you configure the NVIDIA Container Toolkit?
E1012 02:15:37.1740961factory.go:89] You can check the prerequisites at: https://github.com/NVIDIA/k8s-device-plugin#prerequisites
E1012 02:15:37.1741041factory.go:90] You can learn how to set the runtime at: https://github.com/NVIDIA/k8s-device-plugin#quick-start
E1012 02:15:37.1741131factory.go:91] If thisis not a GPU node, you should set up a toleration or nodeSelector to only deploy this plugin on GPU nodes
I1012 02:15:37.1741231 main.go:346] No devices found. Waiting indefinitely.
驱动失败,错误提示已经清楚说明了失败原因
- 该Node部署GPU节点即该Node没有GPU资源
- 该Node有GPU资源,没有安装Docker驱动
没有GPU资源的节点肯定无法使用,但是已经有GPU资源的Node节点也会报这个错误
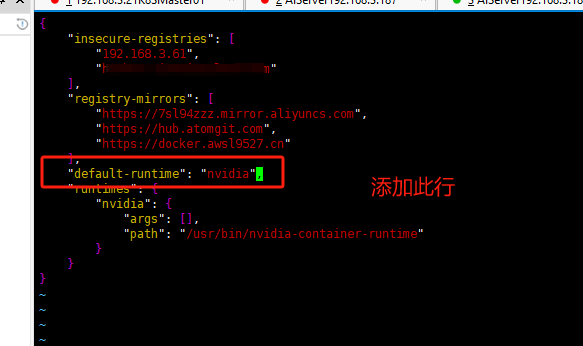
有GPU节点的修复方法,修改配置文件添加配置
# cat /etc/docker/daemon.json
{
"insecure-registries": [
"192.168.3.61"
    ],
"registry-mirrors": [
"https://7sl94zzz.mirror.aliyuncs.com",
"https://hub.atomgit.com",
"https://docker.awsl9527.cn"
    ],
"default-runtime": "nvidia",
"runtimes": {
"nvidia": {
"args": [],
"path": "/usr/bin/nvidia-container-runtime"
        }
    }
}
关键配置是以下行
再次查看Pod日志
# kubectl logs -f nvidia-device-plugin-daemonset-mp5ql -n kube-system
I1012 02:22:00.9902461 main.go:199] Starting FS watcher.
I1012 02:22:00.9902781 main.go:206] Starting OS watcher.
I1012 02:22:00.9903731 main.go:221] Starting Plugins.
I1012 02:22:00.9903821 main.go:278] Loading configuration.
I1012 02:22:00.9906921 main.go:303] Updating config with default resource matching patterns.
I1012 02:22:00.9907761 main.go:314]
Running with config:
{
"version": "v1",
"flags": {
"migStrategy": "none",
"failOnInitError": false,
"mpsRoot": "",
"nvidiaDriverRoot": "/",
"nvidiaDevRoot": "/",
"gdsEnabled": false,
"mofedEnabled": false,
"useNodeFeatureAPI": null,
"deviceDiscoveryStrategy": "auto",
"plugin": {
"passDeviceSpecs": false,
"deviceListStrategy": [
"envvar"
      ],
"deviceIDStrategy": "uuid",
"cdiAnnotationPrefix": "cdi.k8s.io/",
"nvidiaCTKPath": "/usr/bin/nvidia-ctk",
"containerDriverRoot": "/driver-root"
    }
  },
"resources": {
"gpus": [
      {
"pattern": "*",
"name": "nvidia.com/gpu"
      }
    ]
  },
"sharing": {
"timeSlicing": {}
  }
}
I1012 02:22:00.9907801 main.go:317] Retrieving plugins.
I1012 02:22:01.0109501 server.go:216] Starting GRPC server for'nvidia.com/gpu'
I1012 02:22:01.0112811 server.go:147] Starting to serve 'nvidia.com/gpu' on /var/lib/kubelet/device-plugins/nvidia-gpu.sock
I1012 02:22:01.0123761 server.go:154] Registered device plugin for'nvidia.com/gpu' with Kubelet
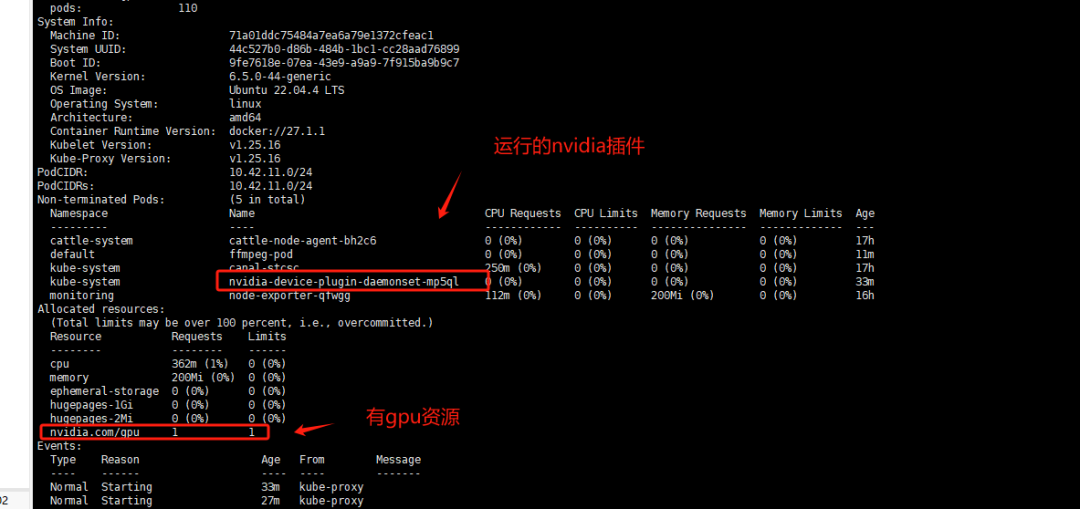
查看GPU节点信息
# kubectl describe node aiserver003087
在k8s中测试GPU资源调用
测试Pod
# cat gpu_test.yaml
apiVersion:v1
kind:Pod
metadata:
name:ffmpeg-pod
spec:
nodeName:aiserver003087#指定有gpu的节点
containers:
-name:ffmpeg-container
image:nightseas/ffmpeg:latest#k8s中配置阿里的私有仓库遇到一些问题,暂时用公共镜像
command: [ "/bin/bash", "-ce", "tail -f /dev/null" ]
resources:
limits:
nvidia.com/gpu:1# 请求分配 1个 GPU
创建Pod
# kubectl apply -f gpu_test.yaml
pod/ffmpeg-pod configured
往Pod内倒入一个视频进行转换测试
# kubectl cp test.mp4 ffmpeg-pod:/root
进入Pod
# kubectl exec -it ffmpeg-pod bash
转换测试视频
# ffmpeg -hwaccel cuvid -c:v h264_cuvid -i test.mp4 -vf scale_npp=1280:720 -vcodec h264_nvenc out.mp4
成功转换并且输出out.mp4则代表调用GPU资源成功
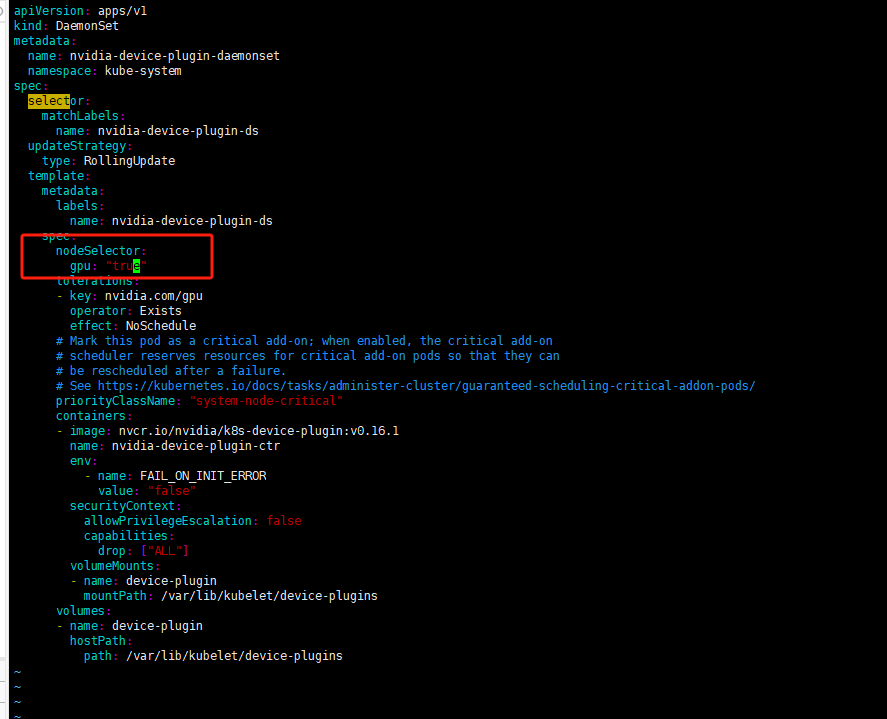
为保证DaemonSet至部署至带GPU资源的服务器可以做一个node标签选择器
设置给节点标签
# kubectl label nodes aiserver003087 gpu=true
修改DaemonSet配置文件添加标签选择保证DaemonSet至部署至带gpu=true标签的Node上
deployment配置文件修改位置是一致的
修改gpu测试Pod的yaml文件使用标签选择器
# cat gpu_test.yaml
apiVersion:v1
kind:Pod
metadata:
name:ffmpeg-pod
spec:
#nodeName: aiserver003087 #指定有gpu的节点
containers:
-name:ffmpeg-container
image:nightseas/ffmpeg:latest#k8s中配置阿里的私有仓库遇到一些问题,暂时用公共镜像
command: [ "/bin/bash", "-ce", "tail -f /dev/null" ]
resources:
limits:
nvidia.com/gpu:1
nodeSelector:
gpu:"true"
#kubernetes.io/os: linux
注意: 标签选择器需要值需要添加双引号"true"否则apply会报错,不能把bool值作为对应的值应用至标签选择器
黑客&网络安全如何学习**
今天只要你给我的文章点赞,我私藏的网安学习资料一样免费共享给你们,来看看有哪些东西。
1.学习路线图

攻击和防守要学的东西也不少,具体要学的东西我都写在了上面的路线图,如果你能学完它们,你去就业和接私活完全没有问题。
2.视频教程
网上虽然也有很多的学习资源,但基本上都残缺不全的,这是我们和网安大厂360共同研发的的网安视频教程,之前都是内部资源,专业方面绝对可以秒杀国内99%的机构和个人教学!全网独一份,你不可能在网上找到这么专业的教程。
内容涵盖了入门必备的操作系统、计算机网络和编程语言等初级知识,而且包含了中级的各种渗透技术,并且还有后期的CTF对抗、区块链安全等高阶技术。总共200多节视频,200多G的资源,不用担心学不全。

因篇幅有限,仅展示部分资料,需要见下图即可前往获取
🐵这些东西我都可以免费分享给大家,需要的可以点这里自取👉:网安入门到进阶资源
3.技术文档和电子书
技术文档也是我自己整理的,包括我参加大型网安行动、CTF和挖SRC漏洞的经验和技术要点,电子书也有200多本,由于内容的敏感性,我就不一一展示了。
因篇幅有限,仅展示部分资料,需要点击下方链接即可前往获取
🐵这些东西我都可以免费分享给大家,需要的可以点这里自取👉:网安入门到进阶资源
4.工具包、面试题和源码
“工欲善其事必先利其器”我为大家总结出了最受欢迎的几十款款黑客工具。涉及范围主要集中在 信息收集、Android黑客工具、自动化工具、网络钓鱼等,感兴趣的同学不容错过。
还有我视频里讲的案例源码和对应的工具包,需要的话也可以拿走。
🐵这些东西我都可以免费分享给大家,需要的可以点这里自取👉:网安入门到进阶资源
最后就是我这几年整理的网安方面的面试题,如果你是要找网安方面的工作,它们绝对能帮你大忙。
这些题目都是大家在面试深信服、奇安信、腾讯或者其它大厂面试时经常遇到的,如果大家有好的题目或者好的见解欢迎分享。
参考解析:深信服官网、奇安信官网、Freebuf、csdn等
内容特点:条理清晰,含图像化表示更加易懂。
内容概要:包括 内网、操作系统、协议、渗透测试、安服、漏洞、注入、XSS、CSRF、SSRF、文件上传、文件下载、文件包含、XXE、逻辑漏洞、工具、SQLmap、NMAP、BP、MSF…

本文转自 https://blog.youkuaiyun.com/yy17111342926/article/details/149347068?spm=1001.2014.3001.5502,如有侵权,请联系删除。


 4562
4562

 被折叠的 条评论
为什么被折叠?
被折叠的 条评论
为什么被折叠?
 到【灌水乐园】发言


