


 本文详细介绍了NIO中的Buffer,包括其capacity、limit和position属性的运用,以及如何通过Flip操作切换读写模式。接着讨论了NIO的内存分配,特别是DirectBuffer实现的零拷贝优化。此外,还讲解了文件通道的读写步骤,类型化ByteBuffer、只读ByteBuffer的使用,以及堆外内存与零拷贝的概念。最后提到了内存文件映射与文件锁,以及Buffer的Scattering和Gathering操作。
Buffer:
Buffer的三个重要属性:capacity, limit, position; position的值永远都不可能大于limit的值。
先定义一个容量为6的buffer,位置如图所示

如果先读入4个数据,读入完成后position的索引是4;再进行写操作,需要经过Flip:将position指向第一个进行写的位置,即0位置,limit指向原来的position位置,即4位置。当position的值与limit的值相等时就是不可以再写了。Capacity的值一直保持不变。4个数据都读完后,再调用flip方法,则position指向0位置,limit位置不变。
    public final Buffer flip() {
        limit = position;
        position = 0;
        mark = -1;
        return this;
    }
NIO内存的分配主要有两种,一种是堆上的内存分配,一种是堆外的内存分配。堆外的内存不是有JVM控制的,是由操作系统统一处理的。DirectBuffer:零拷贝。
文件通道:
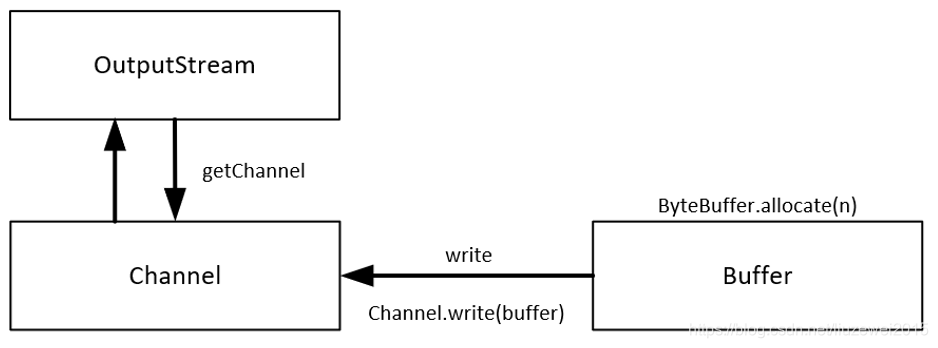
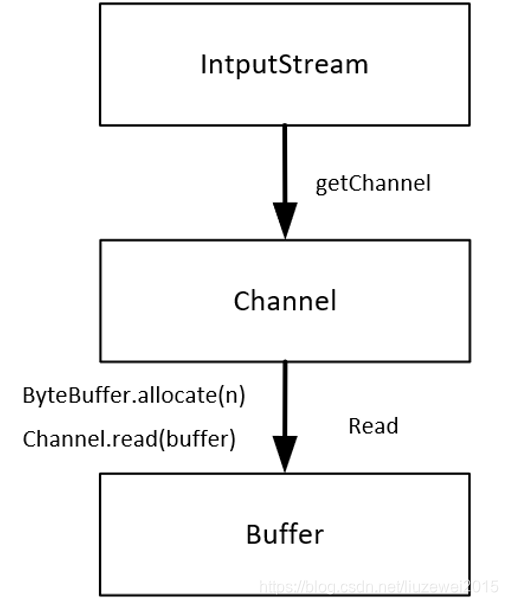
通过NIO读取文件涉及到3个步骤:
- 从FileInputStream获取到FileChannel对象。
- 创建Buffer
- 将数据从Channel读取到Buffer中
绝对方法与相对方法的含义:
- 相对方法:limit值和position值会在操作时被考虑到
- 绝对方法:完全忽略掉limit与position值。通过索引直接get或put相应的值。
    @Test
    public void TestFileNio() throws Exception {
        FileInputStream fileInputStream = new FileInputStream("input.txt");
        FileOutputStream fileOutputStream = new FileOutputStream("output.txt");

        FileChannel inChannel = fileInputStream.getChannel();
        FileChannel outChannel = fileOutputStream.getChannel();

//        ByteBuffer buffer = ByteBuffer.allocate(1024);
        ByteBuffer buffer = ByteBuffer.allocate(3);//当buffer只分配4个字节,重复多次用
        while (true){
            buffer.clear();//如果注释掉这一行,则内容会不停的循环输出;
            //因为position没有置为0,buffer中数据不会更新。且buffer中position位置为limit位置,
            // 使用下面的read时不会有字节被读取,read一直返回0,不会结束循环

            System.out.println("before read position:" + buffer.position());
            int read = inChannel.read(buffer);//从channel中读取数据到buffer,如果channel数据读完,返回值为-1
            System.out.println("after read position:" + buffer.position());
            System.out.println("read:" + read);

            if(-1 == read){//读完才退出
                break;
            }
            buffer.flip();
            System.out.println("before write position:" + buffer.position());
            outChannel.write(buffer);
            System.out.println("after write position:" + buffer.position());
        }
        inChannel.close();
        outChannel.close();

    }
类型化的ByteBuffer与slice用法
类型化的ByteBuffer;slice Buffer与原有的Buffer共享相同的底层数组;
    @Test
    public void primitiveNIOTest(){
//        ByteBuffer类型化的get和put
//        特别适用于指定协议的一些数据,规整的
        ByteBuffer buffer = ByteBuffer.allocate(64);
        buffer.putInt(12);
        buffer.putLong(12121322L);
        buffer.putDouble(1212.12132);
        buffer.putShort((short)2);
        buffer.putChar('n');

        buffer.flip();

        System.out.println(buffer.getInt());//需要与放进去的类型一一对应,否则报错
        System.out.println(buffer.getLong());
        System.out.println(buffer.getDouble());
        System.out.println(buffer.getShort());
        System.out.println(buffer.getChar());

    }

    @Test
    public void sliceBufferNIOTest(){
        ByteBuffer byteBuffer = ByteBuffer.allocate(10);
        for(int i= 0; i<byteBuffer.capacity();++i){
            byteBuffer.put((byte) i);
        }
        byteBuffer.position(2);//指定position and limit
        byteBuffer.limit(6);

        ByteBuffer sliceBuffer = byteBuffer.slice();
        //slice:原有byteBuffer中指定的position与limit内的数据共享
        for(int i= 0; i<sliceBuffer.capacity();++i){
            byte b = sliceBuffer.get(i);//绝对方法
            b*=2;
            sliceBuffer.put(i,b);//修改sliceBuffer中的值
        }

        byteBuffer.position(0);//指定position and limit
        byteBuffer.limit(byteBuffer.capacity());

        while (byteBuffer.hasRemaining()){
            System.out.println(byteBuffer.get());//显示原始byteBuffer中的值
        }

    }
只读ByteBuffer
我们可以随时将一个普通的Buffer调用asReadOnlyBuffer方法返回一个只读Buffer ;但不能将一个只读Buffer转换为读写Buffer
    @Test
    public void readOnlyByteBufferTest(){
        //只读ByteBuffer;我们可以随时将一个普通的Buffer调用asReadOnlyBuffer方法返回一个只读Buffer
        //但不能将一个只读Buffer转换为读写Buffer
        ByteBuffer byteBuffer = ByteBuffer.allocate(10);

        System.out.println(byteBuffer.getClass());//class java.nio.HeapByteBuffer

        for(int i= 0; i<byteBuffer.capacity();++i){
            byteBuffer.put((byte) i);
        }

        ByteBuffer readonlyBuffer = byteBuffer.asReadOnlyBuffer();
        //创建只读Buffer, 共享原来Buffer的内容。不可对其进行put

        System.out.println(readonlyBuffer.getClass());//class java.nio.HeapByteBufferR
    }
ByteBuffer对象源码实现:返回HeapByteBuffer
    public static ByteBuffer allocate(int capacity) {
        if (capacity < 0)
            throw new IllegalArgumentException();
        return new HeapByteBuffer(capacity, capacity);
    }
ByteBuffer对象中的asReadOnlyBuffer方法的源码实现:直接返回了HeapByteBufferR对象
    public ByteBuffer asReadOnlyBuffer() {

        return new HeapByteBufferR(hb,
                                     this.markValue(),
                                     this.position(),
                                     this.limit(),
                                     this.capacity(),
                                     offset);
    }
对于HeapByteBufferR类中的put等操作方法,源码实现:直接抛异常:
    public ByteBuffer put(byte x) {
        throw new ReadOnlyBufferException();
    }
堆外内存与零拷贝
是用ByteBuffer.allocateDirect(.....)分配堆外内存(本地内存):源码:
    public static ByteBuffer allocateDirect(int capacity) {
        return new DirectByteBuffer(capacity);
    }
使用此方法:
  @Test
    public void TestDirectFileNio() throws Exception {
        FileInputStream fileInputStream = new FileInputStream("input1.txt");
        FileOutputStream fileOutputStream = new FileOutputStream("output1.txt");

        FileChannel inChannel = fileInputStream.getChannel();
        FileChannel outChannel = fileOutputStream.getChannel();

        ByteBuffer buffer = ByteBuffer.allocateDirect(1024);//allocateDirect

        while (true){
            buffer.clear();

            int read = inChannel.read(buffer);


            if(-1 == read){
                break;
            }
            buffer.flip();
            outChannel.write(buffer);
        }
        inChannel.close();
        outChannel.close();

    }
底层实现分析:(其中涉及到大量本地方法,使用c,C++实现)
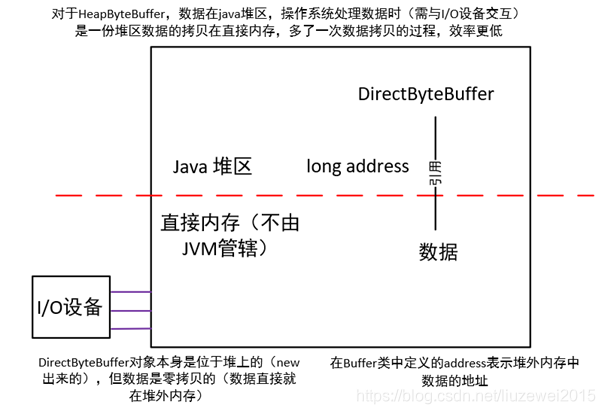
通过原生代码操作java堆中的内存数据是行不通的:GC过程中会对内存进行整理(虽然操作系统可以处理java堆数据,但GC回收堆内存有很大的影响);所以通过HeapByteBuffer得到的数据,在堆外(Native堆)有一份相同的数据拷贝,操作系统操作数据是操作的是堆外的拷贝数据。拷贝也有一种考量:I/O操作时比较慢的,拷贝较快(相比I/O),所以性价比高。
直接缓冲区:java虚拟机可以直接进行本地的I/O操作,避免了在操作系统的原生的I/O操作时还要复制内容到中间的缓冲区。
内存文件映射与文件锁:
    @Test
    public void mappedFileNIOTest() throws Exception {
        //内存文件映射
        RandomAccessFile randomAccessFile = new RandomAccessFile("input2.txt", "rw");
        FileChannel fileChannel = randomAccessFile.getChannel();

//        Maps a region of this channel's file directly into memory.
        MappedByteBuffer mappedByteBuffer = fileChannel.map(FileChannel.MapMode.READ_WRITE,
                0,5);
        mappedByteBuffer.put(0,(byte)'l');
        mappedByteBuffer.put(1,(byte)'l');
        mappedByteBuffer.put(4,(byte)'z');

        randomAccessFile.close();
    }

    @Test
    public void lockFileNIOTest() throws Exception {
        //文件锁
        RandomAccessFile randomAccessFile = new RandomAccessFile("input3.txt", "rw");
        FileChannel fileChannel = randomAccessFile.getChannel();

        //Acquires a lock on the given region of this channel's file.
        FileLock fileLock = fileChannel.lock(1, 3, true);
        //设置为true表示共享锁:可以查看但无法修改或删除的一种数据锁;
        //    如果事务T对数据A加上共享锁后,则其他事务只能对A再加共享锁,不能加排它锁。
        // 排它锁:如果事务T对数据A加上排他锁后,则其
        //    他事务不能再对A加任任何类型的封锁。获准排他锁的事务既能读数据,又能修改数据。

        System.out.println("valid:"+fileLock.isValid());
        System.out.println("lock type:"+fileLock.isShared());

        fileLock.release();
        randomAccessFile.close();
    }
Buffer的Scattering和Gathering
Scattering将一个channel中数据读到多个Buffer中,按顺序且读满一个再读下一个;Gathering往外写的时候将多个Buffer中的写到一个channel中;适用于数据的自动分们别类:如传递的消息:消息头、消息体等等部分组成
    @Test
    public void scatterAndGatheringNIOTest() throws Exception {
//        Buffer的Scattering和Gathering:
//        Scattering将一个channel中数据读到多个Buffer中,按顺序且读满一个再读下一个
//        Gathering往外写的时候将多个Buffer中的写到一个channel中
//        适用于数据的自动分们别类:如传递的消息:消息头、消息体等等部分组成
        ServerSocketChannel serverSocketChannel = ServerSocketChannel.open();
        InetSocketAddress address = new InetSocketAddress(8899);
        serverSocketChannel.socket().bind(address);

        int massageLength = 3+4+5;
        ByteBuffer[] buffers = new ByteBuffer[3];
        buffers[0] = ByteBuffer.allocate(3);
        buffers[1] = ByteBuffer.allocate(4);
        buffers[2] = ByteBuffer.allocate(5);

        SocketChannel socketChannel = serverSocketChannel.accept();

        while(true){
            int byteRead = 0;
            while (byteRead < massageLength){
                long r = socketChannel.read(buffers);
                byteRead+=r;
                System.out.println("byteRead:" + byteRead);
                Arrays.asList(buffers).stream().map(buffer->"position:" + buffer.position()
                        + " ,limit: " + buffer.limit()).forEach(System.out::println);
            }
            Arrays.asList(buffers).forEach(buffer->buffer.flip());//翻转操作

            long byteWritten = 0;//开始写操作
            while (byteWritten < massageLength){
                long r = socketChannel.write(buffers);
                byteWritten += r;
            }
            Arrays.asList(buffers).stream().map(buffer -> buffer.clear());//clear操作
            System.out.println("byteRead: " + byteRead + " ,byteWrite: " + byteWritten
                    + ", massageLength" + massageLength);
        }


 1015
1015

 被折叠的 条评论
为什么被折叠?
被折叠的 条评论
为什么被折叠?
 到【灌水乐园】发言


