


- 写一个hello world:
路径传参PathVariable RequestParam;请求传参method=RequestMethod.GET ;//@RestController里面的方法都以JSON格式输出,不需要其它额外配置 //@RestController 注解相当于@ResponseBody和@Controller合在一起的作用,如果web层 // 的类上使用了@RestController注解,就代表这个类中所有的方法都会以JSON的形式返 // 回,也相当于JSON的一种快捷返回方式 //@Controller代表输出内容到页面 @RestController public class IndexController { // @RequestMapping提供路由信息;"/"路径的HTTP Request都会被映射到hello()方法上进行处理 //web请求:controller----service-----DAO------Database //1通过路径传递 //2通过请求参数传递 @RequestMapping(path = {"/"} ) @ResponseBody public String index(){ return "Hello word!"; } @RequestMapping(path = {"/","/index1"} , method = {RequestMethod.PUT}) @ResponseBody public String index1(){ return "Hello word!"; } // @RequestMapping(path = {"/profile/{userId}"} ) @ResponseBody public String profile(@PathVariable("userId") int userId){ return String.format("profile page of %d", userId); } // @RequestMapping(path = {"/profile1/{userId}/{groupId}"} ) @ResponseBody public String profile1(@PathVariable("userId") int userId, @PathVariable("groupId") String groupId){ return String.format("profile page of %s ,k ; %d", groupId, userId); } // @RequestMapping(path = {"/profile2/{userId}/{groupId}"} ) @ResponseBody public String profile2(@PathVariable("userId") int userId, @PathVariable("groupId") String groupId, @RequestParam("type") int type, @RequestParam("key") String key ){ return String.format("profile page of %d, %s, t = %d, k = %s",userId, groupId ,type,key); } // @RequestMapping(path = {"/profile3/{userId}/{groupId}"} ) @ResponseBody public String profile3(@PathVariable("userId") int userId, @PathVariable("groupId") String groupId, @RequestParam(value = "type" , defaultValue = "1") int type , @RequestParam(value = "key" , defaultValue = "liu") String key ){ return String.format("profile page of %s / %d, t:%d, k=%s", groupId, userId,type,key); } } - 单元测试:
@RunWith(SpringRunner.class) @SpringBootTest public class WebControllerTest { private MockMvc mockMvc; @Before//在测试启动的时候优先执行,一般用作资源初始化 public void setUp() throws Exception{ mockMvc = MockMvcBuilders.standaloneSetup(new IndexController()).build(); } @Test public void contextLoads() { System.out.println("Test!"); } @Test public void getUser() throws Exception{ String resposeString = mockMvc.perform(MockMvcRequestBuilders. post("/getUser")). andReturn().getResponse().getContentAsString(); //获取请求的返回信息,并将返回信息转化为字符串,最后将请求的响应结果打印出来 System.out.println("result: " + resposeString); } @Test public void getUsers() throws Exception{ String resposeString = mockMvc.perform(MockMvcRequestBuilders. get("/getUsersList")). andReturn().getResponse().getContentAsString(); //获取请求的返回信息,并将返回信息转化为字符串,最后将请求的响应结果打印出来 System.out.println("results: " + resposeString); } @Test public void saveUsers() throws Exception{ //数据校验 mockMvc.perform(MockMvcRequestBuilders.post("/saveUser"). param("name", " ").param("age", "66"). param("pass","test") ); } } - 数据校验:
在WebController中添加方法:saveUserpublic class User { // Hibernate Validator数据校验,包括了是否为空,长度,大小,特定格式等 @NotEmpty(message = " 姓名不能为空") private String name; @Max(value = 100, message = " 年龄不能大于100岁") @Min(value = 20, message = " 年龄不能小于20岁") private int age; @NotEmpty(message = " 密码不能为空") @Length(min = 6,message = "密码长度不能小于6位") private String pass; public User(String name, int age, String pass) { this.name = name; this.age = age; this.pass = pass; } public String getName() { return name; } public int getAge() { return age; } public String getPass() { return pass; } public void setName(String name) { this.name = name; } public void setAge(int age) { this.age = age; } public void setPass(String pass) { this.pass = pass; } }@RequestMapping("/saveUser") // BuildingResult参数检验的结果会存储在此对象中,可以根据属性来判断是否校验通过,校验不通过 // 可以将错误信息打印出来 public void saveUser(@Valid User user, BindingResult result ){ // @Valid参数前面添加@Valid注解,代表此对象使用了参数校验 System.out.println("user:" + user); if(result.hasErrors()){ List<ObjectError> list = result.getAllErrors(); for(ObjectError error : list){ System.out.println(error.getCode()+"-" +error.getDefaultMessage()); } } }
- 自定义Filter:过滤器,可以在前端拦截所有用户的请求
1实现Filter接口,实现其中的doFilter()方法:MyFilter类 ;MyFilter2类与MyFilter类相同。
2添加@Configuration注解,将自定义Filter加入过滤链 WebConfiguration类public class MyFilter implements Filter { @Override public void init(FilterConfig filterConfig) throws ServletException { // TODO Auto-generated method stub } @Override public void doFilter(ServletRequest servletRequest, ServletResponse servletResponse, FilterChain filterChain) throws IOException, ServletException { HttpServletRequest request = (HttpServletRequest) servletRequest; System.out.println("this is MyFilter, url: " + request.getRequestURI()); filterChain.doFilter(servletRequest, servletResponse); } @Override public void destroy() { // TODO Auto-generated method stub } }@Configuration public class WebConfiguration { @Bean public FilterRegistrationBean testFilterRegistration(){ FilterRegistrationBean registration = new FilterRegistrationBean(); registration.setFilter(new MyFilter()); registration.addUrlPatterns("/*"); registration.setOrder(6); return registration; } public FilterRegistrationBean test2FilterRegistration(){ FilterRegistrationBean registration = new FilterRegistrationBean(); registration.setFilter(new MyFilter2()); registration.addUrlPatterns("/*"); registration.setOrder(1); return registration; } } - 配置文件:application.properties中可以配置;或自己新增.properties配置文件(自定义配置文件)
application.properties:neo.title=liu neo.description=technology spring.thymeleaf.cache=falseother.properties:
-
other.title= keep smile other.blog=www.JD.com -
读取多个配置项://定义一个NeoProperities对象,来接收所有以neo开头的配置内容
NeoProperties.java
@Component//定义为实例,方便在SpringBoot项目中引用
@ConfigurationProperties(prefix = "neo")//定义一个NeoProperities对象,来接收所有以neo开头的配置内容
public class NeoProperties {
    private String title;
    private String description;

    public String getTitle() {
        return title;
    }

    public String getDescription() {
        return description;
    }

    public void setTitle(String title) {
        this.title = title;
    }

    public void setDescription(String description) {
        this.description = description;
    }
}

otherProperties.java
@Component//定义为实例,方便在SpringBoot项目中引用
@ConfigurationProperties(prefix = "other")
@PropertySource("classpath:other.properties")//多一个注解来指明配置文件地址
public class otherProperties {
    private String title;
    private String blog;

    public String getTitle() {
        return title;
    }

    public  String getBlog() {
        return blog;
    }

    public void setTitle(String title) {
        this.title = title;
    }

    public void setBlog(String description) {
        this.blog = description;
    }
}
新建测试类进行测试:
@RunWith(SpringRunner.class) @SpringBootTest public class PropertiesTest { @Value("${neo.title}")//会默认读取application.properties文件中的neo.title配置属性值,并赋给title private String title;// @Test public void testSingle(){ Assert.assertEquals(title,"liu");//判断属性值是否与目标值一样 } @Resource private NeoProperties properties; @Test public void testMore() throws Exception{ System.out.println("title:"+properties.getTitle()); System.out.println("description:"+properties.getDescription()); } @Resource private otherProperties other; @Test public void testOther() throws Exception{ System.out.println("title:"+ other.getTitle()); System.out.println("blog:"+other.getBlog()); } } - 模板引擎Thymeleaf基础使用:
Thymeleaf旨在提供一个优雅的、高度可维护的创建模板的方式
Thymeleaf 的作⽤域在 HTML 标签内,类似标签的⼀个属性来使⽤,这就是它的特点@Controller public class HelloController { @RequestMapping("/model") public String model(ModelMap map){ map.addAttribute("message","http://www.JD.com"); return "hello";//resolving template [hello], when exist and accessible } }上述会解析到resouces|templates|文件夹下的hello.html文件:
<!DOCTYPE html>
<html lang="en" xmlns:th="http://www.thymeleaf.org">
#所有使⽤ Thymeleaf 的⻚⾯必须在 HTML 标签声明 Thymeleaf
<head>
    <meta charset="UTF-8"></meta>
    <title>Hello</title>
</head>
<body>
<h1  th:text="${message}">Hello World</h1>
</body>
</html>
同理可得 (使用此模板)添加赋值、字符串拼接;条件判断If/unless; for循环;URL;三目运算;switch选择;等等功能。
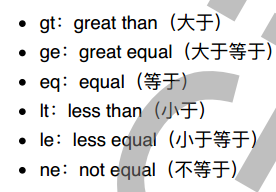
@Controller
public class ExampleController {


    @RequestMapping("/if")
    public String ifunless(ModelMap map) {
        map.addAttribute("flag", "yes");
        return "if";
    }

    @RequestMapping("/list")
    public String list(ModelMap map) {
        map.addAttribute("users", getUserList());
        return "list";
//        for循环:在页面中显示类似表格
    }

    @RequestMapping("/url")
    public String url(ModelMap map) {
        map.addAttribute("type", "liuzewei1996");
        map.addAttribute("pageId", "springcloud/2017/09/11/");
        map.addAttribute("img", "http://image.baidu.com");
        return "url";
    }

    @RequestMapping("/eq")
    public String eq(ModelMap map) {
        map.addAttribute("name", "neo");
        map.addAttribute("age", 30);
        map.addAttribute("flag", "yes");
        return "eq";
//        三目运算符的使用
    }

    @RequestMapping("/switch")
    public String switchcase(ModelMap map) {
        map.addAttribute("sex", "woman");
        return "switch";
    }

    private List<User> getUserList(){
        List<User> list=new ArrayList<User>();
        User user1=new User("大牛",12,"123456");
        User user2=new User("小牛",6,"123563");
        User user3=new User("liu",66,"666666");
        list.add(user1);
        list.add(user2);
        list.add(user3);
        return  list;
    }

}
对应的HTML文件:
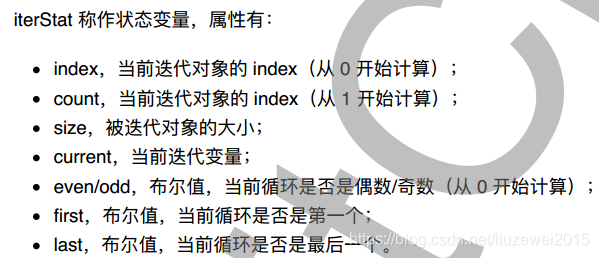
<!DOCTYPE html> <html lang="en" xmlns:th="http://www.thymeleaf.org"> <head> <meta charset="UTF-8"></meta> <title>Example If/Unless </title> </head> <body> <div > <h1>If/Unless</h1> <a th:if="${flag == 'yes'}" th:href="@{https://github.com/liuzewei1996}"> home </a> <br/> <a th:unless="${flag != 'no'}" th:href="@{http://www.JD.com/}" >JD</a> </div> </body> </html> <!DOCTYPE html> <html lang="en" xmlns:th="http://www.thymeleaf.org"> <head> <meta charset="UTF-8"></meta> <title>Example for </title> </head> <body> <div > <h1>for 循环</h1> <table> <tr th:each="user,iterStat : ${users}"> <td th:text="${user.name}">neo</td> <td th:text="${user.age}">6</td> <td th:text="${user.pass}">213</td> <td th:text="${iterStat.index}">index</td> </tr> </table> </div> </body> </html> <!DOCTYPE html> <html lang="en" xmlns:th="http://www.thymeleaf.org"> <head> <meta charset="UTF-8"></meta> <title>Example String </title> </head> <body> <div > <h1>text</h1> <p th:text="${userName}">neo</p> <span th:text="'Welcome to our application, ' + ${userName} + '!'"></span> <br/> <span th:text="|Welcome to our application, ${userName}!|"></span> </div> </body> </html> <!DOCTYPE html> <html lang="en" xmlns:th="http://www.thymeleaf.org"> <head> <meta charset="UTF-8"></meta> <title>Example switch </title> </head> <body> <div > <div th:switch="${sex}"> <p th:case="'woman'">她是一个姑娘...</p> <p th:case="'man'">这是一个爷们!</p> <!-- *: case的默认的选项 --> <p th:case="*">未知性别的一个家伙。</p> </div> </div> </body> </html> <!DOCTYPE html> <html lang="en" xmlns:th="http://www.thymeleaf.org"> <head> <meta charset="UTF-8"></meta> <title>Example url </title> </head> <body> <div > <h1>URL</h1> <a th:href="@{https://github.com/{type}(type=${type})}">link1</a> <br/> <a th:href="@{http://www.ityouknow.com/{pageId}/can-use-springcloud.html(pageId=${pageId})}">view</a> <br/> <div th:style="'background:url(' + @{${img}} + ');'"> <br/><br/><br/> </div> </div> </body> </html> <!DOCTYPE html> <html lang="en" xmlns:th="http://www.thymeleaf.org"> <head> <meta charset="UTF-8"></meta> <title>Example gt eq </title> </head> <body> <div > <h1>EQ</h1> <input th:value="${name}"/> <br/> <input th:value="${age gt 30 ? '中年':'年轻'}"/> <br/> <a th:if="${flag eq 'yes'}" th:href="@{http://favorites.ren/}"> favorites </a> </div> </body> </html> - request/response:
@RequestMapping("/request") @ResponseBody public String request(Model model, HttpServletResponse response, HttpServletRequest request, HttpSession httpSession, @CookieValue("JSESSIONID") String sessionId ){ StringBuilder sb = new StringBuilder(); sb.append("COOKIEVALUE:" + sessionId);//方式一:可以通过注解的方式读取Cookie的值 Enumeration<String> headerNames = request.getHeaderNames(); while (headerNames.hasMoreElements()){ String name = headerNames.nextElement(); sb.append(name + ":" + request.getHeader(name) + "<br>"); } if(request.getSession() != null){ for(Cookie cookie : request.getCookies()){ sb.append("Cookie:"+ cookie.getName() + "value:" + cookie.getValue()); }//方式二:此处读取Cookie的值(用户登录功能的实现可能用到这个值) } sb.append(request.getMethod()+"<br>"); sb.append(request.getQueryString()+"<br>"); sb.append(request.getPathInfo()+"<br>"); sb.append(request.getRequestURL()+"<br>"); //response是用来返回给用户的 response.addHeader("Tianmensan", "hello");//字符串中不能有空格 response.addCookie(new Cookie("username", "liu")); return sb.toString(); } - 重定向(redirect)
@RequestMapping(path = {"/redirect/{code}"}, method = {RequestMethod.GET}) // @ResponseBody//此行代码不需要 public String redirect(@PathVariable("code") int code) { //重定向,页面的跳转 return "redirect:/";//301跳转:永久转移、302跳转:临时转移 }/// 输入http://localhost:8080/redirect/301 直接跳转首页(http://localhost:8080),输出hello word @RequestMapping(path = {"/redirect/11/{code}"}, method = {RequestMethod.GET}) // @ResponseBody//此行代码不需要 public String resee(@PathVariable("code") int code, HttpSession httpSession) { //重定向,页面的跳转 httpSession.setAttribute("msg", "jump to the massage");//可以将参数传递给要跳转的页面 return "redirect:/";//301跳转:永久转移、302跳转:临时转移 } - Error,错误异常处理
@RequestMapping(path = {"/admin"}, method = {RequestMethod.GET}) @ResponseBody public String admin(@RequestParam("key") String key){ if("admin".equals(key)){ return "hello admin"; } throw new IllegalArgumentException("参数不对"); } @ExceptionHandler()//出现异常的处理函数 @ResponseBody public String error(Exception e){ return "error:" + e.getMessage(); } - IOC:有很多个对象,通过依赖注入的方式将他们连接起来。控制反转。
优点:无需关注变量的初始化;只要通过注解的方式来表示;@Controller public class SettingController { @Autowired//在用的地方这样依赖注入 TestService testService; @RequestMapping(path = {"/setting"} ,method = {RequestMethod.GET}) @ResponseBody public String setting(HttpSession httpSession){ return "setting message" + testService.getMessage(12); } } @Service public class TestService { public String getMessage(int userId){ return "test service:" + String.valueOf(userId); } } - AOP(面向切面的编程)
@Aspect
@Component
public class LogAspect {
//  面向切面编程
    public static final Logger logger = LoggerFactory.getLogger(LogAspect.class);
    @Before("execution(* com.example.templates.web.IndexController.*(..))")
    public void beforeMethod(JoinPoint joinPoint){
        StringBuilder sb = new StringBuilder();
        for(Object arg: joinPoint.getArgs()){//参数都保存到sb,后面打印出来
            sb.append("args:" + arg.toString() + "|");
        }
        logger.info("before method:"+ sb.toString());
        //在执行IndexController中任意方法是,先执行beforeMethod()
    }
//*为通配符
    @After("execution(* com.example.templates.web.IndexController.*(..))")
    public void afterMethod(){
        logger.info("after method");//在执行IndexController中任意方法后,执行afterMethod()
    }
}
项目理解(二):Spring基础总结:Hello word-Thymeleaf-AOP-IOC
最新推荐文章于 2020-10-03 10:59:57 发布
 博客介绍了Web开发的基础内容,包括写hello world、路径与请求传参、单元测试、数据校验等。还涉及自定义Filter、配置文件读取、模板引擎Thymeleaf使用,以及request/response处理、重定向、错误异常处理,同时提到IOC和AOP技术。


 137
137

 被折叠的 条评论
为什么被折叠?
被折叠的 条评论
为什么被折叠?
 到【灌水乐园】发言


