


硬件环境
-
STM32F103ZET6(或者其他板子)
-
2.8寸TFT电阻式触摸屏
软件环境
-
keil5
-
LVGL软件源码
-
正点原子触摸屏例程
我移植的是8.3版本可以在github中下载到
官方githubhttps://github.com/lvgl/lvgl/tree/release/v8.3
如果没用过github可以用网盘提取:
链接:https://pan.baidu.com/s/1Chi4iDx7grIzrtcGqif3qg
提取码:YQDX
准备工作完成后开工!!!
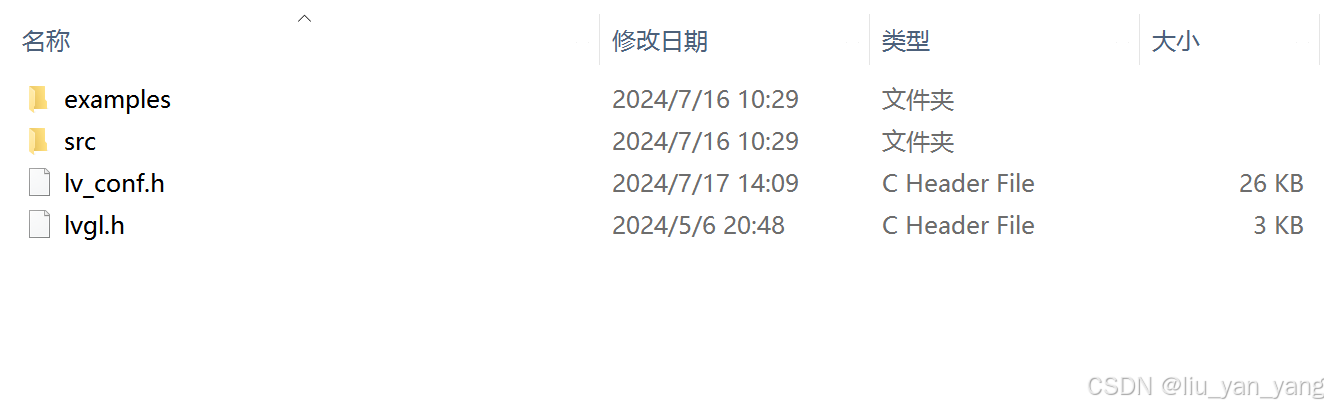
1、lvgl码源
下载以后打开文件可以看见下面四个文件

2、加入文件
在STM32工程下创建一个文件夹名称为LVGL
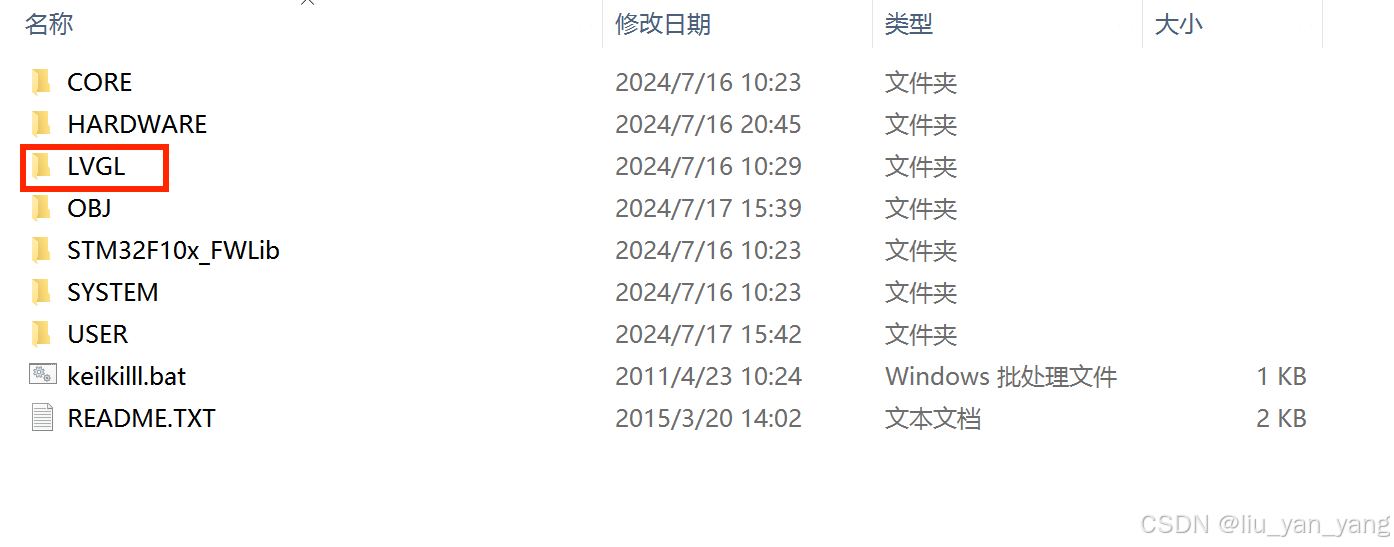
将上图中的四个文件加入到LVGL文件夹中
把v_conf_template.h文件重命名为lv_conf.h
在LVGL/examples/porting文件夹中把三个.h文件开头的#if 0改为#if 1;
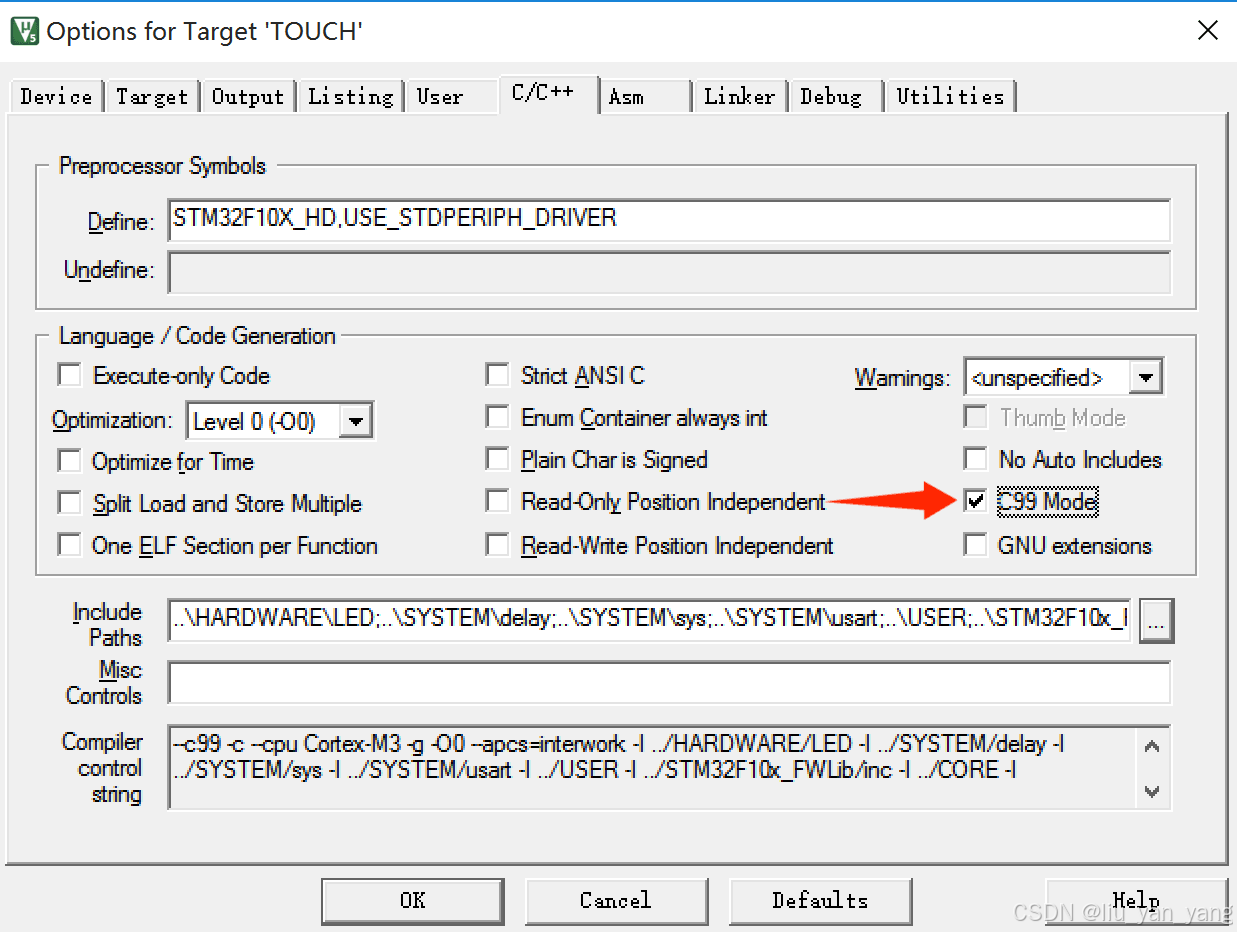
打开你原本的stm32工程(就是那个正常驱动屏幕的工程),使能c99
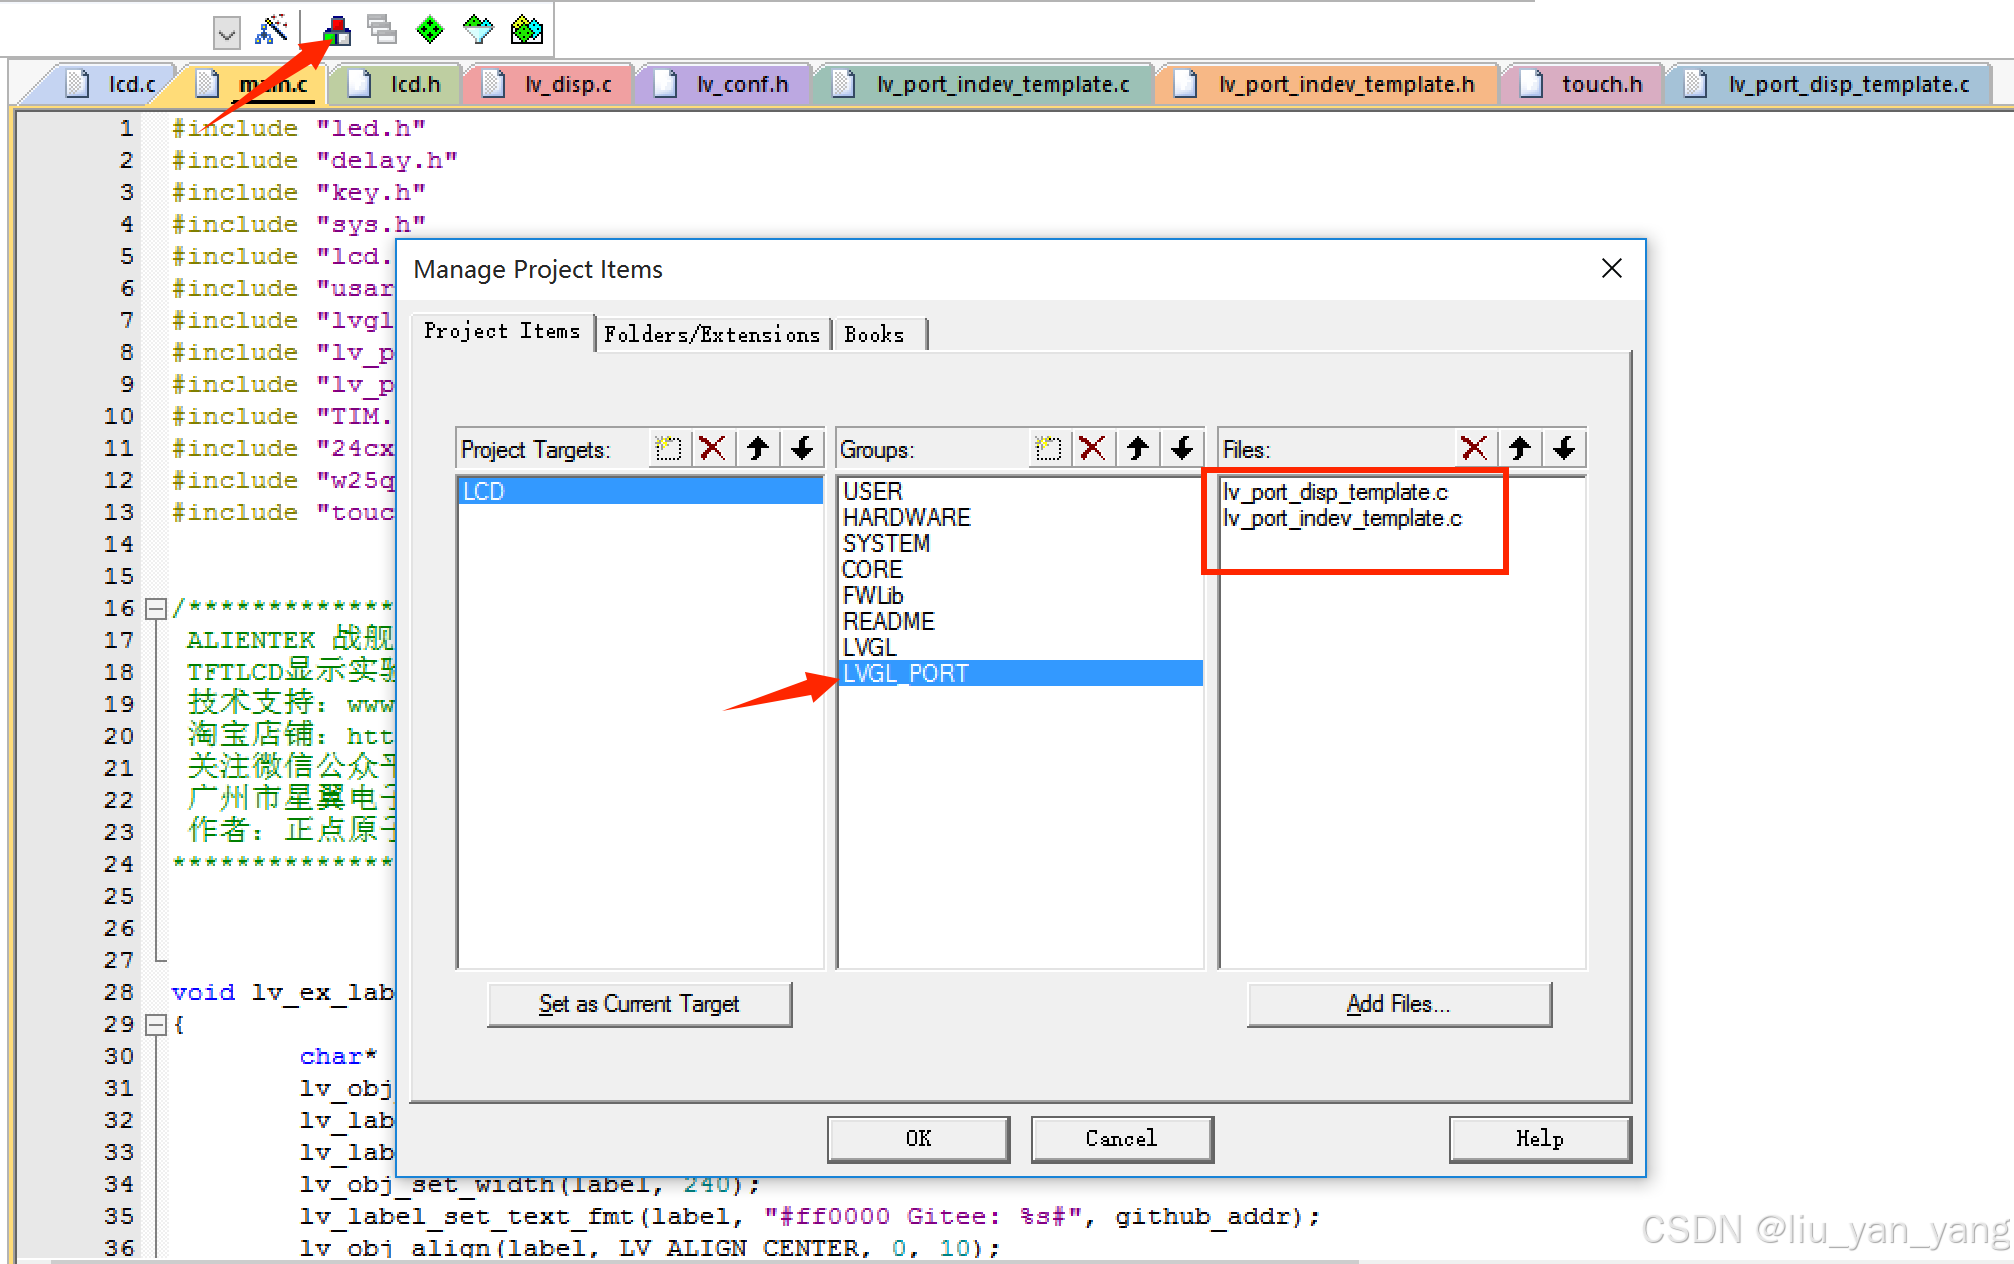
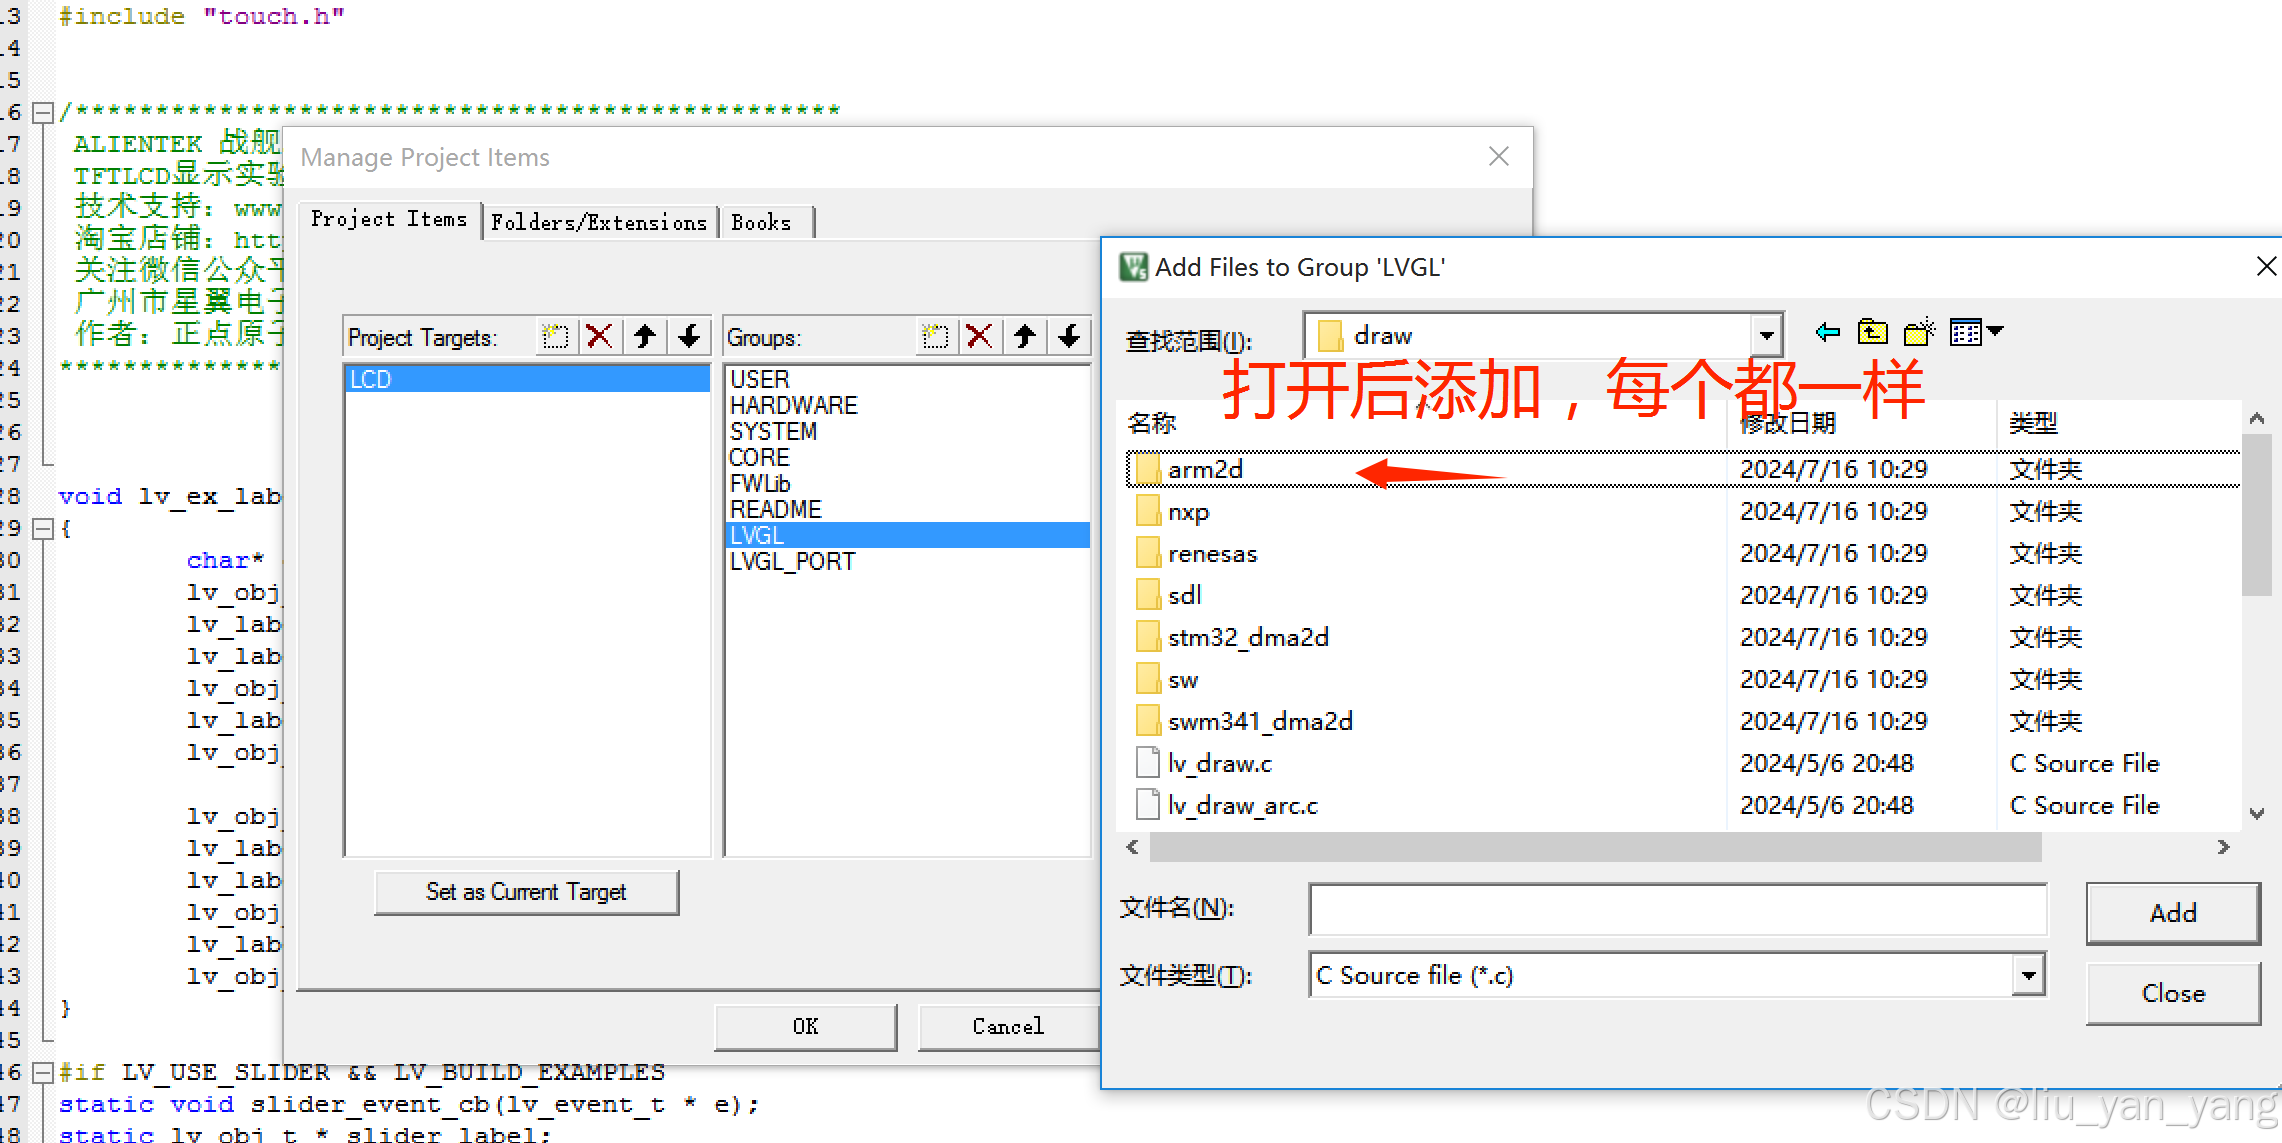
3、添加文件到工程
在左侧栏中添加两个文件夹

添加两个port文件到 LVGL_port文件夹 ,位于LVGL/examples/porting,
添加lvgl源文件
将LVGL/src目录下的core draw font hal misc widgets文件夹下的所有文件全部添加进LVGL组
注:文件夹中还有子文件夹要一层一层打开并加入,文件很多一定细心一点。
 将LVGL/src/extra/目录下的文件添加进lvgl组。具体为:
layouts目录下所有子目录文件
themes目录下所有子目录文件
widgets目录下所有子目录文件
lv_extra.c
注:这里需要看好,不是所有文件夹都添加!!!
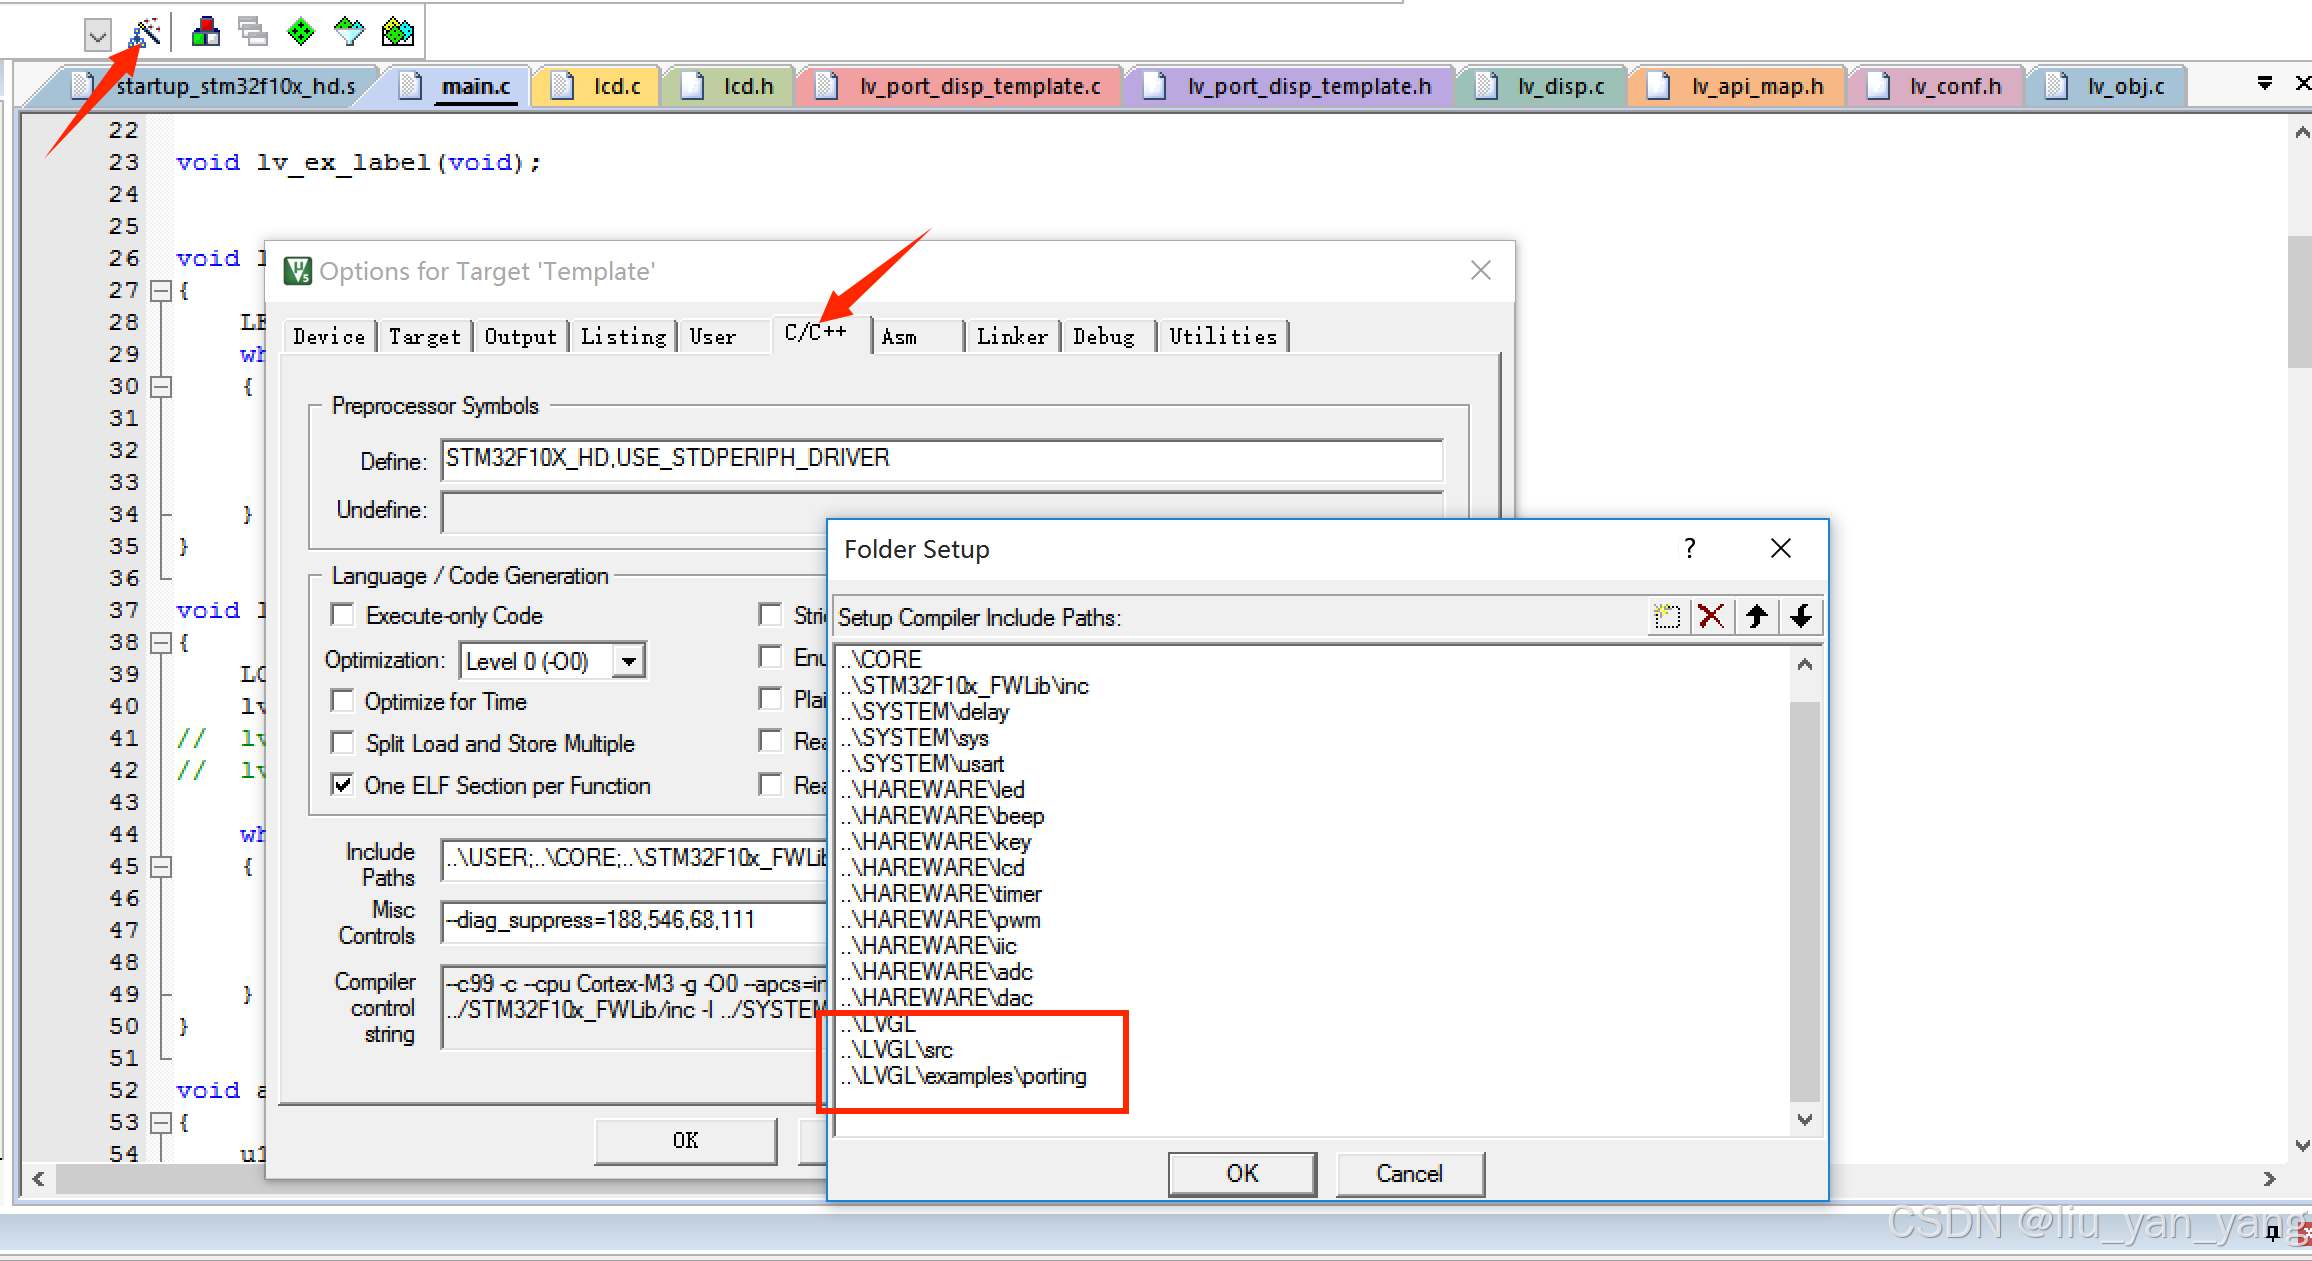
4、加入路径
将lvgl ,src,porting文件夹路径填入
5、修改配置文件
修改lv_port_disp_template.h
直接复制替换掉原来的就行。
/**
 * @file lv_port_disp_templ.h
 *
 */

/*Copy this file as "lv_port_disp.h" and set this value to "1" to enable content*/
#if 1

#ifndef LV_PORT_DISP_TEMPL_H
#define LV_PORT_DISP_TEMPL_H

#ifdef __cplusplus
extern "C" {
#endif

/*********************
 *      INCLUDES
 *********************/
 #include "lvgl.h"


/*********************
 *      DEFINES
 *********************/

/**********************
 *      TYPEDEFS
 **********************/

/**********************
 * GLOBAL PROTOTYPES
 **********************/
/* Initialize low level display driver */
void lv_port_disp_init(void);

/* Enable updating the screen (the flushing process) when disp_flush() is called by LVGL
 */
void disp_enable_update(void);

/* Disable updating the screen (the flushing process) when disp_flush() is called by LVGL
 */
void disp_disable_update(void);

/**********************
 *      MACROS
 **********************/

#ifdef __cplusplus
} /*extern "C"*/
#endif

#endif /*LV_PORT_DISP_TEMPL_H*/

#endif /*Disable/Enable content*/
6、修改显示文件
修改lv_port_disp_template.c
这里修改的比较多就直接复制我修改好的吧。
#include "lcd.h"
/**
 * @file lv_port_disp_templ.c
 *
 */

/*Copy this file as "lv_port_disp.c" and set this value to "1" to enable content*/
#if 1

/*********************
 *      INCLUDES
 *********************/
#include "lv_port_disp_template.h"
#include <stdbool.h>

/*********************
 *      DEFINES
 *********************/

#ifndef MY_DISP_HOR_RES
    #warning Please define or replace the macro MY_DISP_HOR_RES with the actual screen width, default value 320 is used for now.
    #define MY_DISP_HOR_RES    160
#endif

#ifndef MY_DISP_VER_RES
    #warning Please define or replace the macro MY_DISP_HOR_RES with the actual screen height, default value 240 is used for now.
    #define MY_DISP_VER_RES   128
#endif

/**********************
 *      TYPEDEFS
 **********************/

/**********************
 *  STATIC PROTOTYPES
 **********************/
static void disp_init(void);

static void disp_flush(lv_disp_drv_t * disp_drv, const lv_area_t * area, lv_color_t * color_p);
//static void gpu_fill(lv_disp_drv_t * disp_drv, lv_color_t * dest_buf, lv_coord_t dest_width,
//        const lv_area_t * fill_area, lv_color_t color);

/**********************
 *  STATIC VARIABLES
 **********************/

/**********************
 *      MACROS
 **********************/

/**********************
 *   GLOBAL FUNCTIONS
 **********************/

void lv_port_disp_init(void)
{
    /*-------------------------
     * Initialize your display
     * -----------------------*/
    disp_init();

    /*-----------------------------
     * Create a buffer for drawing
     *----------------------------*/

    /**
     * LVGL requires a buffer where it internally draws the widgets.
     * Later this buffer will passed to your display driver's `flush_cb` to copy its content to your display.
     * The buffer has to be greater than 1 display row
     *
     * There are 3 buffering configurations:
     * 1. Create ONE buffer:
     *      LVGL will draw the display's content here and writes it to your display
     *
     * 2. Create TWO buffer:
     *      LVGL will draw the display's content to a buffer and writes it your display.
     *      You should use DMA to write the buffer's content to the display.
     *      It will enable LVGL to draw the next part of the screen to the other buffer while
     *      the data is being sent form the first buffer. It makes rendering and flushing parallel.
     *
     * 3. Double buffering
     *      Set 2 screens sized buffers and set disp_drv.full_refresh = 1.
     *      This way LVGL will always provide the whole rendered screen in `flush_cb`
     *      and you only need to change the frame buffer's address.
     */

    /* Example for 1) */
    static lv_disp_draw_buf_t draw_buf_dsc_1;
    static lv_color_t buf_1[MY_DISP_HOR_RES * 10];                          /*A buffer for 10 rows*/
    lv_disp_draw_buf_init(&draw_buf_dsc_1, buf_1, NULL, MY_DISP_HOR_RES * 10);   /*Initialize the display buffer*/

//    /* Example for 2) */
//    static lv_disp_draw_buf_t draw_buf_dsc_2;
//    static lv_color_t buf_2_1[MY_DISP_HOR_RES * 10];                        /*A buffer for 10 rows*/
//    static lv_color_t buf_2_2[MY_DISP_HOR_RES * 10];                        /*An other buffer for 10 rows*/
//    lv_disp_draw_buf_init(&draw_buf_dsc_2, buf_2_1, buf_2_2, MY_DISP_HOR_RES * 10);   /*Initialize the display buffer*/

//    /* Example for 3) also set disp_drv.full_refresh = 1 below*/
//    static lv_disp_draw_buf_t draw_buf_dsc_3;
//    static lv_color_t buf_3_1[MY_DISP_HOR_RES * MY_DISP_VER_RES];            /*A screen sized buffer*/
//    static lv_color_t buf_3_2[MY_DISP_HOR_RES * MY_DISP_VER_RES];            /*Another screen sized buffer*/
//    lv_disp_draw_buf_init(&draw_buf_dsc_3, buf_3_1, buf_3_2,
//                          MY_DISP_VER_RES * LV_VER_RES_MAX);   /*Initialize the display buffer*/

    /*-----------------------------------
     * Register the display in LVGL
     *----------------------------------*/

    static lv_disp_drv_t disp_drv;                         /*Descriptor of a display driver*/
    lv_disp_drv_init(&disp_drv);                    /*Basic initialization*/

    /*Set up the functions to access to your display*/

    /*Set the resolution of the display*/
    disp_drv.hor_res = MY_DISP_HOR_RES;
    disp_drv.ver_res = MY_DISP_VER_RES;

    /*Used to copy the buffer's content to the display*/
    disp_drv.flush_cb = disp_flush;

    /*Set a display buffer*/
    disp_drv.draw_buf = &draw_buf_dsc_1;

    /*Required for Example 3)*/
    //disp_drv.full_refresh = 1;

    /* Fill a memory array with a color if you have GPU.
     * Note that, in lv_conf.h you can enable GPUs that has built-in support in LVGL.
     * But if you have a different GPU you can use with this callback.*/
    //disp_drv.gpu_fill_cb = gpu_fill;

    /*Finally register the driver*/
    lv_disp_drv_register(&disp_drv);
}

/**********************
 *   STATIC FUNCTIONS
 **********************/

/*Initialize your display and the required peripherals.*/
static void disp_init(void)
{
    /*You code here*/
}

volatile bool disp_flush_enabled = true;

/* Enable updating the screen (the flushing process) when disp_flush() is called by LVGL
 */
void disp_enable_update(void)
{
    disp_flush_enabled = true;
}

/* Disable updating the screen (the flushing process) when disp_flush() is called by LVGL
 */
void disp_disable_update(void)
{
    disp_flush_enabled = false;
}

/*Flush the content of the internal buffer the specific area on the display
 *You can use DMA or any hardware acceleration to do this operation in the background but
 *'lv_disp_flush_ready()' has to be called when finished.*/
static void disp_flush(lv_disp_drv_t * disp_drv, const lv_area_t * area, lv_color_t * color_p)
{
    if(disp_flush_enabled) {
        /*The most simple case (but also the slowest) to put all pixels to the screen one-by-one*/

        int32_t x;
        int32_t y;
        for(y = area->y1; y <= area->y2; y++) {
            for(x = area->x1; x <= area->x2; x++) {
                /*Put a pixel to the display. For example:*/
                /*put_px(x, y, *color_p)*/

				LCD_Fast_DrawPoint(x,y,color_p->full);
                color_p++;
            }
        }
    }

    /*IMPORTANT!!!
     *Inform the graphics library that you are ready with the flushing*/
    lv_disp_flush_ready(disp_drv);
}

/*OPTIONAL: GPU INTERFACE*/

/*If your MCU has hardware accelerator (GPU) then you can use it to fill a memory with a color*/
//static void gpu_fill(lv_disp_drv_t * disp_drv, lv_color_t * dest_buf, lv_coord_t dest_width,
//                    const lv_area_t * fill_area, lv_color_t color)
//{
//    /*It's an example code which should be done by your GPU*/
//    int32_t x, y;
//    dest_buf += dest_width * fill_area->y1; /*Go to the first line*/
//
//    for(y = fill_area->y1; y <= fill_area->y2; y++) {
//        for(x = fill_area->x1; x <= fill_area->x2; x++) {
//            dest_buf[x] = color;
//        }
//        dest_buf+=dest_width;    /*Go to the next line*/
//    }
//}

#else /*Enable this file at the top*/

/*This dummy typedef exists purely to silence -Wpedantic.*/
typedef int keep_pedantic_happy;
#endif
7、去除warning
此时编译应该没有error,但是有warning这个warning无伤大雅可以直接屏蔽,若到这一步的时候会有很多的error那就不能继续下一步,需要排除一下问题在哪。
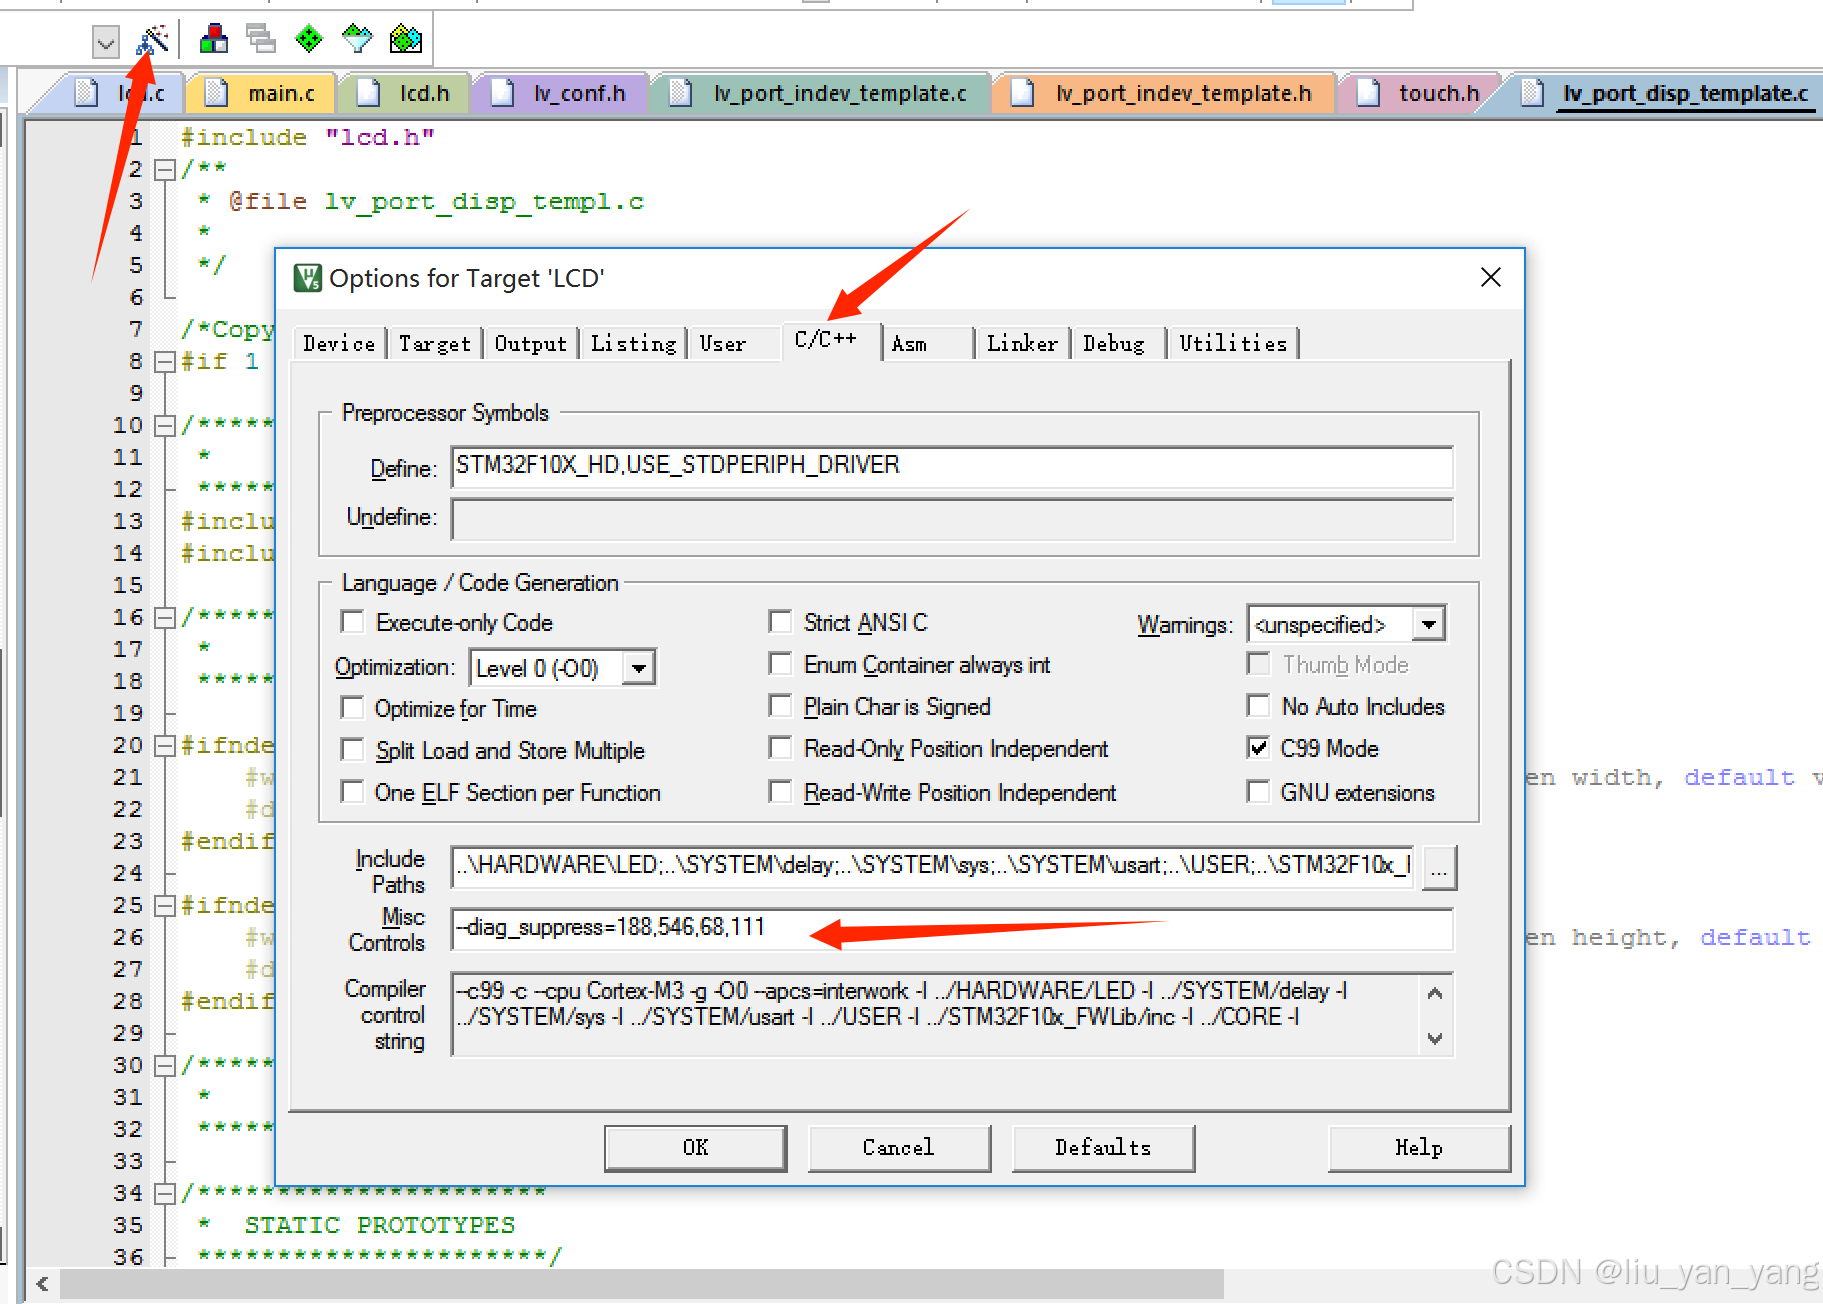
--diag_suppress=188,546,68,111
8、添加“心跳”函数
lv_tick_inc(1);//在放在定时器中
如果这个对你而言比较难实现你也可以把这个放到主函数的循环里也可以。
9、显示测试
添加头文件
#include "lvgl.h"

#include "lv_port_disp_template.h"
初始化
    LCD_Init();
    lv_init();
    lv_port_disp_init();
    lv_ex_label();
复制测试代码到你的main.c中创建一个测试函数
void lv_ex_label(void)
{
		char* github_addr = "https://gitee.com/W23";
		lv_obj_t * label = lv_label_create(lv_scr_act());
    lv_label_set_recolor(label, true);
    lv_label_set_long_mode(label, LV_LABEL_LONG_SCROLL_CIRCULAR); /*Circular scroll*/
    lv_obj_set_width(label, 120);
    lv_label_set_text_fmt(label, "#ff0000 Gitee: %s#", github_addr);
    lv_obj_align(label, LV_ALIGN_CENTER, 0, 10);

    lv_obj_t * label2 = lv_label_create(lv_scr_act());
    lv_label_set_recolor(label2, true);
    lv_label_set_long_mode(label2, LV_LABEL_LONG_SCROLL_CIRCULAR); /*Circular scroll*/
    lv_obj_set_width(label2, 120);
    lv_label_set_text_fmt(label2, "#ff0000 Hello# #0000ff world !123456789#");
    lv_obj_align(label2, LV_ALIGN_CENTER, 0, -10);
}
在循环中写
 lv_task_handler();
 delay_ms(10);
至此,显示部分移植完毕,如果有问题单独联系我。


 1万+
1万+


 到【灌水乐园】发言


