


springboot官网:Spring | HomeLevel up your Java code and explore what Spring can do for you.![]() https://spring.io/
https://spring.io/
开发手册:

springboot特点:
| 特点 | 说明 |
| 创建独立的Spring应用 | SpringBoot可以创建独立的Spring应用,它比用原生的SpringFramework开发的 应用更简单,配置更少。 |
| 内嵌web服务器 | 以前开发web应用,会把项目打成war包,然后部署到外部Tomcat运行项目,现 在直接运行jar包即可。 |
| 提供可选的start依赖, 简化构建配置 | 启动器start,可以直接引入该场景下所有的包依赖,并且多个jar包对应的版本 也帮我们选择好了。 |
| 自动配置Spring以及第 三方功能 | 以前开发Spring项目,有很多常规配置需要配置,并且引入其他技术时,都伴随 着大量的配置需要手动执行。那么有了自动配置后,这些都不需要自己去配置了, 可以直接面向业务代码开发,而不必被大量配置所困扰了。 |
| 提供生产级别的特性 | SpringBoot自带了生产级别的指标和运行状况检查,可以帮助我们了解服务运行 的最新状况。并且,当我们需要修改某些配置的时候,也不需要直接在项目源码 上进行修改了,可以通过外部化配置,就可以将修改生效。 |
| 完全不需要代码生成, 也不需要XML配置 | SpringBoot是整合Spring生态圈技术栈的一站式框架,是简化Spring技术栈的快 速开发脚手架,缺点是SpringBoot迭代快,变化快,且封装很深,内部原理复杂, 不容易精通。 |
新建springboot项目
加入parent:
    <parent>
        <groupId>org.springframework.boot</groupId>
        <artifactId>spring-boot-starter-parent</artifactId>
        <version>2.7.5</version>
        <relativePath/> <!-- lookup parent from repository -->
    </parent>
加入依赖:
        <dependency>
            <groupId>org.springframework.boot</groupId>
            <artifactId>spring-boot-starter-web</artifactId>
        </dependency>

        <dependency>
            <groupId>org.projectlombok</groupId>
            <artifactId>lombok</artifactId>
            <optional>true</optional>
        </dependency>
        <dependency>
            <groupId>org.springframework.boot</groupId>
            <artifactId>spring-boot-starter-test</artifactId>
            <scope>test</scope>
        </dependency>
写主启动类:
@RestController    // 即 @Controller 和 @ResponseBody
@SpringBootApplication
public class MyApplication {

    @RequestMapping("/")
    String home() {
        return "Hello World!";
    }

    public static void main(String[] args) {
        SpringApplication.run(MyApplication.class, args);
    }

}
安装ApiPost插件,在IDE中测试(替代postman)
(首先启动服务)

也通过 https://start.spring.io/ 帮助搭建项目脚手架:
springboot特性1:属性管理
spring-boot-starter-parent的父pom是spring-boot-dependencies
在spring-boot-dependencies.pom里面包含了开发中常用的版本集合。
如果我们只是使用默认的版本,那么引入dependency即可;但是如果我们需要自定义依 赖版本,那么额外还需要在标签中引入自定义的版本。
特性2:场景starter
我们引入什么场景的starter,那么就会将一整套场景的jar包都引入进来,我们也不需要关 注多jar包直接的版本号是否兼容彼此,这块工作spring已经帮我们做好了。
SpringBoot提供的Starter有哪些:Build Systems :: Spring Boot![]() https://docs.spring.io/spring-boot/reference/using/build-systems.html#using.build-systems.starters分为三类Starter,分别为:
https://docs.spring.io/spring-boot/reference/using/build-systems.html#using.build-systems.starters分为三类Starter,分别为:
application starters
production starters
technical starters
核心starter:


特性3:自动配置AutoConfiguration
SpringBoot所有的自动配置功能都在spring-boot-autoconfigure包里面。
        <dependency>
            <groupId>org.springframework.boot</groupId>
            <artifactId>spring-boot-autoconfigure</artifactId>
        </dependency>
特性4:默认包扫描路径
主程序MyApplication.java所在的包及其下面的所有子包里面的组件都会被默认扫描。
特性5:自定义包扫描路径
如果有的包或者文件跟主启动类不在一个层级下,如果想要被扫描到,可以指定如下注解: @SpringBootApplication(scanBasePackages = "com.demo")
或者指定如下注解: @ComponentScan("com.demo")
建议使用默认包扫描路径即可
特性6:SpringBoot配置相关介绍
SpringBoot支持两种配置类型:(加载的优先级:.properties .ymal .yml)
① application.properties
② application.yaml / application.yml
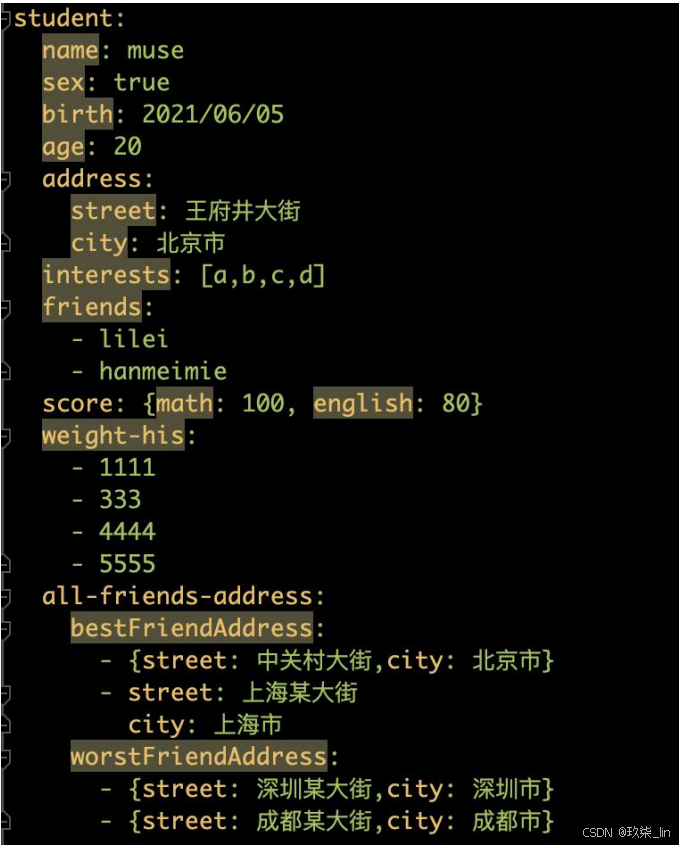
介绍properties和yaml的配置项书写方式对比,以及介绍默认配置值和配置对应处理类
自定义配置绑定方式
方式1:@ConfigurationProperties(prefix = "demo") + @Component 这两个注解放在实体类上
方式2:@ConfigurationProperties + @EnableConfigurationProperties
方式1举例:
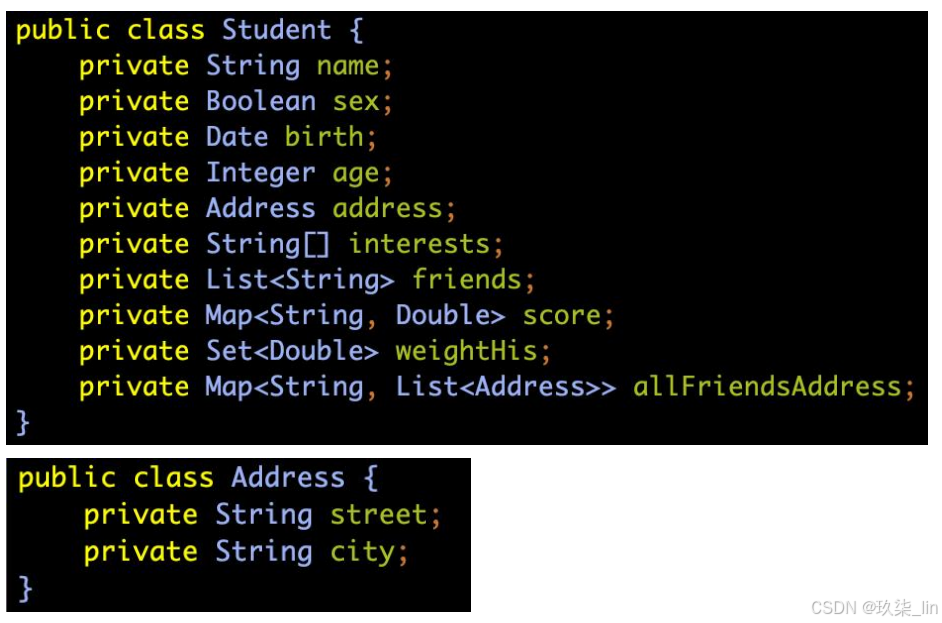
实体类:
@Component
@ConfigurationProperties(prefix = "wlp")
@Data
public class Student {
    String name;
    int age;
}
配置文件application.properties:
wlp.name=xxxx
wlp.age=12
主启动类main方法:(主启动类上加了@RestController注解)
    public static void main(String[] args) {
        ConfigurableApplicationContext context = SpringApplication.run(SpringboottestApplication.class, args);
        Student student = context.getBean(Student.class);
        System.out.println(student);
    }
运行结果:

方式2举例:
配置类:@EnableConfigurationProperties注解的参数可以是class数组
@Configuration
@EnableConfigurationProperties(Student.class)
    public class config {
}
实体类:
@ConfigurationProperties(prefix = "wlp")
@Data
public class Student {
    String name;
    int age;
}
配置文件:
wlp.name=xxxx
wlp.age=12
主启动类:
    public static void main(String[] args) {
        ConfigurableApplicationContext context = SpringApplication.run(SpringboottestApplication.class, args);
        Student student = context.getBean(Student.class);
        System.out.println(student);
    }
在application.properties中给我们自定义的属性赋值时,不会提示,如果需要提示,需要添加依赖
添加配置提醒:(添加完依赖后,刷新Maven,同时Rebuild Project)
        <dependency>
            <groupId>org.springframework.boot</groupId>
            <artifactId>spring-boot-configuration-processor</artifactId>
            <optional>true</optional>
        </dependency>
特性7:yaml书写规则
(实体类➕@ConfigurationProperties(prefix = "student")
配置类➕@EnableConfigurationProperties(Student.class))
特性8:常用注解:
| 注解 | 说明 |
| @Configuration | 定义配置类,之前的Spring配置都是写在xml配置文件里的。在新的Spring版本中,首要选择把配置写在配置类中。 |
| @ComponentScan | 定义扫描路径 |
| @Bean | 默认方法名就是bean的id,返回类型就是方法返回的类型。也可@Bean("xxx"),指定bean的名称。 |
| @Import | 给容器中自动创建出注解中指定类型的组件,默认组件的名字就是全类名。 |
| @Conditional | 满足Conditional指定的条件时,才向IOC容器中注入组件。 |
| @ImportResource | 制定对应的xml文件,Spring就可以把xml中配置的Bean都加载到IOC中,而不用一个个手写@Bean了。 |
@Bean示例:
实体类Address:
@Data
public class Address {
    private int id;
    private String province;
    private String city;
    private String district;
}
配置类:
@Configuration
public class config {
    @Bean("northCity")
    public Address north(){
        Address address = new Address();
        address.setId(2);
        address.setProvince("河北");
        address.setCity("保定");
        address.setDistrict("莲池区");
        return address;
    }
}
主启动类:
//        SpringboottestApplication.class 为主启动类的名字,northCity为bean的名字(@Bean的属性值优先级高于方法名)
        ConfigurableApplicationContext context = SpringApplication.run(SpringboottestApplication.class, args);
        Address north = context.getBean("northCity", Address.class);
        System.out.println(north);
运行结果:

获得全部bean的名字:
        ConfigurableApplicationContext context = SpringApplication.run(SpringboottestApplication.class, args);
        Arrays.stream(context.getBeanDefinitionNames()).forEach(System.out::println);
@Import 8:30
@Conditional示例:(只有存在“northCity”这个bean的时候,才会创建“newStudent”这个bean)
@Configuration
public class config {
    @Bean("northCity")
    public Address north(){
        Address address = new Address();
        address.setId(2);
        address.setProvince("河北");
        address.setCity("保定");
        address.setDistrict("莲池区");
        return address;
    }

    @Bean("newStudent")
    @ConditionalOnBean(name = "northCity")
    public Student student(){
        Student student = new Student();
        student.setAge(11);
        student.setName("hahaha");
        student.setAddress(north());
        return student;
    }
}
注释掉 @Bean("northCity") 时,以下输出两个false,不注释掉的话,输出两个true。
ConfigurableApplicationContext context = SpringApplication.run(SpringboottestApplication.class, args);
boolean newStudent = context.containsBean("newStudent");
boolean northCity = context.containsBean("northCity");
System.out.println(newStudent);
System.out.println(northCity);
@ImportResource 示例:
(使用场景:项目中有一些老资源是用xml文件写的,当想用xml文件中的bean时,可以用@ImportResource引入)
resource路径下写student.xml文件:
<bean id="importStudent" class="com.wlp.springboottest.entity.Student">
	<property name="name" value="conger"></property>
	<property name="age" value="19"></property>
</bean>在配置类config上加注解:
@ImportResource("classpath:student.xml")以下测试语句输出 true:
boolean importStudent = context.containsBean("importStudent");
System.out.println(importStudent);
特性9:自动配置原理

(面)SpringBoot里面的注解@SpringBootApplication 做了什么?回答一下三大点:
@SpringBootApplication
@SpringBootConfiguration:配置类的属性
@ComponentScan:自定义扫描路径
@EnableAutoConfiguration:
@Import(AutoConfigurationImportSelector.class)
@AutoConfigurationPackage
@Import(AutoConfigurationPackages.Registrar.class):确定包扫描路径(new PackageImports(metadata).getPackageNames().toArray(new String[0]))(以传入启动类,然后解析启动类的package获得的,所以只能识别到启动类同级及子集目录,上级识别不到)
1. 进入AutoConfigurationPackages的Registrar类:
	static class Registrar implements ImportBeanDefinitionRegistrar, DeterminableImports {

        // metadata 是主启动类名,new PackageImports(metadata).getPackageNames().toArray(new String[0]) 是主启动类的路径,即确定包扫描路径
		@Override
		public void registerBeanDefinitions(AnnotationMetadata metadata, BeanDefinitionRegistry registry) {
			register(registry, new PackageImports(metadata).getPackageNames().toArray(new String[0]));
		}

		@Override
		public Set<Object> determineImports(AnnotationMetadata metadata) {
			return Collections.singleton(new PackageImports(metadata));
		}

	}
register中的metadata就是主启动类
2. 进入AutoConfigurationImportSelector类:
public String[] selectImports(AnnotationMetadata annotationMetadata) {
	if (!isEnabled(annotationMetadata)) {
		return NO_IMPORTS;
	}
	AutoConfigurationEntry autoConfigurationEntry = getAutoConfigurationEntry(annotationMetadata);
	return StringUtils.toStringArray(autoConfigurationEntry.getConfigurations());
}
getAutoConfigurationEntry(AnnotationMetadata annotationMetadata):
protected AutoConfigurationEntry getAutoConfigurationEntry(AnnotationMetadata annotationMetadata) {
	if (!isEnabled(annotationMetadata)) {
		return EMPTY_ENTRY;
	}
	AnnotationAttributes attributes = getAttributes(annotationMetadata);
	List<String> configurations = getCandidateConfigurations(annotationMetadata, attributes);
	configurations = removeDuplicates(configurations);
	Set<String> exclusions = getExclusions(annotationMetadata, attributes);
	checkExcludedClasses(configurations, exclusions);
	configurations.removeAll(exclusions);
	configurations = getConfigurationClassFilter().filter(configurations);
	fireAutoConfigurationImportEvents(configurations, exclusions);
	return new AutoConfigurationEntry(configurations, exclusions);
}
对获得的configurations进行重复的移除。
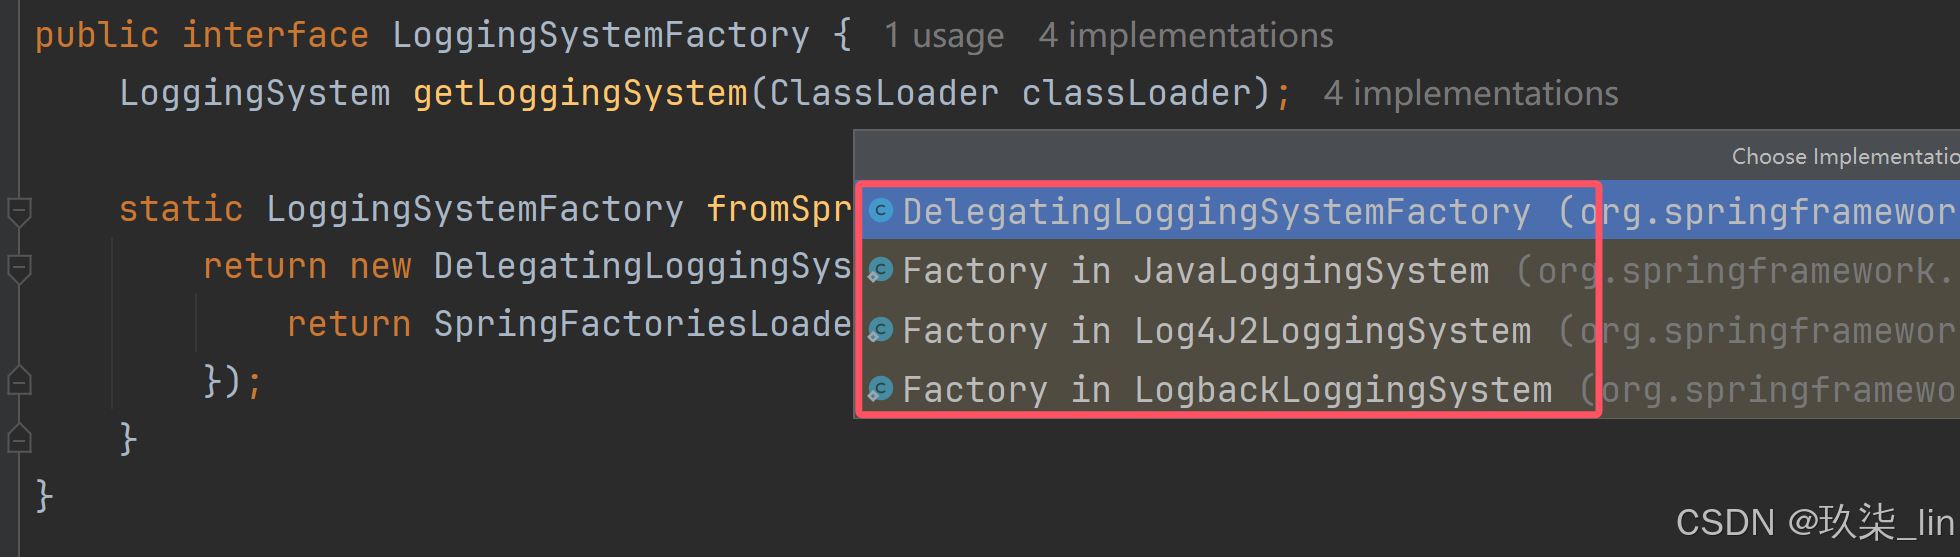
getCandidateConfigurations(annotationMetadata, attributes):主要是从META-INF/spring.factories和META-INF/spring/%s.imports中加载配置信息。
protected List<String> getCandidateConfigurations(AnnotationMetadata metadata, AnnotationAttributes attributes) {
	List<String> configurations = new ArrayList<>(
			SpringFactoriesLoader.loadFactoryNames(getSpringFactoriesLoaderFactoryClass(), getBeanClassLoader()));
	ImportCandidates.load(AutoConfiguration.class, getBeanClassLoader()).forEach(configurations::add);
	Assert.notEmpty(configurations,
			"No auto configuration classes found in META-INF/spring.factories nor in META-INF/spring/org.springframework.boot.autoconfigure.AutoConfiguration.imports. If you "
					+ "are using a custom packaging, make sure that file is correct.");
	return configurations;
}
3行的load和4行的import所对应的加载的内容是绿色部分的两个路径:META-INF/spring.factories 和 META-INF/spring/org.springframework.boot.autoconfigure.AutoConfiguration.imports.
(1)loadFactoryNames() :
    public static List<String> loadFactoryNames(Class<?> factoryType, @Nullable ClassLoader classLoader) {
        ClassLoader classLoaderToUse = classLoader;
        if (classLoaderToUse == null) {
            classLoaderToUse = SpringFactoriesLoader.class.getClassLoader();
        }

        String factoryTypeName = factoryType.getName();
        return (List)loadSpringFactories(classLoaderToUse).getOrDefault(factoryTypeName, Collections.emptyList());
    }
loadFactoryNames() 的参数:getSpringFactoriesLoaderFactoryClass()
protected Class<?> getSpringFactoriesLoaderFactoryClass() {
	return EnableAutoConfiguration.class;
}
所以 factoryTypeName 为 EnableAutoConfiguration。
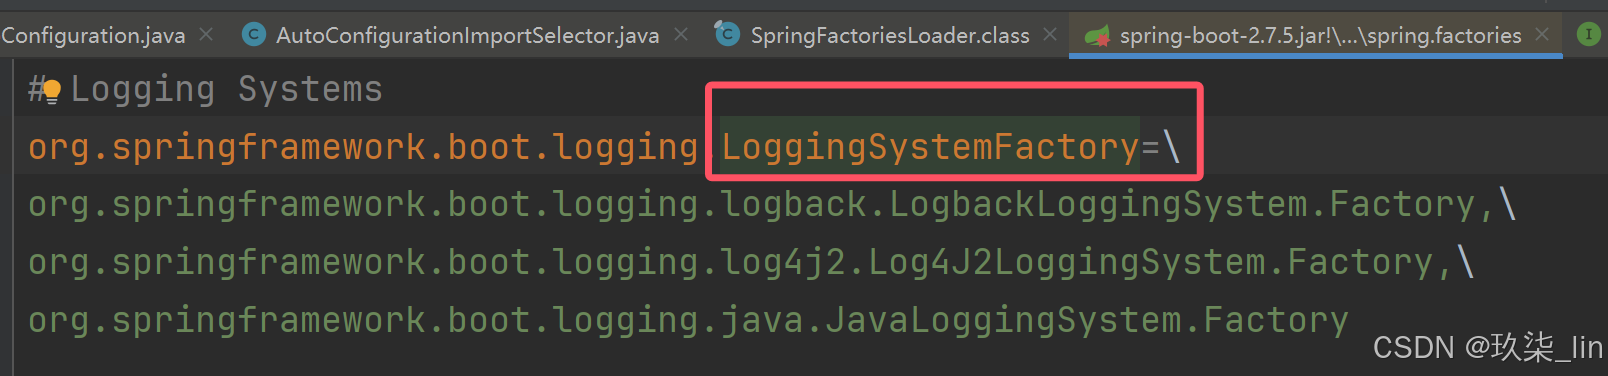
loadSpringFactories(ClassLoader classLoader):将META-INF/spring.factories路径下的所有的配置文件的键值对放到缓存中。key是接口,value是实现类。
private static Map<String, List<String>> loadSpringFactories(ClassLoader classLoader) {
	Map<String, List<String>> result = (Map)cache.get(classLoader);  // 缓存中获得值,默认没有
	if (result != null) {
		return result;
	} else {
		Map<String, List<String>> result = new HashMap();

		try {
			Enumeration<URL> urls = classLoader.getResources("META-INF/spring.factories");

			while(urls.hasMoreElements()) {
				URL url = (URL)urls.nextElement();
				UrlResource resource = new UrlResource(url);   // url:spring-boot-2.7.5.jar!/META-INF/spring.factories
				Properties properties = PropertiesLoaderUtils.loadProperties(resource);
				Iterator var6 = properties.entrySet().iterator();

				while(var6.hasNext()) {
					Map.Entry<?, ?> entry = (Map.Entry)var6.next();
					String factoryTypeName = ((String)entry.getKey()).trim();
					String[] factoryImplementationNames = StringUtils.commaDelimitedListToStringArray((String)entry.getValue());
					String[] var10 = factoryImplementationNames;
					int var11 = factoryImplementationNames.length;
// result 即 spring.factories中的键值对
					for(int var12 = 0; var12 < var11; ++var12) {
						String factoryImplementationName = var10[var12];
						((List)result.computeIfAbsent(factoryTypeName, (key) -> {
							return new ArrayList();
						})).add(factoryImplementationName.trim());
					}
				}
			}


			result.replaceAll((factoryType, implementations) -> {
				return (List)implementations.stream().distinct().collect(Collectors.collectingAndThen(Collectors.toList(), Collections::unmodifiableList));
			});
			cache.put(classLoader, result);
			return result;
		} catch (IOException var14) {
			IOException ex = var14;
			throw new IllegalArgumentException("Unable to load factories from location [META-INF/spring.factories]", ex);
		}
	}
}
"META-INF/spring.factories" :以下factories的格式即上面定义的result(cache)的类型
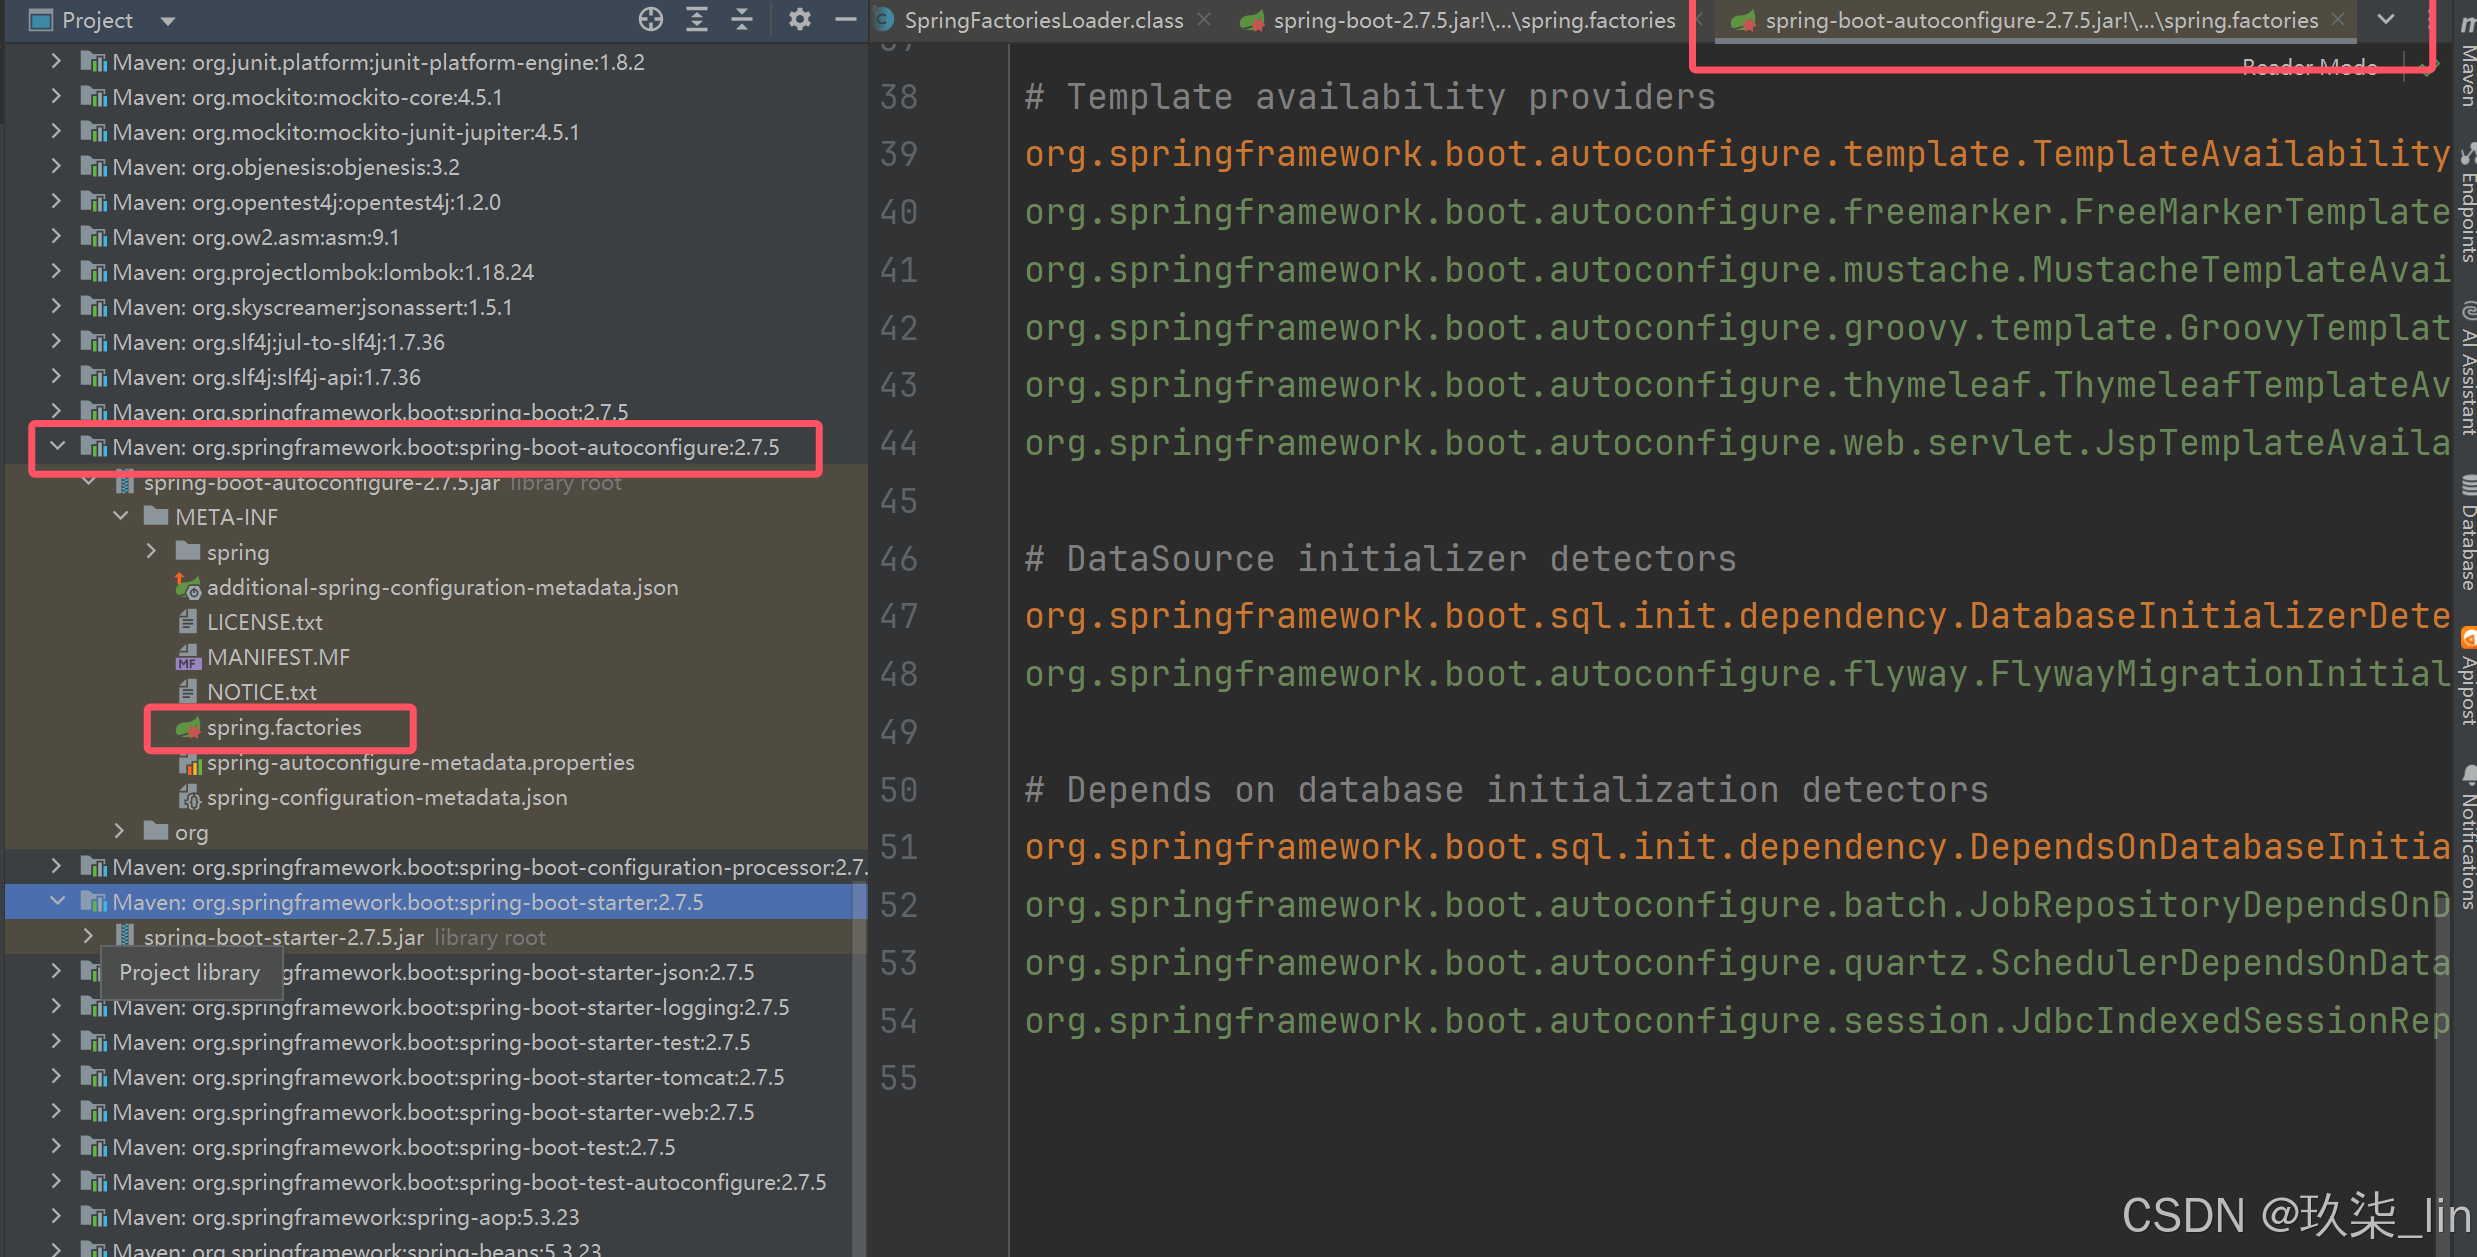
以上的urls指代的三个路径是:
META-INF/spring.factories
Maven/apache-maven-3.8.6/maven-repo/org/springframework/boot/spring-boot-autoconfigure/2.7.5/spring-boot-autoconfigure-2.7.5.jar!/META-INF/spring.factories
Maven/apache-maven-3.8.6/maven-repo/org/springframework/spring-beans/5.3.23/spring-beans-5.3.23.jar!/META-INF/spring.factories
回到AutoConfigurationImportSelector类:
protected List<String> getCandidateConfigurations(AnnotationMetadata metadata, AnnotationAttributes attributes) {
	List<String> configurations = new ArrayList<>(
			SpringFactoriesLoader.loadFactoryNames(getSpringFactoriesLoaderFactoryClass(), getBeanClassLoader()));
	ImportCandidates.load(AutoConfiguration.class, getBeanClassLoader()).forEach(configurations::add);
	Assert.notEmpty(configurations,
			"No auto configuration classes found in META-INF/spring.factories nor in META-INF/spring/org.springframework.boot.autoconfigure.AutoConfiguration.imports. If you "
					+ "are using a custom packaging, make sure that file is correct.");
	return configurations;
}
configurations为空,原因:SpringFactoriesLoader.loadFactoryNames加载出来的键值对列表中需要返回factoryTypeName 为 EnableAutoConfiguration类型的键值对,没有该键值对则configurations为空。
(2)ImportCandidates.load方法:从META-INF/spring/%s.imports里面加载信息放到configurations中。
    public static ImportCandidates load(Class<?> annotation, ClassLoader classLoader) {
        Assert.notNull(annotation, "'annotation' must not be null");
        ClassLoader classLoaderToUse = decideClassloader(classLoader);
        String location = String.format("META-INF/spring/%s.imports", annotation.getName());
        Enumeration<URL> urls = findUrlsInClasspath(classLoaderToUse, location);
        List<String> autoConfigurations = new ArrayList();

        while(urls.hasMoreElements()) {
            URL url = (URL)urls.nextElement();
            autoConfigurations.addAll(readAutoConfigurations(url));
        }

        return new ImportCandidates(autoConfigurations);
    }
所以进行加载操作的加载路径包括:META-INF/spring.factories 和 META-INF/spring/%s.imports
META-INF/spring.factories包括:

findUrlsInClasspath(ClassLoader classLoader, String location) 进行加载:
    private static Enumeration<URL> findUrlsInClasspath(ClassLoader classLoader, String location) {
        try {
            return classLoader.getResources(location);
        } catch (IOException var3) {
            IOException ex = var3;
            throw new IllegalArgumentException("Failed to load autoconfigurations from location [" + location + "]", ex);
        }
    }
把加载的内容放入 autoConfigurations 中,然后再添加到add中:
	protected List<String> getCandidateConfigurations(AnnotationMetadata metadata, AnnotationAttributes attributes) {
		List<String> configurations = new ArrayList<>(
				SpringFactoriesLoader.loadFactoryNames(getSpringFactoriesLoaderFactoryClass(), getBeanClassLoader()));
		ImportCandidates.load(AutoConfiguration.class, getBeanClassLoader()).forEach(configurations::add);
		Assert.notEmpty(configurations,
				"No auto configuration classes found in META-INF/spring.factories nor in META-INF/spring/org.springframework.boot.autoconfigure.AutoConfiguration.imports. If you "
						+ "are using a custom packaging, make sure that file is correct.");
		return configurations;
	}
此时的configurations是全部的AutoConfiguration.
以上步骤说明了从两个路径(META-INF/spring.factories 和 META-INF/spring/%s.imports)去加载spring启动时候需要的一些类,最终加载出了144个AutoConfiguration。
@SpringBootApplication主要做了一下内容:
- ① 负责配置
- ② 负责包扫描
- ③ 负责从默认包扫描路径下以及selector的两个路径下(META-INF/spring.factories 和 META-INF/spring/%s.imports)加载配置,第一个路径
特性10:按需开启自动配置项特征介绍:
如上所述,虽然加载了spring.factories配置文件中所有配置的类,但是,并不是全部都加载到IOC中,而是采用按需加载(即:@ConditionOnXXX)的方式进行加载。这种方式可以归纳为:
- ① 容错兼容:DispatcherServletAutoConfiguration.multipartResolver(…)
- ② 用户配置优先:WebMvcAutoConfiguration.defaultViewResolver()
- ③ 外部配置项修改组件行为:WebMvcAutoConfiguration.defaultViewResolver()
- ④ 查看自动配置情况:debug=true (在application.yml中配置,在启动的时候可以看到配置情况)
容错兼容:
@Bean
@ConditionalOnBean(MultipartResolver.class)
@ConditionalOnMissingBean(name = DispatcherServlet.MULTIPART_RESOLVER_BEAN_NAME)
public MultipartResolver multipartResolver(MultipartResolver resolver) {
	// Detect if the user has created a MultipartResolver but named it incorrectly
	return resolver;
}
public static final String MULTIPART_RESOLVER_BEAN_NAME = "multipartResolver";存在MultipartResolver的bean,但是名字不叫multipartResolver的情况下创建multipartResolver 的 bean
以上用法主要是为了改名字:用户创建了resolver但是名字起错了,以上方法将用户创建的resolver以“multipartResolver”为名字返回
用户配置优先、外部配置项修改组件行为:
@Bean
@ConditionalOnMissingBean
public InternalResourceViewResolver defaultViewResolver() {
	InternalResourceViewResolver resolver = new InternalResourceViewResolver();
	resolver.setPrefix(this.mvcProperties.getView().getPrefix());
	resolver.setSuffix(this.mvcProperties.getView().getSuffix());
	return resolver;
}
用户创建了的话,用用户创建的,用户没有创建的话,spring帮忙创建。
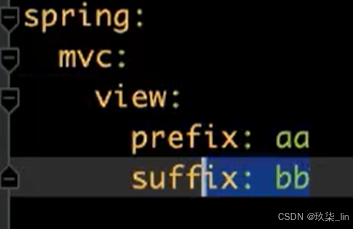
外部配置项修改组件行为:找到配置项的路径,在yaml中重新给赋值(如下图),直接就在以上resolver.setPrefix()中生效了。
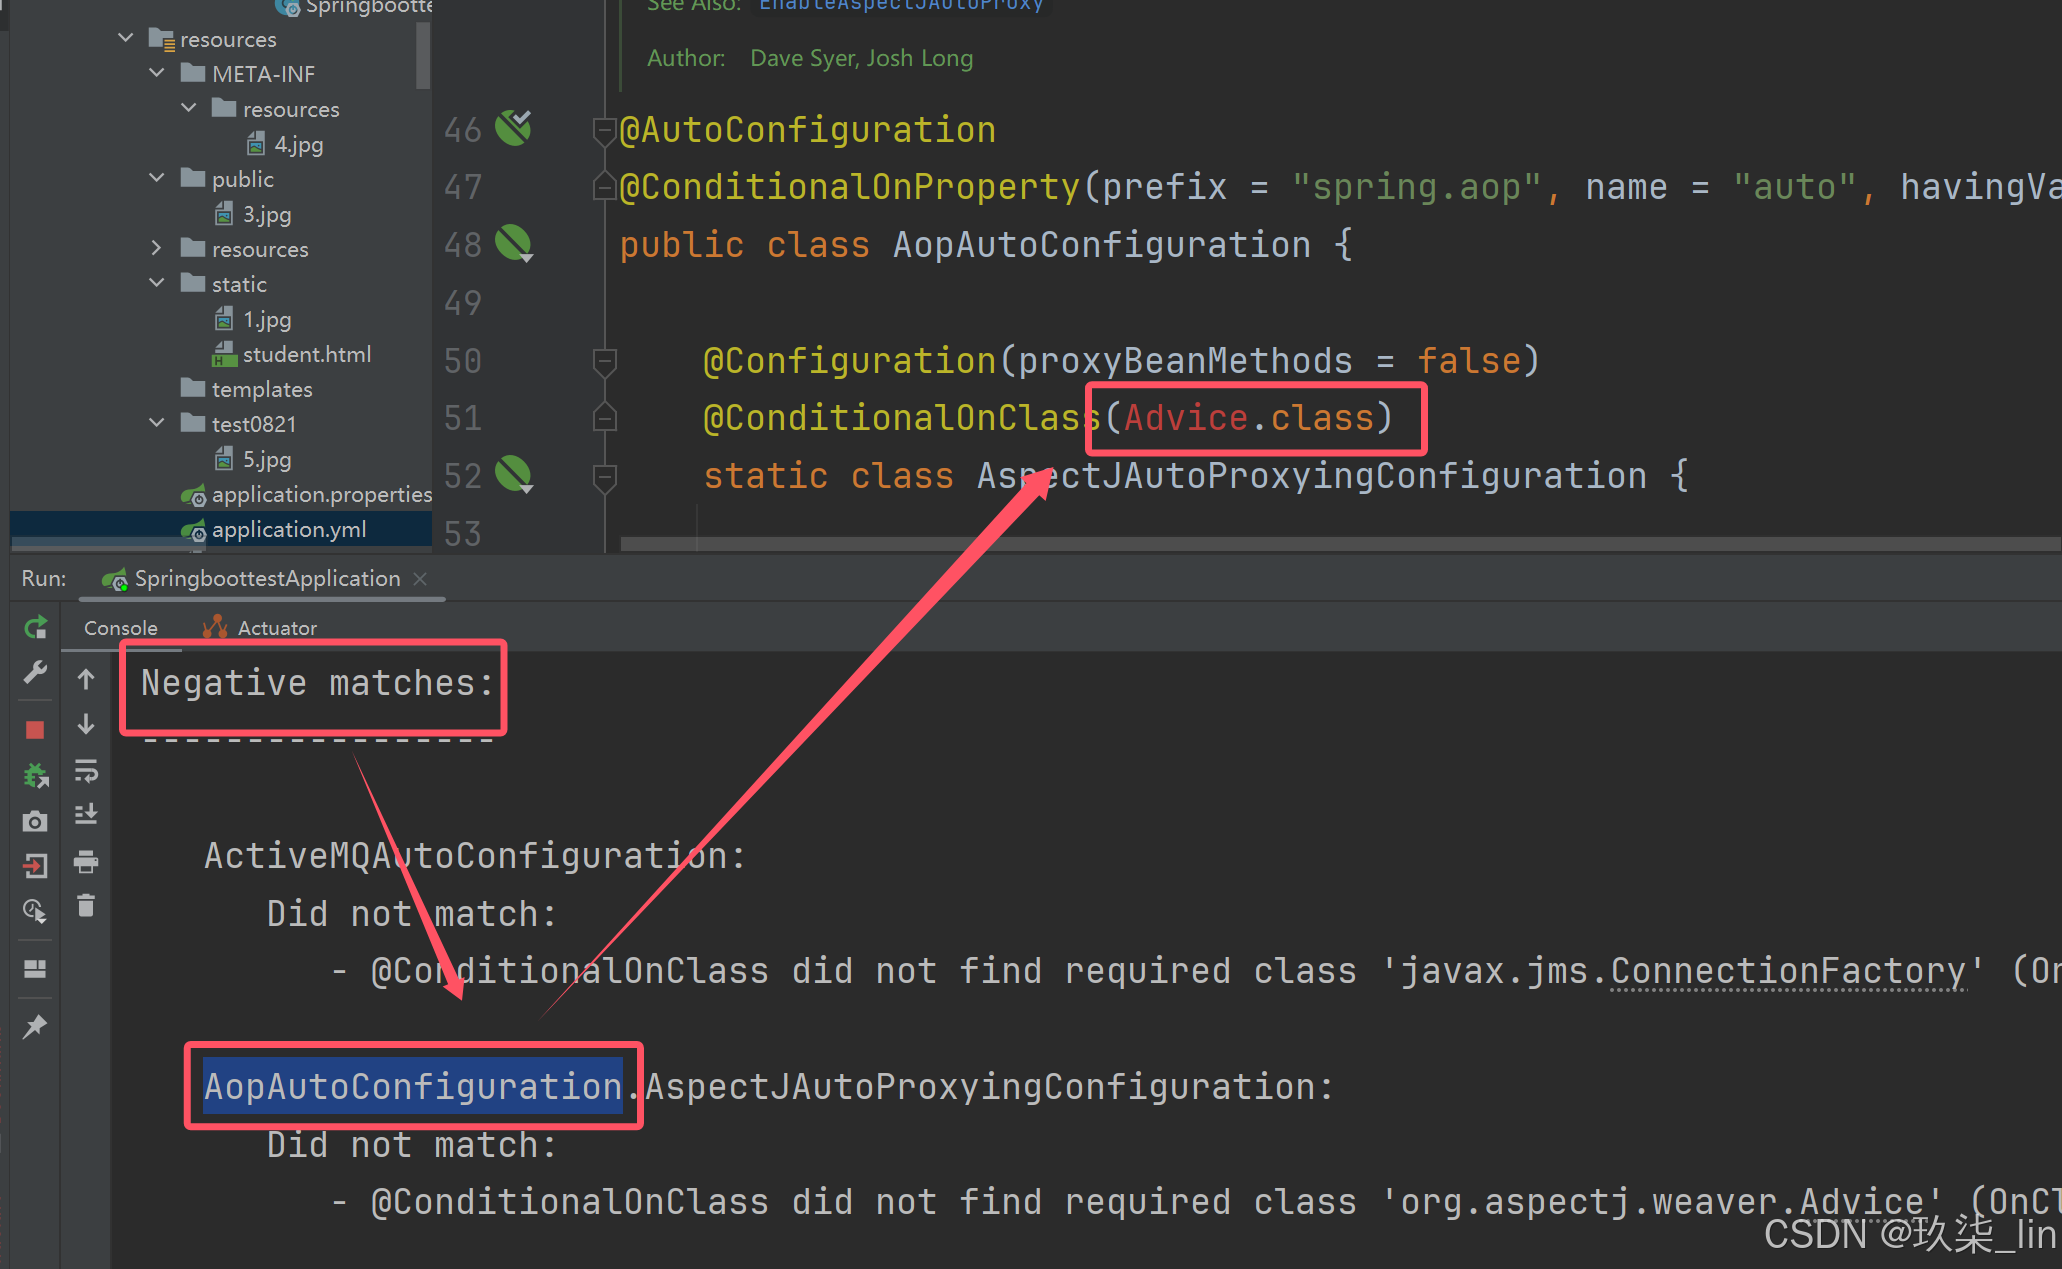
查看自动配置
:yaml中配置debug=true之后重新启动,会看到有些自动配置没有匹配到,因为这个配置类中在按条件创建bean的时候缺少类
SpringBoot Web:
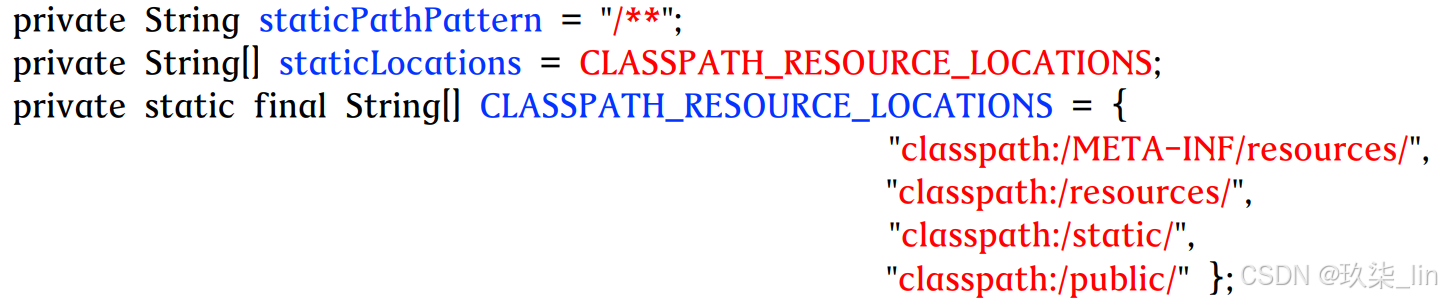
静态资源访问:
请求进来,先看Controller能不能处理,如果不能处理,尝试去寻找静态资源。可以通过【当前项目根路径+静态资源名】即:http://localhost:8080/kangxi.jpg的方式,访问静态资源
默认情况下,springboot server的静态资源在以下路径可以被直接请求到:
/static
/public
/resources
/META-INF.resources
如果想放到自己创建的目录下,且能够被识别到,需要在application.yml中进行配置:
spring:
  web:
    resources:
      static-locations: [classpath:/test0821/]
其中【test0821】是自己在resources下创建的目录。
另一种配置:
spring:
  mvc:
static-path-pattern: "/resources/**"此种配置时的访问路径:http://localhost:8080/resources/3.jpg
相关源码在WebMvcAutoConfiguration.addResourceHandlers(...)方法中
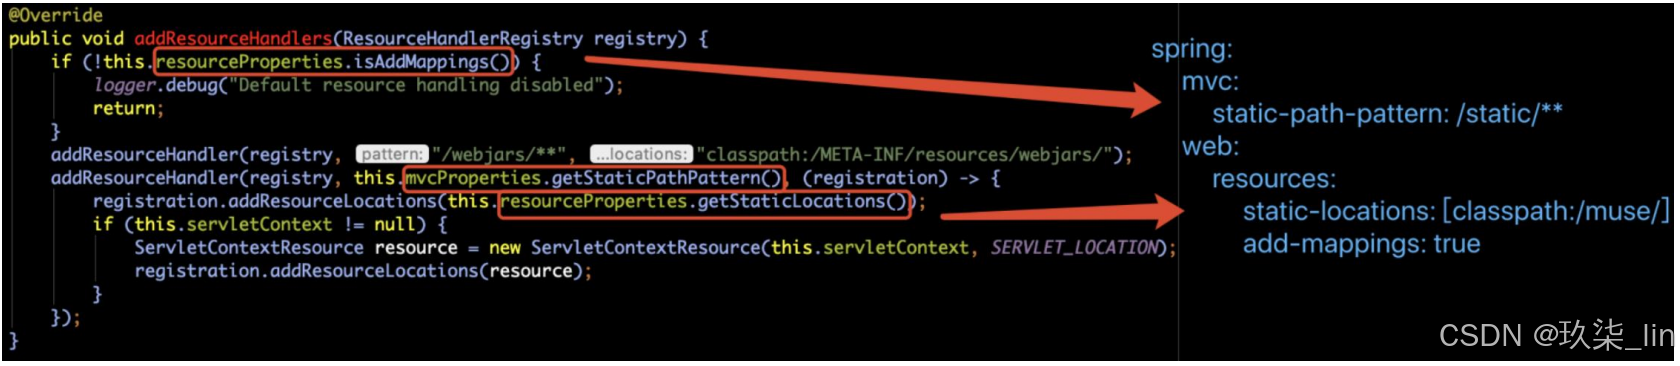
isAddMapping()默认为true,所以如果在yaml中不配置add-mapping的话,会继续往下走,获取静态资源目录,如果配置了为false,即为将静态资源禁止了,会直接返回,去读取自己配置的路径。
Rest风格请求映射:
请求路径:采用@RequestMapping 或 @XxxMapping
Rest风格支持(使用HTTP请求方式动词啦表示对资源的操作)

举例:
在 /static /public /resources 任一路径下创建html页面:
<!DOCTYPE html>
<html lang="en">
<head>
    <meta charset="UTF-8">
    <title>Title</title>
</head>
<body>
get方法测试:
<form action="/student" method="get">
    <input value="提交" type="submit">
</form>
post方法测试:
<form action="/student" method="post">
    <input value="提交" type="submit">
</form>

delete方法测试:
<form action="/student" method="delete">
    <input value="提交" type="submit">
</form>
put方法测试:
<form action="/student" method="put">
    <input value="提交" type="submit">
</form>

</body>
</html>
controller类:
@RestController
public class StudentController {
    @GetMapping("/student")
    public String getStudent(){
        return "getStudent";
    }
    @PostMapping("/student")
    public String postStudent(){
        return "postStudent";
    }
    @DeleteMapping("/student")
    public String deleteStudent(){
        return "deleteStudent";
    }
    @PutMapping("/student")
    public String putStudent(){
        return "putStudent";
    }
}网页端请求:http://localhost:8080/student.html

此时只有get和post能够请求到,delete和put请求到的都是get方法。
解决此问题:
携带_method的表单提交,application.yml中开启hiddenMethod过滤:
spring:
  mvc:
    hiddenmethod:
      filter:
        enabled: true
修改前端请求代码:
delete方法测试:
<form action="/student" method="post">
    <input name="_method" type="hidden" value="DELETE">
    <input value="提交" type="submit">
</form>
put方法测试:
<form action="/student" method="post">
    <input name="_method" type="hidden" value="PUT">
    <input value="提交" type="submit">
</form>
按住Ctrl点击 spring.mvc.hiddenmethod.filter.enabled: true 进入:
{
      "name": "spring.mvc.hiddenmethod.filter.enabled",
      "type": "java.lang.Boolean",
      "description": "Whether to enable Spring's HiddenHttpMethodFilter.",
      "defaultValue": false
    },
搜索 spring.mvc.hiddenmethod.filter 进入 WebMvcAutoConfiguration 类,并定位到以下方法:
	@Bean
	@ConditionalOnMissingBean(HiddenHttpMethodFilter.class)
	@ConditionalOnProperty(prefix = "spring.mvc.hiddenmethod.filter", name = "enabled")
	public OrderedHiddenHttpMethodFilter hiddenHttpMethodFilter() {
		return new OrderedHiddenHttpMethodFilter();
	}
进入 OrderedHiddenHttpMethodFilter 方法中:
public class OrderedHiddenHttpMethodFilter extends HiddenHttpMethodFilter implements OrderedFilter {
    public static final int DEFAULT_ORDER = -10000;
    private int order = -10000;

    public OrderedHiddenHttpMethodFilter() {
    }

    public int getOrder() {
        return this.order;
    }

    public void setOrder(int order) {
        this.order = order;
    }
}
进入起主要作用的类 HiddenHttpMethodFilter :
protected void doFilterInternal(HttpServletRequest request, HttpServletResponse response, FilterChain filterChain) throws ServletException, IOException {
	HttpServletRequest requestToUse = request;
	if ("POST".equals(request.getMethod()) && request.getAttribute("javax.servlet.error.exception") == null) {
		String paramValue = request.getParameter(this.methodParam);
		if (StringUtils.hasLength(paramValue)) {
			String method = paramValue.toUpperCase(Locale.ENGLISH);
			if (ALLOWED_METHODS.contains(method)) {
				requestToUse = new HttpMethodRequestWrapper(request, method);
			}
		}
	}
	filterChain.doFilter((ServletRequest)requestToUse, response);
}
可以看到当请求方法是post时,获得请求的参数value(delete或put),如果参数不为空,把参数转换成大写,然后进行请求。
提供自定义入参的converter实现:
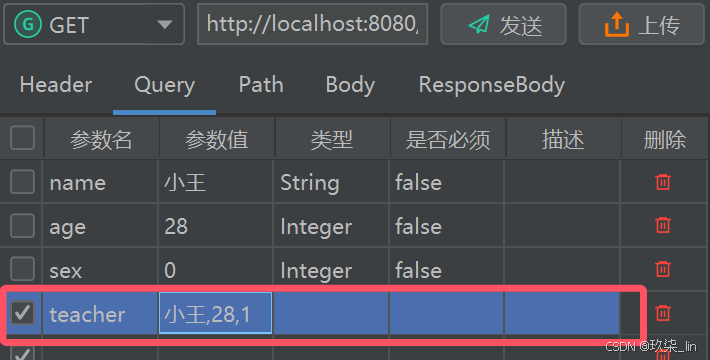
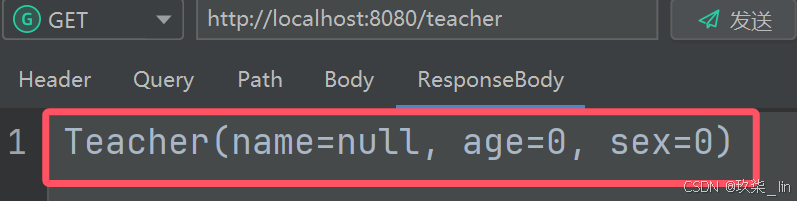
示例:
@GetMapping("teacher")
public String getTeacher(Teacher teacher){
	return teacher.toString();
}
请求时:
返回值:
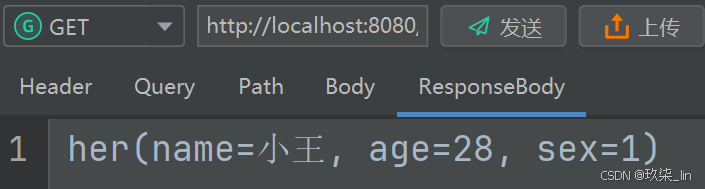
想要得到正确的返回结果,需要在配置类里写,并标注为@Bean
@Bean
public WebMvcConfigurer webMvcConfigurer() {
	return new WebMvcConfigurer() {
		@Override
		public void addFormatters(FormatterRegistry registry) {
			registry.addConverter(new Converter<String, Teacher>() {
				  @Override
				  public Teacher convert(String s) {
					  String[] args = s.split(",");
					  Teacher teacher = new Teacher();
					  teacher.setAge(Integer.parseInt(args[1]));
					  teacher.setName(args[0]);
					  teacher.setSex(Integer.parseInt(args[2]));
					  return teacher;
				  }
			});
		}
	};
}
返回结果:
SpringApplication启动流程图:
由 SpringApplication.run(SpringboottestApplication.class, args); 进入run方法,
public static ConfigurableApplicationContext run(Class<?>[] primarySources, String[] args) {
	return (new SpringApplication(primarySources)).run(args);
}
两条路: new SpringApplication(primarySources) 和 .run(args)
① new SpringApplication(primarySources):
primarySource为主启动类。
new SpringApplication时:
public SpringApplication(Class<?>... primarySources) {
	this((ResourceLoader)null, primarySources);
}
Ctrl点“this”:resourceLoader为空
public SpringApplication(ResourceLoader resourceLoader, Class<?>... primarySources) {
	this.sources = new LinkedHashSet();
	this.bannerMode = Mode.CONSOLE;
	this.logStartupInfo = true;
	this.addCommandLineProperties = true;
	this.addConversionService = true;
	this.headless = true;
	this.registerShutdownHook = true;
	this.additionalProfiles = Collections.emptySet();
	this.isCustomEnvironment = false;
	this.lazyInitialization = false;
	this.applicationContextFactory = ApplicationContextFactory.DEFAULT;
	this.applicationStartup = ApplicationStartup.DEFAULT;
	this.resourceLoader = resourceLoader;
	Assert.notNull(primarySources, "PrimarySources must not be null");
	this.primarySources = new LinkedHashSet(Arrays.asList(primarySources));
	// 确定走servlet技术栈
	this.webApplicationType = WebApplicationType.deduceFromClasspath();
	this.bootstrapRegistryInitializers = new ArrayList(this.getSpringFactoriesInstances(BootstrapRegistryInitializer.class));
	this.setInitializers(this.getSpringFactoriesInstances(ApplicationContextInitializer.class));
	this.setListeners(this.getSpringFactoriesInstances(ApplicationListener.class));
	this.mainApplicationClass = this.deduceMainApplicationClass();
}
resourceLoader为空,deduceFromClasspath()方法:主要是确定使用哪套技术栈
static WebApplicationType deduceFromClasspath() {
if (ClassUtils.isPresent("org.springframework.web.reactive.DispatcherHandler", (ClassLoader)null) && !ClassUtils.isPresent("org.springframework.web.servlet.DispatcherServlet", (ClassLoader)null) && !ClassUtils.isPresent("org.glassfish.jersey.servlet.ServletContainer", (ClassLoader)null)) {
return REACTIVE;
} else {
String[] var0 = SERVLET_INDICATOR_CLASSES;
int var1 = var0.length;
for(int var2 = 0; var2 < var1; ++var2) {
String className = var0[var2];
if (!ClassUtils.isPresent(className, (ClassLoader)null)) {
return NONE;
}
}
return SERVLET;
}
}
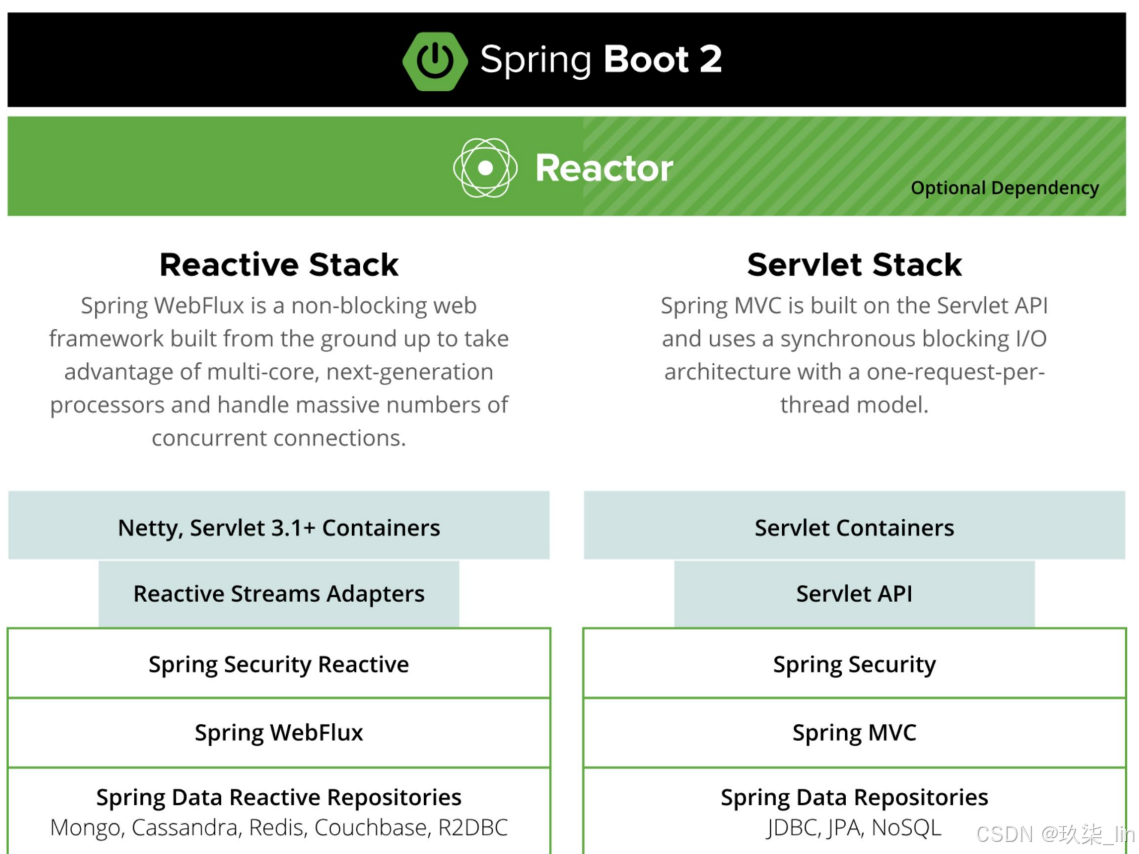
}以上代码的作用:在springboot的两套技术栈(reactive和servlet)选择其一:
其中 SERVLET_INDICATOR_CLASSES 包含以下两个类:
private static final String[] SERVLET_INDICATOR_CLASSES
= new String[]{"javax.servlet.Servlet",
"org.springframework.web.context.ConfigurableWebApplicationContext"};
当这两个类都存在(一定都存在),返回SERVLET。
SpringApplication中最重要的方法:

getSpringFactoriesInstances():
private <T> Collection<T> getSpringFactoriesInstances(Class<T> type, Class<?>[] parameterTypes, Object... args) {
	ClassLoader classLoader = this.getClassLoader();
	Set<String> names = new LinkedHashSet(SpringFactoriesLoader.loadFactoryNames(type, classLoader));
	List<T> instances = this.createSpringFactoriesInstances(type, parameterTypes, classLoader, args, names);
	AnnotationAwareOrderComparator.sort(instances);
	return instances;
}
(1)loadFactoryNames(type, classLoader):获得META-INF/spring.factories中的配置项名叫BootstrapRegistryInitializer的配置
public static List<String> loadFactoryNames(Class<?> factoryType, @Nullable ClassLoader classLoader) {
	ClassLoader classLoaderToUse = classLoader;
	if (classLoaderToUse == null) {
		classLoaderToUse = SpringFactoriesLoader.class.getClassLoader();
	}

	String factoryTypeName = factoryType.getName();
	return (List)loadSpringFactories(classLoaderToUse).getOrDefault(factoryTypeName, Collections.emptyList());
}
loadSpringFactories(classLoaderToUse) :
private static Map<String, List<String>> loadSpringFactories(ClassLoader classLoader) {
	Map<String, List<String>> result = (Map)cache.get(classLoader);
	if (result != null) {
		return result;
	} else {
		Map<String, List<String>> result = new HashMap();

		try {
			Enumeration<URL> urls = classLoader.getResources("META-INF/spring.factories");

			while(urls.hasMoreElements()) {
				URL url = (URL)urls.nextElement();
				UrlResource resource = new UrlResource(url);
				Properties properties = PropertiesLoaderUtils.loadProperties(resource);
				Iterator var6 = properties.entrySet().iterator();

				while(var6.hasNext()) {
					Map.Entry<?, ?> entry = (Map.Entry)var6.next();
					String factoryTypeName = ((String)entry.getKey()).trim();
					String[] factoryImplementationNames = StringUtils.commaDelimitedListToStringArray((String)entry.getValue());
					String[] var10 = factoryImplementationNames;
					int var11 = factoryImplementationNames.length;

					for(int var12 = 0; var12 < var11; ++var12) {
						String factoryImplementationName = var10[var12];
						((List)result.computeIfAbsent(factoryTypeName, (key) -> {
							return new ArrayList();
						})).add(factoryImplementationName.trim());
					}
				}
			}

			result.replaceAll((factoryType, implementations) -> {
				return (List)implementations.stream().distinct().collect(Collectors.collectingAndThen(Collectors.toList(), Collections::unmodifiableList));
			});
			cache.put(classLoader, result);
			return result;
		} catch (IOException var14) {
			IOException ex = var14;
			throw new IllegalArgumentException("Unable to load factories from location [META-INF/spring.factories]", ex);
		}
	}
}
返回:接口名对应的实现名列表的map
(2)createSpringFactoriesInstances(type, parameterTypes, classLoader, args, names) :根据上面获得的接口names创建对象。
private <T> List<T> createSpringFactoriesInstances(Class<T> type, Class<?>[] parameterTypes, ClassLoader classLoader, Object[] args, Set<String> names) {
	List<T> instances = new ArrayList(names.size());
	Iterator var7 = names.iterator();

	while(var7.hasNext()) {
		String name = (String)var7.next();

		try {
			Class<?> instanceClass = ClassUtils.forName(name, classLoader);
			Assert.isAssignable(type, instanceClass);
			Constructor<?> constructor = instanceClass.getDeclaredConstructor(parameterTypes);
			T instance = BeanUtils.instantiateClass(constructor, args);
			instances.add(instance);
		} catch (Throwable var12) {
			Throwable ex = var12;
			throw new IllegalArgumentException("Cannot instantiate " + type + " : " + name, ex);
		}
	}

	return instances;
}
new 对象时的三个步骤:
① 找到对应的类
② 调用构造函数
③ 创建对象
反射:找class 、 找constructure、new Instance()
this.deduceMainApplicationClass() : 找启动类的main方法
    private Class<?> deduceMainApplicationClass() {
        try {
            StackTraceElement[] stackTrace = (new RuntimeException()).getStackTrace();
            StackTraceElement[] var2 = stackTrace;
            int var3 = stackTrace.length;

            for(int var4 = 0; var4 < var3; ++var4) {
                StackTraceElement stackTraceElement = var2[var4];
                if ("main".equals(stackTraceElement.getMethodName())) {
                    return Class.forName(stackTraceElement.getClassName());
                }
            }
        } catch (ClassNotFoundException var6) {
        }

        return null;
    }
综上:this.SpringApplication(ResourceLoader resourceLoader, Class<?>... primarySources) 方法的作用是:加载入参的值,给启动类赋值,把springFactories相关的配置字符串转成实例
② run():
public ConfigurableApplicationContext run(String... args) {
	long startTime = System.nanoTime();
	DefaultBootstrapContext bootstrapContext = this.createBootstrapContext();
	ConfigurableApplicationContext context = null;
	this.configureHeadlessProperty();
	SpringApplicationRunListeners listeners = this.getRunListeners(args);
	listeners.starting(bootstrapContext, this.mainApplicationClass);

	Throwable ex;
	try {
		ApplicationArguments applicationArguments = new DefaultApplicationArguments(args);
		ConfigurableEnvironment environment = this.prepareEnvironment(listeners, bootstrapContext, applicationArguments);
		this.configureIgnoreBeanInfo(environment);
		Banner printedBanner = this.printBanner(environment);  // springboot启动的banner
		context = this.createApplicationContext();
		context.setApplicationStartup(this.applicationStartup);
		this.prepareContext(bootstrapContext, context, environment, listeners, applicationArguments, printedBanner);
		this.refreshContext(context);  // 初始化IOC的整个生命周期
		this.afterRefresh(context, applicationArguments);
		Duration timeTakenToStartup = Duration.ofNanos(System.nanoTime() - startTime);
		if (this.logStartupInfo) {
			(new StartupInfoLogger(this.mainApplicationClass)).logStarted(this.getApplicationLog(), timeTakenToStartup);
		}

		listeners.started(context, timeTakenToStartup);
		this.callRunners(context, applicationArguments);
	} catch (Throwable var12) {
		ex = var12;
		this.handleRunFailure(context, ex, listeners);
		throw new IllegalStateException(ex);
	}

	try {
		Duration timeTakenToReady = Duration.ofNanos(System.nanoTime() - startTime);
		listeners.ready(context, timeTakenToReady);
		return context;
	} catch (Throwable var11) {
		ex = var11;
		this.handleRunFailure(context, ex, (SpringApplicationRunListeners)null);
		throw new IllegalStateException(ex);
	}
}
refreshContext最终追踪到AbstractApplicationContext.class类的 refresh() 方法(一个属于spring的方法,springboot就是对spring加了个壳):初始化生命周期
    public void refresh() throws BeansException, IllegalStateException {
        synchronized(this.startupShutdownMonitor) {
            StartupStep contextRefresh = this.applicationStartup.start("spring.context.refresh");
            this.prepareRefresh();
            ConfigurableListableBeanFactory beanFactory = this.obtainFreshBeanFactory();
            this.prepareBeanFactory(beanFactory);

            try {
                this.postProcessBeanFactory(beanFactory);
                StartupStep beanPostProcess = this.applicationStartup.start("spring.context.beans.post-process");
                this.invokeBeanFactoryPostProcessors(beanFactory);
                this.registerBeanPostProcessors(beanFactory);
                beanPostProcess.end();
                this.initMessageSource();
                this.initApplicationEventMulticaster();
                this.onRefresh();
                this.registerListeners();
                this.finishBeanFactoryInitialization(beanFactory);
                this.finishRefresh();
            } catch (BeansException var10) {
                BeansException ex = var10;
                if (this.logger.isWarnEnabled()) {
                    this.logger.warn("Exception encountered during context initialization - cancelling refresh attempt: " + ex);
                }

                this.destroyBeans();
                this.cancelRefresh(ex);
                throw ex;
            } finally {
                this.resetCommonCaches();
                contextRefresh.end();
            }

        }
    }


 被折叠的 条评论
为什么被折叠?
被折叠的 条评论
为什么被折叠?
 到【灌水乐园】发言


