


 本文详细介绍了Vue.js的基本指令,包括数据绑定{{}}, v-model, v-html/v-text, v-bind, v-show/v-if, v-for, v-on及其事件修饰符,以及如何处理本地图片和静态资源。讲解了数据绑定、条件语句、事件处理和组件的使用方法,是学习Vue语法的良好参考。"
113102659,8744887,R语言多元线性回归:变量选择与诊断,"['r语言', '统计分析', '回归模型', '数据诊断']
本文详细介绍了Vue.js的基本指令,包括数据绑定{{}}, v-model, v-html/v-text, v-bind, v-show/v-if, v-for, v-on及其事件修饰符,以及如何处理本地图片和静态资源。讲解了数据绑定、条件语句、事件处理和组件的使用方法,是学习Vue语法的良好参考。"
113102659,8744887,R语言多元线性回归:变量选择与诊断,"['r语言', '统计分析', '回归模型', '数据诊断']
文章目录
一.目录及几个主要文件说明
目录结构:
build文件:打包之后的项目文件
config:配置目录(包括端口之类)
node_modules:依赖包文件
src:开发目录文件【开发只使用这个】 包括:
- assets:放置一些图片(如logo)
- components:放置组件文件。可以不用
- App.vue:项目入口文件(可以将组件直接写在这里,而不使用components目录)
(整个项目的主模板,通过webpack打包后会把整个文件放到index.html中,生成到id="app"中)- main.js:项目的核心文件。整个项目加载从这里开始
static:静态资源目录文件(本地图片,字体,css等 非服务端)
test:初始测试目录,可删除
index.html:首页入口文件(可以加一些meta信息或代码统计之类)
package.json:项目配置文件
README.md:说明文档
webpack.config.js:webpack配置文件
1.创建项目(简化版)
vue init webpack-simple name
2.安装依赖
cnpm install
3.index.html
<!DOCTYPE html>
<html lang="en">
  <head>
    <meta charset="utf-8">
    <title>demo-1</title>
  </head>
  <body>
  	//vue框架渲染元素
    <div id="app"></div>
    //APP.vue通过webpack打包后的整个文件  渲染到id="app"中
    <script src="/dist/build.js"></script>
  </body>
</html>
4.清除APP.vue多余内容
它是整个项目的主模板,通过webpack打包后会把整个文件放到index.html中,生成到id="app"中
<template>
  <div id="app">

  </div>
</template>

<script>
//这里暴露出了主模板,
//所以main.js中才可以import App from './App.vue' 引用主模板
export default {
  name: 'app',

}
</script>

<style>

</style>
5.main.js
import Vue from 'vue'  //引入vue整个类对象
import App from './App.vue'  //引入主模板(因为APP.vue中export default暴露出了主模板)

//实例化vue对象
new Vue({
  el: '#app',  //配置关联元素
  render: h => h(App)  //渲染更新界面(回调函数)
})
二.vue语法
vue的开发模式是单组件模式开发 全部是 小的组件 .vue
加粗样式
组件的写法格式
<template></template> (template模板里面只能存在一个子元素div) , <script></script> , <style></style>(只有style可以有多个)
vue基本指令
指令中可以添加运算 ?:
1.数据绑定指令
1.{{}} 数据模板指令 进行数据绑定
【可以进行基本运算 及 js代码】
APP.vue中:
<template>
  <div id="app">
    <div>{{msg}}</div>
  </div>
</template>

<script>
export default {
  name: 'app',
  data(){  //数据声明为函数型 返回对象(数据)
    return{
      msg:"Hello world!"
    }
  }
}
</script>
启动项目 cnpm run dev

2.v-model 表单元素数据绑定
<input type="text" v-model="msg">
(数据双向):

3.v-html & v-text
v-html 元素的html内容绑定指令(解析html)
v-text 元素的文本值指令绑定
<template>
  <div id="app">
    <p>{{txt}}</p>
	<p v-text="txt"></p>
	<p v-html="txt"></p>
  </div>
</template>

<script>
export default {
  name: 'app',
  data(){  //数据声明为函数型 返回对象(数据)
    return{
      txt: "<span>span标签</span>"
    }
  }
}
</script>

指令中也可以进行基本运算 及 js代码
<template>
  <!-- 模板中只能有一个子集div -->
  <div id="app">
   	<div v-html="list.slice(0,1)==0?'你好':'不好'"></div>
  </div>
</template>

<script>
export default {
  name: 'app',
  data(){  //数据声明为函数型 返回对象(数据)
    return{
      list:[0,1],
    }
  }
}
</script>

2.元素属性绑定 v-bind
v-bind 指令进行元素的属性值绑定的
eg: v-bind:title=“msg”;
简写 :title=“msg”
(1)
	<template>
	  <!-- 元素属性绑定以及简写 -->
	  <h3 v-bind:title="title">属性绑定全写</h3>
	  <h3 :title="title">属性绑定简写</h3>
	</template>

	<script>
	export default {
	  name: 'App',
	  data(){
	    return {
	      title: "标题",
	    }
	  }
	}
	</script>

(2)
<template>
    <input type="text" v-model="type">
    <input :type="type">
  </div>
</template>

<script>
export default {
  name: 'app',
  data(){
    return{
      type:'text',
    }
  }
}
</script>


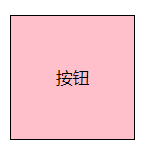
3.元素显示隐藏
v-show 值可能是变量 也可能是表达式
<template>
    <!-- 元素的显示隐藏 -->
    <button v-show="isshow">按钮</button>
  </div>
</template>

<script>
export default {
  name: 'App',
  data(){
    return {
      isshow:false,  //true则显示
    }
  },
}
</script>

此时,再加一个
<input type="text" v-modle="isshow">
发现其为空,在里面输入true后button也不会出现
因为isshow是boolean类型值,而v-modle=“isshow” 是字符串类型值(字符串的false为.length==0)
如果 isshow:“false”,则显示false,而button也存在
和v-if区别:
v-if 为false时,元素会被销毁;
而v-show存在,只是不显示(==display:none)
4.条件语句指令
v-if,v-if-else,v-else
可以使用标签 也可以使用模板
标签:
<template>
  <!-- 模板中只能有一个子集div -->
  <div id="app">
    <div v-if="enterif">进入if</div>    //或:enterif=0
    <div v-else-if="!enterif">变量</div>
    <div v-else>else文本</div>
  </div>
</template>

<script>
export default {
  name: 'app',
  data(){  //数据声明为函数型 返回对象(数据)
    return{
      enterif:false,
    }
  }
}
</script>

模板:
<template>
    <!-- v-if -->
    <template v-if="ifhas">
      <h3>h3标签</h3>
    </template>
    <template v-else-if="ifelse">
      <h2>h2标签</h2>
    </template>
    <template v-else>
      <h1>h1标签</h1>
    </template>
  </div>
</template>

<script>
export default {
  name: 'App',
  data(){
    return {
      ifhas: false,
      ifelse:true,
    }
  },
}
</script>
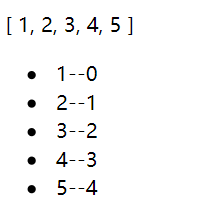
5.集合绑定 v-for
数组(集合)渲染
v-for 指令 循环谁给谁添加指令
当前元素上需要绑定唯一key:key="index"
<template>
  <div id="app">
    <!-- 集合绑定 -->
    <p>{{arr}}</p>
    <ul>
      <li v-for="(item,index) in arr" :key="index">
        {{item+"--"+index}}
      </li>
    </ul>
  </div>
</template>

<script>
export default {
  name: 'App',
  data(){
    return {
      arr:[1,2,3,4,5],
    }
  },
}
</script>
	stu:[
        {name:"小花",sex:"女"},
        {name:"小花",sex:"女"},
        {name:"小花",sex:"女"},
        {name:"小花",sex:"女"},
      ],

	<ul>
      <li v-for="(item,index) in stu" :key="index">
        {{item}}
      </li>
    </ul>

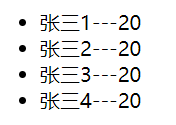
遍历集合类对象:
<template>
   <div>
    <ul>
      <li v-for="(item,index) in result" :key="index">
        <span>{{item.name}}</span>---<span>{{item.age}}</span>
      </li>
    </ul>
  </div>
</template>

<script>
export default {
  name: 'app',
  data(){
    return{
      result:[
        {name:'张三1',age:20,sex:'男'},
        {name:'张三2',age:20,sex:'女'},
        {name:'张三3',age:20,sex:'男'},
        {name:'张三4',age:20,sex:'女'},
      ]
    }
  }
}
</script>
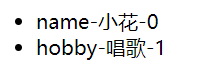
遍历对象:
<template>
   <div>
    <ul>
      <li v-for="(item,key,index) in obj" :key="index">
        {{key}}-{{item}}-{{index}}
      </li>
    </ul>
  </div>
</template>

<script>
export default {
  name: 'app',
  data(){
    return{
      obj:{
        name:'小花',
        hobby:'唱歌'
      },
    }
  }
}
</script>
6.类别绑定 class style
元素的class属性绑定 style绑定
使用的是之前的属性绑定 :class :style
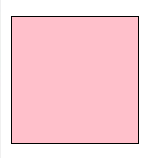
(1)class属性绑定
	<template>
	    <!-- class类名称绑定   对象绑定  集合绑定-->

	    <!-- 写法一 -->
	     <div class="box" :class="{'isbg':isadd}"></div>

		<!-- 写法二 -->
    	 <div :class="{box:true,isbg:isadd}"></div>
	  </div>
	</template>

	<script>
	export default {
	  name: 'app',
	  data(){
	    return{
	      isadd:true,
	    }
	  }
	}
	</script>

	<style>
	.box{
	  width: 100px;
	  height: 100px;
	  border: 1px solid #000;
	}
	.isbg{
	  background-color: pink;
	}
	</style>
写法三:
<template>
  <div>
     <button :class="clist">按钮</button>
  </div>
</template>

<script>
export default {
  name: 'app',
  data(){
    return{
      clist:{
        isbg:true,
        box:true
      }
    }
  }
}
</script>
(2)style绑定
<template>
    <!-- 元素的样式绑定 -->
    <!-- 写法一 -->
    <div :style="{width:w,height:h+'px',border:b}"></div>

    <!-- 写法二 -->
    <div :style="style"></div>
</template>

<script>
export default {
  name: 'App',
  data(){
    return {
      w:"100px",
      h:"100px",
      b:"1px solid #000",
      style:{
        width:"100px",
        height:100,
        border:"1px solid red",
      }
    }
  },
</script>
7.元素的事件绑定 v-on
指令 v-on:type="" 简写@type=""
“”可以绑定事件处理函数,也可以写js代码
<template>
<!-- 元素的事件绑定 -->
<button v-on:click="handle">事件</button>
<!-- 简写 -->
<button @click="handle">事件</button>
</div>
</template>
<script>
export default {
name: 'App',
data(){
return {
msg:'你好',
}
},
methods:{
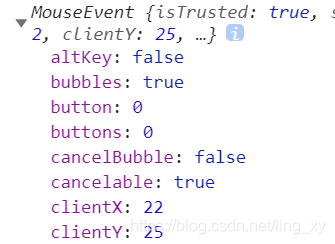
handle(e){
console.log("点我");
console.log(this); //指向当前组件对象 VueComponents对象
console.log(this.style);
//执行事件方法 不带括号 默认参数e
//e.target 和 e.srcElement 都指向当前对象button
console.log(e); //事件执行参数 MouseEvent
//e.type :click
//参数中有相关坐标 x,y pageX pageY clientX clientY
}
},
</script>
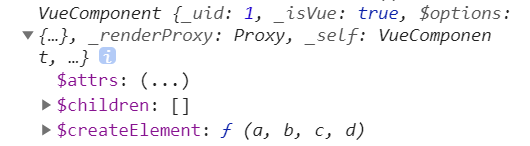
e:
(带$基本都是一些API)
事件里面的this指向谁?
  this  指向的还是当前组件
  3.0 版本之前输出的this指当前组件 vueComponent对象
  3.0版本生成的是Proxy 对象代理对象()等价当前组件

- 事件执行函数传递参数,如果需要事件执行参数
类似参数传递 使用$event传递
<template>
  <div id="app">
    <button @click="sendParams('a',$event)">按钮传递参数</button>
  </div>
</template>

<script>
export default {
  name: 'app',
  data () {
  },
  methods:{
    sendParams(args,e){
      //事件执行 传递参数 可以直接接收
      //事件执行函数传递参数,如果需要事件执行参数
      //类似参数传递 使用$event传递
      console.log(args,e,this);  //a   MouseEvent  VueComponent
    }
  }
}
8.事件访问修饰符
处理事件的常见机制
(1)冒泡
<template>
<div id="app">
<!-- 举例冒泡 -->
<div @click="maopao" class="child">
<button @click="maopao">child子集</button>
</div>
</div>
</template>
<script>
export default {
name: 'App',
data(){
return {
count:0,
};
},
methods:{
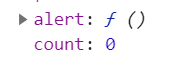
maopao(){
this.count++;
console.log(this.count); //2
},
},
}
</script>
<style>
.child {
width: 200px;
height: 200px;
border: 1px solid #000;
}
</style>
阻止冒泡:.stop
<template>
  <div id="app">
    <div @click="maopao" class="child">
      <button @click.stop="maopao">child子集</button>
    </div>
  </div>
</template>
(2)捕获
捕获修饰符 capture 修改冒泡为捕获
<template>
<div id="app">
<!-- 捕获修饰符 capture 修改冒泡为捕获 -->
<div @click.capture="buhuo(1)" class="child">
<button @click="buhuo(2)">child子集</button>
</div>
</div>
</template>
<script>
export default {
name: 'App',
data(){
return {
count:0,
};
},
methods:{
buhuo(args){
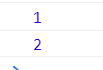
console.log(args);
},
},
}
</script>
<style>
.child {
width: 200px;
height: 200px;
border: 1px solid #000;
}
</style>
(3)阻止事件默认行为
修饰符 .prevent
阻止提交:
<template>
  <!-- vue的相关指令 -->
  <div id="app">
    <!-- 阻止事件默认行为的修饰符 .prevent -->
    <!-- 可以连用 如 @submit.stop.preven -->
    <form @submit.prevent="regest">
      <input type="text" name="name"/>
      <button>注册</button>
    </form>
  </div>
</template>

<script>
export default {
  name: 'App',
  methods:{
    regest(){
      console.log("注册");
    }
  },
}
</script>

(4).self
只有点击自身触发 e.target是自身 才可以
可联想事件委托
<template>
  <!-- vue的相关指令 -->
  <div id="app">
    <!--.self 修饰符  只有点击自身触发  e.target是自身 才可以 -->
    <div @click.self="self" class="child">
      <button @click="self">child子集</button>
    </div>
  </div>
</template>

<script>
export default {
  name: 'App',
  methods:{
    self(){
      console.log("我自己触发");
    },
  },
}
</script>
(5).once
当前事件只能触发一次
<template>
  <!-- vue的相关指令 -->
  <div id="app">
    <!-- once 修饰符  当前事件只能触发一次 -->
    <button @click.once="once">触发一次</button>
  </div>
</template>

<script>
export default {
  name: 'App',
  methods:{
    once(){
      console.log("触发一次");
    }
  },
}
</script>
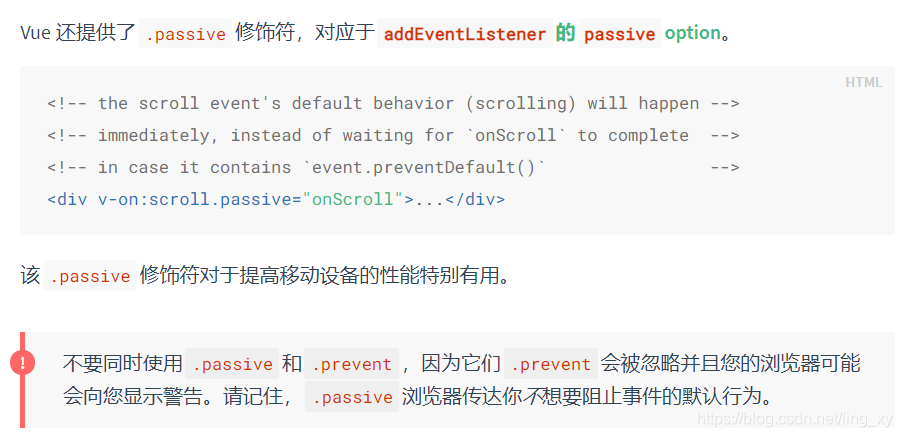
(6).passive
处理scroll事件的类似默认行为(常用于移动端)

<!-- passive修饰符
    告诉编译器我没有组织事件的默认行为 不用再查看了
    看不到效果 但提高了性能
    -->
    <div class="box" @scroll.passive="scrollData">
      <div>{{content}}</div>
    </div>

	<style>
	.box{
	  width: 200px;
	  height: 300px;
	  overflow-y: scroll;
	  overflow-x: hidden;
	}
	</style>
10.键盘修饰符
键盘的修饰符
.enter 回车
.tab
.delete (捕获“删除”和“退格”键)
.esc
.space
.up
.down
.left
.right
系统修饰符
.ctrl
.alt
.shift
	<!--  键盘的修饰符  -->
    <input type="text" @keyup="keyp">
    <!-- .enter  回车 -->
    <input type="text" @keyup.enter="keyp">
    <input type="text" @keyup.13="keyp">
    <input type="text" @keydown.ctrl.shift="clearValue">
    <input type="text" @click.ctrl.enter="keyp">

	keyp(e){
      e.target.blur(e);   //按下指定按键 输入框失焦
      console.log(e.which);   //输出键码 enter:13  空格:32
     }
    //e参数的 which code 都是键的ASCII值

	clearValue(e){
      let ele=e.target;  //使让文本框内容清零
      ele.value="";
    }
	<!-- .exact按键更加精确   alt+shift 单机就不会触发 -->
    <input type="text" @click.alt.exact="keyp" />
	<!-- .left  .right  .middle  鼠标上的键 -->
    <input type="text" @click.right.prevent="keyp" />
    <!-- .prevent 阻止了右键的默认行为 -->
* vue中data为什么是一个函数?
单纯的写成对象形式,就使得所有组件实例共用了一份data,就会造成一个变了全都会变的结果
所以组件中的data写成一个函数,数据以函数返回值形式定义,这样每复用一次组件,就会返回一份新的data,类似于给每个组件实例创建一个私有的数据空间,让各个组件实例维护各自的数据。
从JavaScript原型链角度来解释:
如果data是Object对象类型,Object是引用数据类型,如果不用function返回,每个组件的data都是内存的同一个地址,一个数据改变了其他也改变了。(如果两个实例同时引用一个对象,那么当你修改其中一个属性的时候,另外一个实例也会跟着改)
JavaScript只有函数构成作用域(注意理解作用域,只有函数{}构成作用域,对象的{}以及if(){}都不构成作用域),data是一个函数时,每个组件实例都有自己的作用域,每个实例相互独立,不会相互影响
本地图片地址
1.图片存储在 src/assets 中
App.vue中配置src
<img src="./assets/img/1.jpg" alt="">

2.使用@
先在webpack.config.js中
在resolve里 配置@路径
resolve: {
    alias: {
      'vue$': 'vue/dist/vue.esm.js',
      '@':path.resolve(`${__dirname}/src`)
    },
    extensions: ['*', '.js', '.vue', '.json']
  },
配完后项目一定要重启
然后在App.vue中配置src时,可以直接使用@代替src
<img src="@/assets/img/1.jpg" alt="">
3.static中静态资源
在项目中建立一个静态文件static
在这个文件当中直接取图片 static/target.jpg
<img src="static/2.jpg" alt="">

static中一般存放一些 静态css、图片等
- 图片被鼠标左键拖拽时会出现小图片浮层,阻止这一默认事件:
<img src="static/2.jpg" @mousedown.prevent>


 被折叠的 条评论
为什么被折叠?
被折叠的 条评论
为什么被折叠?
 到【灌水乐园】发言


