


 本文介绍如何使用JVMTI和本地动态库对Java的jar包进行加密,防止代码被反编译,保护软件安全。通过Agent方式在JVM加载时解密类文件,实现对特定包下类的保护。
需求
对某一特定jar包实现加密,使之不能反编译,保护代码安全
JVMTI
JVMTI即JVM工具接口,提供了本地编程接口,主要是提供了调试和分析等接口。JVMTI非常强大,通过它能做很多事,可以监听某些事件,线程分析等等。
那么一般怎么使用JVMTI?一般使用Agent方式来使用,就是通过-agentlib和-agentpath指定Agent的本地库,然后Java启动时就会加载该动态库。这个时刻其实可以看成是JVM启动的时刻,而并非是Java层程序启动时刻,所以此时还不涉及与Java相关的类和对象什么的。
agent动态库被加载后,JVM肯定会指定一个入口函数,该入口函数为:
JNIEXPORT jint JNICALL Agent_OnLoad(JavaVM *vm,char *options,void *reserved)于是在JVM启动前要做的事都可以放到这个函数中,比如设置jvmtiCapabilities,设置关注的事件,设置事件的回调函数等等。其中关键的jvmtiCapabilities,jvmtiEventCallbacks,jvmtiEvent三个结构体如下,根据实际情况设置。
具体实现
- 编写我们的agent动态库,使之在JVM加载时完成一些逻辑,从前面也知道,主要就是在
Agent_OnLoad函数中编写逻辑,先获取jvmtiEnv,在通过它设置jvmtiCapabilities,完成。这里关注的事类文件加载时事件。
JNIEXPORT jint JNICALL Agent_OnLoad(JavaVM *vm,char *options,void *reserved)
{

 jvmtiEnv *jvmti;
 jint ret = vm->GetEnv((void **)&jvmti, JVMTI_VERSION);
 if (JNI_OK != ret)
 {
     printf("ERROR: Unable to access JVMTI!\n");
     return ret;
 }
 jvmtiCapabilities capabilities;
 (void)memset(&capabilities, 0, sizeof(capabilities));

 capabilities.can_generate_all_class_hook_events = 1;
 capabilities.can_tag_objects = 1;
 capabilities.can_generate_object_free_events = 1;
 capabilities.can_get_source_file_name = 1;
 capabilities.can_get_line_numbers = 1;
 capabilities.can_generate_vm_object_alloc_events = 1;

 jvmtiError error = jvmti->AddCapabilities(&capabilities);
 if (JVMTI_ERROR_NONE != error)
 {
     printf("ERROR: Unable to AddCapabilities JVMTI!\n");
     return error;
 }

 jvmtiEventCallbacks callbacks;
 (void)memset(&callbacks, 0, sizeof(callbacks));

 callbacks.ClassFileLoadHook = &ClassDecryptHook;
 error = jvmti->SetEventCallbacks(&callbacks, sizeof(callbacks));
 if (JVMTI_ERROR_NONE != error) {
     printf("ERROR: Unable to SetEventCallbacks JVMTI!\n");
     return error;
 }

 error = jvmti->SetEventNotificationMode(JVMTI_ENABLE, JVMTI_EVENT_CLASS_FILE_LOAD_HOOK, NULL);
 if (JVMTI_ERROR_NONE != error) {
     printf("ERROR: Unable to SetEventNotificationMode JVMTI!\n");
     return error;
 }

 return JNI_OK;
}
2.这里处理逻辑实际上就是判断如果是某包下的类就进行解密,否则不处理。这里所说的函数,即是上面指定的替代函数,它对应于监听的事件,会在对应的事件发生事被调用。
void JNICALL ClassDecryptHook(
 jvmtiEnv *jvmti_env,
 JNIEnv* jni_env,
 jclass class_being_redefined,
 jobject loader,
 const char* name,
 jobject protection_domain,
 jint class_data_len,
 const unsigned char* class_data,
 jint* new_class_data_len,
 unsigned char** new_class_data
 )
{
 *new_class_data_len = class_data_len;
 jvmti_env->Allocate(class_data_len, new_class_data);

 unsigned char* _data = *new_class_data;

 if (name&&strncmp(name, "com/seaboat/", 11) == 0) {
     for (int i = 0; i < class_data_len; i++)
     {
         _data[i] = class_data[i] - 4;
     }
 }
 else {
     for (int i = 0; i < class_data_len; ++i)
     {
         _data[i] = class_data[i];
     }
 }
}
3.额外的写一个加密程序对某个jar包进行加密处理,这里同样用本地库方式,但加密解密动态库不要一起对外发布,还有Java层调用本地库加密的程序也不要对外发布。
java层
public class ByteCodeEncryptor {
  static{
    System.loadLibrary("ByteCodeEncryptor");
  }

  public native static byte[] encrypt(byte[] text);

  public static void(String[] args){
      try {
      ByteArrayOutputStream baos = new ByteArrayOutputStream();
      byte[] buf = new byte[1024];
      File srcFile = new File(fileName);
      File dstFile = new File(fileName.substring(0, fileName.indexOf("."))+"_encrypted.jar");
      FileOutputStream dstFos = new FileOutputStream(dstFile);
      JarOutputStream dstJar = new JarOutputStream(dstFos);
      JarFile srcJar = new JarFile(srcFile);
      for (Enumeration<JarEntry> enumeration = srcJar.entries(); enumeration.hasMoreElements();) {
          JarEntry entry = enumeration.nextElement();
          InputStream is = srcJar.getInputStream(entry);
          int len;
          while ((len = is.read(buf, 0, buf.length)) != -1) {
              baos.write(buf, 0, len);
          }
          byte[] bytes = baos.toByteArray();
          String name = entry.getName();
          if(name.endsWith(".class")){
              try {
                  bytes = ByteCodeEncryptor.encrypt(bytes);
              } catch (Exception e) {
                  e.printStackTrace();
              }
          }
          JarEntry ne = new JarEntry(name);
          dstJar.putNextEntry(ne);
          dstJar.write(bytes);
          baos.reset();
      }
      srcJar.close();
      dstJar.close();
      dstFos.close();
    } catch (Exception e) {
      e.printStackTrace();
    }
  }

}
main函数直接将已打好的jar包加密成*_encrypt.jar
本地库
void encode(char *str)
{
    unsigned int m = strlen(str);
    for (int i = 0; i < m; i++)
    {
        str[i] = str[i]+4;
    }

}

extern"C" JNIEXPORT jbyteArray JNICALL
Java_com_seaboat_bytecode_ByteCodeEncryptor_encrypt(JNIEnv * env, jclass cla,jbyteArray text)
{
    char* dst = (char*)env->GetByteArrayElements(text, 0);
    encode(dst);
    env->SetByteArrayRegion(text, 0, strlen(dst), (jbyte *)dst);
    return text;
}
启动
启动时需要加入启动参数
1)通过agentlib参数启动
java -agentlib:ByteCodeEncryptor -jar Test.jar Test
2)通过agentpath参数启动
java -agentpath:../cpp/ByteCodeEncryptor.dll -jar Test.jar Test
注意事项
1、使用vs2010编译dll文件时需要注意,根据需求生成32位还是64位,![]()
2、项目属性--VC++目录--包含目录C:\Program Files\Java\jdk1.8.0_111\include\win32和C:\Program Files\Java\jdk1.8.0_111\include(jdk所在目录)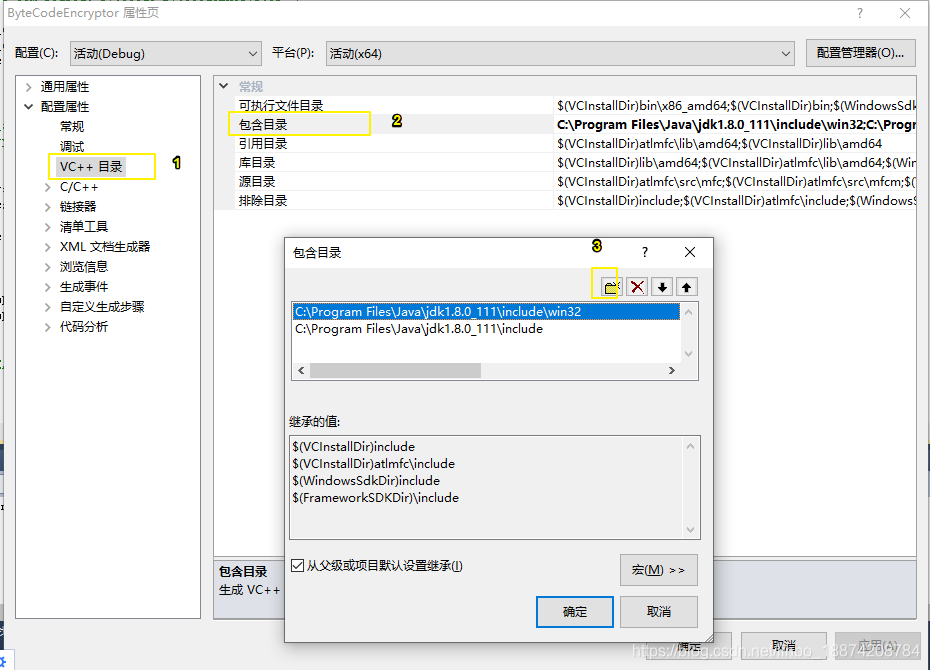
3、生成dll后将dll加入环境变量,或者直接将dll文件copy到 jre/bin 下,然后再本地启动main实现加密
加密后在linux系统运行?
以上是在windows系统运行加密后的jar程序,要想在linux系统上实现此方式加密,需要把cpp文件编译成*.so动态库文件,而不是仅支持windows系统的dll动态库
linux cpp编译.so动态库
1、在linux系统安装g++ ,sudo yum install gcc-c++
2、创建文件夹cpp,copy com_seaboat_bytecode_ByteCodeEncryptor.h和com_seaboat_bytecode_ByteCodeEncryptor.cpp,*.cpp文件加入头文件#include <string.h>
3、linux用g++生成*.so动态库 (g++ -o libByteCodeEncryptor.so -I /usr/local/jdk/jdk1.8.0_102/include/ -I /usr/local/jdk/jdk1.8.0_102/include/linux/ -I /usr/include -D__int64="long long" -shared -fPIC com_seaboat_bytecode_ByteCodeEncryptor.cpp)
参数说明:-I jni头文件目录,-D__int64 类型转换
4、生成后copy到程序lib目录下
5、启动java程序,参数:-agentpath:../cpp/libByteCodeEncryptor.so (agentlib需要添加.so到本地库:sudo vim /etc/ld.so.conf 加入.so所在绝对路径,sudo ldconfig 刷新配置,sudo /sbin/ldconfig -v 查看配置,或export LD_LIBRARY_PATH=/home/aldx1/qisu-ifce-cmpp-0.0.1/lib:$LD_LIBRARY_PATH)
提醒
安全起见,本地库和动态dll、动态so文件不能一并发布
此加密方式适用于任何jar包,spring项目 springboot项目都可行:生成jar包--jar包本地加密--jvm加载jar包前解密
参考链接:https://juejin.im/post/596de75a5188254b5e015767#heading-3
参考链接:https://www.xuebuyuan.com/3264680.html
参考链接:https://jingyan.baidu.com/article/2d5afd6901396985a2e28e04.html
参考链接:https://www.cnblogs.com/codetrend/archive/2013/01/28/2879490.html
反编译工具:http://java-decompiler.github.io/
源码:https://github.com/sea-boat/ByteCodeEncrypt


 1万+
1万+

 被折叠的 条评论
为什么被折叠?
被折叠的 条评论
为什么被折叠?
 到【灌水乐园】发言


