


1 VMware 前期
1.1 VMware 下载&安装
1.2 Ubuntu 系统安装
1.3 VMware-Tool 安装 & 文件共享
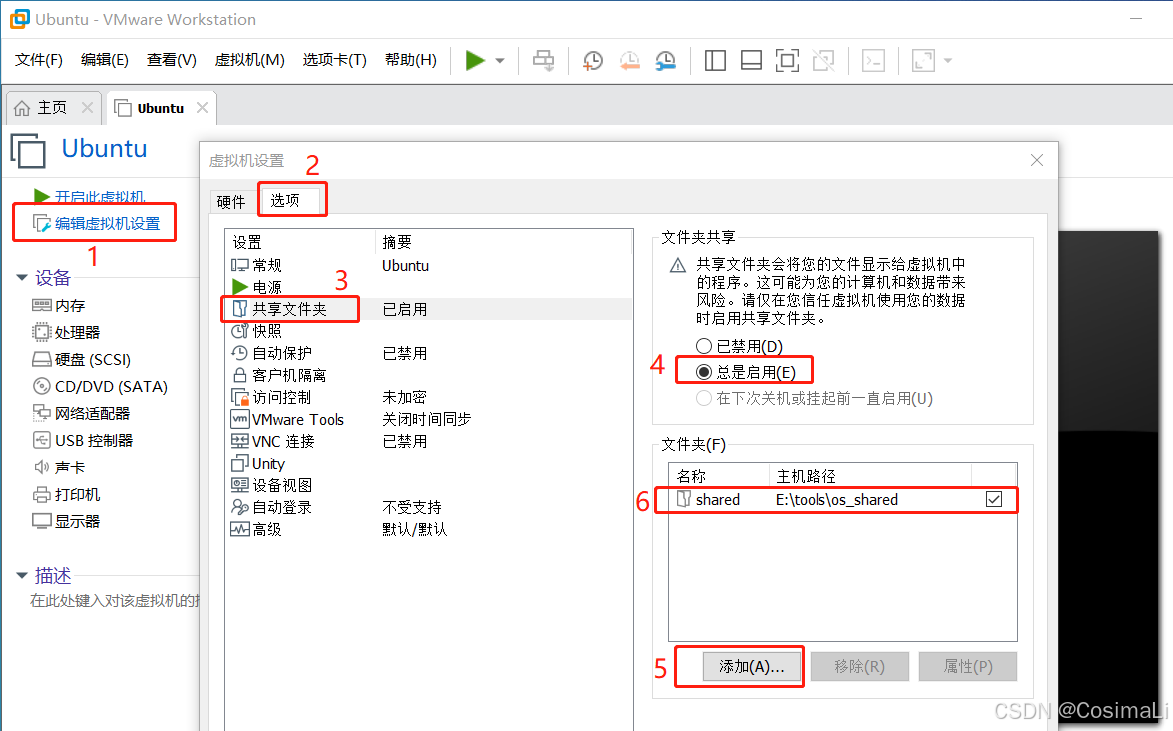
1.3.1 虚拟机共享文件设置
1)点击 编辑虚拟机设置 选项
2)点击 共享文件夹
3)点击 总是启用 -> 添加共享
1.3.2 VMware-Tool 安装方法1参考优快云博客
# 按照以下步骤操作
# 更新软件源列表
sudo apt-get update

# 如果之前安装过,则需要卸载
sudo apt-get autoremove open-vm-tools

# 安装
sudo apt-get install open-vm-tools-desktop

# 重启
sudo reboot
1.3.3 VMware-Tool 安装方法2
推荐这篇博客VMware Tools工具的安装问题
1.3.4 查询vmware-tools安装状态
查询vmware-tools是否安装成功,如下图,已经查询到版本号:
vmware-toolbox-cmd -v
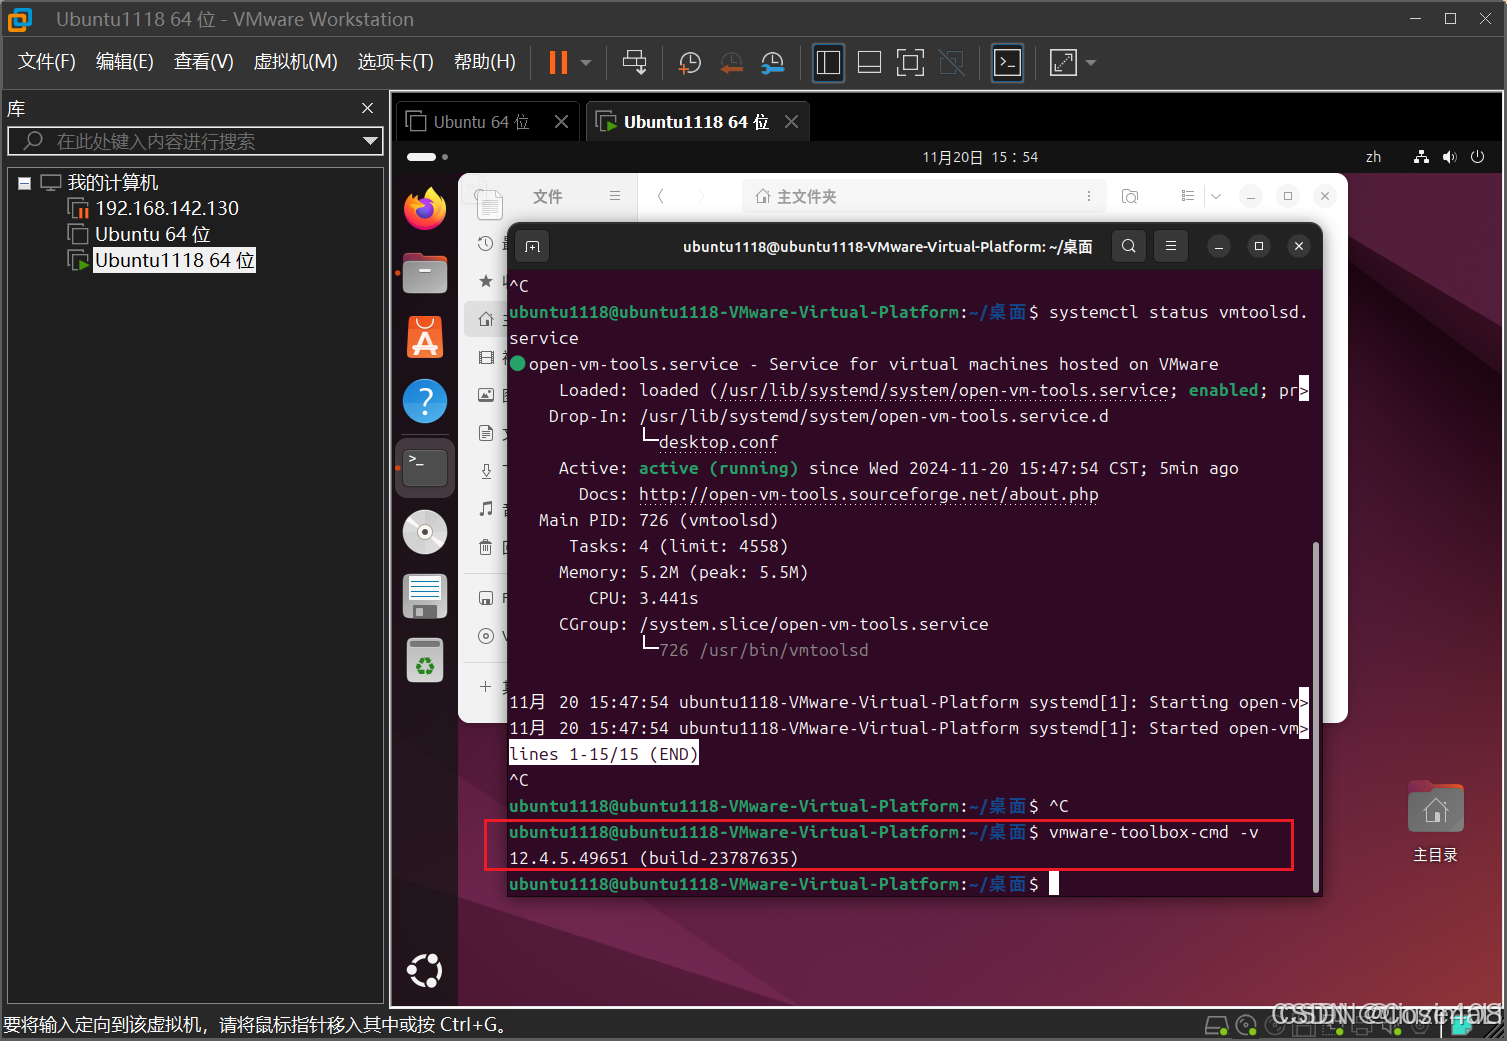
查询vmware-tools状态:
# 方式一
systemctl status open-vm-tools.service

# 方式二
systemctl status vmtoolsd.service
vmware-tools确认安装完毕重启后,即可通过鼠标拖动文件在虚拟机与主机之间互传文件、拷贝数据等常规操作。
1.3.5 Ubuntu与主机共享文件
手动挂载文件
sudo vmhgfs-fuse .host:/       /mnt/hgfs/
sudo vmhgfs-fuse .host:/shared /mnt/hgfs/
1.4 Ubuntu 基本配置
1.4.1 更换软件源
1)阿里云镜像:https://developer.aliyun.com/mirror/ubuntu,根据自己的版本选择合适的软件源
2)vs code历史版本https://blog.51cto.com/YangPC/12980321
- 不建议更换为国内的源,更换后你再安装某些软件会提示链接不到自己的远程源库。vscode的扩展管理就找不到远程源库。
1.5 Linux 命令
Linux的命令特别多,可以使用在线网站来查询:
- Linux命令查询网站 https://www.linuxcool.com/chmod
1.5.1 系统操作
安装软件xxx.deb软件包,使用dpkg-deb命令 https://www.linuxcool.com/dpkg-deb
BusyBox 文件系统自带tftp客户端,可以使用tftp64做服务器
-l FILE:指定本地文件名

-r FILE:指定远程文件名

-g:从服务器获取文件(下载)

-p:向服务器上传文件(上传)

-b SIZE:设置传输块大小(单位:字节)

tftp -g -r remote_file.txt -l local_file.txt 192.168.1.100
文件内容查找
grep -r "单词" 路径:./   ./xx/xx
# -r 递归查找目录中的单词
# -i:忽略大小写。
# -n:显示匹配行的行号
# -l:仅显示包含匹配内容的文件名
# -w:精确匹配单词(避免部分匹配)
示例
grep -ri "error" /var/log
grep -r "hello" .
特定文件名、内容查找
查找 /home 目录下所有 .txt 文件中包含单词 test 的内容
find /home -type f -name "*.txt" -exec grep -l "test" {} +

grep -r "shell" --include="*.h"

查找 /var/log 目录下最近 7 天内修改过的文件中包含单词 warning 的内容:
find /var/log -type f -mtime -7 -exec grep -li "warning" {} +
串口操作
# shell 下查看串口状态:波特率、停止位
stty -F /dev/ttyS2 -a
/********************************* 结果 **********************************************************
[  766.960978] dw-apb-uart ff0c0000.serial: got rx and tx dma channels
speed 9600 baud;stty: /dev/ttyS2: No such file or directory
 line = 0;
intr = ^C; quit = ^\; erase = ^?; kill = ^U; eof = ^D; eol = <undef>;
eol2 = <undef>; swtch = <undef>; start = ^Q; stop = ^S; susp = ^Z; rprnt = ^R;
werase = ^W; lnext = ^V; flush = ^O; min = 0; time = 50;
-parenb -parodd -cmspar cs8 hupcl -cstopb cread clocal -crtscts
-ignbrk -brkint -ignpar -parmrk -inpck -istrip -inlcr -igncr icrnl -ixon -ixoff
-iuclc -ixany -imaxbel -iutf8
-opost -olcuc -ocrnl onlcr -onocr -onlret -ofill -ofdel nl0 cr0 tab0 bs0 vt0
ff0
-isig -icanon iexten -echo -echoe echok -echonl -noflsh -xcase -tostop -echoprt
echoctl echoke -flusho -extproc
*******************************************************************************************/
# shell 下查设置波特率
stty -F /dev/ttyS2 115200
CAN操作;官方APP层示例
#在shell下设置CAN波特率等参数需要执行一下流程
ip link set can1 down							# 关闭CAN
ip link set can1 type can bitrate 500000		# 设置波特率
ip link set can1 up								# 打开CAN

# shell 下查看CAN状态:波特率
ip -details link show can0

/********************************* 结果 **********************************************************
2: can0: <NOARP,UP,LOWER_UP,ECHO> mtu 72 qdisc pfifo_fast state UP mode DEFAULT group default qlen 10
    link/can  promiscuity 0 allmulti 0 minmtu 0 maxmtu 0
    can <FD> state ERROR-ACTIVE (berr-counter tx 0 rx 0) restart-ms 0
          bitrate 1003102 sample-point 0.744
          tq 10 prop-seg 36 phase-seg1 36 phase-seg2 25 sjw 1 brp 2
          rk3576_canfd: tseg1 1..128 tseg2 1..128 sjw 1..128 brp 1..256 brp_inc 2
          dbitrate 2006204 dsample-point 0.714
          dtq 71 dprop-seg 2 dphase-seg1 2 dphase-seg2 2 dsjw 1 dbrp 14
          rk3576_canfd: dtseg1 1..32 dtseg2 1..16 dsjw 1..16 dbrp 1..256 dbrp_inc 2
          clock 196608000 numtxqueues 1 numrxqueues 1 gso_max_size 65536 gso_max_segs 65535 tso_max_size 65536 tso_max_segs 65535 gro_max_size 65536 parentbus platform parentdev ff320000.can
*******************************************************************************************/

# shell 下查设置波特率
sudo ip link set can0 type can bitrate 500000
ip -details link show can0

# 设置 CAN FD 接口 can0
sudo ip link set can0 type can bitrate 500000 dbitrate 2000000 fd on

如果需要设置采样点,可以在 ip 命令中添加 sample-point 参数:
sudo ip link set can0 type can bitrate 500000 sample-point 0.875 dbitrate 2000000 sample-point 0.750 fd on

# shell环境下接收数据
candump can1

# shell环境下发送数据
cansend can0 5A1#11.22.33.44.55.66.77.88

``CAN的官方文档中有给出示例中,参数会有变动需要根据当前编译器头文件进行适度更改``
``否则会导致CAN报文发送不出去或者接收不到``
int s;
struct sockaddr_can addr;
struct ifreq ifr;

s = socket(PF_CAN, SOCK_RAW, CAN_RAW);

strcpy(ifr.ifr_name, "can0" );	// 有些编译器是:ifr.ifr_ifrn.ifrn_name
ioctl(s, SIOCGIFINDEX, &ifr);

addr.can_family = AF_CAN;
addr.can_ifindex = ifr.ifr_ifindex;

bind(s, (struct sockaddr *)&addr, sizeof(addr));

(..)
1.5.2 权限命令
chmod ---------------- 改变文件权限
dr-xr-xr-x   69 root     root             0 Jan  1 00:00 proc
-rwxrwxr-x    1 root     root         12231 Oct 12  2022 pseudo_init
lrwxrwxrwx    1 root     root            11 Oct 12  2022 rdinit -> pseudo_init
如上所示 d_r-x_r-x_r-x 分别表示文件属性,权限分别为:
- 文件类型:- 文件、d 文件夹、c 字符设备
- 读 r、写 w、执行 x。
- 拥有者权限 u、组权限 g、其它用户权限 o。。
示例:chmod u+x xx.sh 给拥有执行xx.sh文件权限;参考正点原子 Linux 2.7.2 章节。
!!-------------------- 重复上一条命令
!-n------------------ 重复前 n 条命令
which--------------- 查找命令文件位置
bg------------------- 将处于暂停状态下的任务转为后台运行;与符号 &功能相同
fg------------------- 能使后台运行中的任务重新恢复至前台执行
dmesg--------------- 显示开机过程信息。Linux系统内核会将开机过程信息存储在环形缓冲区(ring buffer)中,随后再写入到/var/log/dmesg文件里,如果开机时来不及查看这些信息,则可以利用dmesg命令进行调取
1.5.3 帮助命令 man
在 Linux 系统下,可以通过 man 命令来查看某一个 Linux 系统调用的帮助信息,man 命令可以将该系统调用的详细信息显示出来,譬如函数功能介绍、函数原型、参数、返回值以及使用该函数所需包含的头文件等信息;man 更像是一份帮助手册,所以也把它称为 man 手册,当我们需要查看某个系统调用的功能介绍、使用方法时,不用在上网到处查找,直接通过 man 命令便可以搞定,man 命令用法如下所示:
- man 2 open # 1表示查看Linux命令、2表示查看系统调用、3表示标准C库函数
- man open
1.5.4 网络命令
iperf 网络测速命令:
- 服务端:iperf -s
- 客户端:iperf -c 192.168.1.xx(ip addrs)
ifconfig 网络接口参数命令
- 显示网络端口信息:ifconfig -a
- 关闭网络:ifconfig eth0 down
- 开启网络:ifconfig eth0 up
arp ARP缓存表;该表记录了本机与其他主机之间的IP地址和MAC地址的对应关系
- 查看当前缓存表:arp -n
- 删除某条信息:arp -d ip_addr
route显示与设置路由信息
- 查看当前路由表:route -n
- 删除某条信息:route del default gw ip_addr
1.5.5 重复命令
watch周期性执行任务命令;例如每隔几秒钟、几分钟执行一次,持续关注某个命令的运行结果,免去运维人员一遍遍地手动运行
- 间隔1秒查看网络状态:watch -n 1 “netstat -an | grep ‘:500[1-9]|:501[0-6]’”
- 监视系统负载状态:watch -n 1 uptime
1.6 Linux 运用函数
1.6.1 int poll(struct pollfd *fds, nfds_t nfds, int timeout)
poll() 是 Linux 中用于多路复用 I/O 的函数,可以同时监视多个文件描述符的状态(可读、可写、异常等)。以下是 poll() 函数的参数及其作用:
struct pollfd {
    int   fd;         // 文件描述符
    short events;     // 需要监视的事件(输入)
    short revents;    // 实际发生的事件(输出)
};
fd: 需要监视的文件描述符。
events: 需要监视的事件(例如 POLLIN 表示可读,POLLOUT 表示可写)。
revents: 实际发生的事件,由 poll() 函数填充。

 nfds_t nfds 类型: nfds_t(通常是无符号整数)。作用: 指定 fds 数组的长度,即需要监视的文件描述符的数量。

int timeout 类型: int;作用: 指定 poll() 函数的超时时间(以毫秒为单位)。
timeout > 0: 等待指定的毫秒数。
timeout = 0: 立即返回,不阻塞。
timeout = -1: 无限等待,直到有事件发生。

{
	struct pollfd fds;
    fds.fd = fd;
    fds.events = POLLIN;
    int ret = poll(&fds, 1, timerout);
    if (ret > 0) {
       	// 可读
    }
    else if (0 == ret)   {
        // 超时
    }
    else  {
        // 错误
    }
}
1.6.2 文件打开函数
open:适合底层控制和高性能场景。适合打开驱动文件/dev/xx
- 文件描述符 fd 在一个进程内是非负整数,0-系统标准输入、1-系统标准输出、2-系统标准错误,3~(ulimit -n) 按文件打开前后进行顺序分配;ulimit -n 可以查看当前进程能打开最大文件数量
fopen:适合普通文件的顺序读写操作。像/proc/uptimr这个文件不适合其它函数打开;需要缓冲机制(如文本文件、日志文件)。需要跨平台兼容性。
creat:专门用于创建文件。
openat:基于目录文件描述符打开文件,安全性更高。
fdopen:将文件描述符转换为文件指针。
popen:打开管道,执行 shell 命令。
socket:打开套接字,用于网络通信。
1.7 Linux 生成随机文件
1.7.1 dd生成内容是随机的xxx.bin
生成 100KB 文件
dd if=/dev/urandom of=random_100KB.txt bs=1024 count=100

生成 1MB 文件
dd if=/dev/urandom of=random_1MB.txt bs=1024 count=1024

生成 2MB 文件
dd if=/dev/urandom of=random_2MB.txt bs=1024 count=2048
1.7.2 base64生成内容是随机的xxx.txt
生成 100KB 文件
head -c 100KB /dev/urandom | base64 > random_100KB.txt

生成 1MB 文件
head -c 1M /dev/urandom | base64 > random_1MB.txt

生成 2MB 文件
head -c 2M /dev/urandom | base64 > random_2MB.txt
1.8 进程&线程相关命令
1.8.1 系统状态
ps显示当前系统进程列表
- ps aux
top显示当前系统资源状态、类似任务管理器。按H可以显示线程、按1可以显示各个核心使用率
- top -n 5 显示完5次后自动退出 top 命令
- top -d 1 设置显示更新速度1秒1次
- top 直接使用默认参数
htop相比较top的优势有可以横向或纵向滚动浏览进程列表
- htop 显示相关进程
taskset查看PID(进程ID)在哪个核心运行、设置PID在指定核心运行
- taskset -pc pid 查看PID在那个核心运行
- taskset -pc 1 pid 设置PID在核心0上运行(核心从0开始)
lsof 查看文件进程信息;查看该进程有哪些文件、驱动、SOCKET等被打开
进程 542
- 542 /usr/bin/bash 0 /dev/null
- 542 /usr/bin/bash 1 /dev/console
- 542 /usr/bin/bash 2 /dev/console
进程 575 - 575 /usr/bin/bash 0 /dev/console
- 575 /usr/bin/bash 1 /dev/console
- 575 /usr/bin/bash 2 /dev/console
- 575 /usr/bin/bash 255 /dev/console
进程 687 - 687 /usr/bin/bash 0 /dev/null
- 687 /usr/bin/bash 1 /var/log/usbdevice.log
- 687 /usr/bin/bash 2 /var/log/usbdevice.log
2 RK3506编译
2.1 编译准备
使用的SDK中官方进行了封装:编译器、一件编译、一键打包等。只需要在编译时根据弹出的错误安装相应的命令:scons。


 4895
4895

 被折叠的 条评论
为什么被折叠?
被折叠的 条评论
为什么被折叠?
 到【灌水乐园】发言


